Motor Guard JMB-1250 User manual

PALM BEVELING TOOL
Model JMB-1250
WARNING: Read and understand all instructions before attempting to operate tool.
Failure to follow instructions may result in property damage and/or serious
personal injury.
IMPORTANT SAFETY INSTRUCTIONS
To reduce the risk of serious
injury and/or property damage,
observe all warnings and
instructions while operating the
tool. Keep work area clean and well
lit. Maintain tool in top condition and
obtain service from manufacturer if
tool malfunctions. Use only
accessories and replacement parts
that are provided by the
manufacturer.
Always wear proper personal
protection when operating this
tool. A full face shield per ANSI
Z87.1-2003 standard is required at
all times to protect face and eyes
against injury from flying parts.
Adequate gloves and clothing are
required to reduce the risk injury
from sparks or sharp edges.
SAVE THESE INSTRUCTIONS
Record the following information for warranty and repair purposes:
Model No.: ______________________ Serial No.: _____________________________
Date Purchased: _________________ Purchased From: _________________________
IF YOU HAVE ANY QUESTIONS ABOUT THE OPERATION OF PRODUCT CALL TOLL FREE
800-227-2822
8:00 am to 5:00 pm - Pacific Time - Monday through Friday
MOTOR GUARD CORPORATION
580 CARNEGIE STREET
MANTECA, CALIFORNIA, 93557-6141 USA
www.motorguardplasma.com
INSTRUCTIONS

Page 2
PREPARING THE TOOL FOR USE
Unpack tool and inspect for damage and to see that all parts operate freely.
Before connecting desired air connection fitting to tool apply PTFE tape or another suitable thread-
sealing compound to the male threads (Fig. 1). Install air coupling and tighten with a wrench.
Hold tool with air inlet facing up and add a few drops of air tool oil (SAE 10) to provide proper tool
lubrication on first use (Fig 2).
Connect tool to a supply of clean/dry air. In applications where an airline lubricator is not used, a few
drops of air tool oil should be applied weekly per the above procedure.
ADJUSTING DEPTH OF CUT
IMPORTANT: Disconnect tool from air supply and relieve internal pressure before
adjusting cutter depth. Failure to follow these directions can result in serious personal injury.
Refer to Figure 3 below. Tool ships with cutting depth preset at approximately 0.5mm. To adjust
depth of cut, disconnect tool from air supply and unlock Flange by turning Flange Screw counter-
clockwise until Flange rotates freely.
Looking at tool from top, rotate Flange until arrow on Housing aligns with desired depth. Rotating
Flange clockwise will decrease cutting depth while rotating Flange counter-clockwise will increase
cutting depth. Depth is adjustable from 0.1mm to 1.5mm.
Once desired cutting depth is set, lock Flange by turning Flange Screw clockwise until flange cannot
rotate.
Reconnect air hose and perform a test cut, readjusting depth as needed.
Fig. 1
Fig. 2
Fig. 3

Page 3
OPERATING THE TOOL
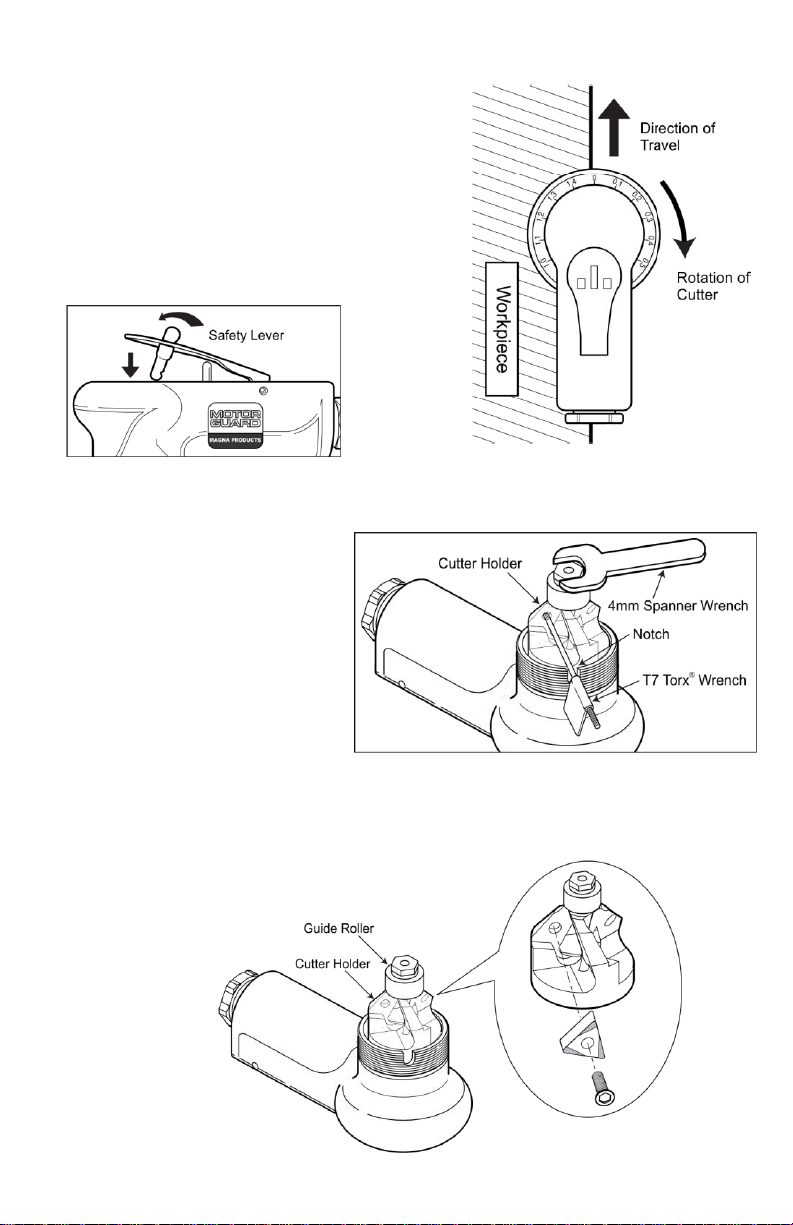
Place Flange flush with flat work surface and operate tool
by rotating safety lever forward to free paddle (Fig. 4)
Press and hold paddle down to operate tool. Cutting
blades must be clear of work surface before beginning
tool rotation. Bring rotating tool into contact with work
surface and move tool smoothly in direction shown (Fig. 5).
Best results are obtained by operating the tool in the
direction shown and travelling at a smooth, steady pace.
Operating in the reverse direction may cause tool to
“climb” the work while excessive travel speed may cause
chatter and a poor surface finish.
CUTTER INDEXING AND REPLACEMENT
IMPORTANT: Disconnect tool
from air supply and relieve internal
pressure before performing any
disassembly or adjustment. Failure to
follow these directions can result in
serious personal injury.
Three-sided cutters can be indexed to
provide a newly sharp edge. Loosen
Flange Screw and remove Flange by
turning counter-clockwise. Rotate Cutter
Holder so that Cutter Bolt can be
accessed through Notch in Housing (Fig.
6). Using Torx®Wrench, loosen Cutter
Bolt by turning counter-clockwise (Fig. 7). Rotate cutter holder to access remaining cutters.
Follow same procedure in reverse to install new cutters. To loosen Guide Roller Nut, insert Torx®
Wrench in Notch to prevent rotation (Fig. 6).
Fig. 4
Fig. 6
Fig. 5
Fig. 7

Page 4
EXPLODED VIEW AND REPLACEMENT PARTS
PARTS LIST
Index
Part No.
Description
Qty/Tool
Index
Part No.
Description
Qty/Tool
1
JMB001
Hex Nut
1
18
Ball Bearing
1
2
JMB002
Spring Washer
1
19
Body
1
3
JMB003
Ball Bearing
1
20
Shaft
1
4
JMB004
Cutter Bolt (Pk/3)
3
21
Roll Pin
1
5
JMB005
Cutter, 45° (Pk/3)
3
22
Safety Lever
1
6
Cutter Holder
1
23
O-Ring
1
7
Flange
1
24
O-Ring
1
8
Screw
1
25
Inner Bolt
1
9
Lock Ring
1
26
Valve Seat
1
10
Ball Bearing
1
27
Valve
1
11
Collar
1
28
Valve Spring
1
12
Front Plate
1
29
Rear Gasket
1
13
Roll Pin
1
30
Inlet Bushing
1
14
Rotor Blade
4
31
JMB031
Hex Wrench
1
15
Rotor
1
32
JMB032
Torx Wrench
1
16
Cylinder
1
33
JMB033
Spanner Wrench
1
17
Rear Plate
1
40
JMB040
Cutter, Radius (Pk/3)
3
Items with Part Number listed are available through your tool distributor, for all other repair parts, contact
manufacturer.
LIMITED WARRANTY
Motor Guard Corporation assumes the responsibility of providing products that are free from defects in workmanship and
material. Should a product fail due to a defect in workmanship or material, Motor Guard Corporation will repair or, at its
option, replace the product without charge, other than the transportation charges, provided that the product is returned to
the factory, transportation prepaid, within One (1) Year of the date of purchase. Please contact Motor Guard Corporation
for return authorization and shipping instructions.
This limited warranty does not cover normal wear and tear or damage to the product due to neglect, misuse or accident, nor
does it cover any loss, damage or expense, either direct, indirect or consequential, arising from the non-function of this
product.
33045 Rev 08/16