MotoTote MTX Series User manual

Revised 05/16/2015Page 1 of 4
Four high quality
tie-down straps
Additional items you will need
One 5/8” wrench or socket
One 11/16” wrench or socket
Instructionsfor
MotoToteMTXcarriers:
Intended Use and Limitations
Accessory Pack Contents
Check the accessory pack for these items: Note that some of the itemsmay already be installed on the MotoTote
1 ea 4 ea 8-12 ea 4 medium
3 long
Lynch
pin 1 ea
1 ea
1 ea
End caps Bolts Nuts Washers Lanyard Hex wrench
Ramp keeper tab
...the tongue weight capacity of your vehicle OR 10% of vehicle’s total towing
capacity. This info is in the vehicle user’s manual or the manufacturer’s website.
Note: The vehiclemust have a class III or better hitch receiverANDthe vehicle
must be rated to support the total weight of the bike + MotoTote.
PLEASE READ THESE INSTRUCTIONS CAREFULLY!
The MotoTote is a hitch-mounted carrier for transporting motorcycles. Do not use it for any other
purpose.
Do not exceedproduct limitations or deviate from these instructions
1 short
and
MTXS MTX3
Bike
MTXS MAX=600 lbs/272 kg
MTX3 MAX = 500 lbs/227 kg
+
MotoTote
60 lbs/27 kg
=
TOTAL
CANNOT EXCEED
5 locking
2 flange
Additionally, the Zero Wobble Bolt Kit includes on long bolt, one flange nut, and one flat washer
1 lock
5 flat
Maximum weight capacities for MotoTote carriers manufactured before May2015 are as follows: MTXS = 550 lbs./250 kg.
MTX3= 450 lbs./205kg.

Revised 05/16/2015 Page 2 of 4
MTX Platform for
AND This section applies to both carriers
NOTE: The MTX Platform can be bolted on
facing either way regardless ofwhich way you
plan forthebike toface. However, ifyou
plan to install theMotoTote Light Kit, then
make sure the light holes are facing outwards
(away from vehicle)
Attach Rear Tie Down Arm and Track with
two medium bolts at rear of track and nuts
(no washers) and one short bolt at front of
track with LOCK WASHER. Track should be
on top of Wheel Stop base as shown.
Adjust position of Wheel Track for length of
bike. Most sport bikes will use shortest/
forward-most position.
Put Ramp Keeper Tab on third
hole from MTX Platform (skip two
holes), toward the end where the
rear of bike will be.
ONLY
NOTE about this big hole: The big vertical hole
must be away from the hitch or bolt holes will
not line up. The hole is covered up when MTX
Platform is in furthest-out position.
This hole is for optional hitch ball so is not
used during a normal assembly. To attach a
hitch ball, move Platform closer to vehicle to
expose the hole.
For m3: Disregard and
SKIP TO THE NEXT SECTION
Light holes
MTX Platform
Receiver
Tube
Ramp Keeper Tab
Bolt the MTX Platform to the Receiver Tube with
2 long bolts, FLANGE nuts and 4 washers as shown.
Tighten until METAL IS COMPRESSED and connection is
tight. Retighten as needed for the first 500 miles of use.
You can put Platform closer to vehicle if desired
using holes along length of Receiver Tube.
Bolt holes will not line up if the Receiver Tube is
backwards - see note below.
Wheel
Stop
NOTE: You can assemble
your MotoTote so the bike
will face either left orright.
If you want bike to face left
then attachWheel stop on
the left and Track on right
-vice versa for facing right.
Track
Front Tie
Down Arm
Rear Tie
Down Arm
Attach Front Tie Down Arm and Wheel Stop
with two medium bolts and nuts (no washers).
Position the Wheel Stop for length of bike: For-
ward for larger bikes and rearward for shorter
bikes. Most sport bikes will use the shortest/
rear-most position.
Flange nut
Flange nut

Revised 05/16/2015 Page 3 of 4
Attachment to Hitch This section applies to both carriers
Vehicle Receiver
Hitch Tube
Receiver Tube
of MotoTote
The head of the Zero-
Wobble Bolt needs to
be recessed into hitch
pin hole of vehicle re-
ceiver hitch tube.
ONLY
Attach Front Tie Down Arm and Wheel Stop with two
medium bolts - DON’T PUT NUTS ON BOLTS YET.
Position the Wheel Stop for length of bike: Mid/forward
position for dirt bikes, rear-most position for scooters.
Slide Receiver Tube ofthe MotoTote carrier
into the vehicle receiver hitch tube.
Secure the MotoTote Receiver Tube tothe
vehicle hitch tube with the Zero-Wobble Bolt,
FLANGE NUT, and washer as shown.
DO NOT PUT WASHER ON BOLT HEAD.
The bolt head should recess into the hitch
hole and seat against the Receiver Tube
of the MotoTote carrier as shown.
Attach Rear Tie Down Arm
and Track with two medium
bolts and nuts (no washers).
Wheel
Back
Stop
For Sport: Disregard and
GO BACK TO PREVIOUS SECTION
Rear Tie
Down Arm
Track
Front Tie
Down Arm
Wheel
Stop
NOTE: You can assemble
your MotoTote so the bike
will face either left orright.
If you want bike to face left
then attachWheel stop on
the left and Track on right
-vice versa for facing right.
Put Wheel Back Stop on top of previously
positioned pieces, hold down with hand, then
remove the two previously inserted bolts.
Position Back Stop for front tire diameter:
Forward for small tires, rearward for large tires.
Re-insert the two bolts. Now put on and tighten nuts
(no washers).
Use the one short bolt with LOCK WASHER where
Track and Back Stop join as shown.
Flange nut

Revised 05/16/2015 Page 4 of 4
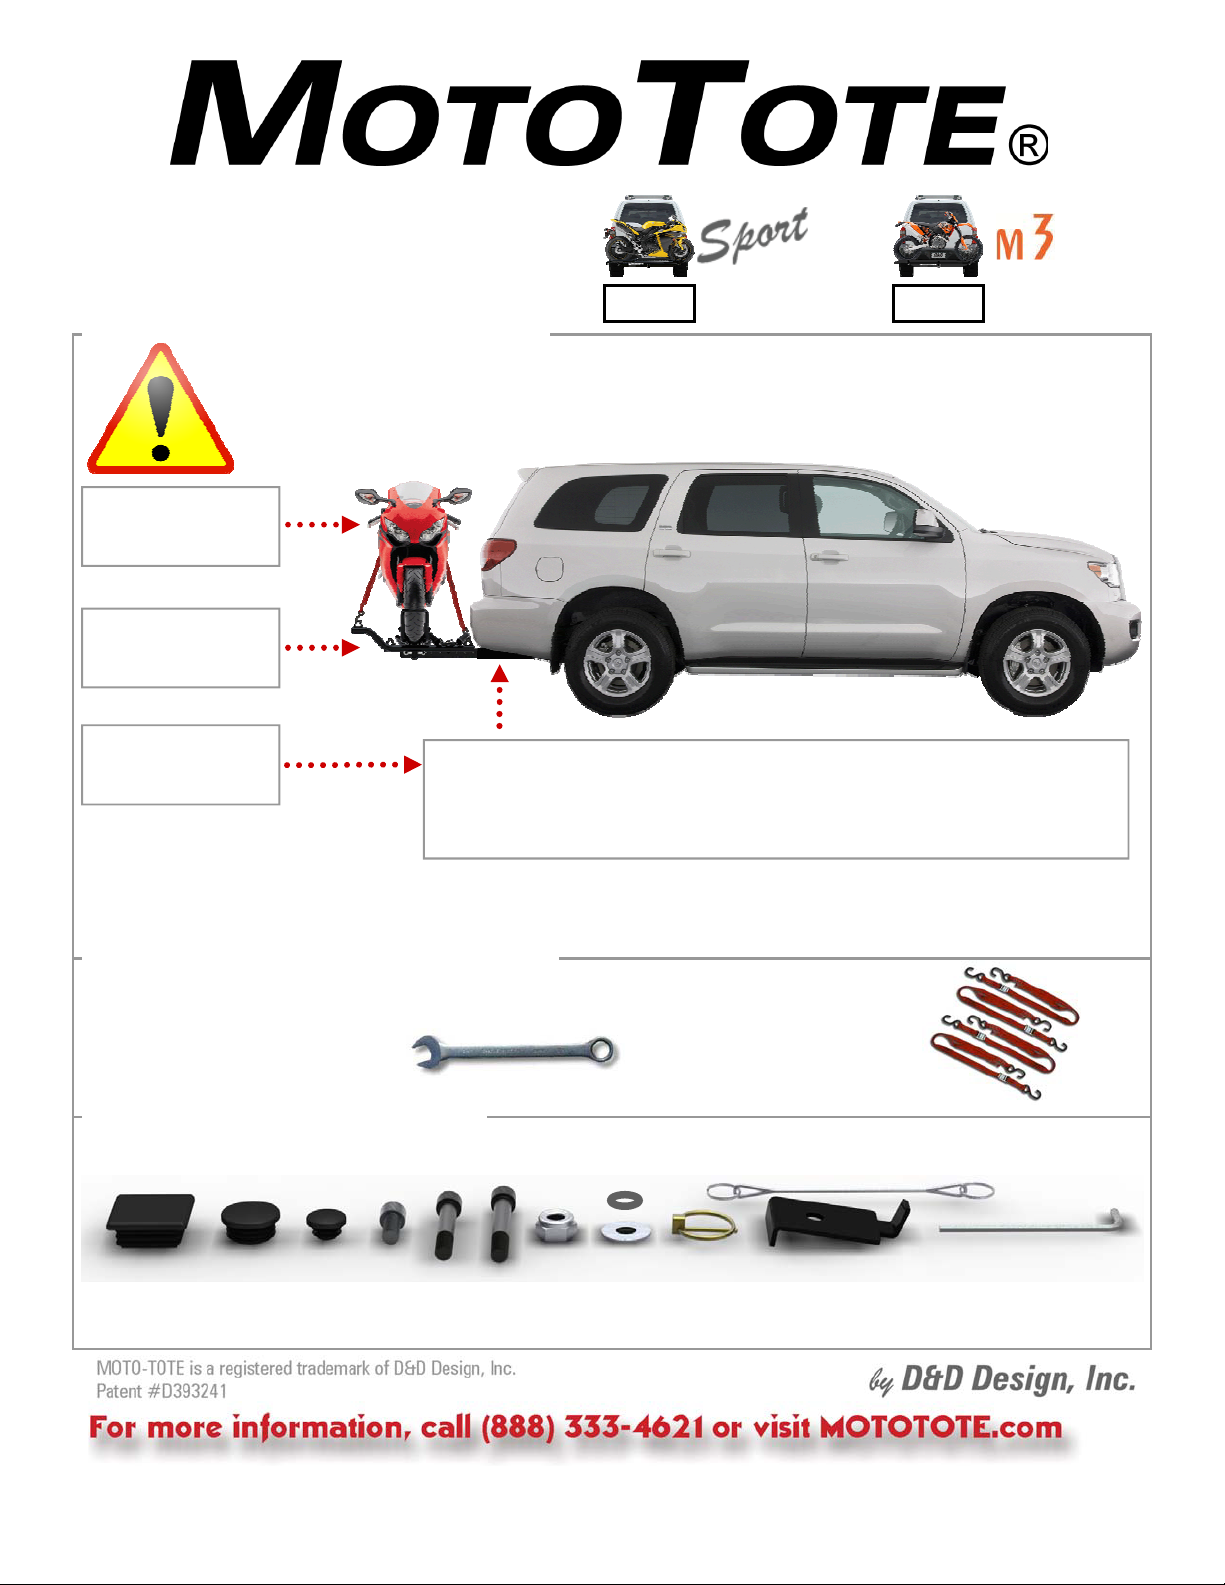
After loading:
The bike should be about vertical to the ground, not tilted to either side.
Secure the loose ends of the tie-downs. Do not let them hang free.
Loading and Securing the Bike
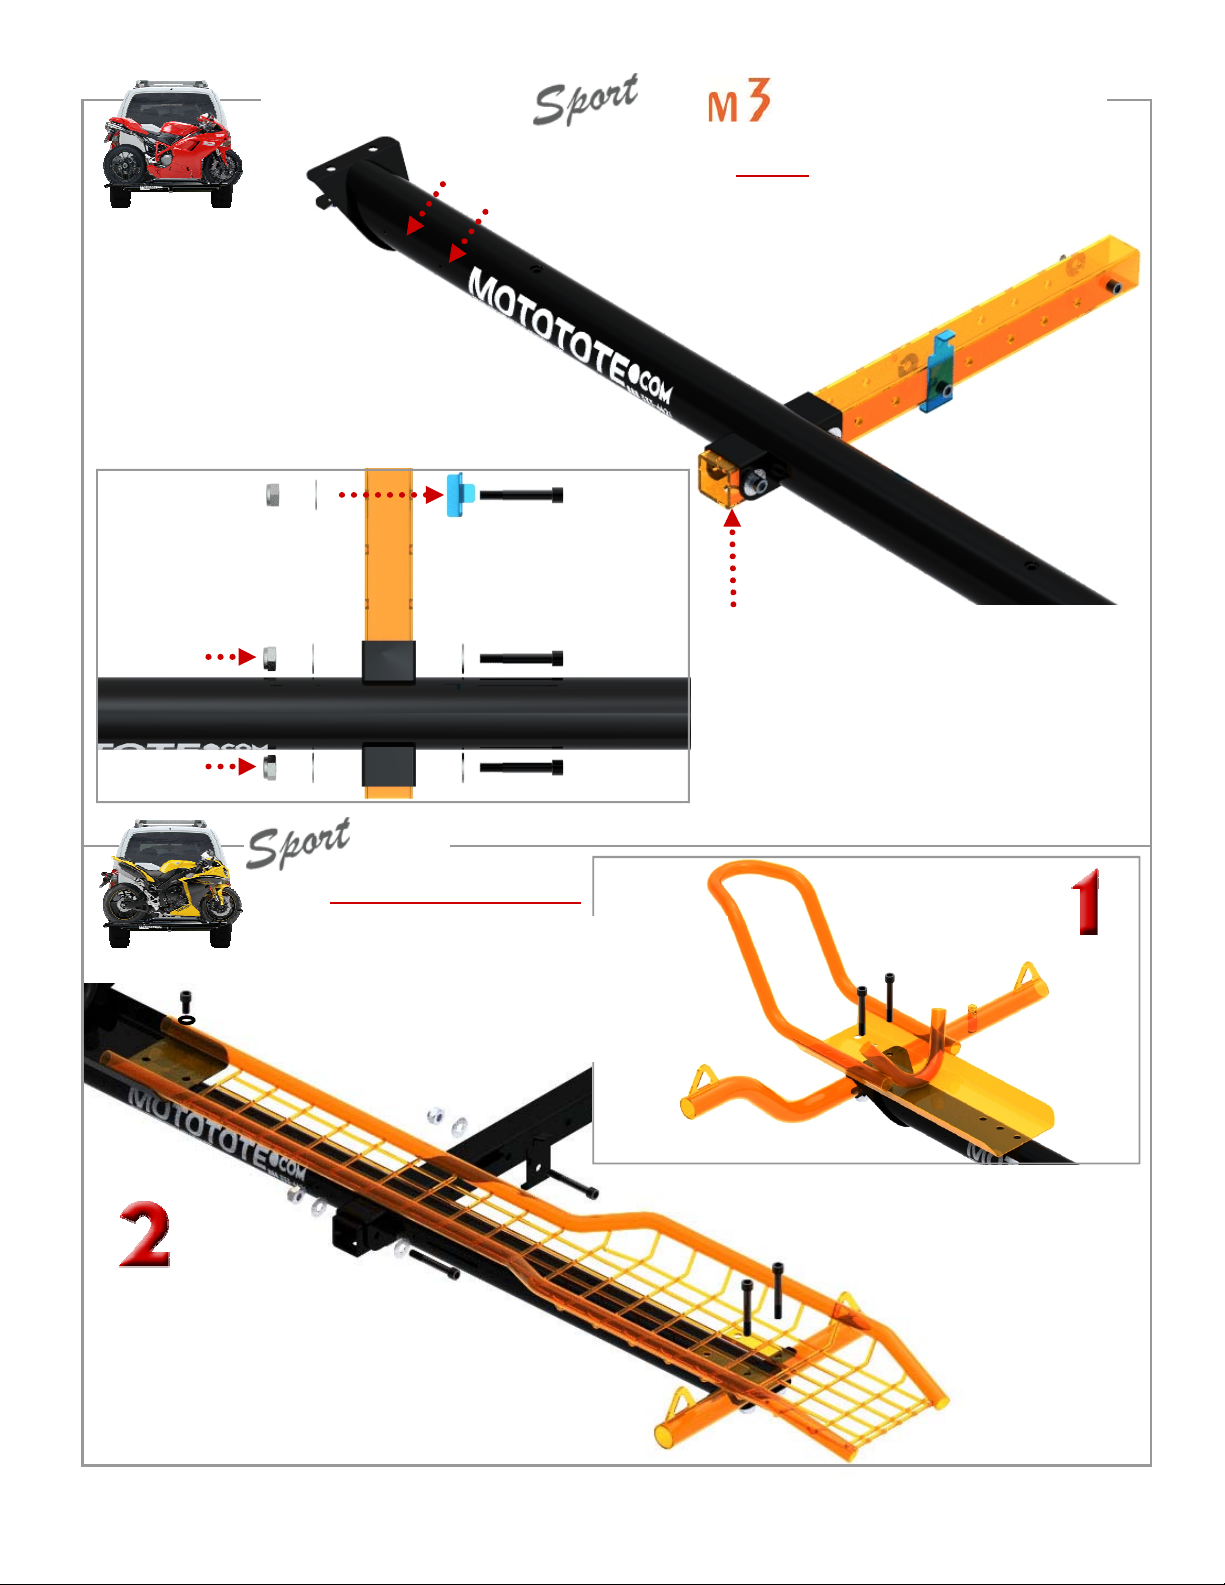
Use theloading ramp to load the bike. Be sure thetwohooks on
the end ofthe ramp are inserted into the slots in the Wheel Track.
Roll the bike upthe ramp and onto the MotoTote.
Loading the bike
Use two tie-downs to secure the handle-
bars to the two front tie down loops, com-
pressing the suspension sufficiently so
that the bike is secured tightly.
Use one tie-down to secure the rear tire
to the two tie down loops at the rear.
Run a tie-down from one foot peg under
the track to the other foot peg, then cinch
down as tight as possible.
Secure the bike with four tie-downs
Inspect theMotoTote before each use for any damage or defects. Donotuse ifany damage or defects arepresent.
Alwaysuse quality tie downs made for motorcycles.
Inspect tie downs for fray orwear. If present, donot use them.
Make sure to tie the foot pegs down to the MotoTote as well as the back tire.
Always secure the ends of the tie downs so they don’t hang free.
Don’t use the MotoTote for other than intended use as described inthese Instructions.
Don’t haul more weight (bike and carrier combined) than the tongue weight rating ofyour vehicle.
Don’t modify orchange the MotoTote
Do s and Don’t s
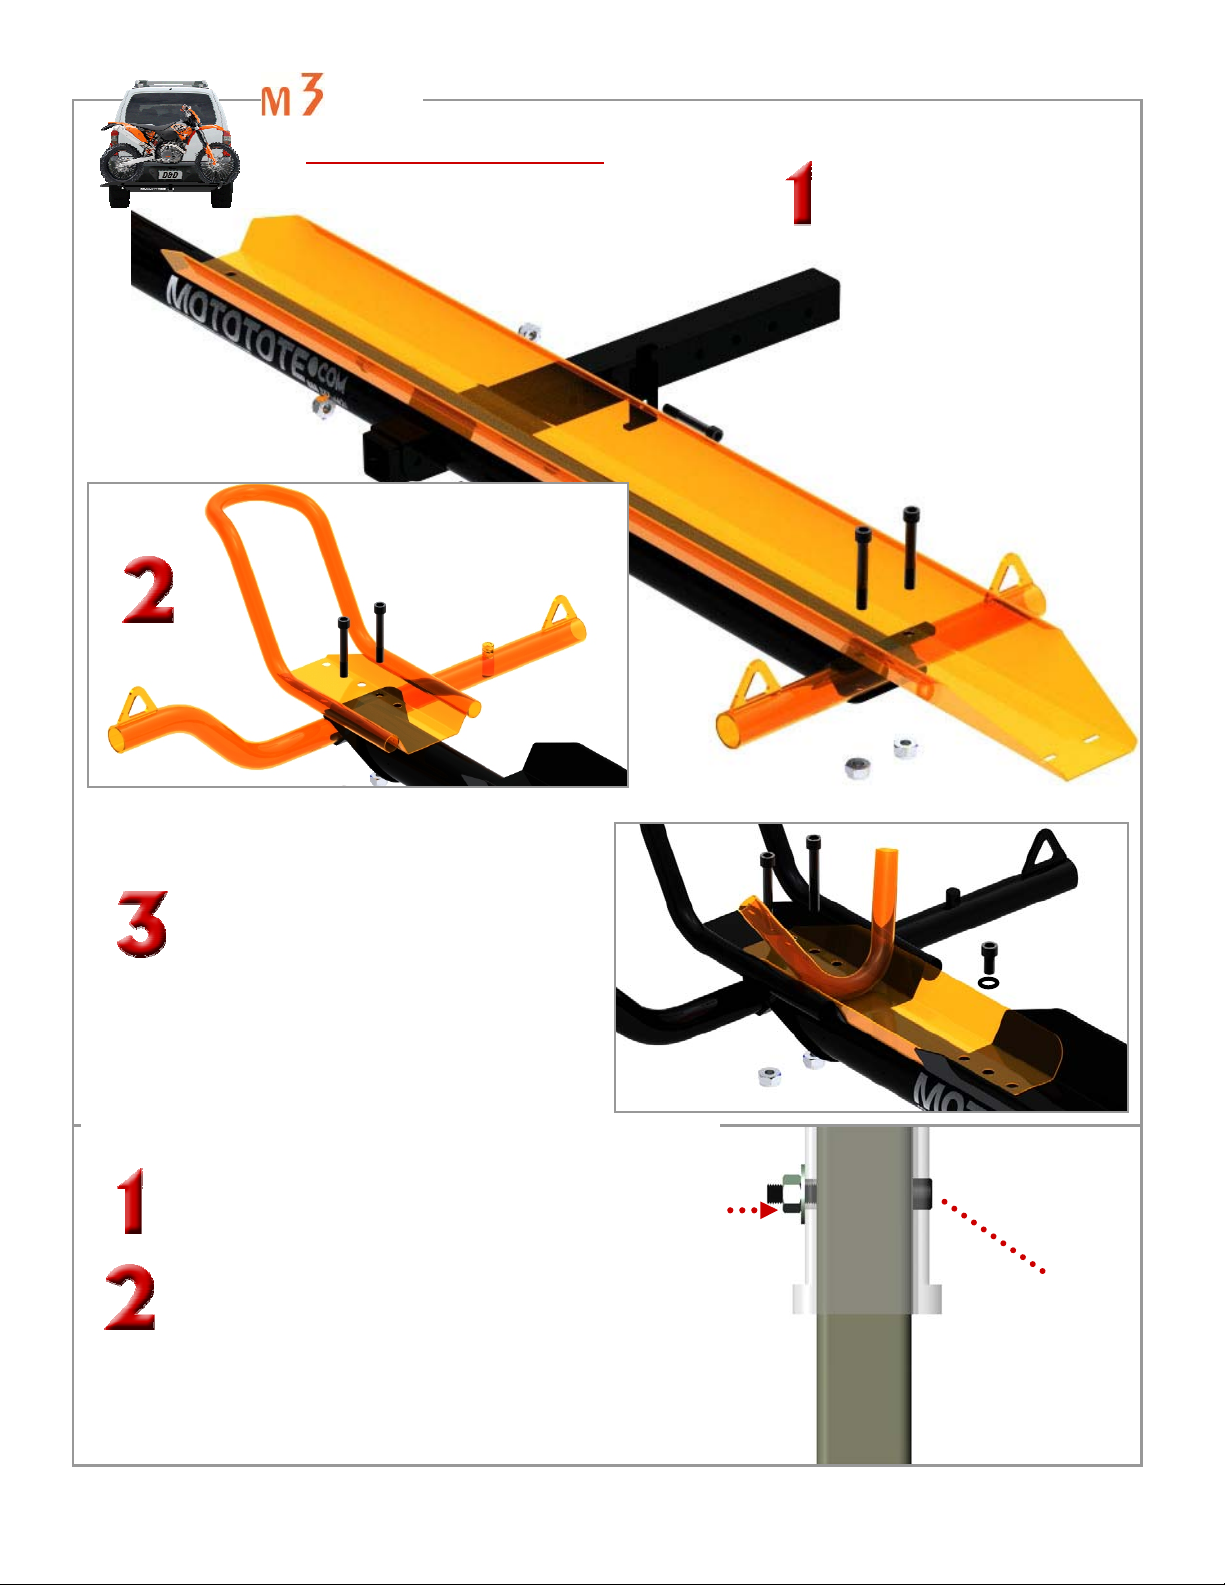
Stowing Loading Ramp for Transport
The ramp can be attached (stowed) for
transport so you don’t have to put it
inside your vehicle. Stow the ramp with
the quick-connect hardware as shown.
One Year Limited Warranty
For one year from the date of retail purchase, D&D Design, Inc. will, at its option, repair or replace any part or parts found to be defective in mate-
rial or workmanship. This covers products which have been operated in accordance with these instructions, and which have not been subject to
misuse, abuse, commercial use, neglect, accident, improper maintenance or alterations. Warranty service is available, with proof of purchase,
through D&D Design, Inc. by contacting D&D Design, Inc. at (888) 333-4621 or support@mototote.com.
This whole page applies to both carriers
This manual suits for next models
2
Table of contents
Other MotoTote Automobile Accessories manuals
Popular Automobile Accessories manuals by other brands

Defender
Defender 222 manual

mft
mft compact 2e+1 FIX4BIKE user manual

Polaris
Polaris 2878840 instructions

AMP Research
AMP Research BedXTender HD MAX 74842-01A Assembly Installation Guide

Menabo
Menabo DELTA DL FIX 203FP Fitting instructions

Masterbuilt
Masterbuilt HITCH-HAUL Bike Carrier HEDB2 Assembly and operating instructions

Prorack
Prorack K082 Fitting instructions

FILTRON
FILTRON K 1254-2 Series Installation instruction

Yakima
Yakima FullBack installation instructions

Safe Fleet
Safe Fleet PRIME DESIGN VBR-226 manual

TAUBENREUTHER
TAUBENREUTHER 5-279 Installation instruction

Siemens
Siemens SICHARGE D 8EM5907-0AA000-1AA7.05 operating instructions