Mountway Neptune User manual

Operating instructions

Quick start guide
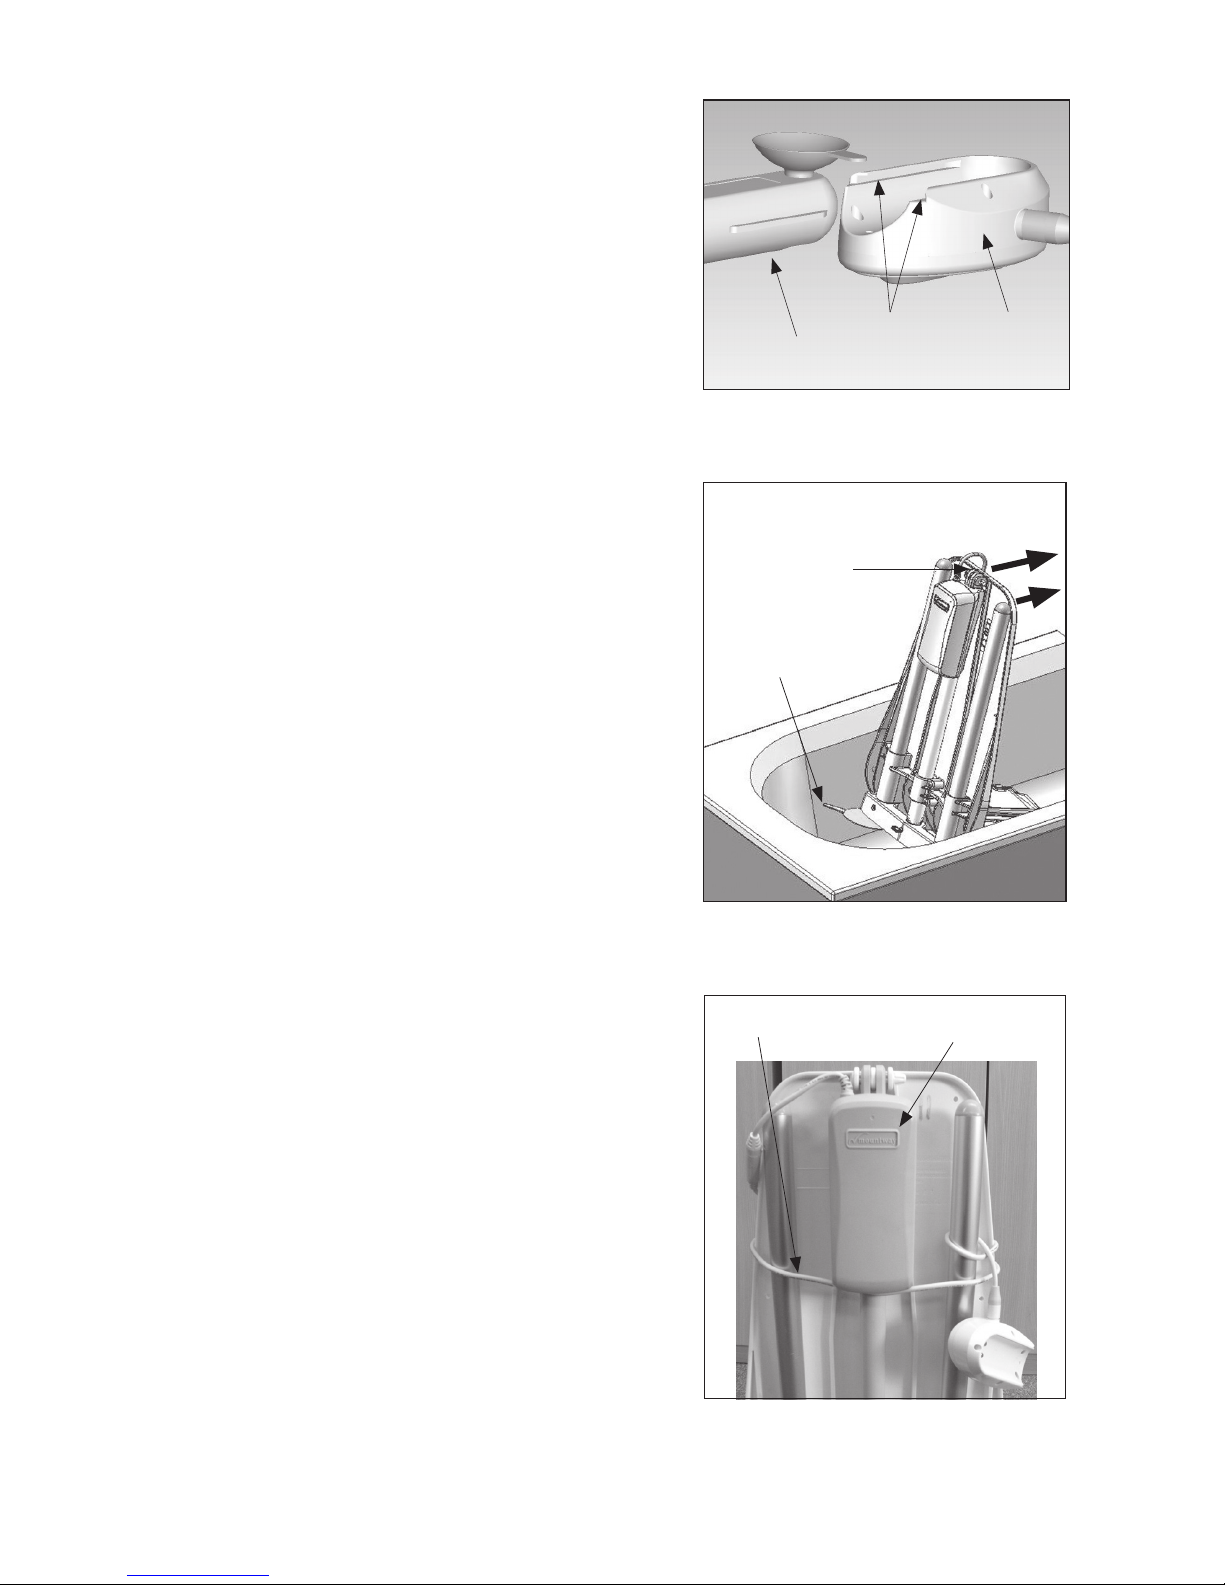
1.Charge the battery by sliding it into the
tracks on the charging cradle (g 1) and
plugging it into the mains.
• When the light is constant red, it is charging.
• When the light is constant green, it is ready
to use.
2.Prepare the bath/tub by removing:
• Non-slip mats, oil and cleaner residues;
• Obstructions such as handles (or t side ap
protectors), handrails and soap dishes;
• Overhead obstructions at the rear and over
the bath/tub such as cupboards, shelves.
3.Install the bath lift by:
• Placing it with the suction feet on the at
bottom of the bath/tub and at the opposite
end to the taps/faucets;
• Checking for any obstructions likely to
interfere with the bath lift’s movement
(move the bath lift forward if there are xed
overhead obstacles);
• Pressing rmly on the seat to secure the
suction feet to the bath/tub;
Then:
• Unfold the two side aps to rest against the
sides of the bath/tub;
• Run water to any level under the actuator
casing (g 2).
4. Use the bath lift by:
• Sliding the charged battery fully into the
tracks on the hand control (g 3);
• Pressing the UP button.
Please ensure both yourself and any helpers read these operating instructions
carefully and in full before using your bath lift. These operating instructions
should be retained for future reference.
This bath lift is designed and manufactured to assist individuals in getting in and out of the
bath/tub. It should not be used for any other purpose. Do not use it in combination with
other lifting or moving devices. If you are unable to get out of the bath/tub unaided, do
not bathe without someone on call to help in an emergency.
Hand control
Side aps
Actuator
Actuator casing
Suction feet
Figure 2
Charger
Tracks
Light indicator
Charging cradle
Battery
Figure 1
This guide should be read in conjunction with your bath lift’s full operating
instructions, which start on page 4.
2
3
Only continue if the light on the hand control is
constant or ashing green and if the battery has been
charged within the last 7-10 days.
When the seat reaches the top of the bath/tub:
• Release your nger from the UP button;
• Sit on the side ap and rotate onto the seat;
• Extend your feet out in front of you and keep your
hands above the seat;
• Press the DOWN button on the hand control;
• Attach the hand control and battery to the edge of
the bath/tub or to a tiled wall.
For convenience during bathing, you may raise or lower
the seat to any desired height by pressing the UP or
DOWN button and releasing it to stop.
When you have nished bathing:
• Retrieve the battery and hand control;
• Press the UP button until the side aps are level
with the top of the bath/tub;
• Release the UP button and move onto the side ap;
• Turn whilst lifting each leg out of the bath/tub;
• Drain the bath/tub.
5. When you are not using the bath lift:
• Disconnect the battery and place on charge;
• Store the lift at the bottom of the bath/tub.
To remove the lift from the bath/tub, place it in its
lowest position and:
• Disconnect the battery from the hand control;
• Place the hand control on the seat;
• Fold in the side aps;
• While holding the top of the backrest, pull the
suction release tags on the rear suction feet then
tilt the bath lift forward (g 4);
• Release the tags on the front suction feet and lift
the bath lift out of the bath/tub;
• Wrap the hand control cable clockwise around
the seat, positioning the cable coil under the
actuator casing;
• Loop the remainder of the cable around one of
the tubes(g 5);
• Store the bath lift upright or on its side.
Tracks Hand control
Figure 3
Battery
Actuator casingCable coil
Figure 5
Figure 4
Top of
backrest
Suction
release tag

4
Operating instructions
Contents
Unpacking the bath lift
1. Unpacking the bath lift .............5
Before you start
2. Charging the battery ...............5
3. Preparing the bath/tub
for installation..........................6
4. Installing the bath lift ...............7
Using the bath lift
5. Connecting the hand control .......8
6. Using the bath lift ..................8
Removing and storing the bath lift
7. When the bath lift is not in use . . . 10
8. Removing the bath lift from
thebath/tub ......................10
9. Cleaning ..........................11
Warranties, maintenance & servicing
10. Maintenance and servicing .......11
11. Warranty ........................ 12
Symbols
12. Symbols .........................12
Technical data
13. Technical data ....................13
Troubleshooting
14. Troubleshooting ..................15
Parts list
15. Accessories ......................18
16. Parts list ..........................20

1. Unpacking the bath lift
Open the packaging and ensure the bath lift is not damaged and that all parts are included. If it
has been damaged in transit or parts are missing, contact your supplier immediately.
Inside the box you will nd:
• A bath lift, complete with two side aps and hand control attached (see g 1)
• A battery (see g 2)
• A battery charger with charging cradle attached (see g 2)
If your bath lift is supplied with optional soft covers, t them at this stage
(see cover tting instructions).
Before installing or using the bath lift for the rst time, ensure you charge the battery
(see section 2, “Charging the battery” below).
2. Charging the battery
Before rst operation of your bath lift or after long periods of non-use (typically
7-10 days), fully charge the battery as follows. A at battery will take up to 2 hours to
charge.
i ) Slide the battery into the tracks on the charging cradle until it clicks into place (see g 2).
ii ) Plug the charger into the mains socket/outlet outside the bathroom and switch on the
electricity supply (if applicable).
iii) The light indicator on the charger box will initially ash in a quick sequence of red, green,
red, green, before a constant red light appears to indicate charging is in progress (see g 2).
iv) When the battery has been fully charged, the red light on the charger box turns to a
constant green light, which indicates the battery is ready for use. We recommend charging
the battery after each bath wherever possible and leaving it on charge until your next bath.
The battery cannot be overcharged.
v) When you are ready to use your fully charged battery (see paragraph iv), switch o
the mains socket or remove the charger from the mains socket/outlet, then ensure
you disconnect the battery from the charging cradle. (This prevents the battery
discharging and will reset the charger ready for its next use.)
5
Diagrams for operation and explanation of use are on the
fold-out diagram sheet attached to the rear of this booklet
Other manuals for Neptune
2
This manual suits for next models
1
Table of contents
Other Mountway Bathroom Aid manuals


Popular Bathroom Aid manuals by other brands

Cobi Rehab
Cobi Rehab XXL-Rehab Rise N Tilt user manual

Invacare
Invacare 9630E Styxo Assembly, installation and operating instructions

Leckey
Leckey firefly splashy BIG user manual

NRS Healthcare
NRS Healthcare H85350 User instructions

Pressalit Care
Pressalit Care R2040 Assembly instruction

WENKO
WENKO 23285100 Assembly instructions


