manuals.online logo
Brands
  1. Home
  2. •
  3. Brands
  4. •
  5. MOVEIS ALBATROZ
  6. •
  7. Indoor Furnishing
  8. •
  9. MOVEIS ALBATROZ MASTER PLUS User manual

MOVEIS ALBATROZ MASTER PLUS User manual

A
DETALHAMENTO EXTERNO DETALHAMENTO INTERNO
TABELA COR INSTRUÇÃO MONTAGEM PRODUTO CUIDADO PARA CONSERVAÇÃO E LIMPEZA DO MÓVEL
DETALHAMENTO INTERNO
PASSO
1
PASSO 2 PASSO 3
DESCRIÇÃO CÓDIGO
LISTA DE ACESSÓRIOS E FERRAGEM
DESCRIÇÃO DA PEÇA / Description / Descripción
Nº
LISTA DE PEÇAS / Pieces List / Lista de Piezas
BR MAT.
PRIMA QTDE
1000.06
1000.06
1000.06
1000.06
1000.06
CRU
1000.06
1000.06
1000.06
1000.06
1000.06
1000.06
1000.06
1000.06
1000.06
1000.06
1000.06
1000.06
1000.06
1000.43
1000.43
1000.43
1000.43
CRU
MDF
MDP
MDP
MDP
MDP
MDP
MDP
MDP
MDP
MDF
MDP
MDP
MDP
MDP
MDP
MDP
MDP
MDP
MDP
TREE
TREE
TREE
TREE
TREE
01
01
01
01
01
01
01
02
01
01
01
01
01
01
01
01
05
12
06
06
01
01
01
03
MEDIDAS
1643x480x15
1235x450x15
1235x450x15
1235x450x15
1515x298x15
652x44x15
442x450x15
449x298x15
449x298x15
1160x480x15
385x298x15
464x298x15
450x442x15
1520x450x15
1065x450x15
660x200x15
660x200x15
140x380x15
604x130x12
625x385x3
456x402x3
1137x466x3
1093x457x3
670x420x3
Parafuso -3,5x28
Screw / Tornillo
K
03PÇ
C
Prego - 10x10
Nail / Clavo
F
90PÇS
Cavilha - 6x30 madeira
Dowel / Clavija
Parafuso 4,5x45
Screw / Tornillo
A
30PÇS 30PÇS
B
J
03PÇS 08PÇS
Puxador 250 mm
Handle / Manija
O
Suporte prateleira plástico
Shelf Support / Soporte
04PÇS 02PÇS
E
138PÇS
Parafuso -3,5x12
Screw / Tornillo
A
04PÇS
REF.1000
CÔMODA MASTER PLUS
NO
FL
BC
CED
TK
CED INT
BR
NG INT
BR
TK INT
BR
01
02
03
04
05
06
07
08
09
10
11
12
13
14
15
16
17
18
19
20
21
22
23
24
D
108PÇS
Parafuso -3,0x12
Screw / Tornillo
Dobradiça metal
Hinge / Bisagra
G
07PÇ
Kit fechadura metal
Lock Kit / Cerradura
P
01PÇ 03PÇ
S
Cantoneira
Corner / Esquinero
M
24PÇS
LSache cola 20g
Glue / Goma
01PÇ
42PÇS
Junção traseira metal
Rear Junction / Unión
H
16PÇS
N
Q
12PÇS
E
50PÇS
B
08PÇS
G
07PÇS
Prepare a peça 2,3 utilizando as ferragens (A,E e Q). Prepare a peça 14,15 utilizando as ferragens
(C,E,G e O ).
Fixe a peça 1 nas peças 2,3,4 5 utilizando a ferragem (B). Fixe o acessório (T) na peça 01 utilizando a ferragem (E).
C
04PÇS
02PÇ
O
Não molhar o móvel e não expor em lugar úmido
O peso máximo de carga informado refere-se a objetos distribuido
de maneira uniforme sobre toda área de contato da peça
kg
123456
03
kg
17
20
19 18
03
kg
16
20
19 18
NOGAL
FLORAL
BRANCO
CEDRO
TEKA
CEDRO INTERNA
BRANCA
NOGAL INTERNA
BRANCA
TEKA INTERNA
BRANCA
45
43
06
79
66
82
77
78
NOGAL
Separe as peças e acessórios de maneira
organizada
Não expor o móvel próximo de fontes de calor.
Não usar produtos abrasivos.
Limpe com flanela limpa e seca.
E
32PÇS
CHEST / CÓMODA
Outer detail / Detalle externo Inside detail / Detalle interno
Avaialable colours
table de colores Description
Descripción
Code
Código
NOGAL
FLORAL
WHITE
CEDAR
TEAK
CEDAR INSIDE WHITE
NOGAL INSIDE WHITE
TEAK INSIDE WHITE
NOGAL
FLORAL
BLANCO
CEDRO
TECA
CEDRO INTERNO
BLANCO
NOGAL INTERNO
BLANCO
TECA INTERNO
BLANCO
Intructions to Assembly / Instrucciones de montaje Care to conservation and clean / Cuidados de limpieza
Separate parts and accessories in way organized
Separe las piezas y accesorios de manera organizada
Forrar o chão com o papelão das embalagens.
Cover the floor with the cardboard
Cubra el suelo con la embalaje de cartón
É necessário 01 pessoa para montar o produto
It is necessary one person to assembly
És necesário una persona para asamblar
Set maximum weight load refers to objects distributed
uniformly over the entire contact area of the workpiece.
Conjunto de carga máxima de peso se refiere a objetos distribuidos
uniformemente sobre toda el área de contacto de la pieza de trabajo.
Do not wet the mobile and do not expose in a wet place
No moje el producto y no exponer en un lugar húmedo
Do not expose the mobile near heat sources
no exponga cercano de fuentes de calor
No utilice productos abrasivos.
Do not use abrasive products.
Clean with dry cloth
Limpieza con un paño limpio y seco
ACCESSORIES AND HARDWARE / ACCESORIOS Y EQUIPOS
STEP 1
STEP 2
PASO 2
Prepare the pieces 1 and 2 using the tools (F e J). Fix the 3 in the 1 and 2 using (B).
Prepare las piezas 1 y 2 usando (F y J). Fije la pieza 3 en las 1 y 2 usando (B).
STEP 3
PASO 3
Fix the piece 5 in the 3 using the tool (B).
Fije la pieza 5 en la 3 usando la herramienta (B).
CEDRO
02PÇS
Perfil H 652mm
Frame / perfilo
R
06PÇS
Kit corrediça
telescópica 350 mm meta
Slider / Correderal
Q
E
Q
Put the 3rd screw in the first hole.
Ponga el tercer tornillo en el hoyo
Colocar 3º parafuso no
primeiro furo da corrediça.
Q
EE
14
TEKA
18
18
O produto deve ser a montado por um profissional
qualificado
The product must be assembly by a professional
El producto debe ser assemblado por un
professinal calificado
Ferramentas necessárias
(não fornecidas)
Not include tools / No herramientas
02
A
03
C
CO
EG
14
EG
C
CO
T
E
05
kg
05
kg
05
kg
05
kg
05
kg
05
kg
05
kg
05
kg
05
kg
15
kg
BASE
LATERAL ESQUEDA
DIVISÓRIA ESQUERDA
DIVISÓRIA DIREITA
LATERAL DIREITA
TRAVA DA GAVETA
TAMPO DVD
PRATELEIRA DIREITA
PRATELEIRA SUP. TORRE
TAMPO
LATERAL SUPERIOR DA TORRE
TAMPO DA TORRE
PRATELEIRA MÓVEL
PORTA C/ ESPELHO
PORTA
FRENTE GAVETA CHAVE
FRENTE GAVETA
LATERAL GAVETA
CONTRA FUNDO GAVETA
FUNDO DA GAVETA
FUNDO SUPERIOR TORRE
FUNDO INFERIOR TORRE
FUNDO CENTRAL
FUNDO ESQUERDO
1000.45
1000.45
1000.45
1000.45
1000.77
CRU
1000.77
1000.77
1000.77
1000.45
1000.77
1000.77
1000.77
1000.77
1000.77
1000.77
1000.77
1000.06
1000.06
1000.43
1000.43
1000.43
1000.43
CRU
1000.66
1000.66
1000.66
1000.66
1000.78
CRU
1000.78
1000.78
1000.78
1000.66
1000.78
1000.78
1000.78
1000.78
1000.78
1000.78
1000.78
1000.06
1000.06
1000.43
1000.43
1000.43
1000.43
CRU
1000.79
1000.79
1000.79
1000.79
1000.82
CRU
1000.82
1000.82
1000.82
1000.79
1000.82
1000.82
1000.82
1000.82
1000.82
1000.82
1000.82
1000.06
1000.06
1000.43
1000.43
1000.43
1000.43
CRU
LISTA COR ACESSÓRIO
DESCRIÇÃO ACESSÓRIO
Description / Descripción
BRANCO
BRANCO
BR NOGAL
PRETO
NOGAL
B - PARAFUSO 4,5x45 mm
B -
B -
O - PUXADOR MDF 250MM
O -
O -
ACCESSORIES LIST / LISTA DE ACCESORIOS
SCREW
TORNILLO
SHOES
ZAPATA
WHITE/BLANCO
WHITE/BLANCO
BLACK / NEGRO
NOGAL
CEDRO
PRETO
CEDRO
BLACK/NEGRO
CEDAR/CEDRO
TEKA
BRANCO
TEKA
TEAK/TECA
WHITE/BLANCO
15
14
01
06
02
24
10
03
13
07
11
04
22
08
08
09
12
05
24
24
23
21
Suporte oblongo plástico
Support / Soporte
I
01PÇ
ULogomarca
Logo
Parafuso minifix zamac
Minifix Screw / Tornillo minifix
Tambor minifix 12 mm zamac
Drum / Tambor
Tampa minifix 15mm plástico
Cover / Tapa
08PÇS
Rodizio 60x55x35 plástico/metal
Casters / Ruedas
T
15
B B B B
B
B
B
B
01
08PÇS
T
01
BASE
LEFT SIDE
LEFT DIVISION
RIGHT DIVISION
RIGHT SIDE
DRAWER LOCKER
TOP DVD
RIGHT SHELF
TOWER SHELF
TOP
TOWER SUPERIOR SIDE
TOWER TOP
MOBILE SHELF
DOOR WITH MIRROR
DOOR
DRAWER FRONT WITH KEY
DRAWER FRONT
DRAWER SIDE
DRAWER BACKGROUND
DRAWER BACKGROUND
TOWER SUPERIOR BACK
TOWER INFERIOR BACK
CENTRAL BACKGROUND
LEFT BACKGROUND
BASE
LATERAL IZQUIERDA
PARTICION IZQUIERDA
PARTICION DERECHA
LATERAL DERECHA
BLOQUEO DE CAJON
TAMPO DVD
ESTANTE DERECHA
ESTANTE SUPERIOR ORRE
TAMPO
LATERAL SUPERIOR TORRE
TAMPO DA TORRE
ESTANTE MOVIL
PUERTA CON ESPEJO
PUERTA
FRENTE CAJON CON LLAVE
FRENTE CAJON
LATERAL CAJON
CONTRAFONDO CAJON
FONDO DEL CAJON
FONDO SUPERIOR TORRE
FONDO INFERIOR TORRE
FONDO CENTRAL
FONDO IZQUIERDO
Prepare the piece 2,3 using the tools (A,E & Q). Prepare the 14,15 using (C,E,G & O ).
Prepare las piezas 2,3 usando las herrages (A,E y Q). Prepare la 14,15 usando (C,E,G y O ).
PASO 1
Cabideiro Aluminio 432 mm
01PÇS
R
R
J
S
Dica: Para melhor acabamento
utilizar o acessório (S).
Tip: To the best finish use Q
Consejo: para mejor acabado use la Q
16
P
E
PASSO 5
ASPECTO FINAL DO PRODUTO
Fixe a peça 10 nas peças 2,3 e 4 utilizando a ferragem (J). Encaixando na ferragem (A).
Fixe a peça 11 na peça 4 utilizando a ferragem (C). Encaixe o acessório (H) na peça 03 e 4.
Fixe o acessório (I) na peça 3 e 4 utilizando ferragem (E).
PASSO 6
04PÇS 14PÇS
B E
PASSO 7
PASSO 8
PASSO 2
E
Fixar as peças 14,15 nas peças 04,05 utilizando a ferragem (E).
0,48 m
Preparar as peças 15 utilizando as ferragens(A,M,D e L)e fixar na peça 14.Fixar a peça 16 nas
peças 15 utilizando a ferragem(C).Fixar o acessório(O)na peça14 utilizando a ferragem (C).
Data de Atualização 06/02/2017
PASSO 4
B
18PÇS
Fixe a peça 6 na peça 2,3 utilizando a ferragem (B)
Fixe a peça 7 nas peças 3 e 4 e Fixe a peça 8,9 nas peças 4,5 utilizando a ferragem (B)
PASSO 1
MONTAGEM DA GAVETA C/ CHAVE
P
01PÇ
STEP 4
PASO 4
Fix the piece 6 in the 2,3 using the tool (B). Fix the 7 in the 3, 4 and fix the 8,9 in the 4,5 using (B)
Fije la pieza 6 en la 2,3 usando la herraje (B). Fije la 7 en las 3,4 y fije la 8,9 en la 4,5 usando (B)
STEP 5
PASO 5
Fix the 10 in the 2,3 and 4 using (J). To fit in (A)
Fije la 10 en las 2 y 3 usando (J). Encaje en la (A)
STEP 6
PASO 6
Fix the 11 in the 4 using (C). To fit the (H) in the 3 & 4. fix the (I) in the 3 & 4 using (E)
Fije la 11 en la 4 usando la (C). Encaje la (H) en la 3 y 4. fije la (I) en la 3 y 4 usando (E)
STEP 7
PASO 7
Fix the 14 & 15 in the 4 & 5 using (E)
Fije la 14 y 15 en las 4 y 5 usando (E).
STEP 1
PASO 1
FINAL ASPECT / ASPECTO FINAL
18
18
16
20
E
Q
E
D
D
F
19
F
D
F
F
F
D
DD
E
18
E
Q
E
E
Dica: Colocar corrediça
na marcação da lateral
Put the slider in the marc.
Ponga la corredera en
la marca
DDD
D
03
kg
01PÇ
O
L
C
06PÇS
A
04PÇS
M
04PÇS
D
08PÇS
D
10PÇS
F
06PÇS
L
Q
01PÇ
E
08PÇS
DRAWER ASSEMBLY / MONTAJE DE CAJÓN
Colocar
cola nas
cavilhas
cola
cola
Fazer par na lateral da gaveta
A
A
19
CC
C
O
18
18
16
18 18
16
M+D
AL
L
C
Make couple on the side
Hacer par en la lateral
cola
Dica: Passar cola na peça 18 e 19
para ajudar a fixar a peça 20
Put glue in the 18 to help fix 20
Ponga goma en la 18 para
ayudar fijar la 20
Preparar as peças 18 utilizando as ferragens(A,M,D e L)e fixar na peça 16. Fixar a peça 19 nas
peças 18 utilizando a ferragem(C). Fixar o acessório(O) na peça 16 utilizando a ferragem (C).
Fixar a ferragem (Q) nas peças 18 utilizando a ferragem (E).Fixar a peça 20 nas peças 18 e 19
utilizando as ferragens (D e F). Fixar o acessório (P) na peça 16 utilizando a ferragem (E).
Fix the 21, 22, 23 & 24 using (N, F & R) using (C).
Fije las 21, 22, 23 y 24 usando (N, F y R) usando (C).
Fixação das peças 21,22,23 e 24 utilizando a ferragem (N,F e R) ferragem (C).
STEP 1
PASO 1
Prepare the 18 using (A, M, D & L) and fix in the 16. Fix the 19 in the 18 using (C). Fix (O) in the
16 using (C).
Prepare la 18 usando (A,M,D y L) y fije en la 16. Fije la 19 en la 18 usando (C).
Fije (O) en la 16 usando (C).
STEP 2
PASO 2
Fix the (Q) in the 18 using (E). Fix the 20 in the 18 and 19 using (D & F). Fix (P) in the 16
using (E).
Fije (Q) en la 18 usando (E). Fije la 20 en la 18 y 19 usando (D y F). Fije (P) en la 16 usando (E).
Dica: Ao fixar os fundos deixar
espaço de 15 cm entre os pregos.
When fix the backgrpund leave
15 cm space between the nails
Deje espacio de 15 cm entre
los clavos
05PÇS
O
PASSO 1
L
C
MONTAGEM DA GAVETA S/ CHAVE
Preparar as peças 15 utilizando as ferragens(A,M,D e L)e fixar na peça 14.Fixar a peça 16 nas
peças 15 utilizando a ferragem(C).Fixar o acessório(O)na peça14 utilizando a ferragem (C).
30PÇS
A
20PÇS
STEP 1
PASO 1
DRAWER ASSEMBLY / MONTAJE DE CAJÓN
Colocar
cola nas
cavilhas
cola
cola
Fazer par na lateral da gaveta
A
A
19
CC
C
O
18
18
17
18 18
17
M+D
AL
L
C
Make couple on the side
Hacer par en la lateral
M
20PÇS
D
40PÇS
Prepare the 18 using (A,M,D and L) and fix in the 17. Fix the 19 in the 18 using (C).
Fix the (O) in the 17 using (C).
Prepare 18 usando (A,M,D y L) y fije en la 17. Fije la 19 en la 18 usando (C).
Fije (O) en la 17 usando (C).
Preparar as peças 18 utilizando as ferragens (A,M,D e L)e fixar na peça 17.Fixar a peça 19 nas
peças 18 utilizando a ferragem (C).Fixar o acessório (O) na peça17 utilizando a ferragem (C).
PASSO 2
D
50PÇS
F
30PÇS
Fixar o acessório (Q) nas peças 18 utilizando a ferragem (E).Fixar a peça 20 nas peças 18
utilizando as ferragens (D e F).
STEP 2
PASO 2
18
E
Q
E
E
Dica: Colocar corrediça
na marcação da lateral
Put the slide in the marc
Ponga la corredera en
la marca
17
Repetir processo nas cinco gavetas
Repeat the process in all drawers
Repita el proceso en los cajones
03
kg
18
18 17
20
E
Q
E
D
D
F
19
F
D
F
F
F
D
DD
E
DDD
D
cola
Dica: Passar cola na peça 18 e 19
para ajudar a fixar a peça 20
Tip: Put glue in the 18 to fix
20.
Ponga goma en la 18 para fijar
la 20
L
Q
03PÇS
E
30PÇS
L
Fix the (Q) in the 18 using (E). Fix the 20 in the 18 using (D and F).
Fije (Q) en la 18 usando (E). Fije 20 en la 18 usando (D y F).
1,64m
1,60 m
Logomarca
03PÇS
J
03PÇS
K
03PÇS
S
B
B
B B
B
B
B
B
B
B B
B
B
B
B
B
B
B
03
06
04
02
05
09
08
08
07
01
K
K
K
A
A
10
02 03
04
12
11
H
04PÇS
H
H
B B B
B
C
C
04
03
G
24
24
24
21
22 23
N
F
42PÇS
F
02PÇS
R
16PÇS
N
N N
N
N
N
N
N
N
N
N
N
N
N
N
N
F
F
F
F F
F
F
F
F
F
F
A
02PÇS
C
E
I
02PÇS
04PÇS
02PÇS
E + I
14
15
04
05
01PÇS
U

Other MOVEIS ALBATROZ Indoor Furnishing manuals

MOVEIS ALBATROZ 6022 User manual

MOVEIS ALBATROZ

MOVEIS ALBATROZ 6022 User manual

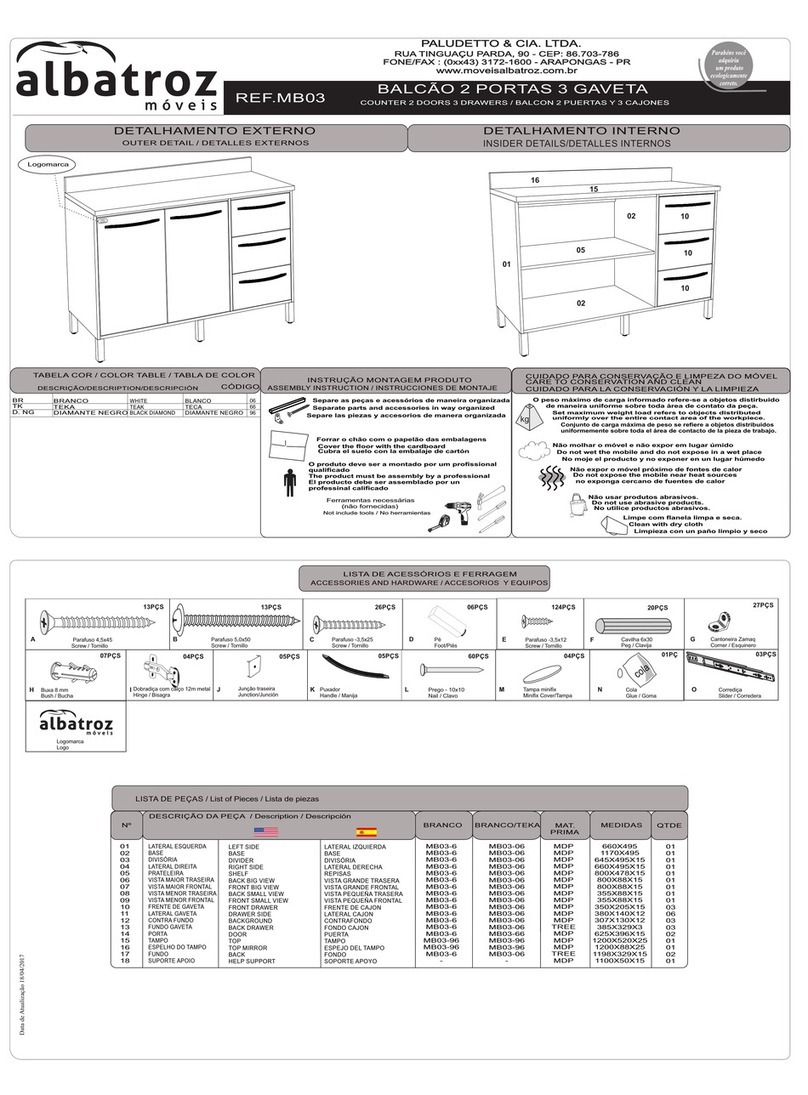
MOVEIS ALBATROZ MB03 Datasheet

MOVEIS ALBATROZ

MOVEIS ALBATROZ MB03 Datasheet

Popular Indoor Furnishing manuals by other brands

Office Star Products AVE SIX LANE LAN25ES Assembly instructions

Office Star Products

Office Star Products AVE SIX LANE LAN25ES Assembly instructions

Multay RB 08 Step by step assembly instructions

Multay

Multay RB 08 Step by step assembly instructions

Cooper Lighting Nuage 301-IP Specification sheet

Cooper Lighting

Cooper Lighting Nuage 301-IP Specification sheet

Woodendot Cielo Assembly instructions

Woodendot

Woodendot Cielo Assembly instructions

Country Living D71 M80771 owner's manual

Country Living

Country Living D71 M80771 owner's manual

Kenroy Home RAWLINS 47005 Use and care guide

Kenroy Home

Kenroy Home RAWLINS 47005 Use and care guide

Furinno FR16123 Quick start quide

Furinno

Furinno FR16123 Quick start quide

GiFi LONDON 601795 Assembly instructions

GiFi

GiFi LONDON 601795 Assembly instructions

eliving FURNITURE NOBU Series Assembly instruction

eliving FURNITURE

eliving FURNITURE NOBU Series Assembly instruction

DURAVIT XViu XV 7034 Mounting instructions

DURAVIT

DURAVIT XViu XV 7034 Mounting instructions

PLACES OF STYLE ALARIC 180 Assembly instructions

PLACES OF STYLE

PLACES OF STYLE ALARIC 180 Assembly instructions

Ronbow Signature E034150 Installation and care guide

Ronbow

Ronbow Signature E034150 Installation and care guide

Dallas 0770-LB-12 Assembly instructions

Dallas

Dallas 0770-LB-12 Assembly instructions

Teknion district 120 Hub HA Worksurface with Connection Kit for hiSpace Quick Connect with District Spine... installation guide

Teknion

Teknion district 120 Hub HA Worksurface with Connection Kit for hiSpace Quick Connect with District Spine... installation guide

Songmics OBG75 manual

Songmics

Songmics OBG75 manual

Seconique Corona Dinette Set Assembly instructions

Seconique

Seconique Corona Dinette Set Assembly instructions

Amantii 40-TRV-XL-XT Assembly, installation and operation instructions

Amantii

Amantii 40-TRV-XL-XT Assembly, installation and operation instructions

Next ELLA ROBE 895780 Assembly instructions

Next

Next ELLA ROBE 895780 Assembly instructions

manuals.online logo
manuals.online logoBrands
  • About & Mission
  • Contact us
  • Privacy Policy
  • Terms and Conditions

Copyright 2025 Manuals.Online. All Rights Reserved.