Mr. Gasket 12D User manual
GENERAL INFORMATION
The Mr. Gasket (Micro) Electric Fuel Pump #12D is a gravity
feed pump designed for use with diesel applications, either
as a stand alone, booster or fuel transfer pump. Pump is
self-priming, with a two bolt and two wire installation. Aver-
age 2 amp draw at maximum delivery. Operating fuel pres-
sure range for is 4 – 7 PSI and flow is 35 GPH.
MOUNTING PROCEDURE
Step 1
Make sure the fuel tank is very close to empty. Drain if
needed. Inspect the current fuel line – if it is cracking, re-
place it with a new fuel rated hose. Install supplied in-line
filter to prevent small particles from entering the pump.
We highly recommend installing a filter as well between
the carburetor and fuel pump to prevent small particles
from entering the carburetor. If you choose to no longer
use your mechanical fuel pump, make sure to install a
block-off plate or plug the pump inlet and outlets. All fuel
line connections should be leak-proof.
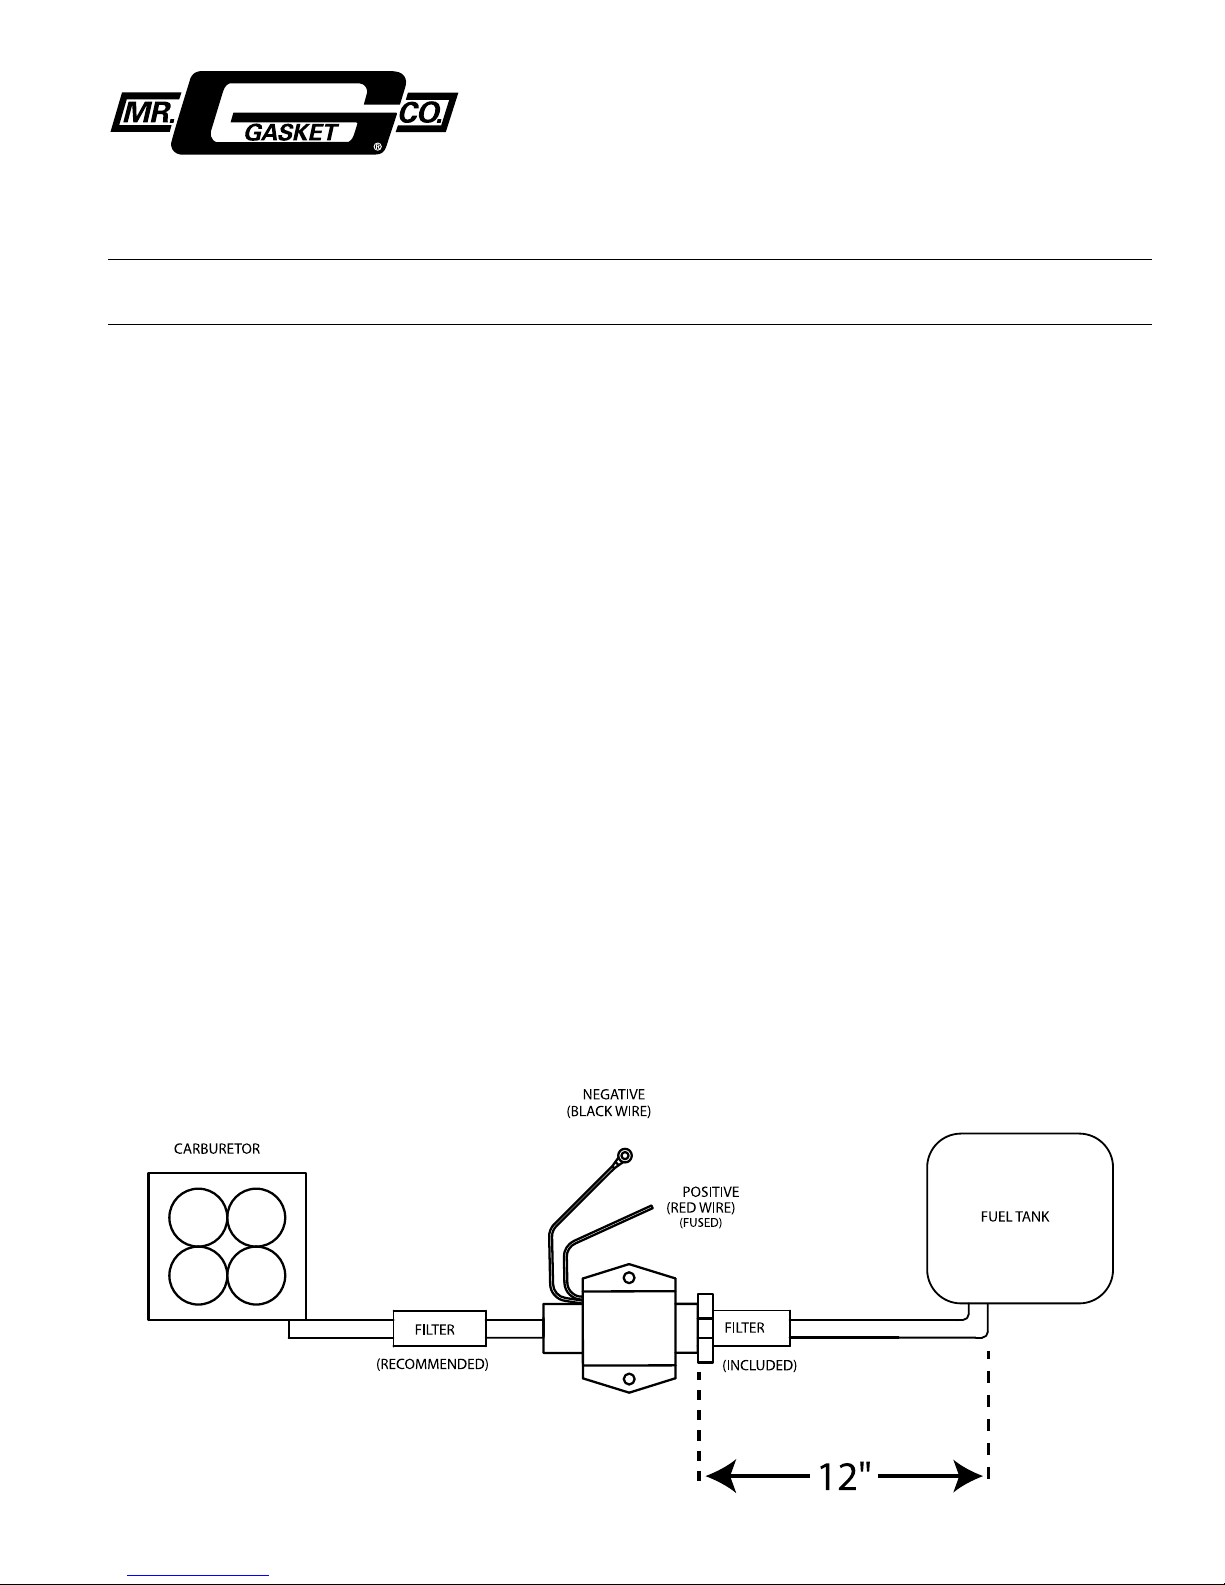
Step 2
Mount the pump about 12” from the fuel tank and as close
to the lowest level of the tank to ensure proper fuel sup-
ply. Refer to Figure 1. Make sure mounting area is clean
of all rust, paint and grease.
Step 3
Using the pump mounting bracket as a template, drill two
7/32” holes. Next, use the supplied self-tapping bolts and
star washers to secure the pump and ground lead to the
frame. Always mount the pump in a location that allows
you to add the safety nuts provided. Install the supplied
filter in the pump inlet and install outlet fitting using thread
sealer and tighten to 10-ft-lbs. NOTE: Never install pump
in engine compartment.
Step 4
Attach the hose to the inlet side of the supplied filter using
automotive quality hose clamps. Some tank outlets may
have 3/8” instead of the supplied 5/16” fittings. You may
need to purchase one 3/8” barb x 1/8” NPT x 3/8” length.
If using 3/8” fitting, you may need to purchase a 3/8” filter.
DO NOT USE PUMP WITHOUT A FILTER. Install the
correct size fuel line from the outlet port on the fuel pump
to the factory metal fuel line going to the engine bay. If
no fuel line exists, fabricate a hard line from the pump to
the engine compartment. NOTE: Never run rubber fuel
line from the rear of the vehicle to the front. Always
minimize use of rubber hose. When possible, use steel
hard line.
Step 5
Make sure to use the red lead for 12 Volt power (fused
5 amp max) and the black lead for ground. The red
positive lead needs to be connected to the switched
ignition terminal. Use a 5 amp fuse or in-line fuse holder.
Use only automotive grade electrical cable - minimum
16 gauge. If wire is run over 20 feet, use 14 gauge.
Ensure that all connections are secured and sealed
from the elements. NOTE: This pump is for negative
ground systems only.
INSTALLATION INSTRUCTIONS
(MICRO) ELECTRIC DIESEL FUEL PUMP – Mr. Gasket Part No. 12D
FORM 12D2012-REV2
READ ALL INSTRUCTIONS CAREFULLY BEFORE BEGINNING INSTALLATION. FOR NEGATIVE GROUND SYSTEMS ONLY. NOT FOR USE
WITH FUEL INJECTED SYSTEMS, HIGH PERFORMANCE OR MODIFIED ENGINES, AIRCRAFT OR MARINE APPLICATIONS.
FIGURE 1:

Step 6
Inspect and tighten all connections before start up. Turn
the key to the on position to prime, and leave on for 10
seconds, then turn off. Inspect for fuel leaks. If leaks are
present, re-tighten clamps and restart. Let the vehicle run
for several seconds, then turn off and re-inspect for leaks.
Check pump and fuel line connections every 5,000 miles.
MR. GASKET LIMITED NINETY (90) DAY WARRANTY
Mr. Gasket which includes ACCEL, Hays, Lakewood,
Mallory and Mr. Gasket product lines, warrants its prod-
ucts only to the original purchaser at retail to be free from
defects in material and workmanship for a period of 90
days from the date of original retail purchase, except that
the following products have longer warranty periods:
WHO IS COVERED:
The warranty extends to original purchaser at retail only,
with a proof of purchase.
WHAT IS COVERED:
All parts which are defective in materials or workmanship
on original installation only, subject to the following:
WHAT IS NOT COVERED:
1. Products which have been subjected to abuse, ac-
cident, alteration, modification, improper installation, im-
proper operational adjustments, tampering, negligence,
misuse, or if repaired or serviced by anyone other than
Mr. Gasket.
2. Actual or alleged labor, transportation or other inciden-
tal charges.
3. Actual or alleged consequential damages incurred by
use of this product.
WHAT WE WILL DO:
Mr. Gasket at its election, will either repair or replace all
defective parts free of charge.
NO OTHER WARRANTY, EXPRESS OR IMPLIED, IS
APPLICABLE TO THE PRODUCTS OR MR. GASKET. THE
DURATION OF ANY IMPLIED WARRANTIES, INCLUDING
THEIMPLIEDWARRANTIESOFMERCHANTABILITYAND
FITNESS FOR A PARTICULAR PURPOSE, IS LIMITED TO
THE DURATION OF THE EXPRESS WARRANTY HEREIN.
MR. GASKET SHALL NOT BE LIABLE FOR THE LOSS OF
USE OF THE PRODUCT, INCONVENIENCE, LOSS OR
ANY OTHER DAMAGES, DIRECT OR CONSEQUENTIAL,
ARISING OUT OF THE USE OF, OR INABILITY TO
USE,THE PRODUCT OR FOR ANY BREACH OF ANY
EXPRESS OR IMPLIED WARRANTY, INCLUDING THE
IMPLIED WARRANTIES OF MERCHANTABILITY AND
FITNESS FOR A PARTICULAR PURPOSE APPLICABLE
TOTHIS PRODUCT.
Some states do not allow the exclusion or limitation of
incidental or consequential damages or limitations on
how long an implied warranty lasts, so these limitations
or exclusions may not apply to you. This warranty gives
you specific legal rights and you may also have other
rights which vary state to state. Materials, components,
specifications, colors, model changes, availability and
prices are subject to change without notice or obliga-
tion. Manufacturers’ brand names, trademarks and
registered trademarks are used for reference only and
are not to imply that any product is of their manufac-
ture or any association herewith. Mr. Gasket, makes
no representation or warranty, express or implied,
that its products comply with local, State or Federal
emission levels, noise levels or safety standards. The
purchaser assumes all responsibility for such use and
compliance.
INFORMACIÓN GENERAL
La bomba de combustible (micro) eléctrica Mr. Gasket N.º 12D es
una bomba alimentada por gravedad diseñada para uso con apli-
caciones diesel, ya sea como bomba autónoma, de refuerzo o de
transferencia de combustible. La bomba es autocebante, con una
instalación de dos pernos y dos cables. Promedio de consumo de
2 amperios en un suministro máximo. El rango de presión de com-
bustible de funcionamiento es 28 – 48 kPa (4 – 7 PSI) y el caudal
es de 132 l/h (35 GPH).
PROCEDIMIENTO DE MONTAJE
Paso 1
Asegúrese de que el tanque de combustible esté prácti-
camente vacío. Drénelo si fuera necesario. Inspeccione
la línea de combustible actual, si está cuarteada, reemp-
lácela con una nueva manguera apta para usar con com-
bustible. Instale el filtro en línea proporcionado para evitar
que las partículas pequeñas ingresen en la bomba nueva.
Es altamente recomendable instalar también un filtro en-
tre el carburador y la bomba de combustible para evitar
que partículas pequeñas ingresen en el carburador. Si
decide no usar más su bomba de combustible mecánica,
asegúrese de instalar una placa de bloqueo o tape las
entradas y salidas de la bomba. Todas las conexiones de
la línea de combustible deben ser a prueba de fugas.
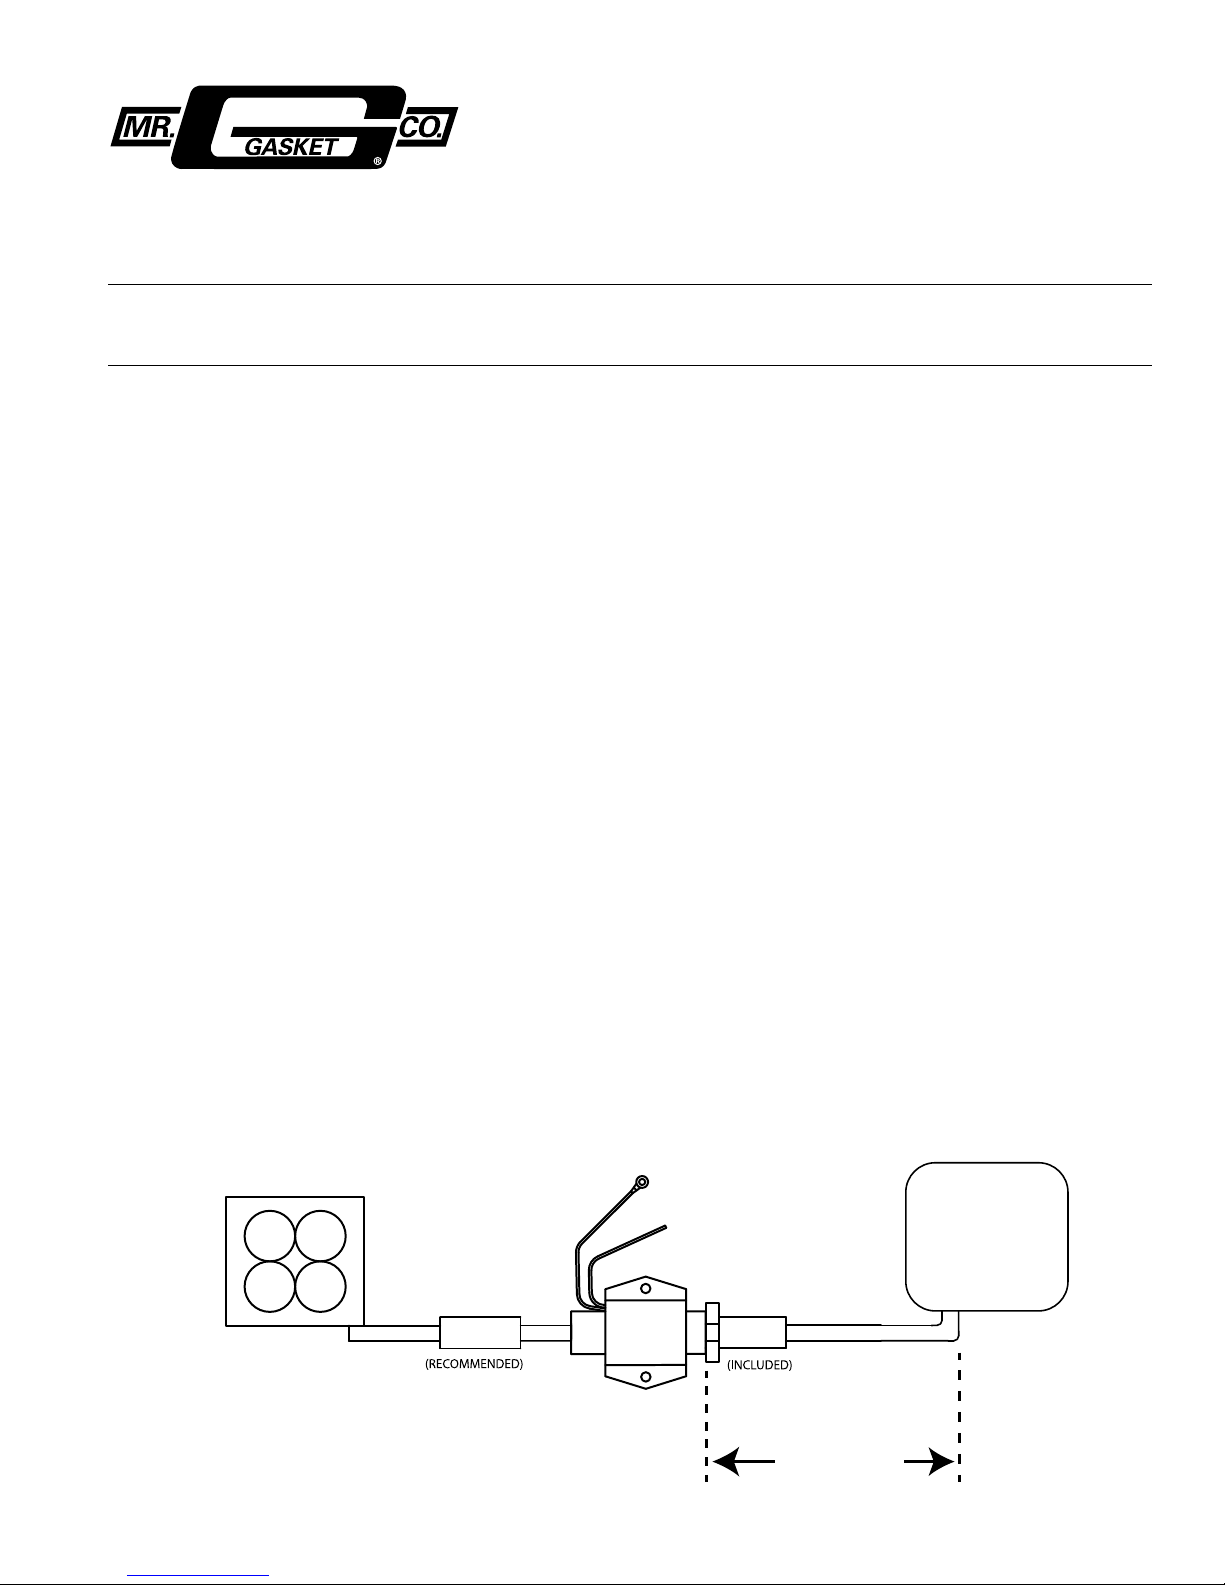
Paso 2
Instale la bomba aproximadamente a 30,5 cm (12 pulg.) del
tanque de combustible y lo más cerca posible del nivel más
bajo del tanque para asegurar un suministro correcto de
combustible. Refiérase a la figura 1. Asegúrese de que el área
de montaje esté libre de todo tipo de óxido, pintura y grasa.
Paso 3
Utilice el soporte de montaje de la bomba como plantilla
y haga dos orificios de 5,5 mm (7/32 de pulg.) con un tal-
adro. Luego use los pernos autorroscantes y las arandelas
de estrella que se suministran para asegurar la bomba, y
el cable a tierra al chasis. Siempre instale la bomba en
una ubicación que le permita agregar las tuercas de se-
guridad incluidas. Instale el filtro provisto en la entrada de
la bomba e instale el adaptador de salida usando sellador
para roscas y apriete a 13,5 Nm (10 pies lb) NOTA: Nunca
instale la bomba en el compartimiento del motor.
Paso 4
Conecte la manguera en el lado de entrada del filtro pro-
porcionado usando abrazaderas de manguera aptas para
uso automotor. Algunas salidas del tanque pueden tener un
tamaño de 9,5 mm (3/8 de pulg.) en lugar de los adaptado-
res de 8 mm (5/16 de pulg.) incluidos. Es posible que deba
comprar un adaptador dentado de 9,5 mm (3/8 de pulg.) x
3,2 mm (1/8 de pulg.) NPT x 9,5 mm (3/8 de pulg.) de largo.
Si usa un adaptador de 9,5 mm (3/8 de pulg.) es posible que
deba comprar un filtro de 9,5 mm (3/8 de pulg.). NO USE LA
BOMBA SIN UN FILTRO. Instale la línea para combustible
del tamaño correcto desde el puerto de salida en la bomba
de combustible hasta la línea de combustible de metal
de fábrica que va al compartimiento del motor. Si no hay
una línea de combustible, fabrique una línea rígida desde
la bomba al compartimiento del motor. NOTA: nunca
coloque una línea de caucho para combustible desde
la parte trasera del vehículo a la delantera. Siempre
reduzca al mínimo el uso de mangueras de caucho.
Cuando sea posible, use líneas rígidas de acero.
INSTRUCCIONES DE INSTALACIÓN
BOMBA DE COMBUSTIBLE (MICRO) ELECTRÓNICA DIESEL – N.º de pieza Mr. Gasket 12D
ANTES DE COMENZAR LA INSTALACIÓN, LEA TODAS LAS INSTRUCCIONES CUIDADOSAMENTE. ÚNICAMENTE PARA SISTEMAS DE
TIERRA NEGATIVA. NO APTAS PARA USARSE CON SISTEMAS DE INYECCIÓN DE COMBUSTIBLE, MOTORES DE ALTO RENDIMIENTO O
MODIFICADOS, APLICACIONES EN AERONAVES O MARÍTIMAS.
FORM 12D2012-REV2
FIGURA 1: POSITIVO
(CABLE ROJO)
NEGATIVO
(CABLE NEGRO)
(FUSIONADO)
CARBURADOR
FILTRO
FILTRO
TANQUE DE
COMBUSTIBLE
30,5 cm
(12 pulg.)

Paso 5
Asegúrese de usar el cable rojo para la corriente de
12 voltios (con fusible de 5 amperios como máximo) y
el cable negro para la tierra. El cable rojo positivo debe
conectarse a un terminal de encendido activado. Use un
fusible o un portafusible en línea de 5 amp. Use única-
mente cable eléctrico de grado automotor, de un calibre
mínimo de 16. Si el tendido de cable tiene más de 6 m
(20 pies), use un calibre 14. Asegúrese de que todas
las conexiones estén aseguradas y selladas contra los
elementos. NOTA: Esta bomba es para sistemas con
conexión negativa a tierra únicamente.
Paso 6
Inspeccione y ajuste todas las conexiones antes del ar-
ranque. Gire la llave a la posición de encendido para cebarla,
déjela encendida durante diez segundos y luego apáguela.
Compruebe que no haya fugas de combustible. Si hay
alguna fuga, vuelva a apretar las abrazaderas y vuelva a ar-
rancar. Deje que el vehículo permanezca encendido algunos
segundos, luego apáguelo y vuelva a inspeccionar que no
haya fugas. Inspeccione las conexiones de la bomba y las
líneas de combustible cada 8047 km (5000 millas).
GARANTÍA LIMITADA POR 90 (NOVENTA) DÍAS DE
MR. GASKET
Mr. Gasket, que incluye las líneas de productos ACCEL,
Hays, Lakewood, Mallory y Mr. Gasket, garantiza única-
mente al comprador minorista original que sus productos
estarán libres de defectos de materiales y mano de obra
durante un período de 90 días a partir de la fecha de com-
pra original al por menor, a excepción de los siguientes
productos que tengan períodos de garantía más extensos:
QUIÉN ESTÁ CUBIERTO:
La garantía se emite únicamente al comprador minorista
original que tenga comprobante de compra.
CUBRE:
Todas las piezas que tengan defectos de materiales o
mano de obra en una instalación original únicamente,
sujeto a lo siguiente:
NO CUBRE:
1. Los productos que hayan sufrido algún maltrato, ac-
cidente, alteración, modificación, instalación inadecuada,
ajustes de funcionamiento inadecuados, manipulación
indebida, negligencia, uso indebido, o si fueron reparados
o recibieron servicio por cualquier otra compañía que no
sea Mr. Gasket.
2. Cargos por mano de obra y transporte reales o supues-
tos u otros cargos incidentales.
3. Daños indirectos reales o supuestos en los que se
incurrieron al usar este producto.
QUÉ HAREMOS:
Mr. Gasket a su elección, reparará o reemplazará todas
las piezas defectuosas sin cargo.
NO SE EXTIENDE NINGUNA OTRA GARANTÍA, EXPRESA
NI IMPLÍCITA, A LOS PRODUCTOS NI A MR. GASKET. LA
DURACIÓN DE TODA GARANTÍA IMPLÍCITA, INCLUIDAS
LAS GARANTÍAS IMPLÍCITAS DE COMERCIABILIDAD E
IDONEIDAD PARA UN PROPÓSITO EN PARTICULAR, SE
LIMITA A LA DURACIÓN DE LA GARANTÍA EXPRESA EN LA
PRESENTE. MR. GASKET NO SERÁ RESPONSABLE POR
LAPÉRDIDADEUSODELPRODUCTO,INCONVENIENTES,
PÉRDIDA O CUALQUIER OTRO DAÑO, DIRECTO O
INDIRECTO, QUE SURJA DEL USO O INCAPACIDAD
PARA USAR EL PRODUCTO, NI DEL INCUMPLIMIENTO
DE UNA GARANTÍA EXPRESA O IMPLÍCITA, INCLUIDAS
LAS GARANTÍAS IMPLÍCITAS DE COMERCIABILIDAD
E IDONEIDAD PARA UN PROPÓSITO EN PARTICULAR
APLICABLES A ESTE PRODUCTO.
Algunos estados no permiten la exclusión ni limitación en
cuanto a daños incidentales o indirectos, ni limitaciones
en cuanto a la duración de una garantía implícita, por lo
que estas limitaciones o exclusiones pueden no tener
vigencia en su caso. Esta garantía le da derechos legales
específicos, y puede tener además otros derechos que
varían de un estado a otro. Los materiales, componentes,
especificaciones, colores, cambios de modelo, disponibi-
lidad y precios están sujetos a cambios sin previo aviso u
obligación. Los nombres de las marcas, marcas registra-
das y marcas comerciales registradas de los fabricantes
se usan como referencia únicamente y no suponen que
los productos sean de su fabricación o una asociación con
los mismos. Mr. Gasket no realiza declaración ni otorga
ninguna garantía, expresa ni implícita, con respecto a que
sus productos cumplan con los niveles de emisiones,
niveles de ruido o normas de seguridad locales, estatales
o federales. El comprador asume toda la responsabilidad
por dicho uso y cumplimiento.
MR GASKET SYSTEMS FUEL SYSTEMS
Table of contents
Languages:
Other Mr. Gasket Water Pump manuals


Popular Water Pump manuals by other brands

VARISCO
VARISCO V Series INSTRUCTIONS FOR THE INSTALLATION, USE AND MAINTENANCE

Oase
Oase Profimax 7000 operating instructions

GORMAN-RUPP
GORMAN-RUPP SF SERIES Nstallation, operation and maintenance manual

Clarke
Clarke CVPW Assembly and maintenance instructions

DAB
DAB VA 55/130 Installation & maintenance instructions

Gardena
Gardena 19080 operating instructions


Atlas Copco
Atlas Copco GHS 350 VSD+ Instruction book

hillvert
hillvert HT-LOUIS 45 user manual

esotec
esotec Rimini LED operating manual

Franklin Electric
Franklin Electric Turf Boss FTB1CI-SSI Series owner's manual

Lafferty
Lafferty 920115 Installation & operation instructions

Textron
Textron Klauke AHP 850-LC instruction manual