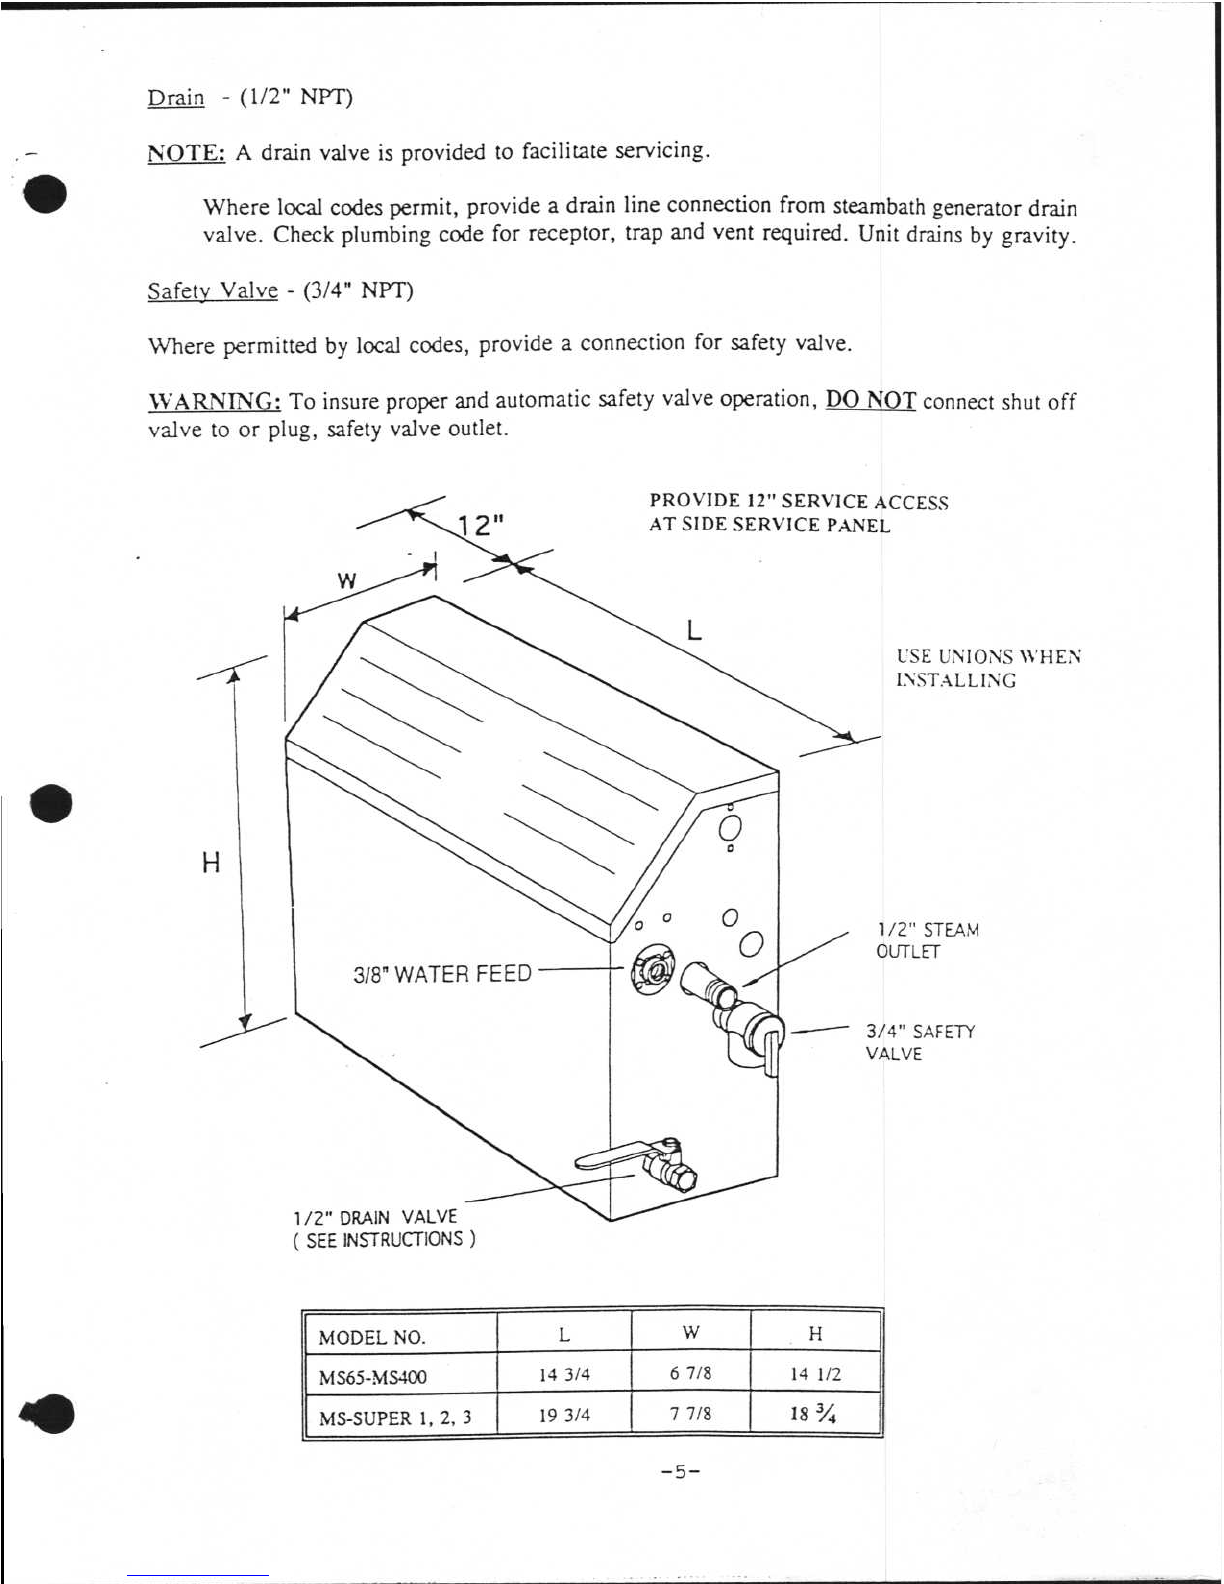
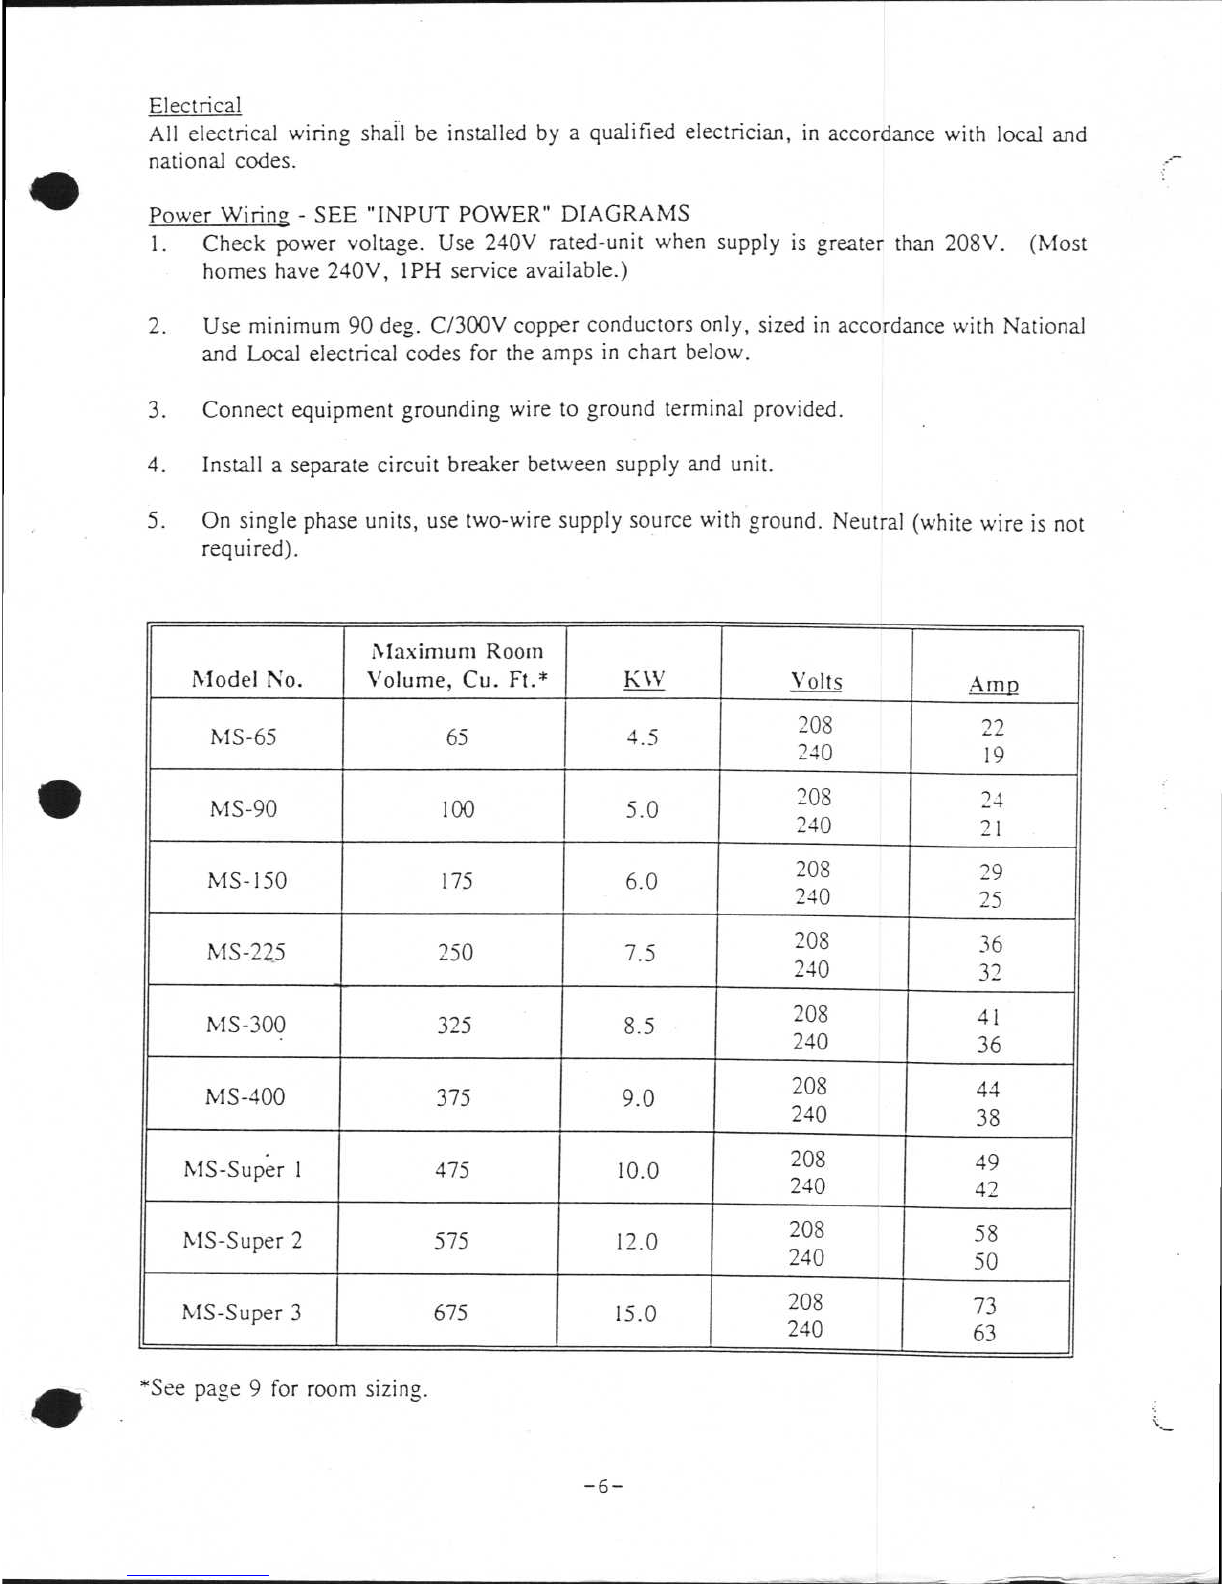
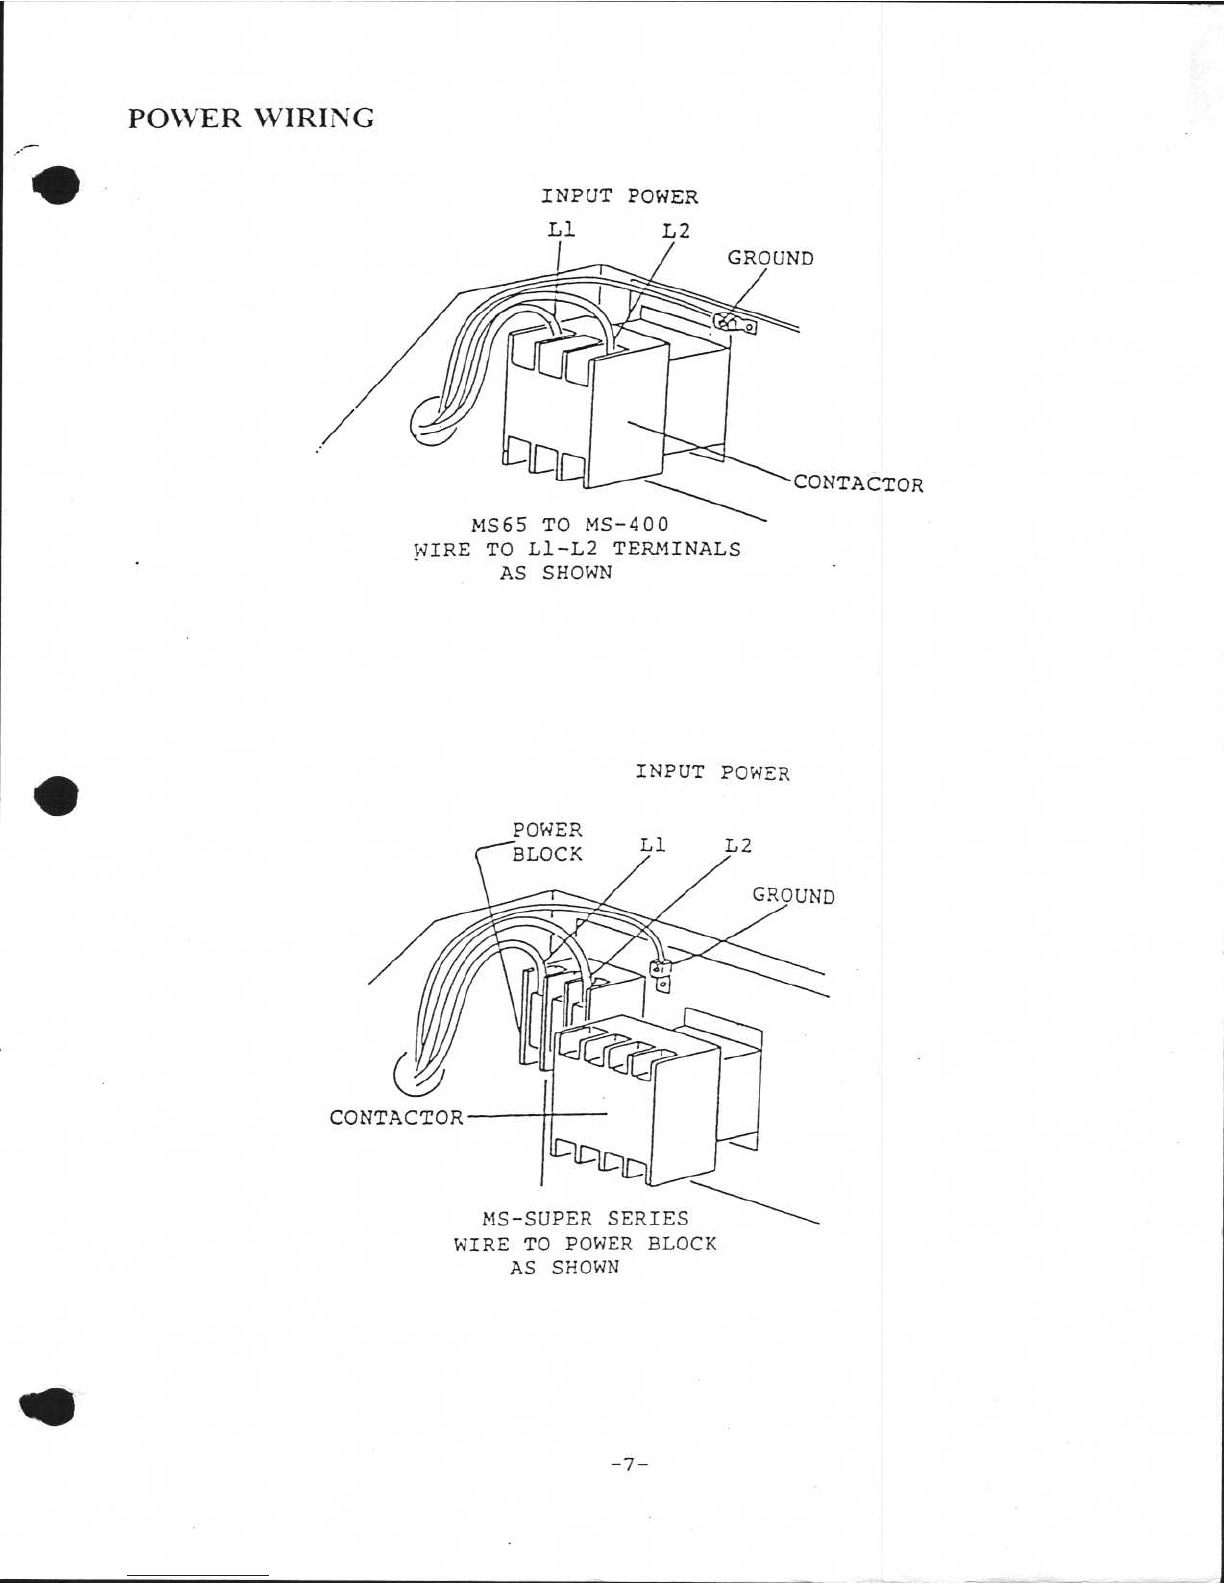
mr. steam MS-65 Instruction manual

PUR101289
Rev. 5-96
INSTALLATION, OPERATION & MAINTENANCE MANUAL
Aar
S
-
twee
STEAMBATH GENERATOR SYSTEMS FOR
RESIDENTIAL APPLICATIONS
AIODELS: MS-65, MS-90, MS-150, MS-225, MS-300, MS-400
MS-SUPER1, MS-SUPER2, MS-SUPER3
For Serial No. P63000 and up
READ ALL INSTRUCTIONS BEFORE INSTALLING OR SERVICING!
LEAVE THIS MANUAL WITH OWNER
MR. STEAM a division of SUSSMAN-AUTOMATIC CORPORATION, 43-20 34th Street, Long Island City, NY 11101
Telephone: 718-937-4500 - Toll Free: 800-76-STEAM - FAX No. 718-472-3256

BEFORE INSTALLING
IMPORTANT
Take a minute to read these instructions before installing or servicing. Although this MS
steambath generator has been fully qualified for shipment by MR. STEAM, the following must
be reviewed for proper, safe and enjoyable steam bathing.
-
Verify that the model and accessories are correct, including incoming line voltage.
-
Insure steambath generator has been correctly selected for the steambath room. Pay
particular attention to room volume and construction. If any questions, please refer to
MR. STEAM sizing guide enclosed. (see page 9)
-
Marble or glass walls or ceilings, or exterior walls "ENLARGE" the room's size,
requiring a generator larger than one based only on the room's cubic foot (L x H x W)
volume.
-
The physical size of the unit, clearance for plumbing servicing and its distance from the
steam room must all be considered
before
final installation.
•
IMPORTANT
MR. STEAM units intended to be operated with optional accessories, such as digital timer
and/or temperature controls, are to be installed strictly in accordance with the specific
instructions supplied with these optional accessories and the information contained in this
manual.
STEAM ROOM REQUIREMENTS
1.
Steam room must be completely enclosed, with full walls, door, floor and ceiling.
2.
It
is
recommended that a gasketed door is used for heat sealing and steam containment.
3.
If tile-type flooring is used, install anti-skid strips or equivalent, for safety.
4.
Walls
and ceilings must be covered with water-resistant, non-corrosive surface, such as
tile, molded acrylic, fiberglass, etc.
5.
Provide a floor drain.
•
•
—2—

HATE(
FEED
lir( OFF
VALVE
STRAINER
Ill
S TEA M
LINE
LOCATING THE STEAM GENERATOR UNIT
Select a location as near as possible to the steam room. Typical locations include: closet, vanity
cabinet, insulated attic or basement.
1.
For best performance locate steambath generator within 20 feet of steam room.
See page 9 for guidance if generator is greater than 20 feet from steam room.
2.
Do not install steambath generator inside steam room.
3.
Do not install steambath generator outdoors.
4.
Do not install steambath generator in unheated attic or basement where water could freeze.
5.
Do not install steambath generator near combustible or corrosive materials and chemicals.
6.
Install steambath generator on a solid and level surface.
7.
Install steambath generator in an upright position only.
8.
Provide access to top and ends of steambath generator for servicing.
9.
Steam line, safety valve and drain valve become hot during operation. Provide appropriate
protection.
10.
SMART/ONE control can be located inside the steam room or on the outside of the steam
room. See SMART/ONE instructions for specific details.
TYPICAL MR. STEAM INSTALLATION
SMAR
CON
-
1{401
I
:1
c
1
I
I
I
t
SI
"LAN
HEAD
..,
..rro
1/ONE
STEAM
ROOM
\
...."
7"
-3-

INSTALLATION
Plumbing
All plumbing shall be performed by a qualified plumber and in accordance with applicable
national and local codes.
-Use unions on all pipe connections.
-Use only brass piping or copper tubing
-Do not use black, galvanized or PVC pipe.
Water Supply - (3/8" NPT)
1.
Connect hot or cold water line. Hot water line is preferable. Hot water should not
exceed
160"
F.
2.
Provide a shut off valve in the supply line.
3.
Do not overheat inlet solenoid valve with solder connections. Overheating will damage
parts.
4.
Flush inlet water line thoroughly before making connection to unit.
5.
Strainer is required if there are solid particles in the water.
6.
Incoming water supply should not exceed 120 psig. For best performance, water pressure
should be 15 to 20 psig.
Steam Outlet - (1/2" NPT)
1.
Do not install a valve in steam line. Flow of steam must be unobstructed.
2.
Use 1/2-inch brass or copper pipe from unit to steam head.
3.
Insulate steam line.
4.
Pitch steam line to avoid valleys and trapping of condensate.
Steam Head
1.
Locate steam head 6 to 12 inches from floor, except:
-
For tub/shower enclosures, install steam head 6 inches above tub top ledge.
-
When used in shower stall with acrylic or other non-heat resistant floors. install steam
head 20-30 inches from floor or use a MR. STEAM steam shield MS-103412.
2.
If steam room is provided with seat(s), locate steam head as far away from seat as
possible.
3.
Install steam head with steam emission slot facing downward.
4.
CAUTION - To preserve steam head finish, do not use wrench or other tools to tighten.
Hand tightening is sufficient.

USE UNIONS WHEN
INSTALLING
1/2" STEAM
OUTLET
3/4" SAFETY
VALVE
1/2" DRAIN VALVE
( SEE INSTRUCTIONS )
Drain
- (1/2" NPT)
NOTE:
A drain valve is provided to facilitate servicing.
Where local codes permit, provide a drain line connection from steambath generator drain
valve. Check plumbing code for receptor, trap and vent required. Unit drains by gravity.
Safety Valve
- (3/4" NPT)
Where permitted by local codes, provide a connection for safety valve.
WARNING:
To insure proper and automatic safety valve operation,
DO NOT
connect shut off
valve to or plug, safety valve outlet.
PROVIDE 12" SERVICE ACCESS
1 2"
AT SIDE SERVICE PANEL
•
•
MODEL NO.
L
W
MS65-MS400
14
3/4
6
7/8
14
1/2
MS-SUPER 1, 2,
3
19
3/4
7
7/8
18
3/4
-5-

Electrical
All electrical wiring shall be installed by a qualified electrician, in accordance with local and
national codes.
Power Wiring - SEE "INPUT POWER" DIAGRAMS
1.
Check power voltage. Use 240V rated-unit when supply is greater than 208V. (Most
homes have 240V, 1PH service available.)
2.
Use minimum 90 deg. C/300V copper conductors only, sized in accordance with National
and Local electrical codes for the amps in chart below.
3.
Connect equipment grounding wire to ground terminal provided.
4.
Install a separate circuit breaker between supply and unit.
5.
On single phase units, use two-wire supply source with ground. Neutral (white wire is not
required).
•
Model No.
Maximum Room
Volume, Cu. Ft.*
KW
Volts
.imp
MS-65
65
4.5
208
240 22
19
MS-90
100
5.0
208
240
24
21
MS-I50
175
6.0
208
240
29
25
MS-225
250
7.5
208
240
36
32
MS-300
325
8.5
208
240
41
36
MS-400
375
9.0
208
240 44
38
MS-Super 1
475
10.0
208
240
49
42
MS-Super 2
575
12.0
208
240
58
50
MS-Super 3
675
15.0
208
240
73
63
*See page 9 for room sizing.
-6-

GROUND
CgfCl
CONTACTOR
MS65 TO MS-400
WIRE TO L1-L2 TERMINALS
AS SHOWN
POWER
BLOCK
Ll
L2
GROUND
CONTACTOR
POWER WIRING
INPUT POWER
Ll
L2
INPUT POWER
MS-SUPER
SERIES
WIRE TO POWER BLOCK
AS SHOWN
-7-

CHECK OUT AND OPERATION
•
1. Turn on SMART/ONE.
-
When using standard SMART/ONE control, follow specific instruction sheet provided
with controls.
-
When using optional digital timer and/or temperature controls, follow specific instruction
sheets provided with controls.
2.
Steam will begin to appear in a few minutes at the steam head.
-
When the installation includes an optional air switch, press button once and release if no
steam appears after 5 minutes.
-
When system is equipped with an "optional room temperature control or digital
timer/temperature control," steam will shut off when desired temperature is reached and
will automatically resume.
3.
Steam will shut off automatically when SMART/ONE counts down to zero.
-
To shut steam off manually, push optional air switch once or turn off SMART/ONE.
•
- To clear steam from enclosure area, turn on shower before opening door.
OPTIONAL EQUIPMENT
Refer to specific instruction sheets for installation, operation and maintenance of optional
equipment and accessories such as SMART/ONE, SMART/PLUS, SMART/REMOTE,
AUTOFLUSH, etc.
MAINTENANCE
MR. STEAM steambath generators are designed for unattended operation and require little
maintenance. Other than periodic draining, maintenance procedures are not required. Every 2
months, or more often in "hard" water areas, the drain valve should be opened fully flushing
out accumulated materials, salts and other particles which are natural by-products of boiling
water. Note: For best results, this should be done immediately after using the steambath
generator, while contents are still hot and with the control off! The unit will refill automatically
when power is reapplied. In areas of very hard water, a MR. STEAM autoflush system and
water treatment is recommended for generator longevity.

•
Five Easy Steps To Properly Select . . .
"The Intelligent Steambath" for Your Home
The MR. STEAM model selected depends on the steam room volume and the type of construction used.
1)
Measure the Length, Width and Height in feet of the steam shower or tub/shower being used.
L
,W
2)
Multiply the Length X Width X Height to give you the room
volume = BASIC CUBIC FEET
(a)
3)
If the interior wall construction material within the steam area is composed of natural
marble, stone, slate, glass block or concrete, place on line (b) the same figure
appearing on line (a).
(b)
4)
TOTAL (a) AND (h) TO OBTAIN (c).
(c)
5)
Increase (c) by 15% for each of the design features noted below
ONLY
if they describe your steambath
installation:
•
One exterior outside wall
(d)
•
Tile on mud wall
(e)
•
An extra glass panel in addition to the door
(f)
•
A cast iron tub
(g)
•
For steambath rooms higher than 8 ft..
please add 15% for each foot above 8 ft.
(h)
•
If generator is more thant 20 feet from steambath
room, add 15% for every 20 feet distance.
(I)
ADD LINES (d) THRU (i) TO LINE (c) = (i) TOTAL CUBIC FEET REQUIRED
Compare the cubic foot requirements (i) to the selection chart on hack of page 6 and select the appropriate model.
If the total cubic feet required (i) is two times or more the value noted in position (a), we strongly recommend that
you specify either an optional Digital Timer & Temperature Control or a Digital Temperature Control.
It is important to specify the correct voltage. Standard voltages are 240 Volts, single phase and 208 Volts, single
phase.
IMPORTANT
The above selection formula for sizing the steambath generator are recommendations only. Because of all
the numerous variables in construction, materials, and insulation (values) these sizing instructions and
specifications should he considered as guidelines only.
It is best that you consult your professional bath planner to evaluate the particular requirements before a
MR. STEAM unit is selected.
MR. STEAM personnel will review the appropriateness of the unit selected as long as We receive complete
information, including working drawings, specifications, and pertinent electrical and construction details
from the owner, architect, or engineer. Otherwise, the manufacturer disclaims responsibility for the sizing
of a unit selected.
—9—

TROUBLE SHOOTING
The information contained in this section is intended to aid qualified service personnel in the testing and
repair of steambath generators.
To avoid electric shock, disconnect generator from electric voltage supply. All servicing must be
performed by qualified personnel only.
PROBLEM
PROBABLE CAUSE
SUGGESTED REMEDY
System is not working
Electric power is off
Turn power on
Control is "OFF" or in "PAUSE" mode
Turn control "ON"
Temperature control is set too low Set control to higher temperature
System is heating up
Wait 5 minutes for steam
NOTE: The following servicing information is intended for use by qualified personnel only. It is
not intended for the home owner and/or end-user of this equipment. If there is any question,
consult with qualified personnel or the manufacturer.
PROBLEM
PROBABLE CAUSE
SUGGESTED REMEDY
System is not working
Improper installation
Review instructions
Incorrect power supply
Check power supply
Transformer malfunction
Check transformer output* -
Replace, if necessary
Control is inoperative
Check control operation* -
Replace, if necessary
Water is not feeding
See below
Unit is not heating See below
Water is not feeding Supply valve is closed
Open Valve
Clogged water line
Check water line
•
Low water pressure
Water pressure must be at least
15 psig
Clogged solenoid valve built-in filter
Remove obstruction
*See Major Electrical Components Test (page 13)
—10—

PROBLEM
PROBABLE CAUSE
SUGGESTED REMEDY
Water is not feeding
(continued)
Probe is shorted to ground
Check for shorts
Liquid level control board malfunction
-
Check water solenoid operation
operation*
Solenoid valve malfunction
Check valve - Replace if
necessary
Unit is not heating
Drain valve is open Close drain valve - Check for
leaks
Unit is flooding
See below
Liquid level control malfunction Check liquid level control for
contactor operation*
Contactor malfunction
Check contactor operation
Heating element Malfunction
Check heating element
Flooding (water
continuously flows out
of steam head)
Loose probe connection
Check probe connection
-
Liquid level control malfunction
Check probe operation
Solenoid valve malfunction
Check valve
Drain is hacking up Check drain plumbing
Too much water in steam
See below
Too much water in
steam
Tnere is a valley (trap) in steam line
Check plumbing
Steam line is not insulated
Insulate steam line
Steam line is over 20 feet
Relocate steam generator closer
to steam room
Not enough steam (not
hot enough)
Unit is undersized Check sizing
Voltage is insufficient
Check power supply
Heating element malfunction Check heating element
Leak in steam line
_
Check steam line - Use only
brass pipe or copper tubing
Steam is intermittent
See next page
...
*See Major Electric Component Test (page 13)

PROBABLE CAUSE
SUGGESTED REMEDY
PROBLEM
Loose electrical connection
Check wiring
Check drain valve
Drain is leaking
Check steam outlet
Clogged steam outlet
Check wiring
Short circuit
Check heating element
Heating element malfunction
Check probe circuit
Probe shorted to ground
Check wiring
Loose electrical connection
Check contactor*
Contactor malfunction
Steam is intermittent
Temperature control is set too low
Control turns steam on and off at
set temperature - Turn control
higher, as desired
There is a valley (trap) in steam line,
allowing water to block flow of steam
Correct pitch of steam line
Safety valve or tank is leaking
See below
Safety valve or tank is
leaking
There is a valley (trap) in steam line
Clogged steam line
Check plumbing
Check steam line
Too much steam (too
hot)
Unit is oversized
Add room temperature control or
air switch
Temperature control is set too high
Set control to lower temperature
Fuse blows out or
circuit breaker trips Fuse or circuit breaker is undersized
Over voltage (current)
Check current rating
Check voltage (current)
Heating element burns
out
Over voltage
Liquid level control malfunction
Check voltage
Check p.c.
board
contactor
operation*
Too much calcium build-up on element
Flush generator after each use
*See Major Electrical Components Test (page13)

MAJOR ELECTRICAL SYSTEMS TEST
Transformer Test
1.
Power to unit is on.
2.
Check voltage at terminals 1 & 4 of the Control Terminal Block = 24VAC.
3.
If voltage is OVAC, replace transformer. If voltage is less than 24VAC, check incoming power.
Control Test
1.
Power to unit is on.
2.
Transformer test is good.
3.
Turn control on.
4.
Check voltage at terminals 2 & 4 of the Control Terminal Block = 24VAC.
5.
If voltage is OVAC, check control wiring and connections for proper fit and installation.
Water Solenoid Test
1.
Power to unit is on.
2.
Control test is good.
3.
Drain water fron unit by opening manual drain valve (not necessary if unit has a functioning
autoflush valve).
4.
Turn control on.
5.
Check voltage at LI and L2 contacts on the Liquid Level Control printed circuit board = 24VAC.
6.
Check voltage at "PUMP" & L2 contacts on the Liquid Level Control printed circuit board =
24VAC. If voltage = OVAC, then proceed to probe test.
7.
Check voltage at the gray and white wires at water solenoid = 24VAC.
8.
If voltage is 24VAC, and water does not enter, replace water solenoid valve.
Probe Test
•
1.
Turn power off.
2.
Drain water from unit by opening manual drain valve (not necessary if unit has a functioning
autoflush valve.)
3.
Disconnect purple wire and green/yellow wire from the Liquid Level Control Board labeled "Probe"
and "GND".
4.
Check resistance between the purple wire and green/yellow wire.
5.
With water level low, probe resistance should be open, if not, replace probe.
-13-

POWER INPUT
L1
L2
TRANSFORMER
G
BLACK I
I
DARK
B_UE
BROWN
LICIT
BLUE
YELLOW
WHITE
L
LIGHT ELLS
01
o
WHITE
CONTROL
CONNECTOR
WHITE
ARIST 0
(7)
'1
I
I
I
<
<I<
•
GR=N
I
R.0
■
∎
)
REO
-
r
WHITE ,
))
I
WHITE
BLACK I
) )
I
BLACK
I
OWN
I
GREEN
0-0
PURPLE
CONTROL
CABLE
SMART/ONE
CONTROL
P.M.
7=7
.
MOJA°
TO PROM
MR STEAM SINGLE PHASE
WIRING DIAGRAM
MODELS MS-65, MS-90, MS-150, MS-225, MS-300, MS-400
WITH SMART/ONE CONTROL
HEATING
ELD4ENT
UQUID LEVEL
CONTROL BOARD
GREY
ITE
CONTROL
TERMINAL
LOCK
WATER FEED
scce+oto
VALVE
CONTACTOR
•
Contactor
110
I. Power to unit is on.
2.
Water solenoid test is good.
3.
Turn control on.
4.
Check voltage at "Contactor" & L2 contacts on the Liquid Level Control printed circuit board
24VAC.
5.
Check voltage at terminals 8 & 4 on Control Terminal Block = 24VAC.
6.
Check voltage at terminals 5 & 4 on Control Terminal Block = 24VAC.
7.
Check voltage at blue and white wires at the contactor coil = 24VAC.
8.
If contactor coil voltage is 24VAC and contactor is not engaging, then contactor must be replace.
•

BLACK
DARK W
LIGHT BLLE
EIIP
WHITE
POWER ,INPUT
Ll L2 L3
TRANSFORMER
W1.1
BROM
91 ACK
CONTROL.
C
,
INECTOR
GREEN
I
PLARIE
I
,
111
.11
"
IF
0,
9
0
1111WIMI
0-0
•
•
a
r•"
00
00
00
•
1111
1
11
M1
INI!!MI11111
C
ONTROL
CABLE
SMART/ONE
CONTROL
L,
VAR
0
LIGHT ELLE
CONTACTOR
c::
.
‘
D•O
Vet'
UQUIDLEVEL
wi4rTE
CONTROL BOARD
WATER
FEED
SOLENOID VALVE
CONTROL
TERMINAL
BLOCK
GROUND
HEATING
ELEMENT
TO PROBE
MR STEAM THREE PHASE WIRING DIAGRAM
WITH SMART/ONE CONTROL
POWER
BLOCK
DARK
BLACK I
HEATING
ELEMENT
TO PROBE
POWER INPUT
L 1 I
IL 2
TRANSFORMER
FUSES
LE-4R BLUE
CONTROL
CONNECTOR I
T
.,
PU
RPLE
p
CONTROL BOARD
LIQUID LEVEL
CONT.
PJM0
I 1
=
GROUND
YELLOW
WATER FRED
SOLENOID VALVE
CONTROL
TERMINAL
BLOCK
CONTACTOR
RED
<
wHrTE
RL ArK
GREEN
CONTROL
CABLE
SMART/PLUS
CONTROL
MR STEAM SINGLE PHASE WIRING DIAGRAM
MODELS MS-SUPER-1, MS-SUPER-2, MS-SUPER-3
WITH SMART/PLUS CONTROL
•
-1
5
-

Contact factory for 3 Phase heating elements.
—16—
MR. STEAM REPLACEMENT PARTS LIST
Item No.
Part No.
Description
1
99178MS
Drain Valve
2
99297
Safety Valve 15PSI
3
100479
Water Feed Solenoid Valve w/filter
4
100477-1
Transformer 24VAC
5
100418
Liquid Level Control Board
6
100476-1
Contactor 40A 2-pole
(MS65,-400 except below)
6
99012
Contactor 50A 3-pole
(MS300-400/208V & all 3 Phase)
6
103453
Contactor 50A 4-pole
(MS-SUPER/Single Phase)
6
103453
Contactor 4 Pole (MS-SUPER)
7
100471-2
Probe Assembly
8
99096W
Heating Element Gasket
9
29041BMS
Heating Element 4.5KW 208V
(MS65)
9
29041CMS
Heating Element 4.5KW 240V
(MS65)
9
29051BMS
Heating Element 5 KW 208V
(MS90)
9
29051CMS Heating Element 5 KW 240V
(MS90)
9
2906IBMS
Heating Element 6 KW 208V
(MS150)
9
29061CMS Heating Element 6 KW 240V
(MS150)
9
29071BMS
Heating Element 7.5KW 208V
(MS225)
9
29071CMS
Heating Element 7.5KW 240V
(MS225)
9
29081BMS
Heating Element 8.5KW 208V
(MS300)
9
29081CM S
Heating Element 8.5KW 240V
(MS300)
9
29091B MS
Heating Element 9 KW 208V
(N1S400)
9
2909ICM S
Heating Element 9 KW 240V
(MS400)
9
2910IBNIS
Heating Element 10 KW 208V
(MS-SUPER I)
9
29101CNIS
Heating Element 10 KW 240V
(MS-SUPER 1)
9
29121BMS
Heating Element 12 KW 208V
(MS-SUPER 2)
9
2912ICNIS
Heating Element 12 KW 240V
(MS-SUPER 2)
9
2915IBMS
Heating Element 15 KW 208V
(MS-SUPER 3)
9
29151CMS
Heating Element 15 KW 240V
(MS-SUPER 3)
•
This manual suits for next models
8
Table of contents
Other mr. steam Iron manuals

mr. steam
mr. steam MS-90E User manual

mr. steam
mr. steam MS SUPER 6E User manual

mr. steam
mr. steam MS-65T Instruction manual

mr. steam
mr. steam MS-90 Instruction manual

mr. steam
mr. steam MS 81500SK User manual

mr. steam
mr. steam CU Series User manual

mr. steam
mr. steam Steam@Home 3000 Instruction manual

mr. steam
mr. steam MS Series Guide

mr. steam
mr. steam MS-65T Owner's manual

mr. steam
mr. steam MS-90E User manual