MRMC MRMC-1512-00 User manual

ii
Pan Bars Quick Start Guide
QSG Product code: MRMC-1465-06
Product covered: MRMC-1512-00, MRMC-1460-01
Date Updated: 10 August 2020
© 2020 Mark Roberts Motion Control Ltd. All rights reserved.
No part of this publication may be reproduced, transmitted, or translated
by any means — graphical, electronic, or mechanical — including
photocopying, recording, taping, or storage in an information retrieval
system, without the express written permission of Mark Roberts Motion
Control.
Although every care has been taken to ensure that the information in this
document is accurate and up to date, Mark Roberts Motion Control
continuously strives to improve their products and may make changes to
the hardware, firmware, and software described in this document. Mark
Roberts Motion Control therefore cannot be held responsible for any
error or omission in this document.
All product names mentioned herein are the trademarks or registered
trademarks of their respective owners.
Contact information
Mark Roberts Motion Control Ltd.
Unit 3, South East Studios
Blindley Heath
Surrey
RH7 6JP
United Kingdom
Telephone: +44 (0) 1342 838000
Web: www.mrmoco.com
www.mrmocorentals.com

Pan Bars Quick Start Guide
iii
Pan Bars Quick Start GuidePan BarsQuick Start Guide
Contents
Chapter 1 Quick Start..................................................................... 1
Safety........................................................................................1
Overview ................................................................................. 1
Pan Bars — With Ethernet Connectivity............................2
Connecting the cables ..................................................3
Enable button ................................................................3
Pan Bars - Mimic Only..........................................................4
Mimic only Pan Bars with Ethernet Mimic box ................5
Connecting the cables ..................................................6
Your first session ....................................................................7
Turning off the system .................................................7
Chapter 2 Pan Bars Flair Setup .................................................... 10
Setting up Ethernet Pan Bars as Mimic Device in
Flair ........................................................................................10
Subsequent sessions....................................................13
Setting up Pan Bars (Encoder output only) as a
Mimic Device in Flair..........................................................14
Chapter 3 Setting up the Pan Bars unit in MHC ......................... 18
System configuration and startup......................................18
Changing the axis settings ........................................21

Pan Bars Quick Start Guide
iv

Pan Bars Quick Start Guide
1
Pan Bars Quick Start GuidePan BarsQuick Start Guide
Chapter 1 Quick Start
Safety
•Do not use around flammable gas. All electrical equipment can
generate sparks that can ignite flammable gas.
•Keep the equipment dry. The system has not been made
weatherproof. Do not use with wet hands.
•Keep cables tidy. Use cable ties to keep them out of harm’s way. If
you have a head with slip rings then make use of them; avoid
running any cables between the base and the rotating head or
camera.
Overview
Thank you for using the Pan Bars from Mark Roberts Motion Control
(MRMC). Pan Bars is a Ethernet mimic controller for the MRMC camera
head. It gives you a smooth, precise and real-time control over your
choice of camera axes —pan and tilt, and camera control — zoom or
focus or both. Pan Bars are designed to work well with both Flair motion
control and MHC software systems by MRMC.
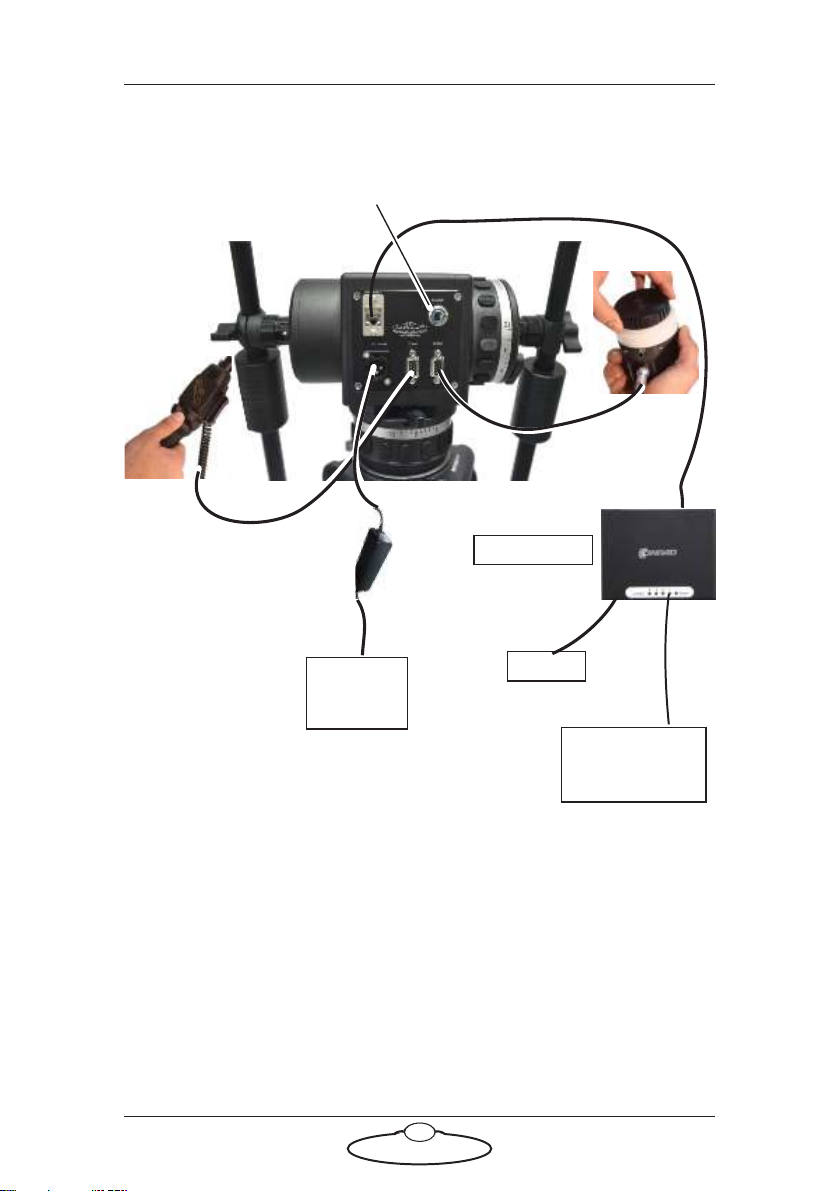
Pan Bars can have the following configuration:
Basic Pan and Tilt over Ethernet to either a Flair or MHC
computer with Zoom or Focus or both - page 2
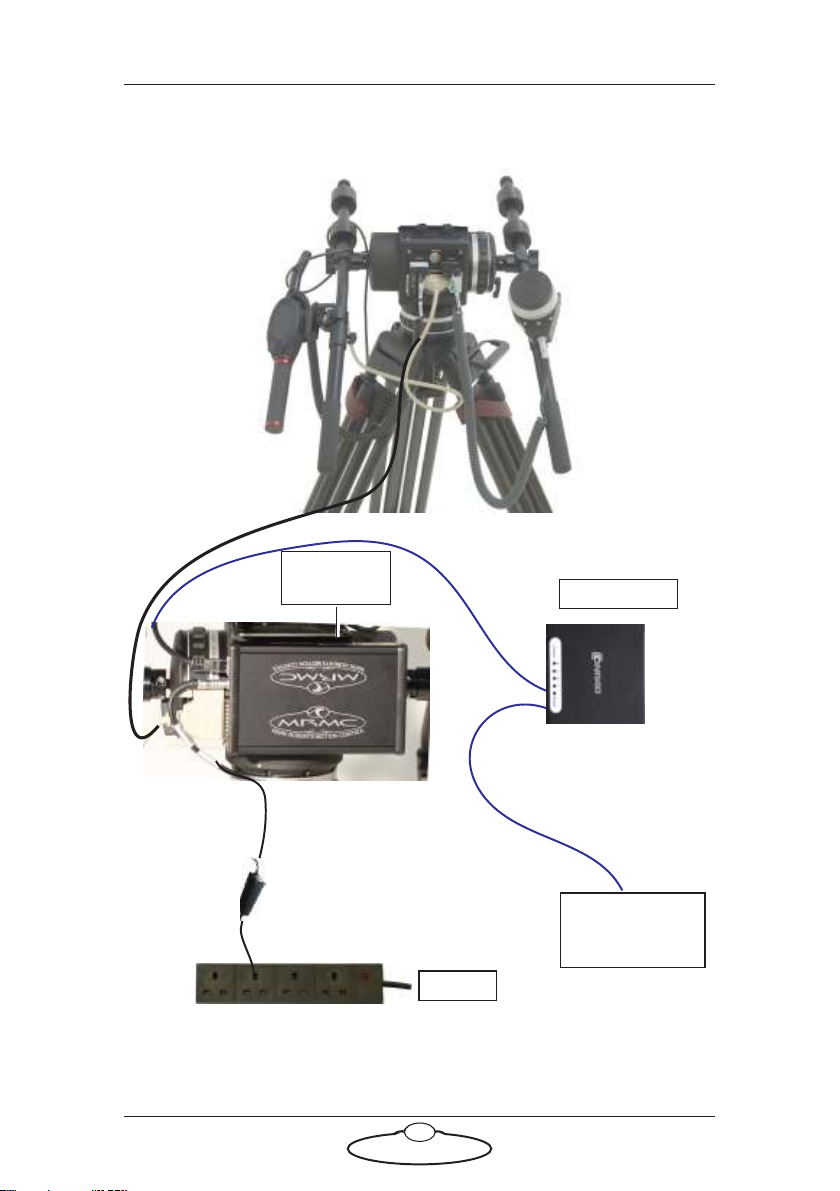
As a mimic controller in which the encoder output is sent to
RT-14 connected to the head - page 4
As a mimic encoder output to a Datalink system using a mimic
box (Flair): The Mimic Box is used to convert the raw encoder
data and provide Ethernet (redundant function as already on
basic Pan Bars) or Datalink which is needed for legacy systems
- page 5
Pan Bars with an Ethernet or Datalink MSA joystick controller:
The Pan Bars provide mimic encoder inputs via Ethernet to the
MSA Joystick which then controls the Head via Ethernet or
Datalink.

Head connected
to pan bars via
Ethernet
Power
ETHERNET
Ethernet hub
Zoom
controller
Focus
controller
Power
(24VDC)
ETHERNET
Enable button
Pan Bars Quick Start Guide
2
Pan Bars — With Ethernet Connectivity

Pan Bars Quick Start Guide
3
Connecting the cables
1. Connect the Focus controller cable to the
FOCUS port in the Pan Bars panel and Focus
controller. Ensure that the red markers on the
plug and socket are aligned.
2. Connect the Zoom controller cable to the
ZOOM port on the Pan Bars panel.
3. Connect the Ethernet and power cables, as shown. Your Pan Bars
configuration can have an MHC or Flair PC which is in turn
connected to the head via Ethernet or you can use MSA Joystick
controller from MRMC via Ethernet which need not be connected
to a PC.
4. Add the Pan Bars as a device in MHC Admin login (if applicable).
For more information on this, refer to the MHC Quick Start Guide.
You can now use the Pan Bars to control the currently active head in
MHC.
Enable button
Enable is a toggle button; pressing it allows the head to be controlled by
Pan Bars. Releasing this button allows you move the Pan Bars without
changing the head position.
Note
If you are not using the Zoom controller, disable it in the software.

FOCUS
ZOOM
RT-14
EXPANSION
Pan Bars Quick Start Guide
4
Pan Bars - Mimic Only

Pan Bars Quick Start Guide
5
Mimic only Pan Bars with Ethernet Mimic box
Head connected
to pan bars via
Ethernet
Power
ETHERNET
ETHERNET
FOCUS
EXPANSION
ZOOM
Ethernet hub
Ethernet
Mimic Box

Pan Bars Quick Start Guide
6
Connecting the cables
1. Connect the Focus controller cable to the
FOCUS port in the Pan Bars panel and Focus
controller. Ensure that the red markers on the
plug and socket are aligned.
2. Connect the Zoom controller cable to the
ZOOM port on the Pan Bars panel.
3. Use the Expansion cable to connect the EXPANSION port on the
Pan Bars panel and the Expansion port on the Ethernet Mimic box.
4. Connect Surface Pro, the Ethernet Mimic box, and the MRMC head
with the Ethernet hub using network cables.
5. Connect the power cable to the POWER
socket in the control box. Ensure that the red
markers on the plug and socket are aligned.
6. Connect the devices in the system – Surface Pro, Ethernet hub, and
head – to power.
Note
If you are not using the Zoom controller, disable it in the software.

Pan Bars Quick Start Guide
7
Your first session
Instructions for using the head with a specific controller, are beyond the
scope of this manual. When you want to use the Pan Bars, you typically
need to perform the steps given below. Refer to the manual that came
with your head for details.
1. Attach the cables to the Pan Bars, Ethernet Mimic box, Surface Pro
and head, as described in the previous section. Make sure the
relevant indicators light up; for example, the power indicator LEDs
on all 24Volt power supply bricks ( ), and the power indicator
LED on the head ( ).
2. Focus control has to be physically set to zero before booting up the
PC. To do this, fully rotate the Focus knob anticlockwise on the
joystick to zero the focus axis.
3. Press the POWER button on Surface Pro.
4. Set up the head using MHC software installed on Surface Pro.
Turning off the system
There’s no power switch on the Pan Bars; power is turned off by removing
the power cable for Ethernet Pan Bars or removing the Expansion cable
for Mimic only Pan Bars.
Note
It is a good idea to attach the power cables last, after all the
other cables are in place.
It is also recommended that you power up Surface Pro last,
after powering up the head, as powering up two devices
simultaneously on the same Ethernet network can cause
communication problems.

Pan Bars Quick Start Guide
8
Notes

Pan Bars Quick Start Guide
9
Notes

Pan Bars Quick Start Guide
10
Pan Bars Quick Start GuidePan BarsQuick Start Guide
Chapter 2 Pan Bars Flair Setup
Setting up Ethernet Pan Bars as Mimic Device in
Flair
You can use the Ethernet connected Pan Bars as mimic device in Flair.
You can add up to two mimic devices in Flair, which Flair refers to as
MimicBoard1 and MimicBoard2. Each mimic device has upto eight
mimic control axes allocated to it in Flair, and Flair automatically
numbers these using the next available numbers. For example Mimic Axis
9, Mimic Axis 10, etc.
The procedure below tells you how to configure Flair to recognise the Pan
Bars.
1. Make sure the relevant cables are attached as described in the
previous section.
2. Edit the file C:\Flair\Flair6\Flair.ini. This file is a text file
that you can edit with any text editor such as Notepad, either
directly or by using the Flair menu option Help >View .ini File.
You need to add or edit some lines in the file similar to the following
lines.
*NetworkBoards: 3
*NodeProgram3: Uni6Ether_II.btl
*MimicBoard1: 3
*Autorecalibrate:True
*LoadfromHC:True
Hint
When connecting a Flair PC with the Pan Bars using an Ethernet
connection, you might need to temporarily disable the Wi-Fi
connection on the laptop so that Flair does not try to use it to
connect to the Pan Bars. (In the laptop’s Network and Sharing
Center, click on Change Adapter settings, right-click on Wireless
Network Connection and in the pop-up menu choose Disable.)

Pan Bars Quick Start Guide
11
The keywords used in the above table are described below:
*NetworkBoards: The number of network boards (nodes) in
the system. You need to increase this by one (1) to cater for the
new board in the Pan Bars mimic device.
*NodeProgram3: For the node to which you assigned the
mimic (node 3 in this case), add a reference to the .btl file
that you want Flair to load into the mimic device on that node
when starting up. The .btl file is already supplied with Flair
so you don’t need to copy or download it from elsewhere.
*MimicBoard1: Assigns mimic board 1to an available node.
You need to specify a node that is not already used by another
board. In this example nodes 1 to 2 are already used by other
boards so *MimicBoard1 is assigned to node 3. If you need to
add another mimic board, you can add a line *MimicBoard2:
4.
Remember to save the file after you have edited it.
3. In the Flair menu, click on Setups >Network Setup.
4. In the pop-up, click on the Find button.
5. In the Find results, find the IP address of the Pan Bars
(192.168.1.236 in this example), and copy it into the node that you
assigned to the Pan Bars mimic device (Node 3 in this example):
If using a Mimic box to covert raw encoder data to Ethernet, insert
the following lines in Flair.ini:
*NetworkBoards: 3
*NodeProgram3: Quad6Ether_II.btl
*MimicBoard1: 3
*Autorecalibrate:True
*LoadfromHC:True

Pan Bars Quick Start Guide
12
6. In the Network Setup pop-up, click on the buttons Save and Apply.
7. Click Load and exit the Network Setup.
On the next restart, Flair should automatically recognise the Pan
Bars and load the .btl file into them.
8. Check that Flair is receiving data from the encoders in the Pan Bars
by using Flair menu option Setups >Test Mimic Inputs and
making sure that the relevant mimic axes numbers change when you
move the Pan Bars:
9. In the Flair window, right-click on one of the axes buttons along the
top of the screen, such as Pan, and in the pop-up menu choose Axis
Setup.
10. On the Control tab, specify which wheel you want to use to control
this axis, by setting the Controller to the mimic axis that you want
to use, for example Mimic 9:

Pan Bars Quick Start Guide
13
(The mimic axis numbers are the same ones listed earlier in the
Setups >Test Mimic Inputs pop-up.)
11. Specify the other Mimic Settings that you want to use for this
control (in the same section of the pop-up), then click on Save,
Apply, and Exit.
12. In the Flair window, right-click on one of the axes buttons along the
top of the windows, such as Pan, and in the pop-up menu choose
Mimic Setup. You can also access this through the menu option
Mimic >Axis Mimic.
13. Specify Live for the axes that you have assigned the Pan Bars to, then
Apply. After you have tested the mimic operation you can use other
settings; see the Flair manual for details.
Moving the Pan Bars should now move the associated axis and change the
axis position numbers on the Flair screen. You can access the Axis Mimic
Setup dialog box again to assign the third and fourth mimic axis
whenever device is plugged into the ZOOM and FOCUS ports, such as a
Zoom controller and a FIZ pot.
Subsequent sessions
Once you have configured Flair to work with the Pan Bars, the start-up
procedure for subsequent sessions is as follows:
1. Make sure all cables are attached.
2. Power up the Windows PC but do not start Flair yet.

Pan Bars Quick Start Guide
14
3. Power up the Pan Bars.
4. Start Flair.
5. Enable the mimic controls in Flair, either by right-clicking on the
relevant axes buttons at the top of the Flair window and choosing
Mimic Setup in the pop-up menu, or by using the main menu
option Mimic >Axis Mimic.
Setting up Pan Bars (Encoder output only) as a
Mimic Device in Flair
Once you plugged the Pan Bars to RT-14 using the Mimic1 or Mimic2
ports, you can start controlling the axis using the Pan Bars via the Flair
Motion Control Software.
You can add up to two mimic devices in Flair using RT-14 called the RIC
Mimic, or Root Mimic devices. Each Root mimic device has four mimic
control axes allocated to it in Flair as Rt Mimic Axis1, Rt Mimic Axis2 etc.
The procedure below tells you how to configure Flair to recognise the Pan
Bars.
1. Make sure the relevant cables are attached as described in the
previous section.
2. Edit the file C:\Flair\Flairx\Flair.ini. This file is a text file
that you can edit with any text editor such as Notepad, either
directly or by using the Flair menu option Help >View .ini File.
You need to add or edit some lines in the file similar to the following
lines.
*RICMimic: True
This allows you to use the Root Mimic inputs.
Remember to save the file after you have edited it.
Hint
Flair does not store the Mimic >Axis Mimic settings from one
session to the next, so you need to do this step at the start of
every session. This is for safety reasons, as it would be
dangerous to start up a robotic system with the mimic devices
in an unknown state and fully enabled.

Pan Bars Quick Start Guide
15
3.With the Windows PC running but with Flair not running, attach the power cables the head, and the RT-14 unit.
4.When the RT-14 unit has finished starting up, start Flair by double-
clicking on the Flair icon on the Windows Desktop.
At this point, ignore any Flair error messages.
5.Check that Flair is receiving data from the encoders in the Pan Bars by using Flair menu option Setups >Test Mimic Inputs and making sure that the relevant Root mimic axes numbers change when you move the pan bars:
– Typically pan is assigned to Pan axis on the head and
appears as Ric Axis 1.
– Typically, tilt is assigned to Tilt axis on the head and
appears as Ric Axis 2.
– If a Zoom controller is plugged into the ZOOM port, then
this will appear as Ric Axis 3.
– If a FIZ pot or Zoom controller is plugged into the
FOCUS port, then this will appears as Ric Axis 4.
6. In the Flair window, click Show Mimic. The additional Root Mimic
options appear below each rig axis.
7. In the Controller drop-down, specify which Root Mimic axis you
want to control this axis, for example to assign Pan axis on the head
to Pan on the Pan Bars, select the Controller as Rt Mimic 1, or RIC
Mimic 1:

Pan Bars Quick Start Guide
16
(The mimic axis numbers are the same ones listed earlier in the
Setups >Test Mimic Inputs pop-up.) Note that after you assigned
the Root Mimic Axes the axes names appear in the Controlling
column in the Test Mimic Inputs dialog box.
8. Specify the other Mimic Settings that you want to use for this
control.
9. Click Live for the axes that you have assigned the Pan Bars to. After
you have tested the mimic operation you can use other settings; see
the Flair manual for details.
Moving a Pan Bars should now move the associated axis and change the
axis position numbers on the Flair screen.
This manual suits for next models
2
Table of contents
Other MRMC Digital Imaging Accessories manuals