MRP TD4C User manual

MEDREPPRO LLC
Instruction Manual
For
TD4C
Tabletop Low Speed Centrifuge

MEDREPPRO LLC
1
Safety Notices
We appreciate your business with our TD4C centrifuge. To prevent any
potential accident, please operate centrifuges according to the following safety
protocol.
1. Unplug the main power cord, when performing maintenance or when
centrifuge is expected not being used for a long period of time.
2. Load the rotor with samples arranged symmetrically. Opposing tubes
must be of equal weight. If necessary, use "water blank" tubes to
balance sample tubes of unequal weigh. Do not conclude that tubes are
balanced by sight over volume. Use the pan balance provided in the
centrifuge room for balancing tubes in rotors for the centrifuge.
3. Never exceed the maximum speed posted for the rotor!
4. Never use the rotor that appears damaged (e.g. O-rings missing,
scratched, corroded, and cracked).

MEDREPPRO LLC
2
⚫Model Type
It is small & light tabletop low speed centrifuge
⚫FUNCTION
User will first put the centrifugal sample into the tubes, then put the tubes into
this ordinary centrifugal instrument to make a physical separation as per the
different densities of components of this sample based on setting certain
centrifugal speed & time, like separating blood (3500rpm, 8minutes) which will
appear 3 layers including PPP, PRP, & Red cells, finally user will take the tubes
out of the centrifuge to extract the material he needs.
⚫Main specification and technical parameters
Max speed:
4000rpm
Max RCF
1880xg
Max volume
8× 20ml
Noise
≤55dBA
Timer
0~99min
Net weight
6.5KG
Dimension
310× 270× 220mm
Power
supply
AC110V 60HZ 1A
Speed accuracy
± 20rpm
Package
Carton box
⚫Available rotors
Those 8×15ml, 6x10/15ml,12×5ml,12×7ml,8×10/7/5ml rotors are
available for you. You can choose one of them in the process of
centrifugal working theory and specialties.
It is driven by brush-less direct current motor directly, it has the following
specialties: time and speed digital display, electric lock, simple construction,
reliable and easy to operate, checking the tubes in the same level in your eyes
instead of weighing the tube, cause of the auto-balance function.
⚫Unpacking
Please Check whether there are serious damages on the package as soon as
you received the centrifuge, if so, please contact us directly, if not, please
unpacking the package, take out the instruction manual, checking the
components and accessories according the packing list in the instruction
manual. If you found something missing, please tell us.

MEDREPPRO LLC
3
⚫Installation:
The centrifuge should be installed on a flat, stable surface. Most customers
use a table or desk. When all four feet are touching the surface, connect the
power supply to the unit and then plug it in. Make sure the socket is grounded,
avoid an electric shock. (Most European electric sockets are grounded).
⚫Operation:
1. Checking whether the round nut in the rotor is loose, if so, fasten them.
2. Prepare the tubes; put the test liquids into the tubes, checking whether
they are in the same level with your eyes.
3. Load tubes on the tube rack symmetrically; otherwise it will be resulted in
severe vibration in the process of centrifugal.
4. Close the lid, make sure it is locked
5. Set parameters
The time and speed will be showing on the panel, switches and buttons as the
following figure:

MEDREPPRO LLC
4
Picture1 Show as per Speed
⑨⑩⑦⑧⑥
①②③④⑤
Plug in and turn on the switch, the digital window in the panel will be brighten.
Name
Function
①Program and rotor button (P/R)
Control the program and rotor no.
②Selection button (SEL)
Select Speed, RCF, time parameter
③Increase button (▲)
Increase all the parameters
④Decrease button (▼)
Decrease all the parameters
⑤Stop button
Stop centrifuge
⑥Start button
Start the centrifuge to work
⑦Working indicator
Working status
⑧Stop indicator
Stop working status
⑨Speed/RCF screen
Can display the speed and RCF
⑩Time Screen
Can display time
P/R SPEED/RCF TIME
A 1 ※3100 04∶39
P/R
SEL
STOP
START

MEDREPPRO LLC
5
❖The parameters pre-selection
1) Set speed
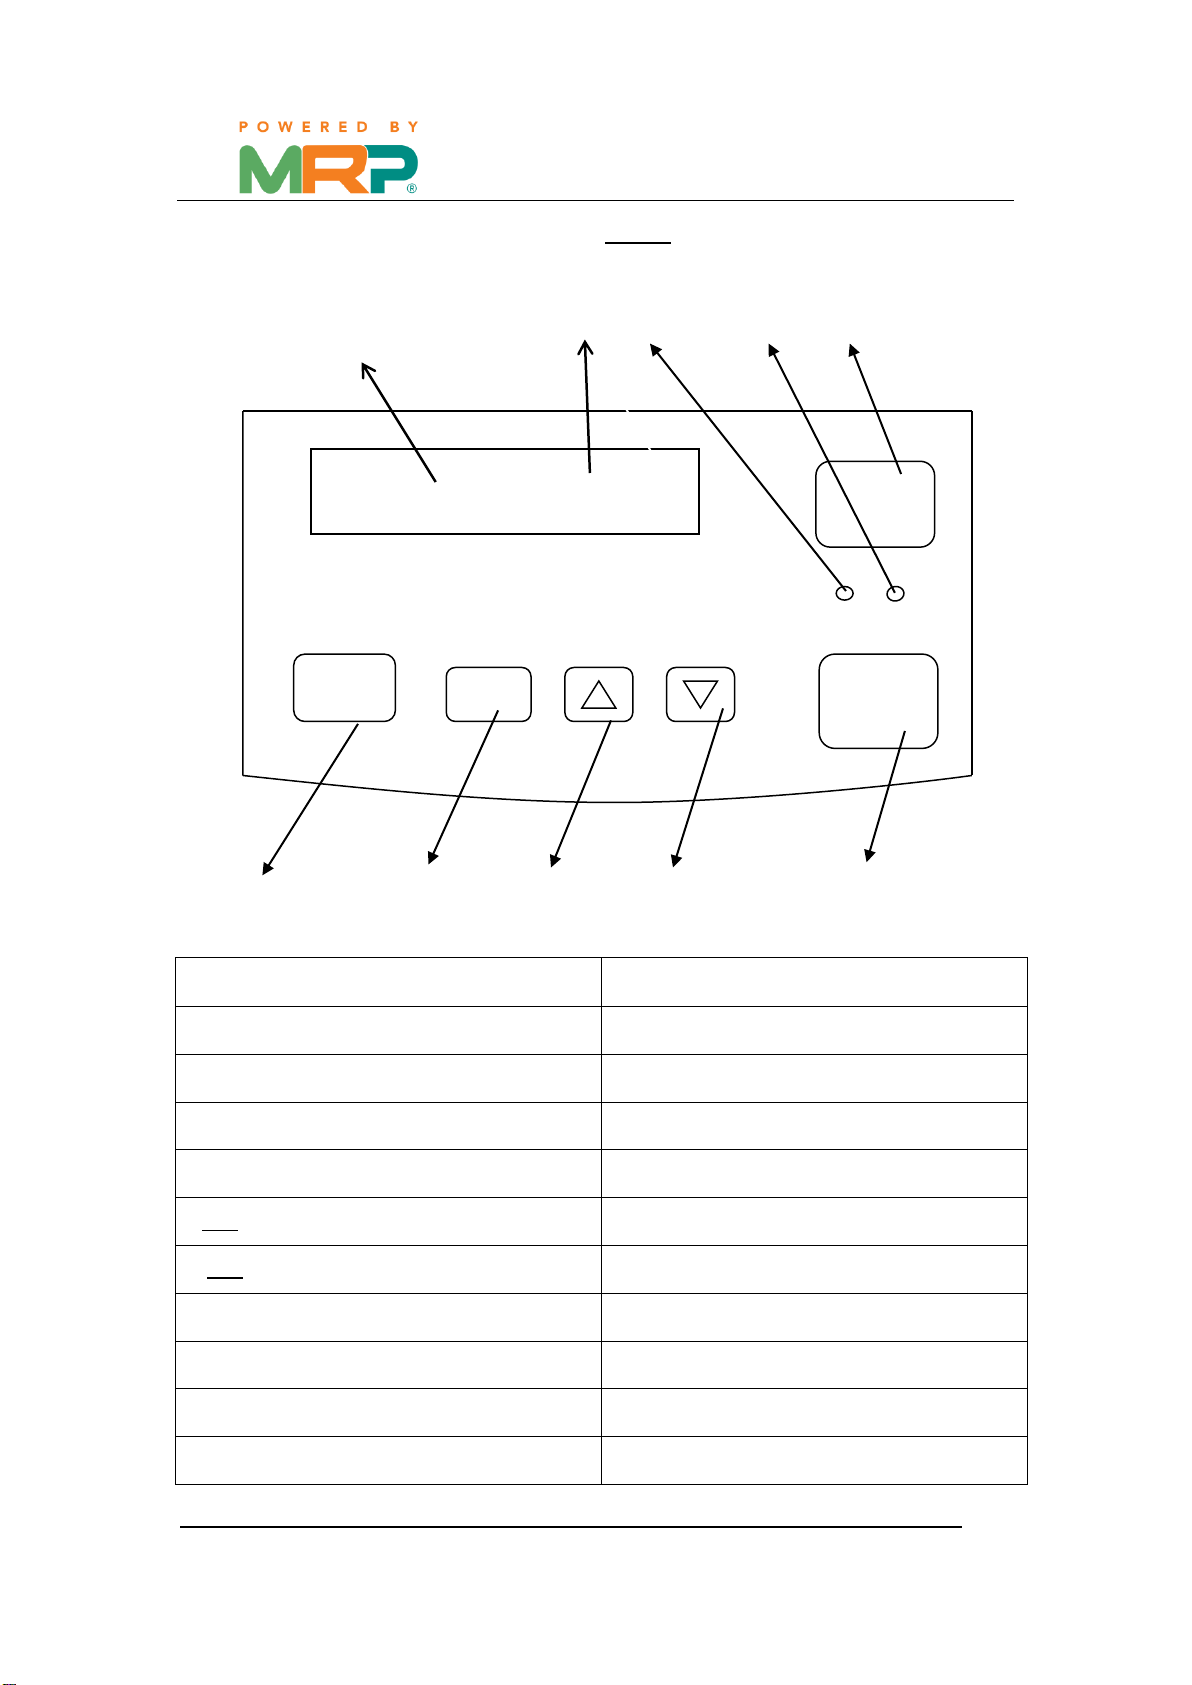
At first, Press ②“SEL” button, the position “A 1 ※3100” will be flicker in the
digital window⑨, then Press speed button③/④(▲/▼)to adjust the speed.
Range is 0rpm to 4000rpm. (rpm=rotations per minute).
2) Set the time
Press ②“SEL “ button until the position “ 04:39” will be flicker in the digital
window⑩, then Press time button③/④(▲/▼) to adjust the time. Range is 0 to
99 minutes.
3) Set the brake (acceleration and deceleration)
Press ②“SEL “button to hold seconds. The time window ⑩will show bX. Use
the button ▲/▼to set the brake rate. There are ten possibilities ranging
slowest to fastest from b0 to b9.
(PS: we will set suitable “b5 “before loading! So generally speaking, customers
don’t need to do this step again)
❖Start the centrifuge
Press the start button ⑥, the start indicator ⑦will be brighten,the centrifuge
starts to work,the speed window⑨will show the rpm and the time window⑩
begin to count down the remaining time. It takes about 1min for the centrifuge
to reach maximum speed.
❖Stop the centrifuge
When the centrifuge is finished or you push the STOP button⑤, the time
window will show 0, the stop indicator ⑧will brighten and the speed window

MEDREPPRO LLC
6
⑨will show 0. Open the lid and take out the tubes.
❖Open the lid
Take out the tubes, centrifugation finished.
❖Power off
Push the switch down. The display panel is off, but the whole machine is still
on. If the machine will not be used for a long time, unplug it from the wall.
❖Trouble shooting
Check that the machine is turned on! (The top part of the switch is pushed in).
Check the power connection and fuses in the machine. Replace if necessary.
If the centrifuge still doesn’t work, then please contact us. Unauthorized repair
attempts inside the machine will void the warranty.
❖Quality Warranty
1. We have one –year warranty on our machines.
2. Customers will only be charged for parts on repairs of machines older than
12 months.
3. We will respond to any troubleshooting or maintenance queries within 24
hours.
4. After the machine fixed, our professional technician will file it and keep track
of the usage of the machine.
Thank you!
Table of contents
Popular Laboratory Equipment manuals by other brands

Precisionary
Precisionary RF-800 user manual

Digitus
Digitus DN-651141 Quick installation guide

Benchmark
Benchmark Orbi-Shaker Operation manual

Thermo Scientific
Thermo Scientific Thermo Scientific SL16 instruction manual

Phoenix Instrument
Phoenix Instrument RS Series manual

Fortinet
Fortinet GPI-145 quick start guide

Oasis Scientific
Oasis Scientific Vividia M256Pro user guide

VERDER
VERDER Carbolite Gero HTMA 6/95 Installation, operation and maintenance instructions

Bruker
Bruker minispec TC3 user manual

Scilogex
Scilogex SCI-L180-E user manual

REPLIGEN
REPLIGEN TangenX PRO PD Compatibility guide

Thermo Scientific
Thermo Scientific IonPac CS16 product manual