MRP Ripper ST Installer manual

DJR,
lntroducti6n:
Thank you for purchasing this MRP product. This manual contains the steps and instructions required to assemble your car. Please
read this manual completely before attempting to start maintenance. Follow the directions in this manual closely to reduce problems
during operation. Have fun and enjoy the exciting world of R:/C.
No.6539M RP-F
The contents are subject to change without prior notice due to product improvements and specificatrion changes.
JD723-1MP

Thank you for your purchase of this MRP product. You should enjoy many hours of fun and excitement from this advanced RJC model. MRP strives to bring
you the highest level of quality and service we can provide. We race and test our cars around the world to bring you state-of-the-art products.
Please read all instructions and familiarize yourself with the systems and controls of this model before running. Have fun and enjoy the exciting world of R/C!
Thanks you for purchasing a MRP product. Please read all instructions thoroughly before operation.
1. This product is not a toy. lt is a high performance model product. lt is important to familiarize yourself with the model, its manual, and its construclion
before assembly or operation. Children's operating under the supervision of the adults is necessary.
2. Always keep this instruction manual ready at your hand for your assembling and operating reference, even after completing the assembly.
3. Do not operate model products in rain, on public roads, near crowds, near airport, or near areas with restricted radio operation.
4. This product, its parts, and its construction tools can be harmful to your health. Always exercise extreme caution when assembling and/or operating this
product. Do not touch any part of model that rotates.
5. Check your radio frequency with the proper operating frequency of the area or country. Always check if there are any modelers operating on the same
frequency as you are. Also, check your radio for proper operation before operating a model
6. Use an adequate charger for the batteries and follow the instruction correctly.
7. Right after use, do not touch equipment on the model because they may generate high temperatures!
8. Do not stall the motor. The ESC may fail if power is applied to the motor when car cannot move freely.
9. By the act of assembling or operating this product, the user accepts all resulting liability. lf the buyer is not prepared to accept this liability, then he/she
return this product in new, unassembled, and unused condition to the place of purchase.
WARNING: To avoid a possible fire hazard, ALWAYS unplug the battery after use.
Do NOT leave your vehicle unattended with the battery plugged in.
INTRODUCTION D 1 DRIVING BASIC D4.
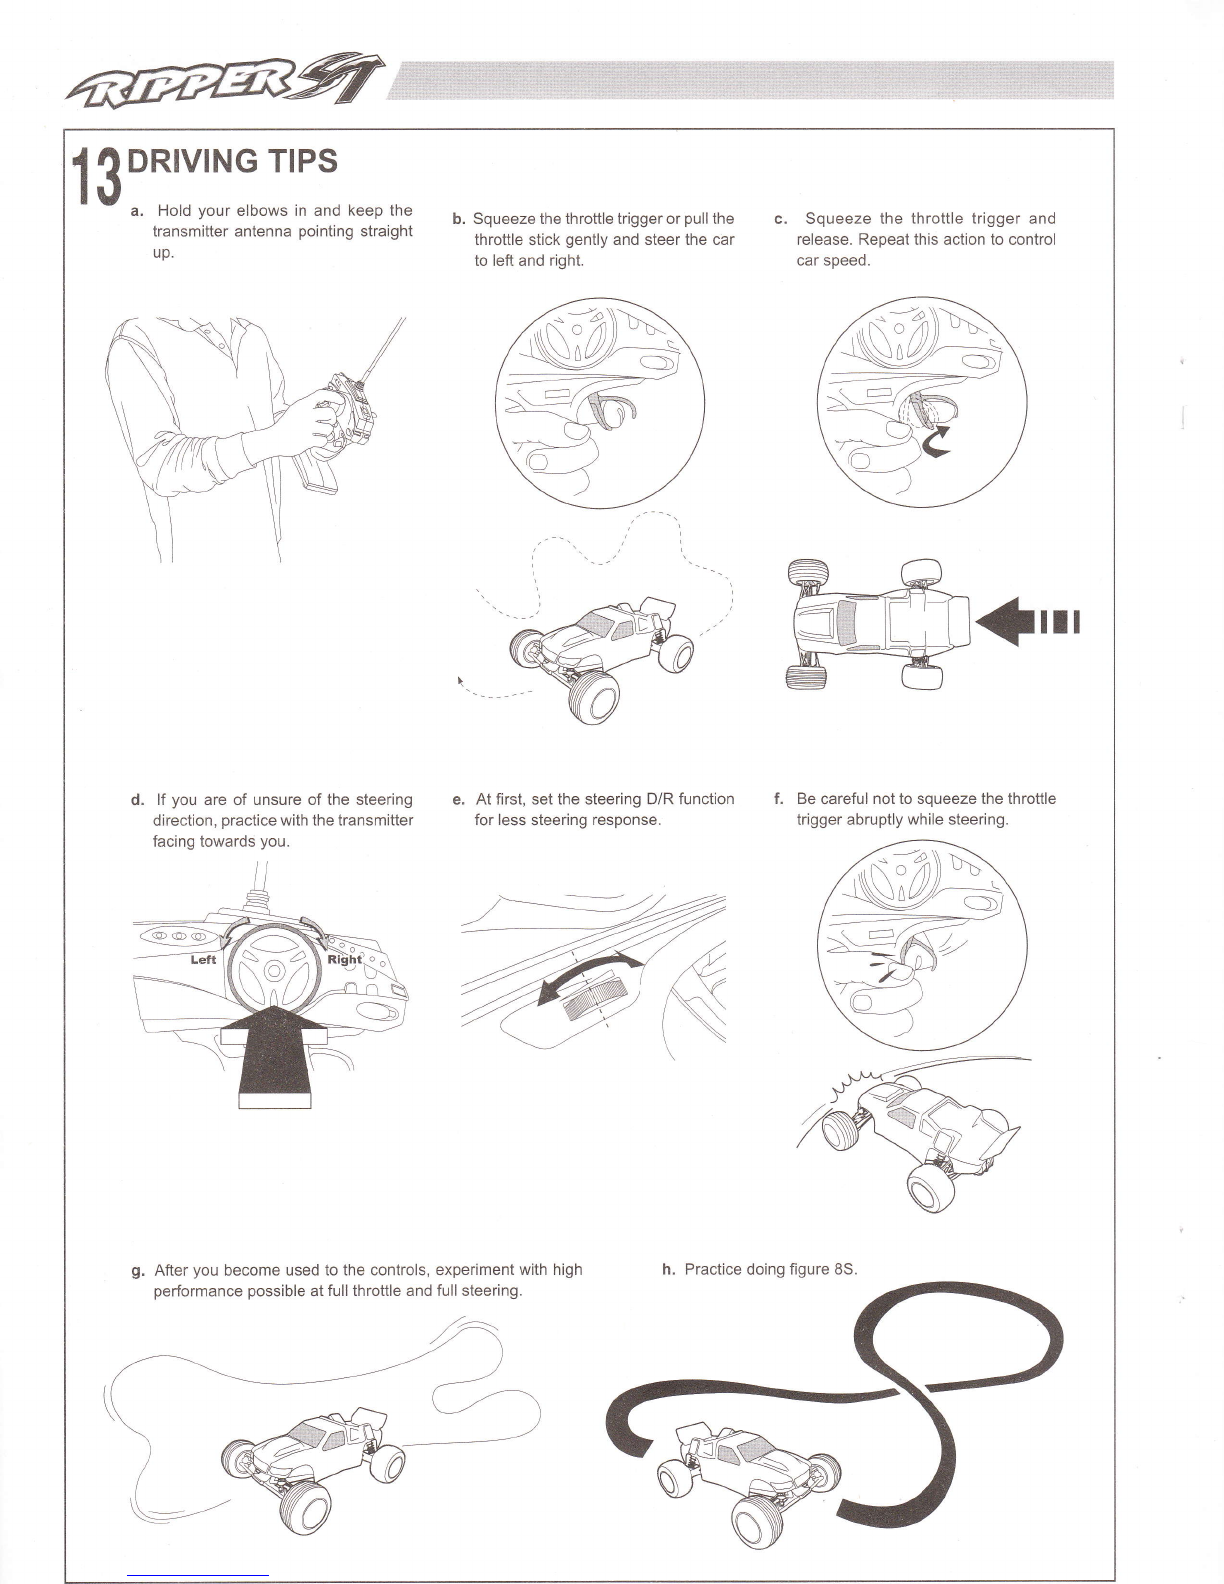
CAUTION D,I DRIVING TIPS D5
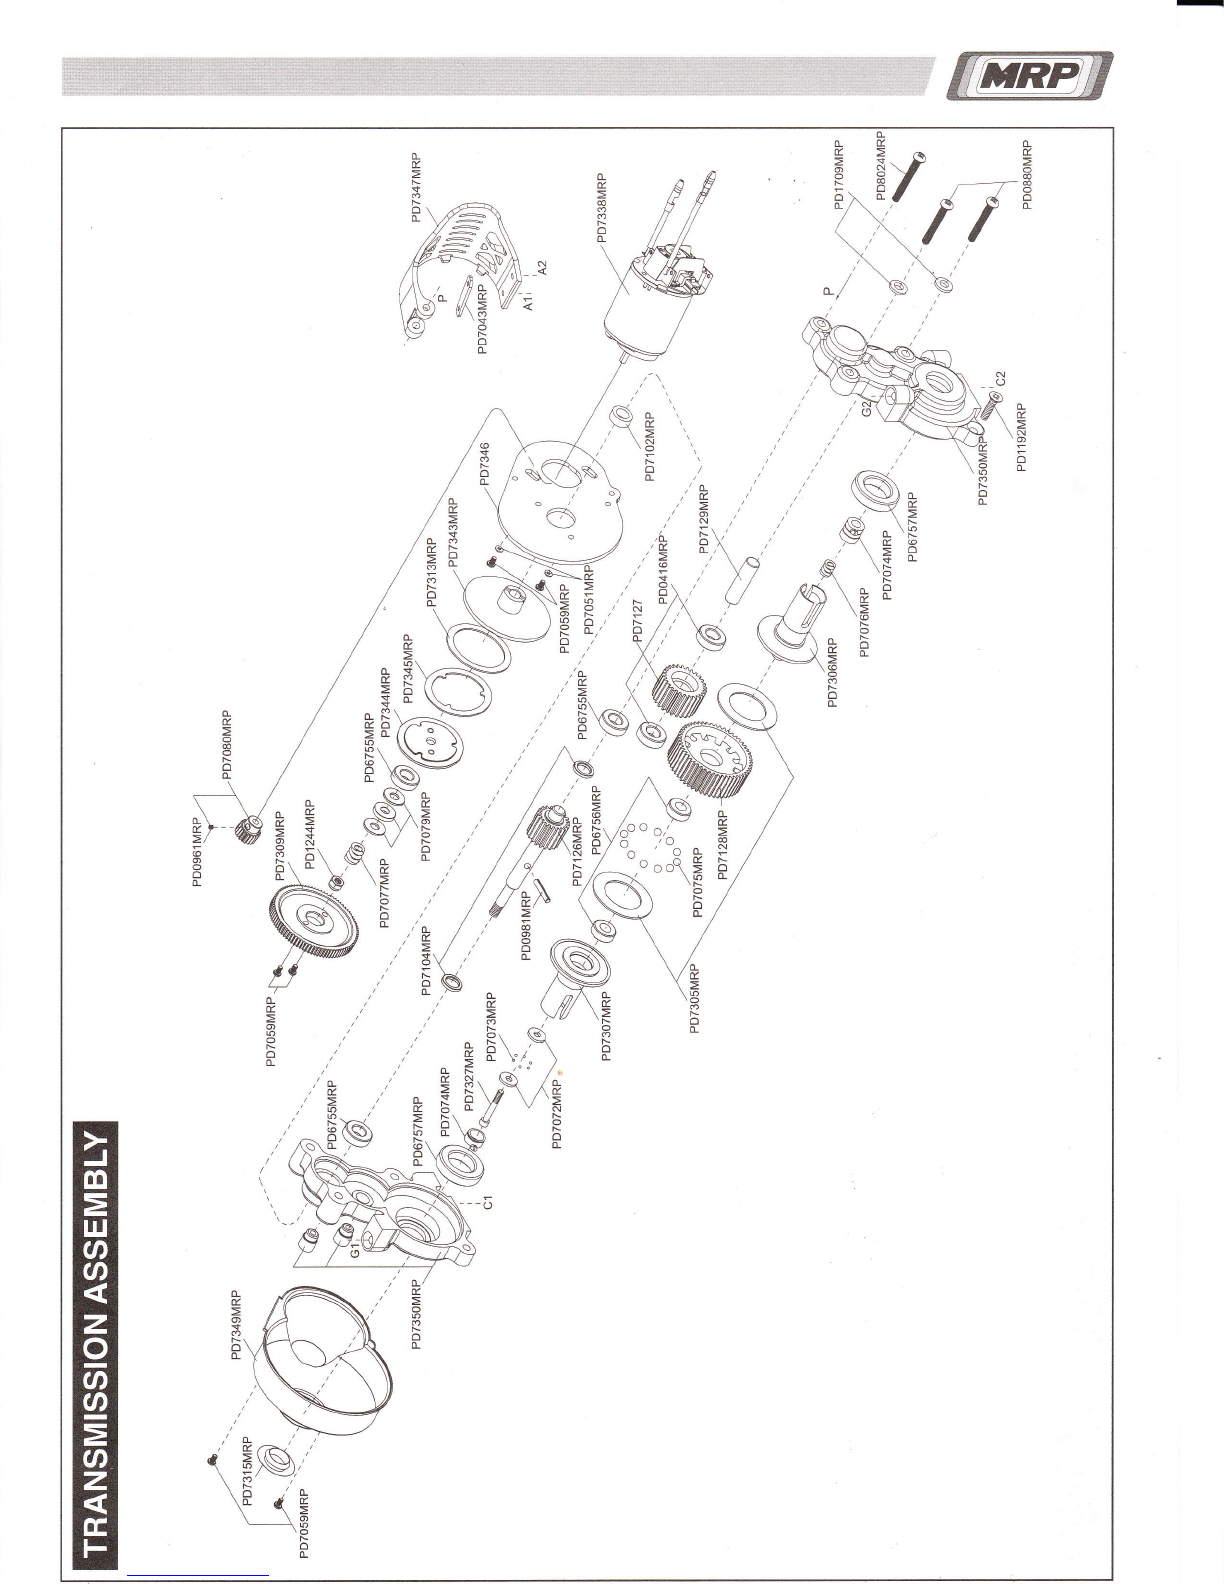
ITEMS REQUIRED FOR OPERATION D 1 TRANSMISSION ASSEMBLY D6
CHARGING THE BATTERY PACK D2 CHASSIS ASSEMBLY D7
PREPARING THE CHASSIS D2 SERVO SAVER ASSEMBLY >>7
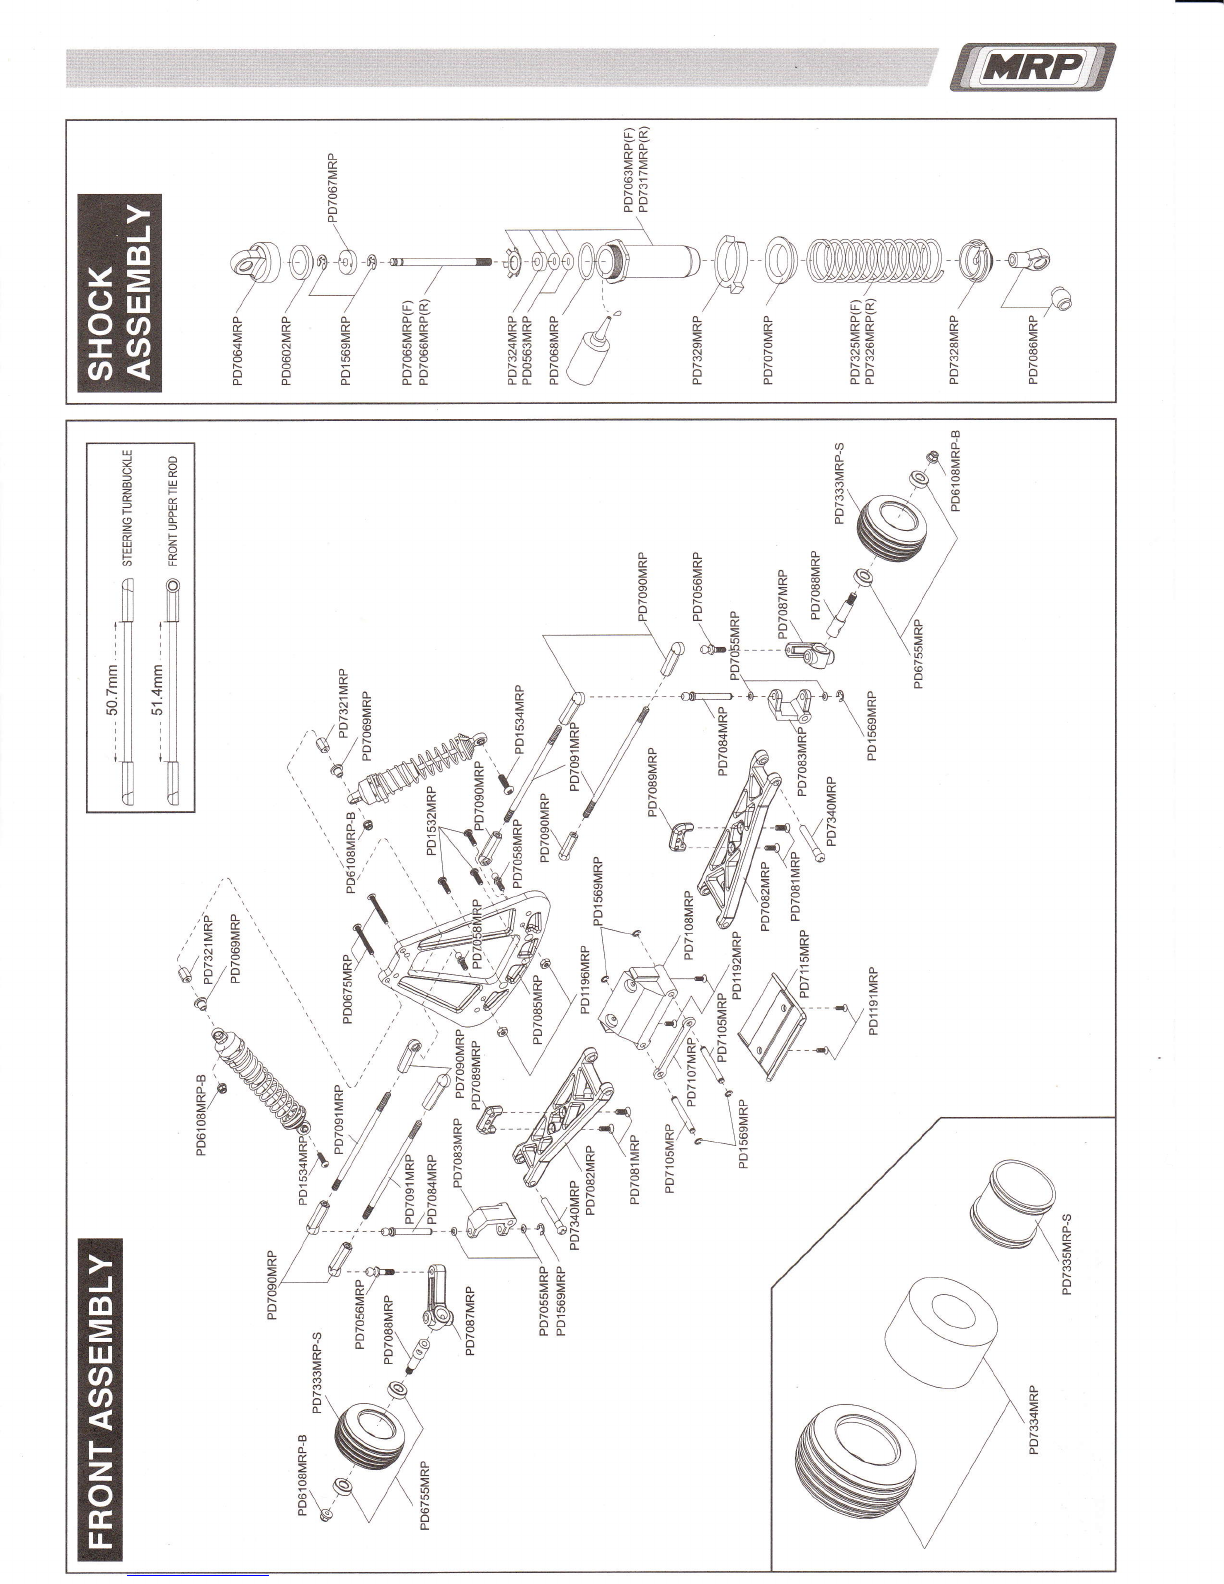
PREPARING THE RADIO D2 FRONTASSEMBLY DA
RADIO BATTERY INSTALLATION D2 SHOCKASSEMBLY )>A
RADIOOPERATION D2 REARASSEMBLY D9
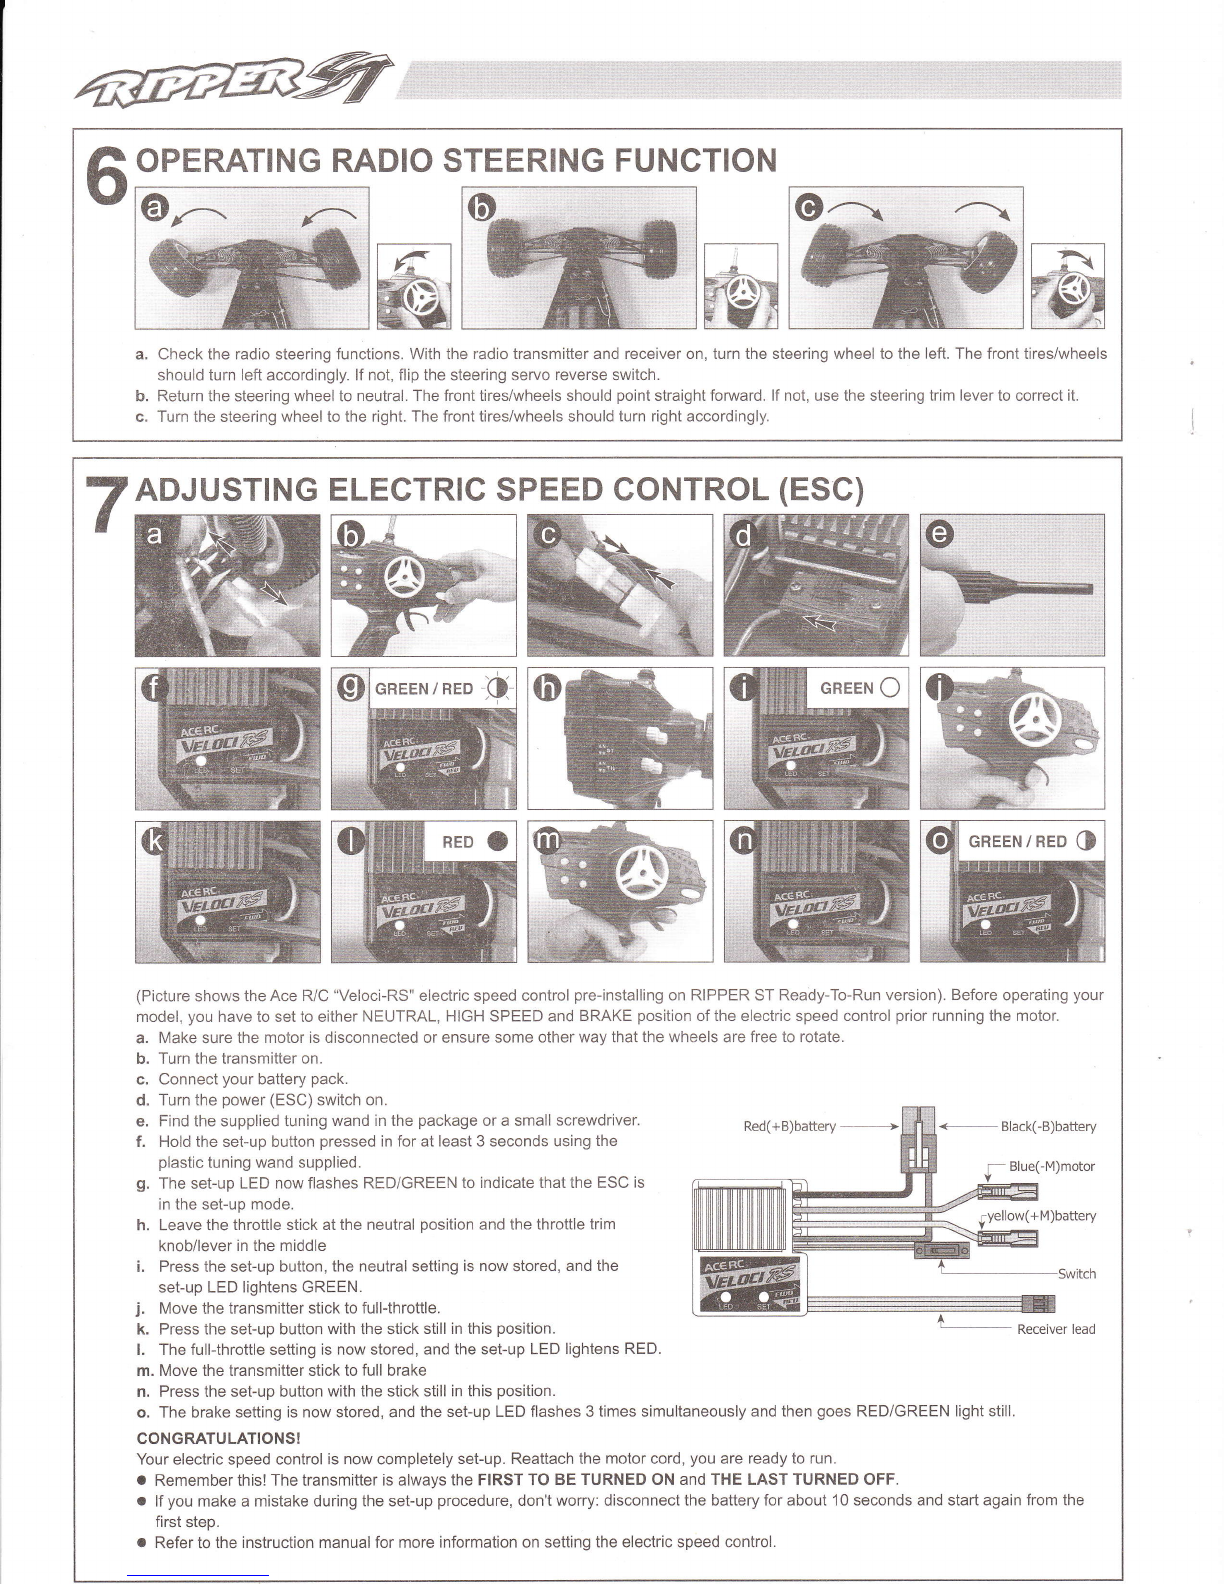
OPERATING RADIO STEERING FUNCTION D3 RIPPER ST PARTS LIST D,1 O
ADJUSTING ELECTRIC SPEED CONTROL(ESC) DB RIPPER ST SPARE PARTS LIST D 14
VELOCI SPECIAL FEATURE D4 RIPPER ST OPTIONAL PARTS LIST D 16
SHOCKADJUSTMENT D4 TROUBLE SHOOTING
WHEELAND TIRE PREPARATION D4 QUICK START GUIDE
MAINTENANCE AFTER RUNNING D4
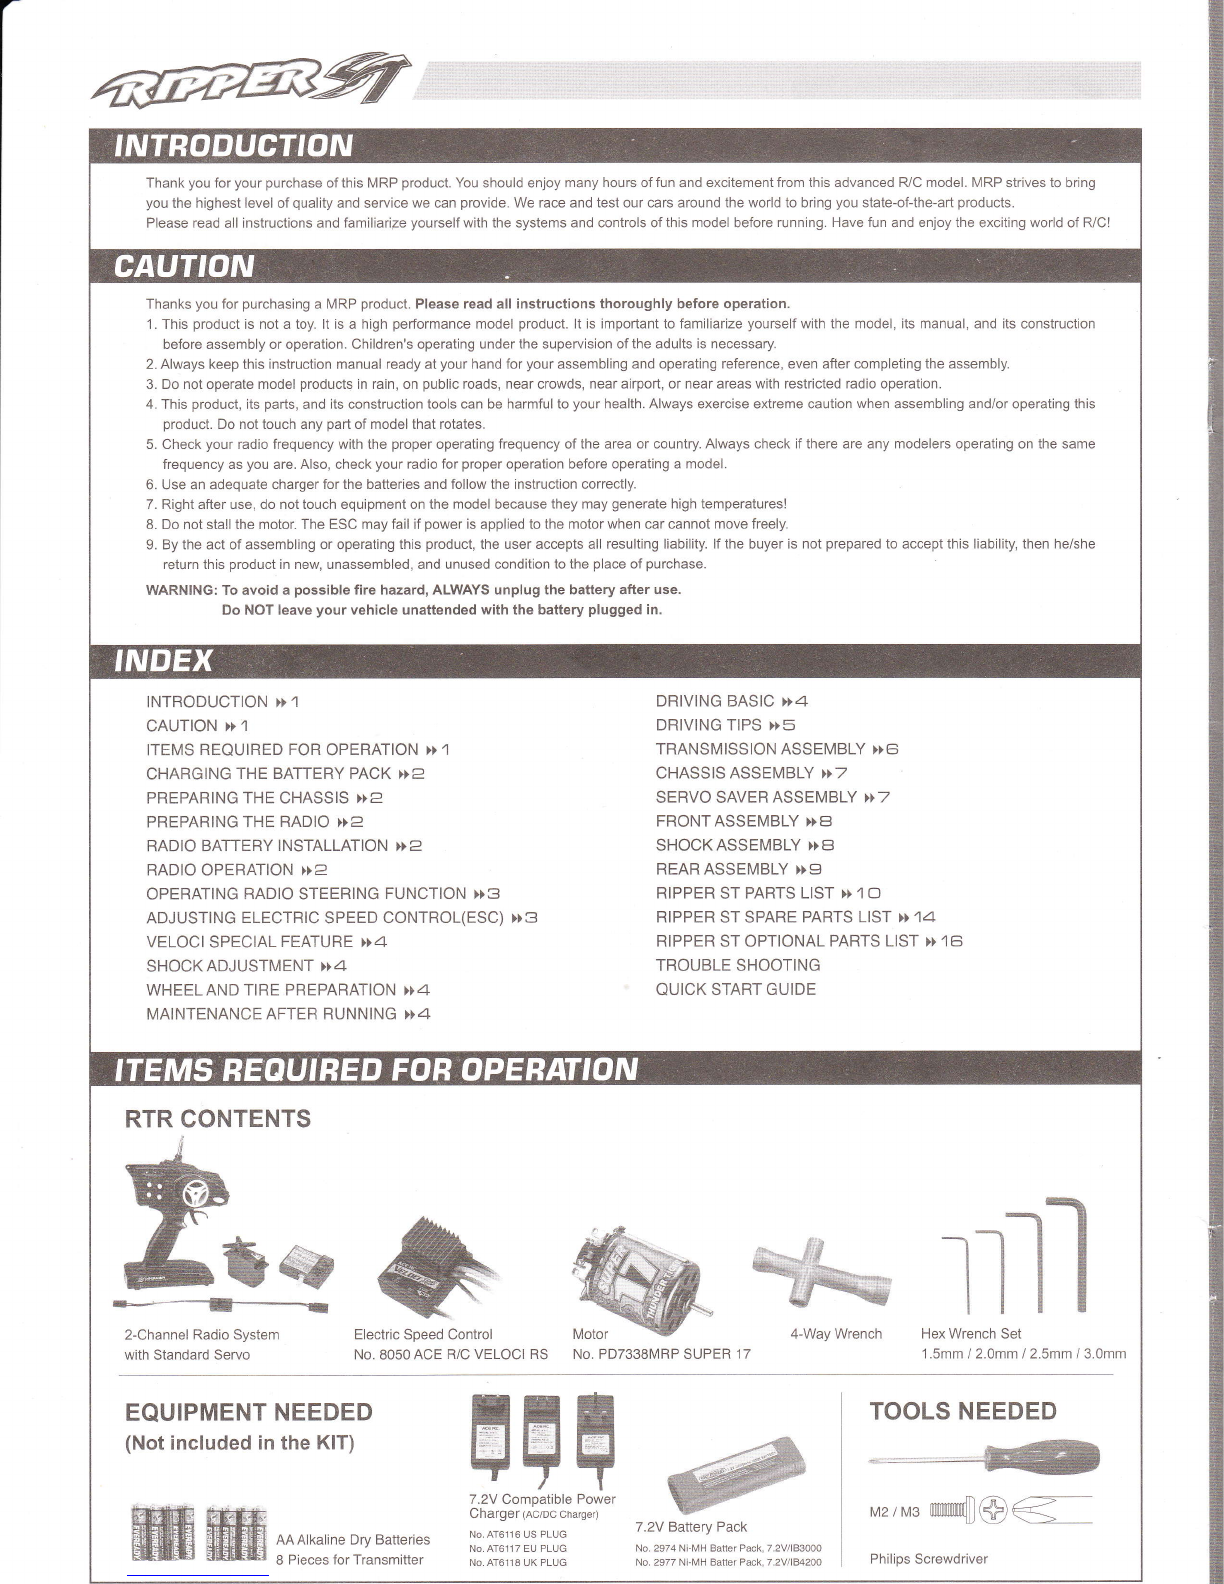
RTR CONTENTS
2-Channel Radio System
wiih Standard Servo Electnc Speed Control
No. 8050 ACE R/C VELOCI RS No. PD7338MRP SUPER 17 Hex Wrench Set
'1.5mm / 2.Omm / 2.5mm / 3.0mm
EQUIPMENT NEEDED
(Not included in the KIT)
II;
Er.a
-
a.-,_-rI I :. jjt l$::,.1
HU II
--r- | I
7.2V Compatible Power
Charger (Ac/Dc charge0
No. 4T61't6 US PLUG
No AT6117 EU PLUG
TOOLS NEEDED
M2lM3nltolmmfrfl@<
7.2V Battery Pack
No. 2974 Ni-NrH Bater Pack, 7.2Vl183000
No. 2977 Ni-N,4H Batler Pack,7.2V/IB420O

EW
CHARGING THE BATTERY PACK
(Battery and Charger are not included in the kit.)
1. When charging the battery, first plug the battery pack into the
charger, and then connect the charger to the AC wall ouilet.
2. Once the charger is connected, a red LED will light up to
indicate that the charging has begun. The LED will light up
green to indicate that charging is completed.
3. When finished charging, first disconnected the charger from the
AC wall outlet. Disconnect the battery pack from the charger.
Install the battery pack on your vehicle.
ATTLR ChAR6ING IS
CO\,lPLlrF llED.
Cliii:N), D I StON f,lECT
T}.]E SATTTRY TRCM THF
crARcril.
&
ar
3
&xrIUG SATT'RY PAiK
INT' THT 'HAi1GTR,
I'LUG II"I'IC AC OUTLFT
tLFD WILL LIGHi RrO)
PREPARING THE CHASSIS
Remove the body pins (3pcs.) and detach the body.
Straighten antenna with a screwdriver so it is eaiser to insert into antenna tube.
Put the antenna wire through the antenna pipe. ( Do not cut or shorten antenna wire.l) Push the antenna pipe into the chassis
mount hole.
a,
b.
c.
PREPARING THE RADIO Install the antenna into transmitter. Check the frequencv printed
on the transmitter crystal.
Check the frequency printed on the receiver crystal, and make
sure it matches with the transmitter crystal. Make sure no one
will operate on the same frequency when you are. When there is
a radio gliich, it will most likely be caused by improper crystal,
damaged crystal, or people operating on the same frequency.
RADIO BATTERY I NSTALLATIONa. lnstall B AA-size alkaline batteries into transmitter.
b. Install the power pack and connect to the ESC.
Gaution: Gheck all the wiring and connections before you
connect the speed control to a drive battery. Incorrect
polarity will wreck your speed control.
RADIO OPERATION
rylff
a. When turning radio on, first turn on the transmitter.
b. Then, turn on the ESC. When turning off, first turn the ESC off, then the transmitter off.
c. To reverse the functions of servos, use the small, white servo reverse switches located on side of the pistol transmitter. To trim the
servos on pistol transmitter, use the trim switches on side of the steering wheel
Caution: Do not run flat the battery of your transmitter in case of losing control of the car. For more details, please check the
transmitter instruction manual.

OPERATING RADIO STEERING FUNCTION
b.
c,
Check the radio steering functions. With the radio transmitter and receiver on, turn the steering wheel to the left. The front tires/wheels
should turn left accordingly. lf not, flip the steering servo reverse switch.
Return the steering wheel to neutral. The front tires/wheels should point straight forward. lf not, use the steering trim lever to correct it.
Turn the steering wheel to the right. The front tires/wheels should turn right accordingly.
ADJUSTING ELECTRTC SPEED CONTROL (ESC)
F
(Picture shows the Ace R/C "Veloci-RS" electric speed control pre-installing on RIPPER ST Ready-To-Run version). Before operating your
model, you have to set to either NEUTRAL, HIGH SPEED and BRAKE position of the electric speed control prior running the motor.
a. Make sure the motor is disconnected or ensure some other wav that the wheels are free to rotate.
b. Turn the transmitter on.
c. Connect your battery pack.
d. Turn the power (ESC) switch on.
e. Find the supplied tuning wand in the package or a small screwdriver.
f. Hold the selup button pressed in for at least 3 seconds using the
plastic tuning wand supplied.
g. The sef up LED now flashes RED/GREEN to indicate that the ESC is
in the setup mode.
h. Leave the throttle stick at the neutral position and the throttle trim
knob/lever in the middle
i. Press the sefup button, the neutral setting is now stored, and the
set-up LED lightens GREEN.
Red(+B)battery-
yellow(+M)battery
Move the transmitter stick io fullthrottle.
Press the set-up button with the stick siill in this position.
The fullthrottle setting is now stored, and the set-up LED lightens RED.
Move the transmitter stick to full brake
Press the set-uo button with the stick still in this position.
The brake setting is now stored, and the set-up LED flashes 3 times simultaneously and then goes RED/GREEN light still.
CONGRATULATIONS!
Your electric speed control is now completely set-up. Reattach the motor cord, you are ready to run.
. Remember this! The transmitter is always the FIRST TO BE TURNED ON and THE LAST TURNED OFF"
o lf you make a mistake during the sef up procedure, don't worry: disconnect the battery for aboui 10 seconds and start again from the
first steo.
o Refer to the instruction manual for more information on setting the electric speed control.
+BlackcB)battery
J Blue(-lvl)motor
L Receiverlead
I.
k.
t.
m.
n.
o.

$ *x'WX W
CD VELOCI SPECIAL FEATURE
/Fl
t7 The VELOCI digital speed controls feature a new overheat protection function. This function protects the VELOCI against overheating
during operation. lf the speed controls temperature exceeds safe levels, the motor function will be temporarily switched off. However, full
steering function is still maintained during this period. When the overheat protection mode is activated, the setup LED will flash GREEN
and RED simultaneously. Simply wait a few minutes to allow the speed control to cool down to normal operating temperatures and full
function will be restored.
Overheating may be caused by the following:
a. Driving in reverse in excess of B seconds.
b. The motor used has less than factory limit of turns.
c. Gear mesh is too tight or other drivetrain problems.
d. Inappropriate gear ratios.
e. Repeatedly going from full reverse to full forward instantaneously.
f. Using full brakes too often.
g. Not enough ventilation to the speed control.
SHOCK ADJUSTMENT ,,,\?j R-,
0. ))
\\..-///
------,+=a-
4mm 'f-H r--
---T -
Hard Suspension {lrr lilr> Soft Suspension
Use the included shock clips to adjust for spring pre-load.
10WHEEL AND TIRE PREPARATION
a.
b.
c,
Remove wheel cap crew using equipped 3mm hex wrench and detach wheels.
Replace fresh tires and wheels if the original tires worn out seriously.
Tighten the wheel cap screw down with the washer.
11 MAINTENANCE AFTER RUNNING
a. Always turn off the radio system and disconnect the battery pack when the car is not in use.
b. Remove the sand, mud, dirt, and any other elements completely from the car before you store it.
c. Never use chemicals or any solvents to clean the chassis as it may cause damage to the electronics components and plastic parts
as well. Use compressed air, soft paintbrush, or toothbrush to clean dust and dirt.
l.;fi)-uN
Sry--r--
Stop (Neutral) Brake Reverse Acceleration

,,*tXi,,}*.*X,X,Xi:,XXX,,Xi,lllXr*,i
1? DRTVTNG T|PS
V a. Hoto your elbows in and keep the
transmitter antenna pointing straight b. Squeeze the throttle trigger or pull the
throttle stick gently and steer the car
to left and rioht.
c. Squeeze the throttle trigger and
release. Reoeat this aciion to control
car soeeo.
{rl
d. lf you are of unsure of the steering
direction. practice with the transmitter
facing towards you.
At first, set the steering D/R function
for less steering response. f. Be careful not to squeeze the throttle
trigger abruptly while steering.
After you become used to the controls, experiment with high
performance possible at full throttle and full steering. h. Practice doing figure 8S.
?

c
[tr(L
t>,qt
€ dr €
* At
F^ dl a (q F
- f /:
\, \,
,,\ ,\
L
E
N
.o
o
I
0
t
N
N
o
c
ooI
aE
o\=
N
o
c
L
tr
o
N
o
c
c
t
r
o
L
c
t
N
@
o
L
I
E
@
N
o
(L
L
d
N
N'
o
L
L
t
N
F
L
p
/V
6
N
-\L
L
tr
o
ts
o
I
o
t
o
o
0-
o
E
@
o
o
0
"?,
oo
I
x
o
o
I
,, l
/&
r
o
L

,ix
L
t
N
o
0
L
t
r
o
c
&
t
o
L
o
u
N
o
L
c
E.
N
ts
o
L
L
d
N
o
c
D------
c
t
o
o
I
o
tr
N
N
o
I
c
&
N
N
o
L
d
r
o
LL/
e
o

,xx.WXXlxeXiX,XX*X,x x,iXi,xXX,XlXrx**xXXXXXii:t*l:X$x*Xt*,:li WK
Lt
Ic
dt
oo
NN
oo
OL
c
ct
ts
@
N
o
c
\\
-,4\\ \ ,A\ \
(Ail\\ l())6t {o)) fi) or -
\a/)t I \\Jt/ / \-),/ '
-}uY/ */ /
/ // / /
/ /--a L_t
L L C LL
t d d tt
$ N O O@
@ o @ @@
o @ o oo
F O S NN
o o o oo
c [ [ c[
,E_ /^
frFt ,,a\ /,/hnY^?^nhV?mqn' ffi' - --r
(((//I ((f )]) ((U,U,\!,ryl],U,ry,ry,1\/,{r"'" 111911 a@
uvu \-J/ \\>yryggggga'42/ .v /
/n / / / F,
//ca/t-}@
c id L t/
t tt d t
N NN N €
o oo o o
ts FF N N
o oo o o
C CL I L
-n
/9
l/
[[ [
tso F
oo o
cc &
/F*NNW
dN*e E
6',KX
Er ' ;x") L
E
8r ,e
o t/!
Ls
,L o-"
,'= B .,
r' ,$ 8
dh,uF
q
L
t
€
,/f,
/o
/L
ffi_ex
?'' p &3a
co \.
d_n
>/
@
o
c
o
r
o
&v/ql
' \./ c
^ \(
rC
\> :
I
o
@
o
,"// //B a F W'rE '=
t //iA R,, q &H E
v I F,F |f, \=3 r
-------aE- q w w'qqSI
n \ \\.
U us- - ga -**
,,4
V\ a
A
t
N
o
I
dtx
rN
t/ t
,n \-------\ \ "
g--€er----m c L
- */ lilll . gg
= * llH s EB
p; @'F nn
A =\ \N
'E\1V o-'
t17
/
G
\K 6\, \
w/_
a /\;
r-\ / \o
' \ / \ts
( \/ @
t \/ n
c
N
o
A

i
o
o
d
N
N
o
I
F
o
*r ^0
\ ,/Y
"1 /
* ,1/
=t9
@</
ov
@p
t //
= \//
6 //
a//
\//
\dV
\:l
_&
V\
L
tr
o
G
L
t
N
N
o
L
t .)A
>/ \\
;\\
o
L
i\,/
u
c
\>
o
o
o
I
t
N
N
r/
ol
L,'
@
I
tr
r
o
c
\r
L
o n \\
N E\X
R;\
F\
6\
o\
LO\
d(s
>.Y
8r L)
6 F \ //
p a \ //
= tv/
ts J/
o6Y
\B^
\ l&*',l
\A-l
//
//
/
\:sL
nqN- d
\WA-
/r84. / \/ t
FF, r X / o
.l B/ [
( , ,3,7
'.A u\
g( b /
L/A /
>/ \ /
ts\/
x &\/
r
@
o
L
6
L
tr
@
o
I
['
tr
@
N
I
\
L
E
F
I'
I
d.
@
o
o

f/--\\
t\ /)
1:=7
(1 0) ,l!
m
'i/
(20)
at
I
a
aa
PDO602MRP
1/B SHOCK DIAPHRAGM
PD6758MRP-R
PAINTED BODY (RED)
PD7048MRP
DOUBLE SIDE TAPE
PD7063MRP
FR MOLD SHOCK BODY
PD7067MRP
SHOCK PISTON
PD7076MRP
DIFF THRUST SPRING
PD1983MRP
ANENNA BAG, 1/8
PD6759MRP
FR SPRINGCLEAR BODY WDECALS
PD7O55MRP
NYLON SPACER, 1/32"
PD7064MRP
SHOCK CAP
PD7069MRP
SHOCK BUSHING
PD7077MRP
TOROUE CONTROL SPRING
PD6108MRP-B
NUT M3 PLASTIC
P676OMRP
DECALS
PD7O56MRP
SHORT BALLSTUD
PD7065MRP
FR SHOCK SHAFT
PD7079MRP
BEARING WASHER
PD6758MRP-B
PAINTED BODY (BLACK)
PD7O43MRP
TOP SHAFT SPACER
PD7058MRP
LONG BALLSTUD
PD7066MRP
RR SHOCK SHAFT
PD7074MRP
DIFF BOLT&LOCKING
PDTOSOMRP
PINION GEAR. 187
@@@@
@@@@
@@@
@@@
@@
8B gg
gg
oooo
oooo
osoo oo
oo @@
@@
PDTOTOMRP
SPRING COLLARS
@
@@ Ss
@G\
\-\\ o\)
\l
/{.---)\
(1 0)
t! tl
/i>-
q@ @

ffi &ffi
6€
9999
WM@W
oo oo
\(12)
PD7O82MRP
FR SUSPENSION ARMS
PD7086MRP
PLASTIC BALL & EYELET
PDT09OMRP
BALLSTUD CUPS
PD7095MRP
STEERING SERVO MOUNT
PD7099MRP
RR HUB CARRIER
PD7107MRP
CROSS BRACE
PD7O83MRP
FR BLOCK CARRIER, 30"
PD7087MRP
FR STEERING BLOCK
PD7O91 MRP
TURNBUCKLE
PD7095MRP
RRARM & SHOCK MOUNT
PD7102MRP
MOTOR PLATE GASKET
PD71O8MRP
FR BULKHEAD
PD7084MRP
KINGPIN BALLSTUD
PD7O88MRP
FR AXLE. ALUMINUM
PD7093MRP
FR BODY MOUNT
PD7097MRP
RR SHOCKTOWER
PD7103MRP
STUB AXLE
PD7109MRP
FRONG TOP PLATE
NN
PD7085MRP
FR SHOCK TOWER
PD7089MRP
FR ARM SHOCK MOUNT
PD7O94MRP
BATTERY STRAP
PD7098MRP
RR DOGBONE
PD71OsMRP
FR INNER HINGE PIN
PD7111MRP
MOUNTING PIN
\\\ \\\
\\\ \\\
8E
\\ Q
&ffi (/n)
\!/
(10)
h\
\ /-\
h\ Xd
\ /'\
\@\
\@/
b
?*z
a!

$$
PD7112MRP
STEER DRAG LINK
PD7117MRP
BATTERY BLOCK
PD7129MRP
IDLER GEAR SHAFT
PD7142MRP
CHASSIS PLATE
PD73O7MRP
RT DIFF DRIVE
PD7113MRP
SERVO LINK CUP
PD7126MRP
DRIVE WGEAR/SHAFT
PD7130MRP
CHASSIS SET
PD7143MRP
STEERING SERVO HORN
PD7308MRP
IRANNY BRACE
PD7115MRP
FR BUMPER
PD7127MRP
IDLER GEAR
PD71 31 MRP
RR HUB HINGE SCREW
PD7305MRP
DIFF DRIVE RING
PD7309MRP
SPUR GEAR/877
PD7116MRP
BATTERY PADS
PD7128MRP
DIFF GEAR
PD7132MRP
RR HINGE SCREW
PD7306MRP
LT DIFF DRIVE
PD7313MRP
CLUTCH DISC
2
e'e/
6S@
@@67
EB
PD7317MRP
\
Qww
\
2
tttt'
#'.7
,/ /-
6/
@
@
PD7315MRP
@@
PD7321 MRP
ty/
(10)
PD7324MRP

€€ €€
q--..
-%
(10)
-
@w ,.^
,.A //A\\
@w
PD7325MRP
FR SPRING
PD7329MRP
PRELOAD SPACERS
PD7333MRP.S
FRONT WHL & TIRE
PD734OMRP
FR HINGE SCREW
PD7344MRP
TOROUE HUB. OUTER
PD7349MRP
PD7326MRP
RR SPRING
PD733OMRP-S
REAR WHL & TIRE
PD7334MRP
FRONT TIRE & INSERT
PD7341MRP
SERVOARM & BUSHING
PD7345MRP
SLIPPER RING
@@
@@
\___i \=,
PD7327MRP
DIFF THRUST BOLT
PD7331 MRP
REAR TIRE & INSERT
PD7335MRP-S
FRONT WHEEL
PD7342MRP
FRONT KICKUP
PD7346MRP
MOTOR MOUNT
PD0673MRP M3x20 (20)
PD0675MRP M3x25 (20)
BT M. SCREW
@@
PD7328MRP
SPRING CUP
PD7332MRP-S
REAR WHEEL
@@ @@
gg @@
@8
ee88
PD7338MRP
540 MOTOR
PD7343MRP
TORQUE HUB, INNER
PD7347MRP
MOTOR COVER
PD0972MRP M4Z(20)
PD1244MRP M3B (10)
LOCK NUT
ffiffir
PD7350MRP
g I PD0961MRP M3x3B(20)
v I PD1961MRP M3x12B(20)
SET SCREWS
^ I PD0563MRP d2.8x6.6 (10)
(9 | poogzstr,tRP o2.sx1.9 (20)
PD7068MRP A9.5x1.2 (20)
O-RING
NNNN
NNNE
NNNN
G@GG @@
4
{.a
@' @
@@Rt))I)N
g

2\PD0981MRP a2x10 (20)
v I PD7101MRP 01 .6x9.5 (10
SPRING PIN
/--\ | PD7073MRP O5t64" (20)
J I eozozsrilne o3t32" (20)
DIFF THRUST BALL
p | ,or'or*p M3x12s (20)
SK H.M-SCREW
@ | tot'tnutRP M3B (20)
NUT
@l eoz onuae 2.24x6. 1 5x0.9 (1 o)
v I PD7100MRP 4.79x6.98x2.5 (20)
PDI 709MRP 3x6x0.5 (20)
PD7051 M RP .260x.117 x.0 1 s (20)
PD7104MRP 4.85x7.15x1.1 (10)
PD7322MRP 3.3x6.3x1.6 (1 0)
WASHER
@ | eorsosrv Rp azsmm (20)
E-CLIP
R\PD1713MRP o1xR4
BODY CLIPS
^ | PD0416MRP 5x10 (2)
(A I pD'tssMRp 3/8x3/16 (4)
\(7 | PD6756MRP 5t32x5t16 (2)
PD6757MRP 3/8x5/8 (2)
BEARING
RIPPER ST SPARE PARTS LIST
PD1'191MRP M3xBB (20)
PD1192MRP M3x10B (20)
PD1673MRP M3x168 (20)
PD7081MRP M3x128 (20)
PD7323MRP M3.5x2.25 (20)
PD7945MRP M3x6B (20)
CTPM,SCREW
(@)
M
v
v
v
PD0880MRP M3x25B (20)
PD1532MRP M3xBB (20)
PD1533MRP M3x10B (20)
PD1534MRP M3x12B(20\
PD7059MRP M3x5B (20)
PD8024MRP M3x28B (20)
BT PM. SCREW
PART# DESCRIPTION NOTE
PDO416MRP BEARING (2), M5x10
PDO563MRP O-RING (10), d2.8x6.6mm
PDO6O2MRP 1/8 SHOCK DTAPHRAGM (10)
PD0673MRP BT M. SCREW (20), M3x20
PDO675MRP BT M. SCREW (20\,M3x2S
PDO8SOMRP BT P.M. SCREW (20), M3x25
PDO961 MRP SET SCREWS (20), M3x3
PDO972MRP LOCK NUT (20),M4
PDO975MRP o-RING (20), A3
PDO98,l MRP SPRING PIN (20), 2x1Omm
PD1191MRP CTP.M.SCREW (20), M3x8
PD1192MRP CTPM.SCREW (20), M3x10
PD1196MRP NUT (20), M3
PD1244MRP LOCK NUT (10), M3mm
PD1532MRP BT P.M. SCREW (20), M3x8
PD1533MRP BT P.M. SCREW (20), M3x10
PD1534MRP BT P.M. SCREW (20), M3x12
PD1569MRP E-CLIP (20), 2.5mm
PD1673MRP CT P.M. SCREW (20), M3x'16
PD17O9MRP WASHER (20),3mm
PD1713MRP BODY CLTPS (20)
PD1961MRP SET SCREW (20),M3x12
PD1983MRP ANENNA BAG, 1/8
PD6108MRP-B NUT M3 PLASTTC (20)
PD6755MRP BEARING (4), 3/1 6"x3/8"
PD6756MRP BEARING (2),5/32x5t16
PD6757MRP BEARING (2), 3/8"x5/8"
PD6758MRP-B PAINTED BODY (BLACK)
PD6758MRP-R PAINTED BODY (RED)
PD6759MRP CLEAR BODYWDECALS
PD6760MRP DECALS
PD7043MRP TOP SHAFT SPACER
PD7048MRP DOUBLE SIDE TAPE
PD7O51 MRP WASHER #4 (20)
PD7055MRP NVI nNl qpAatra t1n\ lta.j
PART# DESGRIPTION NOTE
PD7O56MRP SHORT BALLSTUD
PD7O58MRP LONG BALLSTUD
PD7O59MRP BT P.M. SCREW (20), M3xs
PD7063MRP FR MOLD SHOCK BODY
PD7O64MRP SHOCK CAP
PD7065MRP FR SHOCK SHAFT
PD7066MRP RR SHOCK SHAFT
PD7O67MRP SHOCK PISTON
PD7068MRP BLACK O-RING (20)
PD7O69MRP SHOCK BUSHING
PDTOTOMRP SPRING COLLARS
PD7072MRP DIFF THRUST WASHER (10)
PD7O73MRP DIFF THRUST BALL (20)
PD7O74MRP DIFF BOLT & LOCKING
PD7075MRP CARBIDE DIFF BALL (20)
PD7O76MRP DIFF THRUST SPRING
PD7077MRP TORQUE CONTROL SPRING
PD7O79MRP BEARING WASHER
PDTOSOMRP PINION GEAR, 1BT
PD7O81 MRP CTPM.SCREW (20),M3x12
PDTO82MRP FR SUSPENSION ARMS
PD7O83MRP FR BLOCK CARRIER, 30'
PDTO84MRP KINGPIN BALLSTUD
PD7085MRP FR SHOCK TOWER
PD7086MRP PLASTIC BALL & EYELET
PD7O87MRP FR STEERING BLOCK
PDTOSBMRP FRAXLE, ALUMINUM
PD7089MRP FRARM SHOCK MOUNT
PDTO9OMRP BALLSTUD CUPS (12)
PD7O91 MRP TURNBUCKLE
PD7093MRP FR BODY MOUNT
PD7O94MRP BATTERY STRAP
PD7095MRP STEERING SERVO MOUNT
PD7O96MRP RRARM & SHOCK MOUNT

RIPPER ST SPARE PARTS LIST
PART# DESCRIPTION NOTE
PDTO98MRP RR DOGBONE
PD7099MRP RR HUB CARRIER
PDTlOOMRP RRAXLE SHIMS (20)
PD71O1MRP DRIVE ROLL PIN (10)
PD71O2MRP MOTOR PLATE GASKET (10)
PD7 O3MRP STUB AXLE
PD7 04MRP TOP SHAFT SPACER (10)
PD7 05MRP FR INNER HINGE PIN
PD7 OTMRP CROSS BRACE
PD7 OSMRP FR BULKHEAD
PD7 O9MRP FRONG TOP PLATE
PD7111MRP MOUNTING PIN
PD7112MRP STEER DRAG LINK
PD7113MRP SERVO LINK CUP
PD7115MRP FR BUMPER
PD7116MRP BATTERY PADS
PD71 1 TMRP BATTERY BLOCK
PD7126MRP DRIVE W/GEAR/SHAFT
PD71 27MRP IDLER GEAR
PD7128MRP DIFF GEAR
PD7129MRP IDLER GEAR SHAFT
PD713OMRP CHASSIS SET
PD71 31 MRP RR HUB HINGE SCREW
PD71 32MRP RR HINGE SCREW
PD7142MRP CHASSIS PLATE
PD7143MRP STEERING SERVO HORN
PD7305MRP DIFF DRIVE RING
PD7306MRP LT DIFF DRIVE
PD73O7MRP RT DIFF DRIVE
PDT3OBMRP TRANNY BRACE
PD73O9MRP SPUR GEAR/B7T
PART# DESGRIPTION NOTE
PD731 3MRP CLUTCH DISC
PD7314MRP SK H.M.SCREW (20), M3x12
PD7315MRP INSERT BUTTON
PD7317MRP RR MOLD SHOCK BODY
PD7321 MRP SHOCK STANDOFF
PD7322MRP 1/16" SPACER (10)
PD7323MRP CT P.M.SCREW (20\, M3x12
PD7324MRP SHOCK WASHER (10)
PD7325MRP FR SPRING
PD7326MRP RR SPRING
PD7327MRP DIFF THRUST BOLT (10)
PD732BMRP SPRING CUP
PD7329MRP PRELOAD SPACERS
PD7330MRP-S REAR WHL&TIRE
PD7331 MRP REAR TIRE&INSERT
PD7332MRP-S REAR WHEEL
PD7333MRP-S FRONT WHL&TIRE
PD7334MRP FRONT TIRE&INSERT
PD7335MRP-S FRONT WHEEL
PD7338MRP 540 MOTOR
PD734OMRP FR HINGE SCREW
PD7341 MRP SERVO ARM&BUSHING
PD7342MRP FRONT KICKUP
PD7343MRP TORQUE HUB, INNER
PD7344MRP TORQUE HUB, OUTER
PD7345MRP SLIPPER RING
PD7346MRP MOTOR MOUNT
PD7347MRP MOTOR COVER
PD7349MRP GEAR DUST COVER
PD7350MRP TRANSMISSION CASE
PD7945MRP CT P.M.SCREW (20), M3x6
PD8O24MRP BT PM.SCREW (20), M3x28

&&&&
cooa O
cO
O
sg
S*
PD1741MRP
ALUM SHOCK CAPS
PD671 1 MRP
ALUM SHOCK BUSHING
PD6724MRP
ALUM FR SHOCK BODY (L)
PD6738MRP
ALUM FR SHOCK SET
PD7137MRP
ALUM TRANS BRACE
PD224OMRP
ALUM TURNBUCKLE WRENCH
PD6712MRP
ALUM ST SERVO MOUNT
PD6725MRP
ALUM RR SHOCK BODY (L)
PD7134MRP
ALUM FR BULKHEAD
PD7,13BMRP
ALUM REAR HUB
&&
ntn
ffi
PD633BMRP
ALUM SHOCK BOTTOM
PD6713MRP
BATTERY THUMB SCREW
PD6737MRP
ALUM FR INLINE AXLE
PD7135MRP
ALUM FR KNUCKLE ARMS
PD7,I39MRP
ALUM CHASSIS PLATE
PD671 OMRP
FR KTCKUPALUM (L)
PD6714MRP
BATTERY HOLD STRAP
PD6739MRP
ALUM RR SHOCK SET
PD7136MRP
ALUM FR HUB CARRIER
PD7140MRP
ALUM REAR SUSP MOUNT
-.*r./! ="n.ll
*zr./f .\..\,t)
PD8916MRP
&# *rW
*w
%w
PD7144MRP
I O Ot
??C?
PD8233MRP
%
d# #F
ff" tr'
d.d
ff't" ry qd
Q
w
PD7.141MRP
nD tnt ED ^r h ^d?

rttr/lll
tllttt...
ttttltlt
tttttttttt
tlltlt
ffi"
f8,
PD8904MRP
STEEL TURNBUCKLES, M3x70.2mm
PDB929MRP
UNIVERSAL SHAFT, CVA
PD91 67MRP
RR SPRING 3 PAIRS
PD89O5MRP
STEEL TURNBUCKLES, M3x70.2mm
PD8931 MRP
FR SHOCK SHAFT
PD0667MRP M3x8 (20)
PD0668MRP M3x10 (20)
BHCS SCREWS
PD1338MRP M3x12(20)
PD7475MRP M3x10 (20)
SHCS SCREWS
PD8925MRP
FR SHOCK TOWER, GRP
PDB932MRP
RR SHOCK SHAFT
PD0677MRP M3x8 (20)
PD0678MRP M3x10 (20)
PD0679MRP M3x12 (20)
FHCS SCREWS
PD8926MRP
SCREW KIT
PD9163MRP
FR SPRING 3 PAIRS
PD1301MRP M3x0.5 (20)
PD1304MRP M4x0.7 (20)
ALUM LOCKNUTS
,ll:;il;rilii i?+
PINION GEAR
RIPPER ST OPTIONAL PARTS LIST
,2l'@Wo%.
,,,,',7,fufuffi
,.^1,U@@%.
''riiffiouoYe
PART# DESGRIPTION NOTE
PDO667MRP BHCS SCREWS (20), M3x8mm
PDO66BMRP BHCS SCREWS (20), M3x1Omm
PD0677MRP FHCS SCREWS (20), M3x8mm
PD0678MRP FHCS SCREWS (20), M3x1Omm
PD0679MRP FHCS SCREWS (20), M3x12mm
PD1301MRP ALUM LOCKNUTS (20), M3x0.5mm
PD13O4MRP ALUM LOCKNUTS (20), M4x0.7mm
PD1338MRP SHCS SCREWS (20), M3x12mm
PD1741MRP ALUM SHOCK CAPS
PD224OMRP ALUM TURNBUCKLE WRENCH
PD633BMRP ALUM SHOCK BOTTOM
PD671OMRP FR KICKUPALUM (L)
PD6711MRP ALUM SHOCK BUSHING
PD6712MRP ALUM ST SERVO MOUNT
PD671 3MRP BATTERY THUMB SCREW
PD6714MRP BATTERY HOLD STRAP
PD6724MRP ALUM FR SHOCK BODY (L)
PD6725MRP ALUM RR SHOCK BODY (L)
PD6737MRP ALUM FR INLINE AXLE
PD6738MRP ALUM FR SHOCK SET
PD6739MRP ALUM RR SHOCK SET
PD7123MRP PINION GEAR, 197
PD7124MRP PINION GEAR,2OT
PART# DESCRIPTION NOTE
PD7125MRP PINION GEAR,21T
PD7134MRP ALUM FR BULKHEAD
PD7135MRP ALUM FR KNUCKLE ARMS
PD7136MRP ALUM FR HUB CARRIER
PD7137MRP ALUM TRANS BRACE
PD7138MRP ALUM REAR HUB
PD71 39MRP ALUM CHASSIS PLATE
PD714OMRP ALUM REAR SUSP MOUNT
PD7141 MRP OP IDLER GEAR 2BT
PD7144MRP SEALED BEARING SET
PD7475MRP SHCS SCREWS {20). M3x1Omm
PD8233MRP ALUM SHOCK BALL
PD89O4MRP STEEL TURNBUCKLES (2), M3x70.2mm
PD89O5MRP STEEL TURNBUCKLES (6), M3x70.2mm
PD8916MRP BODY CLTPS (L)
PDB925MRP FR SHOCK TOWER, GRP
PD8926MRP SCREW KIT
PDB929MRP UNIVERSAL SHAFT, CVA
PDB931 MRP FR SHOCK SHAFT
PD8932MRP RR SHOCK SHAFT
PD9163MRP FR SPRING 3 PAIRS
PD9167MRP RR SPRING 3 PAIRS

c
@
_c
U
.=
3
c
CJ
E
'c
CJ
G'
CJ
--,
P'7
JC
E;
r=
o>
>E
E -E*
::o
_ge0,
PE.g
=L>
go>
-Lr!
+ (U€
F Eio
nE'i
Xoi
o
qJ
6
OJ
e.
o
t!
0
o
(a
o
(o
J
.s
.T
(,
qJ
qJ
ql
r
o
ctr
G
L
c
O!
c
o
o
o.
=
tt
o
J
o
.!
C
U
\,11
U
.;
o
E
c
tt
o
El
ct!
=
CL
o
=
o
o
vt
6
(J
C
.g
.2
c
E
CJ
o
-:z .9
lt!
t
E
c
-
q.
o
o
Jo
o
=
ro
o
>x
dJ i:
coE
:LU
VPq
Y.,U
5*F
c YE
o *>
U C.., !/)
:l P$
c:>o
E''
c
at
o
ic
0
d
0
0
z
E
c.,
6
a
CJ
qJ
G
o-
.E
!,
o
El
gl
=
CL
o
=
o
|!
6
>
(U
(E
q,,
(!
IJ
!o
t'l
|g
.9
!
.9
o
tg
o
o;
EC
-(u
sft
v9
os
b'i
Y=-
3
ol
o
o
6
E
6
o
E
IE
o
I
o
:
.E
o
o
E
.:
O)
E
.=
E
a)
E'!
En
P
TL
o
c
o
o
E
qJ
:4
XE
n>
F-O
s3
=
i:g
ao-
=8
CJF
x^
uij u
g E9
U OU
{
(J
;
C
.=
o
3
o
o.
tr
o
tr
g
4
o
0.
|!
|!
t!
|!
o
o
o
o
E
o
to
o
o.
t,
I
z
I
t-
o
o
I
o
ltl
J
tr
I
o
!t
l-

N
5q o
;; tr
=e I
3p A
a__- I
+fr A
11 0
H= {
+= D
re .
;P .{
3x Gt
fie C
oJ.- I
ia tr
3 x_ ltl
=
5
d
E
a
o
f
Table of contents
Popular Motorized Toy Car manuals by other brands

Team C
Team C T8TEt8te Assembly instructions

Spinmaster
Spinmaster Meccano Steam 18303 instructions

V-tech
V-tech Safari Sounds Microphone user manual

TOP racing
TOP racing Rebel R-F01 manual

KID Trax
KID Trax Cars 3 Lightning McQueen Toddler Quad... manual

Spinmaster
Spinmaster MECCANO OFF-ROAD RACER 27 IN 1 instructions