MSI Port-A-Weigh MSI-4260 User manual

M E A S U R E M E N T S Y S T E M S I N T E R N A T I O N A L
Page 2 MSI-4260 Port-A-Weigh •User Guide

M E A S U R E M E N T S Y S T E M S I N T E R N A T I O N A L
MSI-4260 Port-A-Weigh •User Guide Page 3
TABLE OF CONTENTS
Introduction ............................................................4
Certification............................................................4
Specifications .........................................................4
Unpacking ..............................................................5
Controls ..................................................................5
Operation ................................................................6
Battery Pack ...........................................................7
Battery Operation ...................................................7
Back Light .............................................................. 8
Other Features ........................................................ 8
Internal Switch Settings ......................................... 9
Calibration Verification .......................................11
Complete Calibration ...........................................12
Battery Charger Operation ...................................13
Troubleshooting Guide ........................................15
Proper Loading Procedure ...................................17
The MSI Limited Warranty..................................18

M E A S U R E M E N T S Y S T E M S I N T E R N A T I O N A L
Page 4 MSI-4260 Port-A-Weigh •User Guide
INTRODUCTION
The Measurement Systems International Port-A-Weigh is a computerized, self-
contained, battery-operated crane scale. The scale is made up of three separate
sections which house the electronics, load cell and battery respectively. The
sections are bolted together and sealed against moisture by the use of O-rings.
The scale housing is made of impact resistant cast aluminum alloy. All elec-
tronics are shock mounted and the display window is impact resistant polycar-
bonate. The accuracy of the scale meets or exceeds the requirements of Na-
tional Institute of Standards Technology, Handbook 44. For most scales, this is
0.1% of applied load.
CERTIFICATION
Measurement Systems International (MSI) certifies the MSI-4260 Port-A-
Weigh has been thoroughly tested and inspected and found to meet its pub-
lished specifications when shipped from the factory. MSI further certifies that
its calibration measurements are traceable to NIST.
❏ Fishing Industry Model
❏ Industrial Model
❏ Legal-For-Trade Model
Program Number ______________________________________
Capacity _______________________ ❏ Lb.❏ Kg
Serial Number ______________________________________
SW1 (Front switch) 1 2 3 4 5 6 7 8
SW2 (Rear switch) 1 2 3 4 5 6 7 8
Note:
Circled numbers above are closed.
Cal Number ______________________________________
Standard Options ______________________________________
______________________________________
Custom Options ______________________________________
SPECIFICATIONS
Accuracy:
Plus or minus 0.1% of applied load

M E A S U R E M E N T S Y S T E M S I N T E R N A T I O N A L
MSI-4260 Port-A-Weigh •User Guide Page 5
Operating Temperature Range:
14°to 140°F (-10°to 60°C)
Power:
12 Volt lead acid rechargeable battery (charger included)
Operating Time:
LCD: 50 hours, LED: 25 hours (between charges)
Enclosure:
NEMA IV, alodined cast aluminum
Safe Overload:
200% rated capacity
Ultimate Overload:
500% rated capacity with the following exceptions:
50,000 lb = 490% of kilogram capacity
70,000 lb = 475% of pound capacity, 430% of kilogram capacity
100,000 lb = 450% of kilogram capacity
UNPACKING
When unpacking the scale from the shipping container, insure that all parts are
accounted for. Check the scale for any visible damage and immediately report
any damage to your shipper. It is advisable to use the original shipping con-
tainer when shipping or transporting the Port-A-Weigh.
CONTROLS
Port-A-Weigh operation is controlled by depressing a series of push-button
switches. These switches are totally sealed against moisture and are recessed to
prevent damage caused by rough handling.
Push-button controls – Industrial Model
Industrial Model
There are 5 push-button controls which are described below:
1. ON/OFF: Turns the unit on or off. Unit will automatically shut off after

M E A S U R E M E N T S Y S T E M S I N T E R N A T I O N A L
Page 6 MSI-4260 Port-A-Weigh •User Guide
5 minutes of non-operation.
2. LOCK: Depressing this switch overrides the automatic shut-off for
continuous use.
3. ZERO: Sets the display to “0”. Any positive weight zeroed will be
subtracted from the scale capacity. Negative weights that are zeroed will
have no affect on the capacity.
4. TARE: The Tare control consists of two push-button; SET and CLEAR.
By pushing the Set button, any hanging load on the scale will be tared.
The scale will display “0” and operate in the Net mode. Tare Clear
removes the set value and returns the scale to the Gross operating mode.
OPERATION
1. Turn the unit on with the ON/OFF push-button. Upon activation, the
display on the Port-A-Weigh will display a segment check of “-88888”.
Missing segments alerts the operator that the display is not working
properly.
Immediately following the segment check “-88888” a program number
will appear (P-16, P-18 or other variation. This is a number that
signifies what computer program is being used in a particular scale.
Program numbers change as new models appear on the market or as
additional features are added to the scale.
Following the segment check and program number, the display will
stabilize and will be ready for operation.
2. Depress the Lock button (Industrial Model Only) if continuous opera-
tion is desired.
Note: The Lock button has no affect until the test sequence (Item 1
above) is complete.
3. Depress the Zero button to set the display to a zero weight reading.
4. For net weight operation, tare weights may be entered using the Set
button. Tare value may be removed with the Clear button.
5. Turn the unit off to conserve battery life when weighing is complete.

M E A S U R E M E N T S Y S T E M S I N T E R N A T I O N A L
MSI-4260 Port-A-Weigh •User Guide Page 7
BATTERY PACK
The Port-A-Weigh is powered by a 12 volt rechargeable battery. The battery is
located in the rear compartment of the scale. Two stainless steel fasteners
secure the battery access door. To remove the battery for charging; unlatch the
fasteners and pull the battery straight out. The battery will automatically
disengage from its connectors and may be plugged into the battery charger for
recharging.
BATTERY OPERATION
The battery will operate continuously for 50 hours with the LCD display and 25
hours with the LED display before requiring recharging. The Port-A-Weigh
will alert you when the battery is within 2 hours of requiring recharging by
flashing a tick in the upper left-hand corner of the display adjacent to the “LO”
marking cast into the housing.
When the battery requires recharging, the weight reading on the display will be
replaced by “LO”, after which the scale will shut itself off to prevent battery
damage. If the On button is depressed at this point, “LO” will reappear and then
the scale will again deactivate automatically.
Instructions for charging are located on the battery charger. Charging time for a
completely discharged battery is approximately 16 hours. A spare battery pack

M E A S U R E M E N T S Y S T E M S I N T E R N A T I O N A L
Page 8 MSI-4260 Port-A-Weigh •User Guide
is recommended to keep the Port-A-Weigh continuously operational.
Note: More frequent charging of the battery prolongs its life.
BACK LIGHT
A display light for low light operation is standard with the Port-A-Weigh. This
light is activated and deactivated by a photocell which senses ambient light
levels. No controls are required to activate the backlight.
OTHER FEATURES
1. The capacity of your scale is located on the scale just above the display
window. If this capacity is exceeded by approximately 4%, the unit will
display “EEEE”. (This overrange point will be decreased if positive
weight has been zeroed out.
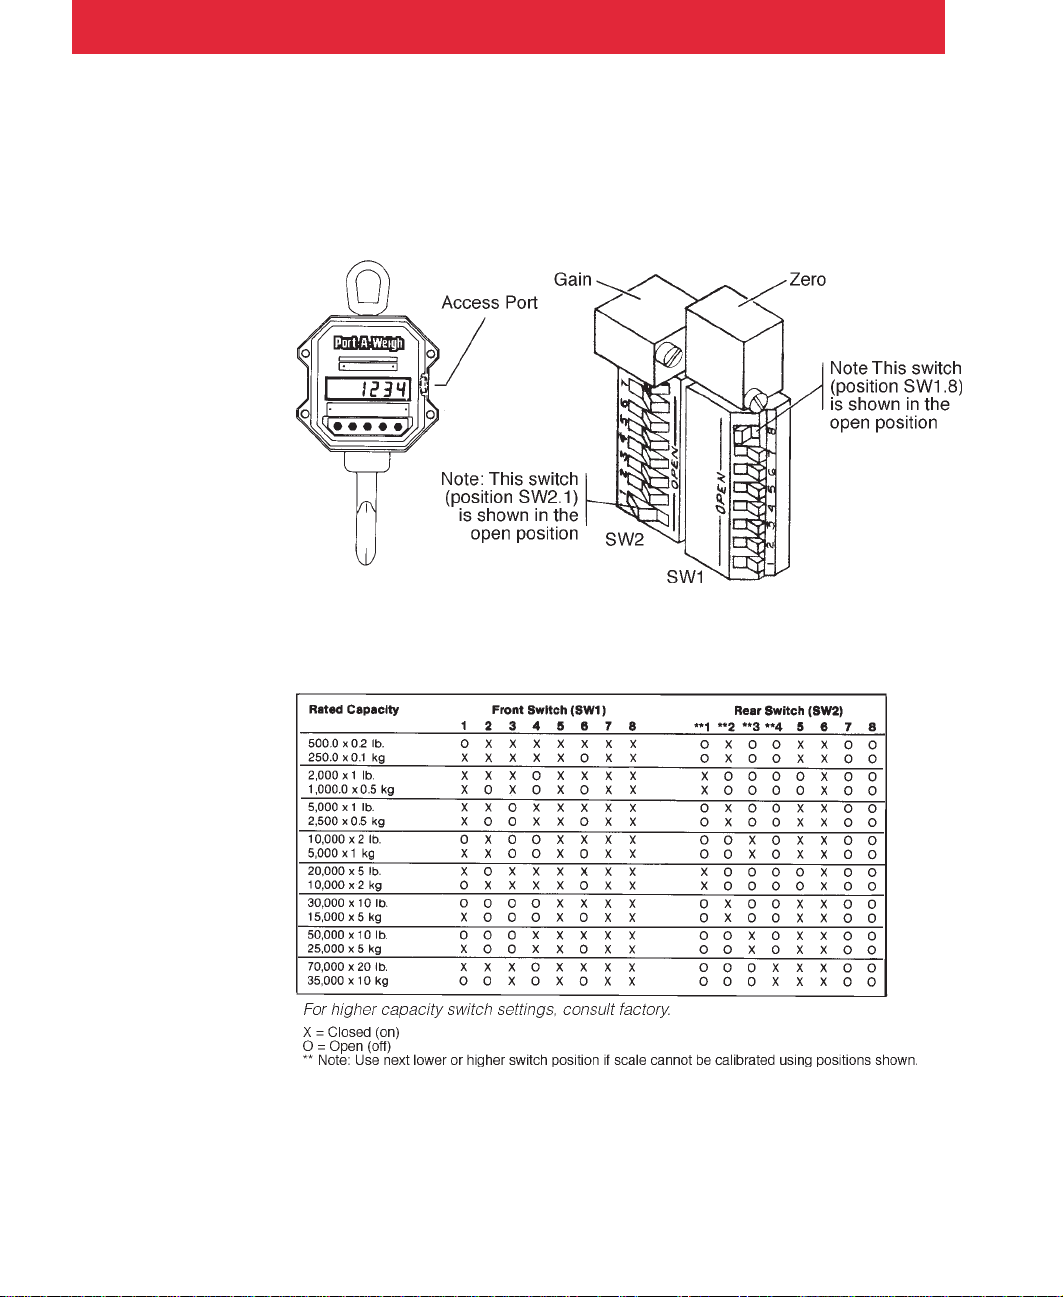
2. To convert from Pounds to Kilograms, reverse the capacity plate located
on the scale exterior above the display window and reset the internal
Pound/Kilogram and Count By switches. (See “Internal Switch Settings”
and Figure 1).
3. The unit has a safe mechanical overload capacity of 200% and an ultimate
overload of 500%. Overloads greater than 500% may result in structural
failure.
4. Legal-For-Trade model: The accuracy of this scale is 0.1% of applied
load. The operating controls and accuracy allow it to be sealed as Legal-
For-Trade.
5. Remote Control ON/ZERO: When fitted with this option, the scale may
be activated and zeroed by using a hand-held transmitter, or may be
operated as a standard unit. A two position selector switch located on the
lower left side of the electronic housing selects local in the scale. The
switch should be turned off when the scale is not in use to conserve
battery life.
In remote operation , the scale is activated by depressing the hand-held
transmitter switch. Depressing the switch a second time will zero the
scale. The scale will operate for 5 minutes before automatically turning
off to preserve battery life. A Zero/Tare memory is supplied as standard,
so that the amount previously zeroed or tared will be recalled when the
scale is reactivated.
All radio controlled scales are shipped with the same operational codes.
If more than one radio controlled scale is to be used at the same location,
the codes should be changed to prevent inadvertent interference. Consult
your dealer or the factory for instructions.
6. Presettable Tare: When fitted with this option, known tare weights may

M E A S U R E M E N T S Y S T E M S I N T E R N A T I O N A L
MSI-4260 Port-A-Weigh •User Guide Page 9
be pre set without a load on the scale. Using the UP and DOWN switches,
specific negative tare values may be entered. (Not available on Legal-
For-Trade models).
Note: The preceding instructions are intended as an operational aid for
the Port-A-Weigh. More complete service information and specifica-
tions are available on request from the factory.
INTERNAL SWITCH SETTINGS
The Port-A-Weigh has several internal switches. The same printed circuit
board is used for every capacity Port-A-Weigh. Two sets of switches are
manipulated to set up various capacities and “count by” increments. These
switches are accessed through an access port located on the right side of the
scale. (See figure 1).
SW1 – Front Switch
1, 2 Count By - Determines increments in which the weight is displayed.
3, 4 Rated Capacity in Pounds - These switches match the electronics to the
load cell used for a given capacity.
5 Auto Zero Maintenance (AZM) - Activates or deactivates the auto zero
maintenance. This feature eliminates zero drift in the absence of weight
on the scale.
6 LB/KG Select - Selects whether the load being weighed is displayed in
pounds or kilograms. The scale may require slight recalibration.
Note: Count By must also be changed.
7 Filter - Activates or deactivates the digital motion filter. Activating this
switch helps to stabilize the display when the item being weighed is
moving. This switch should remain on during normal operation.
8 Memory Enable - Activates or deactivates the zero memory. When
activated, it will allow the scale to remember the last amount zeroed out
if the scale should be shut off. When deactivated, the amount zeroed out
will be forgotten when the scale is turned off.
Note: This switch must be left open if the zero memory is not installed.
SW2 – Rear Switch
1 - 4 Analog Gain Select - Acts as a course gain control when calibrating the
scale. The capacity of the scale will determine the position of these
switches. (Note: only one switch can be closed at a time)
5, 6 CAL Select: - Determines the magnitude of the calibration number
displayed when the CAL Test switch is activated.
7 CAL Test - Activates the CAL test.
8 Decimal Point - Activates or deactivates the decimal point on the

M E A S U R E M E N T S Y S T E M S I N T E R N A T I O N A L
Page 10 MSI-4260 Port-A-Weigh •User Guide
display. (For systems having program numbers P-14 and below only). On
programs P-15 and above, the decimal point is automatically set.
Note: The Operational Mode Chart included in these instructions indi-
cates proper switch settings for each capacity. (See Figure 2).
Figure 1: Location of Internal Switches and Gain Potentiometers
Figure 2: Internal Switch Setting Table

M E A S U R E M E N T S Y S T E M S I N T E R N A T I O N A L
MSI-4260 Port-A-Weigh •User Guide Page 11
CALIBRATION VERIFICATION
The Port-A-Weigh is calibrated at the factory; however, to check the calibration
prior to use, follow the procedures outlined below.
Caution: Do not apply test weights during this procedure.
Note: This is an approximation and is not an acceptable means of calibration by
Weights and Measures.
1. Remove the access port plug on the side of the scale and open the
Memory Enable switch (SW1 Position 8). (See Figure 1).
2. Open the Filter and AZM switches (SW 1 Positions 7 and 5).
3. Turn on the unit by depressing the ON/OFF button. (This combined with
step 2, zeros the zero and tare memory so that true analog zero will be
obtained in step 6).
4. The display will cycle through the segment check, the program number,
then stabilize. Depress the Lock button then wait three minutes before
proceeding. This will allow the electronics to stabilize.
5. Zero the scale by adjusting the internal Zero potentiometer located above
SW1. (See Figure 1).
6. Depress the Zero button on the front of the scale.
7. Close the Cal Test switch (SW2 Position 7).
8. Compare the number displayed with the Cal Number stamped on the
serial tag located in the battery compartment.
9. If the numbers compare, the scale is in calibration. If they do not, turn the
Gain potentiometer (located behind the Zero potentiometer) either
clockwise or counterclockwise until they do. (See Figure 1).
10. Open the Cal Test switch (SW2 Position 7). The display should return to
zero. If not, repeat steps 7 through 11.
11. The scale is now calibrated.
12. Close the Filter and ATZ switches (SW1 Position 7 and 5).
13. Close the Memory Enable switch (SW1 Position 8).
14. Replace the access port plug.
15. The scale is now ready to use.
Calibration Verification may be used if the load cell or the electronics have
been changed. However, when these components are changed, complete
calibration must be carried out as soon as possible.
Note: If the load cell has been changed, the calibration number for the new load
cell must be used.

M E A S U R E M E N T S Y S T E M S I N T E R N A T I O N A L
Page 12 MSI-4260 Port-A-Weigh •User Guide
COMPLETE CALIBRATION
1. Remove the access port plug on the side of the scale and open the
Memory Enable switch (SW1 Position 8). (See Figure 1).
2. Open the Filter and AZM switches (SW1 Positions 7 and 5).
3. Turn on the unit by depressing the ON/OFF button. (this combined with
step 2, zeros the zero and tare memory so that true analog zero will be
obtained in step 6).
4. The display will cycle through the segment check, the program number,
and then stabilize. Depress the Lock button and wait three minutes before
proceeding. This will allow the electronics to stabilize.
5. Find the internal Zero Adjustment located above SW1 and zero the
display by turning the potentiometer either clockwise or counterclock-
wise.
6. Depress the push-button Zero located on the front of the scale. This sets
the exact center of zero.
7. Lift known test weights that equal the rated capacity of the scale and turn
the Gain adjustment (potentiometer above SW2) clockwise or counter
clockwise until the display reads the weight of the test weights.
8. Remove the test weights and verify that the display reads “0”. If it does
not, depress the Zero button and repeat step 5 above.
9. Sequentially pick up test weights that equal 25%, 50%, 75% and 100% of
the rated capacity of the scale.
10. If any further gain adjustments are made, steps 6 and 7 above must be
repeated.
11. Close the Cal Test switch SW2 Position 7 and record the new calibration
number.
12. Reset the following switches:
Filter: Close SW1 position 7.
Memory Enable: Close SW1 position 8
Cal Test: Open SW2 position 7.
AZM: Close SW1 position 5.
13. Replace access port plug.

M E A S U R E M E N T S Y S T E M S I N T E R N A T I O N A L
MSI-4260 Port-A-Weigh •User Guide Page 13
BATTERY CHARGER OPERATION
1. Plug AC line cord into 115 VAC, 50 or 60 Hz or 230 VAC as specified on
charger label.
2. Red indicator lamp will illuminate to indicate that the battery charger is
functioning properly.
3. Insert battery into charger.
4. The indicator lamp will go out (unless the battery is fully charged)
indicating that the battery is charging.
5. When the light illuminates, the battery has reached 80% of full charge.
This will require 8 to 12 hours for a fully discharged battery. The battery
should be charged 12 to 16 hours to reach full capacity. The battery may
be left connected to the charger continuously if desired.
6. The indicator lamp may flash slowly on and off when the battery is fully
charged and in the “float” mode.

M E A S U R E M E N T S Y S T E M S I N T E R N A T I O N A L
Page 14 MSI-4260 Port-A-Weigh •User Guide
This page intentionally left blank.

M E A S U R E M E N T S Y S T E M S I N T E R N A T I O N A L
MSI-4260 Port-A-Weigh •User Guide Page 15
TROUBLESHOOTING GUIDE
Symptom Possible Cause Remedy
1. Display is blank when ON/OFF button A. Discharged battery Recharge
is pushed B. Defective battery Replace
C. Corroded battery connections Clean
D. Defective switch or electronics module Requires authorized
service
2. Display shows correct power-up sequence A. Discharged battery Recharge
but displays “LO” instead of weight, then B. Defective battery connections Replace
shuts off. C. Defective electronics module Requires authorized
service
3. Display does not function properly A. Computer lockup Remove and re-
or insert battery. If
Front panel switches do not function problem persists,
normally. or authorized service is
Unit will not turn off. B. Faulty electronics module required.
4. Display does not respond to weight changes. A. Same as 3 A. & B. above
B. All coarse gain switches are open Close one
C. Faulty load cell or electronics module Requires authorized
service
5. Display overranges below 100% of capacity. A. Significant positive weight is zeroed out Normal (See
Operational
Controls Section –
Number 3)
B. Zero potentiometer requires adjustment Follow Calibration
Verification Section
(Steps 1 thru 7)
C. Cal Test switch closed Open switch
D. Memory switch is closed on scale without
memory backup option Open switch
6. Display experiences excessive zero drift A. AZM switch open Close switch
between weighings B. Resolution too great for proper AZM track- Set “Count by”
ing switches according
to table
C. Scale does not have AZM feature Zero the display
(Program numbers below P-15) with zero button
D. Scale electronics not stabilized after Leave scale on two
turning on the scale minutes before
weighing

M E A S U R E M E N T S Y S T E M S I N T E R N A T I O N A L
Page 16 MSI-4260 Port-A-Weigh •User Guide
7. Display shows large number after power- A. Cal Test switch closed Open switch
up sequence with AZM switch open and B. Memory switch closed on scale without Open switch
no weight applied. memory backup option
C. Zero potentiometer requires adjustment Follow Calibration
Verification Section
(Steps 1 thru 7)
D. Defective load cell or electronics module Requires authorized
service
8. Displayed weight shows large error. A. Scale not zeroed before applying weight Depress Zero button
before applying
weight
B. Requires calibration See Calibration
Verification and
Complete Calibra-
tion Sections.
C. Lb/Kg or capacity switches in wrong Set to correct
position position
9. Display reading not stable. A. Filter switch off Turn on
B. Too much resolution Set “Count by”
switches to correct
position
C. Faulty electronics module Requires authorized
service
10.Battery charger lamp off with charger on A. Defective charger Requires authorized
and battery not inserted service
11.Battery charger lamp does not stay off A. Battery already charged
when battery is inserted. B. Corroded battery connections Clean
C. Defective charger Requires authorized
service
D. Defective battery Replace
12.Charger lamp does not come on after A. Defective charger Requires authorized
16 hours of charging. service
B. Defective battery Replace
C. Corroded battery connections Clean
13.Charger lamp flashes. A. No problem – Indicates a fully charged battery

M E A S U R E M E N T S Y S T E M S I N T E R N A T I O N A L
MSI-4260 Port-A-Weigh •User Guide Page 17
PROPER LOADING PROCEDURE
DO
ENTERSETUP PEAK HOLD TARE MEMORY CLEAR SELECT
TEST
∑
T
0
ZERO NET/GROSS TARE TOTALPOWER VIEW
∑
SHIFT
USE HARDWARE THAT CREATES SINGLE
POINT ATTACHMENTS AND ALLOWS THE
SCALE FREEDOM OF ALIGNMENT.
DO NOT
ENTERSETUP PEAK HOLD TARE MEMORY CLEAR SELECT
TEST
∑
T
0
ZERO NET/GROSS TARE TOTALPOWER VIEW
∑
SHIFT
DO NOT USE MULTIPLE ATTACHMENTS.
DO NOT
ENTERSETUP PEAK HOLD TARE MEMORY CLEAR SELECT
TEST
∑
T
0
ZERO NET/GROSS TARE TOTALPOWER VIEW
∑
SHIFT
1. DO NOT PUSH OR PULL ON LOADED
SCALE. 2. DO NOT PULL LATERALLY ON
HOOK WITH SCALE LOADED.
DO NOT
ENTERSETUP PEAK HOLD TARE MEMORY CLEAR SELECT
TEST
∑
T
0
ZERO NET/GROSS TARE TOTALPOWER VIEW
∑
SHIFT
DO NOT INTERFACE HARDWARE
(SHACKLES, HOOKS ETC.) THATARE
OVERSIZEDAND RESTRICT SINGLE POINT
LOADING AND SELF-ALIGNMENT WHICH
CAN RESULT IN OFF-AXIS LOADING.
PUB.PLP-01-95

M E A S U R E M E N T S Y S T E M S I N T E R N A T I O N A L
Page 18 MSI-4260 Port-A-Weigh •User Guide
THE MSI LIMITED WARRANTY
MEASUREMENT SYSTEMS INTERNATIONAL, INC., WARRANTS load
sensing elements and meters against defects in workmanship and materials for
a period of one year from date of purchase and warrants electrical cables and
batteries against the same defects for a period of ninety (90) days from date of
purchase.
Any device which proves defective during the warranty period will be replaced
or repaired at no charge; provided that the defective device is returned to the
Company freight prepaid.
In no event shall the Company be liable for the cost of any repairs or alterations
made by others except those repairs or alterations made with its specific
written consent, nor shall the Company be liable for any damages or delays
whether caused by defective workmanship, materials or otherwise.
The Company shall not be liable for any personal injury or property damage
resulting from the handling, possession or use of the equipment by the cus-
tomer.
The warranty set forth herein is exclusive and is expressly in lieu of all other
warranties, express or implied, including without limitation any implied
warranties of merchantability or fitness, or of any other obligations or liability
on the part of the Company.
The liability of the Company under this warranty is limited solely to repairing
or replacing its products during the warranty periods; and the final judgement
and disposition of all claims will be made by MEASUREMENT SYSTEMS
INTERNATIONAL, INC.

M E A S U R E M E N T S Y S T E M S I N T E R N A T I O N A L
MSI-4260 Port-A-Weigh •User Guide Page 19
NOTES

MADE IN THE
USA
©1997 by Measurement Systems International
Printed in U.S.A.
PUB.114-02-90C
14240 INTERURBAN AVENUE SOUTH
SEATTLE, WASHINGTON 98168-4660 U.S.A.
PHONE: 206-433-0199 • FAX: 206-244-8470
Measurement Systems International
Other manuals for Port-A-Weigh MSI-4260
1
Table of contents
Other MSI Scale manuals