MSV PlayTec V 160 User manual

- 1-
MSV PlayTec V 160
User Manual
An important advice before using the machine.
Please charge the lithium battery before you use it.
- 2-
Congratulation you bought the MSV PlayTec V 160 Tennis Ball Machine. To have a long lasing
fun with this machine please read this User Manual carefully.
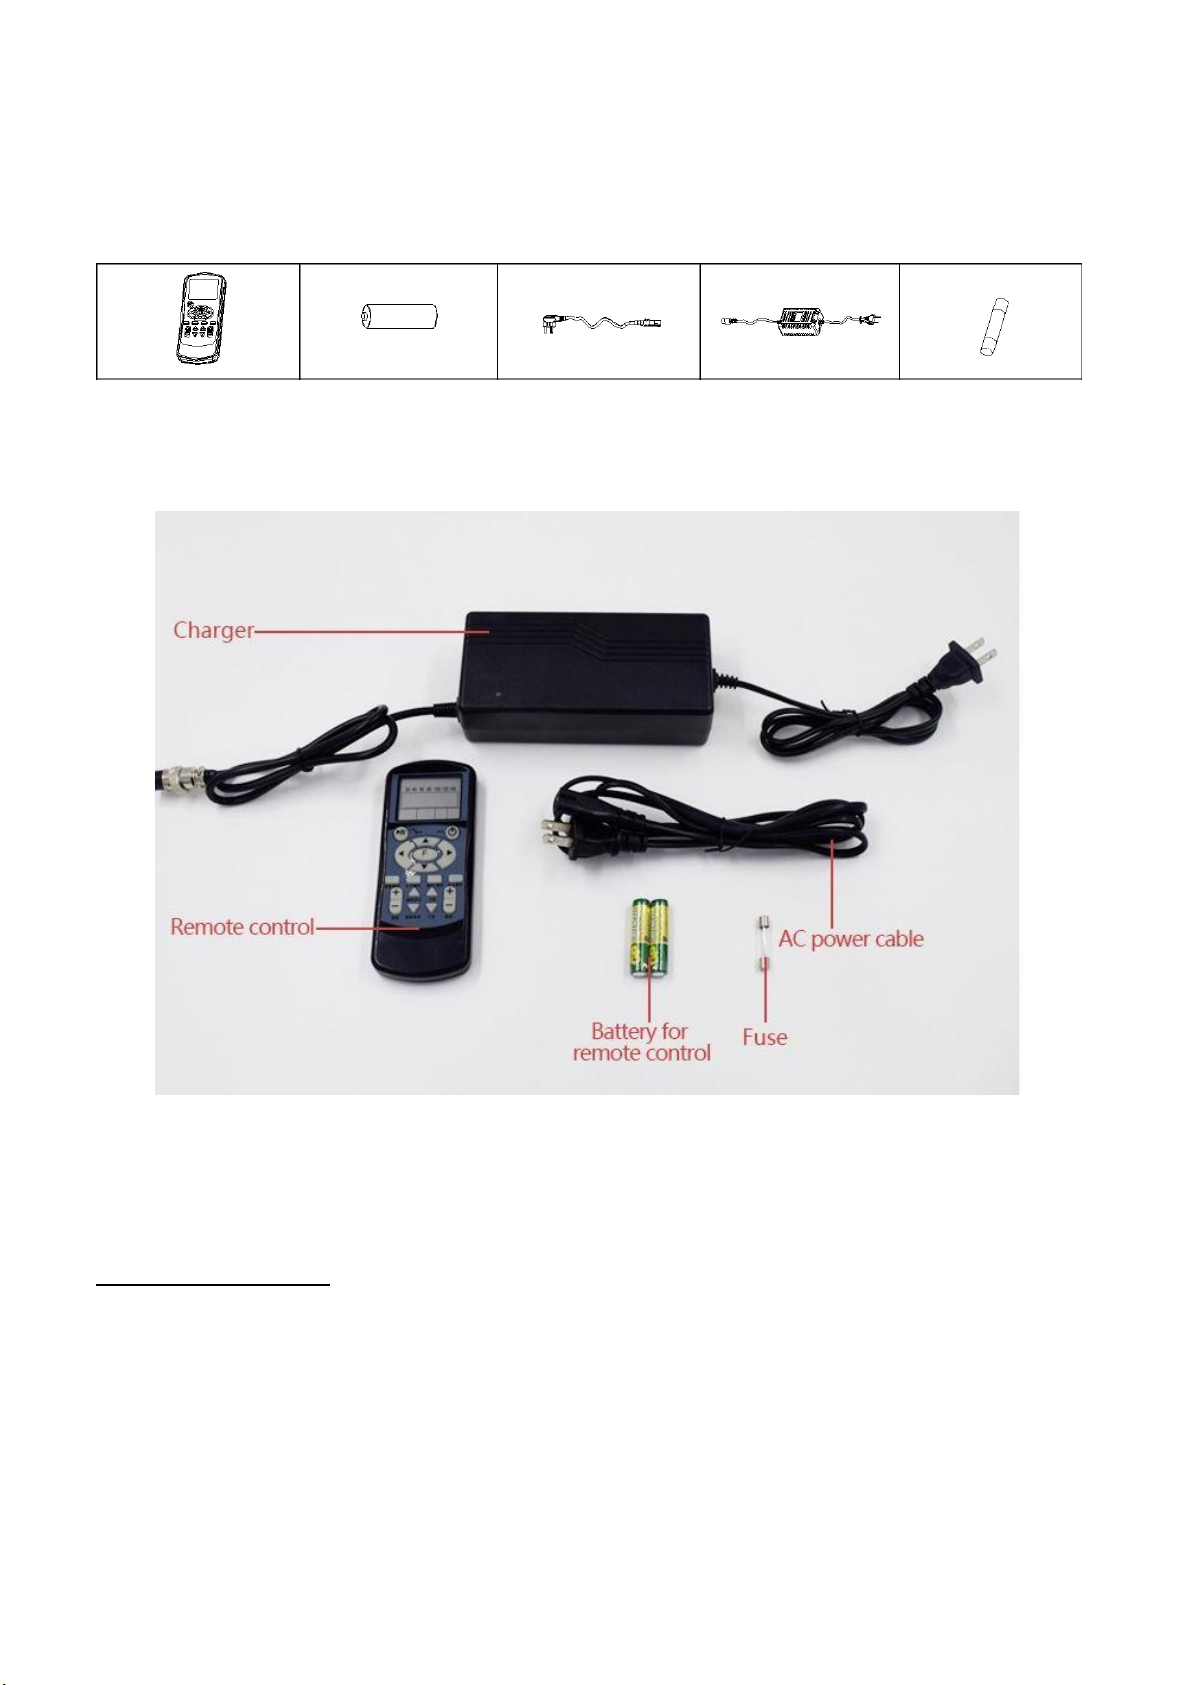
The delivery contains:
1x 2x 1x 1x 2x
Put the batteries into the remote and one fuse into fuse-container, which you will find on the
back of the machine. Before you do it switch the machine on, in case the red lamp aside of
the switcher lightens, the fuse is already put in its container.
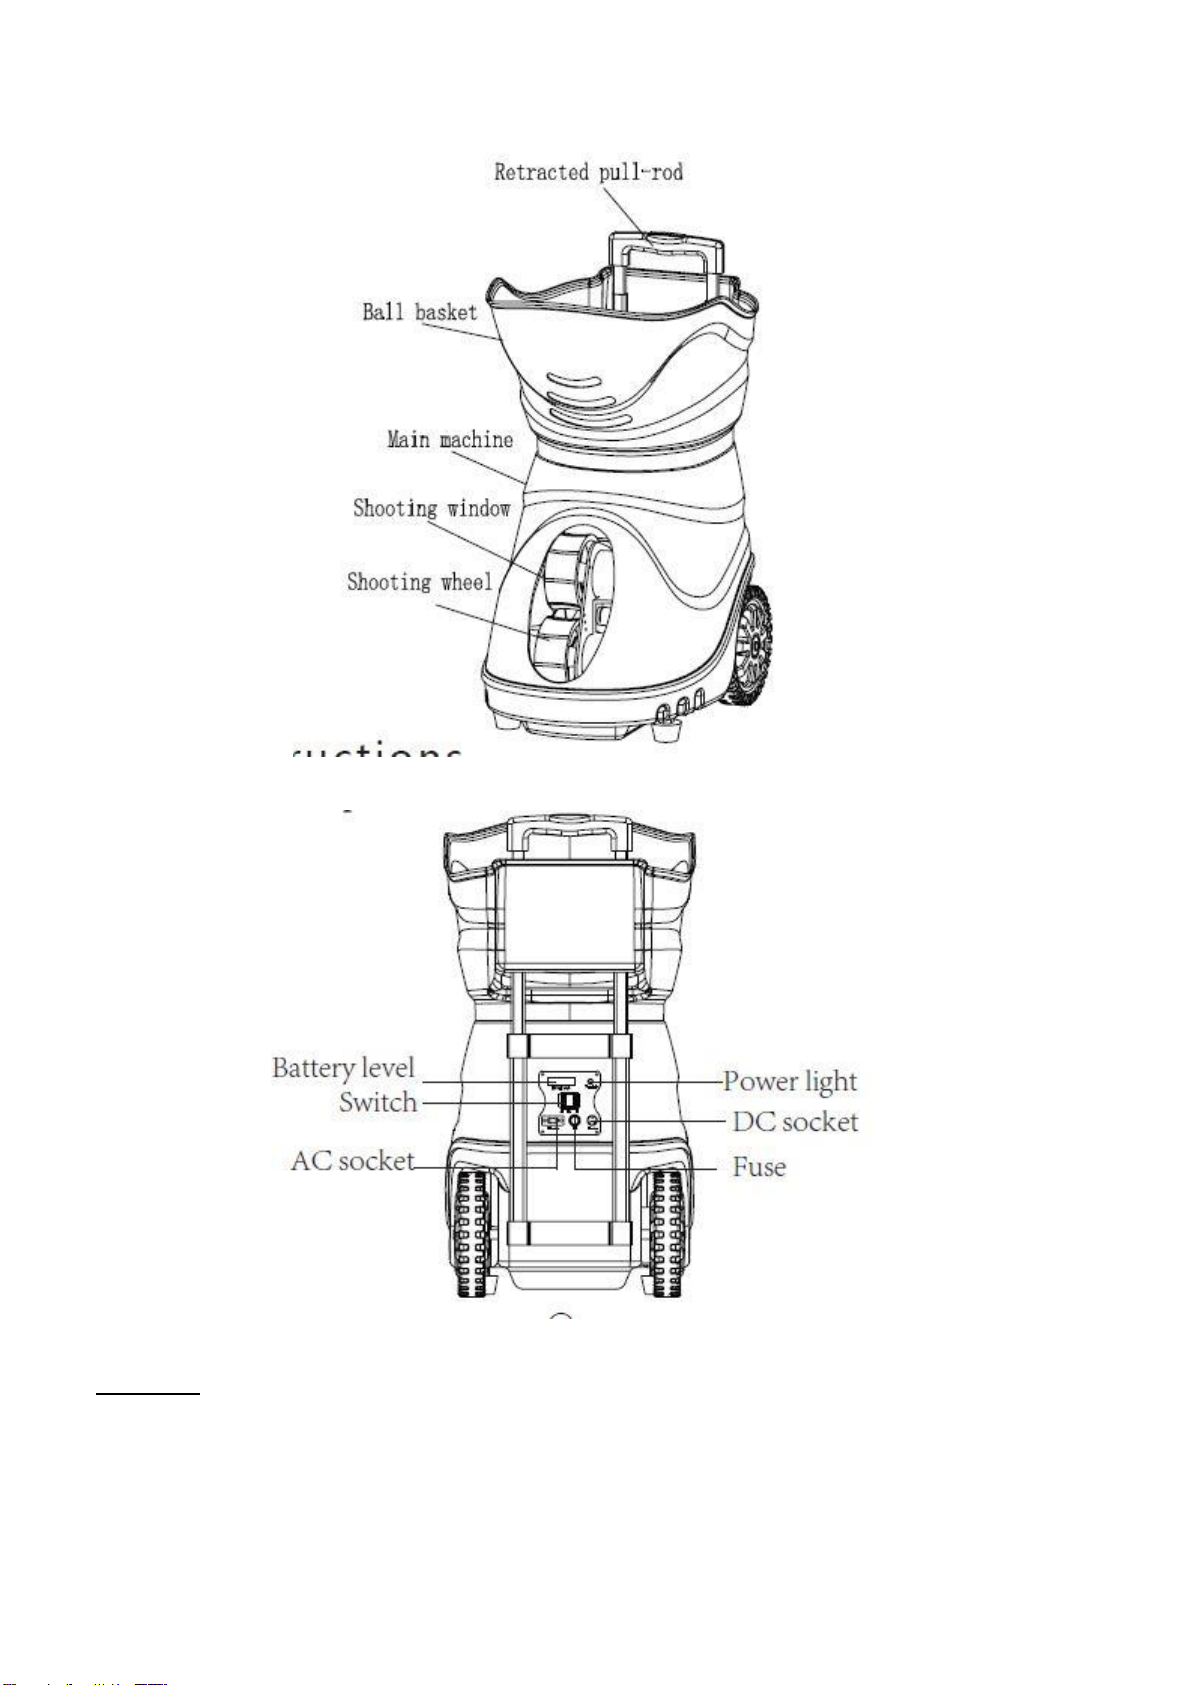
Operation preparation
Please charge the lithium battery before the first usage totally. The battery is within the
machine on the backside of the machine you will find a switch with the description AC, OFF
and DC. During you charge must the switch have the position OFF. Please connect the electric
cable with the power adapter and plug the supplied cable of the charger into the DC connecter
of the machine and screw it in tight if necessary.

- 3-
On the backside of the charger you will see a red diode during the charging process. Once the
battery is charged the diode will show a green light. The charging process can take several
hours. The charger gets warm during it charges. How many percent are charged you can see
on a display on the backside of the machine.
When you want to operate the machine with the battery, the switch has to be on DC. When
you want to operate the machine with the socket outlet, the switch has to be on AC. The
supplied electrical cable has then to be connected with the machine (AC connecter)
Bind the screw-cap with the discretion FUSE is a 30A/h glass fuse. Three are in the shipment,
one fuse has to be install to operate the machine. We did that already for you.
Balls
If possible don’t use quite new balls in the first 10 hours. The printer’s ink and the wax film on
the new balls can leave a slippery film on the rubber coating of the throwing wheels. This can
create odd moments ( e.g. two balls are thrown at one time or the precision to the regular ball
placement decreases).New balls can be used after the break in time. In case there are no
used balls available and you have to use new ball from the very beginning, you should then
clean after ten hours the throwing wheels as decrypted in the chapter Cleaning”.
The uniformity of the throws depends on the homogeneity of the balls, which you use. The
machine throws will throw faster little used balls than old strongly used balls. A mixture out of
both you should avoid therefore.
Irregular throws can be created through too much dirt and printing’s ink on the rubber
coating. Please clean in such cases the throwing wheels how descripted in the chapter.
„Cleaning“. Please do not use wet balls!!
- 4-
Assembly
1. Place the machine on the floor.
2. Pull the telescope out and pull the basket over it. Until it is jammed tight.

- 5-
Put up and Start
If you use pressure less balls then place the machine in the middle of the base line depending
on the jump behavior of the balls. Pressurized balls jump higher, in this case place the machine
one or two meters behind the base line. The length of the balls you can basically regulate
though the speed and the place of the machine. Please watch that the machine starts time
deferred after you have pressed the button start.
With the button Frequency you can adjust the interval with which the balls should
be thrown.
The button Topspin and Back Spin (Slice) will be pressed, when you want to play the
following balls with a spin.
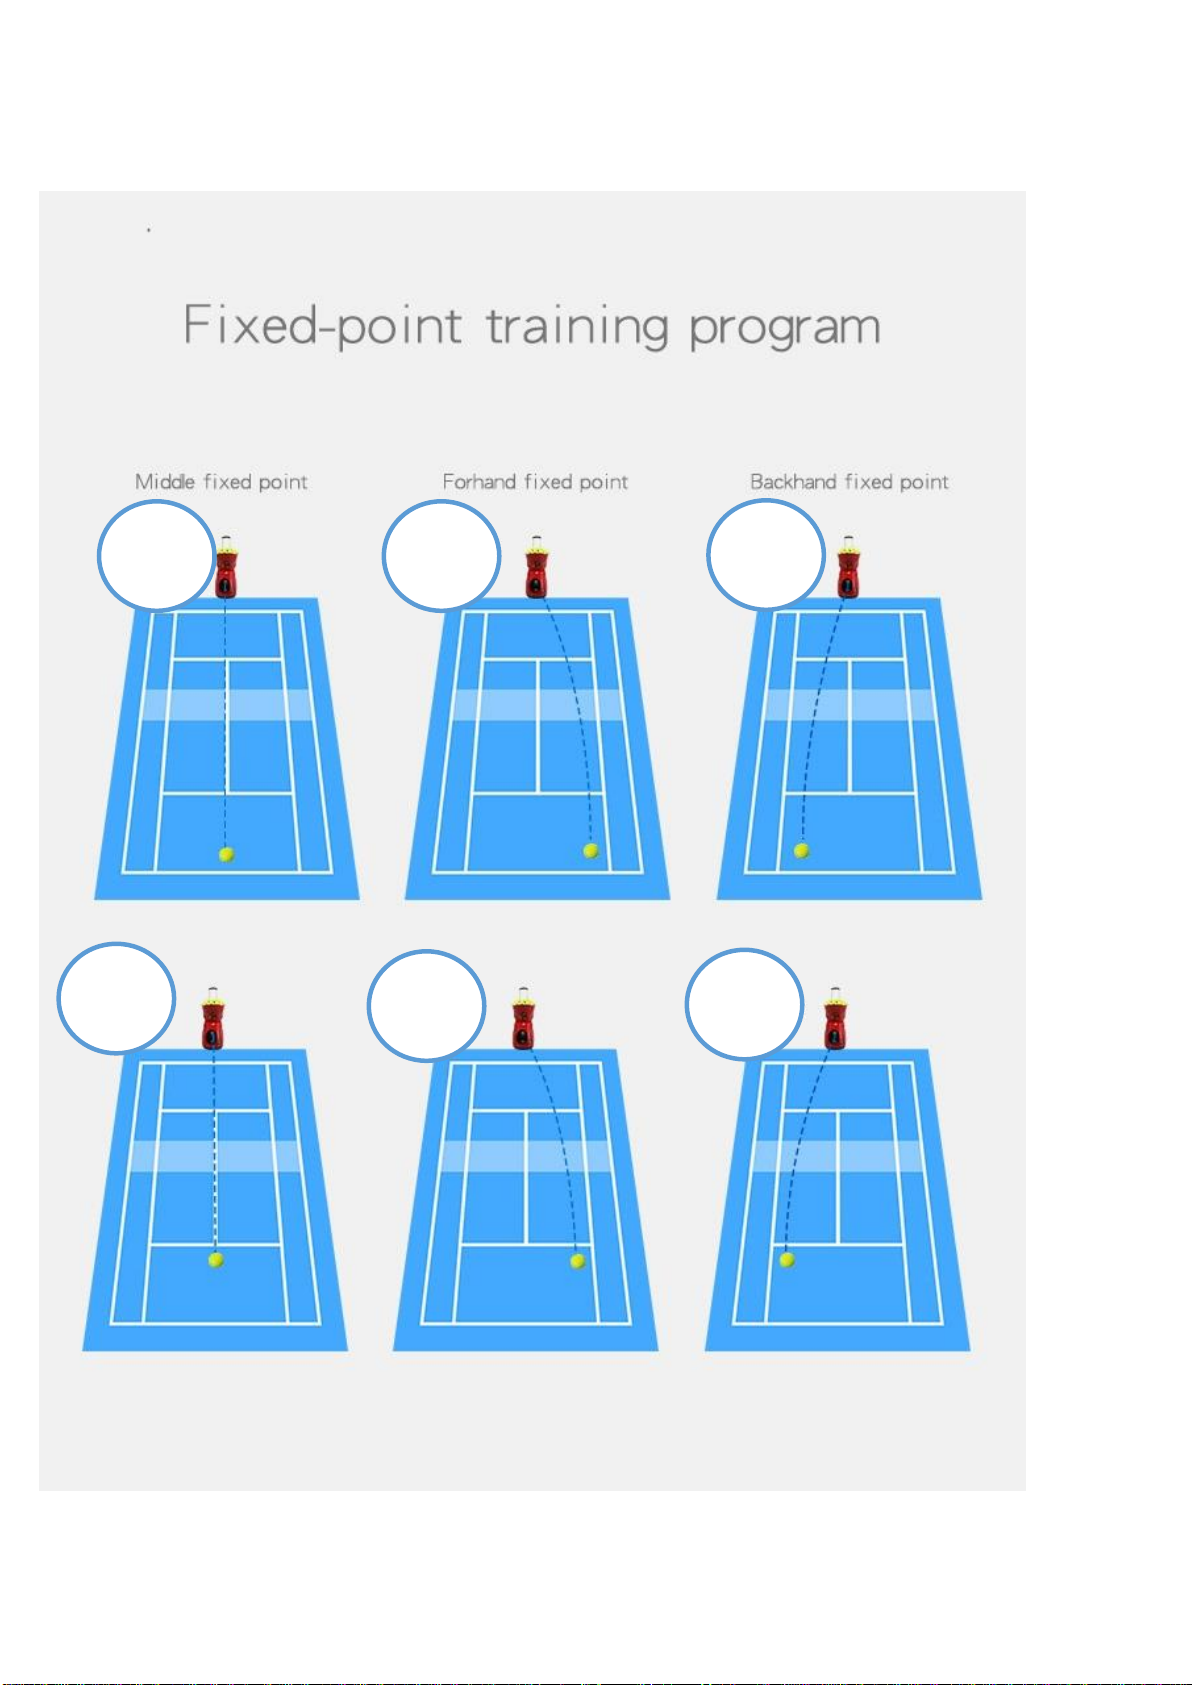
In the middle of the remote the button which shows a „F“ that is the button for the Fixed
Point. There are four buttons for the direction control of the Fixed Point, which are
labeled with arrows.
oThe button Fix Point, will be activated also always when you choose a new adjustment.
oRight Fixed Point, right beside the (F)
oLeft Fixed Point left beside the (F)
oDeep Fixed Point above the (F)
oShort (= Light) Fixed Point, below the (F)
By pressing the button Vertical repeated times vertical will throwing will be adjusted..
This is shown on the display of the remote (please see also the diagrams No. 7, 8, 11,
12 and 14 in the annex).
With the button Random the machine the machine throws balls according to the Radom
principal, this can be stopped by the button Work/Pause (see the diagram 13 in the
annex).
When pressing the button Cross repeated times you will have cross flying balls up to
six times (please see the diagrams 17-22 in the annex).
--------------------------------------------------------------------------
With the buttons up/down Topspin will be the forward directed Spin transferred on the
ball. To perform this must the upper throwing wheel run faster, than the lower one. On

- 6-
the remote will remove the speed of the different throwing wheel are displayed. (e.g.:
70/90 –60/110 –50 /110 -40/120 –30/130 –20 /140).
The buttons up/down Back Spin the function exactly the other way around compared
with the Top Spin and produce a backwards directed spin, which will be used for the
Slice-Balls.
With the button Program ON you can program by yourself. Please press this button
three seconds long. Now you can choose with the button UP; Down, Left and Right
now you can choose the points on the display of your remote where you want to shoot
the balls. When you have found the point then please press the button Program ON to
save the program.
Please notice: You can select 28 different points on your display.
When you want to cancel single points, then you have to select the points and press
the button Program OFF.
When you want to cancel all the points all at once then you have to press three seconds
long Program OFF.

- 7-
Explanation of the remote control
To understand the remote better, you can take the remote home and try it there. The display
shows you the half of a court where the balls will be placed when you press the buttons. The
handling and the discretion is done with the view to the throwing wheels.In case the peep
sound is too loud, you should take 1 cm tape and stick this on the loud speaker which is left
of the throwing wheels on the back side of the main board.
- 8-
With the button Power ON/OFF will be only the remote switched ON/OFF. (Please
press three seconds long). When you switch OFF please press so long until all points
on the display have disappeared.
With the opposite button Work/Pause you can start the ball feed or stop it and make a
break.
The display shows on top the ball speed from 20 to 140 Km/h. To change the ball speed
please press the button Speed.
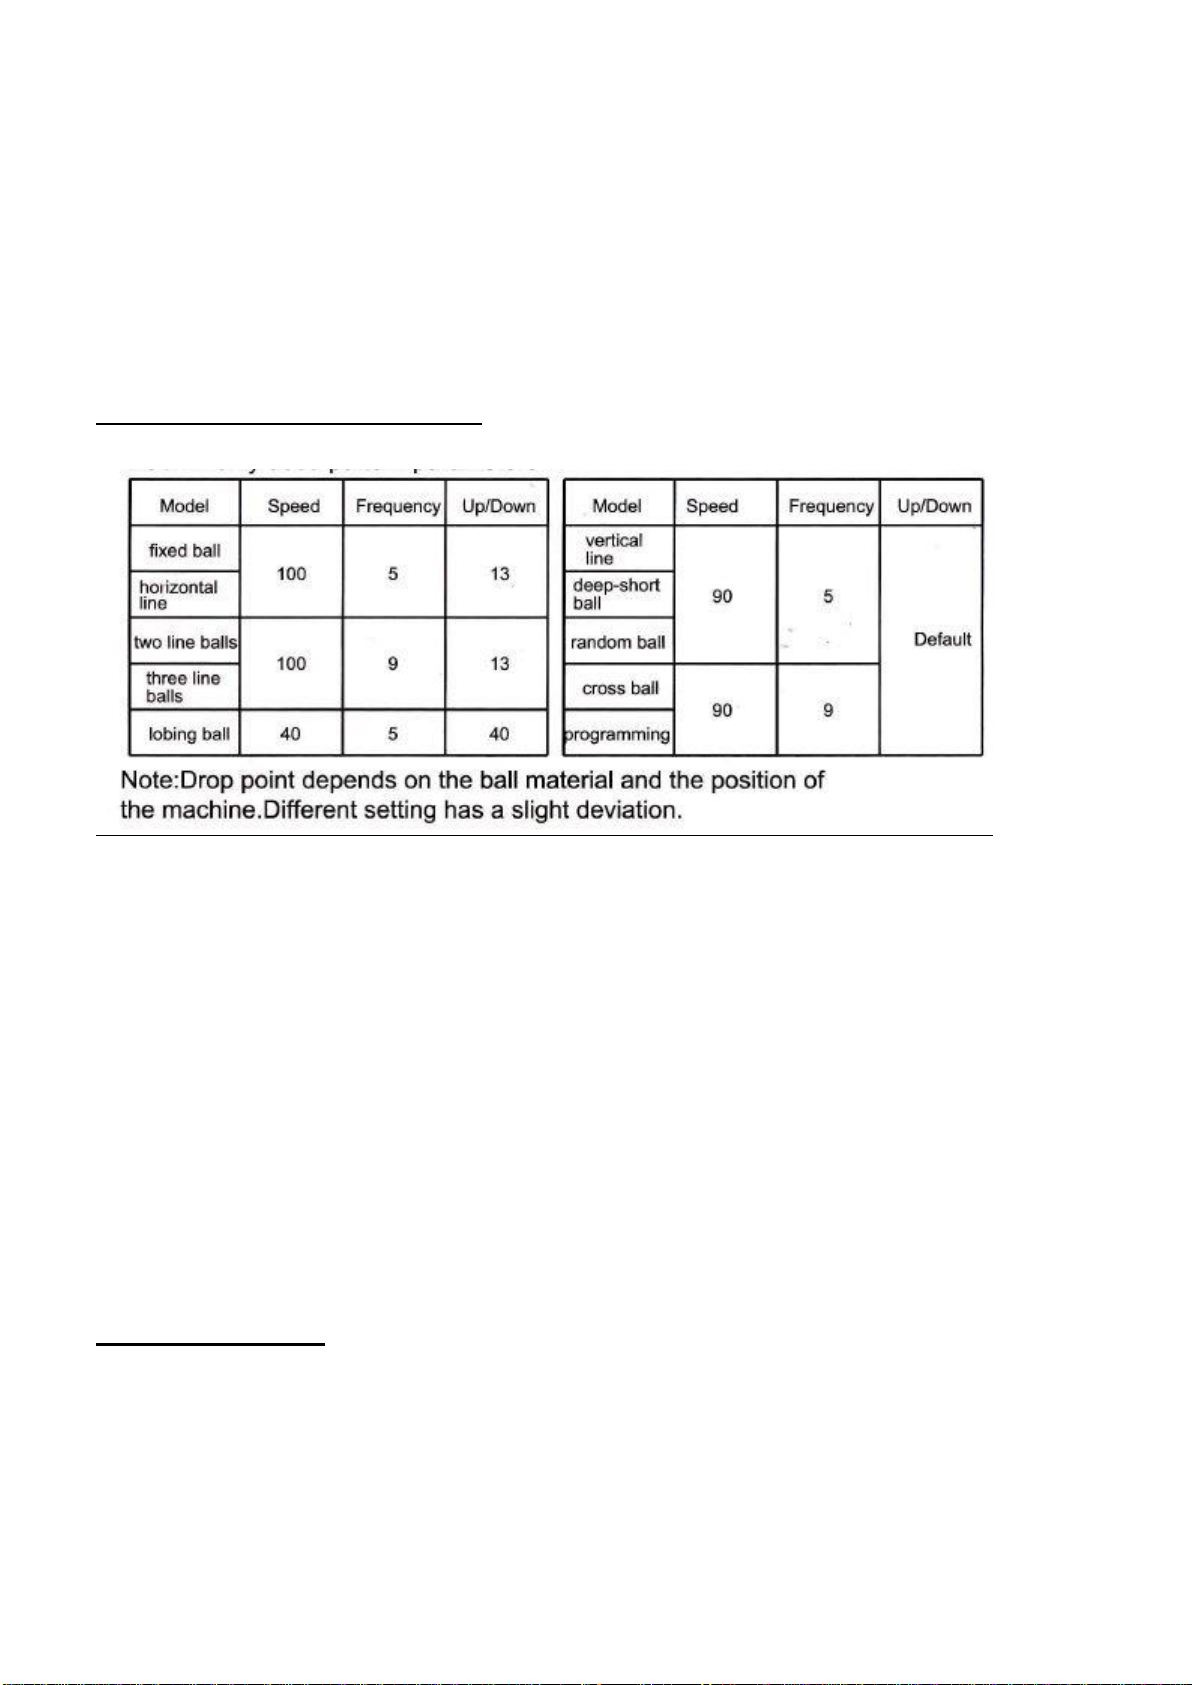
Commonly used pattern Parameters
Maintenance and Cleaning
The throwing wheels should be cleaned all 100 hours.
Take a sandpaper and grind from rim to rim cross. The throwing wheel must feel rough after
they are grinded.
Please don’t use air pressure to clean inside.
Important advice for Lithium Battery
A self-discharge of 3% per month happens at room temperature of 21%.
After you have totally charged the battery the capacity is four hours of playing If you have
totally charged the Lithium battery and you are playing with the machine rd. two hours the
charge is then still 60%, this charge is still good for another three hours..
Ihr Service-Partner :
Mauve® Sports –MSV oHG
In der Lüh 24
D-53506 Hönningen/Germany
+49(0)2643 - 9482871
- 9-
2
3
4
5
6
7
- 10 -
8
10
9
Popular Fitness Equipment manuals by other brands


G-FITNESS
G-FITNESS AIR ROWER user manual

CAPITAL SPORTS
CAPITAL SPORTS Dominate Edition 10028796 manual

Martin System
Martin System TT4FK user guide

CIRCLE FITNESS
CIRCLE FITNESS E7 owner's manual

G-FITNESS
G-FITNESS TZ-6017 user manual

Accelerated Care Plus
Accelerated Care Plus OMNISTIM FX2 CYCLE/WALK user manual


