MSW Motor Technics MSW-DMS202-PRO User manual

EXPONDO.COM
DRILLING MACHINE STAND
MSW-DMS202-PRO
MSW-DMS502-PRO
BEDIENUNGSANLEITUNG
User manual | Instrukcja obsługi | Návod k použití | Manuel d´utilisation | Istruzioni per l‘uso | Manual de instrucciones

2Rev. 14.10.2020
PRODUKTNAME KERNBOHRSTÄNDER
PRODUCT NAME DRILLING MACHINE STAND
NAZWA PRODUKTU STATYW DO WIERTNICY
NÁZEV VÝROBKU STOJAN NA JÁDROVÉ VRTÁNÍ
NOM DU PRODUIT BÂTI DE CAROTTAGE
NOME DEL PRODOTTO SUPPORTO PER TRAPANO A COLONNA
NOMBRE DEL PRODUCTO SOPORTE PARA PERFORADORA
MODELL
MSW-DMS202-PRO
MSW-DMS502-PRO
PRODUCT MODEL
MODEL PRODUKTU
MODEL VÝROBKU
MODÈLE
MODELLO
MODELO
HERSTELLER
EXPONDO POLSKA SP. Z O.O. SP. K.
MANUFACTURER
PRODUCENT
VÝROBCE
FABRICANT
PRODUTTORE
FABRICANTE
ANSCHRIFT DES HERSTELLERS
UL. NOWY KISIELIN-INNOWACYJNA 7, 66-002 ZIELONA GÓRA | POLAND, EU
MANUFACTURER ADDRESS
ADRES PRODUCENTA
ADRESA VÝROBCE
ADRESSE DU FABRICANT
INDIRIZZO DEL PRODUTTORE
DIRECCIÓN DEL FABRICANTE
DE
BEDIENUNGSANLEITUNG
2. NUTZUNGSSICHERHEIT
Gehörschutz benutzen.
Augenschutz benutzen.
Staubschutz benutzen (Schutz der Atemwege).
Handschutz benutzen.
Fußschutz benutzen.
Gesichtsschutz benutzen.
Schutzkleidung benutzen.
ACHTUNG! Warnung vor Handverletzungen!
HINWEIS! In der vorliegenden Anleitung sind
Beispielbilder vorhanden, die vom tatsächlichen
Aussehen das Produkt abweichen können.
ACHTUNG! Lesen Sie alle Sicherheitshinweise und
alle Anweisungen durch. Die Nichtbeachtung der
Warnungen und Anweisungen kann zu schweren
Verletzungen bis hin zum Tod führen.
3
Rev. 14.10.2020
TECHNISCHE DATEN
Parameter Werte
Produktname KERNBOHRSTÄNDER
Modell MSW-
DMS202-PRO
MSW-
DMS502-PRO
Abmessungen
[Breite x Tiefe
x Höhe; mm]
296x512x910 295x512x1096
Säulenabmessun-
gen [mm] 60x62x850 80x75x2000
Gewicht [kg] 14,4 24,4
Bis zum maximalen
Bohrdurchmesser
[mm]
202 502
Verfahrbereich
[mm] 510 650
Montagenloch-
durchmesser [mm] 60 110
Arbeitswinkelein-
stellungen [o]
5-10-15-20-
25-30-35-
40-45
5-10-15-20-
25-30-35-
40-45
Gesamtüberset-
zung der Antriebs-
stange
1:1 1:2/1:1
1. ALLGEMEINE BESCHREIBUNG
Diese Anleitung ist als Hilfe für eine sichere und zuverlässige
Nutzung gedacht. Das Produkt wurde strikt nach den
technischen Vorgaben und unter Verwendung modernster
Technologien und Komponenten sowie unter Wahrung der
höchsten Qualitätsstandards entworfen und angefertigt.
Die originale Anweisung ist die deutschsprachige Fassung.
Sonstige Sprachfassungen sind Übersetzungen aus der
deutschen Sprache.
VOR INBETRIEBNAHME MUSS DIE ANLEITUNG
GENAU DURCHGELESEN UND VERSTANDEN
WERDEN.
Für einen langen und zuverlässigen Betrieb des Geräts
muss auf die richtige Handhabung und Wartung
entsprechend den in dieser Anleitung angeführten
Vorgaben geachtet werden. Die in dieser Anleitung
angegebenen technischen Daten und die Spezikation
sind aktuell. Der Hersteller behält sich das Recht vor, im
Rahmen der Verbesserung der Qualität Änderungen
vorzunehmen. Unter Berücksichtigung des technischen
Fortschritts und der Geräuschreduzierung wurde das
Gerät so entworfen und produziert, dass das infolge der
Geräuschemission entstehende Risiko auf dem niedrigsten
Niveau gehalten wird.
Die Begrie "Gerät" oder "Produkt" in den Warnungen
und Beschreibung des Handbuchs beziehen sich auf
KERNBOHRSTÄNDER.
2.1. SICHERHEIT AM ARBEITSPLATZ
a) Halten Sie Ihren Arbeitsplatz sauber und gut
beleuchtet. Unordnung oder schlechte Beleuchtung
kann zu Unfällen führen. Handeln Sie vorausschauend,
beobachten Sie, was getan wird, und nutzen Sie Ihren
gesunden Menschenverstand bei der Verwendung
des Gerätes.
b) Benutzen Sie das Gerät nicht in explosionsgefährdeten
Bereichen, zum Beispiel in Gegenwart von brennbaren
Flüssigkeiten, Gasen oder Staub. Geräte können unter
Umständen Funken erzeugen, welche Staub oder
Dämpfe entzünden können.
c) Wenn Sie nicht sicher sind, ob das Gerät
ordnungsgemäß funktioniert, wenden Sie sich an den
Service des Herstellers.
d) Reparaturen dürfen nur vom Service des Herstellers
durchgeführt werden. Führen Sie keine Reparaturen
auf eigene Faust durch!
e) Halten Sie Kinder und Unbefugte fern; Unachtsamkeit
kann zum Verlust der Kontrolle über das Gerät führen.
f) Verwenden Sie das Gerät in einem gut belüfteten
Bereich.
g) Überprüfen Sie regelmäßig den Zustand der
Sicherheitsinformationsaufkleber. Falls die Aufkleber
unleserlich sind, sollten diese erneuert werden.
h) Bewahren Sie die Gebrauchsanleitung für den
weiteren Gebrauch auf. Sollte das Gerät an Dritte
weitergegeben werden, muss die Gebrauchsanleitung
mit ausgehändigt werden.
i) Verpackungselemente und kleine Montageteile
außerhalb der Reichweite von Kindern aufbewahren.
j) Halten Sie das Gerät von Kindern und Tieren fern.
k) Im Laufe der Nutzung dieses Werkzeugs einschlieβlich
anderer Werkzeuge soll man sich nach übrigen
Betriebsanweisungen richten.
Deutsch
English
Polski
Česky
Français
Italiano
Español
3
7
11
15
19
23
27
INHALT | CONTENT | TREŚĆ | OBSAH | CONTENU | CONTENUTO | CONTENIDO
ERLÄUTERUNG DER SYMBOLE
Das Produkt erfüllt die geltenden
Sicherheitsnormen.
Gebrauchsanweisung beachten.
Recyclingprodukt.
ACHTUNG!, WARNUNG! oder HINWEIS!, um
auf bestimmte Umstände aufmerksam zu
machen (allgemeines Warnzeichen).

4
DE
ACHTUNG! Obwohl das Gerät in Hinblick
auf Sicherheit entworfen wurde und über
Schutzmechanismen sowie zusätzlicher
Sicherheitselemente verfügt, besteht bei
der Bedienung eine geringe Unfall- oder
Verletzungsgefahr. Es wird empfohlen, bei der
Nutzung Vorsicht und Vernunft walten zu lassen.
Rev. 14.10.2020
2.2. PERSÖNLICHE SICHERHEIT
a) Es ist nicht gestattet, das Gerät im Zustand der
Ermüdung, Krankheit, unter Einuss von Alkohol,
Drogen oder Medikamenten zu betreiben, wenn das
die Fähigkeit das Gerät zu bedienen, einschränkt.
b) Die Maschine darf nur durch entsprechend
geschulte, zur Bedienung geeignete und physisch
gesunde Personen bedient werden, die die
vorliegende Anleitung gelesen haben und die
Arbeitsschutzanforderungen kennen.
c) Seien Sie aufmerksam und verwenden Sie Ihren
gesunden Menschenverstand beim Betreiben des
Gerätes. Ein Moment der Unaufmerksamkeit während
der Arbeit kann zu schweren Verletzungen führen.
d) Benutzen Sie eine persönliche Schutzausrüstung,
die den in Punkt 1 der Symbolerläuterungen
vorgegebenen Maßgaben entspricht. Die Verwendung
einer geeigneten und zertizierten Schutzausrüstung
verringert das Verletzungsrisiko.
e) Überschätzen Sie Ihre Fähigkeiten nicht. Sorgen Sie
für einen sicheren Stand während der Arbeit. Dies gibt
Ihnen eine bessere Kontrolle über das Gerät im Falle
unerwarteter Situationen.
f) Tragen Sie keine weite Kleidung oder Schmuck.
Halten Sie Haare, Kleidung und Handschuhe von
beweglichen Teilen fern. Lose Kleidung, Schmuck
oder lange Haare können durch sich bewegende Teile
erfasst werden.
g) Es wird empfohlen, Augen-, Ohren- und Atemschutz
zu verwenden.
h) Das Gerät ist kein Spielzeug. Kinder sollten in der
Nähe des Geräts unter Aufsicht stehen, um Unfälle zu
vermeiden.
2.3. SICHERE ANWENDUNG DES GERÄTS
a) Überhitzen Sie das Gerät nicht. Verwenden
Sie nur geeignete Werkzeuge für die jeweilige
Anwendung. Richtig ausgewählte Geräte und der
sorgsame Umgang mit ihnen führen zu besseren
Arbeitsergebnissen.
b) Nicht verwendete Werkzeuge sind außerhalb
der Reichweite von Kindern sowie von Personen
aufzubewahren, welche weder das Gerät noch die
Anleitung kennen. In den Händen unerfahrener
Personen können diese Geräte eine Gefahr darstellen.
c) Halten Sie das Gerät stets in einem einwandfreien
Zustand. Prüfen Sie vor jeder Inbetriebnahme, ob
am Gerät und seinen beweglichen Teilen Schäden
vorliegen (defekte Komponenten oder andere
Faktoren, die den sicheren Betrieb der Maschine
beeinträchtigen könnten). Im Falle eines Schadens
muss das Gerät vor Gebrauch in Reparatur gegeben
werden.
d) Halten Sie das Gerät außerhalb der Reichweite von
Kindern.
e) Reparatur und Wartung von Geräten dürfen
nur von qualiziertem Fachpersonal und mit
Originalersatzteilen durchgeführt werden. Nur so wird
die Sicherheit während der Nutzung gewährleistet.
f) Um die Funktionsfähigkeit des Gerätes zu
gewährleisten, dürfen die werksmäßig montierten
Abdeckungen oder Schrauben nicht entfernt werden.
HINWEIS!Kinder und Unbeteiligte müssen bei der
Arbeit mit diesem Gerät gesichert werden.
g) Beachten Sie bei Transport zwischen Lager und
Bestimmungsort und Handhabung des Gerätes die
Grundsätze für Gesundheits- und Arbeitsschutz des
Landes, in dem das Gerät verwendet wird. .
h) Das Gerät muss regelmäßig gereinigt werden, damit
sich nicht dauerhaft Schmutz festsetzt.
i) Das Gerät ist kein Spielzeug. Reinigung und Wartung
dürfen nicht von Kindern ohne Aufsicht durch eine
erwachsene Person durchgeführt werden..
j) Es ist untersagt, in den Aufbau des Geräts einzugreifen,
um seine Parameter oder Konstruktion zu ändern.
k) Geräte von Feuer – und Wärmequellen fernhalten.
l) Überlasten Sie das Gerät nicht.
m) Auf die richtige Einstellung des Handgris achten.
n) Es wird empfohlen den Seitenhandgri zu verwenden.
MSW-DMS502-PRO
3.2. VORBEREITUNG ZUR VERWENDUNG
ARBEITSPLATZ DES GERÄTES:
Halten Sie das Gerät von heißen Oberächen fern. Das Gerät
sollte immer auf einer ebenen, stabilen Oberäche und
außerhalb der Reichweite von Kindern und Personen mit
eingeschränkten Funktionen verwendet werden.
AUFBAU DES GERÄTES
Verwenden Sie einen Betonanker, um den Kernbohrständer
zu befestigen, nachdem Sie die geeignete Position für das
Stativ entsprechend der Zielarbeit der Lochsäge ausgewählt
haben. Bohren Sie dazu mit einem Bohrhammer ein für
den Anker geeignetes Loch in die Oberäche. Bei einer
Ziegeloberäche sollte ein spezieller Mauerwerksanker mit
Klebsto verwendet werden, um rissige Mauern/Wände zu
reparieren.
ACHTUNG: Die Verwendung eines Ankers für Beton auf
Ziegeln kann zum Bruch und Lösen des Ankers führen!
Stellen Sie bei Vakuummontagen sicher, dass sich kein
Schmutz oder andere lose Elemente auf der Oberäche
benden, an der das Stativ befestigt werden soll, und dass
der Unterdruck allein ausreicht, um das Stativ mit seinem
Zubehör zu halten.
ACHTUNG: Verwenden Sie keine Vakuumbefestigungen
beim Decken- oder Gewölbebohren usw. in Positionen über
dem Kopf des Bedieners!
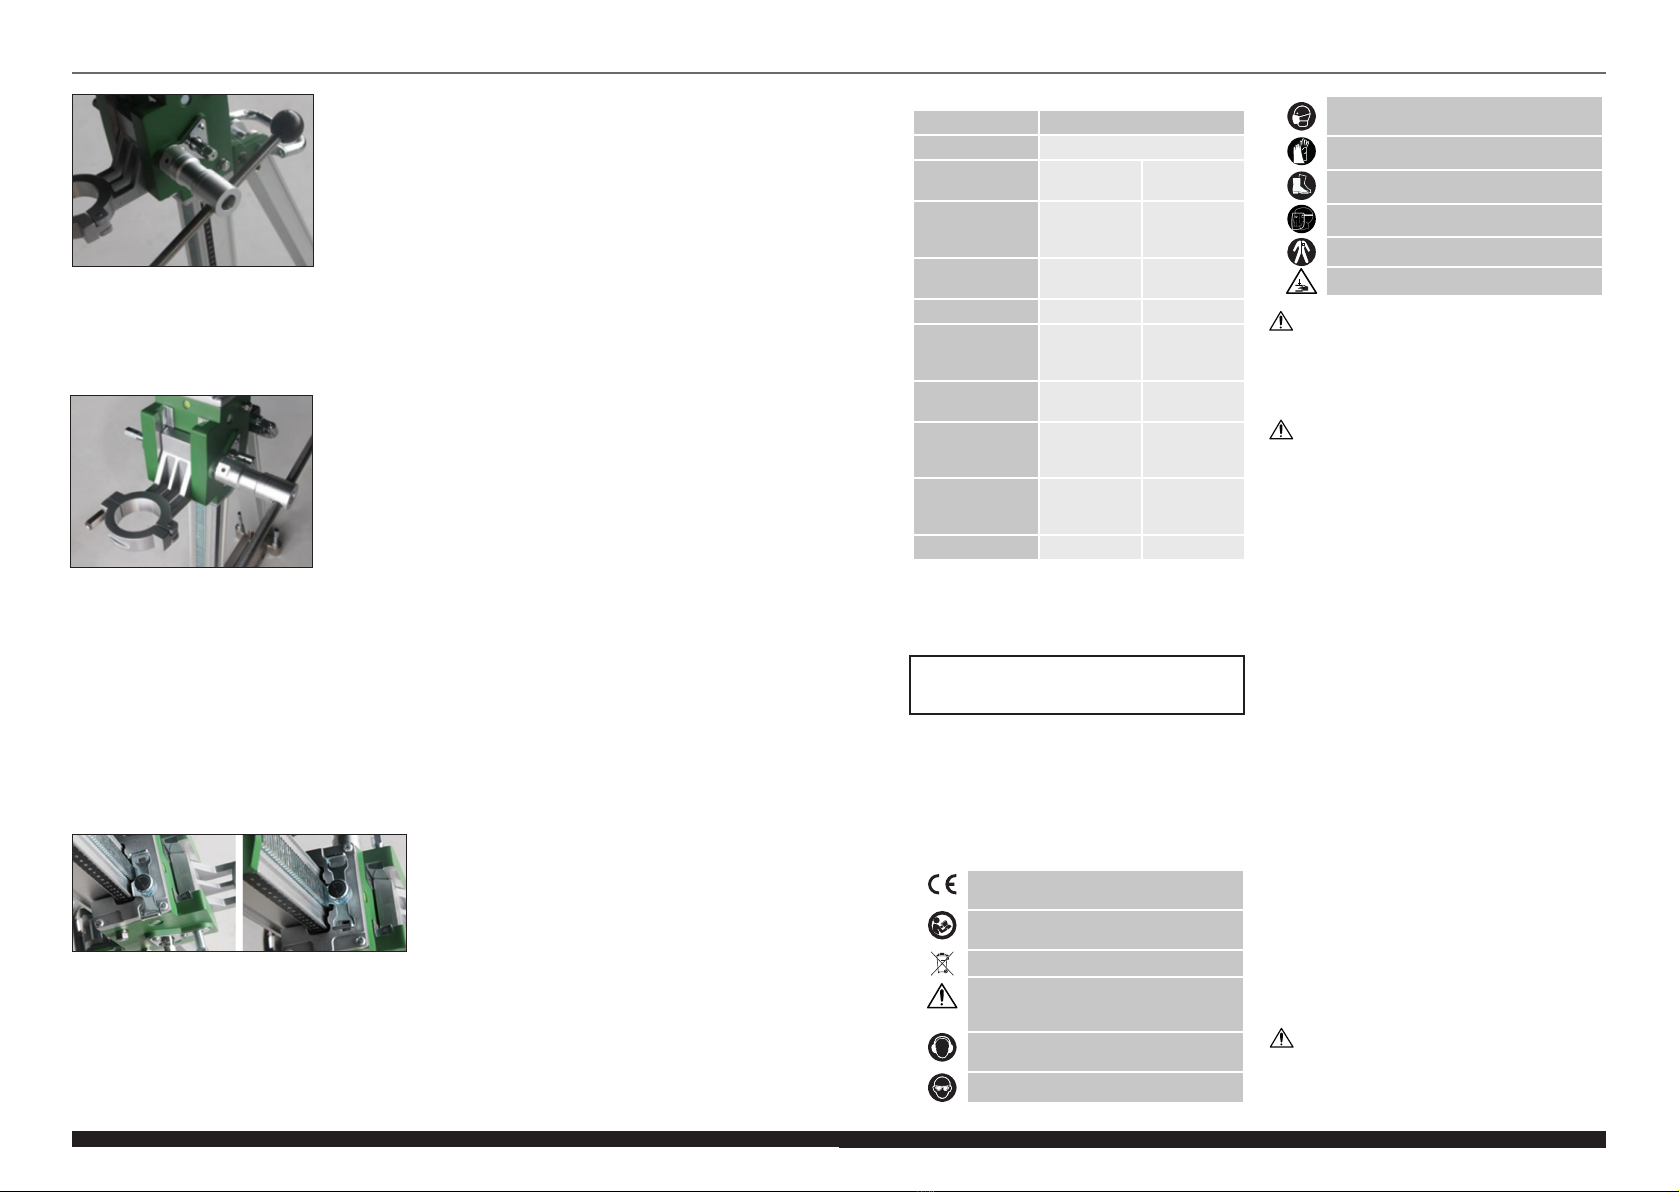
Verwenden Sie die Libelle (Wasserwaage), um das Gerät zu
nivellieren, indem Sie die vier Nivellierschrauben an der Basis
des Stativs bzw. Kernbohrständers richtig drehen. Ziehen Sie
die Muttern erst nach dem Nivellieren fest. Das Nivellieren
des Stativs ist sowohl für vertikale als auch für horizontale
Bohrlöcher erforderlich.
3.3. ARBEIT MIT DEM GERÄT
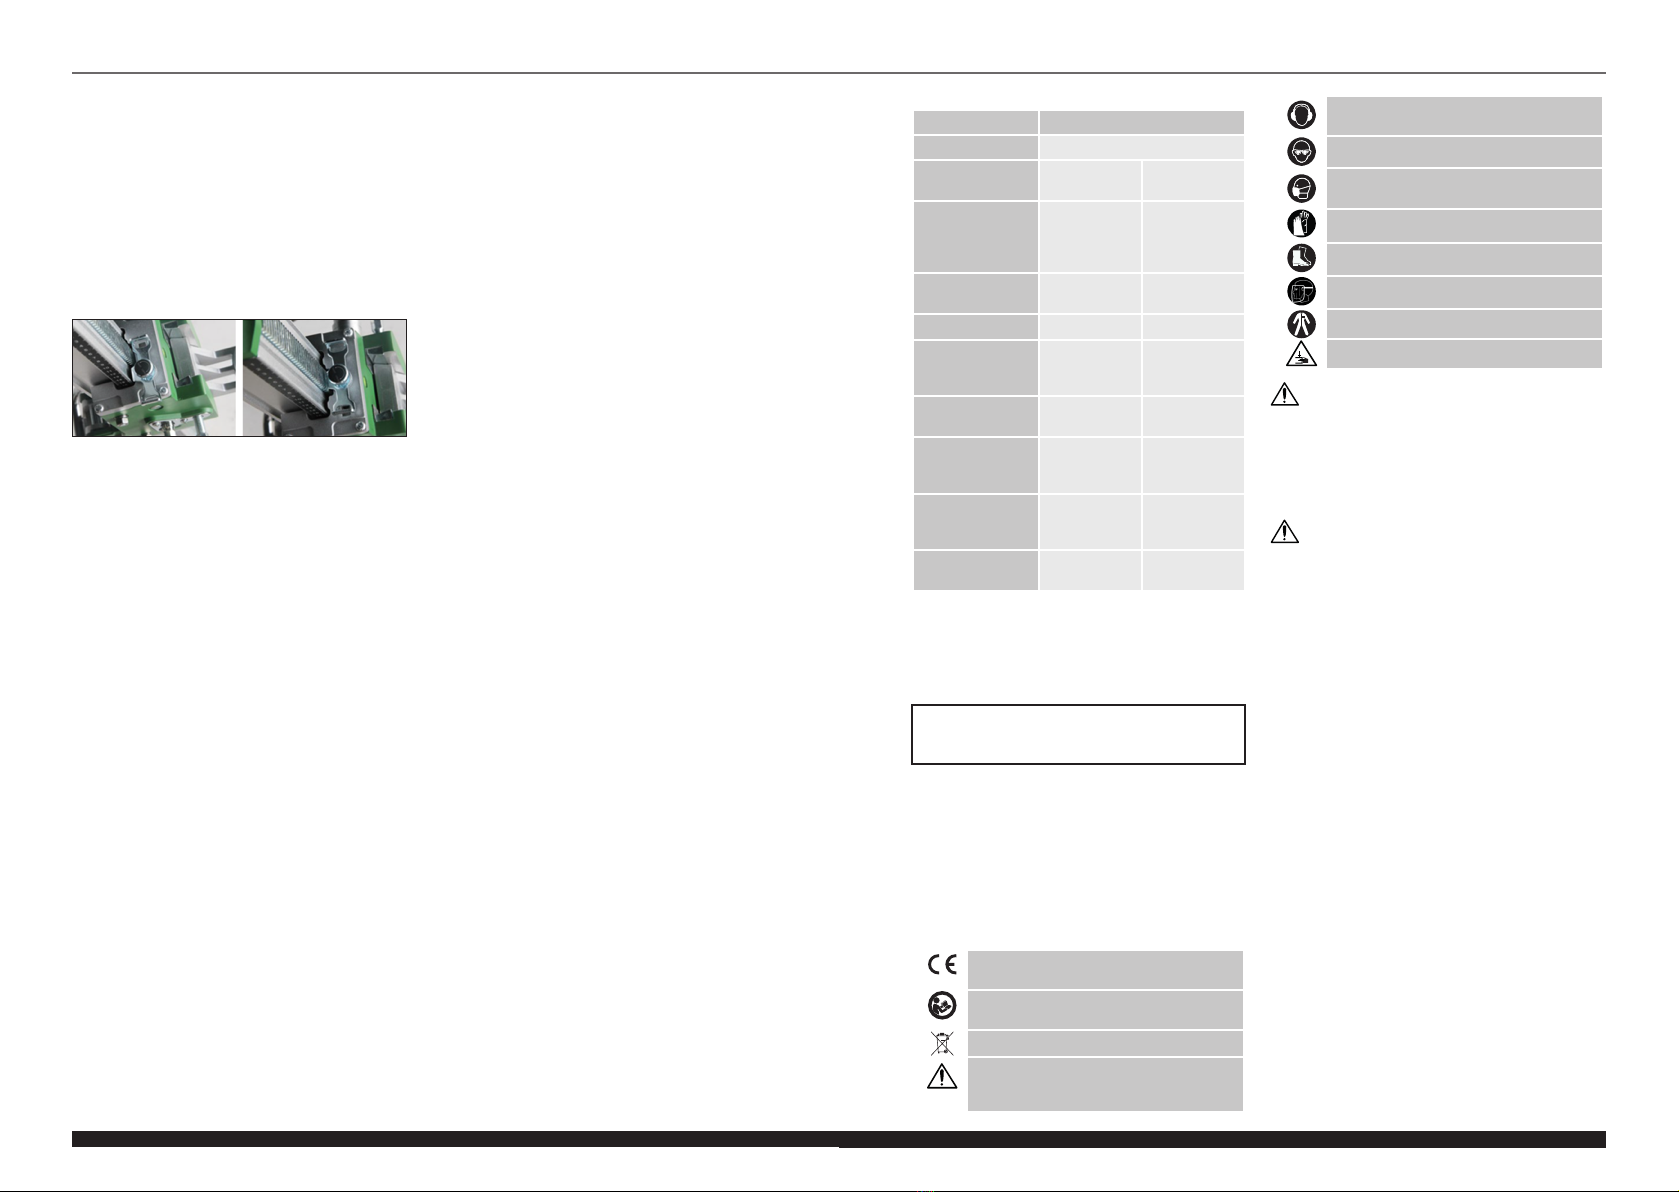
3.3.1 EINSTELLEN DES STATIVWINKELS
Der Winkel des Kernbohrständers sollte an die Mittelposition
des zu bohrenden Lochs angepasst werden. Der Bereich des
Neigungswinkels kann im Bereich von 0-45o eingestellt
werden. Lösen Sie zum Einstellen des Neigungswinkels die
Klemmschraube am Träger mit der Kurbel. Achten Sie beim
Einstellen des Winkels auf die Skala am Träger. Ziehen Sie
die Klemmschraube nach dem Einstellen des gewünschten
Winkels wieder an. Ziehen Sie die Stellschraube am Schlitten
fest, um sicherzustellen, dass die Montageplatte oder
Halterung nicht locker ist.
ACHTUNG: Ziehen Sie die Druckschrauben nicht zu fest an,
da sich sonst die Säule oder Rampe verformen kann.
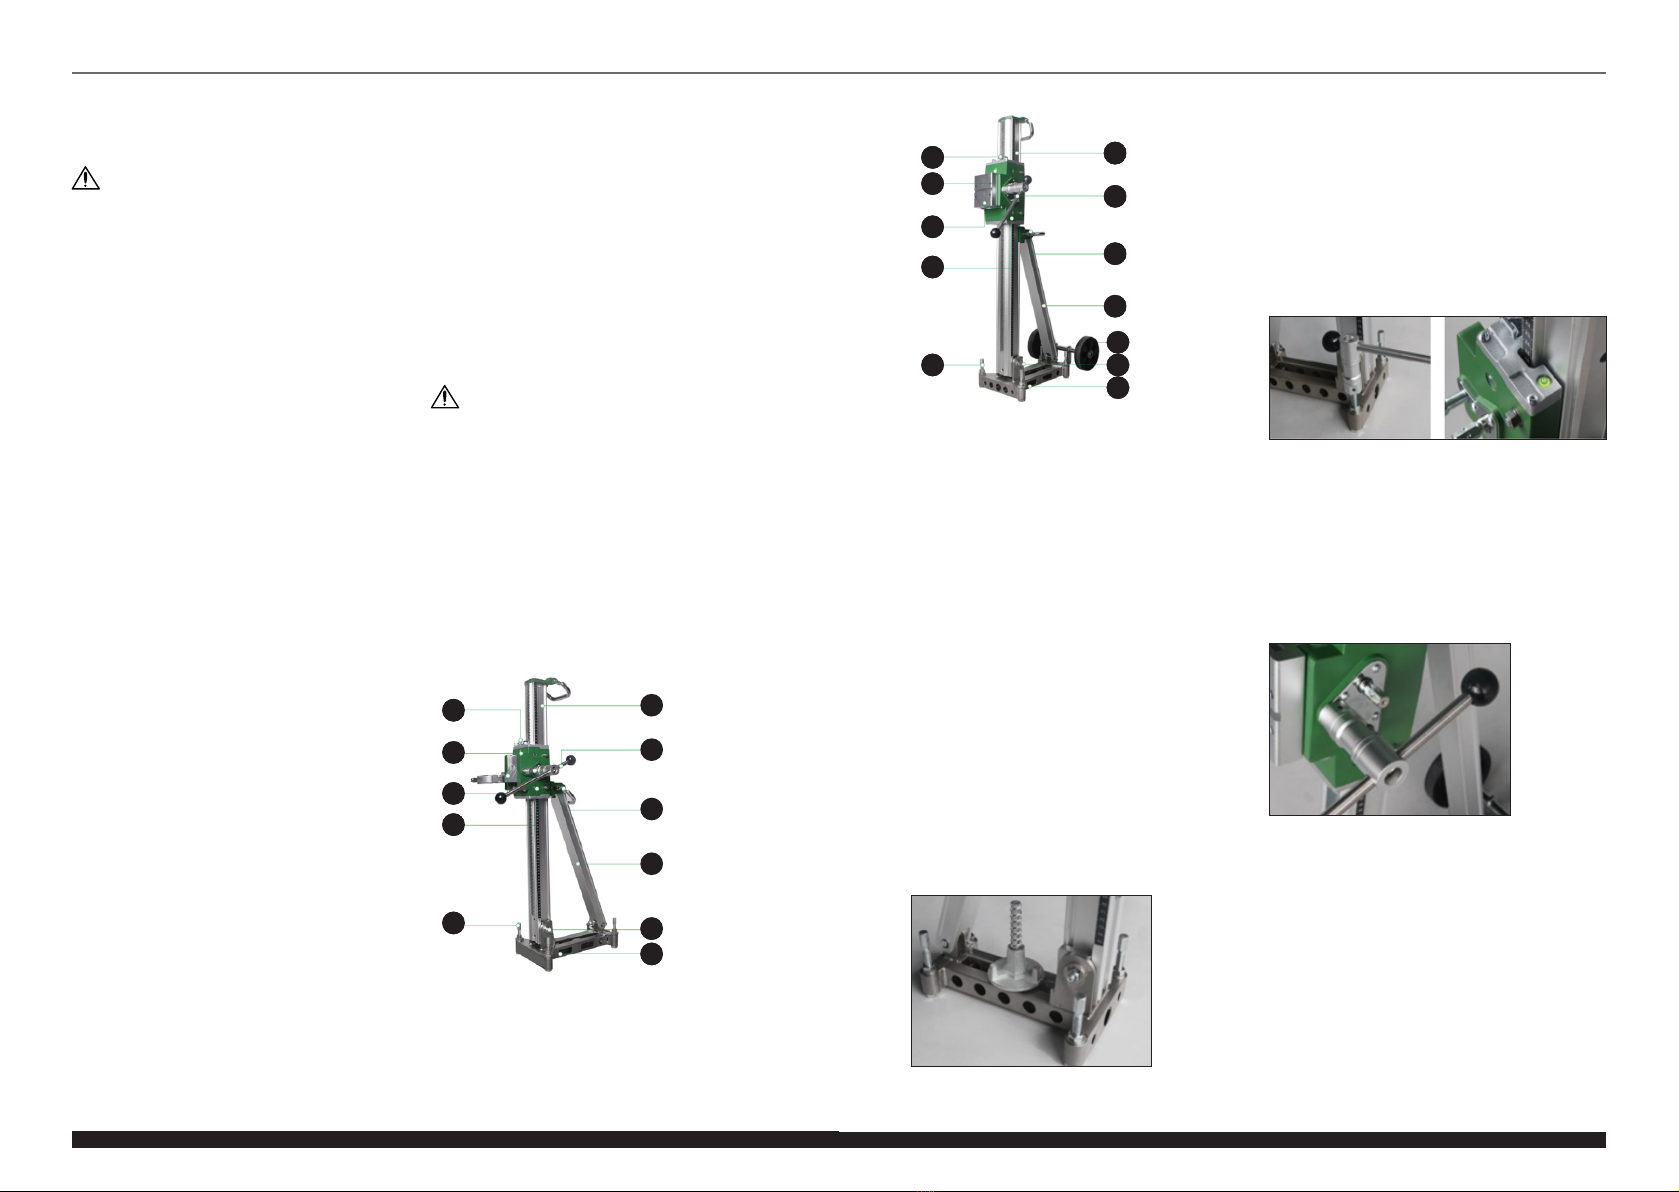
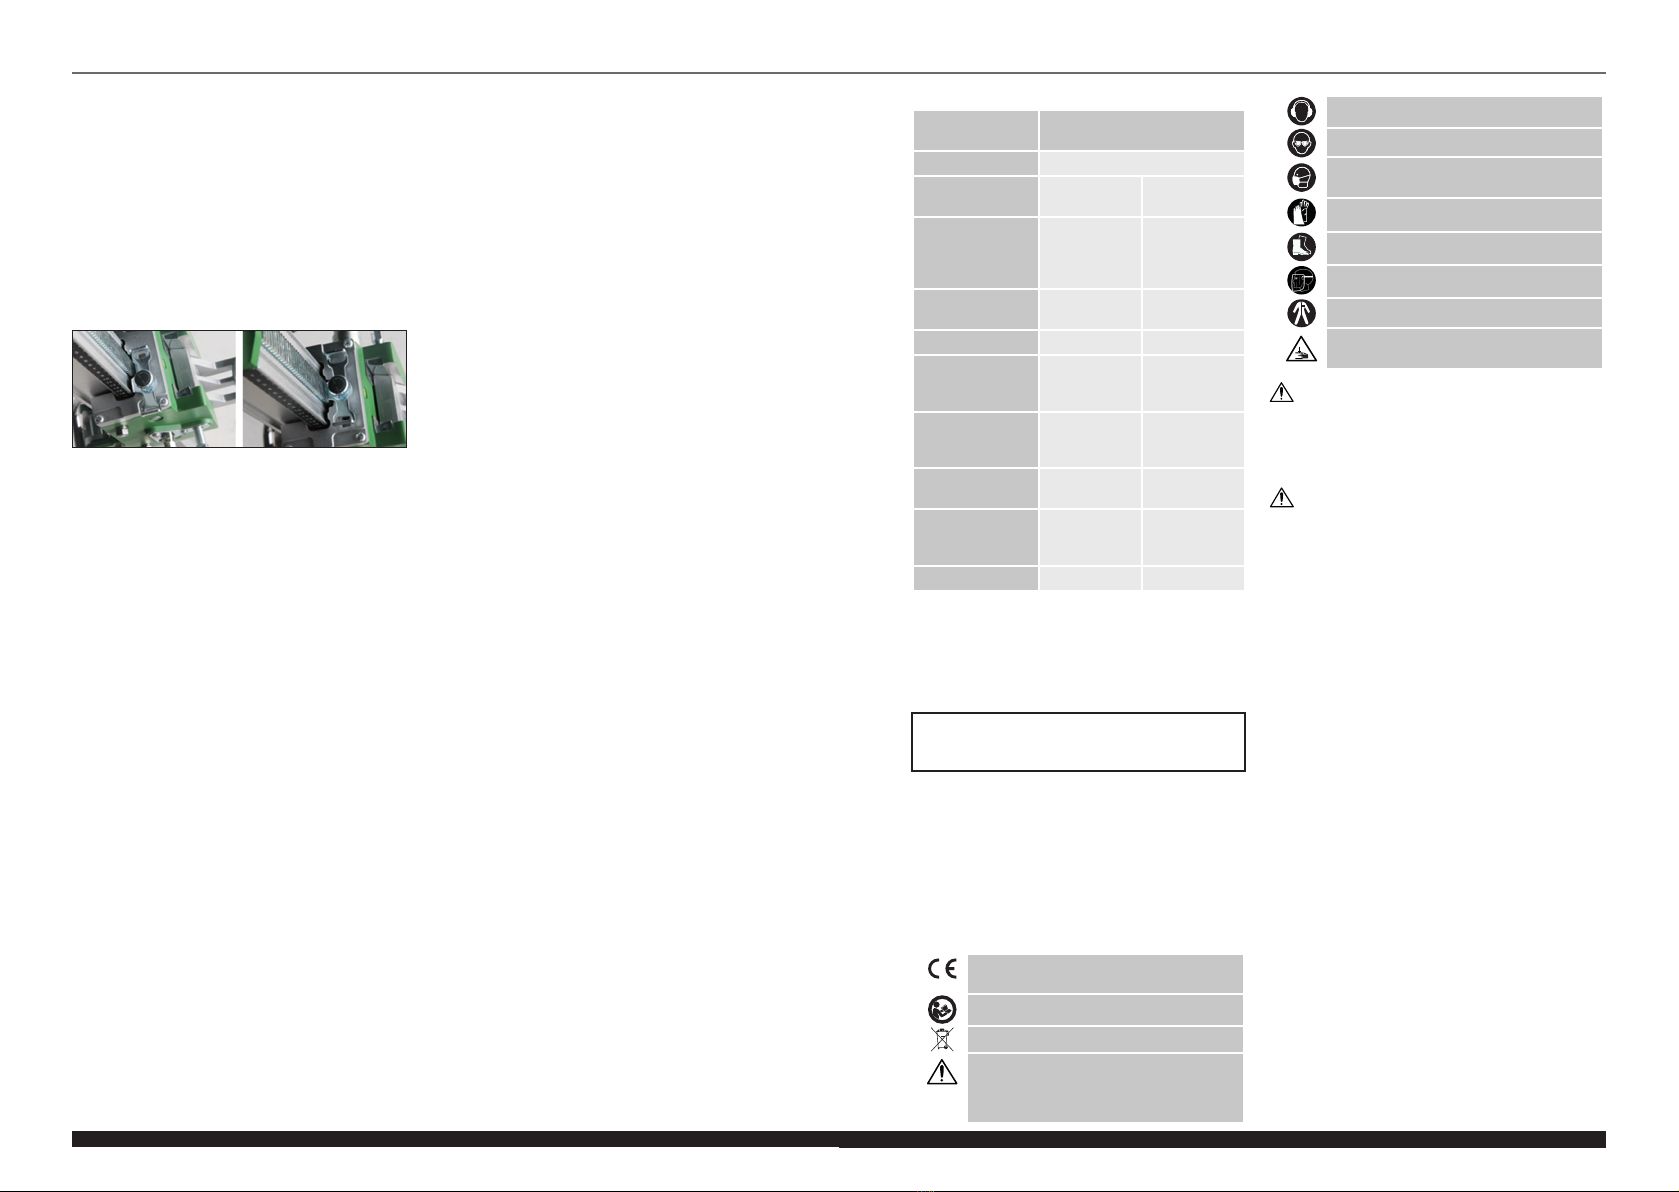
3.3.2 EINSTELLEN DES HUBS DES SCHIEBEWAGENS
Überprüfen Sie den festen Sitz der Führung an der Säule.
Wenn diese locker ist, ziehen Sie die 4 Exzenterspanner im
Wagen fest. Um den richtigen Leerlauf einzustellen, ziehen
Sie die Spannmutter mit den Schraubenschlüsseln 13 und
8 mm an und testen Sie den Wagen, indem Sie die Kurbel
auf und ab drehen. Korrekt, er sollte keinen Leerlauf haben
und sich auch während der Auf-/Abbewegung nicht selbst
schneiden bzw. blockieren.
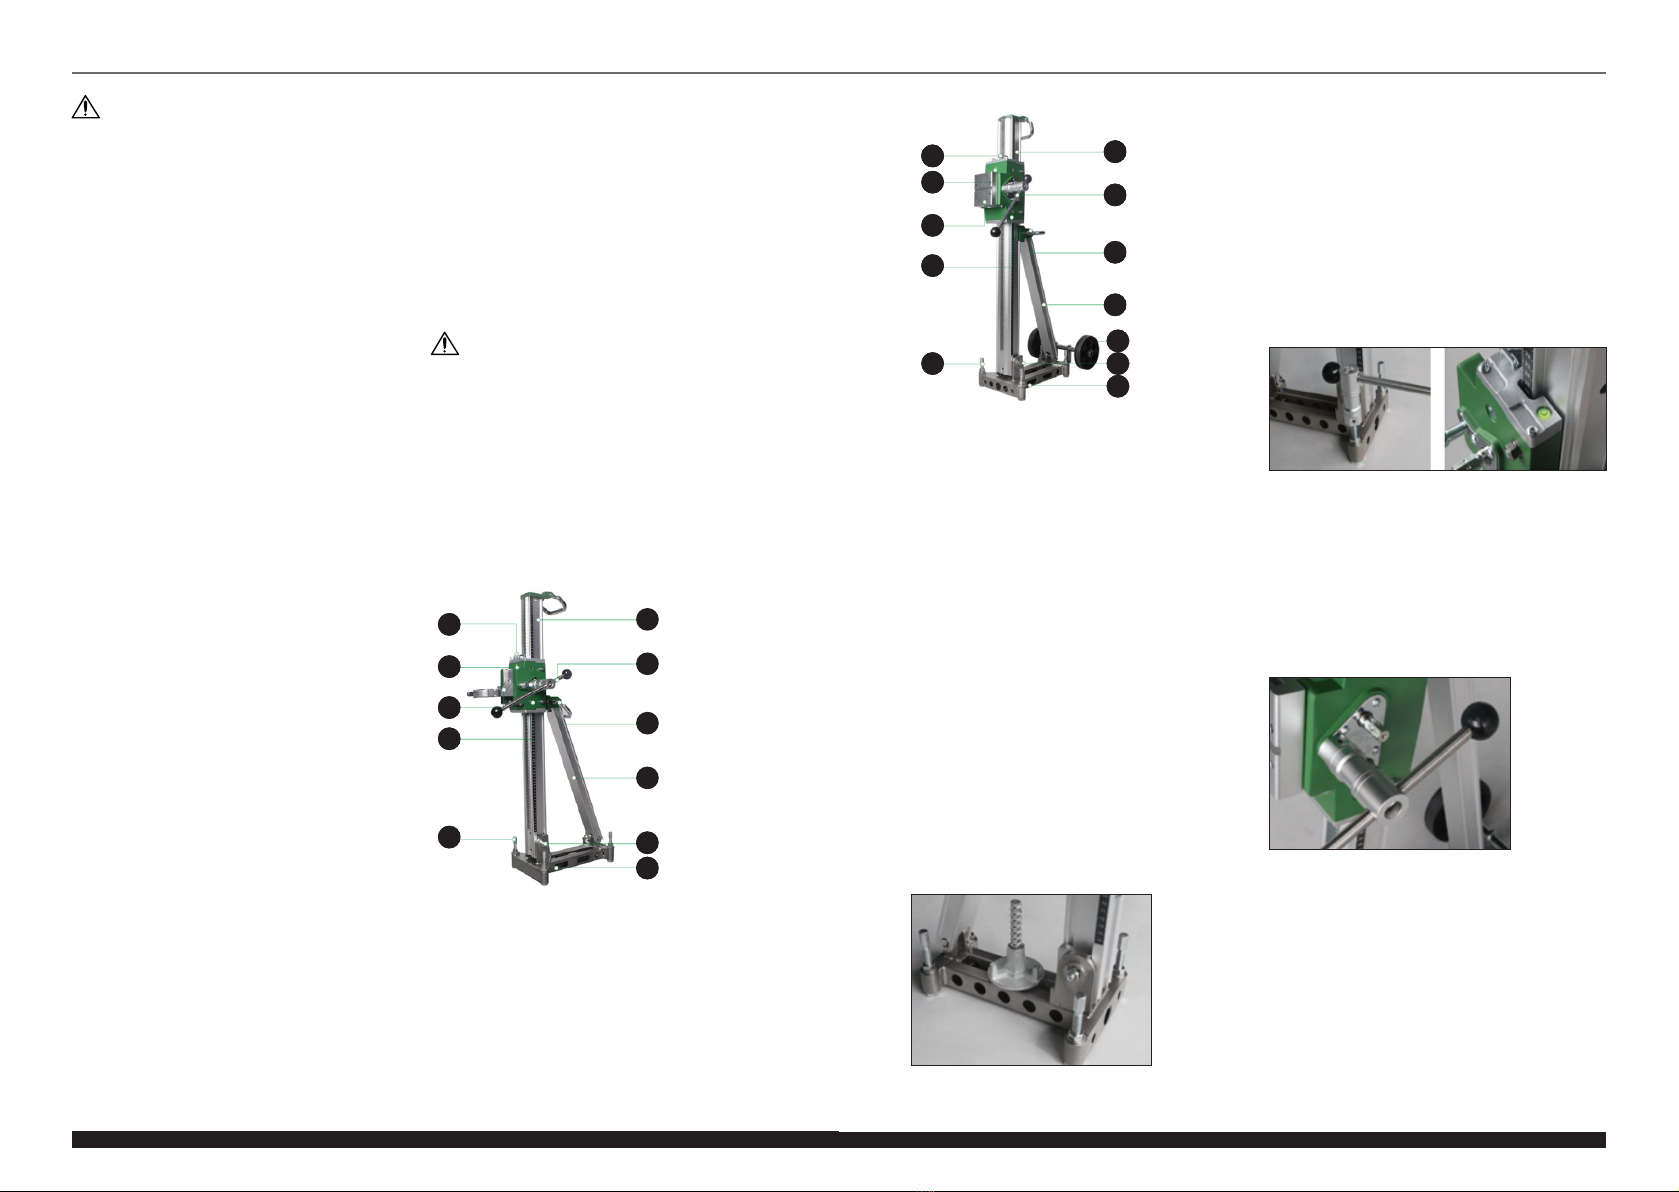
1. Spalte
2. Kurbel zur Höhenverstellung
3. Neigungswinkelverriegelung
4. Halterung
5. Fixieren der Säule
6. Basis
7. Wagenschloss
8. Libelle
9. Montagestelle einer Lochsäge
10. Schiebewagen
11. Nivellierschraube
12. T ransporträder (nur MSW-DMS502-PRO)
3. NUTZUNGSBEDINGUNGEN
Das Produkt wurde entwickelt, um bei Lochbohrgeräten zu
helfen, die Präzision des Bohrens zu beeinträchtigen und das
Bohren von Löchern in einem Winkel zu erleichtern.
Für alle Schäden bei nicht sachgemäßer Verwendung
haftet allein der Betreiber.
3.1. GERÄTEBESCHREIBUNG
MSW-DMS202-PRO
DE
5
Rev. 14.10.2020
1
2
3
4
5
6
7
8
9
10
11
7
8
9
10
11
1
2
3
4
12
5
6

6
DE
3.3.3 MONTAGE UND POSITIONIERUNG DER LOCHSÄGE
Das Modell MSW-DMS202-PRO ist für die Installation einer
manuellen Lochsäge (MSW-DDM202L-PRO oder MSW-
DDM202S-PRO) geeignet und verfügt über eine spezielle
Klemme, während das Modell MSW-DMS502-PRO nur
für Lochsägen vorgesehen ist Arbeiten Sie mit einem
Ständer (MSW-DDM402-PRO) und haben Sie eine 4-Loch-
Befestigung.
Heben Sie den Wagen zur leichteren Montage der Lochsäge
auf dem Stativ leicht an und stellen Sie die Höhe erst nach
dem Befestigen ein. Verwenden Sie bei Lochsägen nur
für Stative zuerst vier Schrauben, um das Montagekissen
an der Lochsäge zu befestigen. Befestigen Sie dann die
Montageplatte an der vollständig eingesetzten Halterung
und ziehen Sie die Feststellschraube fest. Diese Schraube
sollte fest angezogen und beim Entfernen vollständig
gelöst werden. Das Wagenschloss bendet sich oben am
Wagen und dient zur sicheren Befestigung des Wagens auf
der gewünschten Arbeitshöhe. Um das Schloss zu lösen,
schieben Sie es nach links, lösen Sie die Rändelschraube des
Schlosses, stellen Sie die gewünschte Höhe des Wagens ein,
indem Sie die Kurbel in die entsprechende Richtung drehen,
und verriegeln Sie das Schloss nach dem Einstellen erneut,
indem Sie es nach links bewegen rechts und ziehen Sie die
darauf bendliche Rändelschraube fest.
WICHTIG: Es ist nicht gestattet, die Höhe des Wagens bei
eingerastetem Schloss einzustellen, da dies sowohl den
Vorschubmechanismus als auch das Schloss beschädigen
kann! Beim Modell MSW-DMS502-PRO verfügt der
Mechanismus zur Einstellung der Wagenhöhe über 2
Gänge: 1:1 und 1:2 (weniger Kurbelumdrehung - schnellerer
Vorschub). Bei Bohrlöchern mit einem Durchmesser von
mehr als 202 mm sollte ein reduzierter Gang verwendet
werden, d.h. 1:2 - bewegen Sie die Kurbel einfach zum
entsprechenden Ende des Getriebes.
3.4. REINIGUNG UND WARTUNG
a) Verwenden Sie zur Reinigung der Oberäche
ausschließlich Mittel ohne ätzende Inhaltsstoe.
b) Bewahren Sie das Gerät an einem trockenen, kühlen,
vor Feuchtigkeit und direkter Sonneneinstrahlung
geschütztem Ort auf.
c) Es ist verboten, das Gerät mit einem Wasserstrahl zu
besprühen oder in Wasser zu tauchen.
d) In Hinblick auf technische Ezienz und zur
Vorbeugung vor Schäden sollte das Gerät regelmäßig
überprüft werden.
e) Benutzen Sie einen weichen Lappen zur Reinigung.
f) Zum Reinigen ist ein weicher, feuchter Lappen zu
verwenden.
g) Zum Reinigen darf man keine scharfen und/
oder Metallgegenstände (z.B. Drahtbürste oder
Metallspachtel) benutzen, weil diese die Oberäche
des Materials, aus dem das Gerät hergestellt ist,
beschädigen können.
h) Reinigen Sie das Gerät nicht mit säurehaltigen
Substanzen. Medizinische Geräte, Verdünner,
Kraftsto, Öle oder andere Chemikalien können das
Gerät beschädigen.
ENTSORGUNG GEBRAUCHTER GERÄTE
Dieses Produkt darf nicht über den normalen Hausmüll
entsorgt werden. Geben Sie das Gerät bei entsprechenden
Sammel- und Recyclinghöfen für Elektro- und
Elektronikgeräte ab. Überprüfen Sie das Symbol auf dem
Produkt, der Bedienungsanleitung und der Verpackung. Die
bei der Konstruktion des Gerätes verwendeten Kunststoe
können entsprechend ihrer Kennzeichnung recycelt werden.
Mit der Entscheidung für das Recycling leisten Sie einen
wesentlichen Beitrag zum Schutz unserer Umwelt. Wenden
Sie sich an die örtlichen Behörden, um Informationen über
Ihre lokale Recyclinganlagen zu erhalten.
EN
USER MANUAL
2. USAGE SAFETY
Wear protective goggles.
Wear a dust mask (respiratory tract
protection).
Wear protective gloves.
Wear foot protection.
Wear a face shield.
Wear protective clothing.
ATTENTION! Hand crush hazard!
PLEASE NOTE! Drawings in this manual are for
illustration purposes only and in some details may
dier from the actual product.
ATTENTION! Read all safety warnings and all
instructions. Failure to follow the warnings and
instructions may result in serious injury or even
death.
7
Rev. 14.10.2020
TECHNICAL DATA
Parameter
description Parameter value
Product name DRILLING MACHINE STAND
Model MSW-
DMS202-PRO
MSW-
DMS502-PRO
Dimensions
[Width x Depth
x Height; mm]
296x512x910 295x512x1096
Column
dimensions [mm] 60x62x850 80x75x2000
Weight [kg] 14,4 24,4
For maximum
drilling diameter
[mm]
202 502
Travel range [mm] 510 650
Mounting hole
diameter [mm] 60 110
Working angle
settings [o]
5-10-15-20-
25-30-35-
40-45
5-10-15-20-
25-30-35-
40-45
Sliding gear ratio 1:1 1:2/1:1
1. GENERAL DESCRIPTION
The user manual is designed to assist in the safe and
trouble-free use of the device. The product is designed and
manufactured in accordance with strict technical guidelines,
using state-of-the-art technologies and components.
Additionally, it is produced in compliance with the most
stringent quality standards.
DO NOT USE THE DEVICE UNLESS YOU HAVE
THOROUGHLY READ AND UNDERSTOOD THIS
USER MANUAL.
To increase the product life of the device and to ensure
trouble-free operation, use it in accordance with this user
manual and regularly perform maintenance tasks. The
technical data and specications in this user manual are
up to date. The manufacturer reserves the right to make
changes associated with quality improvement. The device
is designed to reduce noise emission risks to a minimum,
taking into account technological progress and noise
reduction opportunities.
The terms "device" or "product" are used in the warnings
and instructions to refer to DRILLING MACHINE STAND.
2.1. SAFETY IN THE WORKPLACE
a) Make sure the workplace is clean and well lit. A messy
or poorly lit workplace may lead to accidents. Try
to think ahead, observe what is going on and use
common sense when working with the device.
b) Do not use the device in a potentially explosive
environment, for example in the presence of
ammable liquids, gases or dust. The device generates
sparks which may ignite dust or fumes.
c) If there are any doubts as to the correct operation
of the device, contact the manufacturer's support
service.
d) Only the manufacturer's service point may repair the
device. Do not attempt any repairs independently!
e) Children or unauthorised persons are forbidden to
enter a work station. (A distraction may result in loss
of control over the device).
f) Use the device in a well-ventilated space.
g) Regularly inspect the condition of the safety labels. If
the labels are illegible, they must be replaced.
h) Please keep this manual available for future reference.
If this device is passed on to a third party, the manual
must be passed on with it.
i) Keep packaging elements and small assembly parts in
a place not available to children.
j) Keep the device away from children and animals.
k) If this device is used together with another equipment,
the remaining instructions for use shall also be
followed.
The original operation manual is written in German. Other
language versions are translations from the German.
LEGEND
The product satises the relevant safety
standards.
Read instructions before use.
The product must be recycled.
WARNING! or CAUTION! or REMEMBER!
Applicable to the given situation. (general
warning sign)
Use ear protection. Exposure to loud noise
may result in hearing loss.
REMEMBER! When using the device, protect
children and other bystanders.

MSW-DMS502-PRO
3.2. PREPARING FOR USE
APPLIANCE LOCATION
Keep the device away from any hot surfaces The device
should always be used mounted on an even, stable surface
and out of the reach of children and people with limited
psychological functions.
ASSEMBLING THE APPLIANCE
After choosing the right position for the column stand,
keeping in mind the target job for the hole saw, use a
concrete anchor to x the column stand in place. To do this,
drill an anchor port for the anchor with a hammer drill. In
case of brick surface, a special masonry anchor should be
used along with a ller to repair cracked walls.
PLEASE NOTE: the use of concrete anchor on a brick wall may
result in breakage and loosening the anchor!
In the case of vacuum clamping, make sure that there is
no dirt or other loose elements on the surface to which
the column stand will be attached, and that the negative
pressure alone is sucient to hold the column and the
accessories.
PLEASE NOTE: do not use vacuum clamping when drilling
holes in the ceiling, vault etc. above the operator's head!
Use the spirit level, position the device by turning the four
levelling screws at the base of the tripod - tighten their nuts
after the levelling is nished. The column stand must be
levelled both for vertical and horizontal drilling
3.3. DEVICE USE
3.3.1 SETTING THE COLUMN STAND ANGLE
The angle of the stand should be adjusted to the central
position of the hole to be drilled. The angle inclination range
can be set in the range of 0-45o. To set the inclination angle,
use the crank to loosen the clamping screw on the support -
when adjusting the angle, pay attention to the graded scale
on the support. After setting the desired angle, retighten the
clamping screw. Tighten the clamping screw on the carriage
to make sure the mounting plate or bracket is not loose.
PLEASE NOTE: do not tighten the pressure screws too
much, otherwise the column stand or its elements may be
deformed.
3.3.2 SETTING THE CARRIAGE TRAVEL SMOOTHNESS
Check the tightness of the guide on the column - if it is loose,
tighten the 4 eccentric tensioners inside the carriage. To set
the correct clearance, use the 13 and 8 mm wrenches to
tighten the tensioner nut, then test the carriage by turning
the crank up and down. It should not travel too freely, nor
should it get stuck during the up/down movement.
1. Column
2. Crank for height adjustment
3. Tilt angle lock
4. Bracket
5. Column xing element
6. Base
7. Carriage lock
8. Spirit level
9. Mounting on a hole saw
10. Carriage
11. Levelling screw
12. Transport wheels (MSW-DMS502-PRO only)
EN
9
Rev. 14.10.2020
7
8
9
10
11
1
2
3
4
12
5
6
8
EN
ATTENTION! Despite the safe design of the device
and its protective features, and despite the use of
additional elements protecting the operator, there
is still a slight risk of accident or injury when using
the device. Stay alert and use common sense when
using the device.
Rev. 14.10.2020
2.2. PERSONAL SAFETY
a) Do not use the device when tired, ill or under the
inuence of alcohol, narcotics or medication which
can signicantly impair the ability to operate the
device.
b) The machine may be operated by physically t
persons who are able to handle the machine, are
properly trained, who have reviewed this operating
manual and have received training in occupational
health and safety.
c) When working with the device, use common sense
and stay alert. Temporary loss of concentration while
using the device may lead to serious injuries.
d) Use personal protective equipment as required
for working with the device, specied in section 1
(Legend). The use of correct and approved personal
protective equipment reduces the risk of injury.
e) Do not overestimate your abilities. When using the
device, keep your balance and remain stable at all
times. This will ensure better control over the device
in unexpected situations.
f) Do not wear loose clothing or jewellery. Keep hair,
clothes and gloves away from moving parts. Loose
clothing, jewellery or long hair may get caught in
moving parts.
g) Use eye, ear and respiratory protection.
h) The device is not a toy. Children must be supervised to
ensure that they do not play with the device.
2.3. SAFE DEVICE USE
a) Do not overload the device. Use the appropriate tools
for the given task. A correctly-selected device will
perform the task for which it was designed better and
in a safer manner.
b) When not in use, store in a safe place, away from
children and people not familiar with the device who
have not read the user manual. The device may pose
a hazard in the hands of inexperienced users.
c) Keep the device in perfect technical condition. Before
each use check for general damage and especially
check for cracked parts or elements and for any other
conditions which may impact the safe operation of
the device. If damage is discovered, hand over the
device for repair before use.
d) Keep the device out of the reach of children.
e) Device repair or maintenance should be carried out by
qualied persons, only using original spare parts. This
will ensure safe use.
f) To ensure the operational integrity of the device, do
not remove factory-tted guards and do not loosen
any screws.
g) When transporting and handling the device between
the warehouse and the destination, observe the
occupational health and safety principles for manual
transport operations which apply in the country where
the device will be used.
h) Clean the device regularly to prevent stubborn grime
from accumulating.
i) The device is not a toy. Cleaning and maintenance may
not be carried out by children without supervision by
an adult person.
j) It is forbidden to interfere with the structure of
the device in order to change its parameters or
construction.
k) Keep the device away from sources of re and heat.
l) Do not overload the device.
m) Properly set the tool holder in the machine.
n) The tool becomes very hot during operation.
3. USE GUIDELINES
The product is designed to assist working with hole saws,
aecting the precision of drilling and making it easier to drill
holes at an angle.
The user is liable for any damage resulting from
unintended use of the device.
3.1. DEVICE DESCRIPTION
MSW-DMS202-PRO
1
2
3
4
5
6
7
8
9
10
11
3.3.3 MOUNTING AND POSITIONING OF THE HOLE SAW
The MSW-DMS202-PRO model is adapted for the
installation of a manual hole saw (MSW-DDM202L-PRO or
MSW-DDM202S-PRO), and has a special clamp, while the
MSW-DMS502-PRO is dedicated to hole saws that can only
work with a stand (MSW-DDM402- PRO) and has a 4-bolt
clamping.

10
EN
For easier mounting of the hole saw on the tripod, raise the
carriage slightly and only after xing it, adjust its height. For
column stand-only hole saws, rst use the four screws to
secure the mounting pad to the hole saw. Then, attach the
fully inserted mounting plate to the cradle and tighten the
locking screw. This screw should be fully tightened, and fully
loosened on dismantling.
The carriage lock is located on the top of the carriage and
serves to securely x the carriage at the desired working
height. In order to release the lock, slide it to the left, loosen
the knurled screw of the lock, set the desired height of the
trolley by turning the crank in the appropriate direction and,
after adjusting it, close the lock again by moving it to the
right and tightening the knurled screw.
IMPORTANT: do not adjust the height of the carriage with
the lock closed, as it may damage both the travel mechanism
and the lock itself.
In the MSW-DMS502-PRO model, the carriage height
adjustment mechanism has 2 gears: 1:1, and a reduced
1:2 gear (less crank rotation - faster travel). In the case of
boreholes over 202 mm in diameter, a reduced ratio should
be used, i.e. 1:2 – simply move the crank to the appropriate
end of the gear mechanism.
3.4. CLEANING AND MAINTENANCE
a) Use only non-corrosive cleaners to clean the surface.
b) Store the unit in a dry, cool place, free from moisture
and direct exposure to sunlight.
c) Do not spray the device with a water jet or submerge
it in water.
d) The device must be regularly inspected to check its
technical eciency and spot any damage.
e) Use a soft cloth for cleaning.
f) Use a soft, damp cloth for cleaning.
g) Do not use sharp and/or metal objects for cleaning
(e.g. a wire brush or a metal spatula) because they
may damage the surface material of the appliance.
h) Do not clean the device with an acidic substance,
agents of medical purposes, thinners, fuel, oils or
other chemical substances because it may damage
the device.
DISPOSING OF USED DEVICES
Do not dispose of this device in municipal waste systems.
Hand it over to an electric and electrical device recycling
and collection point. Check the symbol on the product,
instruction manual and packaging. The plastics used to
construct the device can be recycled in accordance with their
markings. By choosing to recycle you are making a signicant
contribution to the protection of our environment.
Contact local authorities for information on your local
recycling facility.
PL
INSTRUKCJA OBSŁUGI
2. BEZPIECZEŃSTWO UŻYTKOWANIA
Stosować ochronę słuchu. Narażenie na hałas
może powodować utratę słuchu.
Założyć okulary ochronne.
Stosować maskę przeciwpyłową (ochrona
dróg oddechowych).
Stosować rękawice ochronne.
Stosować ochronę stóp.
Stosować ochronę twarzy.
Stosować kombinezon ochronny.
UWAGA! Niebezpieczeństwo zgniecenia dłoni!
UWAGA! Ilustracje w niniejszej instrukcji obsługi
mają charakter poglądowy i w niektórych
szczegółach mogą różnić się od rzeczywistego
wyglądu produktu.
UWAGA! Przeczytać wszystkie ostrzeżenia
dotyczące bezpieczeństwa oraz wszystkie instrukcje.
Niezastosowanie się do ostrzeżeń i instrukcji może
spowodować ciężkie obrażenia ciała lub śmierć.
11
Rev. 14.10.2020
DANE TECHNICZNE
Opis parametru Wartość parametru
Nazwa produktu STATYW DO WIERTNICY
Model MSW-
DMS202-PRO
MSW-
DMS502-PRO
Wymiary
[Szerokość
x głębokość
x wysokość; mm]
296x512x910 295x512x1096
Wymiary kolumny
[mm] 60x62x850 80x75x2000
Ciężar [kg] 14,4 24,4
Do maksymalnej
średnicy wiercenia
[mm]
202 502
Zakres przesuwu
[mm] 510 650
Średnica otworu
montażowego
[mm]
60 110
Ustawienia kątów
pracy [°]
5-10-15-20-
25-30-35-
40-45
5-10-15-20-
25-30-35-
40-45
Przełożenie
przekładni 1:1 1:2/1:1
1. OGÓLNY OPIS
Instrukcja przeznaczona jest do pomocy w bezpiecznym i
niezawodnym użytkowaniu. Produkt jest zaprojektowany
i wykonany ściśle według wskazań technicznych przy
użyciu najnowszych technologii i komponentów oraz przy
zachowaniu najwyższych standardów jakości.
PRZED PRZYSTĄPIENIEM DO PRACY NALEŻY
DOKŁADNIE PRZECZYTAĆ I ZROZUMIEĆ NINIEJSZĄ
INSTRUKCJĘ.
Dla zapewnienia długiej i niezawodnej pracy urządzenia
należy dbać o jego prawidłową obsługę oraz konserwację
zgodnie ze wskazówkami zawartymi w tej instrukcji. Dane
techniczne i specykacje zawarte w tej instrukcji obsługi są
aktualne. Producent zastrzega sobie prawo dokonywania
zmian związanych z podwyższeniem jakości. Uwzględniając
postęp techniczny i możliwość ograniczenia hałasu,
urządzenie zaprojektowano i zbudowano tak, aby ryzyko
jakie wynika z emisji hałasu ograniczyć do najniższego
poziomu.
Termin „urządzenie” lub „produkt” w ostrzeżeniach i w opisie
instrukcji odnosi się do STATYW DO WIERTNICY.
2.1. BEZPIECZEŃSTWO W MIEJSCU PRACY
a) Utrzymywać porządek w miejscu pracy i dobre
oświetlenie. Nieporządek lub złe oświetlenie może
prowadzić do wypadków. Należy być przewidującym,
obserwować co się robi i zachowywać rozsądek
podczas używania urządzenia.
b) Nie używać urządzenia w stree zagrożenia
wybuchem, na przykład w obecności łatwopalnych
cieczy, gazów lub pyłów. Urządzenia wytwarzają iskry,
mogące zapalić pył lub opary.
c) W razie wątpliwości czy urządzenie działa poprawnie,
należy skontaktować się z serwisem producenta.
d) Naprawy urządzenia może wykonać wyłącznie
serwis producenta. Nie wolno dokonywać napraw
samodzielnie!
e) Na stanowisku pracy nie mogą przebywać dzieci
ani osoby nieupoważnione. (Nieuwaga może
spowodować utratę kontroli nad urządzeniem.)
f) Urządzenie używać w dobrze wentylowanej
przestrzeni.
g) Należy regularnie sprawdzać stan naklejek z
informacjami dotyczącymi bezpieczeństwa. W
przypadku gdy, naklejki są nieczytelne należy je
wymienić.
h) Zachować instrukcję użytkowania w celu jej
późniejszego użycia. W razie, gdyby urządzenie miało
zostać przekazane osobom trzecim, to wraz z nim
należy przekazać również instrukcję użytkowania.
i) Elementy opakowania oraz drobne elementy
montażowe należy przechowywać w miejscu
niedostępnym dla dzieci.
Instrukcją oryginalną jest niemiecka wersja instrukcji.
Pozostałe wersje językowe są tłumaczeniami z języka
niemieckiego.
OBJAŚNIENIE SYMBOLI
Produkt spełnia wymagania odpowiednich
norm bezpieczeństwa.
Przed użyciem należy zapoznać się
z instrukcją.
Produkt podlegający recyklingowi.
UWAGA! lub OSTRZEŻENIE! lub PAMIĘTAJ!
opisująca daną sytuację (ogólny znak
ostrzegawczy).

MSW-DMS502-PRO
3.2. PRZYGOTOWANIE DO PRACY
UMIEJSCOWIENIE URZĄDZENIA
Urządzenie należy trzymać z dala od wszelkich gorących
powierzchni. Urządzenie należy zawsze użytkować
zamocowane na równej, stabilnej powierzchni i poza
zasięgiem dzieci oraz osób ograniczonych funkcjach
psychicznych, sensorycznych i umysłowych
MONTAŻ URZĄDZENIA
Po wybraniu odpowiedniej pozycji dla statywu zgodnie z
docelową pracą otwornicy należy użyć kotwy do betonu aby
zamocować statyw w miejscu. W tym celu należy wywiercić
przy pomocy wiertarki udarowej w powierzchni otwór
odpowiedni do kotwy. W przypadku powierzchni ceglanej
należy użyć specjalnej kotwy kamieniarskiej wraz z klejem do
naprawy pękniętych murów/ścian.
UWAGA: użycie na cegle kotwy do betonu może skutkować
jej pęknięciem i poluzowaniem kotwy!
W przypadku mocowań próżniowych należy upewnić się, że
na powierzchni do której będzie statyw przymocowany nie
ma jakichś nieczystości i innych luźnych elementów, a samo
podciśnienie jest wystarczające by utrzymać statyw wraz z
osprzętem.
UWAGA: nie należy używać mocowań próżniowych przy
odwiertach w sucie, sklepieniu itp. pozycjach nad głową
operatora!
Za pomocą libelli wypoziomować urządzenie odpowiednio
kręcąc czterema śrubami poziomującymi u podstawy
statywu – dopiero po wypoziomowaniu dokręcić ich nakrętki.
Poziomowanie statywu konieczna zarówno dla odwiertów
pionowych, jak i poziomych.
3.3. PRACA Z URZĄDZENIEM
3.3.1 USTAWIENIE KĄTA STATYWU
Kąt statywu należy dopasować do pozycji centralnej otworu,
który ma być wywiercony. Zakres pochylenia kąta można
ustawić w zakresie 0-45o. Aby ustawić kąt pochylenia
należy wykorzystać korbę do poluzowania śruby zaciskowej
na podpórce – przy nastawianiu odpowiedniego kąta
zwrócić uwagę na podziałkę znajdująca się na podpórce.
Po ustawieniu żądanego kąta dokręcić z powrotem śrubę
zaciskową. Dokręcić śrubę dociskową na wózku celem
upewnienia się, że płyta montażowa lub wspornik nie są
luźne.
UWAGA: nie dokręcać śrub dociskowych zbyt mocno, w
przeciwnym razie może dojść do deformacji kolumny, czy
pochylni.
3.3.2 USTAWIENIE POSUWU WÓZKA
Sprawdzić dokręcenie prowadnicy na kolumnie – jeśli jest
luźne należy dokręcić 4 napinacze mimośrodowe wewnątrz
wózka. Aby ustawić odpowiedni luz należy użyć kluczy
13 i 8 mm by dociągnąć nakrętkę napinacza, następnie
przetestować wózek kręcąc korbą w dół i górę. Prawidłowo
nie powinien mieć luzu, a także nie przycinać się podczas
ruchu góra/dół.
1. Kolumna
2. Korba regulacji wysokości
3. Blokada kąta pochylenia
4. Wspornik
5. Mocowanie kolumny
6. Podstawa
7. Blokada wózka
8. Libella
9. Mocowanie na otwornicę
10. Wózek
11. Śruba poziomująca
12. Kółka transportowe (tylko MSW-DMS502-PRO)
PL
13
Rev. 14.10.2020
7
8
9
10
11
1
2
3
4
12
5
6
12
PL
UWAGA! Pomimo iż urządzenie zostało
zaprojektowane tak aby było bezpieczne, posiadało
odpowiednie środki ochrony oraz pomimo użycia
dodatkowych elementów zabezpieczających
użytkownika, nadal istnieje niewielkie ryzyko
wypadku lub odniesienia obrażeń w trakcie pracy
z urządzeniem. Zaleca się zachowanie ostrożności
i rozsądku podczas jego użytkowania.
Rev. 14.10.2020
2.2. BEZPIECZEŃSTWO OSOBISTE
a) Niedozwolone jest obsługiwanie urządzenia w
stanie zmęczenia, choroby, pod wpływem alkoholu,
narkotyków lub leków, które ograniczają w istotnym
stopniu zdolności obsługi urządzenia.
b) Maszynę mogą obsługiwać osoby sprawne zycznie,
zdolne do jej obsługi i odpowiednio wyszkolone,
które zapoznały się z niniejszą instrukcją oraz zostały
przeszkolone w zakresie bezpieczeństwa i higieny
pracy.
c) Należy być uważnym, kierować się zdrowym
rozsądkiem podczas pracy urządzeniem. Chwila
nieuwagi podczas pracy, może doprowadzić do
poważnych obrażeń ciała.
d) Należy używać środków ochrony osobistej
wymaganych przy pracy urządzeniem
wyszczególnionych w punkcie 1 objaśnienia symboli.
Stosowanie odpowiednich, atestowanych środków
ochrony osobistej zmniejsza ryzyko doznania urazu.
e) Nie należy przeceniać swoich możliwości. Utrzymywać
balans i równowagę ciała przez cały czas pracy.
Umożliwia to lepszą kontrolę nad urządzeniem w
nieoczekiwanych sytuacjach.
f) Nie należy nosić luźnej odzieży ani biżuterii. Włosy,
odzież i rękawice utrzymywać z dala od części
ruchomych. Luźna odzież, biżuteria lub długie włosy
mogą zostać chwycone przez ruchome części.
g) Zaleca się stosować ochronę oczu, uszu i dróg
oddechowych.
h) Urządzenie nie jest zabawką. Dzieci powinny być
pilnowane, aby nie bawiły się urządzeniem.
2.3. BEZPIECZNE STOSOWANIE URZĄDZENIA
a) Nie należy przeciążać urządzenia. Używać narzędzi
odpowiednich do danego zastosowania. Prawidłowo
dobrane urządzenie wykona lepiej i bezpieczniej
pracę dla którego zostało zaprojektowane.
b) Nieużywane urządzenia należy przechowywać
w miejscu niedostępnym dla dzieci oraz osób
nieznających urządzenia lub tej instrukcji
obsługi. Urządzenia są niebezpieczne w rękach
niedoświadczonych użytkowników.
c) Utrzymywać urządzenie w dobrym stanie
technicznym. Sprawdzać przed każdą pracą czy
nie posiada uszkodzeń ogólnych lub związanych z
elementami ruchomymi (pęknięcia części i elementów
lub wszelkie inne warunki, które mogą mieć wpływ
na bezpieczne działanie urządzenia). W przypadku
uszkodzenia, oddać urządzenie do naprawy przed
użyciem.
d) Urządzenie należy chronić przed dziećmi.
e) Naprawa oraz konserwacja urządzeń powinna być
wykonywana przez wykwalikowane osoby przy
użyciu wyłącznie oryginalnych części zamiennych.
Zapewni to bezpieczeństwo użytkowania.
f) Aby zapewnić zaprojektowaną integralność
operacyjną urządzenia, nie należy usuwać
zainstalowanych fabrycznie osłon lub odkręcać śrub.
PAMIĘTAĆ! należy chronić dzieci i inne osoby
postronne podczas pracy urządzeniem.
g) Przy transportowaniu i przenoszeniu urządzenia z
miejsca magazynowania do miejsca użytkowania
należy uwzględnić zasady bezpieczeństwa i higieny
pracy przy ręcznych pracach transportowych
obowiązujących w kraju, w którym urządzenia są
użytkowane.
h) Należy regularnie czyścić urządzenie, aby nie dopuścić
do trwałego osadzenia się zanieczyszczeń.
i) Urządzenie nie jest zabawką. Czyszczenie i
konserwacja nie mogą być wykonywane przez dzieci
bez nadzoru osoby dorosłej.
j) Zabrania się ingerowania w konstrukcję urządzenia
celem zmiany jego parametrów lub budowy.
k) Trzymać urządzenia z dala od źródeł ognia i ciepła.
l) Nie należy przeciążać urządzenia.
m) Należy pamiętać o prawidłowym ustawieniu uchwytu
narzędzia w urządzeniu.
n) Urządzenie ulega mocnemu nagrzaniu podczas pracy.
3. ZASADY UŻYTKOWANIA
Produkt przeznaczony jest do pomocy przy pracy z
otwornicami, wpływając na precyzję wiercenia oraz
ułatwiając wykonywanie otworów pod kątem.
Odpowiedzialność za wszelkie szkody powstałe w
wyniku użytkowania niezgodnego z przeznaczeniem
ponosi użytkownik.
3.1. OPIS URZĄDZENIA
MSW-DMS202-PRO
1
2
3
4
5
6
7
8
9
10
11
j) Urządzenie trzymać z dala od dzieci i zwierząt.
k) W trakcie użytkowania tego urządzenia wraz z innymi
urządzeniami należy zastosować się również do
pozostałych instrukcji użytkowania.

14
PL
3.3.3 MOCOWANIE I USTAWIENIE OTWORNICY
Model MSW-DMS202-PRO przystosowany jest do montażu
otwornicy ręcznej (MSW-DDM202L-PRO lub MSW-
DDM202S-PRO) i posiada specjalną klamrę, zaś MSW-
DMS502-PRO dedykowany jest do otwornic mogących
pracować tylko ze statywem (MSW-DDM402-PRO) i posada
mocowanie na 4 śruby.
Dla łatwiejszego montażu otwornicy na statywie należy
nieco podnieść do góry wózek, a dopiero po zamocowaniu
wyregulować jego żądaną wysokość. Przy otwornicach
przystosowanych tylko do pracy ze statywem należy wpierw
użyć czterech śrub by zamocować podkładkę montażową
na otwornicy. Następnie płytę montażową zamocować w
kołysce do końca wsuniętą i dokręcić śrubę blokującą. Śruba
ta powinna być w pełni dokręcona, zaś przy demontażu
całkowicie poluzowana.
Blokada wózka znajduje się na jego górze i służy do
pewnego zamocowania wózka na żądanej wysokości pracy.
Celem zwolnienia blokady należy przesunąć ją w lewo,
poluzować śrubę radełkowaną blokady, ustawić żądaną
wysokość wózka kręcąc korbą w odpowiednim kierunku i
po ustawieniu ponownie zaryglować blokadę, przesuwając w
prawo i dokręcając znajdująca się na niej śrubę radełkowaną.
WAŻNE: nie wolno regulować wysokości wózka z zasunięta
blokadą, gdyż grozi to uszkodzeniem zarówno mechanizmu
posuwu jak i blokady!
W modelu MSW-DMS502-PRO mechanizm regulacji
wysokości wózka ma 2 przełożenia: 1:1 oraz zredukowany
1:2 (mniej kręcenia korbą-szybszy posuw). W przypadku
odwiertów powyżej 202 mm średnicy należy użyć
przełożenia zredukowanego tj. 1:2 – wystarczy przełożyć
korbę na odpowiednią końcówkę mechanizmu przekładni.
3.4. CZYSZCZENIE I KONSERWACJA
a) Do czyszczenia powierzchni należy stosować
wyłącznie środki niezawierające substancji żrących.
b) Urządzenie należy przechowywać w suchym i
chłodnym miejscu chronionym przed wilgocią i
bezpośrednim promieniowaniem słonecznym.
c) Zabrania się spryskiwania urządzenia strumieniem
wody lub zanurzania urządzenia w wodzie.
d) Należy wykonywać regularne przeglądy urządzenia
pod kątem jego sprawności technicznej oraz wszelkich
uszkodzeń.
e) Do czyszczenia należy używać miękkiej ściereczki.
f) Do czyszczenia należy używać miękkiej, wilgotnej
ściereczki.
g) Do czyszczenia nie wolno używać ostrych i/lub
metalowych przedmiotów (np. drucianej szczotki lub
metalowej łopatki) ponieważ mogą one uszkodzić
powierzchnię materiału, z którego wykonane jest
urządzenie.
h) Nie czyścić urządzenia substancja o odczynie
kwasowym, środkami przeznaczenia medycznego,
rozcieńczalnikami, paliwem, olejami lub innymi
substancjami chemicznymi może to spowodować
uszkodzenie urządzenia.
USUWANIE ZUŻYTYCH URZĄDZEŃ.
Po zakończeniu okresu użytkowania nie wolno usuwać
niniejszego produktu poprzez normalne odpady komunalne,
lecz należy go oddać do punktu zbiórki i recyklingu
urządzeń elektrycznych i elektronicznych. Informuje o tym
symbol, umieszczony na produkcie, instrukcji obsługi lub
opakowaniu. Zastosowane w urządzeniu tworzywa nadają
się do powtórnego użycia zgodnie z ich oznaczeniem. Dzięki
powtórnemu użyciu, wykorzystaniu materiałów lub innym
formom wykorzystania zużytych urządzeń wnoszą Państwo
istotny wkład w ochronę naszego środowiska.
Informacji o właściwym punkcie usuwania zużytych urządzeń
udzieli Państwu lokalna administracja.
CZ
NÁVOD K OBSLUZE
Používejte protiprachovou masku (ochrana
dýchacích cest).
Používejte ochranné rukavice.
Používejte ochranou obuv.
Používejte ochranu obličeje.
Používejte ochranný oděv.
VAROVÁNÍ! Nebezpečí pohmoždění rukou!
15
Rev. 14.10.2020
TECHNICKÉ ÚDAJE
Popis parametru Hodnota parametru
Název výrobku STOJAN NA JÁDROVÉ VRTÁNÍ
Model MSW-
DMS202-PRO
MSW-
DMS502-PRO
Rozměry [Šířka
x Hloubka
x Výška; mm]
296x512x910 295x512x1096
Rozměry sloupku
[mm] 60x62x850 80x75x2000
Hmotnost [kg] 14,4 24,4
Pro maximální
průměr vrtání
[mm]
202 502
Rozsah posuvu
[mm] 510 650
Průměr
montážního otvoru
[mm]
60 110
Nastavení
pracovních úhlů [o]
5-10-15-20-
25-30-35-
40-45
5-10-15-20-
25-30-35-
40-45
Převodový poměr 1:1 1:2/1:1
Pojem „zařízení“ nebo „výrobek“ v bezpečnostních pokynech
a návodu se vztahuje na STOJAN NA JÁDROVÉ VRTÁNÍ.
2.1. BEZPEČNOST NA PRACOVIŠTI
a) Na pracovišti udržujte pořádek a mějte dobré
osvětlení. Nepořádek nebo špatné osvětlení mohou
vést k úrazům. Buďte předvídaví a sledujte, co se
během práce kolem vás děje. Při práci se zařízením
vždy zachovávejte zdravý rozum.
b) Se zařízením nepracujte ve výbušném prostředí,
například v přítomnosti hořlavých kapalin, plynů nebo
prachu. Zařízení vytváří jiskření, skrze které může dojít
ke vznícení prachu nebo výparů.
c) Pokud máte pochybnosti o tom, zda zařízení funguje
správně, kontaktujte servis výrobce.
d) Opravy zařízení může provádět pouze servis výrobce.
Opravy neprovádějte sami!
e) Na pracovišti se nesmí zdržovat děti a nepovolané
osoby. (Nepozornost může způsobit ztrátu kontroly
nad zařízením.)
f) Zařízení používejte v dobře větraných prostorách.
g) Je třeba pravidelně kontrolovat stav etiket s
bezpečnostními informacemi. V případě, že jsou
nečitelné, je třeba etikety vyměnit.
h) Návod k obsluze uschovejte za účelem jeho
pozdějšího použití. V případě předánání zařízení
třetím osobám musí být spolu se zařízením předán
rovněž návod k obsluze.
i) Obalový materiál a drobné montážní prvky
uchovávejte na místě nedostupném pro děti.
j) Zařízení mějte v dostatečné vzdálenosti od dětí a
zvířat.
k) Pokud společně s tímto nástrojem používáte nějaké
další nářadí, pak musíte dodržovat také jeho návod k
použití.
VYSVĚTLENÍ SYMBOLŮ
Výrobek splňuje požadavky příslušných
bezpečnostních norem.
Před použitím výrobku se seznamte s
návodem.
Recyklovatelný výrobek.
UPOZORNĚNÍ! nebo VAROVÁNÍ! nebo
PAMATUJTE! popisující danou situaci.
(všeobecná výstražná značka)
Používejte ochranu sluchu. Vystavení se hluku
může vést ke ztrátě sluchu.
Používejte ochranné brýle.
1. VŠEOBECNÝ POPIS
Návod slouží jako nápověda pro bezpečné a spolehlivé
používání výrobku. Výrobek je navržen a vyroben přesně
podle technických údajů za použití nejnovějších technologií a
komponentů a za dodržení nejvyšších jakostních norem.
PŘED ZAHÁJENÍM PRÁCE SI DŮKLADNĚ PŘEČTĚTE
TENTO NÁVOD A UJISTĚTE SE, ŽE JSTE POCHOPILI
VŠECHNY POKYNY.
Pro zajištění dlouhého a spolehlivého fungování zařízení
pravidelně provádějte revize a údržbu v souladu s pokyny
uvedenými v tomto návodu. Technické údaje a specikace
uvedené v návodu jsou aktuální. Výrobce si vyhrazuje
právo provádět změny za účelem zvýšení kvality. Vzhledem
k technickému pokroku a možnosti omezení hluku bylo
zařízení navrženo a vyrobeno tak, aby nebezpečí vyplývající
z emise hluku bylo omezeno na nejnižší úroveň.
POZOR! Obrázky v tomto návodu jsou pouze
ilustrační a v některých detailech se od skutečného
vzhledu výrobku mohou lišit.
Originálním návodem je německá verze návodu. Ostatní
jazykové verze jsou překladem z německého jazyka.
2. BEZPEČNOST POUŽÍVÁNÍ
POZNÁMKA! Přečtěte si tento návod včetně všech
bezpečnostních pokynů. Nedodržování návodu a
pokynů může vést k úrazu elektrickým proudem,
požáru anebo těžkému úrazu či smrti.
PAMATUJTE! Při práci se zařízením chraňte děti a
jiné nepovolané osoby.

MSW-DMS502-PRO
3.2. PŘÍPRAVA K PRÁCI
UMÍSTĚNÍ ZAŘÍZENÍ
Zařízení udržujte v bezpečné vzdálenosti od veškerých
horkých povrchů. Zařízení vždy používejte připevněné na
rovném, stabilním povrchu a mimo dosah dětí a osob s
omezenými funkcemi.
MONTÁŽ ZAŘÍZENÍ
Po výběru vhodné polohy pro stojan podle cílové práce
vrtačky zajistěte stojan na místě pomocí upevňovací kotvy do
betonu. K tomuto účelu vyvrtejte pomocí příklepové vrtačky
v povrchu otvor vhodný pro kotvu. V případě cihlového
povrchu použijte speciální kotvu do zdiva společně s
lepidlem určeným k opravě prasklých stěn / zdí.
UPOZORNĚNÍ: pokud do cihly použijete kotvu do betonu,
kotva se může zlomit nebo povolit!
V případě vakuového upevnění se ujistěte, že na povrchu, ke
kterému bude stojan připevněn, nejsou žádné nečistoty ani
jiné volné prvky a že samotný podtlak je dostatečný pro to,
aby udržel stojan včetně příslušenství.
UPOZORNĚNÍ: nepoužívejte vakuové upevnění při vrtání do
stropu nebo klenby apod. polohách nad hlavou obsluhy!
Pomocí libely vyrovnejte zařízení otáčením čtyř nivelačních
šroubů na základně stojanu – matice dotáhněte až po
vyrovnání. Vyrovnání stojanu je nutné pro horizontální i
vertikální vrtání.
3.3. PRÁCE SE ZAŘÍZENÍM
3.3.1 NASTAVENÍ ÚHLU STOJANU
Úhel stojanu je třeba přizpůsobit středové poloze otvoru,
který má být vyvrtán. Rozsah úhlu sklonu lze nastavit v
rozmezí 0-45°. K nastavení úhlu sklonu použijte kliku pro
povolení upínacího šroubu na podpěře – při nastavování úhlu
sledujte stupnici na podpěře. Po nastavení požadovaného
úhlu utáhněte zpět upínací šroub. Dotáhněte přítlačný šroub
na vozíku a ujistěte se, že montážní deska nebo držák nejsou
povolené.
UPOZORNĚNÍ: přítlačné šrouby příliš nedotahujte, jinak
může dojít k deformaci sloupku nebo rampy.
3.3.2 NASTAVENÍ POSUVU VOZÍKU
Zkontrolujte dotažení vodící lišty na sloupku – pokud je
povolená, utáhněte 4 excentrické napínáky uvnitř vozíku.
Chcete-li nastavit správnou vůli, použijte klíče 13 a 8 mm
a utáhněte matici napínáku, poté otestujte vozík otáčením
kliky nahoru a dolů. Správně by neměl mít žádnou vůli a
neměl by se zadrhávat při pohybu nahoru/dolů.
1. Sloupek
2. Klika pro nastavení výšky
3. Pojistka úhlu sklonu
4. Držák
5. Upevnění sloupku
6. Základna
7. Pojistka vozíku
8. Libela
9. Upevnění pro vržačku
10. Vozík
11. Nivelační šroub
12. Přepravní kolečka (pouze MSW-DMS502-PRO)
CZ
17
Rev. 14.10.2020
7
8
9
10
11
1
2
3
4
12
5
6
16
CZ
Rev. 14.10.2020
2.2. OSOBNÍ BEZPEČNOST
a) Zařízení nepoužívejte, jste-li unaveni nebo pod vlivem
drog, alkoholu nebo léků, které významně snižují
schopnost zařízení ovládat.
b) Zařízení smí obsluhovat fyzicky zdatné osoby, které
s ním umí zacházet, byly příslušně vyškoleny k jeho
obsluze, seznámily se s tímto návodem a byly také
proškoleny v oblasti bezpečnosti a ochrany zdraví při
práci.
c) Při práci se zařízením buďte pozorní, řiďte se zdravým
rozumem. Chvilka nepozornosti při práci může vést k
vážnému úrazu.
d) Používejte osobní ochranné pomůcky vyžadované pro
práci se zařízením, specikované v bodě 1 vysvětlením
symbolů.
Používání vhodných, atestovaných osobních
ochranných prostředků snižuje nebezpečí úrazu.
e) Nepřeceňujte své schopnosti. Udržujte stabilní postoj
a rovnováhu po celou dobu práce. To vám umožní
lépe ovládat zařízení v neočekávaných situacích.
f) Nenoste volné oblečení nebo šperky. Vlasy, oděv a
rukavice udržujte v bezpečné vzdálenosti od rotujících
dílů. Volný oděv, šperky nebo dlouhé vlasy mohou
zachytit rotující díly.
g) Používejte ochranu očí, uší a dýchacích cest.
h) Zařízení není hračka. Dohlížejte na děti, aby si nehrály
se zařízením.
2.3. BEZPEČNÉ POUŽÍVÁNÍ ZAŘÍZENÍ
a) Zařízení nepřetěžujte. Pro daný úkol používejte vždy
správný typ nářadí. Správně zvolené nářadí lépe a
bezpečněji provede práci, pro kterou bylo navrženo.
b) Nepoužívaná zařízení uchovávejte mimo dosah dětí
a osob, které nejsou seznámeny se zařízením nebo
návodem k obsluze. Zařízení jsou nebezpečná v rukou
nezkušených uživatelů.
c) Zařízení udržujte v dobrém technickém stavu.
Kontrolujte před každou prací jeho celkový stav i
jednotlivé díly a ujistěte se, že je vše v dobrém stavu,
a uživateli tak při práci se zařízením nehrozí žádné
nebezpečí. V případě, že zjistíte poškození, nechte
zařízení opravit.
d) Udržujte zařízení mimo dosah dětí.
e) Opravu a údržbu zařízení by měly provádět pouze
kvalikované osoby za výhradního použití originálních
náhradních dílů. Zajistí to bezpečné používání zařízení.
f) Pro zachování navržené mechanické integrity zařízení
neodstraňujte předem namontované kryty nebo
neuvolňujte šrouby.
g) Při přemisťování zařízení z místa skladování na místo
používání berte v úvahu pracovní zásady bezpečnosti
a ochrany zdraví v rámci přenášení břemena platné v
zemi, ve které se zařízení používá.
h) Pravidelně čistěte zařízení, aby nedošlo k trvalému
usazovaní nečistot.
i) Zařízení není hračka. Čištění a údržbu nesmí provádět
děti bez dohledu dospělé osoby.
j) Nezasahujte do zařízení s cílem změnit jeho parametry
nebo konstrukci.
k) Udržujte zařízení mimo zdroje ohně a tepla.
l) Zařízení nepřetěžujte.
m) Pamatujte na správné nastavení úchytu nástroje v
zařízení.
n) Doporučuje se používat postranní úchyty.
1
2
3
4
5
6
7
8
9
10
11
POZNÁMKA! I když zařízení bylo navrženo tak, aby
bylo bezpečné, tedy má vhodné bezpečnostní prvky,
tak i přes použití dodatečné ochrany uživatelem při
práci se zařízením nadále existuje malé riziko úrazu
nebo poranění. Doporučuje se zachovat opatrnost a
zdravý rozum při jeho používání.
3. ZÁSADY POUŽÍVÁNÍ
Výrobek je určen pro pomoc při práci s vrtačkami tak, že
ovlivňuje přesnost vrtání a usnadňuje vrtání otvorů pod
úhlem.
Odpovědnost za veškeré škody vzniklé v důsledku
použití zařízení v rozporu s určením nese uživatel.
3.1. POPIS ZAŘÍZENÍ
MSW-DMS202-PRO
3.3.3 MONTÁŽ A NASTAVENÍ VRTAČKY
Model MSW-DMS202-PRO je přizpůsoben pro montáž
ruční vrtačky (MSW-DDM202L-PRO nebo MSW-DDM202S-
PRO) a je vybaven speciální sponou, MSW-DMS502-PRO je
určen pro vrtačky, které mohou pracovat pouze se stojanem
(MSW-DDM402-PRO) a má upevnění na 4 šrouby.

18
CZ
Pro snadnější montáž vrtačky na stojanu lehce nadzvedněte
vozík a teprve po připevnění nastavte jeho požadovanou
výšku. U vrtaček určených pouze pro práci se stojanem
nejdříve připevněte pomocí čtyř šroubů montážní podložku
k vrtačce. Poté připevněte montážní desku k plně zasunuté
kolébce a dotáhněte zajišťovací šroub. Tento šroub by měl
být zcela dotažen a při demontáži naopak zcela povolen.
Pojistka vozíku je umístěna na horní části vozíku a slouží k
pevnému upevnění vozíku v požadované pracovní výšce.
Chcete-li pojistku povolit, posuňte ji doleva, povolte
rýhovaný šroub pojistky, nastavte požadovanou výšku
vozíku otáčením kliky v příslušném směru a po nastavení
opět pojistku zajistěte posunutím doprava a dotáhněte
rýhovaný šroub, který je na ní umístěn.
DŮLEŽITÉ: nenastavujte výšku vozíku při zasunuté pojistce,
protože by to mohlo poškodit mechanismus posuvu a také
pojistky!
U modelu MSW-DMS502-PRO má mechanismus nastavení
výšky vozíku 2 převody: 1:1 a snížený 1:2 (menší otočky klikou
– rychlejší posuv). V případě vrtů o průměru větším než 202
mm použijte snížený převod, tj. 1:2 – jednoduše přesuňte
kliku na příslušný konec převodového mechanismu.
3.4. ČIŠTĚNÍ A ÚDRŽBA
a) K čištění povrchu zařízení používejte výhradně
prostředky neobsahující žíravé látky.
b) Zařízení skladujte na suchém a chladném místě,
chráněném proti vlhkosti a přímému slunečnímu svitu.
c) Je zakázáno zařízení polévat vodou nebo je do vody
ponořovat.
d) Pravidelně provádějte revize zařízení a kontrolujte,
zda je technicky způsobilé a není poškozeno.
e) K čištění používejte měkký hadřík.
f) K čištění používejte měkký, vlhký hadřík.
g) K čištění nepoužívejte ostré ani kovové předměty
(například drátěný kartáč nebo kovovou obracečku),
protože mohou poškodit povrch materiálu, z něhož je
zařízení vyrobeno.
h) Zařízení nečistěte přípravky s kyselým pH,
dezinfekčními prostředky, ředidly, palivem, oleji nebo
jinými chemickými látkami, může to poškodit zařízení.
LIKVIDACE OPOTŘEBENÝCH ZAŘÍZENÍ
Po ukončení doby používání nevyhazujte tento výrobek
společně s komunálním odpadem, ale odevzdejte jej k
recyklaci do sběrny elektrických a elektronických zařízení.
O tom informuje symbol umístěný na zařízení, v návodě
k obsluze nebo na obalu. Komponenty použité v zařízení
jsou vhodné pro zužitkování v souladu s jejich označením.
Díky zužitkování, recyklaci nebo jiným způsobům využití
opotřebených zařízení významně přispíváte k ochraně
životního prostředí. Informace o příslušné sběrně
opotřebených zařízení poskytne místní obecný nebo
městský úřad.
FR
MANUEL D‘UTILISATION
Portez une protection auditive.
Portez une protection oculaire.
Portez une protection contre la poussière
(protection des voies respiratoires).
Portez des protections pour les mains.
Portez des protections pour les pieds.
Portez une protection faciale.
Portez des vêtements de protection.
ATTENTION ! Mise en garde liée à un risque
de blessures des mains !
19
Rev. 14.10.2020
DÉTAILS TECHNIQUES
Description
des paramètres Valeur des paramètres
Nom du produit BÂTI DE CAROTTAGE
Modèle MSW-
DMS202-PRO
MSW-
DMS502-PRO
Dimensions
[Largeur
x Profondeur
x Hauteur; mm]
296x512x910 295x512x1096
Dimensions de la
colonne [mm] 60x62x850 80x75x2000
Poids [kg] 14,4 24,4
Pour un diamètre
de forage maximal
[mm]
202 502
Plage
d’avancement
[mm]
510 650
Diamètre du trou
de montage [mm] 60 110
Réglage de l'angle
de travail [o]
5-10-15-20-
25-30-35-
40-45
5-10-15-20-
25-30-35-
40-45
Rapport de vitesse 1:1 1:2/1:1
SYMBOLES
Le produit est conforme aux normes de
sécurité en vigueur.
Respectez les consignes du manuel.
Collecte séparée.
ATTENTION ! , AVERTISSEMENT ! et
REMARQUE attirent l'attention sur des
circonstances spéciques (symboles
d'avertissement généraux).
1. DESCRIPTION GÉNÉRALE
L'objectif du présent manuel est de favoriser une utilisation
sécuritaire et able de l'appareil. Le produit a été conçu et
fabriqué en respectant étroitement les directives techniques
applicables et en utilisant les technologies et composants les
plus modernes. Il est conforme aux normes de qualité les plus
élevées.
LISEZ ATTENTIVEMENT LE PRÉSENT MANUEL ET
ASSUREZ-VOUS DE BIEN LE COMPRENDRE AVANT
LA PREMIÈRE UTILISATION.
An de garantir le fonctionnement able et durable de
l'appareil, il est nécessaire d'utiliser et d'entretenir ce
dernier conformément aux consignes gurant dans le
présent manuel. Les caractéristiques et les spécications
contenues dans ce document sont à jour. Le fabricant se
réserve le droit de procéder à des modications à des ns
d’amélioration du produit. L'appareil a été mis au point et
fabriqué en tenant compte des progrès techniques et de la
réduction de bruit an de réduire au maximum les risques
liés aux émissions sonores.
REMARQUE! Les illustrations contenues dans le
présent manuel sont fournies à titre explicatif. Votre
appareil peut ne pas être identique.
La version originale de ce manuel a été rédigée en allemand.
Toutes les autres versions sont des traductions de l'allemand.
2. CONSIGNES DE SÉCURITÉ
ATTENTION! Veuillez lire attentivement toutes les
consignes de sécurité et toutes les instructions. Le
non-respect des avertissements et des consignes
de sécurité peut entraîner des blessures graves ou
la mort.
Les notions d'« appareil », de « machine » et de « produit »
gurant dans les descriptions et les consignes du manuel se
rapportent à/au BÂTI DE CAROTTAGE.
2.1. SÉCURITÉ AU POSTE DE TRAVAIL
a) Veillez à ce que votre poste de travail soit toujours
propre et bien éclairé. Le désordre ou un éclairage
insusant peuvent entraîner des accidents. Soyez
prévoyant, observez les opérations et faites preuve de
bon sens lorsque vous utilisez l’appareil.
b) N'utilisez pas l'appareil dans les zones à risque
d'explosion, par exemple à proximité de liquides,
de gaz ou de poussières inammables. Certains
appareils peuvent produire des étincelles susceptibles
d’enammer la poussière et les vapeurs.
c) En cas d’incertitude quant au fonctionnement correct
de l’appareil, contactez le service client du fabricant.
d) Seul le service du fabricant peut eectuer des
réparations. Ne tentez aucune réparation par vous-
même !
e) Aucun enfant ni personne non autorisée ne doit se
trouver sur les lieux de travail. (Le non-respect de
cette consigne peut entraîner la perte de contrôle sur
l'appareil).
f) Utilisez l'équipement dans un endroit bien aéré.
g) Vériez régulièrement l'état des autocollants portant
des informations de sécurité. S’ils deviennent illisibles,
remplacez-les.
h) Conservez le manuel d’utilisation an de pouvoir
le consulter ultérieurement. En cas de cession de
l’appareil à un tiers, l’appareil doit impérativement
être accompagné du manuel d’utilisation.
i) Tenez les éléments d’emballage et les pièces de
xation de petit format hors de portée des enfants.
j) Tenez l’appareil hors de portée des enfants et des
animaux.
Rev. 14.10.2020

MSW-DMS502-PRO
3.2. PRÉPARATION À L'UTILISATION
CHOIX DE L’EMPLACEMENT DE L’APPAREIL
Tenez l'appareil à l'écart des surfaces chaudes. L'appareil doit
toujours être utilisé sur une surface plane et stable, hors de
portée des enfants et des personnes à fonctions limitées.
MONTAGE DE L’APPAREIL
Après avoir choisi la bonne position pour le bâti en fonction
du travail de carottage prévu, il est nécessaire d'utiliser un
ancrage à béton pour xer le bâti en place. Pour ce faire,
forez un trou dans la surface appropriée pour l'ancrage à
l'aide d'une perceuse à percussion. Dans le cas d'une surface
en briques, utilisez un ancrage spécial pour maçonnerie ainsi
qu'un adhésif pour réparer les maçonneries/murs ssurés.
ATTENTION : L'utilisation d'un ancrage à béton sur une
brique peut entraîner sa ssuration et le desserrage de
l'ancrage !
Dans le cas de la xation sous vide, assurez-vous que la
surface prévu pour la xation du bâti ne comporte pas de
débris ni d'autres pièces libres, et que la dépression est
susante pour le maintien du bâti et de ses accessoires.
ATTENTION : n'utilisez pas de xations sous vide pour forez
dans les plafonds et dans des surfaces au-dessus de la tête
de l'opérateur !
Utilisez le niveau pour mettre l'appareil à niveau en tournant
les quatre vis de mise à niveau à la base du bâti de carottage
- ne serrez leurs écrous qu'après la mise à niveau. La mise
à niveau du bâti est nécessaire pour le forage vertical et
horizontal.
3.3. UTILISATION DE L'APPAREIL
3.3.1 RÉGLAGE DE L'ANGLE DU BÂTI
L'angle du bâti doit être réglé sur la position centrale du trou
à forer. L'angle d'inclinaison peut être réglé de 0 à 45°. Pour
régler l'angle, utilisez la manivelle pour desserrer la vis de
serrage sur le support - faites bien attention à l'échelle sur le
support lors du réglage de l'angle souhaité. Après avoir réglé
l'angle souhaité, resserrez la vis de serrage. Serrez la vis de
serrage du chariot pour vous assurer qu'il y a pas de jeu au
niveau de la plaque de montage ou du support.
ATTENTION : ne serrez pas trop fort les vis de serrage, sinon
la colonne ou la rampe risque de se déformer.
3.3.2 RÉGLAGE D’E L’AVANCEMENT DU CHARIOT
Vériez le serrage du rail de guidage sur la colonne - si c’est
desserré, il faut serrez les 4 tendeurs excentriques à l'intérieur
du chariot. Pour régler le jeu approprié, utilisez une clé de 13
mm et de 8 mm pour serrer l'écrou du tendeur, puis testez le
chariot en tournant la manivelle de haut en bas. Si le charriot
est bien réglé il ne doit pas y avoir de jeu et il ne doit pas se
bloquer pendant son mouvement vers les haut et vers le bas.
1. Colonne
2. Manivelle de réglage de la hauteur
3. Blocage de l'angle d'inclinaison
4. Support
5. Fixation de colonne
6. Base
7. Verrouillage du chariot
8. Niveau
9. Fixation pour carotteuses
10. Chariot
11. Vis de nivellement
12. Roues de transport (MSW-DMS502-PRO uniquement)
FR
21
Rev. 14.10.2020
7
8
9
10
11
1
2
3
4
12
5
6
20
FR
ATTENTION! Bien que l'appareil ait été conçu en
accordant une attention spéciale à la sécurité et qu'il
comporte des dispositifs de protection, ainsi que
des caractéristiques de sécurité supplémentaires,
il n’est pas possible d’exclure entièrement tout
risque de blessure lors de son utilisation. Nous
recommandons de faire preuve de prudence et de
bon sens lorsque vous utilisez l’appareil.
Rev. 14.10.2020
2.2. SÉCURITÉ DES PERSONNES
a) N'utilisez pas l'appareil lorsque vous êtes fatigué,
malade, sous l'eet de drogues ou de médicaments
et que cela pourrait altérer votre capacité à utiliser
l'appareil.
b) Seules des personnes ayant suivi une formation
appropriée, qui sont aptes à se servir de l'appareil et
en bonne santé physique peuvent utiliser la machine.
En outre, ces personnes doivent avoir lu le présent
manuel et connaître les exigences liées à la santé et à
la sécurité au travail.
c) Soyez attentif et faites preuve de bon sens lors que
vous utilisez l’appareil. Un moment d'inattention
pendant le travail peut entraîner des blessures graves.
d) Utilisez l'équipement de protection individuel
approprié pour l'utilisation de l'appareil,
conformément aux indications faites dans le tableau
des symboles, au point 1.
L'utilisation de l'équipement de protection individuel
adéquat certié réduit le risque de blessures.
e) Ne surestimez pas vos capacités. Adoptez toujours
une position de travail stable vous permettant de
garder l'équilibre. Vous aurez ainsi un meilleur
contrôle en cas de situations inattendues.
f) Ne portez ni vêtements amples ni bijoux. Tenez vos
cheveux, vos vêtements et vos gants à l'écart des
pièces mobiles. Les vêtements amples, les bijoux et
les cheveux longs peuvent être happés par les pièces
mobiles.
g) Le port d'équipements de protection des yeux, des
oreilles et des voies respiratoires est recommandé.
h) Cet appareil n'est pas un jouet. Les enfants doivent
demeurer sous la supervision d’un adulte an qu’ils
ne jouent pas avec l’appareil.
2.3. UTILISATION SÉCURITAIRE DE L'APPAREIL
a) Ne faites pas surchauer l'appareil. Utilisez les outils
appropriés pour l'usage que vous en faites. Le choix
d'appareils appropriés et l'utilisation soigneuse de
ceux-ci produisent de meilleurs résultats.
b) Les outils qui ne sont pas en cours d'utilisation
doivent être mis hors de portée des enfants et des
personnes qui ne connaissent ni l'appareil, ni le
manuel d'utilisation s'y rapportant. Entre les mains de
personnes inexpérimentées, ce genre d'appareils peut
représenter un danger.
c) Maintenez l'appareil en parfait état de marche. Avant
chaque utilisation, vériez l’absence de dommages en
général et au niveau des pièces mobiles (assurez-vous
qu’aucune pièce ni composant n’est cassé et vériez
que rien ne compromet le fonctionnement sécuritaire
de l’appareil). En cas de dommages, l’appareil doit
impérativement être envoyé en réparation avant
d’être utilisé de nouveau.
d) Tenez l'appareil hors de portée des enfants.
e) La réparation et l'entretien des appareils doivent être
eectués uniquement par un personnel qualié, à
l'aide de pièces de rechange d'origine. Cela garantit
la sécurité d’utilisation.
REMARQUE! Veillez à ce que les enfants et les
personnes qui n'utilisent pas l'appareil soient en
sécurité durant le travail. .
f) Pour garantir l'intégrité opérationnelle de l'appareil,
les couvercles et les vis posés à l'usine ne doivent pas
être retirés.
g) Lors du transport, de l’installation et de l’utilisation de
l’appareil, respectez les dispositions d'hygiène et de
sécurité en vigueur dans le pays d'utilisation.
h) Nettoyez régulièrement l'appareil pour en prévenir
l’encrassement.
i) Cet appareil n'est pas un jouet. Le nettoyage et
l’entretien ne doivent pas être eectués par des
enfants, à moins qu’ils se trouvent sous la supervision
d’un adulte responsable.
j) Il est défendu de modier l’appareil pour en changer
les paramètres ou la construction.
k) Gardez le produit à l’écart des sources de feu et de
chaleur.
l) Ne surchargez pas l’appareil.
m) Veillez à ce que la poignée soit correctement ajustée.
n) Il est recommandé d'utiliser la poignée latérale.
3. CONDITIONS D’UTILISATION
Ce produit est conçu pour faciliter le travail avec les
carotteuses, en améliorant la précision du forage et en
facilitant la création de trous incliné.
L’utilisateur porte l’entière responsabilité pour
l’ensemble des dommages attribuables à un usage
inapproprié.
3.1. DESCRIPTION DE L'APPAREIL
MSW-DMS202-PRO
1
2
3
4
5
6
7
8
9
10
11
k) Lors de l’utilisation combinée de cet appareil avec
d’autres outils, respectez également les consignes se
rapportant à ces outils.

22
FR
3.3.3 FIXATION ET RÉGLAGE DE LA CAROTTEUSE
Le modèle MSW-DMS202-PRO est conçu pour accueillir
une carotteuses à main ( MSW-DDM202L-PRO ou MSW-
DDM202S-PRO ) et est équipé d'une pince spéciale, tandis
que le modèle MSW-DMS502-PRO est conçu pour les
carotteuses qui ne peuvent fonctionner qu'avec un bâti (
MSW-DDM402-PRO ) et est équipé de 4 vis.
Pour faciliter le montage de la carotteuse sur le bâti il faut
soulever légèrement le chariot vers le haut, le xez et le
régler à la hauteur souhaitée. Pour les carotteuses qui ne
peuvent fonctionner qu'avec un bâti, utilisez d'abord les
vis pour xer la plaque de montage sur la carotteuse. Fixez
ensuite la plaque de montage dans le chariot et serrez la
vis de blocage. Cette vis doit être serrée au maximum et
complètement desserrée au moment du démontage.
Le verrou du chariot est situé sur sa partie supérieure
et sert à xer le chariot à la position de travail souhaitée.
Pour déverrouiller, déplacez le mécanisme de verrouillage
vers la gauche, desserrez la vis moletée du mécanisme
de verrouillage, réglez la hauteur souhaitée en tournant
la manivelle dans la direction appropriée, puis verrouillez
de nouveau en déplaçant vers la droite et en serrant la vis
moletée du mécanisme de verrouillage.
IMPORTANT : ne réglez pas la hauteur du chariot lorsque
le verrou est fermé, car cela risque d'endommager le
mécanisme d'avancement et le verrou !
Dans le modèle MSW-DMS502-PRO le mécanisme de
réglage de la hauteur du chariot à 2 rapports : 1:1 et 1:2
réduit (moins de rotation de la manivelle - avancement plus
rapide). Dans le cas de forages d'un diamètre supérieur à 202
mm, il est nécessaire d'utiliser un rapport réduit, c'est-à-dire
1:2 - il sut de placer la manivelle à l'extrémité appropriée
du mécanisme de transmission.
3.4. NETTOYAGE ET ENTRETIEN
a) Pour nettoyer les diérentes surfaces, n'utilisez que
des produits sans agents corrosifs.
b) Conservez l'appareil dans un endroit propre, frais et
sec, à l'abri de l'humidité et des rayons directs du
soleil.
c) Il est interdit d’asperger l'appareil d'eau ou de
l'immerger dans l'eau.
d) Contrôlez régulièrement l'appareil pour vous assurer
qu'il fonctionne correctement et ne présente aucun
dommage.
e) Utilisez un chion doux lors du nettoyage.
f) Il est conseillé de laver l’appareil uniquement avec un
chion mou et humide.
g) N’utilisez aucun objet présentant des arêtes
tranchantes, ni objet métallique (tels qu’une brosse
ou une spatule en métal) pour le nettoyage car ils
pourraient endommager la surface de l’appareil.
h) Ne nettoyez pas l’appareil pas avec des substances
acides. L’équipement médical, les solvants, les
carburants, les huiles et les produits chimiques
peuvent endommager l’appareil.
MISE AU REBUT DES APPAREILS USAGÉS
À la n de sa vie, ce produit ne doit pas être jeté dans les
ordures ménagères ; il doit impérativement être remis
dans un point de collecte et de recyclage pour appareils
électroniques et électroménagers. Un symbole à cet
eet gure sur le produit, l'emballage ou dans le manuel
d'utilisation. Les matériaux utilisés lors de la fabrication de
l'appareil sont recyclables conformément à leur désignation.
En recyclant ces matériaux, en les réutilisant ou en utilisant
les appareils usagés d’une autre manière, vous contribuez
grandement à protéger notre environnement. Pour obtenir
de plus amples informations sur les points de collecte
appropriés, adressez-vous à vos autorités locales.
IT
ISTRUZIONI PER L’USO
Indossare una protezione per l'udito.
Indossare una protezione per gli occhi.
Utilizzare una protezione contro la polvere
(protezione dell'apparato respiratorio).
Utilizzare dei guanti protettivi.
Utilizzare una protezione per i piedi.
Utilizzare una protezione per il viso.
Utilizzare indumenti protettivi.
ATTENZIONE! Pericolo di lesione alle mani!
23
Rev. 14.10.2020
DATI TECNICI
Parametri
- Descrizione Parametri - Valore
Nome del
prodotto
SUPPORTO PER TRAPANO A
COLONNA
Modello MSW-
DMS202-PRO
MSW-
DMS502-PRO
Dimensioni
[Larghezza
x Profondità
x Altezza; mm]
296x512x910 295x512x1096
Dimensioni della
colonna [mm] 60x62x850 80x75x2000
Peso [kg] 14,4 24,4
Per il diametro
massimo di
foratura [mm]
202 502
Campo di
traslazione [mm] 510 650
Diametro del foro
di montaggio
[mm]
60 110
Impostazione
dell'angolo di
lavoro [o]
5-10-15-20-
25-30-35-
40-45
5-10-15-20-
25-30-35-
40-45
Rapporto di
trasmissione 1:1 1:2/1:1
SPIEGAZIONE DEI SIMBOLI
Il prodotto soddisfa le attuali norme di
sicurezza.
Leggere attentamente le istruzioni.
Prodotto riciclabile.
ATTENZIONE o AVVERTENZA! o NOTA! per
richiamare l'attenzione su determinate circo-
stanze (indicazioni generali di avvertenza).
1. DESCRIZIONE GENERALE
Queste istruzioni sono intese come ausilio per un uso sicuro
e adabile. Il prodotto è stato rigorosamente progettato
e realizzato secondo le direttive tecniche e l'utilizzo delle
tecnologie e componenti più moderne e seguendo gli
standard di qualità più elevati.
PRIMA DELLA MESSA IN FUNZIONE È NECESSARIO
AVER LETTO E COMPRESO LE ISTRUZIONI D'USO
Per un funzionamento duraturo e adabile del dispositivo
assicurarsi di maneggiarlo e curarne la manutenzione
secondo le disposizioni presentate in questo manuale.
I dati e le speciche tecniche indicati in questo manuale
sono attuali. Il fornitore si riserva il diritto di apportare
delle migliorie nel contesto del miglioramento dei
propri prodotti. L'apparecchiatura è stata progettata e
realizzata tenendo in considerazione il progresso tecnico
e la riduzione di rumore, in maniera tale da mantenere al
minimo i possibili rischi derivanti dalle emissioni di rumore.
AVVERTENZA! Le immagini contenute in questo
manuale sono puramente indicative e potrebbero
dierire dal prodotto.
Il manuale originale è stato scritto in tedesco. Le versioni in
altre lingue sono traduzioni dalla lingua tedesca.
2. SICUREZZA NELL'IMPIEGO
ATTENZIONE! Leggere le istruzioni d'uso e di
sicurezza. Non prestare attenzione alle avvertenze
e alle istruzioni può condurre a gravi lesioni o
addirittura al decesso.
Il termine "apparecchio" o "prodotto" nelle avvertenze
e descrizioni contenute nel manuale si riferisce alla/al
SUPPORTO PER TRAPANO A COLONNA.
2.1. SICUREZZA SUL LAVORO
a) Mantenere il posto di lavoro pulito e ben illuminato. Il
disordine o una scarsa illuminazione possono portare
a incidenti. Essere sempre prudenti, osservare che
cosa si sta facendo e utilizzare il buon senso quando
si adopera il dispositivo.
b) Non usare il dispositivo all'interno di luoghi altamente
combustibili, per esempio in presenza di liquidi, gas
o polveri inammabili. Il dispositivo può produrre
scintille in presenza di polvere o vapore inammabili.
c) Se non si è sicuri del corretto funzionamento del
dispositivo, rivolgersi al servizio assistenza del
fornitore.
d) Le riparazioni devono essere eseguite esclusivamente
dal servizio assistenza del produttore. Non eseguire le
riparazioni da soli!
e) I bambini e le persone non autorizzate non devono
essere presenti sul posto di lavoro. (La disattenzione
può causare la perdita del controllo sul dispositivo).
f) Utilizzare il dispositivo in una zona ben ventilata.
g) Controllare regolarmente lo stato delle etichette
informative di sicurezza. Se le etichette non sono ben
leggibili, devono essere sostituite.
h) Conservare le istruzioni d‘uso per uso futuro. Nel caso
in cui il dispositivo venisse adato a terzi, consegnare
anche queste istruzioni.
i) Tenere gli elementi di imballaggio e le piccole parti di
assemblaggio fuori dalla portata dei bambini.
j) Tenere il dispositivo fuori dalla portata dei bambini e
degli animali.
k) Durante l’impiego del dispositivo in contemporanea
con altri dispositivi, è consigliabile rispettare le altre
istruzioni d’uso.
Rev. 14.10.2020

24
IT
ATTENZIONE! Anche se l'apparecchiatura è
stata progettata per essere sicura, sono presenti
degli ulteriori meccanismi di sicurezza. Malgrado
l'applicazione di queste misure supplementari di
sicurezza sussiste comunque il rischio di ferirsi. Si
raccomanda inoltre di usare cautela e buon senso.
Rev. 14.10.2020
2.2. SICUREZZA PERSONALE
a) Non è consentito l'uso del dispositivo in uno stato
di aaticamento, malattia, sotto l'inuenza di alcol,
droghe o farmaci, se questi limitano la capacità di
utilizzare il dispositivo.
b) Il dispositivo deve essere utilizzato solo da personale
adeguatamente istruito, sicamente in grado di
utilizzare il dispositivo e in buona salute, che abbia
letto questo manuale e conosca le normative sulla
sicurezza sul posto di lavoro.
c) Prestare attenzione e usare il buon senso quando si
utilizza il dispositivo. Un momento di disattenzione
durante il lavoro può causare gravi lesioni.
d) Utilizzare dispositivi di protezione individuale adeguati
quando si utilizza il dispositivo, conformemente alle
speciche indicate nella spiegazione dei simboli al
punto 1. L'uso di dispositivi di protezione individuale
adeguati e certicati riduce il rischio di lesioni.
e) Non sopravvalutare le proprie capacità. Mantenere
l'equilibrio durante il lavoro, in questo modo è
possibile controllare meglio il dispositivo in caso di
situazioni impreviste.
f) Non indossare indumenti larghi o gioielli. Tenere
capelli, indumenti e guanti lontano da parti in
movimento. Vestiti sciolti, gioielli o capelli lunghi
possono impigliarsi nelle parti in movimento.
g) Si consiglia di utilizzare una protezione per occhi,
orecchie e vie respiratorie.
h) Questo dispositivo non è un giocattolo. I bambini
devono essere sorvegliati anché non giochino con
il prodotto.
2.3. USO SICURO DEL DISPOSITIVO
a) Non far surriscaldare il dispositivo. Utilizzare strumenti
appropriati. Dispositivi scelti correttamente e un
attento utilizzo degli stessi portano a risultati migliori.
b) Gli strumenti inutilizzati devono essere tenuti fuori
dalla portata dei bambini e delle persone che non
hanno familiarità con il dispositivo e le istruzioni d’uso.
Nelle mani di persone inesperte, questo dispositivo
può rappresentare un pericolo.
c) Mantenere il dispositivo in perfette condizioni. Prima
di ogni utilizzo, vericare che non vi siano danni
generali o danni alle parti mobili (frattura di parti
e componenti o altre condizioni che potrebbero
compromettere il funzionamento sicuro del prodotto).
In caso di danni, l'unità deve essere riparata prima
dell'uso.
d) Tenere il dispositivo fuori dalla portata dei bambini.
e) La riparazione e la manutenzione dell'attrezzatura
devono essere eseguite esclusivamente da personale
specializzato qualicato e con pezzi di ricambio
originali. Ciò garantisce la sicurezza durante l'uso.
f) Per garantire l'integrità di funzionamento
dell'apparecchio, i coperchi o le viti installati in
fabbrica non devono essere rimossi.
g) Quando si trasporta e si sposta l'apparecchiatura
dal luogo di deposito al luogo di utilizzo, i requisiti
di sicurezza e di igiene per la movimentazione
manuale devono essere rispettati per il paese in cui
l'apparecchiatura viene utilizzata.
AVVERTENZA!Quando si lavora con questo
dispositivo, i bambini e le persone non coinvolte
devono essere protetti.
h) Pulire regolarmente l'apparecchio in modo da evitare
l'accumulo di sporcizia.
i) Questo apparecchio non è un giocattolo! La pulizia
e la manutenzione non devono essere eseguite da
bambini a meno che non siano sotto la supervisione
di un adulto.
j) È vietato intervenire sulla costruzione del dispositivo
per modicare i suoi parametri o la sua costruzione.
k) Tenere dispositivi lontano da fonti di fuoco e calore.
l) Non sovraccaricare il dispositivo.
m) Assicurarsi che l'impugnatura sia regolata
correttamente.
n) Si consiglia di utilizzare la maniglia laterale.
3. CONDIZIONI D'USO
Il prodotto è stato progettato per facilitare il lavoro con le
seghe a tazza, inuendo sulla precisione della foratura e
favorendo la realizzazione di fori angolati.
L'operatore è responsabile di tutti i danni derivanti da
un uso improprio.
3.1. DESCRIZIONE DEL DISPOSITIVO
MSW-DMS202-PRO
1
2
3
4
5
6
7
8
9
10
11
MSW-DMS502-PRO
3.2. PREPARAZIONE AL FUNZIONAMENTO
Posizionamento del dispositivo:
Tenere il dispositivo lontano da fonti di calore. Utilizzare
sempre la macchina su una supercie piana e stabile e fuori
dalla portata dei bambini e delle persone con disabilità.
Montaggio del dispositivo
Dopo aver scelto una posizione adatta per il supporto del
trapano in base all'uso previsto della sega a tazza, occorre
utilizzare un ancoraggio per calcestruzzo per ssare il
supporto del trapano in posizione. A tal scopo, praticare un
foro nella supercie adatta all'ancoraggio con un trapano
a percussione. In caso di supercie in mattoni, utilizzare
un ancoraggio adatto per muratura con un adesivo per la
riparazione di murature/muri fessurati.
ATTENZIONE: L'utilizzo di un ancoraggio per calcestruzzo su
un mattone può provocare la sua rottura e l'allentamento
dell'ancoraggio!
Nel caso di ssaggi a vuoto, assicurarsi che la supercie a cui
verrà ssato il supporto sia priva di residui e di altri elementi
sparsi, e che il vuoto sia suciente a trattenere il supporto
e i suoi accessori.
ATTENZIONE: non utilizzare i supporti a vuoto durante
le forature nei sotti, nei tetti, ecc. ovvero sopra la testa
dell'operatore!
Servendosi di una livella, livellare il dispositivo girando le
quattro viti di livellamento alla base del supporto - serrare
i rispettivi dadi solo dopo aver eettuato il livellamento. Il
livellamento del supporto è necessario sia per le forature
verticali che per quelle orizzontali.
3.3. LAVORARE CON IL DISPOSITIVO
3.3.1 REGOLAZIONE DELL’ANGOLO DEL SUPPORTO
L'angolo del supporto deve essere regolato in base alla
posizione centrale del foro da praticare. La gamma di
inclinazione dell'angolo può essere impostata da 0-45o.
Per impostare l'angolo, utilizzare la manovella per allentare
la vite di bloccaggio sul supporto - durante la regolazione
dell'angolo desiderato, prestare attenzione alla scala
riportata sul supporto. Dopo l'impostazione eettuata,
stringere nuovamente la vite di serraggio. Stringere la vite di
ssaggio sul carrello per assicurarsi che la piastra o la staa
di montaggio non siano allentate.
ATTENZIONE: non stringere eccessivamente i bulloni di
ssaggio, altrimenti la colonna o la rampa potrebbero
deformarsi.
3.3.2 REGOLAZIONE DELL'AVANZAMENTO DEL
CARRELLO
Controllare la tenuta della barra di guida sulla colonna -
se allentata, stringere i 4 tenditori eccentrici all'interno del
carrello. Al ne di una corretta regolazione, utilizzare una
chiave da 13mm e 8mm per stringere il dado del tenditore,
quindi testare il carrello girando la manovella su e giù. Se
regolazione è corretta, il dispositivo non dovrebbe avere
alcun gioco e non dovrebbe bloccarsi durante il movimento
su/giù.
1. Colonna
2. Manovella di regolazione dell'altezza
3. Blocco dell'angolo di inclinazione
4. Staa
5. Fissaggio della colonna
6 Base
7. Blocco carrello
8. Livella
9. Fissaggio per sega a tazza
10. Carrello
11. Vite di livellamento
12. Rotelle di trasporto (solo MSW-DMS502-PRO)
IT
25
Rev. 14.10.2020
7
8
9
10
11
1
2
3
4
12
5
6

26
IT
3.3.3 FISSAGGIO E REGOLAZIONE DELLA SEGA A TAZZA
Il modello MSW-DMS202-PRO è progettato per il montaggio
di una sega a tazza manuale (MSW-DDM202L-PRO o MSW-
DDM202S-PRO) e dispone di una bbia apposita, mentre
il modello MSW-DMS502-PRO è progettato per seghe a
tazza che possono lavorare soltanto con un supporto (MSW-
DDM402-PRO) e ha un ssaggio a 4 bulloni.
Per facilitare il montaggio della sega a tazza su un supporto,
è necessario sollevare un po' il carrello e solo dopo regolare
la sua altezza. Per le seghe a tazza progettate soltanto per il
funzionamento con il supporto, prima occorre usare quattro
viti al ne di ssare la piastra di montaggio sulla sega a
tazza. Quindi ssare la piastra di montaggio nel carrello
completamente inserito e stringere la vite di bloccaggio.
Questa vite dovrebbe essere completamente serrata e allo
smontaggio invece, allentata.
Il blocco del carrello si trova nella parte superiore dello
stesso e viene utilizzato per il suo ssaggio all'altezza
di lavoro desiderata. Per rilasciare il blocco, spostare il
meccanismo di bloccaggio a sinistra, allentare la vite
zigrinata sul meccanismo di bloccaggio, regolare l'altezza
desiderata girando la manovella nella direzione giusta, e
quindi bloccare nuovamente spostando il meccanismo
di bloccaggio a destra e stringendo la vite zigrinata sul
meccanismo di bloccaggio.
IMPORTANTE: l'altezza del carrello non deve essere regolata
con la serratura chiusa, poiché ciò potrebbe danneggiare sia
il meccanismo di avanzamento che la serratura!
Sul modello MSW-DMS502-PRO, il meccanismo di
regolazione dell'altezza della guida ha 2 rapporti: 1:1 e
un ridotto 1:2 (meno giri di manovella-avanzamento più
veloce). Nel caso di fori di diametro superiore a 202 mm
è necessario usare un rapporto ridotto, cioè 1:2 - basta
mettere la manovella sull'estremità corretta del meccanismo
di trasmissione.
3.4. PULIZIA E MANUTENZIONE
a) Per pulire la supercie utilizzare solo detergenti senza
ingredienti corrosivi.
b) Tenere l'apparecchio in un luogo asciutto, fresco,
protetto dall'umidità e dalla luce diretta del sole.
c) È vietato spruzzare il dispositivo con un getto d'acqua
o immergere il dispositivo in acqua.
d) Eettuare controlli regolari del dispositivo per
mantenerlo eciente e privo di danni.
e) Per la pulizia utilizzare un panno morbido.
f) Per la pulizia utilizzare un panno morbido e umido.
g) Non utilizzare oggetti appuntiti o / e metallici (come
una spazzola o una spatola metallica) per la pulizia,
poiché potrebbero danneggiare la supercie del
materiale con cui è fatto il dispositivo.
h) Non pulire il dispositivo con sostanze acide.
Attrezzature mediche, diluente per vernici, carburante,
olio o altre sostanze chimiche possono danneggiare
l‘unità.
SMALTIMENTO DELLE ATTREZZATURE USATE
Questo prodotto, se non più funzionante, non deve
essere smaltito insieme ai normali riuti, ma deve essere
consegnato ad un’organizzazione competente per lo
smaltimento dei dispositivi elettrici e elettronici. Maggiori
informazioni sono reperibili sull'etichetta sul prodotto, sul
manuale di istruzioni o sull'imballaggio. I materiali utilizzati
nel dispositivo possono essere riciclati secondo indicazioni.
Riutilizzando i materiali o i dispositivi, si contribuisce a
tutelare l'ambiente circostante. Le informazioni sui rispettivi
punti di smaltimento sono reperibili presso le autorità locali.
ES
MANUAL DE INSTRUCCIONES
Utilizar protección para los oídos.
Utilizar protección para los ojos.
Utilizar protección contra el polvo (para las
vías respiratorias).
Utilizar guantes de protección.
Utilizar calzado de seguridad.
Utilizar protección para el rostro.
Utilizar ropa de protección.
¡ATENCIÓN! ¡Advertencia de lesiones en
manos!
27
Rev. 14.10.2020
DATOS TÉCNICOS
Parámetro - De-
scripción Parámetro - Valor
Nombre del
producto SOPORTE PARA PERFORADORA
Modelo MSW-
DMS202-PRO
MSW-
DMS502-PRO
Dimensiones
[Ancho
x Profundidad
x Altura; mm]
296x512x910 295x512x1096
Dimensiones de la
columna [mm] 60x62x850 80x75x2000
Peso [kg] 14,4 24,4
Hasta el diámetro
máximo de
perforación [mm]
202 502
Rango de
desplazamiento
[mm]
510 650
Diámetro del
agujero de
montaje [mm]
60 110
Inclinación de
los ángulos de
trabajo [o]
5-10-15-20-
25-30-35-
40-45
5-10-15-20-
25-30-35-
40-45
Relación de
transmisión 1:1 1:2/1:1
EXPLICACIÓN DE LOS SÍMBOLOS
El producto cumple con las normas de
seguridad vigentes.
Respetar las instrucciones de uso.
Producto reciclable.
¡ATENCIÓN!, ¡ADVERTENCIA! o ¡NOTA! para
llamar la atención sobre ciertas circunstancias
(señal general de advertencia).
1. DESCRIPCIÓN GENERAL
Este manual ha sido elaborado para favorecer un empleo
seguro y able. El producto ha sido estrictamente diseñado
y fabricado conforme a las especicaciones técnicas y para
ello se han utilizado las últimas tecnologías y componentes,
manteniendo los más altos estándares de calidad.
ANTES DE LA PUESTA EN FUNCIONAMIENTO,
LEA LAS INSTRUCCIONES MINUCIOSAMENTE Y
ASEGÚRESE DE COMPRENDERLAS.
Para garantizar un funcionamiento duradero y able del
aparato, el manejo y mantenimiento deben llevarse a
cabo de acuerdo con las instrucciones de este manual. Los
datos técnicos y las especicaciones de este manual están
actualizados. El fabricante se reserva el derecho de realizar
modicaciones para mejorar la calidad. Teniendo en cuenta
los avances técnicos en materia de reducción del ruido, el
equipo ha sido diseñado y fabricado para mantener el
riesgo de emisiones sonoras al nivel más bajo posible.
¡ADVERTENCIA! En este manual se incluyen fotos
ilustrativas que podrían no coincidir exactamente
con la apariencia real del dispositivo.
El texto en alemán corresponde a la versión original. Los
textos en otras lenguas son traducciones del original en
alemán.
2. SEGURIDAD
¡ATENCIÓN! Lea todas las instrucciones e
indicaciones de seguridad. La inobservancia de
las advertencias e instrucciones al respecto puede
provocar lesiones graves o incluso la muerte.
Conceptos como "aparato" o "producto" en las advertencias
y descripciones de este manual se reeren a SOPORTE PARA
PERFORADORA.
2.1. SEGURIDAD EN EL PUESTO DE TRABAJO
a) Mantenga el lugar de trabajo limpio y bien iluminado.
El desorden o la mala iluminación pueden provocar
accidentes. Tenga cuidado, preste atención al trabajo
que está realizando y use el sentido común cuando
utilice el dispositivo.
b) No utilice el aparato en atmósferas potencialmente
explosivas, p. ej., en la cercanía de líquidos, gases o
polvo inamables. Bajo determinadas circunstancias
los aparatos generan chispas que pueden inamar
polvo o vapores circundantes.
c) Si no está seguro de que la unidad funcione
correctamente, póngase en contacto con el servicio
técnico del fabricante.
d) Las reparaciones solo pueden ser realizadas por
el servicio técnico del fabricante. ¡No realice
reparaciones por su cuenta!
e) Se prohíbe la presencia de niños y personas no
autorizadas en el lugar de trabajo (la falta de atención
puede llevar a la pérdida de control del equipo).
f) Utilice el equipo en un espacio bien ventilado.
g) Compruebe regularmente el estado de las etiquetas
de información de seguridad. Si las pegatinas fueran
ilegibles, habrán de ser reemplazadas.
h) Conserve el manual de instrucciones para futuras
consultas. Este manual debe ser entregado a toda
persona que vaya a hacer uso del dispositivo.
i) Los elementos de embalaje y pequeñas piezas de
montaje deben mantenerse alejados del alcance de
los niños.
Rev. 14.10.2020

MSW-DMS502-PRO
3.2. PREPARACIÓN PARA LA PUESTA EN MARCHA
LUGAR DE TRABAJO
Mantenga la unidad alejada de supercies calientes. El
aparato se debe usar siempre jado a una supercie plana
y estable, fuera del alcance de los niños y de personas con
funciones limitadas.
MONTAJE DE LA MÁQUINA
Después de situar el soporte de forma adecuada al trabajo
de la perforadora, use anclajes para hormigón para jarlo al
suelo. Para ello, utilice un martillo perforador para taladrar
un agujero adecuado al anclaje. Si la supercie es de ladrillo,
use un anclaje para mampostería y un pegamento para
reparar las paredes quebradas.
ATENCIÓN: ¡usar un anclaje para hormigón en ladrillo puede
hacer que se rompe y el anclaje quede suelto!
En caso de realizar anclajes al vacío, asegúrese de que la
supercie a la que se vaya a jar el soporte esté limpia y
libre de elementos sueltos, y que la presión negativa sea
suciente para sujetar el soporte y el equipamiento.
ATENCIÓN: ¡no use anclajes al vacío al perforar techos,
bóvedas y demás supercies sobre la cabeza del operario!
Use el nivel para nivelar el aparato, y apriete los cuatro
tornillos de nivel en la base del soporte. Una vez esté nivelado,
apriete las tuercas. Nivelar el soporte es imprescindible tanto
en las perforaciones verticales como en las horizontales.
3.3. MANEJO DEL APARATO
3.3.1 AJUSTE DEL ÁNGULO DEL SOPORTE
El ángulo del soporte se debe adaptar a la posición central
del oricio que se vaya a perforar. El ángulo de inclinación
se puede ajustar en un rango de 0-45º. Para ajustar el
ángulo de inclinación, use la manivela para aojar el tornillo
de jación del soporte. Al ajustar el ángulo, fíjese en la
escala que se encuentra en el soporte. Después de ajustar
el ángulo, vuelva a apretar el tornillo de jación. Apriete el
tornillo de sujeción del carro para asegurarse de que la placa
de montaje o el apoyo no queden sueltos.
ATENCIÓN: no apriete los tornillos de sujeción demasiado
fuerte, ya que de lo contrario se puede deformar la columna
o la rampa.
3.3.2 AJUSTE DEL AVANCE DEL CARRO
Compruebe que la guía esté bien jada a la columna. Si
estuviera oja, apriete los 4 tensores excéntricos dentro
del carro. Para dejar la holgura adecuada, use llaves de 13
y 8 mm para apretar la tuerca del tensor, y después pruebe
el carro girando la manivela hacia abajo y hacia arriba. No
debería tener holgura ni engancharse en los movimientos
verticales.
1. Columna
2. Manivela de regulación de altura
3. Bloqueo del ángulo de inclinación
4. Soporte
5. Sujeción de la columna
6. Base
7. Bloqueo del carro
8. Nivel
9. Sujeción en la perforadora
10. Carro
11. Rosca de nivelado
12. Ruedas de transporte (solo en MSW-DMS502-PRO)
ES
29
Rev. 14.10.2020
7
8
9
10
11
1
2
3
4
12
5
6
28
ES
¡ATENCIÓN! Aunque en la fabricación de este
aparato se ha prestado gran importancia a la
seguridad, dispone de ciertos mecanismos de
protección extras. A pesar del uso de elementos
de seguridad adicionales, existe el riesgo de
lesiones durante el funcionamiento, por lo que se
recomienda proceder con precaución y sentido
común.
Rev. 14.10.2020
2.2. SEGURIDAD PERSONAL
a) No está permitido utilizar el aparato en estado de
fatiga, enfermedad, bajo la inuencia del alcohol,
drogas o medicamentos, ya que estos limitan la
capacidad de manejo del aparato.
b) La máquina debe ser manipulada exclusivamente por
operarios con la formación adecuada y físicamente
sanos, que hayan leído las presentes instrucciones
y conozcan los requisitos en materia de seguridad y
salud.
c) Actúe con precaución y use el sentido común cuando
maneje este producto. La más breve falta de atención
durante el trabajo puede causar lesiones graves.
d) Utilice el equipo de protección personal necesario
para el empleo de este dispositivo, de acuerdo con
las especicaciones del punto 1 de las explicaciones
de los símbolos. El uso de un equipo de protección
personal apropiado y certicado reduce el riesgo de
lesiones.
e) No sobrestime sus habilidades. Mantenga el equilibrio
durante el trabajo. Esto le da un mejor control sobre el
dispositivo en caso de situaciones inesperadas.
f) No utilice ropa holgada o adornos tales como joyas.
Mantenga el cabello, la ropa y los guantes alejados
de las piezas móviles. La ropa holgada, las joyas o el
cabello largo pueden quedar atrapados en las piezas
móviles.
g) Se recomienda utilizar protecciones para ojos, oídos y
vías respiratorias.
h) Este aparato no es un juguete. Debe controlar que los
niños no jueguen con él.
2.3. MANEJO SEGURO DEL APARATO
a) No permita que el aparato se sobrecaliente. Utilice
las herramientas apropiadas para cada trabajo.
Debe seleccionarse el aparato adecuado para cada
aplicación y utilizarse conforme al n para el que
ha sido diseñado, para conseguir así los mejores
resultados.
b) Mantenga las herramientas fuera del alcance de los
niños y de las personas que no estén familiarizadas
con el equipo en sí o no hayan recibido las
instrucciones pertinentes al respecto. En manos de
personas inexpertas este equipo puede representar
un peligro.
c) Mantenga el aparato en perfecto estado de
funcionamiento. Antes de cada trabajo, compruébelo
en busca de daños generales o de piezas móviles
(fractura de piezas y componentes u otras
condiciones que puedan perjudicar el funcionamiento
seguro de la máquina). En caso de daños, el aparato
debe ser reparado antes de volver a ponerse en
funcionamiento.
d) Mantenga la unidad fuera del alcance de los niños.
e) La reparación y el mantenimiento de los equipos
solo pueden ser realizados por personal cualicado
y siempre empleando piezas de repuesto originales.
Esto garantiza la seguridad durante el uso.
¡ADVERTENCIA!Los niños y las personas no
autorizadas deben estar asegurados cuando
trabajen con esta unidad.
f) A n de asegurar la integridad operativa del
dispositivo, no se deben retirar las cubiertas o los
tornillos instalados de fábrica.
g) Al transportar o trasladar el equipo desde su lugar
de almacenamiento hasta su lugar de utilización, se
observarán los requisitos de seguridad e higiene para
la manipulación manual en el país en que se utilice el
equipo.
h) Limpie regularmente el dispositivo para evitar que la
suciedad se incruste permanentemente.
i) Este aparato no es un juguete. La limpieza y el
mantenimiento no deben ser llevados a cabo por
niños que no estén bajo la supervisión de adultos.
j) Se prohíbe realizar cambios en la construcción del
dispositivo para modicar sus parámetros o diseño.
k) Mantenga el dispositivo alejado de fuentes de fuego
o calor.
l) No permita que el aparato se sobrecargue.
m) Assicurarsi che l'impugnatura sia regolata
correttamente.
n) Si consiglia di utilizzare la maniglia laterale.
3. INSTRUCCIONES DE USO
El producto está indicado para ayudar a trabajar con
perforadoras, aumentar la precisión de perforación y facilitar
la realización de agujeros en inclinación.
El usuario es responsable de los daños derivados de un
uso inadecuado del aparato.
3.1. DESCRIPCIÓN DEL APARATO
MSW-DMS202-PRO
1
2
3
4
5
6
7
8
9
10
11
j) Mantenga el equipo alejado de niños y animales.
k) Al utilizar este equipo junto con otros, también deben
observarse otras instrucciones de uso.

ES
3.3.3 FIJACIÓN Y AJUSTE DE LA PERFORADORA
El modelo MSW-DMS202-PRO está adaptado para la
instalación de la perforadora manual (MSW-DDM202L-
PRO o MSW-DDM202S-PRO) y posee una grapa especial,
mientras que el MSW-DMS502-PRO está dedicado para las
perforadoras que solo pueden funcionar con soporte (MSW-
DDM402-PRO) y posee una sujeción con 4 tornillos.
Para instalar la perforadora en el soporte, levante
ligeramente el carro y después de jarla, regule su altura. En
las perforadoras que solo puedan operarse con el soporte,
primero use los cuatro tornillos para jar la arandela de
montaje a la perforadora. Después, instale la placa de
montaje en la cuna hasta el fondo y apriete el tornillo de
bloqueo. Este tornillo debe estar apretado por completo,
mientras que durante la desinstalación tiene que estar
totalmente aojado.
El bloqueo del carro se encuentra en su parte superior.
Sirve para jar el carro a la altura de trabajo deseada. Para
soltar el bloqueo, desplácelo a la izquierda, aoje el tornillo
moleteado del bloqueo, ajuste la altura del carro deseada
girando la manivela en la dirección adecuada y vuelva a
cerrar el bloqueo desplazándolo a la derecha y apretando
el tornillo moleteado.
IMPORTANTE: no regule la altura del carro con el bloqueo
cerrado, ¡ya que puede dañar tanto el mecanismo de
desplazamiento como el propio bloqueo!
En el modelo MSW-DMS502-PRO, el mecanismo de
regulación de altura tiene 2 relaciones: 1:1 y una reducida a
1:2 (menos giro de manivela - desplazamiento más rápido).
En caso de abrir oricios de más de 202 mm de diámetro,
use la relación reducida 1:2. Entonces, basta con poner
la manivela en el extremo adecuado del mecanismo de
transmisión.
3.4. LIMPIEZA Y MANTENIMIENTO
a) Para limpiar la supercie, utilice solo productos que
no contengan sustancias corrosivas.
b) Guarde el aparato en un lugar seco, fresco y protegido
de la humedad y la radiación solar directa.
c) Prohibido rociar agua sobre el dispositivo o sumergirlo
en agua.
d) En lo que respecta a la eciencia técnica y posibles
daños, el dispositivo debe ser revisado regularmente.
e) Por favor, utilice un paño suave para la limpieza.
f) Para su limpieza utilizar un paño húmedo y suave.
g) No utilizar para la limpieza objetos de metal
puntiagudos y/o alados (p.ej. cepillos metálicos o
espátulas de metal), ya que podrían dañar la supercie
del material del que está hecho el aparato.
h) No limpie el aparato con limpiadores que puedan
contener sustancias ácidas. Los aparatos médicos,
disolventes, carburantes, aceites y otros químicos
podrían dañar el producto.
ELIMINACIÓN DE DISPOSITIVOS USADOS
Tras su vida útil, este producto no debe tirarse al contenedor
de basura doméstico, sino que ha de entregarse en el
punto limpio correspondiente para recolección y reciclaje
de aparatos eléctricos. Al respecto informa el símbolo
situado sobre el producto, las instrucciones de uso o el
embalaje. Los materiales utilizados en este aparato son
reciclables, conforme a su designación. Con la reutilización,
aprovechamiento de materiales u otras formas de uso de
los aparatos utilizados, contribuirás a proteger el medio
ambiente. Para obtener información sobre los puntos de
recogida y reciclaje contacte con las autoridades locales
competentes.
NOTES/NOTZIEN
31
Rev. 14.10.2020
30 Rev. 14.10.2020

expondo.com
CONTACT
expondo Polska sp. z o.o. sp. k.
ul. Nowy Kisielin-Innowacyjna 7
66-002 Zielona Góra | Poland, EU
e-mail: info@expondo.com
Hersteller an Verbraucher
Sehr geehrte Damen und Herren,
gebrauchte Elektro – und Elektronikgeräte dürfen gemäß europäischer Vorgaben [1] nicht zum unsortierten Siedlungsabfall
gegeben werden, sondern müssen getrennt erfasst werden. Das Symbol der Abfalltonne auf Rädern weist auf die Notwendigkeit
der getrennten Sammlung hin. Helfen auch Sie mit beim Umweltschutz. Sorgen Sie dafür, dieses Gerät, wenn Sie es nicht mehr
weiter nutzen wollen, in die hierfür vorgesehenen Systeme der Getrenntsammlung zu geben.
In Deutschland sind Sie gesetzlich [2] verpichtet, ein Altgerät einer vom unsortierten Siedlungsabfall getrennten Erfassung
zuzuführen. Die öffentlich – rechtlichen Entsorgungsträger (Kommunen) haben hierzu Sammelstellen eingerichtet, an denen
Altgeräte aus privaten Haushalten ihres Gebietes für Sie kostenfrei entgegengenommen werden. Möglicherweise holen die
rechtlichen Entsorgungsträger die Altgeräte auch bei den privaten Haushalten ab.
Bitte informieren Sie sich über Ihren lokalen Abfallkalender oder bei Ihrer Stadt – oder Gemeindeverwaltung über die in Ihrem
Gebiet zur Verfügung stehenden Möglichkeiten der Rückgabe oder Sammlung von Altgeräten.
[1] RICHTLINIE 2002/96/EG DES EUROPÄISCHEN PARLAMENTS UND DES RATES
ÜBER ELEKTRO – UND ELEKTRONIK – ALTGERÄTE
[2] Gesetz über das Inverkehrbringen, die Rücknahme und die umweltverträgliche Entsorgung
von Elektro – und Elektronikgeräten (Elektro – und Elektronikgerätegesetz – ElektroG).
Umwelt – und Entsorgungshinweise
Utylizacja produktu
Produkty elektryczne i elektroniczne po zakończeniu okresu eksploatacji wymagają segregacji i oddania ich do wyznaczonego
punktu odbioru. Nie wolno wyrzucać produktów elektrycznych razem z odpadami gospodarstwa domowego. Zgodnie
z dyrektywą WEEE 2012/19/UE obowiązującą w Unii Europejskiej, urządzenia elektryczne i elektroniczne wymagają segregacji
i utylizacji w wyznaczonych miejscach. Dbając o prawidłową utylizację, przyczyniasz się do ochrony zasobów naturalnych
i zmniejszasz negatywny wpływ oddziaływania na środowisko, człowieka i otoczenie. Zgodnie z krajowym prawodawstwem,
nieprawidłowe usuwanie odpadów elektrycznych i elektronicznych może być karane!
For the disposal of the device please consider and act according to the national and local rules and regulations.
This manual suits for next models
1
Table of contents
Other MSW Motor Technics Grinder manuals
Popular Grinder manuals by other brands

Parkside
Parkside PWS 230 A1 Translation of the original instructions

Makita
Makita GA9061 instruction manual

Fein
Fein WSG10-115T instruction manual

Hitachi Koki
Hitachi Koki G 10SR2 Safety instructions and instruction manual

Pattfield
Pattfield ERGO TOOLS E-WS 600 operating instructions

Hitachi Koki
Hitachi Koki G15YC Handling instructions