Clarke American B-2 User manual

Electronic Service
Manuals
This electronic document is provided as a service to our customers.
Wedonotcreatethecontentsoftheinformationcontainedinthisdocu-
ment. Shouldyouhavedetailedquestionspertainingtotheinformation
contained in this document, you may contact Michco, or the manufac-
turer which provided the original information in this electronic deliver-
able. Michco’sonlypartin this electronic deliverable was the electronic
assemblyprocess. Byprovidingthismanualonlinewearenotguaran-
teeing parts availability.
You may contact Michco through the following methods:
Phone (517) 484-9312 or (800) 331-3339
2011 N. High St. -- Lansing, Michigan -- 48906
Fax: (517) 484-9836
Email: [email protected]
Web site: www.Michco.Com
Parts Web site: www.FloorMachineParts.Com
Order Parts on Line at:
www.FloorMachineParts.Com
Directly to Parts & Service:
By Fax: (517) 702-2041
By Voice: Use numbers above.
Serving the Cleaning Industry Since 1922
Notice: All copyrighted material remains property of original owners, all trademarks are property of respective owners.
ManualsaresubjecttoManufacturer’sreproductionlimitations. Originalsorreproductionswereprovidedbymanufacturers
through a request. We make no warranty as to the correctness of information provided in this document and you assume
allrisk. By placing thesemanualsonlinewe are notdeclaringourcorporation to be anmanufacturerauthorizeddealer or
provider, please check ourwebsiteforauthorizedmanufacturerswerepresent.

FormNo.78133D 5/04 Printed in the U.S.A.
READ THIS BOOK
This book has important information for the use and safe operation of this machine. Failure to read
this book prior to operating or attempting any service or maintenance procedure to your Clarke
AmericanSanders machinecouldresultininjurytoyouortootherpersonnel;damagetothemachine
or to other property could occur as well. You must have training in the operation of this machine
beforeusingit. If cannot readEnglish,have this manualexplainedfully before attemptingtooperate
this machine.
Si Ud. no pueden leer el Inglés, se hagan explicar este manual completamente antes de tratar el
manejo o servicio de esta máquina.
All directions given in this book are as seen from the operator’s position at the rear of the machine.
For new books write to: Clarke®, 2100 Highway 265, Springdale, Arkansas 72764
Operator's
Manual
American
B-2+
7" Spinner Edger

Page 2 Clarke®American Sanders American B-2 Operator's Manual
OperatorSafetyInstructions .........................................................3
IntroductionandMachineSpecifications.......................................5
MachineSet-Up ...........................................................................6
HowtoPreparetheMachineforOperation...................................6
SandingCutsandSandpaper .................................................... 7
HowtoOperatetheMachine ........................................................8
RoutineMaintenance....................................................................8
TheDustControlSystem ........................................................8
HowtoAdjusttheAngleoftheSandpaperDisctotheFloor ....8
HowtoChangeAdjustmentofMachine...................................8
HowtoReplacetheLightBulb ................................................8
HowtoCleanVentilationPlug .................................................8
Lubrication............................................................................10
HowtochangetheLubricantintheGearbox .........................10
HowtoChecktheCarbonBrushes .......................................10
AssemblyDrawing#1 ................................................................12
Assembly Parts List #1 ..............................................................13
AssemblyDrawing#2 ................................................................14
Assembly Parts List #2 ..............................................................15
Wiring Diagram..........................................................................16
Contents of this Book

Page 3 Clarke®American Sanders American B-2 Operator's Manual
DANGERmeans: Severe bodily injury or death can occurto you orother personnelif the DAN-
GER statementsfoundonthis machine or inthis Owner'sManual areignored
orarenotadheredto. ReadandobserveallDANGER statementsfoundinthis
Owner'sManualandonyourmachine.
WARNINGmeans: Injury can occur to you or to other personnel if the WARNING statements
foundonyourmachineorinthis Owner's Manual are ignored or are not
adheredto. ReadandobserveallWARNING statementsfoundinthisOwner's
Manualandonyourmachine.
CAUTIONmeans: Damage can occur to the machine or to other property if the CAUTION state-
mentsfound on your machineorinthisOwner's Manual are ignoredorarenot
adheredto. Readand observeallCAUTIONstatementsfound inthisOwner's
Manualandonyourmachine.
DANGER: Failuretoreadthe Owner'sManualpriortooperatingorattempting anyserviceormainte-
nance procedure to your Clarke American Sanders machine could result in injury to you or
to other personnel; damage to the machine or to other property could occur as well. You
must have training in the operation of this machine before using it. If you cannot read
English, have this manual explained fully before attempting to operate this ma-
chine.
DANGER: Sanding/finishingwoodfloorscancreateanenvironmentthatcanbeexplosive. The
followingsafetyproceduresmustbeadheredto:
• Cigarette lighters, pilot lights and any other source of ignition can create an explosion
when active during a sanding session. All sources of ignition should be extinguished or
removedentirelyifpossiblefromtheworkarea.
• Workareasthatarepoorlyventilatedcancreateanexplosiveenvironmentwhencertain
combustible materials are in the atmosphere, i.e., solvents, thinners, alcohol, fuels,
certain finishes, wood dust and other combustible materials. Floor sanding machines
cancauseflammablematerialandvaporstoburn. Readthe manufacturer's label on all
chemicals used to determine combustibility. Keep the work area well ventilated.
• Spontaneouscombustion or an explosioncanoccurwhenworking with sandingdust.
The sanding dust can ignite and cause injury or damage. Sanding dust should be
disposed of properly. Always empty the sanding dust into a metal container that is
locatedoutsideofany building(s).
• Remove the contents of the dust bag when the bag is 1/3 full. Remove the contents of
the dust bag each time you finish using the machine. Never leave a dust bag unattended
with sanding dust in it.
• Do not empty the contents of the dust bag into a fire.
• Hitting a nail while sanding can cause sparks and create an explosion or fire. Always
usea hammer andpunchto countersink allnailsbeforesanding floors.
DANGER: Operating a machine that is not completely or fully assembled could result in injury or
property damage. Do not operate this machine until it is completely assembled. Keep
all fasteners tight. Keep adjustments according to machine specifications.
WARNING AVERTISSEMENT ADVERTENCIA
OPERATORSAFETYINSTRUCTIONS

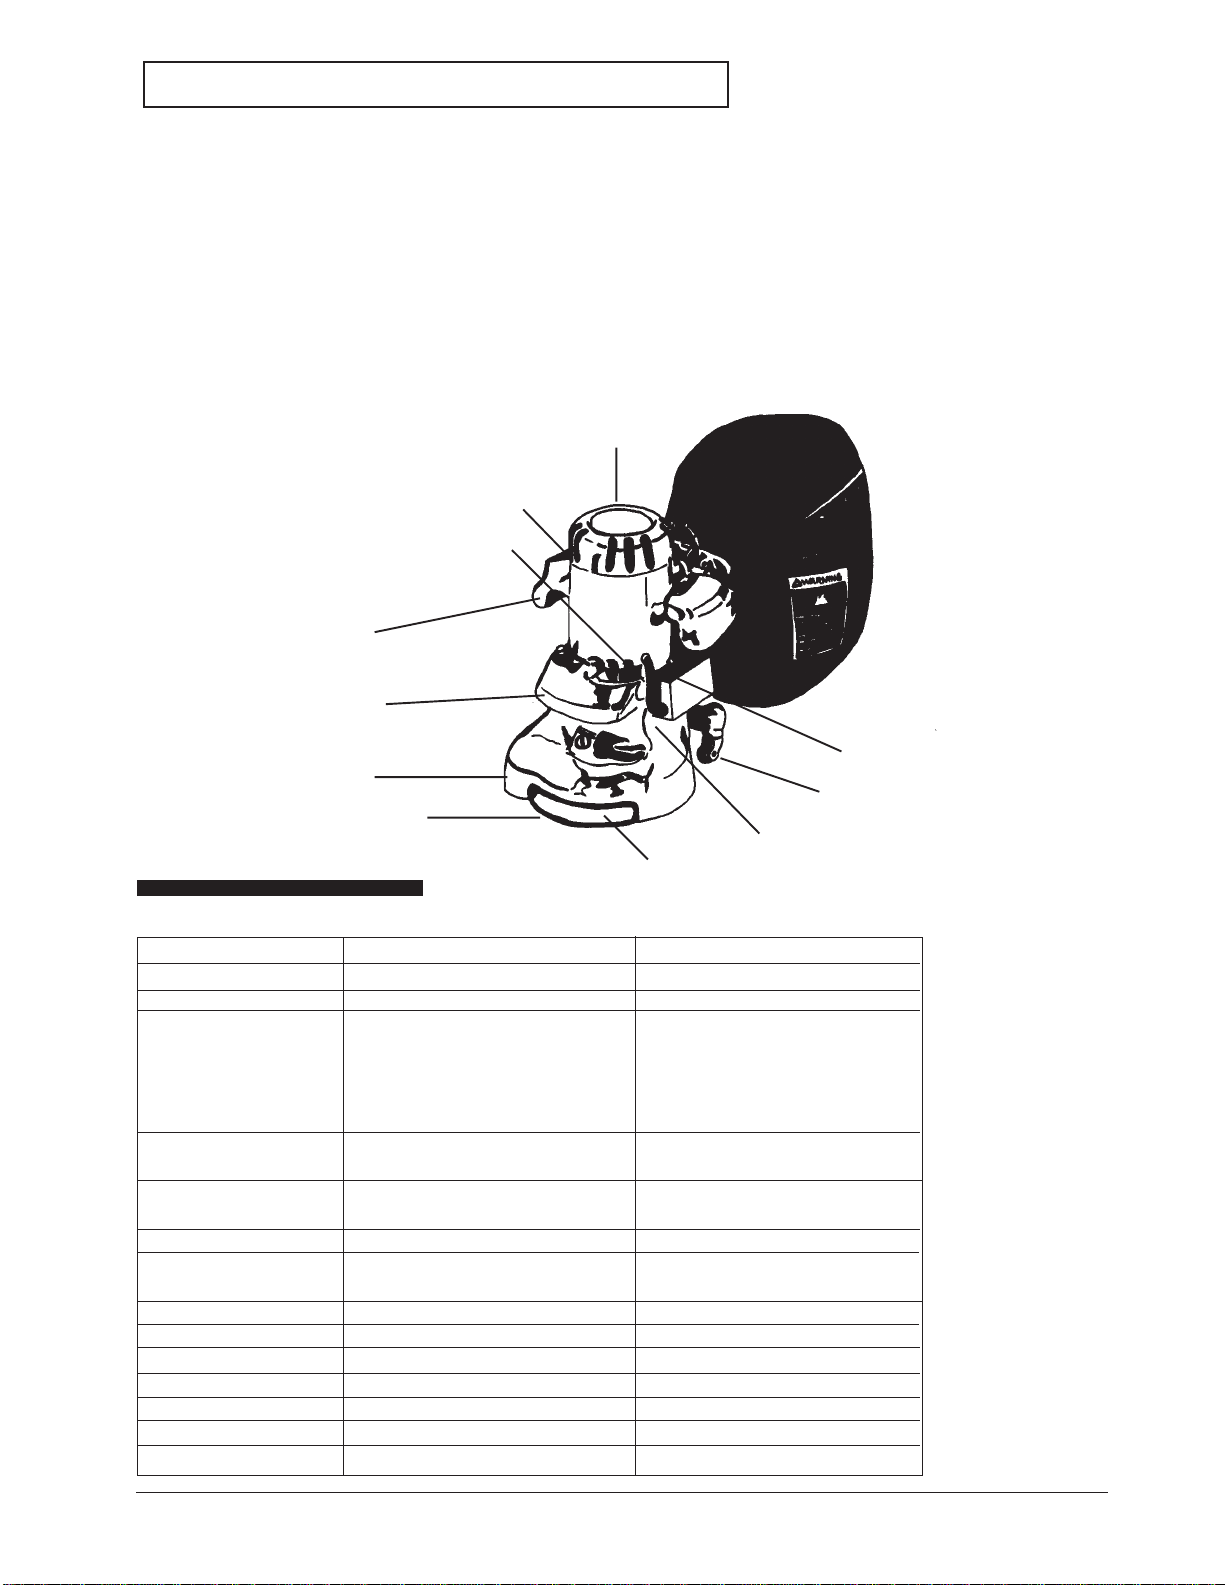
Page 4 Clarke®American Sanders American B-2 Operator's Manual
DANGER: Electrocution could occur if the machine is used on a power circuit that repeatedly trips or is
undersized. Have a licensed electrician check the fuse, circuit breaker or power supply.
DANGER: Electrocution could occur if maintenance and repairs are performed on a unit that is not
properly disconnected from the power source. Disconnect the power supply before attempting
any maintenance or service.
DANGER: Electrocution could occur if machine is used on ungrounded electrical circuit. Never remove
or disable the grounding supply conductor on the electrical cord. Consult an electrician if the
grounding conductor is missing or if you suspect your circuit is not grounded properly.
DANGER: Use of this machine with a damaged power cord could result in an electrical shock. Do not
use the machine if the power cord is damaged. Do not use the electrical cord to move the
machine.
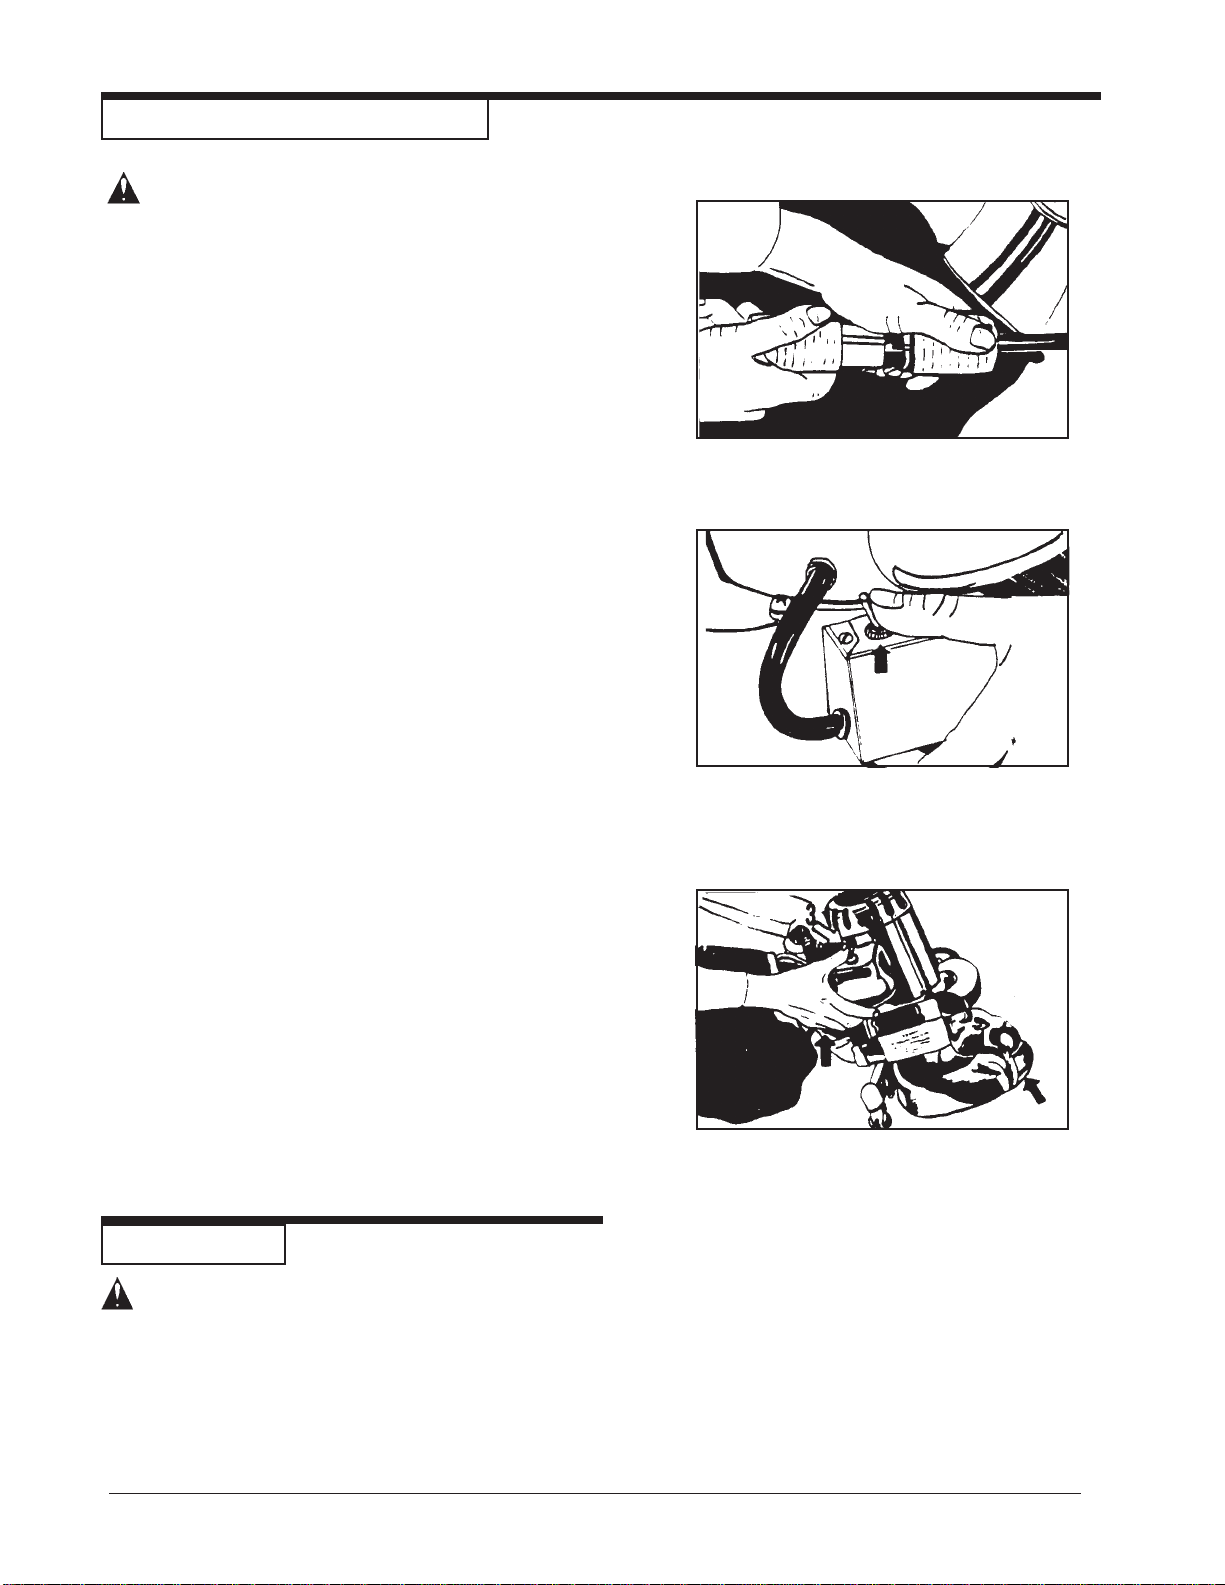
DANGER: Electrocution or injury could occur if the power cord is run over or damaged by the sander.
Keep the cord free from under the machine to avoid contact with the sandpaper. Always lift
the power cord over the machine.
DANGER: Moving parts of this machine can cause serious injury and/or damage. Keep hands, feet and
loose clothing away from all moving parts of the sander.
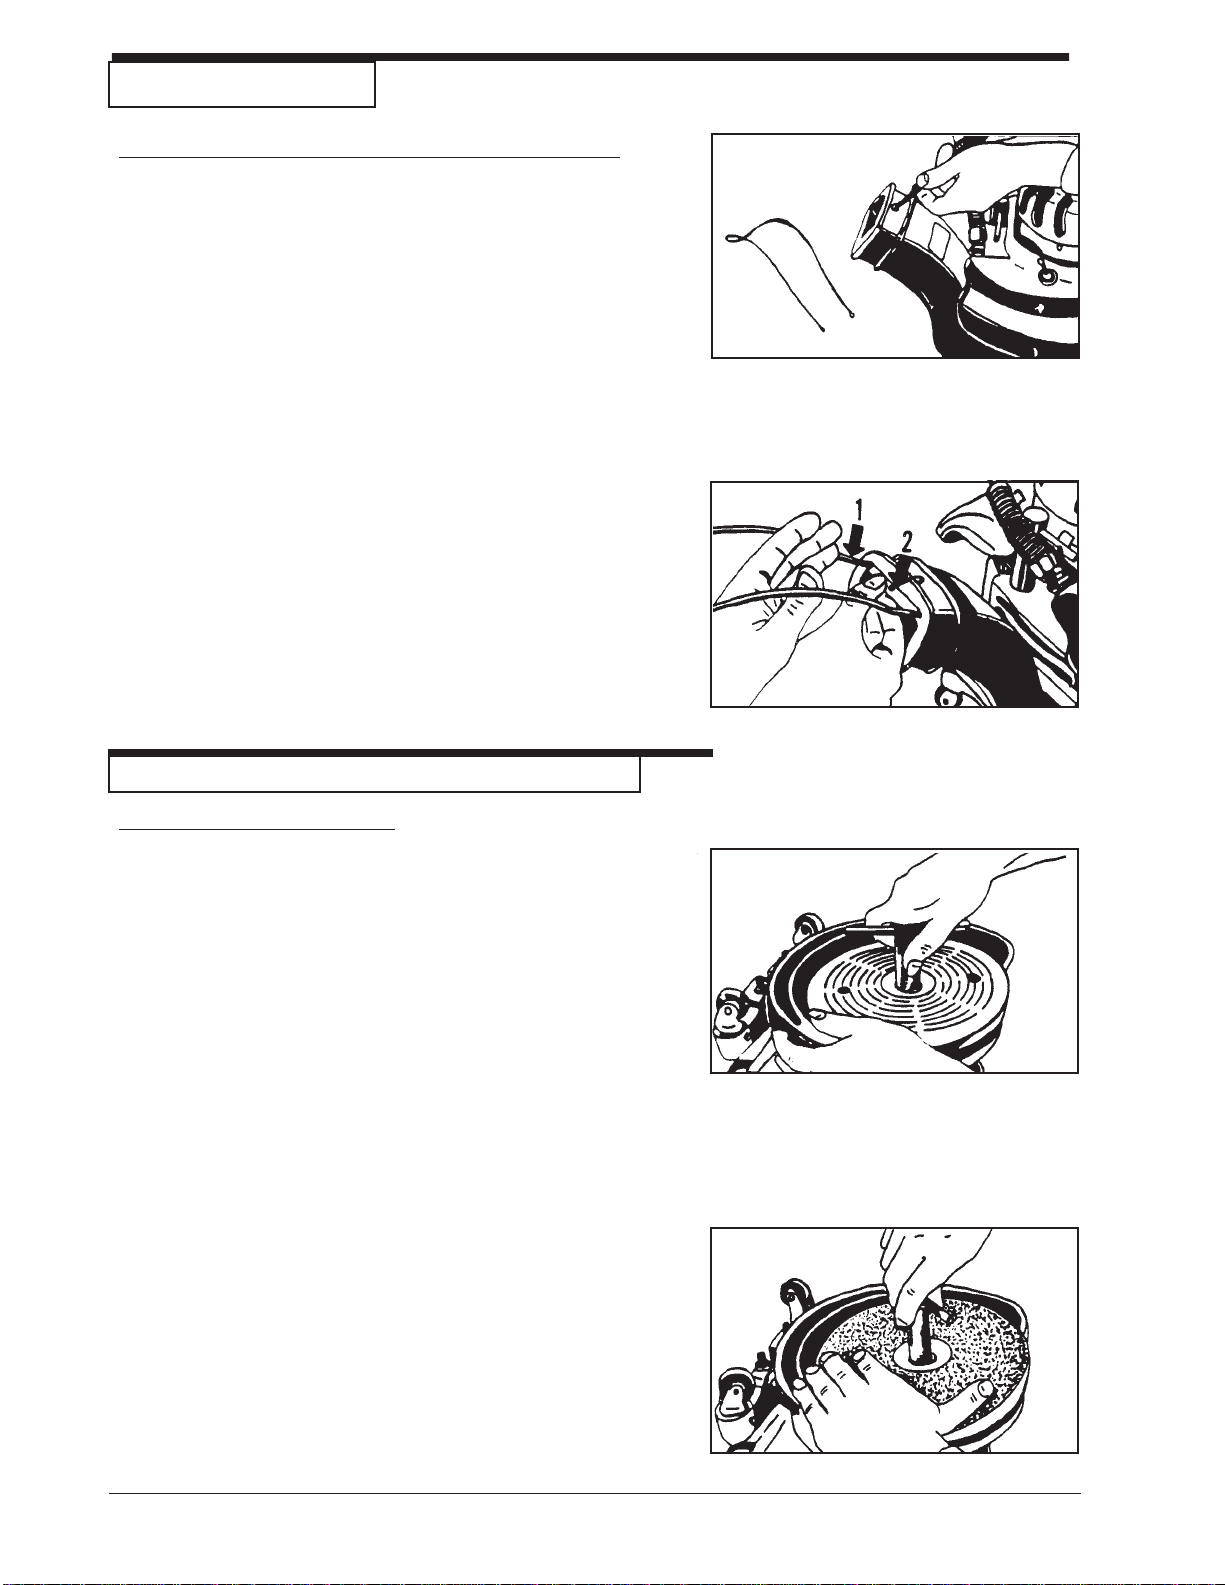
DANGER: Injury to the operator or bystanders could occur if the machine's power is on while performing
maintenance, changing the abrasive, or emptying the dust bag.
WARNING: Failure to read and observe all safety statements found on your machine or in this Owner's
Manual can result in serious injury or damage. Read and observe all safety statements. Make
sure that all labels, decals, warnings, cautions, and instructions are fastened to the machine.
Get new labels from your authorized Clarke American Sanders distributor.
WARNING: Sanding dust can be airborne and can be breathed in while operating a sander. Always wear
a dust mask while operating sanding equipment.
WARNING: Injury to the eyes and/or body can occur if protective clothing and/or equipment is not worn
while sanding. Always wear safety goggles, protective clothing, and a dust mask while
performing any sanding operation.
WARNING: Bodily injury could occur if power is applied to the machine with the power switch already in
the "ON" position. Always check to assure that the power switch is in the "OFF" position
before applying power to the power cable.
CAUTION: Maintenance and repairs performed by unauthorized personnel could result in damage or
injury. Maintenance and repairs performed by unauthorized personnel will void your warranty.
Servicing of this unit must always be referred to an authorized Clarke American Sanders
distributor.
CAUTION: Use of this machine to move other objects or to climb on could result in injury or damage. Do
not use this machine as a step or furniture. Do not ride on this machine.
CAUTION: Damage could occur to the machine if not properly kept in a dry building for storage. Store
the machine in a dry building.
CAUTION: Serious damage to the floor can occur if the machine is left running in one spot while the
sanding disc is in contact with the floor. To avoid damage to the floor, do not dwell while
lowering or raising the sanding disc. Always sand with a constant motion.

Page 5 Clarke®American Sanders American B-2 Operator's Manual
Introduction and Machine Specifications
TheAmericanB-2isspecificallydesignedforfinishingfloor edges, stairs, and other hard-to-reachsurfaces. The
handle location and low center of gravity make the American B-2 easy to operate.
Theexcellentcutting power comes fromapowerfuluniversaltypemotor. A motor that deliversmaximum
performancewithoutslowing downoroverheating. Itsexclusivetwospeedcontrol whenswitchedtohi-speed
produces 3200 rpm for fast, rough sanding. At low speed, the American B-2 operates at 2800 rpm for fine, finish
sanding. A non marking disc guard protects the rubber pad, permitting the edger to work right up to the base-
boardorwall.
Alsostandardis aconvenientbuilt-inheadlight. Powerfulfanandsandingdischousingdesignprovidesefficient
dust pickup. Plus an easy to remove dust pipe that makes cleaning a quick and simple task.
Specifications
Model 07015B 07016B
Motor 115V25-60cycle 230V 25-60 cycle
Frame Aluminum Aluminum
Disc Heavydutysteelprecision Heavydutysteelprecision
balanced,7"dia. 2800 rpm balanced,7" dia.2800rpm
lowspeed,3200rpmhigh lowspeed,3200rpmhigh
speed,heat resistant speed, heatresistant
rubberpad. rubberpad
Gears Hardenedsteelalloypinion Hardenedsteelalloypinion
anddrivegear. anddrivegear.
Bearings Sealedballbearings, Sealedballbearings
lifetimelubricated. lifetimelubricated.
Switch Positiveaction,on-offtoggle Positiveaction,on-offtoggle
DustCollector Powerfulvacuumfan,fullPowerfulvacuumfan,full
aluminumskirt aluminum skirt
Cord 25' 25'
Height (overall) 13½" 13½"
Diameter 91/8"9
1/8"
Disc Diameter 7" 7"
Weight 32 lbs. 32 lbs.
Shipping Weight 46 lbs. 46 lbs
Warranty 1 year limited 1 year limited
Powerful Universal Motor
High Low Switch
Powerful Vacuum Fan for effecient dust pickup
Non-MarkingRoller Guard
Non-Marking Swivel Type
Casters
Balanced Sanding Disc
for perfectly matched job
Aluminum Alloy Casting
Built-InHeadlight
Comfortable Operating
Handles
Hardened Steel Alloy
Pinon and Drive Gear
On-Off Heavy Duty Switch

Page 6 Clarke®American Sanders American B-2 Operator's Manual
MACHINE SET-UP
How to Install the Bag Support Rod and the Dust Bag
To install the support rod and the dust bag, follow this
procedure:
1. Removethesupportrodand the dust bagfromthe
small box.
2. UsingaPhillipsscrewdriver,removethescrew ontop
of the exhaust pipe opening. See Figure 1.
3. Removethe holdingbarfrominsidetheexhaustpipe.
4. Put the ends of the support rod in the exhaust pipe (1).
Make sure the bent ends of the rod are pointing in the
down position. See Figure 2
5. Slide the bar in position to hold the support rod (2).
SeeFigure2.
6. Installtheholdingscrew.
7. Put the opening of the dust bag over the end of the
exhaust pipe. Pull and tie the strings.
HOWTOPREPARETHEMACHINEFOROPERATION
How to Install the Sandpaper
NOTE: Use a sandpaper disc that has a 7" diameter and a
7/8hole in the center.
1. Putthe machine upsidedown.
2. A special wrench is in the bracket behind the motor.
Usethe special wrench toremovethescrew and
washer from the center of the sanding pad. See
Figure3.
3. Put the sanding disc in position on the sanding pad.
4. Put the special washer and the holding screw in
position in the center of the sanding pad.
5. Put one hand on the sandpaper. Using the special
wrench, turn the screw clockwise with the other hand.
Make sure the screw is tight. See Figure 4.
Figure1
Figure2
Figure3
Figure4

Page 7 Clarke®American Sanders American B-2 Operator's Manual
Sanding Cuts and Sandpaper
InitialCut
The purpose of the initial cut is to remove old finish and gross imperfections on the floor surface. A coarse
abrasive should be used. If the surface is severely damaged by deep scratches, pre-existing dwell marks,
uneven planks, etc., it may be necessary to sand across or diagonally to the grain to restore evenness to the
surface. If these conditions are not present, the initial cut should be done in the direction of the grain.
If glazing, loading, or burning takes place immediately into an initial cut, select a coarser abrasive. If this
should occur during an initial cut, the abrasive has dulled and must be replaced.
Final Cuts
The purpose of a finishing cut is to remove the scratches produced during the initial cut. Use a fine (60 - 80
grit)grainabrasive.
Ifthe surface remainsroughafter a finishingcut,itmay be necessarytouse an even finergrainof abrasive (80
- 100 grit). Care should be taken in selecting the grit size of the abrasive. A very fine grain will close the
pores on a wood floor making admission of a stain difficult.
If glazing or burning should occur immediately into a finishing cut, increase pace. If it should occur during a
finishing cut, the abrasive has dulled and must be replaced.
12grit Forremovinggrossimperfectionsandrestoreevenness
16grit tooldflooring. Toremovebuild-upofpaintsandvarnishes.
20grit
30grit Forfirstsandingofnewflooring (maple,oak). Forremoving
36grit minorimperfectionsandfinishesfromoldflooring.
40grit Forinitial cut on newflooring(oak,walnut). Forremoving
minorimperfectionsandfinishesfromoldflooring.
50grit Forfirstsandingofnewflooring(cedar,pine,fir)
Forclean-upof16grit.
60grit For clean-up from initial cut 36 grit.
80grit Forfinalsandingofcertainhardwoods. Forclean-up
of initial cuts (50 grit).
100grit Forfinalsandingofcertainhardwoodsandconiferswhere
a smooth surface is desired.
120grit For finishingcutoncertain conifers.
150grit For finishingcuton certain coniferswherea smooth
surfaceisdesired.
Grain Use Standard Grade
Part #/Qty
945300/50
945301/50
945302/50
945305/100
945308/100
945309/100
945310/100

Page 8 Clarke®American Sanders American B-2 Operator's Manual
HOWTOOPERATETHEMACHINE
DANGER: Failuretoremovetheelectricalplugfrom
theelectricaloutlet before attempting any
serviceormaintenancecouldresultin
electrocutionor severe injury. Always
unplugthemachinebeforeattemptingany
service. Neverleavemachineunattended
whilepluggedin.
Tooperatethemachinefollowthisprocedure:
1. Move the machine to the location of your work.
2. Connect the extension cord to the short power
cord on the machine. See figure 5.
3. Connect the other end of the extension cord to the
powersupplyoutlet.
4. Put the variable speed switch in the "HI" position
(1). See figure 6. After reaching full speed, put the
switch in the "LO" position if low speed is needed.
NOTE: Thehighspeedoperationisforfastwoodremoval.
For finish custs and custom work, use the low speed
operation.
5. Tilt the machine back so that the sandpaper disc
does not touch the floor See (1) in Figure 7. Hold
both handles. See (2) in Figure 7.
6. Put the On/Off switch in the "ON" position. See (3)
in Figure 7.
7. Keepthemachinemoving as you lower the
sandpaperdisctothefloorsurface.
8. Do not press down on the machine. The weight of
themachinegivesenoughpressure foralltypesof
sanding.
MAINTENANCE
Figure5
Figure6
Figure7
CAUTION: Maintenance and repairs performed
by unauthorized personnel could
result in damage or injury. Mainte-
nance and repairs performed by
unauthorized personnel will void your
warranty. Servicing of these units
must always be referred to an autho-
rized Clarke American Sanders
distributor.
NOTE: Do not store or rest the machine on the sanding
disc assembly. It may cause the disc to become
warped or cause it to be out of balance.
2
1

Page 9 Clarke®American Sanders American B-2 Operator's Manual
MAINTENANCE (cont)
TheDustControlSystem
Remove the dust from the bag when the bag is 1/3
full or when the efficiency of the dust control system
decreases.
If the exhaust pipe gets an obstruction, follow this
procedure:
1. Removethefourscrewsthatholdtheexhaust pipe
to the housing. See figure 8.
2. Removetheobstructionfromtheexhaustpipe.
3. Install the exhaust pipe.
How to Adjust the Angle Of The Sandpaper Disc To
The Floor
Theadjustment of themachineiscorrect when thefront
part of the sandpaper disc makes contact with the floor.
To change the adjustment of the machine, follow
thisprocedure:
1. Using the special wrench, loosen the lock nut on
each caster. See (1) figure 9.
2. Loosen the jam nut. See (2) figure 9.
3. Raise or lower the casters as needed.
4. Tighten the jam nut on each caster.
5. Tighten the lock nut on each caster.
How To Replace The Light Bulb
Toreplacethelightbulb,followthisprocedure:
1. Remove the two screws that hold the light guard to
the housing. See figure 10.
2. Removethelightguard.
3. Removethelight bulb fromthesocket.
4. Install a new light bulb.
5. Put the lamp guard in position.
6. Install the two holding screws.
The Ventilation Plug
1. Tocleantheventilationopeninginthecenterofthe
plug, remove the plug from the machine. With the
plugremoved, also inspect thegreaseinthe
gearbox. Seefigure11.
Figure8
Figure10
Figure11
Figure9
1
2

Page 10 Clarke®American Sanders American B-2 Operator's Manual
Figure12
Figure13
Figure14
MAINTENANCE
Lubrication
Themachineiscompletelylubricated. The bearings and
gearsinthegearunithaveenoughlubricantforapproximately
six months of normal operation. All other bearings are sealed
andhaveenoughlubricantforthelifeofthemachine. No
lubricantis needed fortherotatingdisc guard.
How To Change The Lubricant In The Gearbox
Tochangethelubricantinthegearbox, follow this procedure:
1. Put the machine upside down on a bench.
2. Align one of the two holes in the rubber pad with one of
the three holes in the rotating disc guard.
3. Align both holes with one of the three screws in the
gearhousingcover. Removethescrewfromthegear
housingcover. Seefigure12.
4. Align the holes with each of the other two screws, then
removescrews.
CAUTION:Make sure no dust enters the gear
box. Damage could occur to the gear
box.
5. Removethecoverfromthegearhousing.
6. Removetheoldlubricantfromthegearbox.
7. AddtenouncesofClarkeAmericanSanders lubricant
tothe gearbox.
CAUTION:To prevent damage to the motor,
do not add more than ten ounces
of lubricant to the gearbox.
8. Usingthethreescrewsremovedabove,installthecover
onthegearhousing.
9. Start the machine and let it run for 15 minutes. A small
amountof excess lubricantshouldflowout the vent
hole. If none appears it may be necessary to add
additionallubricant.
10. Wipeoff excess lubricantandclearvent hole.
How To Check The Carbon Brushes
Depending on use, a set of brushes can be expected to last
250 hours and should be inspected sometime prior to that
time.
Tocheckthe brushes, follow thisprocedure:
1. Removethemotorcover. Seefigure13.
2. Inspect thecarbonbrushes. Replace both brushesif
either brush has worn to 3/8" in length, or is worn to the
wearindicator. Seefigure14.
3. Toreplacethe brushes, disconnectthefieldwire(A)
fromthebrushholder(B). Thenremovethe two screws
andwashers(C) securing the holderto themotor
housing. Seefigure 15.
Lubricants
Qty Part No.
1 Qt. 16610A
1 Gal. 16611A
Figure15
A
A
B
B
C
C
C
C

Page 11 Clarke®American Sanders American B-2 Operator's Manual
MAINTENANCE
How To Check The Carbon Brushes (cont)
4. Gently pry the holder downfrom themotor housing.
5. Rotateholderfrombeneaththemotorhousingandlift
out.
6. Disconnect the brush shuntwire fromtheholder.
Forconvenience,cuttheterminalfromtheshuntwire
andremovebrush.
7. To put inanewcarbon brush, negotiatetheterminal
on the shunt wire by the spring and brush holder
guide. Take care not to damage the spring. See
figure16.
8. Depress the brush into the guide and connec the
shunt wire to the holder.
9. Depress the brush and insert the holder into the
motorhousing.
10. Rotateholderbeneathmotor housing. Relaxbrush
againstcommutator.
11. Align posts on holder with holes in housing.
12. Gently pry the holder into the housing.
13. Reattachscrewsandwashers.
14. Startupthe machine, ifsparkingbetweeneither
brush and the commutator occurs, use a brush
seating stone on the commutator to promote full
engagementbetweenthebrushesandcommutator.
15. Installthemotorcover.
Figure16

Page 12 Clarke®American Sanders American B-2 Operator's Manual
Model American B-2+ 7" Spinner Edger
Drawing #1 12/02

Page 13 Clarke®American Sanders American B-2 Operator's Manual
2261568A Gear 1
23 67426A Shaft 1
24 915028 Key 1
25 57702A Ring- Retaining 1
26 58114A Seal - Oil 1
27 902550 Bearing 1
28 34232A Gasket 1
29 12906A Cover - Gearcase 1
30 59817A Washer - 1/4 Nylon Countersink 3
31 962098 Screw - ¼-20 x 3/4 Fit Hd 3
32 15000A Guard - Roller 1
33 66917A Retainer 1
34 39707A Washer - Felt 4
35 13200A Disc - Sanding 1
36 62411A Clamp-Paper 1
37 85715A Screw - 5/16-18 x 1 Hx Hd 1
38 925592 Pin ¼ x 1 Spirol 2
39 29404A Yoke, Edger Caster 2A
40 50740A Bearing, Ball, ¼ x ¾ Shield 4
41 299704 Roller Caster 2
42 12203A Caster Assembly 2
NI 52853A Edger Skirt, B-2 1
Note: Ref. #19 (19901A) includes ref #'s 17, 38, 39, 40 (2),
& 41
Note: Ref. #42 (12203A) includes ref #'s 17, 18, 38, 39,
40 (2), & 41.
NOTE: indicates a change has been made since the last
publication of this manual.
1 50953A Bag, Dust 1
2 67114A Rod-Dust Bag Support 1
3 84200A Screw - 8-32 x ½ Flt Hd 4
4 66920A Bar 1
5 26103A Pipe - Discharge 1
6 962454 Screw - ¼ - 20 x 1 4
7 34233A Gasket 1
8 24509B Housing - Gear 1
9 66130A Plug 1
10 38103A Gasket 1
11 21106A Barcket - Caster 1
12 85814A Screw - 5/16 -18 x 1¼ Hx Hd 2
13 980676 Washer - 5/16 Fit 2
14 962015 Screw-Set 10-24 x 3/8 2
15 86203A Screw - 5/16-18 x 1½ St 2
16 920160 Nut - 5/16-18 Hx Jam 2
17 85701A Screw-¼-20 x 1½ Hx St 2
18 51128A Bearing 2
19 19901A Yoke Assembly - Caster 2
20 467308 Ring - Retaining 1
21 51127A Bearing 1
Ref. PartNo. Description Qty. Ref. PartNo. Description Qty.
Model American B-2+ 7" Spinner Edger
Parts List #1 5/04
NI = Not illustrated

Page 14 Clarke®American Sanders American B-2 Operator's Manual
Model American B-2+ 7" Spinner Edger
Drawing #2 5/04
1
18
15
6
19
11
12
22
20
29
30
1
52
21
36
34
35
29
11
40
30
29
20
29
32 31
17
10
4
33
53
54
28
30
41
49
50
51
52
56
59
69
71
67
68
70
72
73
74
75
76
77
78
72
58
57
32
46 48
47
10
4
24
25
16
7
9
5
10
14
13
26
13
3
52 34
2
45
42

Page 15 Clarke®American Sanders American B-2 Operator's Manual
Model American B-2+ 7" Spinner Edger
Parts List #2 5/04
Ref. PartNo. Description Qty. Ref. PartNo. Description Qty.
3487201A Washer - Lock #6 2
35 920112 Nut - 6 x 32 Hex 1
36 50431A Plate, Switch Hi-Lo 1
39 38104A Seal 1
40 47320A Switch - Toggle HiLo 1
41 911139 Nut - Wire 1
42 24302A Handle - Right 1
45 46710A Shield - Insulating 1
46 47322A Switch - On/Off 1
47 215103 Label 1
48 215110 Label 1
49 39305A Tubing 1
50 18403A Socket 1
51 911113 Bulb - 115V 1
911116 Bulb - 230V 1
52 962065 Screw, 8-32 x 1/4 Pn St Mach 6
53962727 Screw, 8-32 x 1/2 Pn St 4
54908621 Washer, Star 4
55 980643 Washer, 7/16 OD x .036 Thk 2
5640717A Holder, Brush 2
57 81300A Nut 1
58 980601 Washer - SH #1214 1
5940583A Brush, Carbon Terminated 2
6740718A Field Assembly - 115V 1
40719A Field Assembly - 240V 1
68 980699 Washer - SH #1210 2
69 58602A Spring 1
70 85358A Screw - 10-24 x 3½ Pn SS 2
71 51126A Bearing 1
72 60800A Baffle 2
73 10111A Armature - 115V 1
10112A Armature - 230V 1
74 65302A Key 1
75 58113A Seal 1
76 902550 Bearing 1
77 63701A Gear - Pinion 1
78 57701A Ring - Retaining 1
NI 31408A Edger Case, B2 1
1 42234A Cord Assembly - 115 V 1
42301A Cord Assembly - 230 V 1
40007A Cord Assembly, 50', w/AU1-10P 1
2 41919A Cord - Interconnecting - 115 V 1
41920A Cord - Interconnecting - 230 V 1
3 68705A Wrench - Special 1
4 85333A Screw - 1/4-20 x 2 Pn Hd 4
5 912169 Plug - Male Twist Lock - 115 V 1
45602A Plug - male Twist Lock - 230 V 1
6 85411A Screw - 6-32 x1/4 4
7 80081A Screw - 5/16-24 x 1/2 FT 1
9 337504 Strain Relief 1
10 980657 Washer - 1/4 Lock 8
11 49301A Wire Assembly 1
12 962330 Screw - 6-32 x 1/4 RD St Mach 1
13 962454 Screw - 1/4-20 x 1 4
14 646302 Plate - Switch 1
15 911461 Connector 115V 1
41708A Connector 230V 1
16 70686A Plate-Name 1
17 22113A Cover 1
18 45603A Plug - 230V 1
911248 Plug -115V 1
40023A Plug,AU1-10P 1
19 16091A Switch Box 1
20 49302A Wiring Assembly 1
21 46711A PaperInsulating 1
22 42400A Diode 1
24 24303A Handle - Left 1
25 62003A Cap - Motor Housing 1
26 64601A Holder - Wrench 2
28 24510A Housing - Motor 1
24535A Housing - Motor (AU) 1
29 41918A Wiring Assembly 1
30 54816A Relief - Strain 4
31 16091A Box - Switch 1
32 48800A Washer - Insulating 12
33 41001A Bushing - Insulating 3
NOTE: indicates a change has
takenplace since lastpublication
ofthismanual
NI = Not illustrated

Page 16 Clarke®American Sanders American B-2 Operator's Manual
Model American B-2 7" Spinner Edger
Wiring Diagram 3/93

Page 17 Clarke®American Sanders American B-2 Operator's Manual
PRODUCT SUPPORT BRANCHES
PRODUCTION FACILITIES
ALTO Danmark A/S, Aalborg
Blytaekkervej 2
DK-9000 Aalborg
+45 72 18 21 00
ALTO Danmark A/S, Hadsund
Industrikvarteret
DK-9560 Hadsund
+45 72 18 21 00
SALES SUBSIDIARIES
Clarke®Canada Ltd., Rexdale Ontario
24 Constellation Ct.
(416) 675-5830
ALTO Overseas Inc., Sydney (Australia)
1B/8 Resolution Drive
Caringbah NSW 2229
+61 2 9524 6122
ALTO Cleaning Systems Asia Pte Ltd., Singapore
No. 17 Link Road
Singapore 619034
+65 268 1006
ALTO Deutschland GmbH, Bellenberg (Germany)
Guido-Oberdorfer-Straße 2-8
89287 Bellenberg
+49 0180 5 37 37 37
ALTO Cleaning Systems (UK) Ltd., Penrith
Gilwilly Industrial Estate
Penrith
Cumbria CA11 9BN
+44 1768 868 995
ALTO France S.A. Strasbourg
B.P. 44, 4 Place d’Ostwald
F-67036 Strasbourg
Cedex 2
+33 3 8828 8400
ALTO Nederland B.V.
Postbus 65
3370 AB Hardinxveld-Giessendam
The Netherlands
+31 184 677 200
ALTO Sverige AB, Molndal (Sweden)
Aminogatan 18
Box 4029
S-431 04 Molndal
+46 31 706 73 00
ALTO Norge A/S, Oslo (Norway)
Bjornerudveien 24
N-1266
+47 2275 1770
U. S. A. Locations European Locations
CORPORATE OFFICE
ALTO U.S. Inc., St. Louis, Missouri
16253 Swingley Ridge Road, Suite 200
Chesterfield, Missouri 63017-1725
PRODUCTION FACILITIES
Clarke®, Springdale, Arkansas
2100 Highway 265
Springdale, Arkansas 72764
(479) 750-1000
Customer Service - 1-800-253-0367
Technical Service - 1-800-356-7274
American Lincoln®, Bowling Green, Ohio 43402
1100 Haskins Road
SERVICE FACILITIES
Clarke®, Elk Grove, Illinois 60007
2280 Elmhurst Road
(847) 956-7900
Clarke®, Denver, Colorado 80204
1955 West 13th Ave.
(303) 623-4367
Clarke®, Houston, Texas 77040
7215 North Gessner Road
713-937-7717
SERVICE AND SALES FACILITY
American Lincoln®/ Clarke®, Madison Heights,
Michigan 48071-0158
29815 John R.
(810) 544-6300
American Lincoln®/ Clarke®, Marietta, Georgia 30066
1455 Canton Road
(770) 973-5225
SALES AND DISTRIBUTION CENTER
Clarke®, Secaucus, NJ 07094
74 Henry Street
(201) 864-5503
Clarke®
Clarke American Sanders
A.L. Cook
Customer Service Headquarters and Factory
2100 Highway 265
Springdale, Arkansas 72764
(479) 750-1000
Technical Service
1-800-356-7274

Clarke®American Sanders U. S. Warranty
This Clarke American Sanders Industrial/Commercial Product is warranted to be free from defects in
materials and workmanship under normal use and service for a period of one year from the date of purchase,
when operated and maintained in accordance with Clarke American Sanders's Maintenance and Operations
Instructions.
This warranty is extended only to the original purchaser for use of the product. It does not cover normal
wear parts such as electrical cable or V-belts.
If difficulty develops with the product, you should:
(a). Contact the nearest authorized Clarke American Sanders repair location or contact the Clarke American
Sanders Service Operations Department, 2100 Highway 265, Springdale, Arkansas 72764, for the nearest
authorized Clarke American Sanders repair location. Only these locations are authorized to make repairs to
the product under this warranty.
(b). Return the product to the nearest Clarke American Sanders repair location. Transportation charges to
andfromthe repairlocation must beprepaidby thepurchaser.
(c). Clarke American Sanders will repair the product and or replace any defective parts without charge within
areasonabletime afterreceiptof the product.
Clarke American Sanders's liability under this warranty is limited to repair of the product and/or replace-
mentofpartsandis giventopurchaser in lieuofall otherremedies,including INCIDENTALANDCONSEQUEN-
TIALDAMAGES.
THERE ARE NO EXPRESS WARRANTIES OTHER THAN THOSE SPECIFIED HEREIN. THERE ARE NO
WARRANTIESWHICHEXTEND BEYONDTHEDESCRIPTION OFTHE FACE HEREOF. NO WARRANTIES,
INCLUDING BUT NOT LIMITED TO WARRANTY OF MECHANTABILITY, SHALL BE IMPLIED. A warranty
registration card is provided with your Clarke American Sanders product. Return the card to assist Clarke
American Sanders in providing the performance you expect from your new floor machine.
Clarke®, 2100 Highway 265, Springdale, Arkansas 72764
Clarke American Sanders reserves the right to make
changes or improvements to its machine without notice.
Always use genuine Clarke American Sanders Parts for repair.
2100 Highway 265
Springdale, Arkansas, 72764
Other manuals for American B-2
1
This manual suits for next models
1
Table of contents
Other Clarke Edger manuals

Clarke
Clarke American Sanders 07011A User manual

Clarke
Clarke 07127A User manual

Clarke
Clarke B2 7" Spinner Edge 07072A User manual

Clarke
Clarke Super 7R Installation and operating manual

Clarke
Clarke 07127A User manual

Clarke
Clarke Super E User manual

Clarke
Clarke Super 7R User manual

Clarke
Clarke Super E User manual

Clarke
Clarke American B-2 User manual

Clarke
Clarke 07097A User manual