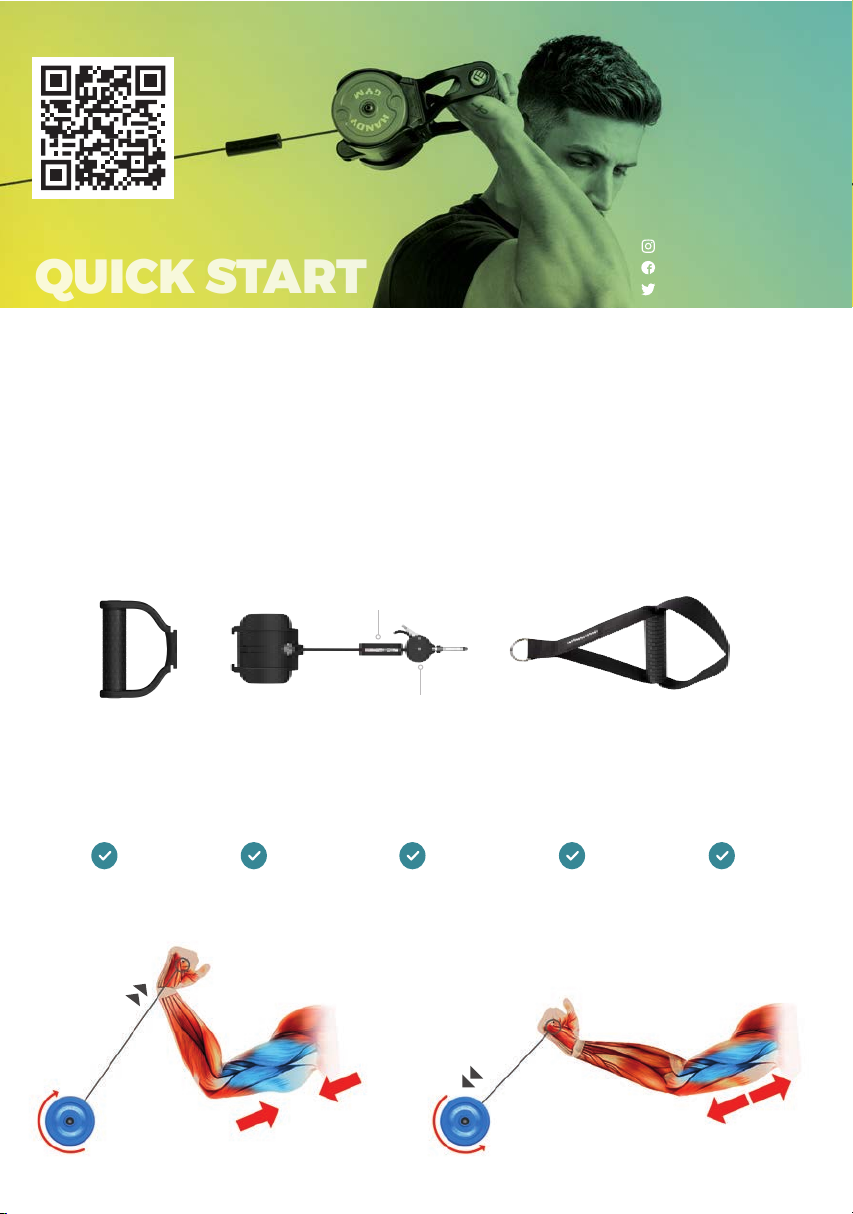
HANDGRIP MACHINE MULTIPURPOSE HANDLE
ROPE REGULATOR
++
SAFETY SPACER
OPEN CLOSE
DO THE EXERCISE.
This is an upright row. Grab the handgrip
with both hands and pull the weight up
to your shoulders. Important: when you
get to the full range of motion allowed
by your chosen rope length, allow the
machine to pull the rope back in.
PULL ALL THE ROPE OUT.
Pull all the rope out of the Handy Gym
machine (see diagram above).
PUT THE HANDLE ON YOUR FOOT.
For your rst upper body exercise, you will
be performing an upright row. Step on
the multipurpose handle with one foot
to secure an anchor point for your rst
upper body exercise.
ADJUST THE ROPE LENGTH.
• Open rope regulator
•Hold the Handy Gym machine at
shoulder height and adjust rope accordingly.
• To Lengthen: Pull rope out of the (+)
opening on regulator
• To Shorten: Pull rope out of the (-)
opening on regulator
•Once rope is at the desired length, close
the rope regulator to lock rope length -
there will be excess rope.
LOAD THE MACHINE.
Spin one disc with your nger to collect
the measured rope length into the
machine .The safety spacer and rope
regulator will be up against the machine
once the rope is fully loaded.
ACCESSORIES
Check that all the accessories
of the corresponding pack are
in the product box, in addition
to the accessories that you
have purchased separately.
Among the accessories we can
distinguish between:
DIRECT ATTACHMENT
ACCESSORIES:
FIRST EXERCISE – UPPER BODY (UPRIGHT ROW)
3 Rack mounting plate: allows the Handy Gym to be attached to rack or bar-type structures.
4Platform: to x the Handy Gym and train on it. A great system for squats and deadlifts.
ROPE ANCHORING ACCESSORIES: Anchored to the carabiner.
5Ankle strap: for glute and leg exercises.
6 Door stopper: allows the Handy Gym to be attached to doors and windows.
7 Multipurpose handle: to perform exercises with the hand or hooked to the foot.
8 Loop strap: you can hold the Handy Gym almost anywhere: column, tree, stairs, etc., being able
to surround objects with a maximum perimeter up to 120cm ( 4‘ ).
9 Belt: designed to perform squats, deadlifts or any other exercise that requires the use of the
waist.
MACHINE ACCESSORIES:
q INERTIAL DISCS:
Thanks to the discs we can obtain a more or less level of resistance. To change these discs, use the
allen key integrated in the rope regulator. Remember that there must always be 2 discs in the
machine and that the screws must be correctly tightened.
wSAFETY SPACER:
It is a hard tube on the rope and separates the machine from the Rope Regulator itself. Its function
is to measure the minimum distance that must exist between the regulator and the machine.
Important: This piece is not a spring or a bumper, it should never be crushed or hit, because the
impact will pass through it to the machine and can cause damage to the internal system. Always
leave the appropriate rope distance so that this impact does not happen.
e ROPE REGULATOR:
It is the piece that allows you to block or slide the rope. Move the cam to unlock and adjust the
length. Lock the rope to start the exercise. Make this adjustment in each routine to always have the
most appropriate distance in each movement.
r PULLEY:
Accessory that doubles the power of the inertial discs, reducing the speed of the exercise by half.
When used, the main carabiner of the handy gym must be anchored to the nose of the machine
(or to the ring when the platform is used) and the rope anchoring accessories must be hooked on
the carabiner of the pulley.
To place these accessories, the
two buttons on the body of the
machine must be pressed while
it is inserted through the rails.
1 Handgrip: performing exerci-
ses with the machine in hand.
2Wall mounting plate: to x
the Handy Gym to any at and
resistant surface. It is xed by
four screws.
Remove Handy Gym from the bottom pocket of the backpack. Depending on the pack, the
machine may have some additional attachments or rope anchoring accessories. Your Handy
Gym comes with two discs (yellow, blue or red) already installed.
FOLLOW THE STEPS: