Multi-COM LTE+ User manual

Multicom LTE+
Installation Guide
Edition 02/2020

W
I
R
I
N
G
D
I
A
G
R
A
M
1

S
E
C
T
I
O
N
R
E
F
E
R
E
N
C
E
For help with your Multicom, please
contact Multicom Customer Service,
email: [email protected]
online: www.suretek.com.au
phone: 1300 65 44 33 (+61 2 8787 9865)
Multicom ® is a registered trademark.
Copyright © 2020 Multicom Systems.
All rights reserved.
Contacting us:
2
Free Apps / Software
• To configure Multicom in-field - TechTools
• To allow user remote control - AlarmLINK
• When no PSTN comm path - Multicom Smart Modem
Install and Configure Multicom
• Configure AlarmLINK (optional)
Connect to WiFi
• Without password
• With password
Program Multicom with TechTools
• Add users to AlarmLINK
• Commisioning
...........................................................4
Handy Section Reference
.........................................15
..................................................................26
...................................31

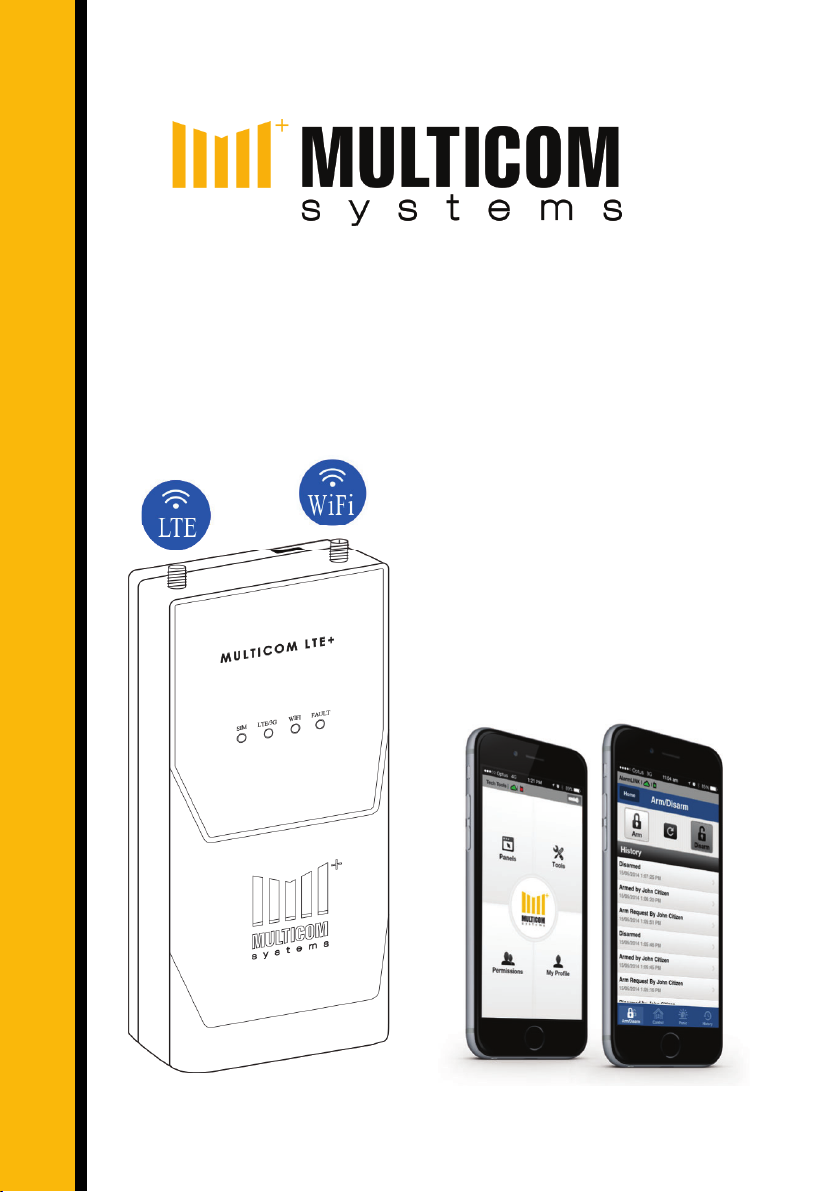
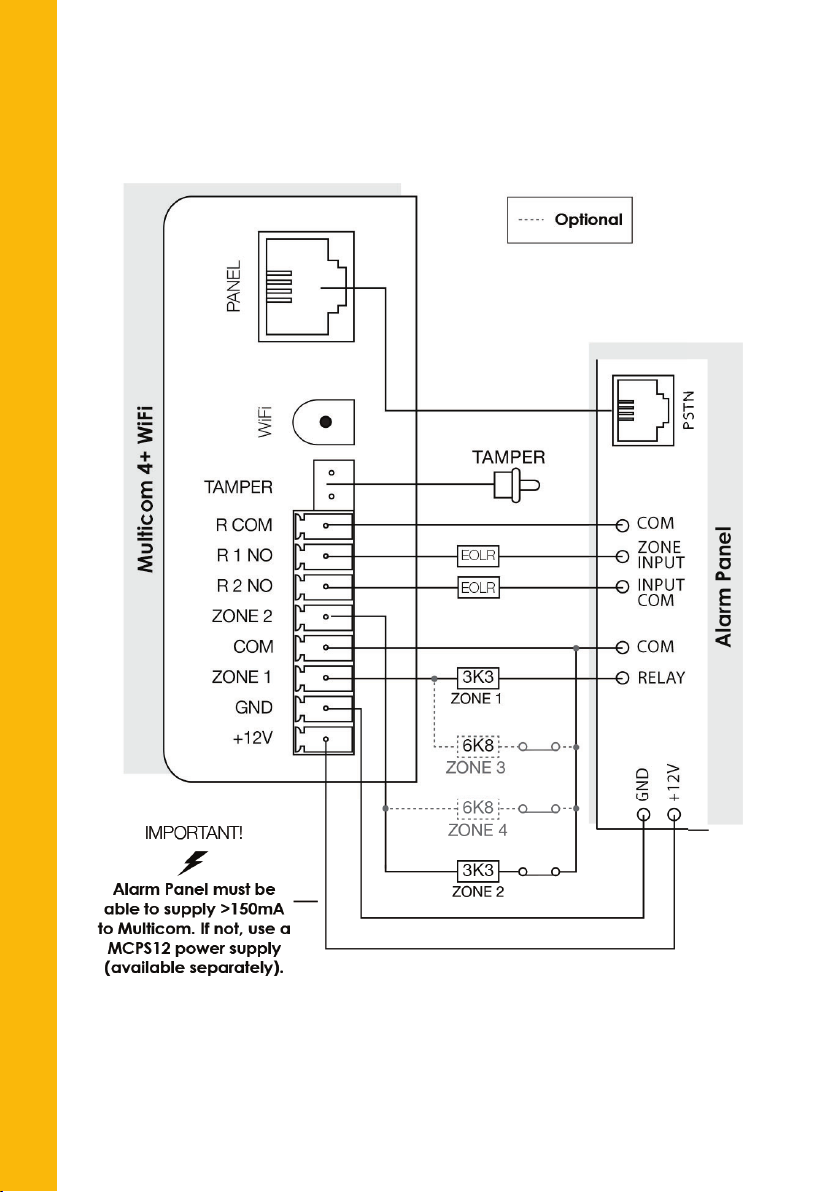
• Multicom LTE+ Alarm Communicator, fitted with
1 Telstra SIM and 1 Optus SIM
• LTE Antenna (Male Connector)
• WiFi Antenna (Female Connector)
• 2x 3K3 Resistors
• 2x 6K8 Resistors
•
• Connection Block
• Tamper Lead
• Antenna Fly Wire – Male Connector
• Antenna Fly Wire – Female Connector
• Velcro Strips
• Tamper Pin Jumper (fitted)
• RJ12 Cable
• Installation Guide
What’s in the Box
W
H
A
T
S
I
N
T
H
E
B
O
X
3
You should find everything you need:

TechTools is comprehensive tool that allows technicians
to manage, configure and commission Multicom alarm
communicators in the field, in real-time:
• Program Multicom device
• Test signal strength in each wireless comm. path
• Program relay operation and zones, enable/disable
• Add a customer to use the alarmLINK app
Also:
• Centrally manage and configure Multicom devices
• Administer any number of field technicians
• View all activity-alarms, polls, and poll fails
• Use built-in complete library of alarm panel manuals
Free Apps / Software
TechTools:
S
O
F
T
W
A
R
E
A
N
D
A
P
P
S
4
2 ways to use
TechTools:
1. TechTools App
2. TechTools web
portal for computers.
Configure onsite / in-field - TechTools App
For more information, please see page 7.

S
O
F
T
W
A
R
E
A
N
D
A
P
P
S
• Remotely arm/disarm
• Generate panic alerts
• Control doors, light & gates
• View complete alarm history
AlarmLINK:
5
To offer AlarmLINK, you
will need to install and set
up TechTools and use the
add customer function.
* Colour scheme
configurable via TechTools
To add your logo to AlarmLINK
send a copy (on a transparent
background, if possible) to:
Brand AlarmLINK with your LOGO
Free Apps / Software
AlarmLINK APP - Allow End User Remote Control
For more information, please see page 11.
AlarmLINK is a Smart Phone App that will empower your
customers to:

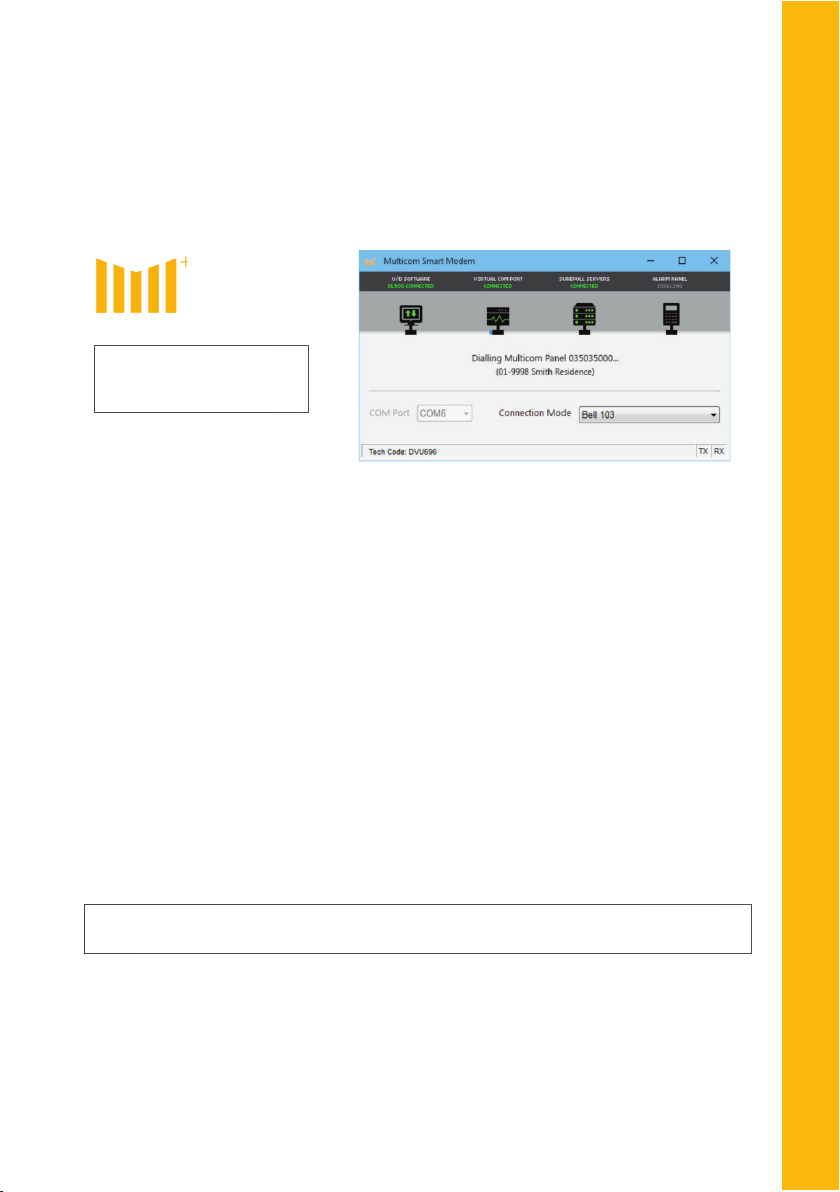
The Multicom Smart Modem creates an IP-based, virtual modem
connection between Upload/Download (U/D) software and an
alarm panel at client sites.
The Multicom Smart Modem (MSM):
• Is a time saving feature
• Provides remote configuration access to alarm panels while
attached to U/D enabled Multicom devices
• Allows traditional U/D programming software to
communicate with the alarm system.
Multicom Smart Modem:
S
O
F
T
W
A
R
E
A
N
D
A
P
P
S
MULTICOM
SMART
MODEM
6
Free Apps / Software
Multicom Smart Modem
IP-based, virtual
modem connection.
For more information, please see page 13.
No PSTN Comm Path

U
S
I
N
G
T
E
C
H
T
O
O
L
S
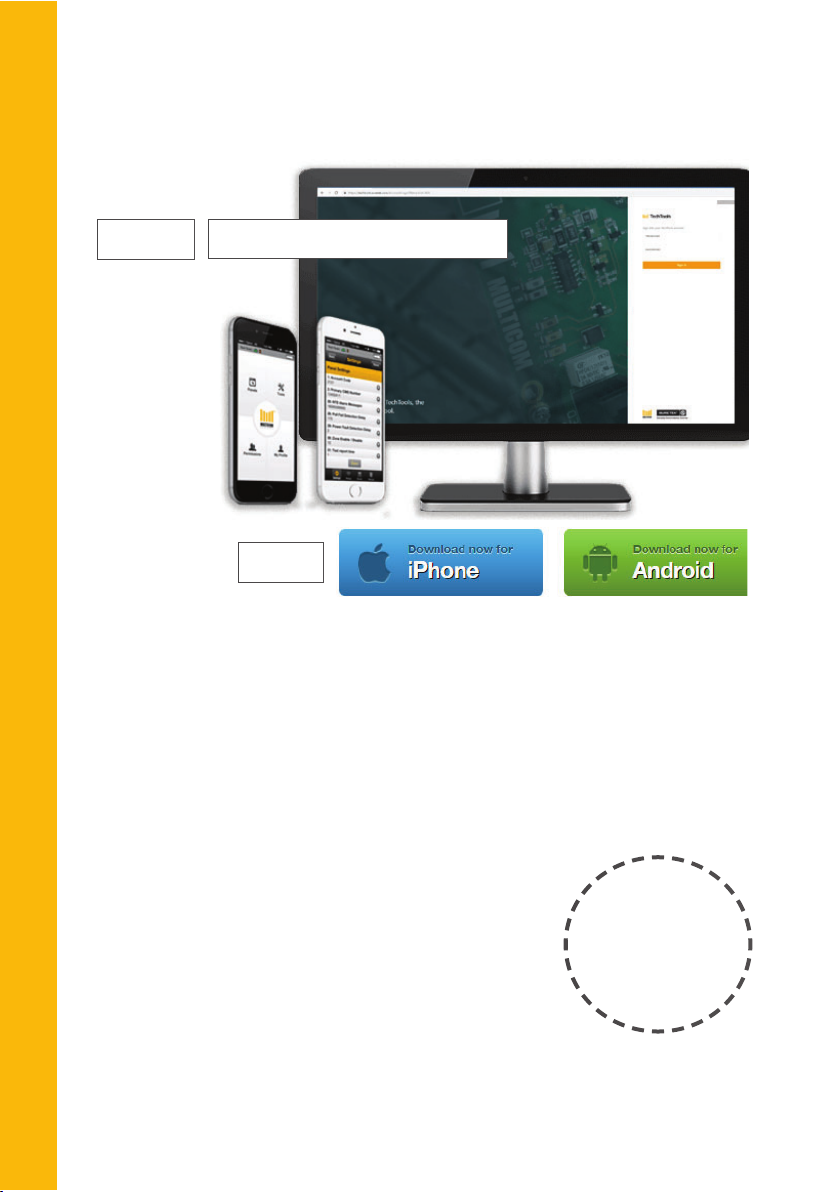
Using The Apps - TechTools
Online Desktop Portal or Smart Phone App
Using TechTools on a Smart Phone:
Using TechTools on a desktop:
You will need access to the TechTools Portal. Call or email
Suretek to request access to TechTools Online Desktop Portal.
Portal screens may differ slightly from app.
1. Download TechTools from your App Store
2. Install App on your smartphone
3. REQUIRED: Register for TechTools TechCode
(Steps on next page)
7
Manage your alarm communicators from a PC or mobile.
Getting Started - Online or Smartphone
APPS:
https://techtools.suretek.com
Downlo
ad
d
links on
back cov
e
er
ONLINE:

U
S
I
N
G
T
E
C
H
T
O
O
L
S
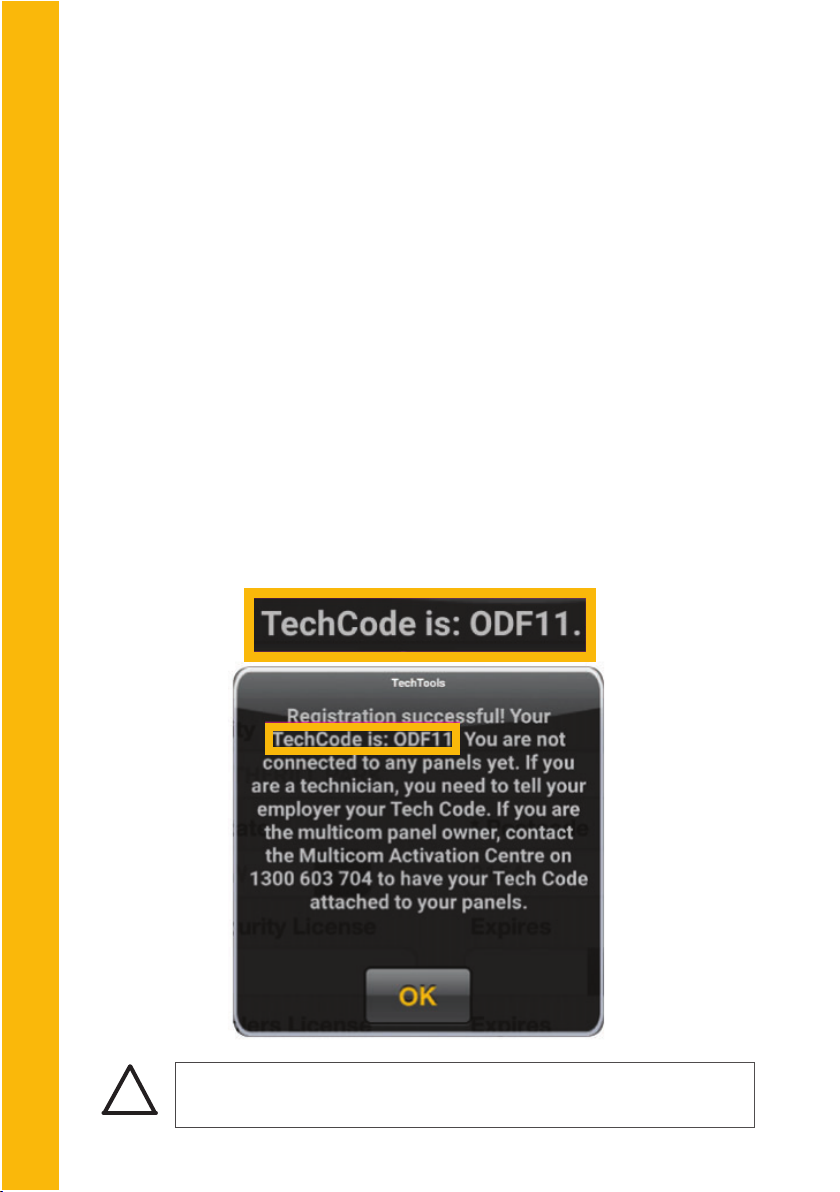
Open TechTools on Smartphone
Fill in the detail page
Tap Register me to recieve TechCode
Your TechCode will be displayed, and
also emailed to you.
8
Using TechTools on Smart Phone
Required - Register for TechCode
Step
1
Step
2
2
Tap New Registration
Step
3
3
Step
4
4
Step
5
5
Step
6
6
Authorize your TechCode: see next
page

U
S
I
N
G
T
E
C
H
T
O
O
L
S
Using TechTools
9
You are required to forward your TechCode to the owner of the
Multicom device for authorisation.
Authorisation of TechCode
You must attach the TechCode to the Multicom device to get
connected. To activate call the Multicom Activation Centre on
1300 603 704.
Owner of Multicom device
Technician from Monitoring Centres/ Bureaus:
!Note: Online Portal users will see Multicom Master TechCode
displayed as Multicom Administrator Login in future versions.

U
S
I
N
G
T
E
C
H
T
O
O
L
S
A Multicom Master TechCode is required to allow technicians to
have access to their Multicom devices:
To set up Multicom Master TechCode
TechTools - For Monitoring Centres / Bureaus
To approve a technician's
TechCode Authorisation Request
Tap Pemissions
Add technician
Technician can now
log in to TechTools to
program Multicom
device
10
Authorising Technicians
Step
1
Step
2
2
Step
3
3
Step
4
4
Open TechTools
Enter TechCode
Tick box if you want to allow technician to
authorise other Multicom technicians
Step
5
5
Call 1300 603 704 to set up your TechCode / Multicom
Adminstrator Login. Once set up you will be able to allow your
technicians to access their Multicom Devices

Offering AlarmLINK App - (Optional)
Remotely arm & disarm
your alarm systems
Remotely control
lights, doors & gates
Send panic alarms with your
location to your monitoring
centre.
View alarm history on
your phone
Protect your family &
employees by
downloading on
multuple devices
By providing AlarmLINK
Your end users will be able to have remote control and access to
their alarm system.
Here is what AlarmLINK can do:
O
F
F
E
R
I
N
G
A
L
A
R
M
L
I
N
K
11
Free App for your end users
If you are not providing AlarmLINK to your customers, skip this
section.
REMEMBER: You can brand AlarmLINK with your own logo and
company colours. See page 5 for more information.
!

To offer AlarmLINK, please review the following steps:
1. The Multicom device needs to be configured. See page 15.
2. You will need access to TechTools. If you haven't already set
up TechTools, please see page 7.
3. Your customers have to be added to AlarmLINK via
TechTools. See page 34.
4. Your customers will need the AlarmLINK Smart Phone App
installed on their phone. Available via Google App Store or
iTunes store.
O
F
F
E
R
I
N
G
A
L
A
R
M
L
I
N
K
12
Offering AlarmLINK App, continued
Necessary Steps
Connect and Control your alarm system.
Downlo
ad
d
links on
back cov
e
er

M
U
L
T
I
C
O
M
S
M
A
R
T
M
O
D
E
M
Multicom Smart Modem (MSM) allows traditional U/D
programming software for communication with the alarm
system when an alarm panel has been upgraded to a Multicom
communicator.
This time saving feature that gives you remote
configuration access to alarm panels while attached to Upload/
Download (U/D) enabled Multicom Devices.
When connection is detected on virtual COM port, Multicom
Smart Modem will create a tunnel to the alarm panel via the
SURETEK NETWORK and Multicom device.
Once the alarm panel is connected, commands can be issued
from the U/D software.
Multicom Smart Modem
13
Downlo
ad
d
links on
back cov
e
er
IMPORTANT: Multicom Smart Modem software installs on a
Windows operating system.
!
How does Multicom Smart Modem work?

M
U
L
T
I
C
O
M
S
M
A
R
T
M
O
D
E
M
1. Installed your panel manufacturer is supplied U/D software for
remote access and programming
2. Allowed for remote access once you have left site by
programming the Alarm Panel for:
- no answering machine defeat
- first call 3rd ring
3. Ensured each panel is programmed correctly (so you won’t
have to return to site to allow remote U/D software access)
Before proceeding to download and install, you should
already have:
IMPORTANT: Only download and install Multicom Smart Modem
when the 3 steps above are completed.
14
Multicom Smart Modem, continued
Necessary steps to be completed before installation
!

Note: For Poor Signal Areas, consider using a high-gain antenna
available from your Multicom supplier.
Wall Mounting
W
A
L
L
M
O
U
N
T
I
N
G
Attach
WiFi Antenna
(Female Connector)
Fix
Velcro Strips (included)
to back of the unit to
mount
Attach
LTE Antennas
(Male Connector)
15
Mounting Multicom to wall
Step
1
Step
2
2
Step
3
3
Attach antennas and velcro:
!

A
L
A
R
M
P
A
N
E
L
M
O
U
N
T
I
N
G
Attach fly wires and antennas:
Alarm Panel Mounting
Attach fly wires
(included)
16
Mounting Multicom inside an alarm panel
Step
4
4
Step
1
Step
2
2
Drill 7mm holes
in alarm panel
Thread fly
wires through
holes and
attach to
antennas
Step
3
s
e
p
4
4
s
(Female Connector)
(Male Connector)
Fix
Velcro Strips (included) and
mount device in alarm panel
Note: For Poor Signal Areas, consider using a high-gain antenna
available from your Multicom supplier.
!

C
O
N
N
E
C
T
T
O
P
O
W
E
R
If Alarm Panel doesn’t have 12V Auxiliary Power output which
can provide 150mA, you can connect to a MCPS 12 Power
Supply (optional - available from Suretek), OR a fixed 12V DC
power supply (≥150mA.)
Connect Multicom to Power
17
1. Connect 12V+ and GND
!

C
O
N
N
E
C
T
T
O
P
A
N
E
L
Connect Multicom to Alarm Panel
18
The centre two pins on the Multicom unit and included RJ12
cable wires are 'Ring' and 'Tip'.
!
2. Use a 4-wire RJ12 cable (included) to connect

P
A
N
E
L
R
E
L
A
Y
O
U
T
P
U
T
Relay/COM:
Note: If not using Zone 2, make sure you seal the zone with a 3K3
EOLR.
Interconnect Alarm Panel Relay Output
19
3. Program Alarm Panel Relay
To allow immediate notifications of communication
failure to the Monitoring Centre.
Connect an Alarm Panel Relay Output to any Multicom
Zone input.
!
Table of contents
Other Multi-COM Cell Phone manuals