Muse M-58 BT User manual

Benutzerhandbuch
Manuale dell’utente
Gebruikershandleiding
Manual do Utilizador
User Manual
Manual de instrucciones
Manuel de l’utilisateur Lire attentivement les instructions avant de faire
fonctionner l’appareil.
Read the instructions carefully before operating the unit.
Leia este manual com atenção antes de qualquer utilização.
Bitte lesen dieses Handbuch vor dem Gebrauch des
Geräts aufmerksam durch.
Antes de utilizar este aparato, lea atentamente las
siguientes instrucciones.
Leggere attentamente le istruzioni prima di utilizzare
l’apparecchio.
Gelieve voor gebruik deze handleiding aandachtig te lezen.
FR
GB
PT
DE
ES
IT
NL
M-58 BT
HX-3621 IB MUSE 001 REV0.indd 1 2014/7/31 15:39:03

FR - 1 FR - 2
EMPLACEMENT ET DESCRIPTION DES COMMANDES
TÉLÉCOMMANDE
1. TOUCHE VEILLE / MARCHE
2. TOUCHE SOURCE: PERMET DE CHOISIR LES MODES FM, DISC,
USB, AUX OU BT.
3. TOUCHE (OUVERTURE DU COMPARTIMENT CD)
4. TOUCHES , : SAUT / RECHERCHE RAPIDE/ SYNTONISATION.
5. TOUCHE / PAIR
6. TOUCHE VOL- / VOL+
7. AFFICHEUR LCD
8. COMPARTIMENT DISQUE
9. CAPTEUR POUR TÉLÉCOMMANDE
10. HAUT-PARLEURS
11. POINTS D'ACCROCHAGE AU MUR
12. PORT USB
13. ANTENNE FM FILAIRE
14. FENTE AUX (D G)
15. AC ENTRÉE ALIMENTATION SECTEUR
1. TOUCHE VEILLE / MARCHE
2. TOUCHE SOURCE (PERMET DE CHOISIR LES MODES FM, DISC, USB,
AUX OU BT)
3. TOUCHE INFO
4. TOUCHE INTRO
5. TOUCHE / MENU
6. / : NAVIGATION VERS LE HAUT/BAS.
7. PAVÉ NUMÉRIQUE (0~9)
8. TOUCHE DIMMER
9. TOUCHE (OUVERTURE DU COMPARTIMENT CD)
10. TOUCHE SHUFFLE
11. TOUCHE REPEAT
12. TOUCHE (SOURDINE)
13. TOUCHE / PAIR
14. TOUCHES , : SAUT / RECHERCHE RAPIDE / SYNTONISATION
15. TOUCHE VOL- / VOL+
16. TOUCHE EQ
17. TOUCHE BASS
18. TOUCHE SLEEP / TIMER
19. TOUCHE CLOCK
20. TOUCHE PROG
ACCESSOIRES
ALIMENTATION
COMMANDES AUDIO
La télécommande fonctionne avec une pile au lithium de type CR2025 (fournie). Pour alimenter latélécommande,
retirez l’onglet d’isolation situé à l’arrière de l’appareil.
REMARQUES:
- Ne chargez jamais des piles non rechargeables. Ne chauffez pas les piles et ne les démontez pas.
- Pour éviter un écoulement, retirez les piles en cas de non-utilisation prolongée de l'appareil.
- En cas de non-utilisation prolongée de la télécommande, retirez les piles an d’éviter tout dommage provoqué par une corrosion
due à un écoulement de celles-ci.
ATTENTION:
Risque d’explosion si les piles n’ont pas été insérées correctement. Remplacez-les uniquement par des piles identiques ou de type
équivalent.
Avant de jeter les piles, consultez votre revendeur car celui-ci peut les reprendre pour les recycler.
REMPLACEMENT DE LA PILE DE LA TÉLÉCOMMANDE
1. Poussez le verrou vers la droite.
2. Sortez le tiroir à pile.
3. Installez une pile « CR2025 » en dirigeant la borne positive de la pile
(+) vers le haut.
4. Replacez le couvercle du compartiment à pile.
1. Cordon d'alimentation CA x 1
2. Télécommande x 1
3. Câble AUX IN 3.5mm, x 1
4. Câble audio stéréo RCA, x 1
Cet appareil fonctionne sur courant alternatif 220-240V 50/60Hz.
Branchez le cordon d'alimentation CA à une prise de courant CA standard.
REMARQUE:
Dans un soucis d'économie d'énergie, à la n de la lecture ou bien encore si le volume d'écoute est réglé à un niveau très bas et
qu’aucune opération n'est effectuée sur l'appareil pendant une période de 2 heures celui ci se mettra automatiquement en mode
veille.
Lorsque vous branchez pour la première fois l'unité sur le secteur, l’unité passera automatiquement en mode veille.
« -- --:-- -- » s'afche.
1. Appuyez sur la touche pour mettre l’appareil en marche. « HELLO » s'afche sur l'écran.
2. Appuyez sur la touche a plusieurs reprises pour choisir la source de lecture désirée: FM—DISC—USB—AUX—BT—FM.
3. Appuyez sur la touche pour remettre l'unité en mode VEILLE.
Remarque: Déconnectez la prise d'alimentation du secteur si vous souhaitez éteindre l'unité complètement.
VOLUME
Utilisez VOL- / VOL+ pour régler le son à un niveau confortable. Le niveau de volume s’afche pendant quelques secondes.
FONCTION SOURDINE ( )
Pour couper temporairement le son provenant des haut-parleurs, appuyez sur la touche de la télécommande. Appuyez une
nouvelle fois sur la touche pour désactiver la fonction sourdine et rétablir le son des haut-parleurs.
EQ (ÉGALISEUR)
Appuyez de manière répétée sur la touche EQ de la télécommande pour sélectionner un mode égaliseur: « POP » ,
« CLASSIC » (classique), « JAZZ » ou. « ROCK ».
BASS (BASSE)
Appuyez sur la touche BASS plusieurs fois sur la télécommande pour choisir Activé ou Désactivé.
Lecture des introductions (CD et MP3)
Durant la lecture, appuyez sur la touche INTRO pour jouer les 10 premieres secondes de chaque chanson. Appuyez sur la touche
INTRO à nouveau pour désactiver cette fonction.
MICRO SYSTÈME CD/MP3/USB AVEC BLUETOOTH
FR
HX-3621 IB MUSE 001 REV0.indd 2 2014/7/31 15:39:03

FR - 3 FR - 4
FONCTION SOMMEIL
RÉGLAGE DE L’HEURE DE L’ALARME
ÉCOUTE DE LA RADIO
ÉCOUTE DES DISQUES
Cette fonction vous permet de régler une durée avant l’arrêt automatique de l’appareil. Vous pouvez choisir une durée (en minutes)
avant l’arrêt automatique del’appareil.
1. Appuyez sur la touche SLEEP / TIMER (fonction sommeil) autant de fois que nécessaire pour sélectionner la durée souhaitée:
90-60-30-15-00.
REMARQUES:
- Cette fonction ne peut être réglée que lorsque l’appareil est en marche.
- La fonction sommeil peut s’annuler en appuyant sur « 00 »
2. Appuyez sur le bouton SLEEP / TIMER pour lire le temps restant.
3. Si vous souhaitez éteindre l’unité avant que le temps se soit écoulé, appuyez sur la touche .
1. En mode veille, maintenez appuyée la touche SLEEP / TIMER de la télécommande, les chiffres des heures clignotent.
2. Utilisez les touches ou de la télécommande pour régler les heures. Appuyez sur la touche SLEEP / TIMER pour conrmer
l’heure, le chiffre des minutes clignotent.
3. Utilisez les touches ou pour régler les minutes. Appuyez sur la touche SLEEP / TIMER pour conrmer.
4. Appuyez sur ou pour choisir la source de réveil: BUZZER / FM / USB / DISC.
5. Appuyez sur la touche SLEEP / TIMER pour conrmer. Les chiffres de niveau du volume de l'alarme apparaissent sur l'écran,
appuyez sur ou pour régler le niveau du son.
6. Appuyez de nouveau sur la touche SLEEP / TIMER pour conrmer et terminer tous les réglages du réveil. “ ”apparaisse sur l’écran.
Activer et désactiver le minuteur d'alarme
- En mode veille, appuyez sur la touche SLEEP / TIMER sur la télécommande pour regarder les réglages de l'alarme.
- Pour activer l'alarme, appuyez sur la touche SLEEP / TIMER, « » apparait sur l'écran.
- Pour désactiver l'alarme, appuyez sur la touche SLEEP / TIMER, « » disparait de l'écran.
Réglage de la luminosité de l’afcheur
Appuyez de manière répétée sur la touche DIMMER de la télécommande pour modier le niveau luminosité.
RECHERCHE MANUELLE DES STATIONS
1. Appuyez sur sur l'unité ou appuyez sur FM surla télécommandepour choisir la fonction RADIO FM.
2. Appuyez successivement sur ou pour rechercher votre station .
3. Réglez le niveau du son en appuyant sur –ou +sur l'unité ou sur VOL- or VOL+ sur la télécommande.
RECHERCHE AUTOMATIQUE DES STATIONS
1. Appuyez sur sur l'unité ou appuyez sur FM surla télécommandepour choisir la fonction RADIO FM.
2. Appuyez et maintenez ou pendant environ 2 secondes pour lancer la recherche. La fonction de recherche automatique
repère les stations dont le signal est fort.
Pour une réception optimale de la radio:
FM: déployez et orientez l’antenne télescopique.
Remarque: Les stations dont le signal est faible peuvent être recherchées manuellement.
Le son est automatiquement coupé pendant la recherche.
PREREGLAGE DE STATIONS
Vous pouvez créer jusqu’à 20 stations FM.
Mémorisation manuelle:
1. En mode FM, Sélectionnez une station manuellement ou automatiquement avec ou .
2. Appuyez une fois sur PROG, "XX" clignote à l'écran pendant quelques secondes.
3. Utilisez ou pour sélectionner un numéro de mémoire.
4. Appuyez à nouveau sur PROG pour mémoriser la station radio sur le numéro de mémoire choisi
5. Répétez les étapes 1 à 4 pour mémoriser d’autres stations.
Mémorisation automatique:
En mode FM, tenez PROG appuyé, l'indicateur « AUTO » s'afche sur l'écran.l'unité recherchera et enregistrera automatiquement
20 stations FM disponibles.
Lorsque vous mémorisez sur une station déjà préréglée, celle-ci sera effacée et remplacée par la nouvelle station mise en mémoire.
Ecoute des stations préréglées
1. Appuyez sur une fois pour choisir la station présélectionnée précédent ou appuyez sur plusieurs fois pour choisir la station
présélectionnée suivante.
2. Réglez le niveau du son en appuyant sur –ou +sur l'unité ou sur VOL- or VOL+ sur la télécommande.
Afcher les Informations RDS
RDS (Radio Data System) est un service qui permet aux stations FM d'afcher des informations supplémentaires. Si vous réglez
sur une station RDS, le nom de la station s'afche. Lorsque vous utilisez la programmation automatique, les stations RDS sont
programmées en premier.
1. Régler sur une station RDS.
2. Appuyez sur la touche INFO à plusieurs reprises pour faire déler les informations suivantes (si disponibles): Nom de station,
PTY, CLOCK INFO(INFO HORLOGE), Frequency (Fréquence), RADIO TEXT (TEXTE RADIO).
1. Appuyez sur pour mettre l’appareil en marche.
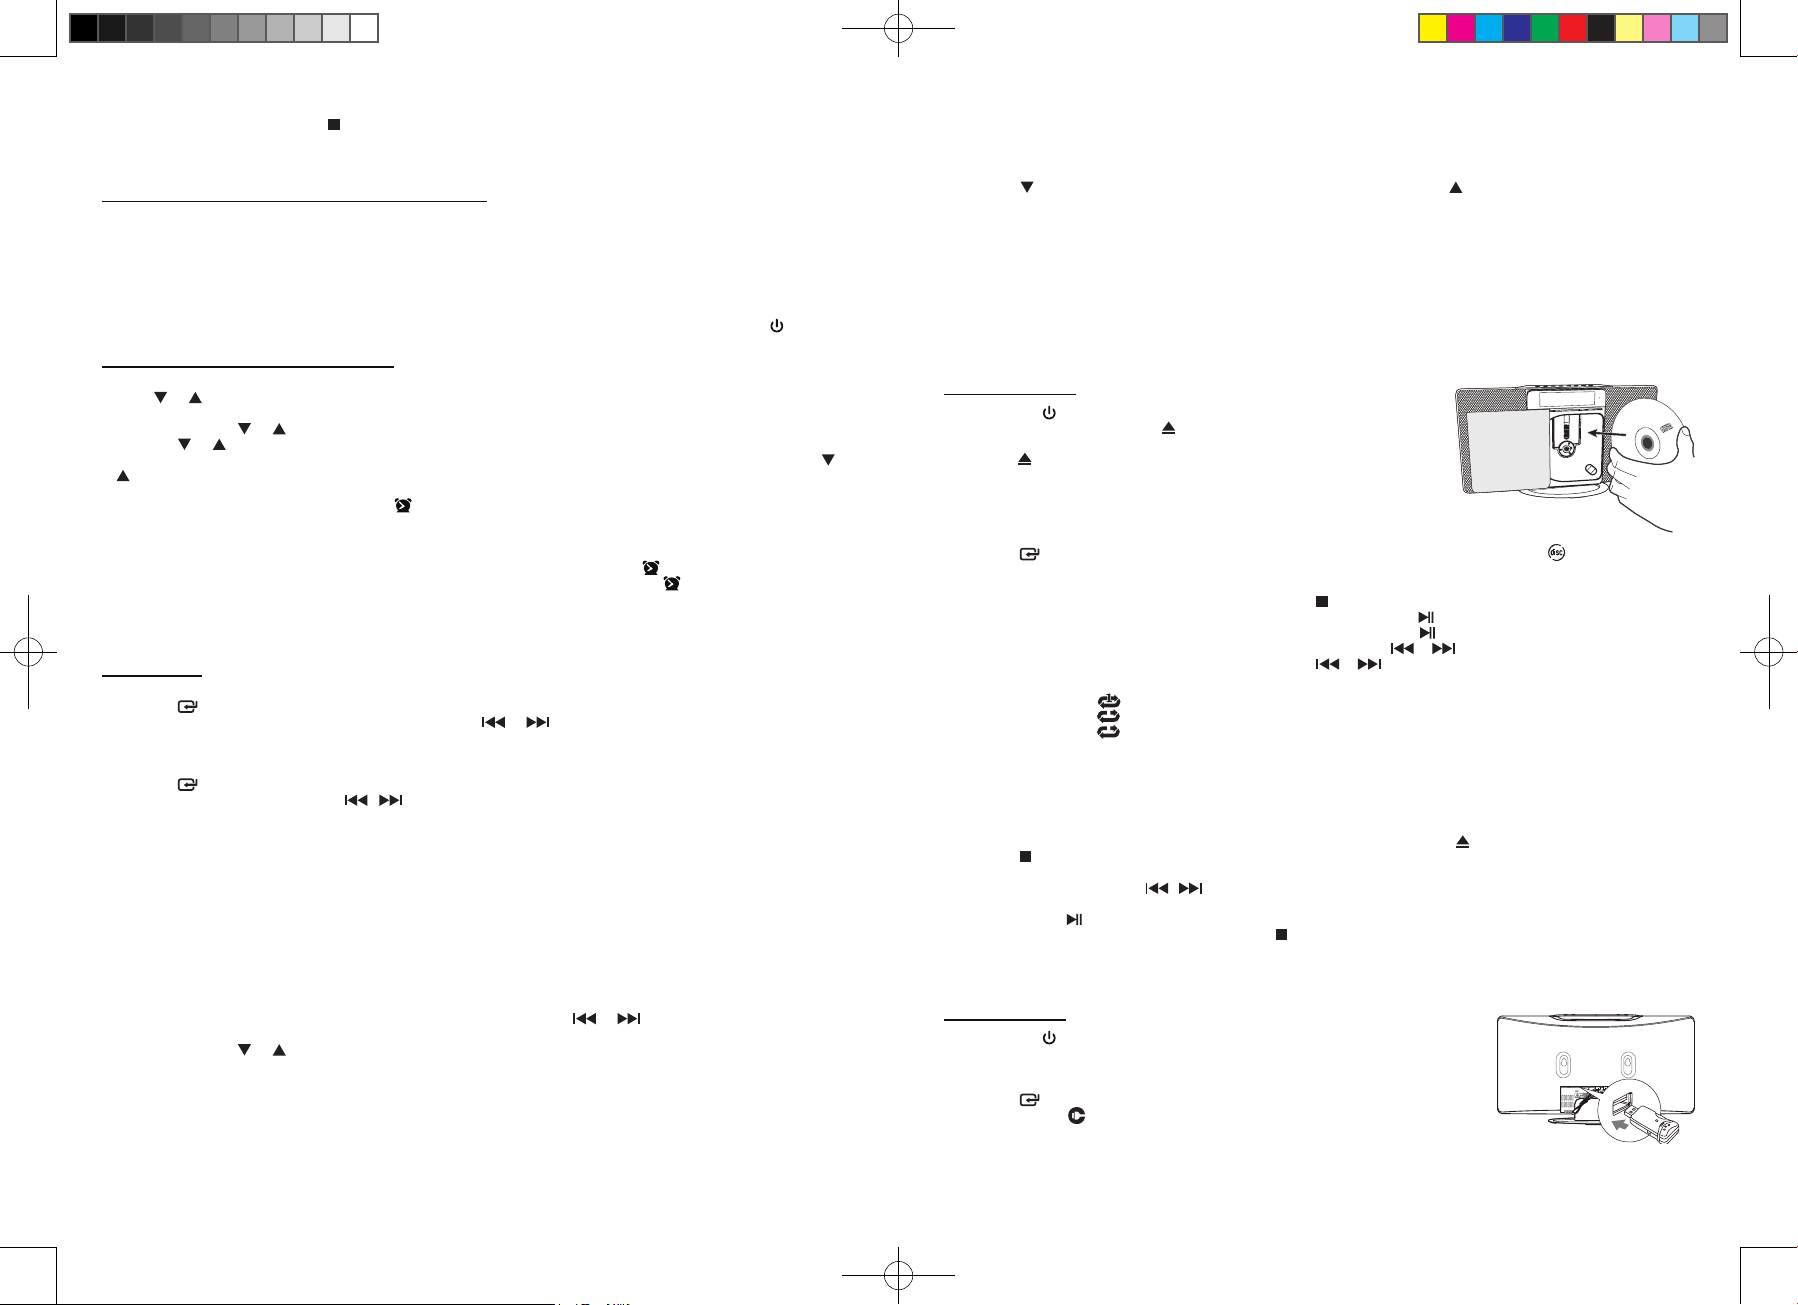
2. Ouvrez le compartiment CD en appuyant sur .
3. Placez le CD avec l'étiquette vers l'extérieur du compartiment CD et appuyez sur
pour fermer le compartiment.
IMPORTANT: La porte du CD est motorisée Ne poussez pas avec la main ou quoi
que ce soit d'autre pour l'ouvrir ou la fermer. Cela pourrait endommager le mécanisme
de la porte.
4. Appuyez sur sur l'unité ou appuyez sur CD sur la télécommande pour choisir la fonction Disque. apparaisse sur l’écran.
5. Au bout de quelques secondes, la lecture commence automatiquement.
Arrêter complètement la lecture: Appuyez sur / MENU
Mettre la lecture en pause: Appuyez sur / PAIR
Reprendre la lecture: D Appuyez sur / PAIR
- Effectuer une avance ou un retour rapide: Maintenez enfoncé ou
- Aller à la piste suivante ou précédente: Appuyez successivement sur ou
Répétition de la plage en cours, s'afche.
Répétition du répertoire, clignote
Répétition totale. s'afche.
ERREUR DISQUE
Remarque: Si le disque est sale, endommagé ou illisible, ou si celui-ci est placé à l'envers, « NO DISC» s'afche à l’écran. Si cela
se produit, nettoyez le disque, insérez le disque correctement ou essayez un autre disque.
LECTURE PROGRAMMÉE
1. Placez le CD avec l'étiquette vers l'extérieur du compartiment CD et appuyez sur pour fermer le compartiment.
2. Appuyez sur / MENU sur la télécommande.
3. Appuyez sur PROG sur la télécommande. « P0X » s'allume et « T0X » clignote.
4. Selectionnez la piste de votre choix avec ou , puis appuyez sur ”PROG” pour la mémoriser.
5. Répétez l’étape 4 jusqu’à la n de votre programmation.
6. Appuyez sur pour commencer la lecture.
7. Pour annuler le programme en cours, appuyez deux fois sur la touche / MENU sur la télécommande.
Remarque: CD/Mp3 jusqu'à 20 pistes programmables.
ÉCOUTE D’UN PERIPHERIQUE USB
1. Appuyez sur pour mettre l’appareil en marche.
2. Connectez une clé USB contenant des chiers MP3 au port USB.
3. Appuyez sur sur l'unité ou appuyez sur USB sur la télécommande pour choisir la
fonction USB. “USB” et “ ” apparaisse sur l’écran.
4. Au bout de quelques secondes, la lecture commence automatiquement.
5. Réglez le niveau du son en appuyant sur –ou +sur l'unité ou sur VOL- or VOL+ sur la
télécommande.
REGLAGE DE L’HEURE
1. En mode veille, maintenez appuyée la touche CLOCK de la télécommande jusqu'à ce que l’heure de l’horloge clignotent sur
l’écran.
2. Appuyez sur / pour régler les heures, puis appuyez sur la touche CLOCK pour conrmer l’heure, le chiffre des minutes
clignotent.
3. Appuyez sur / pour régler les minutes. Appuyez de nouveau sur la touche CLOCK pour enregistrer les réglages.
4. Pour consulter l’horloge à tout moment, appuyez une fois sur la touche CLOCK.
Synchronisation de l’horloge
En mode veille, tenez la touche / MENU appuyée sur la télécommande pendant quelques secondes, alors l'unité passera en mode
de synchronisation de l'horloge.
Remarque: Cette fonction n'est pas disponible si aucune station RDS ne peut être reçue.
HX-3621 IB MUSE 001 REV0.indd 3 2014/7/31 15:39:04

CONNEXION AVEC UN APPAREIL EXTERNE
FONCTIONNEMENT BLUETOOTH
FICHE TECHNIQUE
CONSIGNES DE SÉCURITÉ
GUIDE DE DÉPANNAGE
Remarque:
- Le nombre total de chiers MP3 sur le disque ou l'appareil USBne peut pas dépasser 999.
- Le disque ou l'appareil USB ne peut pas contenir plus de 999 dossiers.
- La durée de chargement nécessite environ 20 secondes ou plus en fonction de la quantité de chiers et de dossiers MP3 présents
sur le disque ou le périphérique USB.
- Le port USB n'est pas conçu pour la charge et le transfert de chiers avec un ordinateur.
- En raison des différentes normes d'enregistrement, de capacité et d'interfaces présentes sur le marché, le fabricant ne sera en
aucun cas tenu responsable de la compatibilité des périphériques USB et lecteurs MP3.
* Câble AUX IN 3.5mm,
Connectez votre source audio (ex: un lecteur mp3) sur les
prises AUX sur l'unité avec le câble AUX IN 3,5mm fourni.
Le mot Bluetooth® ainsi que les marques et logo sont des marques commerciale déposées détenues par Bluetooth SIG, Inc. et
l’utilisation de ces marques par New One S.A.S se fait dans le cadre d’une autorisation. Les autres marques et noms commerciaux
sont les propriétés deleurs titulaires respectifs.
Ce haut-parleur Bluetooth M-58 BT est doté de la fonction audio Bluetooth. Vous pouvez lire le chier audio depuis votre appareil
source audio Bluetooth (ex: téléphone portable) via le M-58 BT.
1. Appuyez sur sur l'unité ou appuyez sur AUX sur la télécommande pour choisir la fonction BT(Bluetooth). « NO BT » s'afchera
sur l'écran si l'unité n'est pas couplée avec un appareil Bluetooth.
2. Tenez la touche / PAIR appuyée jusqu'à ce que « PAIR » apparaisse.
3. Allumez la fonction Bluetooth sur votre appareil audio source Bluetooth (ex: téléphone portable). Sélectionnez l’élément de
recherche d'appareil Bluetooth et entrez dedans. Votre appareil source audio Bluetooth commence à rechercher les appareils
Bluetooth à sa portée (10 mètres). Sélectionnez la radio de cette voiture « M-58BT » et conrmez,. L’indicateur Bluetooth"BT"
reste allumé lorsque le couplage est réussi.
Remarque:
- Saisissez 0000 pour le mot de passe si nécessaire et conrmez-le.
- Si vous avez déjà effectué des connexions Bluetooth avant, une liste des résultats des recherches précédentes s’afche. Select
“M-58BT” and conrm.
4. Pendant la lecture, appuyez sur la touche / PAIR pour mettre en pause la lecture, appuyez de nouveau pour reprendre.
5. Pendant la lecture, appuyez sur ou pour sauter les pistes.
6. Désactivez la fonction Bluetooth de votre appareil source audio Bluetooth mobile pour déconnecter.
RECONNECTER A L’APPAREIL SOURCE AUDIO BLUETOOTH
Sivotre appareil source audio Bluetooth a déjà été couple avec le M-58 BT mais accidentellement déconnecté, tenezla touche /PAIR
appuyée pour refaire la connexion.
Par la présente, NEW ONE S.A.S déclare que l’appareil “MUSE M-58 BT” est conforme aux exigences essentielles et autres
dispositions pertinentes de la directive 1999/5/CE. La déclaration de conformité peut être consultée sur le site
http://www.muse-europe.com/conformity/M-58BT.pdf
Alimentation: AC 220-240V 50/60Hz, 25W
Radio: FM 87.5-108MHz
ATTENTION: pour réduire le risque de choc électrique, ne démontez pas l’appareil. L’appareil ne contient
aucune pièce réparable par l’utilisateur. Conez tout entretien à un technicien qualié.
Le symbole de l'éclair terminé par une èche à l'intérieur d'un triangle avertit l'utilisateur de la présence d’une « tension
dangereuse » dans l'appareil.
Le point d’exclamation à l’intérieur d’un triangle avertit l’utilisateur de la présence d’importantes instructions dans le manuel
accompagnant l’appareil.
Symptôme Cause Remède
Impossible de mettre en
marche l’appareil La prise CA n’est pas branchée sur le secteur. Branchez la correctement sur le secteur.
Pas de son
Le niveau de volume est réglé sur le minimum. Réglez le volume sur le niveau de votre
choix.
L’appareil connecté n’est pas en mode lecture. Lisez de la musique sur l’appareil connecté.
Le son émis de l’appareil connecté est faible. Réglez le volume de votre appareil connecté.
Distortion sonore
Le niveau du volume est trop fort. Réduisez le niveau de volume en appuyant
sur la touche VOL-.
Le niveau de volume de l’appareil connecté
est trop fort.
Réduisez le niveau de volume sur l’appareil
connecté.
La réception Bluetooth ne
fonctionne pas L’appareil n’est pas en mode Bluetooth. Essayez de connecter à nouveau.
* Câble audio stéréo RCA
Connectez votre source TV (ex: un lecteur DVD) sur les
prises AUX sur l'unité avec le câble RCA stéréo fourni.
1. Appuyez sur pour mettre l’appareil en marche.
2. Appuyez sur sur l'unité ou appuyez sur AUX sur la télécommande pour choisir la fonction AUX. « AUX » s'afche à l’écran.
Utilisez normalement votre appareil externe, le son passe automatiquement par les haut-parleurs de votre appareil.
3. Réglez le niveau du son en appuyant sur –ou +sur l'unité ou sur VOL- or VOL+ sur la télécommande.
4. Pour arrêter la lecture, déconnectez votre appareil audio externe de l’entrée auxiliaire.
FR - 5 FR - 6
Si vous souhaitez vous débarrasser de cet appareil, pensez à le recycler dans une décharge pour appareils ménagers
électriques. Renseignez-vous pour connaître votre centre de recyclage le plus proche. Informez-vous auprès des
autorités locales ou de votre revendeur pour de plus amples détails. (Directive sur les Déchets des équipements
électriques et électroniques)
ATTENTION !
- Ne chargez jamais des piles non rechargeables. Ne chauffez pas les piles et ne les démontez pas.
- Ne jetez pas les piles dans le feu !
- N’exposez pas les piles à une chaleur excessive, comme les rayons du soleil, le feu ou d’autres sources de chaleur similaires.
- Veillez à assurer une ventilation correcte de l’appareil et ne couvrez pas les orices de ventilation avec des objets tels que journaux,
nappes, rideaux, etc.
- Ne placez aucune source de chaleur, telle qu’une bougie allumée, sur ou à proximité de l’appareil.
- Utilisez cet appareil sous un climat tempéré.
- N’exposez pas l’appareil à des éclaboussures ou à l’humidité.
- Veillez à respecter une distance minimale de 5 cm autour de votre appareil an de permettre une ventilation sufsante.
- Ne déposez pas d’objets contenant un liquide, tels qu’un vase, sur ou à proximité de l’appareil.
- La plaque signalétique se trouve à l’arrière de cet appareil.
- La che d’alimentation secteur permet de débrancher l’appareil et doit rester facilement accessible. Pour couper complètement
l’alimentation de l’appareil, débranchez complètement la che d’alimentation secteur de la prise secteur. La che d’alimentation
secteur ne peut pas être entravée et doit être facilement accessible durant l’utilisation.
- Sous l’effet de phénomènes électrostatiques et/ou électriques transitoires, le produit peut présenter des dysfonctionnements et une
réinitialisation peut s’avérer nécessaire.
NEW ONE S.A.S
10, Rue de la Mission, 25480 Ecole Valentin, France
HX-3621 IB MUSE 001 REV0.indd 4 2014/7/31 15:39:05

EN - 1 EN - 2
LOCATION AND DESCRIPTION OF CONTROLS
REMOTE CONTROL
1. STANDBY / ON BUTTON
2. : SOURCE BUTTON (TO SELECT FM, DISC, USB, AUX, BT MODE)
3. DISC DOOR OPEN BUTTON
4. / : SKIP/SEARCH / TUNING BUTTON
5. / PAIR BUTTON
6. VOL- / VOL+ BUTTON
7. LCD DISPLAY
8. DISC COMPARTMENT
9. REMOTE SENSOR
10. SPEAKER
11. WALL HANGING POINTS
12. USB PORT
13. FM WIRE ANTENNA
14. AUX (R L) SOCKET
15. AC AC INPUT SOCKET
1. STANDBY / ON BUTTON
2. SOURCE BUTTON (TO SELECT FM, DISC, USB, AUX, BT MODE)
3. INFO BUTTON
4. INTRO BUTTON
5. / MENU BUTTON
6. / : NAVIGATE UP / DOWN THROUGH
7. NUMBER BUTTON (0~9)
8. DIMMER BUTTON
9. : DISC DOOR OPEN BUTTON
10. SHUFFLE BUTTON
11. REPEAT BUTTON
12. : MUTE BUTTON
13. / PAIR BUTTON
14. / : SKIP / SEARCH / TUNING BUTTON
15. VOL- / VOL+ BUTTON
16. EQ BUTTON
17. BASS BUTTON
18. SLEEP / TIMER BUTTON
19. CLOCK BUTTON
20. PROG BUTTON
ACCESSORIES
POWER SUPPLY
AUDIO CONTROLS
The remote control operates on 1pc “CR2025” lithium battery (included). To power up the remote control, remove
the insulation tab from the back of unit.
NOTES:
- Never recharge the batteries, apply heat to them or take them apart.
- In order to avoid leakage, always remove the batteries when unit will not be used for a long period of time.
- If the remote control is not going to be used for a long time, remove the battery to avoid damage caused by battery leakage
corrosion.
CAUTION: Danger of explosion if battery is incorrectly replaced. Replace only with the same or equivalent type.
Before throwing any batteries away, consult your distributor who may be able to take them back for specic recycling.
INSTALLING BATTERY
1. Push the button toward right.
2. Pull the battery loader out.
3. Insert one “CR2025” size battery with the positive side (+) facing up.
4. Replace the cover.
1. AC power cord x 1
2. Remote control x 1
3. 3.5mm AUX IN cable x 1
4. RCA stereo audio cable x 1
This set operates on AC 220-240V 50/60Hz.
Connect the power cord to a convenient AC wall outlet.
NOTE:
In a concern of saving energy, when playback has reached to the end or listening volume is set at a very low level and no control is
operated on the device for a period of 2 hours, the unit will automatically switch to Standby mode.
When you rst connect the unit to the mains socket, the unit will be in STANDBY mode. ”-- --:-- --“ displayed.
1. Press button to turn the unit ON. ”HELLO” is appear on display.
2. Press button repeatedly to select the playback source as desired: FM—DISC—USB—AUX—BT—FM.
3. Press button to switch the unit back to STANDBY mode.
Note: Disconnect the mains plug from the mains socket if you want to switch the unit OFF completely.
VOLUME
Press VOL- / VOL+ to adjust the sound to comfortable level. The volume level will be displayed for a few seconds
MUTE
To cut off the sound from the speakers temporarily, press button on remote control. Press button again to cancel Mute mode
and restore the sound from the speakers.
EQ
Press EQ button on remote control to toggle among the different sound effects (POP/ CLASSIC / JAZZ / ROCK ).
BASS
Press BASS button repeatedly on remote control to select OFF or ON.
Intro playback (CD & MP3)
During playback, press INTRO button to play the rst 10 seconds of each track. Press INTRO again to cancel this function.
MICRO SYSTEM CD/MP3/USB WITH BLUETOOTH
GB
HX-3621 IB MUSE 001 REV0.indd 5 2014/7/31 15:39:06

EN - 3 EN - 4
SLEEP FUNCTION
ALARM TIMER SETTING
LISTENING TO THE RADIO
CD OPERATION
In sleep mode, the unit will turn off automatically after a specied time. You can select duration in minutes before the unit turns off
automatically.
1. When the unit ON, Press SLEEP / TIMER button on remote control repeatedly to select 90-60-30-15-00.
Notes:
- Sleep time can only be set when the unit is turned ON.
- The sleep function is cancelled when “00” is selected.
2. Press SLEEP / TIMER button to check the remaining sleep time.
3. If you want to switch off the unit before sleep time ends, press button.
1. In standby mode, press and hold the SLEEP / TIMER button on remote control, the hour digits will blink.
2. Press or button on remote control to set the hour. Press SLEEP / TIMER button to conrm the hour, the minute digits will
blink.
3. Press or button on remote control to set the minute. Press SLEEP / TIMER button to conrm the minutes.
4. Press or to select the source of wake up: BUZZER / FM / USB / DISC.
5. Press SLEEP / TIMER button to conrm. Alarm volume level digits will show on the display, press or to adjust the sound
level.
6. Press SLEEP / TIMER button again to conrm alarm volume level setting and complete the whole alarm setting process, “ ”
will show on the display.
Activate and Deactivate the Alarm Timer
- In standby mode, Press SLEEP / TIMER button on remote control to review the alarm settings.
- To activate the alarm, Press SLEEP / TIMER button twice on remote control, “ ” appears from display.
- To deactivate the alarms, press the SLEEP / TIMER button twice on remote control, “ ” disappears from display.
DISPLAY DIMMER
Press the DIMMER button on the remote control repeatedly to change the backlight brightness of the display.
MANUAL SEARCH
1. When the unit is on, press on unit or press FM on remote control to select FM RADIO function.
2. Press repeatedly or to nd your station.
3. Adjust the sound level by pressing –or +on unit or VOL- or VOL+ on remote control.
AUTOMATIC SEARCH
1. When the unit is on, press on unit or press FM on remote control to select FM RADIO function.
2. Press and Hold on or for about 2 seconds to start the search. The automatic search function locates station whose signal
is strong.
For optimal radio reception:
FM: Extend and position the antenna wire.
Note:
Stations with weak signals can be searched manually.
The sound is automatically muted during search.
RADIO PRESET STATIONS
You can preset up to 20 FM stations.
Manual storage:
1. In FM mode, Select a station manually or automatically with or .
2. Press PROG, "XX" blinks on the display for a few seconds.
3. Press or to select a preset number.
4. Press PROG again to store the radio station on the selected memory number.
5. Repeat steps 1-4 to store other stations.
Automatic storage:
In FM mode, Press and hold PROG, “AUTO” indicator appear on display, unit will automatically search and save the available 20
FM stations.
Note:
When you store on a channel already been preset, the previous station will automatically be cleared and replaced by the new station.
Listen to station presets
1. Press to select the previous preset station or press repeatedly to select the next preset station.
2. Adjust the sound level by pressing –or +on unit or VOL- or VOL+ on remote control.
Show RDS information
RDS (Radio Data System) is a service that allows FM stations to show additional information. If you tune to a RDS station, the station
name are displayed. When automatic programming is used, RDS stations are programmed rst.
1. Tune to a RDS station.
2. Press the INFO button repeatedly to scroll through the following information (if available): Station name, PTY, CLOCK INFO,
Frequency, RADIO TEXT.
1. Press to turn on the unit.
2. Open the CD door by pushing .
3. Place the CD with label side facing outward to the CD compartment and press to
close the CD door.
IMPORTANT: The CD Door is Motorized Door. Do not push with hand or use any other
means to open or close it. This could damage the door mechanism.
4. Press on unit or press CD on remote control to select DISC function. appears
on the display.
5. After a few seconds, playback starts automatically.
Permanently stop playback: Press / MENU
Pause playback: Press / PAIR
Resume playback: Press / PAIR again
- Search forward or backward: Press and hold or
- To skip to the next or previous track: Press or
Repeat current track displayed.
Repeat folder ashing
Repeat all tracks displayed.
DISC ERROR
Note: If the disc is dirty, damaged or unreadable, or if the disc is placed upside down, “NO DISC” will appear on the display. If this
occurs, clean the disc, insert the disc correctly or try another disc.
PROGRAM
1. Place the CD with label side facing outward to the CD compartment and press to close the CD door.
2. Press / MENU on remote control
3. Press PROG on remote control. “P0X” light up and “T0X” blinking.
4. Select the desired track with / then press PROG to save the program in memory.
5. Repeat step 4 until the end of your programming.
6. Press to start playback.
7. To cancel current program, press / MENU button twice on remote control.
CD/Mp3 up to 20 programs.
LISTENING TO DEVICE USB
1. Press to turn the unit on.
2. Connect a USB device containing MP3 les to the USB port.
3. Press button on unit or press USB button on remote control to select the USB function.
“USB” and “ “ appears on the display.
4. After a few seconds, playback starts automatically.
5. Adjust the sound level by pressing –or +on unit or VOL- or VOL+ on remote control.
SETTING THE TIME
1. In standby mode, press and hold CLOCK button on remote control until the clock hour ashes on display.
2. Press / to set the hour and then press CLOCK to conrm, the minute digits blink.
3. Press / to set the minute. Press CLOCK again to save setting.
4. To check the clock time at any time, press CLOCK once.
Clock Synchronization
In the standby mode, press and hold the / MENU button on the remote control for few seconds, then the unit will enter the CLOCK
SYNC mode.
Note: This feature is not available if no RDS station can be received.
HX-3621 IB MUSE 001 REV0.indd 6 2014/7/31 15:39:06

EN - 5 EN - 6
CONNECTING WITH EXTERNAL DEVICES
BLUETOOTH OPERATION
TECHNICAL SPECIFICATIONS
MORE INFORMATION
TROUBLE SHOOTING GUIDE
* 3.5mm AUX IN cable
Connect your audio source (e.g mp3 player) to the AUX
jacks on unit with the supplied 3.5mm AUX IN cable.
The Bluetooth® word mark and logos are registered trademarks owned by Bluetooth SIG, Inc. and any use of such marks by New
One S.A.S is under license. Other trademarks and trade names are those of their respective owners.
This Bluetooth speaker M-58 BT supports Bluetooth audio function. You can play the audio le in your Bluetooth audio source device
(e.g. mobile phone) via M-58 BT.
1. Press button on unit or press AUX button on remote control to select the BT(Bluetooth) function. “NO BT” will show on display
if the unit is not paired to any Bluetooth device.
2. Press and hold / PAIR till “PAIR” appears.
3. Turn on the Bluetooth function of your Bluetooth audio source device (e.g. mobile phone). Select the item of searching the
Bluetooth device and enter it. Your Bluetooth audio source device (e.g. mobile phone) starts to search for Bluetooth devices
within range (10 meters). Select this Bluetooth speaker “M-58BT” and conrm it. The Bluetooth indicator ”BT” remains on when
pairing is successful.
Note:
- Enter 0000 for the password if necessary and conrm it.
- If you have made Bluetooth connectivity before, a list of the previous search results is displayed. Select “M-58BT” and conrm.
4. During playback, press / PAIR button to pause playback, press again to resume.
5. During playback, press or to skip tracks.
6. Turn off the Bluetooth function of your Bluetooth audio source device to disconnection.
RECONNECT TO THE BLUETOOTH AUDIO SOURCE DEVICE
If your Bluetooth audio source device has already been paired with M-58 BT but accidentally disconnected, press and hold / PAIR
button to do connection again.
Hereby, NEW ONE S.A.S, declares that this MUSE M-58 BT is in compliance with the essential requirements and other relevant
provisions of Directive 1999/5/EC. The declaration of conformity may be consulted at
http://www.muse-europe.com/conformity/M-58BT.pdf
Power supply: AC 220-240V 50/60Hz, 25W
Radio: FM 87.5-108MHz
CAUTION: To reduce the risk of electric shock, do not remove the cover (or back). There are no user serviceable
parts inside the unit. Refer all servicing to qualify personnel.
The lightening ash with arrowhead symbol within the triangle is a warning sign alerting the user of “dangerous voltage”
inside the unit.
The exclamation point within the triangle is a warning sign alerting the user of important instructions accompanying the
product.
Symptom Cause Solution
No power AC plug is not plugged into wall outlet. Plug it to the wall outlet properly.
No sound
Volume is in minimum. Adjust volume to a desired level.
The connected device is not in playback mode. Play the music in the connected device.
Sound output of the connected device is weak. Adjust volume of connected device.
Sound distortion
Volume level is too high. Reduce the volume level by pressing VOL-
button.
Volume level of the connected device is too high. Reduce the volume level of the connected
device.
Bluetooth reception failure Not in the Bluetooth mode. Try to connection again.
* RCA stereo audio cable
Connect your TV’s audio source (e.g. DVD player) to the
AUX jacks on unit with the supplied RCA stereo audio cable.
1. Press to turn the unit on.
2. Press button on unit or press AUX button on remote control to select the AUX function. AUX appears on the display. Normally
use your external audio appliance; the sound automatically goes through the speakers of your device.
3. Adjust the sound level by pressing –or +on unit or VOL- or VOL+ on remote control.
4. Disconnect the external appliance from the auxiliary input to stop playback.
If at any time in the future you should need to dispose of this product please note that waste electrical products should
not be disposed of with household waste. Please recycle where facilities exist. Check with your local authority or retailer
for recycling advice. (Waste Electrical and Electronic Equipment Directive)
IMPORTANT!
- Never recharge the batteries, apply heat to them or take them apart.
- Do not throw batteries in re!
- Battery shall not be exposed to excessive heat such as sunshine, re or the like.
- The ventilation should not be impeded by covering the ventilation openings with items such as newspapers, table-cloths, curtains,
etc.
- No naked ame sources, such as lighted candles, should be placed on the apparatus.
- The use of apparatus is in moderate climates.
- The apparatus should not be exposed to dripping or splashing.
- Ensure a minimum distance of 5cm around the apparatus for sufcient ventilation.
- Do not place objects lled with liquids, such as vases, on the apparatus.
- The marking plate is located on the back of unit.
- Mains plug is used as the disconnect device and it shall remain readily operable. To be completely disconnected the power input,
the mains plug of the apparatus shall be disconnected from the mains completely. The mains plug should not be obstructed or
should be easily accessed during intended use.
- Under the inuence of electrical fast transient or/and electrostatic phenomenon, the product may malfunction and require user to
power reset.
NEW ONE S.A.S
10, Rue de la Mission, 25480 Ecole Valentin, France
NOTE :
- The total number of MP3 les on the disc or USB device can not exceed 999.
- The disc or USB device can not contain more than 999 directories.
- The charging time takes about 20 seconds or more depending on the amount of MP3 les and folders on the disc or USB device.
- The USB port is not designed for charging and les transfer with a computer.
- Manufacturer is not responsible for the playability of USB device or MP3 due to different recording condition, capacity and interface
compatibility, etc...
HX-3621 IB MUSE 001 REV0.indd 7 2014/7/31 15:39:07

PT - 1 PT - 2
DESCRIÇÃO DO APARELHO
TELECOMANDO
1. BOTÃO DE ESPERA / LIGAR
2. : BOTÃO SOURCE (PARA SELECIONAR O MODO FM, DISC, USB,
AUX OU BT)
3. BOTÃO (ABERTURA DO COMPARTIMENTO CD)
4. BOTÃOS / : PULAR / BUSCAR / SINTONIZAR
5. BOTÃOS / PAIR
6. BOTÃOS VOL- / VOL+
7. TELA
8. COMPARTIMENTO PARA DISCO
9. SENSOR PARA O TELECOMANDO
10. CAIXAS DE SOM
11. FUROS PARA INSTALAÇÃO EM PAREDES
12. ENTRADA USB
13. ANTENA FM
14. CONECTOR AUX (R L)
15. AC CABO DE ALIMENTAÇÃO DE REDE
1. BOTÃO DE ESPERA / LIGAR
2. BOTÃO SOURCE (PARA SELECIONAR O MODO FM, DISC, USB, AUX
OU BT)
3. BOTÃO INFO
4. BOTÃO INTRO
5. BOTÃO / MENU
6. / : NAVEGAÇÃO PARA CIMA/BAIXO.
7. TECLADO NUMÉRICO (0 - 9)
8. BOTÃO DIMMER (BOTÃO DE AJUSTE DE ILUMINAÇÃO)
9. BOTÃO (ABERTURA DO COMPARTIMENTO CD)
10. BOTÃO SHUFFLE
11. BOTÃO REPEAT
12. BOTÃO : FUNÇÃO SURDINA
13. BOTÃO /PAIR
14. BOTÃOS / : PULAR / BUSCAR / SINTONIZAR
15. BOTÃO VOL- / VOL+
16. BOTÃO EQ
17. BOTÃO BASS
18. BOTÃO SLEEP / TIMER
19. BOTÃO CLOCK
20. BOTÃO PROG
ACESSÓRIOS
ALIMENTAÇÃO
CONTROLES DE ÁUDIO
O telecomando funciona com uma pilha de lítio “CR2025”(incluída). Para accionar a alimentação do telecomando,retire
a patilha de isolamento da parte de trás do aparelho.
Antes de eliminar as pilhas, consulte o seu revendedor pois este pode retomá-las para reciclagem.
SUBSTITUIÇÃO DA PILHA DO TELECOMANDO
1. Empurre o botão para a direita.
2. Puxe o carregador da pilha para fora.
3. Insira uma pilha de tamanho “CR2025” com o lado positivo (+) virado
para cima.
4. Volte a colocar a tampa.
1. Fio de energia AC x 1
2. Telecomando x 1
3. cabo de ENTRADA AUX de 3.5mm, x 1
4. cabo estéreo RCA de áudio x 1
Conecte o o de energia em uma fonte de 220-240V AC 50/60Hz.
Conecte o o de energia em uma tomada convencional de parede de corrente alternada.
OBSERVAÇÃO:
No interesse de economizar energia, quando uma reprodução terminar ou o nível de volume for denido como muito baixo e
nenhuma operação for realizada por um período de 2 horas, o aparelho entrará automaticamente no modo de Espera.
Quando você conectar o aparelho na tomada pela primeira vez, ele estará no modo de ESPERA. ”-- --:-- --“ será exibido.
1. Prima o botão para pôr o aparelho a funcionar. “HELLO” será exibido na tela.
2. Pressione o botão várias vezezs para selecionar a origem de reprodução, conforme desejado: FM—DISC—USB—AUX—
BT—FM.
3. Pressione o botão para colocar o aparelho no modo de ESPERA.
Nota: Desconecte o aparelho da tomada caso você deseje desligá-lo completamente.
VOLUME
Prima VOL - / VOL+ para ajustar o som para um nível confortável. O nível do volume será exbido por alguns segundos.
FUNÇÃO SURDINA
Para cortar temporariamente o som proveniente dos altifalantes, prima o botão do telecomando. Prima mais uma vez o botão
para desactivar a função surdina e restabelecer o som proveniente dos altifalantes.
EQ (Equalizador)
Pressionar repetidamente a tecla EQ do telecomando para seleccionar um modo equalizador: «POP», «CLASSIC» (clássico),
«JAZZ» ou «ROCK».
BASS(GRAVE)
Pressione o botão BASS várias vezes no controle remoto para selecionar DESLIGADO ou LIGADO.
Reprodução de Introduções (CD & MP3)
Durante uma reprodução pressione o botão INTRO para reproduzir os primeiros 10 segundos de cada faixa. Pressione INTRO
novamente para cancelar esta função.
SOM MICRO-SYSTEM DE CD/MP3/USB COM BLUETOOTH
PT
OBSERVAÇÕES:
- Nunca carregue pilhas não recarregáveis. Não aqueça as pilhas e não as desmonte.
- Para evitar que as pilhas vertam, retire as no caso de não utilização prolongada do aparelho.
- No caso de não utilização prolongada do telecomando, retire a pilha de modo a evitar quaisquer danos causados pela corrosão
originada pelo líquido vertido da referida pilha.
ATENÇÃO:
Risco de explosão se a pilha não for inserida correctamente. Substitua-a apenas por uma pilha idêntica ou de tipo
equivalente.
REGULAÇÃO DA HORA
1. No modo standby, mantenha premido o botão CLOCK do controle remoto até que o algarismo das horas pisque.
2. Prima / para regular as horas e depois prima CLOCK para conrmar a hora. Os digitos dos minutos irão piscar.
3. Prima / para regular os minutos. Prima de novo o botão CLOCK para registar as denições.
4. Para vericar a hora quando desejar, pressione uma vez a tecla CLOCK.
HX-3621 IB MUSE 001 REV0.indd 8 2014/7/31 15:39:08

PT - 3 PT - 4
FUNÇÃO DE ADORMECER (PARAGEM AUTOMÁTICA)
CONFIGURAÇÃO DA HORA DO ALARME
OUVIR RÁDIO
UTILIZANDO O CD
Esta função permite denir um período de tempo de funcionamento antes da paragem automática do aparelho. Pode ser
seleccionado um período de funcionamento (em minutos) antes da paragem automática do aparelho.
1. Prima o botão SLEEP / TIMER do telecomando repetidamente para ajustar o tempo para adormecer: 90-60-30-15-00.
Nota:
- Esta função pode ser ajustada apenas quando o aparelho está em funcionamento.
- A função sleep será cancelada quando “00” for selecionado.
2. Prima o botão SLEEP / TIMER para vericar o tempo restante para adormecer.
3. Caso você queira desligar o aparelho antes que o temporizador da função adormecer termine, pressione o botão .
1. No modo standby, mantenha premido o botão SLEEP / TIMER do controle remoto, os dígitos da hora irão piscar.
2. Prima ou (no controle remoto) para regular as horas e depois prima SLEEP / TIMER para conrmar a hora. Os digitos dos
minutos irão piscar.
3. Pressione os botões ou para denir os minutos. Pressione o botão SLEEP / TIMER para conrmar os minutos.
4. Pressione ou para selecionar a origem do alarme como: BUZZER(DESPERTADOR)/ RÁDIO / USB / DISCO.
5. Pressione o botão SLEEP / TIMER para conrmer. O valor do nível de volume do alarme será exibido na tela. Pressione ou
para ajustar o nível do som.
6. Pressione o botão do SLEEP / TIMER mais uma vez para conrmar a conrguração do nível do volume do alarme e para
completar o processo de denição de alarme., “ ” será exibido na tela.
Ativando e Desativando o Horário do Alarme
- No modo de espera, pressione o botão SLEEP / TIMER no controle remoto para mudar as congurações do alarme.
- Para ativar o alarme, pressione o botão SLEEP / TIMER duas vezes no controle remoto, e “ ” será exibido na tela.
- Para desativar o alarme, pressione o botão SLEEP / TIMER duas vezes no controle remoto, e “ ” será exibido na tela.
AJUSTE DA LUMINOSIDADE DO VISOR
Pressione o botão DIMMER (AJUSTE DE BRILHO) no controle remoto repetidamente para ajustar o brilho na tela LCD.
BUSCA MANUAL
1. Pressione no aparelho ou pressione FM no controle remoto para selecionar a função de FM.
2. Selecione a sua estação de rádio desejada através dos botões ou .
3. Ajuste o nível do som através do –ou +no aparelho ou VOL- ou VOL+ do controle remoto.
BUSCA AUTOMÁTICA
1. Pressione no aparelho ou pressione FM no controle remoto para selecionar a função de FM.
2. Mantenha pressionado um dos botões / durante cerca de 2 segundos para iniciar a procura no sentido pretendido. A
função de procura automática detecta as estações cujo sinal é forte.
Para melhorar a qualidade de recepção rádio:
FM: Estique a antena.
Observação:
As estações cujo sinal é fraco podem ser sintonizadas manualmente.
O som é automaticamente cortado durante a procura.
ESTAÇÕES ARMAZENADAS
Você poderá salvar até 20 estações de rádio na memória.
Armazengem manual:
1. No modo FM , Selecione uma estação manualmente ou automaticamente com ou .
2. Pressione o botão PROG uma vez, o número predenido dígitos "XX" piscará no visor por alguns segundos.
3. Pressione os botões ou para selecionar a posição de memória.
4. Pressione mais uma vez o botão PROG para armazenar a estação de rádio na memória selecionada.
5. Volte a executar as operações dos pontos 1 a 4 para memorizar outras estações.
Observação:
Quando você armazena ou já tiver armazenado estações, as estações anteriores serão automaticamente apagadas e substituidas
pelas novas.
Escutando estações memorizadas
1. Pressione uma vez para selecionar a estação da memória anterior ou pressione várias vezes para selecionar a estação
da memória seguinte.
2. Ajuste o nível do som através do –ou +no aparelho ou VOL- ou VOL+ do controle remoto.
Exibindo informações de RDS
O RDS (Sistema de Dados de Rádio) é um serviço que permite que estações de rádio exibam informações adicionais. Caso você
queira sintonizar uma estação com RDS, o nome da estação será exibido. Quando a sintonia automática for utilizada, as estações
com RDS serão sintonizadas primeiro.
1. Sintonize uma estação com RDS.
2. Pressione o botão INFO para navegar entre as seguintes informações (de acordo com a disponibilidade): Nome da estação, PTY,
INFORMAÇÃO DE HORA, Frequência, TEXTO DA RÁDIO.
Memorização automática:
No modo FM, mantenha PROG pressionado, o indicator “AUTO” será exibido na tela, o dispositivo irá buscar automaticamente e
salvará as 20 estações FM disponíveis.
1. Prima o botão para pôr o aparelho a funcionar.
2. Abra a tampa do CD pressionando .
3. Coloque o CD, com a etiqueta voltada para fora do compartimento do CD e
pressione para fechar a tampa do CD.
IMPORTANTE: A tampa do CD é uma tampa com mecanismo com motor. Não
empurre-a com a mão ou de outras formas visando abri-la ou fechá-la, pois isso
poderá causar danos ao motor.
4. Pressione no aparelho ou pressione CD no controle remoto para selecionar a função de disco. e “ ” será exibido na tela.
5. Depois de alguns segundos, leitura começa automaticamente.
Interromper completamente a reprodução Prima o botão / MENU
Colocar a reprodução em pausa Prima uma primeira vez o botão / PAIR
Retomar a reprodução Prima uma segunda vez o botão / PAIR
Efectuar um avanço ou um retorno rápido Mantenha premido o botão or
Proceder a um salto para a frente ou para trás Prima o botão or
Repetir 1 é exibido.
Repetir pasta piscará
Repetir todas é exibido.
ERRO DO DISCO
Observação: Caso o disco esteja sujo, danicado ou ilegível, ou tenha sido colocado de cabeça para baixo, o texto “ NO DISC ”será
exibido na tela. Caso isso ocorra, limpe o disco, e volte a colocá-lo de maneira correta ou tente outro disco.
REPRODUÇÃO PROGRAMADA
1. Coloque o CD, com a etiqueta voltada para fora do compartimento do CD e pressione para fechar a tampa do CD.
2. Pressione / MENU no controle remoto.
3. Pressione PROG no controle remoto. “P0X” se acenderá e “T0X” cará piscando.
4. Selecione a faixa desejada com / , e então pressione o botão PROG para armazenar a sua programação na memória.
5. Repita o passo 4 até ter terminado de programar as suas seleções.
6. Pressione o botão para inciar a reprodução.
7. Para cancelar a programação atual, pressione o botão / MENU duas vezes no controle remoto.
CD/Mp3 até 20 programações.
OPERAÇÃO USB
1. Prima o botão para pôr o aparelho a funcionar.
2. Conecte um pendrive USB com arquivos MP3 para a porta USB.
3. Pressione no aparelho ou pressione USB no controle remoto para selecionar a função
de USB. “USB” e “ “ será exibido na tela.
4. Depois de alguns segundos, leitura começa automaticamente.
5. Ajuste o nível do som através do –ou +no aparelho ou VOL- ou VOL+ do controle remoto.
Sincronizando o relógio
No modo de espera, mantenha o botão / MENU do controle remoto pressionado por alguns segundos, e então o aparelho entrará
no modo de SINCRONIZAÇÃO DO RELÓGIO.
Observação: Essa função não estará disponível caso não existam estações RDS que possam ser sintonizadas.
HX-3621 IB MUSE 001 REV0.indd 9 2014/7/31 15:39:09

PT - 5 PT - 6
CONECTANDO UM DISPOSITIVO EXTERNO
UTILIZAÇÃO DO BLUETOOTH
ESPECIFICAÇÕES
INSTRUÇÕES DE SEGURANÇA
RESOLUÇÃO DE PROBLEMAS
OBSERVAÇÃO:
- O número total de arquivos de MP3 em um disco ou dispositivo USB não poderá ser maior que 999.
- Um disco ou dispositivo USB não poderá conter mais do que 999 pastas.
- O tempo para carregar é de 20s ou mais, dependendo da quantidade de arquivos MP3 e pastas existentes no disco ou dispositivo
USB.
- A porta USB não deve ser utilizada para recarga ou comunicação com o computador.
- O fabricante não se responsabiliza pela usabilidade de um pendrive ou aparelho de MP3 devido a diferenças nas condições de
gravação, capacidade, compatibilidade de interface, etc.
* Cabo de ENTRADA AUX de 3.5mm
Conecte a sua fonte de áudio (ex.: tocador de mp3) no
conector AUX do seu aparelho com o cabo de ENTRADA
AUX de 3,5mm fornecido.
O nome Bluetooth® e logotipos são marcas registradas de propriedade da Bluetooth SIG, Inc. e quaisquer usos destas marcas pela
New One S.A.S estão licenciados. Outras marcas e nomes registrados pertencem aos seus respectivos proprietários.
Essa caixa de som Bluetooth M-58 BT tem suporte à função de áudio Bluetooth. Você poderá tocar um arquivo de áudio em sua
fonte de som com bluetooth (por exemplo, um telefone móvel) pela M-58 BT.
1. Pressione no aparelho ou pressione AUX no controle remoto para selecionar a função de BT(Bluetooth). “NO BT” (SEM BT)
será exibido na tela, caso o aparelho não esteja emparelhado com outro aparelho.
2. Mantenha / PAIR pressionado até que “PAIR” seja exibido.
3. Ligue a função de Bluetooth da sua fonte de áudio Bluetooth (por exemplo, um telefone móvel). Selecione o item de busca de
aparelhos Bluetooth e entre nele. A sua fonte de áudio Bluetooth (por exemplo, um telefone móvel) buscará dispositivos Bluetooth
dentro da área de alcance (10 metros). Selecione esta caixa de som "M-58BT" na lista exibida e conrme a seleção. O indicador
de "BT"(Bluetooth) continuará a ser exibido quando o pareamento for bem sucedido.
OBSERVAÇÃO:
- Digite 0000 como senha, caso solicitado, e conrme.
- Caso você já tenha feito a conexão anteriormente, uma lista de dispositivos será exibida. Selecione “M-58BT” e conrme.
4. Durante a reprodução, pressione o botão / PAIR para pausar a reprodução, e pressione novamente para continuar.
5. Durante a reprodução, pressione ou para pular as faixas.
6. Desligue a função de Bluetooth da sua fonte de áudio Bluetooth para desconectar..
RECONECTANDO AO DISPOSITIVO DE FONTE DE ÁUDIO BLUETOOTH
Caso a sua fonte de áudio Bluetooth já tenha sido pareado anteriormente com o M-58 BT mas tenha sido acidentalmente
desconectado, matenha o botão / PAIR pressionado para realizar a conexão novamente.
A NEW ONE S.A.S aqui declara que este produto MUSE M-58 BT cumpre os requisitos essenciais e outras disposições relevantes
da Norma 1999/5/CE. A declaração de conformidade pode ser consultada em
http://www.muse-europe.com/conformity/M-58BT.pdf
Alimentação: AC 220-240V 50/60Hz, 25W
Rádio: FM 87.5-108MHz
ATENÇÃO: Para reduzir o risco de choque eléctrico, não desmonte o aparelho. O aparelho não contém
qualquer peça passível de ser reparada pelo utilizador. Cone todas as operações de manutenção a um técnico
qualicado.
O símbolo do relâmpago com uma seta e situado no interior de um triângulo destina-se a alertar o utilizador para a presença
de uma “tensão perigosa” no aparelho.
O ponto de exclamação no interior de um triângulo destina-se a alertar o utilizador para a presença de instruções importantes
no manual que acompanha o aparelho.
Sintoma Causa Solução
Não liga Cabo de energia não está conectado na
tomada.
Conecte o cabo de energia na tomada
corretamente.
Sem som
Volume no mínimo. Ajuste o volume.
O dispositivo conectado não está no modo de
reprodução.
Reproduza a música no dispositivo
conectado.
A saída de som do dispositivo conectado está
baixa. Ajuste o volume do dispositivo conectado.
Distorção do som
Nível de volume está muito alto. Reduza o volume através do botão VOL-.
Nível de volume do dispositivo conectado está
muito alto. Reduza o volume do dispositivo conectado.
Falha na recepção do
Bluetooth Não está no modo Bluetooth. Tente conectá-lo novamente.
* Cabo estéreo RCA de áudio
Conecte a origem de som da sua TV (Ex.: aparelho de
DVD) nos conectores AUX do seu aparelho, com o cabo
estéreo de áudio RCA fornecido.
1. Prima o botão para pôr o aparelho a funcionar.
2. Pressione no aparelho ou pressione AUX no controle remoto para selecionar a função de AUX. O símbolo do modo auxiliar
“AUX” será exibido. Utilize o seu dispositivo de áudio externo. O som sairá automaticamente na caixa de som do seu dispositivo.
3. Ajuste o nível do som através do –ou +no aparelho ou VOL- ou VOL+ do controle remoto.
4. Desligar o dispositivo externo da entrada auxiliar para parar a leitura.
Caso pretenda descartar-se deste aparelho, proceda à sua reciclagem num centro de recolha para electrodomésticos.
Procure obter informações sobre o centro de reciclagem mais próximo. Informe-se junto das autoridades locais ou
do seu revendedor local para a obtenção de pormenores adicionais (Directiva sobre os Resíduos dos Equipamentos
Eléctricos e Electrónicos).
ATENÇÃO
- Nunca carregue pilhas não recarregáveis. Não aqueça as pilhas e não as desmonte.
- Não deite as pilhas no fogo!
- Não exponha as pilhas a calor excessivo, como raios do sol, fogo ou outras fontes de calor semelhantes.
- Certique-se de que garante uma ventilação correcta do aparelho e que não tapa os orifícios de ventilação com objectos como
jornais, toalhas, cortinas, etc.
- Não coloque qualquer fonte de calor, como uma vela acesa, sobre ou na proximidade do aparelho.
- Utilize este aparelho num clima temperado.
- Não exponha o aparelho a salpicos ou a humidade.
- Certique-se de que respeita uma distância mínima de 5 cm à volta do aparelho de modo a permitir uma ventilação suciente.
- Não coloque objectos que contenham líquido, como uma jarra, sobre ou na proximidade do aparelho.
- A placa de características situa-se na parte de trás deste aparelho.
- A cha de alimentação de rede permite desligar o aparelho e deve car facilmente acessível. Para cortar a alimentação do
aparelho, desligue de vez a cha de alimentação de rede da tomada de rede. A cha de alimentação de rede não pode estar
tapada e deve ser facilmente acessível durante a utilização.
- Sob o efeito de fenómenos electrostáticos e/ou eléctricos transitórios, o produto pode apresentar anomalias e pode acabar por ser
necessário proceder-se a uma reinicialização.
NEW ONE S.A.S
10, Rue de la Mission, 25480 Ecole Valentin, France
HX-3621 IB MUSE 001 REV0.indd 10 2014/7/31 15:39:09

DE - 1 DE - 2
BESCHREIBUNG DES GERÄTES
FERNBEDIENUNG
1. BEREITSCHAFT / EINSCHALTEN
2. : TASTE SOURCE (FM-, DISC-, USB-, AUX- ODER BT-MODUS
AUSWÄHLEN)
3. TASTE ÖFFNEN DES DISC-FACHS
4. TASTE / :ÜBERSPRINGEN / SUCHE / FREQUENZ
5. TASTE / PAIR
6. TASTE VOL- / VOL+
7. LCD-ANZEIGE
8. DISK-FACH
9. SENSOR DER FERNBEDIENUNG
10. LAUTSPRECHER
11. WANDMONTAGEPUNKTE
12. USB-PORT
13. UKW-DRAHTANTENNE
14. AUX-ANSCHLUSS (R L)
15. AC NETZKABELFACH
1. BEREITSCHAFT / EINSCHALTEN
2. TASTE SOURCE (FM-, DISC-, USB-, AUX- ODER BT-MODUS
AUSWÄHLEN)
3. TASTE INFO
4. TASTE INTRO
5. TASTE / MENU
6. / : NAVIGATION OBEN / UNTEN
7. ZIFFERNBLOCK (0 - 9)
8. TASTE DIMMER
9. TASTE ÖFFNEN DES DISC-FACHS
10. TASTE SHUFFLE
11. TASTE REPEAT
12. TASTE : STUMMSCHALTUNG
13. TASTE / PAIR
14. / :ÜBERSPRINGEN / SUCHE / FREQUENZ
15. TASTE VOL- / VOL+
16. TASTE EQ
17. TASTE BASS
18. TASTE SLEEP / TIMER
19. TASTE CLOCK
20. TASTE PROG
ZUBEHÖR
STROMVERSORGUNG
AUDIO-BEDIENELEMENTE
Die Fernbedienung wird über die mitgelieferte Lithium-Batterie (1 Batterie, Typ CR 2025) betrieben. Um die
Fernbedienung einzuschalten, entfernen Sie den Isolierungsstreifen auf der Rückseite des Gerätes.
Werfen Sie leere Batterien nicht in den Hausmüll, sondern geben Sie sie bei einer Sammelstelle oder bei Ihrem Händler
ab.
DIE BATTERIE DER FERNBEDIENUNG ERSETZEN
1. Drücken Sie den Knopf nach rechts.
2. Ziehen Sie das Batteriefach heraus.
3. Legen Sie eine Batterie vom Typ “CR2025” derart ein, dass ihre positive
Seite (+) nach oben zeigt.
4. Setzen Sie den Batteriefachdeckel wieder ein.
1. Netzkabel x 1
2. Fernbedienung x 1
3. 3,5-mm-AUX-Kabel, x 1
4. Cinch-Audiokabel x 1
Schließen Sie das Netzkabel an eine AC 220-240V 50/60Hz.
Schließen Sie das Netzkabel in eine Standardsteckdose an.
HINWEIS:
Aus Energiespargründen aktiviert das Gerät automatisch den Standby-Modus, wenn das Ende der Wiedergabe erreicht oder eine
sehr geringe Lautstärke eingestellt ist und 2 Stunden lang keine Eingabe am Gerät erfolgt.
Wenn Sie das Gerät an das Stromnetz anschließen, geht es in den Bereitschaftsmodus. ”-- --:-- --“ wird angezeigt.
1. Drücken Sie auf die Taste , um das Gerät einzuschalten. ”HELLO” erscheint in der Anzeige
2. Betätigen Sie die -Taste wiederholt, um das gewünscht Wiedergabesignal: FM—DISC—USB—AUX—BT—FM.
3. Betätigen Sie die Taste , um das Gerät wieder in den Bereitschaftsmodus zu schalten.
HINWEIS: Ziehen Sie den Netzstecker aus der Steckdose, wenn Sie das Gerät vollständig ausschalten möchten.
LAUTSTÄRKEREGELUNG
Drehen Sie VOL-/ VOL+ Steuerung wird die Lautstärke auf komfortablem Niveau. Die Lautstärke wird dann für ein paar Sekunden
angezeigt.
STUMMSCHALTEN ( )
Um den Ton aus den Lautsprechern vorübergehend wegzuschalten, auf die Taste drücken. Drücken Sie noch einmal auf die
Taste , um die Funktion Stummschalten zu deaktivieren und den Ton aus den Lautsprechern wieder herzustellen.
EQ (Equalizeri)
Drücken Sie wiederholt auf die Taste EQ der Fernbedienung, um einen Equalizermodus auszuwählen: „POP“, „CLASSIC“ (Klassik),
„JAZZ“, oder „ROCK“ . Die Auswahl wird für einige Sekunden angezeigt.
BASS
Betätigen Sie BASS-Taste auf der Fernbedienung mehrmals, um die Funktion ein- bzw. auszuschalten.
INTRO (Intro-Wiedergabe, CD & MP3)
Betätigen Sie die INTRO-Taste während der Wiedergabe, um jeweils die ersten 10 Sekunden jedes Titels abzuspielen. Betätigen
Sie die INTRO-Taste erneut, um diese Funktion wieder zu deaktvieren.
CD/MP3/USB-MIKROSYSTEM MIT BLUETOOTH
DE
HINWEISE:
- Versuchen Sie nicht, nicht auadbare Batterien aufzuladen. Erhitzen Sie Batterien nicht, demontieren Sie sie nicht.
- Um ein Ausießen der Batterien zu vermeiden, wenn Sie das Gerät während längerer Zeit nicht verwenden, nehmen Sie die
Batterien aus dem Gerät.
- Wenn Sie die Fernbedienung während längerer Zeit nicht verwenden, entfernen Sie ihre Batterie, um Schäden durch Ausießen
der Batterie zu vermeiden.
ACHTUNG: Wenn die Batterie nicht richtig eingelegt wird, besteht die Gefahr, dass die Batterie explodiert. Ersetzen Sie eine leere
Batterie nur mit einer identischen oder gleichwertigen Batterie.
EINSTELLEN DER UHRZEIT
1. Halten Sie im Bereitschaftsmodus die CLOCK-Taste solange gedrückt, bis die Stundenanzeige blinkt.
2. Mit oder stellen Sie die Stunden ein, Drücken Sie CLOCK. zur Bestätigung der Stunden, die Minuten blinken.
3. Drücken Sie auf / , um die Minuten einzustellen. Drücken Sie erneut auf die CLOCK-Taste, um die Einstellung abzuspeichern
4. Sie können die Uhrzeit jederzeit überprüfen, indem Sie die CLOCK-Taste betätigen.
HX-3621 IB MUSE 001 REV0.indd 11 2014/7/31 15:39:10

DE - 3 DE - 4
SCHLUMMERFUNKTION (AUTOMATISCHES AUSSCHALTEN)
ALARM-EINSTELLUNG
RADIO HÖREN
Uhrzeitsynchronisation
Wenn das Gerät sich im Bereitschaftsbetrieb bendet, können Sie die / MENU -Taste auf der Fernbedienung für ein paar
Sekunden gedrückt halten, um die Uhrzeitsynchronisation zu aktivieren.
Hinweis: Diese Funktion ist nicht verfügbar, wenn keine RDS-Sender empfangen werden können.
Diese Funktion erlaubt das Einstellen einer Dauer vor dem automatischen Ausschalten des Geräts. Sie können eine Dauer (in
Minuten) vor dem automatischen Ausschalten des Geräts auswählen.
1. Drücken Sie mehrmals die SLEEP / TIMER Taste der Fernbedienung, um die Schlafzeit einzustellen: 90-60-30-15-00.
HINWEISE:
- Diese Funktion kann nur eingestellt werden, während das Gerät in Betrieb ist.
- Die Einschlaffunktion wird deaktiviert, wenn "00" gewählt .
2. Drücken Sie SLEEP / TIMER, um die verbleibende Schlafzeit zu sehen.
3. Wenn Sie das Gerät ausschalten, bevor sich das Gerät von selbst ausschaltet, betätigen Sie die Taste .
1. Halten Sie die SLEEP / TIMER-Taste(Fernbedienung) im Bereitschaftsmodus gedrückt, die Stunden blinken.
2. Mit oder (Fernbedienung) stellen Sie die Stunden ein. Drücken Sie SLEEP / TIMER zur Bestätigung der Stunden, die
Minuten blinken.
3. Mit oder (Fernbedienung) stellen Sie die Minuten ein. Drücken Sie SLEEP / TIMER zur Bestätigung der Minuten.
4. Benutzen Sie die Tasten und , um das Alarmsignal zu wählen: BUZZER / RADIO / USB / DISC..
5. Betätigen Sie die SLEEP / TIMER-Taste zur Bestätigung. Die Alarmlautstärke erscheint in Ziffern auf dem Bildschirm. Benutzen
Sie die Tasten und , um die Lautstärke einzustellen.
6. Betätigen Sie die SLEEP / TIMER-Taste erneut, um die Alarmlautstärke zu bestätigen und die Alarmeinstellung abzuschließen.
" " erscheint in der Anzeige.
Aktivieren und Deaktivieren Sie des Weckalarms
- Betätigen Sie im Bereitschaftsmodus die SLEEP / TIMER-Taste auf der Fernbedienung, um die Weckzeit zu überprüfen.
- Um den Weckalarm zu aktivieren, betätigen Sie die SLEEP / TIMER-Taste auf der Fernbedienung zweimal. " " erscheint in
der Anzeige.
- Wenn Sie den Weckalarm wieder deaktivieren wollen, betätigen Sie die SLEEP / TIMER-Taste auf der Fernbedienung zweimal
und " " verschwindet von der Anzeige.
Einstellen der Leuchtstärke des Displays
Betätigen Sie die DIMMER-Taste auf der Fernbedienung wiederholt, um die Helligkeit der Hintergrundbeleuchtung einzustellen.
MANUELLE SUCHE
1. Betätigen Sie die Taste am Gerät oder betätigen Sie FM auf der Fernbedienung zur Auswahl der FM RADIO -Funktion.
2. Stellen Sie mit den Tasten oder einen Radiosender ein
3. Stellen Sie die Lautstärke mithilfe der Tasten -oder + am Gerät bzw. VOL- oder VOL+ auf der Fernbedienung ein.
AUTOMATISCHE SUCHE
1. Betätigen Sie die Taste am Gerät oder betätigen Sie FM auf der Fernbedienung zur Auswahl der FM RADIO -Funktion.
2. Halten Sie die Tasten / etwa 2 Sekunden gedrückt, um die Suche in eine der Richtungen zu starten. Die automatische
Suchfunktion erkennt Sender mit starkem Signal. Sender mit schwachem Signal können manuell eingestellt.
Zur Verbesserung der Radioempfangsleistung:
UKW: Ziehen Sie den UKW-Antennendraht vollständig aus.
Hinweis:
Sender mit schwachem Signal können manuell eingestellt.
Während der Sendersuche wird der Ton automatisch abgeschaltet.
Gespeicherte Radiosender
Sie können bis zu 20 UKW-Sender speichern.
Manuell speichern:
1. Wählen Sie im UKW-Modus einen Sender manuell oder automatisch mithilfe von oder .
2. Drücken Sie Taste einmal PROG, die Vorwahlnummer Ziffern "XX" wird auf dem Display für einige Sekunden blinken.
3. Benutzen Sie die Tasten / , um einen Senderspeicher zu wählen.
4. Betätigen Sie die PROG erneut, um den Sender unter dem ausgewählten Senderspeicher abzulegen.
5. Wiederholen Sie die Schritte 1 bis 4 zum Speichern weiterer Sender.
Automatisch speichern:
Halten Sie die Taste PROG im UKW-Modus gedrückt und "AUTO" erscheint in der Anzeige. Das Gerät sucht und speichert dann
20 verfügbare 20 UKW-Sender.
CD-BETRIEB
HINWEIS:
Falls auf einem Speicherplatz bereits ein Sender gespeichert ist, wird der vorhandene Sender gelöscht und automatisch durch den
neuen ersetzt.
Aufrufen der gespeicherter Sender
1. Betätigen Sie die Taste " ", um die vorherigen gespeicherten Sender zu wählen bzw. betätigen Sie die Taste " " wiederholt,
um den nächsten gespeicherten Sender zu wählen.
2. Stellen Sie die Lautstärke mithilfe der Tasten -oder + am Gerät bzw. VOL- oder VOL+ auf der Fernbedienung ein.
RDS (Radio Data System)
RDS (Radio Data System) ist ein Dienst, der es UKW-Sendern ermöglicht zusätzliche Informationen anzuzeigen. Wenn Sie einen
RDS-Sender einstellen, wird der Sendername angezeigt. Wenn eine automatische Suche gestartet wird, werden RDS-Sender
vorrangig gespeichert.
1. Stellen Sie einen RDS-Sender ein.
2. Betätigen Sie die INFO-Taste wiederholt, um durch die folgenden Informationen (falls vorhanden) zu blättern: Sendername, PTY,
Uhrzeit-INFO, Frequenz, Radiotext.
1. Drücken Sie auf die Taste , um das Gerät einzuschalten.
2. Öffnen Sie das CD-Ladefach, indem Sie betätigen.
3. Legen Sie eine CD mit der bedruckten Seite nach außen in das CD-Ladefach und
betätigen Sie die Taste , um das CD-Ladefach zu schließen.
WICHTIG: Das CD-Ladefach verfügt über eine motorisierte Schließvorrichtung.
Versuchen Sie nicht das Fach mit der Hand oder anderen Mitteln zu öffnen bzw. zu
schließen. Dies kann zur Beschädigung des Öffnungsmechanismus führen.
4. Betätigen Sie die Taste am Gerät oder betätigen Sie CD auf der Fernbedienung zur Auswahl der DISC-Funktion. erscheint
in der Anzeige.
5. Nach wenigen Sekunden, die Wiedergabe beginnt automatisch.
- Wiedergabe vollständig stoppen Drücken Sie auf die Taste / MENU
- Vorübergehenden Unterbrechen der Wiedergabe Drücken Sie auf die Taste / PAIR
- Wiederaufnehmen der Wiedergabe Drücken Sie ein zweites Mal auf die / PAIR Taste
- Schnellen Vorwärts- oder Rückwärtslaufen Halten Sie die Taste oder
- Springen nach vorn oder zurück Drücken Sie auf die Taste oder
Einzelwiederholung angezeigt.
Verzeichnis wiederholen blinkt
Alles wiederholen angezeigt.
DISC-FEHLER
Hinweis: Wenn die Disc verschmutzt, beschädigt oder nicht mehr lesbar ist oder wenn die Disc falsch herum eingelegt wird, erscheint
" NO DISC" in der Anzeige. Wenn dies geschieht, reinigen Sie die Disc, legen Sie die Disc richtig herum ein oder versuchen Sie es
mit einer anderen Disc.
PROGRAMMIERTE WIEDERGABE
1. Legen Sie eine CD mit der bedruckten Seite nach außen in das CD-Ladefach und betätigen Sie die Taste , um das CD-
Ladefach zu schließen.
2. Betätigen Sie / MENU auf der Fernbedienung.
3. Betätigen Sie PROG auf der Fernbedienung. "P0x" leuchtet auf und "T0X" blinkt.
4. Wählen Sie mit den Tasten / den gewünschten Track und drücken Sie „PROG“, um den Track zu speichern.
5. Wiederholen Sie Schritt 4, bis Sie alle gewünschten Tracks gespeichert haben.
6. Drücken Sie für die Wiedergabe.
7. Um das aktuelle Programm abzubrechen, betätigen Sie die Taste / MENU auf der Fernbedienung zweimal.
CD/MP3 -bis zu 20 programmierte Tracks.
WIEDERGABE EINER USB
1. Drücken Sie auf die Taste , um das Gerät einzuschalten.
2. Schließen Sie einen USB-Datenträger mit MP3-Inhalten am USB-Anschluss an.
3. Betätigen Sie die Taste am Gerät oder betätigen Sie USB auf der Fernbedienung zur
Auswahl der USB-Funktion.“USB”und “ “ erscheint in der Anzeige.
4. Nach wenigen Sekunden, die Wiedergabe beginnt automatisch.
5. Stellen Sie die Lautstärke mithilfe der Tasten -oder + am Gerät bzw. VOL- oder VOL+ auf
der Fernbedienung ein.
HX-3621 IB MUSE 001 REV0.indd 12 2014/7/31 15:39:11

DE - 5 DE - 6
ANSCHLUSS AN EXTERNE GERÄTE
BLUETOOTH-BETRIEB
TECHNISCHE EIGENSCHAFTEN
SICHERHEITSANWEISUNGEN
HINWEISE ZUR FEHLERBEHEBUNG
HINWEIS:
- Die Gesamtzahl der MP3-Dateien auf der Disc oder USB-Gerät darf 999 nicht überschreiten.
- Die DVD oder das USB-Gerät darf nicht mehr als 999 Verzeichnisse beinhalten.
- Die Einlesezeit beträgt etwa 20 Sekunden oder mehr, abhängig von der Anzahl der MP3-Dateien und Ordner auf der Disc oder
dem USB-Gerät.
- Der USB-Anschluss ist nicht geeignet zum Auaden und zur Kommunikation mit einem Computer.
- Der Hersteller garantiert keine Kompatibilität mit USB-Medien oder MP3-Playern aufgrund der unterschiedlichen Aufnahmebedingungen,
Kapazität, Schnittstelle etc.
* 3,5-mm-AUX-Kabel,
Schließen Sie Ihre externes Audiogerät (z. B. ein MP3-
Player) an den AUX-Anschluss des Geräts mithilfe des
mitgelieferten 3,5-mm-AUX-Kabels an.
Der Bluetooth®-Markenname und damit verbundene Logos sind Eigentum der Firma Bluetooth SIG, Inc. Jegliche Benutzung dieser
Marken durch die Firma New One S.A.S stehen unter Lizenz. Alle anderen Produkt-und Markennamen sind Eigentum ihrer der
jeweiligen Besitzer.
Der Bluetooth-Lautsprecher M-58 BT unterstützt die Bluetooth-Audio-Funktion. Sie können Audiodateien auf Ihrem Bluetooth-
Audiogerät (z. B. ein Mobiltelefon) über den M-58 BT abspielen.
1. Betätigen Sie die Taste am Gerät oder betätigen Sie AUX auf der Fernbedienung zur Auswahl der BT(Bluetooth)-Funktion.
"NO BT" erscheint in der Anzeige, wenn das Gerät nicht mit einem Bluetooth-Gerät gekoppelt ist.
2. Halten Sie die Taste / PAIR gedrückt, bis "PAIR" erscheint.
3. Schalten Sie die Bluetooth-Funktion Ihres Bluetooth Audiogeräts (z. B. Ihres Mobiltelefons) aus. Suchen Sie nach dem Bluetooth-
Gerät und tippen Sie darauf. Ihr Bluetooth Audiogerät (z. B. Ihres Mobiltelefon) beginnt dann nach anderen Bluetooth-Geräten
in Reichweite (10 Meter) zu suchen. Wählen Sie die Bluetooth-Lautsprecher "M-58BT" und bestätigen Sie Ihre Auswahl. Die
BT(Bluetooth)-LED leuchtet weiter, wenn die Verbindung erfolgreich aufgebaut wurde.
HINWEIS:
- Geben Sie bei Bedarf 0000 als Passwort ein und bestätigen Sie es.
- Wenn Sie die Bluetooth-Verbindung hergestellt ist, wird eine Liste der vorherigen Suchergebnisse angezeigt. Wählen Sie "M-58BT"
und bestätigen Sie Ihre Auswahl.
4. Betätigen Sie während der Wiedergabe die Taste / PAIR , um die Wiedergabe zu unterbrechen. Betätigen Sie die Taste erneut,
um mit der Wiedergabe fortzufahren.
5. Betätigen Sie während der Wiedergabe die Taste oder , um einen Titel zu überspringen.
6. Schalten Sie die Bluetooth-Funktion Ihres Bluetooth-Audiogeräts aus, um die Verbindung zu trennen.
ERNEUTER VERBINDUNGSAUFBAU MIT BLUETOOTH-AUDIOGERÄTEN
Wenn Ihr Bluetooth-Gerät bereits mit dem M-58 BT gekoppelt wurde, und die Verbindung aber versehentlich unterbrochen wurde,
halten Sie die Taste / PAIR gedrückt, um die Verbindung wieder herzustellen.
NEW ONE S.A.S erklärt hiermit, dass dieser MUSE M-58 BT den wesentlichen Anforderungen und anderen geltenden Vorgaben
der Richtlinie 1999/5/EC entspricht. Die Konformitätserklärung lässt sich unter
http://www.muse-europe.com/conformity/M-58BT.pdf herunterladen.
Netzstromversorgung: AC 220-240V 50/60Hz, 25W
Radio: FM 87.5-108MHz
ACHTUNG: Um Elektroschockgefahr zu vermeiden, dürfen Sie dieses Gerät nicht demontieren. Das Gerät
enthält keine Teile, die der Benutzer selbst reparieren kann. Vertrauen Sie die Instandhaltung des Geräts einem
Fachmann an.
Das in einem Pfeil endende Blitzsymbol innerhalb eines Dreiecks weist den Benutzer auf die Gegenwart einer „gefährlichen
Spannung“ im Gerät hin.
Das Ausrufezeichen im Inneren eines Dreiecks weist den Benutzer auf wichtige Anweisungen hin, die sich in dem das Gerät
begleitenden Handbuch benden.
ERSCHEINUNGSBILD URSACHE BEHEBUNG
Gerät kann nicht
eingeschaltet werden
Das Netzkabel ist nicht an einer Steckdose
angeschlossen.
Schließen Sie es ordnungsgemäß an eine
Steckdose an.
Kein Ton
Die Lautstärke ist auf das Minimum gestellt. Stellen Sie die Lautstärke auf das
gewünschte Niveau.
Der Wiedergabemodus ist am
angeschlossenen Gerät nicht aktiviert.
Starten Sie die Wiedergabe am
angeschlossenen Gerät.
Die Tonausgabe des angeschlossenen Geräts
ist schlecht.
Stellen Sie am angeschlossenen Gerät die
Lautstärke entsprechend ein.
Tonverzerrungen
Lautstärke zu hoch. Reduzieren Sie die Lautstärke mit der Taste
VOL-.
Lautstärke des angeschlossenen Geräts zu
hoch.
Reduzieren Sie am angeschlossenen Gerät
die Lautstärke.
Kein Bluetooth-Empfang Bluetooth-Modus nicht aktiviert. Versuchen Sie es erneut.
* Cinch-Audiokabel,
Schließen Sie Ihre externes Videogerät (z. B. ein DVD-
Player) an den AUX-Anschluss des Geräts mithilfe der
mitgelieferten Cinch-Kabel an.
1. Drücken Sie auf die Taste , um das Gerät einzuschalten.
2. Betätigen Sie die Taste am Gerät oder betätigen Sie AUX auf der Fernbedienung zur Auswahl der AUX-Funktion. Die
Aux-Symbol “ AUX ” erscheint in der Anzeige. Normalerweise wird der Ton bei der Verwendung eines externen Audiogeräts
automatisch über die Lautsprecher des Geräts wiedergegeben.
3. Stellen Sie die Lautstärke mithilfe der Tasten -oder + am Gerät bzw. VOL- oder VOL+ auf der Fernbedienung ein.
4. Wenn Sie die Wiedergabe beenden möchten, trennen Sie die Verbindung des externen Gerätes mit dem Aux-Eingang des
Players.
Wenn Sie dieses Gerät entsorgen möchten, denken Sie daran, es bei einer Sammelstelle für elektrische Haushaltsgeräte
zu entsorgen. Erkundigen Sie sich nach Ihrer nächstgelegenen Wertstoffsammelstelle. Für detaillierte Informationen
wenden Sie sich an die örtlichen Behörden oder an Ihren Händler. (Richtlinie über elektrische und elektronische
Abfallgeräte).
ACHTUNG
- Versuchen Sie nicht, nicht auadbare Batterien aufzuladen. Erhitzen Sie Batterien nicht, demontieren Sie sie nicht.
- Werfen Sie Batterien nicht ins Feuer!
- Batterien dürfen keiner übermäßigen Hitze ausgesetzt werden (wie zum Beispiel praller Sonne, Feuer oder anderen ähnlichen
Hitzequellen).
- Stellen Sie eine ausreichende Belüftung des Geräts sicher und behindern Sie die Belüftungsöffnungen nicht mit Gegenständen wie
z. B. Zeitungen, Tischdecken, Vorhängen, usw.
- Stellen Sie keine Wärmequelle wie eine angezündete Kerze auf oder in der Nähe des Geräts ab.
- Verwenden Sie dieses Gerät in klimatisch gemäßigter Umgebung.
- Setzen Sie das Gerät niemals Wasserspritzern oder Feuchtigkeit aus.
- Achten Sie auf einen Mindestabstand von 5 cm zu Ihrem Gerät, um eine ausreichende Belüftung zu gewährleisten.
- Stellen Sie kein mit Wasser gefülltes Gefäß, wie z. B. Vasen, in der Nähe des Geräts ab.
- Das Typenschild bendet sich auf der Rückseite des Geräts.
- Mit dem Netzstecker kann das Gerät vom Netz getrennt werden, er muss daher leicht zugänglich sein. Um das Gerät vollständig
vom Netz zu trennen, trennen Sie den Netzstecker komplett von der Netzsteckdose. Der Netzstecker darf nicht behindert werden
und muss während der Verwendung leicht zugänglich sein.
- Unter der Einwirkung von elektrostatischen und/oder elektrischen Phänomen kann das Produkt Fehlfunktionen aufweisen. Ein
Zurücksetzen auf die Werkseinstellungen kann sich als notwendig erweisen.
NEW ONE S.A.S
10, Rue de la Mission, 25480 Ecole Valentin, France
HX-3621 IB MUSE 001 REV0.indd 13 2014/7/31 15:39:11

ES - 1 ES - 2
DESCRIPCIÓN DEL APARATO
MANDO A DISTANCIA
1. BOTÓN DE MODO DE ESPERA/ENCENDIDO
2. : BOTÓN SOURCE (PARA SELECCIONAR EL MODO FM, DISC, USB,
AUX O BT)
3. BOTÓN (APERTURA DEL COMPARTIMENTO DE CD)
4. BOTONES / : SALTO / BÚSQUEDA/ SINTONIZACIÓN
5. BOTÓN / PAIR
6. BOTÓN VOL- / VOL+
7. DISPLAY LCD
8. COMPARTIMENTO DEL DISCO
9. SENSOR DE INFRARROJOS DEL MANDO A DISTANCIA
10. ALTAVOCES
11. ORIFICIOS PARA COLGAR EL SISTEMA DE LA PARED
12. PUERTO USB
13. ANTENA FM ALÁMBRICA
14. TOMA AUX (R L)
15. AC ENTRADA DE ALIMENTACIÓN DE RED
1. BOTÓN DE MODO DE ESPERA/ENCENDIDO
2. BOTÓN SOURCE (PARA SELECCIONAR EL MODO FM, DISC, USB, AUX
O BT)
3. BOTÓN INFO
4. BOTÓN INTRO
5. BOTÓN / MENU
6. / : NAVEGACIÓN HACIA ARRIBA/ABAJO.
7. BOTONES NUMÉRICOS (0-9)
8. BOTÓN DIMMER
9. BOTÓN (APERTURA DEL COMPARTIMENTO DE CD)
10. BOTÓN SHUFFLE
11. BOTÓN REPEAT
12. BOTÓN : SUPRESIÓN DEL SONIDO
13. BOTÓN / PAIR
14. BOTONES / : SALTO / BÚSQUEDA/ SINTONIZACIÓN
15. BOTÓN VOL- / VOL+
16. BOTÓN EQ
17. BOTÓN BASS
18. BOTÓN SLEEP / TIMER
19. BOTÓN CLOCK
20. BOTÓN PROG
ACCESORIOS
ALIMENTACIÓN
CONTROLES DE AUDIO
El mando a distancia funciona con una pila de litio “CR2025” (incluida). Para introducir la pila en el mando a distancia,
quitar el precinto aislante de la parta posterior de la unidad.
Antes de tirar las pilas, consulte a su proveedor: puede entregárselas para reciclarlas.
SUSTITUCIÓN DE LA PILA DEL MANDO A DISTANCIA
1. Presione el botón hacia la derecha.
2. Extraiga la pila del mando a distancia.
3. Inserte una pila del tipo "CR2025" con la cara positiva (+) hacia arriba.
4. Vuelva a colocar la tapa.
1. Cable de alimentación x 1
2. Mando a distancia x 1
3. Cable AUX IN de 3,5mm x 1
4. Cable de audio estéreo RCA x 1
Conecte el cable de alimentación a una fuente de suministro eléctrico AC 220-240V 50/60Hz.
Conecte el cable de alimentación AC a una toma de pared AC estándar.
Nota:
Con el objetivo de ahorrar energía, cuando la reproducción haya alcanzado el nal o el volumen se encuentre a un nivel muy bajo y
no se use ningún control en el dispositivo por un periodo de 2 horas, la unidad pasará al modo de espera automáticamente.
Cuando conecte la unidad a la toma de corriente, la unidad se encontrará en el modo DE ESPERA y . ”-- --:-- --“ se mostrará en el
display.
1. Pulse el botón para encender el aparato.” HELLO” aparecerá en el display.
2. Pulse el botón repetidamente para seleccionar la fuente de reproducción que desee: FM—DISC—USB—AUX—BT—FM.
3. Pulse el botón para volver al modo de espera.
NOTA: Desenchufe el aparato de la toma de corriente si quiere apagarlo del todo.
VOLUME
Nutilice los botones VOL-/VOL+ para ajustar el volumen al nivel que desee. El nivel de volumen se mostrará unos segundos.
SUPRESIÓN DEL SONIDO
Para suprimir momentáneamente el sonido de los altavoces, pulse el botón del mando a distancia. Vuelva a pulsar el botón
para desactivar esta función y restablecer el sonido de los altavoces.
EQ (ECUALIZADOR)
Pulse repetidamente el botón EQ del mando a distancia para seleccionar un modo de ecualizador: «POP», « CLASSIC» (clásico),
«JAZZ» o «ROCK».
BASS
Pulse el botón BASS del mando a distancia repetidamente para seleccionar OFF (Apagado) o ON (Encendido).
INTRO(Reproducción introductoria, CD & MP3)
Durante la reproducción, pulse el botón INTRO para reproducir los primeros 10 segundos de cada pista. Pulse INTRO de nuevo
para cancelar esta función.
MICRO SISTEMA DE CD/MP3/USB CON BLUETOOTH
ES
NOTAS:
- Nunca cargue pilas que no son recargables. No caliente las pilas ni las desmonte.
- Si no va a utilizar el aparato durante un largo periodo de tiempo, retire las pilas para evitar una pérdida de líquido de las mismas.
- Si no va a utilizar el mando a distancia durante un periodo de tiempo prolongado, retire las pilas para evitar que se produzcan
daños causados por la corrosión debida a una pérdida de líquido.
ATENCIÓN: Puede producirse una explosión si la pila no se ha introducido correctamente. Cámbiela únicamente por otra del mismo
tipo o uno equivalente.
PUESTA EN HORA DEL RELOJ
1. En modo de espera, mantenga pulsado el botón CLOCK en el mando a distancia hasta que la cifra de las horas parpadee.
2. Pulse / para ajustar la cifra de las horas y, a continuación, pulse CLOCK para conrmar la horas, los dígitos de los minutos
parpadearán.
3. Pulse / para ajustar la cifra de los minutos. Pulse nuevamente el botón CLOCK para guardar la hora jada.
4. Para revisar la hora en cualquier momento, pulse CLOCK una vez.
HX-3621 IB MUSE 001 REV0.indd 14 2014/7/31 15:39:12

ES - 3 ES - 4
FUNCIÓN DE APAGADO AUTOMÁTICO(SLEEP)
PROGRAMACIÓN DEL TEMPORIZADOR DE LA ALARMA
FUNCIONAMIENTO DE LA RADIO
CD OPERATION
Esta función le permite seleccionar el intervalo de tiempo que ha de transcurrir antes del apagado automático del aparato.
1. Pulse el botón SLEEP / TIMER repetidamente para seleccionar 90-60-30-15-00. Suelte la tecla SLEEP.
Notas:
- Este ajuste no podrá efectuarse si el aparato está encendido.
- La función de apagado automático se cancelará al seleccionar “00”.
2. Pulse el botón SLEEP / TIMER para comprobar el tiempo de sleep que queda.
3. Si desea apagar la unidad antes de que se alcance el tiempo de apagado automático (sleep) seleccionado, pulse el botón .
1. En el modo de suspensión, pulse y sostenga el botón SLEEP / TIMER en el mando a distancia , los dígitos de la hora parpadearán.
2. Pulse el botón o en el mando a distancia para ajustar las horas. Pulse el botón SLEEP / TIMER para conrmar la hora, los
dígitos de los minutos parpadearán. .
3. Pulse el botón o en el mando a distancia para ajustar los minutos. Pulse el botón SLEEP / TIMER para conrmar la hora
de despertador.
4. Pulse o para seleccionar la fuente de despertador: BUZZER (Zumbador) / FM / USB / DISC.
5. Pulse el botón SLEEP / TIMER para conrmar. Los dígitos del volumen de la alarma se mostrarán en el display, después pulse
o para ajustar el volumen.
6. Pulse el botón SLEEP / TIMER de nuevo para conrmar el ajuste de nivel de volumen de alarma y completar el proceso de jado
de alarma, “ ” aparecerá en el display.
Activación y desactivación del temporizador de la alarma
- En el modo de espera, pulse el botón SLEEP / TIMER del mando a distancia para revisar los ajustes de la alarma.
- Para activar la alarma, pulse dos veces el botón SLEEP / TIMER del mando a distancia, y “ ” aparecerá en el display.
- Para activar las alarmas, pulse dos veces el botón SLEEP / TIMER del mando a distancia, y “ ” desaparecerá del display.
Ajuste del nivel de intensidad de la luz de la pantalla
Pulse el botón DIMMER del mando a distancia repetidamente para cambiar el brillo de fondo de la pantalla.
BÚSQUEDA MANUAL
1. Pulse en la unidad o pulse el botón FM en el mando a distancia para seleccionar la función RADIO FM.
2. Seleccione la emisora de radio que desee pulsando o .
3. Ajuste el volumen pulsando –o +en la unidad o VOL- o VOL+ en el mando a distancia.
BÚSQUEDA AUTOMÁTICA
1. Pulse en la unidad o pulse el botón FM en el mando a distancia para seleccionar la función RADIO FM.
2. Mantenga pulsado el botón / durante unos 2 segundos para iniciar la búsqueda en el sentido que desee. La función de
búsqueda automática localizará las emisoras con señal fuerte.
Para mejorar la capacidad de recepción de la radio:
FM: Alargar la antena
Notas:
Las emisoras con señal débil se pueden sintonizar de forma manual.
El sonido se cortará automáticamente durante la búsqueda.
Emisoras presintonizadas
Podrá presintonizar hasta 20 emisoras FM.
Almacenamiento manual:
1. En el modo FM, seleccione una emisora manualmente o automáticamente con o .
2. Pulse la tecla PROG una vez, los dígitos de los números predenidos "XX" parpadea en la pantalla durante unos segundos.
3. Pulse el botón o para seleccionar un número de memorización.
4. Pulse el botón PROG de nuevo para memorizar la estación de radio en el número de memorización seleccionado.
5. Repita los pasos 1 a 4 para memorizar otras emisoras de radio.
Almacenamiento automático:
En el modo FM, mantenga pulsado PROG, el indicador “AUTO” aparecerá en el display, y la unidad buscará y guardará
automáticamente 20 emisoras de radio FM disponibles.
Nota:
Cuando guarde en un canal que ya ha sido presintonizado, la emisora anterior se eliminará automáticamente y será sustituida por
la nueva emisora.
Para escuchar emisoras presintonizadas
1. Pulse para seleccionar la emisora presintonizada anterior o repetidamente para seleccionar la siguiente emisora
presintonizada.
2. Ajuste el volumen pulsando –o +en la unidad o VOL- o VOL+ en el mando a distancia.
Visualización de información RDS
RDS (Sistema de Datos de Radio) es un servicio que permite que las emisoras FM muestren información adicional. Si sintoniza
una emisora con RDS, el nombre de la emisora se mostrará. Cuando se use la programación automática, las emisoras con RDS
se programarán primero.
1. Sintonice una emisora RDS.
2. Pulse el botón INFO repetidamente para desplazarse por las siguiente información (si la hubiera): Nombre de la emisora, PTY,
Información del reloj, Frecuencia, Texto de radio.
1. Pulse el botón para encender el aparato.
2. Abra la tapa del alojamiento para CD pulsando .
3. Coloque el CD con la impresión mirando hacia fuera en el compartimento y pulse
para cerrar la tapa del alojamiento para CDs.
IMPORTANTE: La tapa del alojamiento para CDs es una tapa motorizada. No la
empuje con la mano ni use ningún otr medio para abrirla o cerrarla. De hacerlo podría
dañar el mecanismo de la tapa.
4. Pulse en la unidad o pulse el botón CD en el mando a distancia para seleccionar la función DISC. aparecerá en el display.
5. Tras unos segundos, la reproducción comenzará automáticamente.
Detención permanente de la reproducción Pulse el botón / MENU
Interrumpir momentáneamente la reproducción Pulse una vez el botó / PAIR
Retomar la reproducción Pulse de nuevo el botón / PAIR
Realizar un avance o un retroceso rápido. Mantenga pulsado el botón /
Realizar un salto hacia delante o hacia atrás Pulse el botón /
repetición de la pista actual, visualizado.
Repetir carpeta, parpadeando
Repetir todo visualizado.
ERROR DE DISCO
Nota: Si el disco está sucio, dañado o es ilegible, o si el disco se puso al revés, “ NO DISC ”se verán en la pantalla. Si esto ocurre,
limpie el disco, insértelo correctamente o intente con otro disco.
MODOS DE REPRODUCCIÓN
1. Coloque el CD con la impresión mirando hacia fuera en el compartimento y pulse para cerrar la tapa del alojamiento para CDs.
2. Pulse el botón / MENU en el mando a distancia.
3. Pulse el botón PROG en el mando a distancia. “P0X” se iluminará y “T0X” parpadeará.
4. Seleccione la pista que desee pulsando / , después pulse el botón PROG para guardar su programa en la memoria.
5. Repita el paso 4 hasta que haya nalizado programando sus selecciones.
6. Pulse el botón para iniciar la reproducción..
7. Para cancelar el programa en el que se encuentre, luego pulse dos veces el botón / MENU del mando a distancia.
CD/MP3 hasta 20 programas.
PROGRAMACIÓN DE ARCHIVOS DE UN DISPOSITIVO USB
1. Pulse el botón para encender el aparato.
2. Conecte un lápiz USB con contenido MP3 al puerto USB.
3. Pulse en la unidad o pulse el botón USB en el mando a distancia para seleccionar la
función USB. “USB” y “ “ aparecerá en el display.
4. Tras unos segundos, la reproducción comenzará automáticamente.
5. Ajuste el volumen pulsando –o +en la unidad o VOL- o VOL+ en el mando a distancia.
Sincronización del reloj
En el modo de espera, mantenga pulsado el botón / MENU del mando a distancia durante unos segundos, entonces la unidad
entrará en el modo de sincronización del reloj (CLOCK SYNC).
Nota: Esta función no estará disponible si no se recibe ninguna emisora con RDS.
HX-3621 IB MUSE 001 REV0.indd 15 2014/7/31 15:39:13

CONEXIÓN DE DISPOSITIVOS EXTERNOS
FUNCIONAMIENTO DEL BLUETOOTH
FICHA TÉCNICA
INSTRUCCIONES DE SEGURIDAD
GUÍA DE RESOLUCIÓN DE PROBLEMAS
NOTA:
- El número total de archivos MP3 del disco o la unidad USB no podrá exceder los 999.
- El disco o el dispositivo USB no podrán contener más de 999 directorios.
- El tiempo de carga es de 20 segundos o más dependiendo de la cantidad de archivos MP3 y carpetas en el disco o dispositivo
USB.
- El puerto USB no está diseñado para una función de recarga y comunicación con un ordenador.
- El fabricante no se hace responsable de la compatibilidad de las pistas del dispositivo USB o del reproductor MP3 como
consecuencia de las condiciones de grabación, de la capacidad, etc.
* Cable AUX IN de 3,5mm
Conecte su fuente de audio (por ejemplo, un reproductor
mp3) a las tomas AUX de la unidad con el cable AUX IN de
3,5mm que se incluye.
Los logos y nombres Bluetooth® son marcas registradas que pertenecen a Bluetooth SIG, Inc. y cualquier uso de dichas marcas por
parte de New One S.A.S tiene sus respectivas licencias. Otras marcas comerciales y registradas son propiedad de sus respectivos
propietarios..
Este altavoz con Bluetooth M-58 BT acepta la función de audio Bluetooth. Podrá reproducir el archivo de audio en su dispositivo de
fuente de audio Bluetooth (por ejemplo, un teléfono móvil) mediante el M-58 BT.
1. Pulse en la unidad o pulse el botón AUX en el mando a distancia para seleccionar la función BT (Bluetooth). “NO BT” se
mostrará en el display si la unidad no se encuentra emparejada a ningún dispositivo Bluetooth.
2. Mantenga pulsado el botón / PAIR hasta que aparezca “PAIR”.
3. Encienda la función de Bluetooth de su dispositivo de fuente de audio Bluetooth (por ejemplo, un teléfono móvil). Seleccione
el elemento de búsqueda del dispositivo Bluetooth y entre en él. Su dispositivo de fuente de audio Bluetooth (por ejemplo, un
teléfono móvil) empezará a buscar dispositivos Bluetooth en un radio de 10 metros. Seleccione este altavoz con Bluetooth
“M-58BT” y confírmelo, El indicador Bluetooth"BT" permanecerá encendido cuando el emparejamiento se haya realizado con
éxito.
Nota:
- Si fuera necesario, introduzca 0000 como contraseña y conrme.
- Si hubiera realizado la conexión de Bluetooth anteriormente, se mostrará una lista con los resultados de búsqueda encontrados.
Seleccione “M-58BT” y conrme.
4. Durante la reproducción, pulse el botón / PAIR para dejar la reproducción en pausa, pulse..
5. Durante la reproducción, pulse o para saltar de una pista a otra.
6. Apague la función de Bluetooth de su dispositivo de fuente de audio Bluetooth para realizar al desconexión.
RECONEXIÓN AL DISPOSITIVO DE FUENTE DE AUDIO BLUETOOTH
Si su dispositivo de fuente de audio Bluetooth ya ha sido emparejado con M-58 BT pero se ha desconectado accidentalmente,
mantenga pulsado el botón / PAIR para la reconexión.
Por la presente, NEW ONE S.A.S declara que el MUSE M-58 BT cumple con los requerimientos esenciales y otras provisiones
aplicables de la Directiva 1999/5/EC. La declaración de conformidad podrá consultarse en
http://www.muse-europe.com/conformity/M-58BT.pdf
Alimentación: AC 220-240V 50/60Hz, 25W
Radio: FM 87.5-108MHz
ATENCIÓN: Para reducir el riesgo de descarga eléctrica, no desmonte el aparato. En el interior de este aparato
no existe ninguna pieza que pueda ser reparada por el usuario. Para cualquier operación de mantenimiento y
reparación, póngase en contacto con personal técnico cualicado.
El símbolo del rayo con una echa dentro de un triángulo equilátero advierte al usuario de la presencia de voltaje peligroso
en el interior del aparato.
El signo de exclamación dentro de un triángulo equilátero advierte al usuario de la presencia de importantes instrucciones
de funcionamiento y mantenimiento en el manual que acompaña al producto.
Síntoma Causa Solución
No enciende El enchufe no ha sido insertado en la toma
de pared. Enchúfelo correctamente a la pared.
Sin sonido
Volumen al mínimo. Ajuste el volumen al nivel deseado.
El dispositivo conectado no se encuentra en el
modo reproducción.
Reproduzca la música en el dispositivo
conectado.
El audio del dispositivo conectado es débil. Ajuste el volumen del dispositivo conectado.
Distorsión de audio
Volumen demasiado alto. Reduzca el volumen pulsando VOL-.
Volumen del dispositivo conectado demasiado
alto.
Reduzca el volumen del dispositivo
conectado.
Fallo en la recepción de
Bluetooth No se encuentra en el modo Bluetooth. Intente de nuevo la conexión.
* Cable de audio estéreo RCA
Conecte su fuente de audio del TV (por ejemplo, un
reproductor de DVD) a las tomas AUX de la unidad con el
cable de audio estéreo RCA que se incluye.
1. Pulse el botón para encender el aparato.
2. Pulse en la unidad o pulse el botón AUX en el mando a distancia para seleccionar la función AUX. El icono de auxiliar“ AUX ”
se mostrará. Normalmente, al usar su dispositivo externo de audio, el audio se oirá automáticamente por los altavoces de su
dispositivo.
3. Ajuste el volumen pulsando –o +en la unidad o VOL- o VOL+ en el mando a distancia.
4. Desconecte el dispositivo externo de la entrada auxiliar para detener la reproducción.
Si desea deshacerse de este aparato, recuerde que ha de depositarlo en un lugar destinado al reciclado de
electrodomésticos. Infórmese acerca del centro de reciclaje más cercano. Consulte a las autoridades locales o a su
proveedor para obtener más información al respecto. (Directiva de Residuos de Aparatos Eléctricos y Electrónicos)
ATENCIÓN
- Nunca cargue pilas que no son recargables. No caliente las pilas ni las desmonte.
- No tire las pilas al fuego.
- No exponga las pilas a temperaturas demasiado altas, como las producidas por la exposición directa a los rayos del sol, al fuego
o a otras fuentes de calor.
- Para asegurar una ventilación correcta del aparato, no cubra los oricios de ventilación con objetos tales como periódicos,
manteles, cortinas, etc.
- No coloque ninguna fuente de calor, como por ejemplo una vela encendida, sobre el aparato o cerca de él.
- Utilice este aparato en lugares con climas templados.
- No exponga el aparato a salpicaduras o a la humedad.
- Deje libre alrededor del aparato una distancia mínima de 5 cm para garantizar una correcta ventilación del mismo.
- No coloque objetos que contengan líquido, como un jarrón, encima del aparato.
- La placa de identicación se encuentra en la parte posterior del aparato.
- El acceso al enchufe ha de permanecer despejado. Para cortar por completo la alimentación del aparato, desenchúfelo de la
toma de corriente. Se ha de poder acceder fácilmente al enchufe durante el uso del aparato; procure que el acceso al mismo esté
despejado.
- Como resultado de fenómenos electroestáticos y/o eléctricos transitorios, pueden producirse fallos en el funcionamiento del
producto. En estos casos, el usuario deberá reiniciar el aparato desenchufándolo y volviéndolo a enchufar.
NEW ONE S.A.S
10, Rue de la Mission, 25480 Ecole Valentin, France
ES - 5 ES - 6
HX-3621 IB MUSE 001 REV0.indd 16 2014/7/31 15:39:13

IT - 1 IT - 2
DESCRIZIONE DEL PRODOTTO
TELECOMANDO
1. TASTO DI STANDBY / ACCENSIONE
2. : TASTO SOURCE (CONSENTE DI SELEZIONARE UN’ORIGINE TRA
FM, DISC, USB, AUX E BT)
3. TASTO (APRE IL COMPARTIMENTO DEL DISCO)
4. TASTI / : SALTA / RICERCA / SINTONIZZA
5. TASTO / PAIR
6. TASTO VOL- / VOL+
7. DISPLAY LCD
8. COMPARTIMENTO DISCO
9. SENSORE DEL TELECOMANDO
10. ALTOPARLANTI
11. SUPPORTI PER IL FISSAGGIO A MURO
12. PORTA USB
13. ANTENNA FILARE FM
14. CONNETTORI AUX (DESTRO E SINISTRO)
15. AC CAVO DI ALIMENTAZIONE DI RETE
1. TASTO DI STANDBY / ACCENSIONE
2. TASTO SOURCE (CONSENTE DI SELEZIONARE UN’ORIGINE TRA FM,
DISC, USB, AUX E BT)
3. TASTO INFO
4. TASTO INTRO
5. TASTO / MENU
6. / : TASTI DIREZIONALI SU/GIÙ
7. TASTIERA NUMERICA (0-9)
8. TASTO DIMMER
9. TASTO (APRE IL COMPARTIMENTO DEL DISCO)
10. TASTO SHUFFLE
11. TASTO REPEAT
12. TASTO : MUTO
13. TASTO / PAIR
14. TASTI / : SALTA / RICERCA / SINTONIZZA
15. TASTI VOL- / VOL+
16. TASTO EQ
17. TASTO BASS
18. TASTO SLEEP / TIMER
19. TASTO CLOCK
20. TASTO PROG
ACCESSORI
ALIMENTAZIONE
Il telecomando funziona con una batteria al litio di tipo “CR2025” (fornita). Per attivare il telecomando, togliere la
linguetta isolante posta sul retro.
Prima di gettare le pile, rivolgetevi al vostro rivenditore di ducia qualora metta a disposizione un servizio di raccolta e
riciclaggio di pile usate.
SOSTITUZIONE DELLA BATTERIA DEL TELECOMANDO
1. Spingete il pulsante verso destra.
2. Estraete il supporto della pila.
3. Inserite una pila “CR2025” con la polarità positiva (+) rivolta verso l’alto.
4. Ricollocate il supporto.
1. Cavo di alimentazione CA x 1
2. Telecomando x 1
3. Cavo AUX IN da 3,5 mm x 1
4. Cavo audio stereo RCA x 1
Collegare il cavo di alimentazione a una presa elettrica da AC 220-240V 50/60Hz.
Collegare il cavo AC a una vicina presa elettrica AC standard.
N.B.:
Per risparmiare energia, al termine della riproduzione oppure quando il volume è impostato al minimo e nell'arco di 2 ore non viene
eseguita nessuna operazione, l'apparecchio passa in automatico alla modalità di Standby.
MICRO IMPIANTO CD/MP3/USB CON BLUETOOTH
IT
NOTA:
- Non caricate mai pile non ricaricabili. Non scaldate le pile e non apritele.
- Per evitare ogni fuoriuscita di liquido pericoloso, estraete la pila in caso di un lungo periodo di non utilizzo.
- In caso di un prolungato periodo di non-utilizzo del telecomando, rimuovete la pila per evitare eventuali danni dovuti a fuoriuscite
di liquido corrosivo.
ATTENZIONE: Se la pila non è correttamente inserita c’è il rischio di esplosione. Sostituitela unicamente con una pila identica o di
tipo equivalente.
CONTROLLI AUDIO
Quando si collega l'unità alla presa per la prima volta, l'unità si attiva in modalità di STANDBY e sul display compare ”-- --:-- --“.
1. Premete il tasto per accendere l’apparecchio. Sul display viene visualizzato il messaggio ”HELLO”.
2. Premete ripetutamente il tasto per selezionare l’origine di riproduzione: FM—DISC—USB—AUX—BT—FM.
3. Premere il tasto per riportare l'unità alla modalità di STANDBY.
NOTA BENE: per spegnere l'unità completamente, scollegare la spina dalla presa.
VOLUME
Quindi utilizzate i tasti VOL-/VOL+ per impostare il volume sul livello d’ascolto desiderato. Il quadrante mostrerà il livello del volume
per alcuni secondi.
FUNZIONE MUTO
Per disattivare temporaneamente l’audio degli altoparlanti, premete il tasto sul telecomando. Premete nuovamente il tasto
per disattivare la funzione mute e ripristinare l’audio degli altoparlanti.
EQ(EQUALIZZATORE)
Premete ripetutamente il tasto EQ sul telecomando per selezionare una modalità equalizzatore: “POP”, “CLASSIC” (classico),
“JAZZ” o “ROCK”.
BASS (Bassi)
Premere più volte il tasto BASS sul telecomando per selezionare un'opzione tra OFF e ON.
Afspelen intro’s (CD & MP3)
Druk tijdens het afspelen op de toets INTRO om de eerste 10 seconden van elke track af te spelen. Druk nogmaals op de INTRO
toets om deze functie te stoppen.
IMPOSTAZIONE DELL’ORA
1. In modalità standby, tenete premuto il tasto CLOCK sul telecomando no a che la cifra delle ore lampeggia.
2. Premete i tasti / per impostare le ore. Premere il tasto CLOCK per confermare l'ora, le cifre dei minuti lampeggierà.
3. Premete i tasti / per impostare i minuti. Premete di nuovo il tasto CLOCK per confermare le impostazioni.
4. Per visualizzare l’ora in qualsiasi momento, premere una volta il tasto CLOCK.
HX-3621 IB MUSE 001 REV0.indd 17 2014/7/31 15:39:14

IT - 3 IT - 4
FUNZIONE DI SPEGNIMENTO AUTOMATICO (SLEEP)
IMPOSTAZIONE DELLA SVEGLIA
ASCOLTARE LA RADIO
FUNZIONAMENTO DEL LETTORE CD
Questa funzione permette di impostare un intervallo prima dello spegnimento automatico dell’apparecchio. È possibile selezionare
una durata (in minuti) prima dello spegnimento automatico dell’apparecchio.
1. Premete ripetutamente il tasto SLEEP / TIMER sul telecomando per selezionare 90-60-30-15-00.
N.B.:
- Tale funzione può essere impostata solo quando l’apparecchio è acceso.
- La funzione di spegnimento automatic è disattivata quando “00” è selezionato.
2. Premere il tasto SLEEP / TIMER per vericare il rimanente periodo di sleep.
3. Se desiderate spegnere l’apparecchio prima del termine dell’intervallo impostato, premete il tasto .
1. In modalità standby, tenete premuto il tasto SLEEP / TIMER sul telecomando, le cifre dell'ora lampeggieranno..
2. Premi il tasto o per selezionare l'ora. Premere il tasto SLEEP / TIMER per confermare l'ora, le cifre dei minuti lampeggierà.
3. Premere il pulsante o per impostare i minuti. Premete SLEEP / TIMER. per confermare i minuti.
4. Premere il tasto o il tasto per selezionare l'origine della sveglia: BUZZER (CICALINO), FM, USB o DISCO.
5. Premere il tasto SLEEP / TIMER per confermare. Sul display vengono visualizzate le cifre relative al volume della sveglia. Per
regolare il volume, premere il tasto o il tasto .
6. Premere il pulsante di SLEEP / TIMER per confermare l'impostazione del volume dell'allarme e completare l'intero processo di
impostazione dell'allarme, sul display compare l'icona “ ”.
Attivazione e disattivazione della sveglia
- Dalla modalità di standby, premere il tasto SLEEP / TIMER sul telecomando per vericare le impostazioni della sveglia.
- Per attivare la sveglia, premere due volte il tasto SLEEP / TIMER sul telecomando; sul display compare l'icona “ ”.
- Per disattivare la sveglia, premere due volte il tasto SLEEP / TIMER sul telecomando; l'icona “ ” scompare dal display.
Regolazione della luminosità del display
Premere più volte il tasto DIMMER (VARIATORE) del telecomando per regolare la luminosità della luce di sfondo del quadrante.
RICERCA MANUALE
1. Premere il tasto sull'unità o il tasto CD sul telecomando per selezionare la modalità FM RADIO;
2. Selezionare la stazione desiderata premendo o ;
3. Regolare il volume premendo i tasti –e +sull'unità oppure i tasti VOL- o VOL+ sul telecomando.
RICERCA AUTOMATICA
1. Premere il tasto sull'unità o il tasto CD sul telecomando per selezionare la modalità FM RADIO;
2. Tenete premuto uno dei tasti / per circa 2 secondi per avviare la ricerca nella direzione desiderata. La funzione di ricerca
automatica individua automaticamente le stazioni con un segnale forte.
Per migliorare la ricezione della radio:
FM: Estendere l’antenna FM.
N.B.:
Per le stazioni con segnale debole, utilizzare la ricerca manuale.
Durante la ricerca delle stazioni l’audio viene automaticamente escluso.
PRESELEZIONE DELLE STAZIONI
È possibile memorizzare no a 20 stazioni FM.
Memorizzazione manuale:
1. In modalità FM, selezionare una stazione manualmente o automaticamente utilizzando i tasti e .
2. Premere una volta il tasto PROG, e il numero per la preselezione “XX” lampeggerà brevemente sul quadrante.
3. Premere il tasto / per selezionare un numero della preselezione da assegnare alla stazione.
4. Premere nuovamente PROG per memorizzare la stazione nel numero della preselezione selezionato.
5. Ripetere i punti 1-4 to per memorizzare altre stazioni.
Memorizzazione automatica:
In modalità FM, tenere premuto PROG, la dicitura “AUTO” compare sul display, l’apparecchio avvia in automatico la ricerca e salva
le 20 stazioni FM disponibili.
N.B.:
Salvando una stazione in un programma della preselezione già occupato, la stazione precedentemente salvata verrà automaticamente
eliminata e sostituita dalla nuova stazione.
Ascoltare una stazione dalla preselezione
1. Premere una volta per selezionare la stazione preimpostata precedente o premere ripetutamente per selezionare la stazione
preimpostata successiva.
2. Regolare il volume premendo i tasti –e +sull'unità oppure i tasti VOL- o VOL+ sul telecomando.
Visualizzazione delle informazioni RDS
L'RDS (Radio Data System) è un servizio che consente alle stazioni FM di mostrare informazioni aggiuntive. Se la radio è sintonizzata
su una stazione RDS, sul display viene visualizzato il nome della stazione. Se si utilizza la programmazione automatica, le stazioni
RDS vengono programmate per prime.
1. Sintonizzare la radio su una stazione RDS.
2. Premere più volte il tasto INFO per scorrere le informazioni (se disponibili) nel seguente ordine: nome della stazione, PTY, INFO
ORA, Frequenza, TESTO RADIO.
1. Premete il tasto per accendere l’apparecchio.
2. Premere il tasto per aprire lo sportellino del vano CD.
3. Collocare il CD con il lato opaco rivolto verso l'esterno e premere il tasto per
chiudere lo sportellino.
IMPORTANTE: lo sportellino del CD è dotato di sistema di apertura elettrico. Non
forzare l'apertura e la chiusura dello sportellino con le mani o in qualsiasi altro modo, in
quanto ciò potrebbe danneggiare il meccanismo.
4. Premere il tasto sull'unità o il tasto CD sul telecomando per selezionare la modalità DISCO; sul display compare l'icona “ ”.
5. Trascorsi pochi secondi,e la riproduzione verrà automaticamente avviata.
Arrestare la riproduzione in modo permanente Premete il tasto / MENU
Mettere la riproduzione in pausa Premete una volta il tasto / PAIR
Riprendere la riproduzione Premete una seconda volta il tasto / PAIR
Andare velocemente in avanti o all’indietro Premete i tasti or
Fare un salto in avanti o all’indietro Tenete premuti i tasti or
Ripeti 1 icona visualizzata.
Ripeti cartella, icona lampeggiante.
Ripeti tutto, icona visualizzata.
ERRORE DISCO
NOTA BENE: Se il disco dovesse essere sporco, danneggiato o non leggibile, o se dovesse essere inserito capovolto, sul quadrante
apparirà il messaggio “NO DISC”. In questo caso, pulire il disco, reinserirlo correttamente o provare con un nuovo disco.
RIPRODUZIONE PROGRAMMATA
1. Collocare il CD con il lato opaco rivolto verso l'esterno e premere il tasto per chiudere lo sportellino.
2. Premere il tasto / MENU sul telecomando.
3. Premere il tasto PROG sul telecomando. La dicitura “P0X” si illumina e “T0X” lampeggia.
4. Selezionare il brano desiderato premendo / , quindi premere il tasto “PROG” per memorizzarlo nel programma.
5. Ripetere i quattro punti precedenti per aggiungere ulteriori brani.
6. Premere il tasto per avviare la riproduzione.
7. Per annullare la programmazione corrente, premere due volte il tasto / MENU sul telecomando.
In modalità CD/MP3 è possibile programmare no a 20 tracce.
RIPRODUZIONE DI UNA PERIFERICA USB
1. Premete il tasto per accendere l’apparecchio.
2. Collegare un dispositiv USB contenente le MP3 alla porta USB.
3. Premere il tasto sull'unità o il tasto USB sul telecomando per selezionare la modalità
USB, sul display compare l'icona “USB” e “ “.
4. Trascorsi pochi secondi,e la riproduzione verrà automaticamente avviata.
5. Regolare il volume premendo i tasti –e +sull'unità oppure i tasti VOL- o VOL+ sul
telecomando.
Sincronizzazione dell'orologio
Dalla modalità di standby, tenere premuto per alcuni secondi il tasto / MENU sul telecomando per accedere alla modalità di
sincronizzazione dell'orologio.
Nota: questa funzione non è disponibile quando l'unità non è in grado di ricevere stazioni RDS.
HX-3621 IB MUSE 001 REV0.indd 18 2014/7/31 15:39:14

IT - 5 IT - 6
COLLEGAMENTO CON DISPOSITIVI ESTERNI
UTILIZZO DELLA FUNZIONE BLUETOOTH
SPECIFICHE
AVVERTENZE DI SICUREZZA
GUIDA ALLA SOLUZIONE DEI PROBLEMI
N.B.:
- Il numero totale di le MP3 contenuti in un disco o in un dispositivo USB non può essere superiore a 999.
- Il numero totale di directory contenute in un disco o in un dispositivo USB non può essere superiore a 999.
- Il caricamento richiede circa 20 secondi o più, a seconda della quantità di le MP3 e cartelle nel disco o dispositivo USB.
- La porta USB non è idonea per la ricarica della batteria e per comunicare con un computer.
- Il produttore non è responsabile per la riproducibilità di dispositivi USB o lettori MP3, a causa delle innumerevoli condizioni di
registrazione, capacità, compatibilità con l’interfaccia, e così via.
* Cavo AUX IN da 3,5 mm,
Collegare l'origine audio (ad esempio un lettore mp3) ai
connettori AUX sull'unità mediante il cavo AUX IN da 3,5
mm fornito.
Il marchio denominativo Bluetooth® e i relativi loghi sono marchi registrati di Bluetooth SIG, Inc., utilizzati da New One S.A.S su
licenza. Altri marchi e nomi commerciali sono di proprietà dei rispettivi titolari.
L’altoparlante M-58 BT supporta la funzione Bluetooth. Potete riprodurre le audio contenuti nel vostro dispositivo Bluetooth (es.
telefono cellulare) mediante l’altoparlante M-58 BT.
1. Premere il tasto sull'unità o il tasto AUX sul telecomando per selezionare la modalità BT(Bluetooth);. Se l'unità non è associata
a nessun dispositivo Bluetooth, sul display viene visualizzato il messaggio “NO BT”.
2. Tenere premuto il tasto / PAIR no a quando non compare il messaggio “PAIR”.
3. Attivate la funzionalità Bluetooth sul dispositivo Bluetooth (es. telefono cellulare). Selezionate la voce di menu relative alla ricerca
di dispositive Bluetooth e confermate. Il dispositivo Bluetooth avvia la ricerca dei dispositivi Bluetooth attivi nel proprio raggio
d’azione (10 metri). Selezionate l’altoparlante “M-58BT” e confermate, La spia del Bluetooth rimane ssa al completamento
dell’associazione.
N.B.:
- Se viene richiesto l'inserimento della password, digitare 0000, quindi confermare
- Se avete già utilizzato la funzione Bluetooth in precedenza, il dispositivo visualizza un elenco dei precedenti risultati di ricerca.
Selezionate “M-58BT” e confermate.
4. Durante la riproduzione, premete il tasto / PAIR per sospendere la riproduzione, quindi premete il tasto di nuovo per riprenderla.
5. Durante la riproduzione, premete o per saltare una traccia.
6. Per disconnettere i dispositive, disattivate la funzione Bluetooth sull’origine audio.
RECONNESSIONE AL DISPOSITIVO BLUETOOTH
Se avete già associato l’origine audio Bluetooth all’altoparlante M-58 BT ma si è accidentalmente disconnessa, tenere premuto il
tasto / PAIR per ristabilire la connessione.
Con la presente, NEW ONE S.A.S dichiara che MUSE M-58 BT è conforme ai requisiti essenziali e alle altre disposizioni fondamentali
della direttiva 1999/5/EC. La dichiarazione di conformità è consultabile all’indirizzo
http://www.muse-europe.com/conformity/M-58BT.pdf
Alimentatore: AC 220-240V 50/60Hz, 25W
Radio: FM 87.5-108MHz
ATTENZIONE: Per ridurre il rischio di scossa elettrica, non smontate l’apparecchio. Questo apparecchio non
contiene pezzi riparabili dall’utente. Per ogni riparazione rivolgetevi esclusivamente a tecnici qualicati.
Il simbolo del fulmine con una freccia all’estremità all’interno di un triangolo equilatero avverte l’utente della presenza di una
“tensione pericolosa” nell’apparecchio.
Il punto esclamativo inscritto nel triangolo equilatero indica all'utente che nel manuale di istruzioni si trovano importanti
avvertenze per l'uso e la manutenzione dell'apparecchio.
Sintomo Causa Solución
Alimentazione assente La spina non è collegata alla presa a muro. Collegare la spina alla presa.
Audio assente
Volume al minimo. Regolare il volume sul livello desiderato.
Il dispositivo connesso non è in modalità di
riproduzione. Avviare la riproduzione sul dispositivo.
L’audio in uscita dal dispositivo connesso è
debole. Regolare il volume sul dispositivo.
Audio distorto
Il volume è troppo alto. Ridurre il volume usando il tasto VOL-.
Il volume sul dispositivo collegato è troppo
alto. Ridurre il volume sul dispositivo collegato.
Ricezione Bluetooth
assente Il dispositivo non è in modalità Bluetooth. Ripetere il processo di associazione.
* Cavo audio stereo RCA
Collegare l'origine audio (ad esempio un lettore DVD) ai
connettori AUX sull'unità mediante il cavo audio stereo
RCA fornito.
1. Premete il tasto per accendere l’apparecchio.
2. Premere il tasto sull'unità o il tasto AUX sul telecomando per selezionare la modalità AUX; La corrispondente icona “AUX”
apparirà sul quadrante. Di norma, quando si utilizza un dispositivo esterno, l’audio viene emesso in automatico dagli altoparlanti
del dispositivo.
3. Regolare il volume premendo i tasti –e +sull'unità oppure i tasti VOL- o VOL+ sul telecomando.
4. Per arrestare la riproduzione, scollegare la fonte ausiliaria dalla presa AUX.
Se in futuro volete sbarazzarvi di questo apparecchio, ricordate che le apparecchiature elettroniche non devono essere
gettate insieme ai riuti domestici. Informatevi per sapere dove si trova il centro di riciclaggio più vicino. Per ulteriori
dettagli, rivolgetevi alle autorità locali o al vostro rivenditore. (Direttiva sui riuti delle apparecchiature elettriche ed
elettroniche).
ATTENZIONE
- Non caricate mai pile non ricaricabili. Non scaldate le pile e non apritele.
- Non gettate le pile nel fuoco!
- Non esponete le pile ad un calore eccessivo, come raggi solari, fuoco o fonti di calore analoghe.
- Garantite sempre una ventilazione corretta dell’apparecchio e non coprite le aperture di ventilazione con oggetti come giornali,
tovaglie, tende, ecc.
- Non collocate nessuna fonte di calore, come una candela accesa, sopra o nei pressi dell’apparecchio.
- Utilizzate l’apparecchio in ambienti temperati.
- Non esponete l’apparecchio all'acqua o all’umidità.
- Lasciate uno spazio minimo di 5 cm intorno all’apparecchio per permettere una ventilazione sufciente.
- Non collocate nessun recipiente contenente liquidi, come ad esempio un vaso, nelle vicinanze dell’apparecchio.
- La targhetta segnaletica si trova nella parte posteriore dell'apparecchio.
- La presa di alimentazione permette di scollegare l’apparecchio dalla corrente elettrica e deve quindi restare facilmente accessibile.
Per interrompere completamente l’alimentazione dell’apparecchio, scollegate la spina di alimentazione dalla presa di corrente. La
presa di alimentazione deve restare facilmente accessibile durante l’uso, accertatevi che l’accesso alla presa sia libero.
- Per effetto di fenomeni transitori elettrostatici e/o elettrici, è possibile che il prodotto non funzioni correttamente. In tal caso è
opportuno reinizializzare l’apparecchio.
NEW ONE S.A.S
10, Rue de la Mission, 25480 Ecole Valentin, France
HX-3621 IB MUSE 001 REV0.indd 19 2014/7/31 15:39:15

NL - 1 NL - 2
BESCHRIJVING VAN HET TOESTEL
AFSTANDSBEDIENING
1. STANDBY / AAN-KNOP
2. : TOETS SOURCE (VOOR HET SELECTEREN VAN DE FM-, DISC-,
USB- AUX-OF BT-MODUS)
3. TOETS (OPENEN VAN DE CD-LADER)
4. / : OVERSLAAN / ZOEKEN / AFSTEMMEN
5. TOETS / PAIR
6. TOETS VOL- / VOL+
7. LCD-SCHERM
8. DISKCOMPARTIMENT
9. INFRAROODONTVANGER VOOR DE AFSTANDSBEDIENING
10. LUIDSPREKERS
11. WANDMONTAGEPUNTEN
12. USB POORT
13. FM-DRAADANTENNE
14. AUX-AANSLUITING (R L)
15. AC INGANG VOEDINGSSECTOR
1. STANDBY / AAN-KNOP
2. TOETS SOURCE (VOOR HET SELECTEREN VAN DE FM-, DISC-, USB-
AUX-OF BT-MODUS)
3. TOETS INFO
4. TOETS INTRO
5. TOETS / MENU
6. / : NAVIGEREN OMHOOG / OMLAAG
7. NUMERIEK TOETSENBORD (0 - 9)
8. TOETS DIMMER
9. TOETS (OPENEN VAN DE CD-LADER)
10. TOETS SHUFFLE
11. TOETS REPEAT
12. TOETS : DEMPINGSFUNCTIE
13. TOETS / PAIR
14. / : OVERSLAAN / ZOEKEN / AFSTEMMEN
15. TOETS VOL- / VOL+
16. TOETS EQ
17. TOETS BASS
18. TOETS SLEEP / TIMER
19. TOETS CLOCK
20. TOETS PROG
TOEBEHOREN
VOEDING
De afstandsbediening werkt op 1x “CR2025”-lithiumbatterij (meegeleverd). Om de afstandsbediening gebruiksklaar
temaken, moet u de isolatietape die zich op de achterkantvan de bediening bevindt, verwijderen.
Raadpleeg uw dealer alvorens de batterijen weg te werpen omdat hij ze zou kunnen terugnemen om te recycleren.
VERVANGING VAN DE BATTERIJ VAN DE AFSTANDSBEDIENING
1. Duw de toets naar rechts.
2. Trek de batterijlader uit.
3. Plaats een “CR2025” batterij met de positieve kant (+) naar boven.
4. Plaats het lid terug.
1. Netsnoer x 1
2. Afstandsbediening x 1
3. 3.5mm AUX-kabel, x 1
4. RCA-audiokabel x 1
Sluit het netsnoer aan op een AC 220-240V 50/60Hz stroombron.
Sluit het AC-netsnoer aan op een standaard stopcontact.
Opmerking:
Om energie te besparen zal het apparaat automatisch naar de standbymodus schakelen wanneer het afspelen het eindpunt heeft
bereikt of het volume is ingesteld op een zeer laag niveau en het apparaat niet wordt gebruikt voor een periode van 2 uur.
MICROSYSTEEM CD/MP3/USB MET BLUETOOTH
NL
OPMERKINGEN :
- Zorg ervoor dat u nooit niet-oplaadbare batterijen oplaadt. Verwarm de batterijen nooit en probeer ze nooit te openen.
- Wanneer het toestel lange tijd niet gebruikt wordt, haalt u de batterijen beter uit het toestel.
- Als de afstandsbediening lange tijd niet gebruikt wordt, haalt u de batterijen beter uit het toestel om aantasting door uitlopen van
de batterijen te vermijden.
OPGEPAST: Ontplofngsgevaar als de batterij niet juist ingevoegd wordt. Vervang de batterij enkel door een identieke batterij of
door een batterij van hetzelfde type.
MODUS EN VOLUMEREGELING
Het apparaat zal, wanneer het voor het eerst op het lichtnet wordt aangesloten, in de standbymodus staan. Het display toont
”-- --:-- --“.
1. Druk op de toets om het toestel in werking te zetten, ”HELLO” verschijnt op het display.
2. Druk herhaaldelijk op om de gewenste afspeelbron te selecteren: FM—DISC—USB—AUX—BT—FM.
3. Druk op om het apparaat weer standby te zetten.
Opmerking: Haal de stekker uit het stopcontact als u het apparaat volledig wilt uitschakelen.
VOLUMEREGELING
Druk op de toets VOL-/VOL+ om het volume op het gewenste niveau te brengen. Het volumeniveau zal voor een paar seconden
worden weergegeven.
DEMPINGSFUNCTIE
Druk op de toets op de afstandsbediening om het geluid dat uit de luidsprekers komt gedurende een korte periode te onderbreken.
Druk nogmaals op de toets om de functie te desactiveren en het geluid opnieuw door de luidsprekers te sturen.
EQ (Equalizermodi)
Druk meermaals op de toets EQ op de afstandsbediening om een equalizermodus te selecteren: « POP », « CLASSIC » (KLASSIEK),
« JAZZ », of « ROCK ». De selectie wordt voor een paar seconde op het display getoond.
BASS
Druk herhaaldelijk op BASS op de afstandsbediening om AAN of UIT te selecteren.
INTRO(Afspelen intro’s ,CD & MP3)
Druk tijdens het afspelen op de toets INTRO om de eerste 10 seconden van elke track af te spelen. Druk nogmaals op de INTRO
toets om deze functie te stoppen.
INSTELLING VAN DE TIJD
1. Houd vanuit waakstand de CLOCK ingedrukt knop op de afstandsbediening tot de klok uur knippert op het display.
2. Druk op de knop of om de uren te selecteren, druk vervolgens op CLOCK om de uren te bevestigen, de minuutcijfers
knipperen.
3. Druk op / om de minuten in te stellen. Druk opnieuw op de CLOCK om de instellingen op te slaan.
4. Druk één keer op CLOCK om de tijd op elk moment te controleren.
HX-3621 IB MUSE 001 REV0.indd 20 2014/7/31 15:39:16
Table of contents
Languages:
Other Muse Stereo System manuals