Mustang Survival MD3153 User manual

MD3153 INFLATABLE PFD
Hydrostatic Inflation Model
Manual with Automatic Backup
approved by
transport canada
MD3154 INFLATABLE PFD
Hydrostatic Inflation Model with Harness
Manual with Automatic Backup
approved by
transport canada
HT1125 (Rev05April2012)
do not reMove prIor to saLe

TABLE OF CONTENTS
INFLATABLE PFDS............................................................................... 1
Approval Conditions and Carriage Regulations.............................. 1
Mandatory Carriage Requirements ................................................ 2
WHY ARE PFDS REQUIRED SAFETY EQUIPMENT? .............................. 2
WHAT IS AN INFLATABLE PFD?........................................................... 2
INSTRUCTIONS FOR USE .................................................................... 3
Component Inspection Instructions................................................ 4
Readiness Checklist ....................................................................... 4
Sizing and Fit................................................................................. 5
DONNING INSTRUCTIONS.................................................................. 5
INFLATING YOUR INFLATABLE PFD ..................................................... 6
Information ................................................................................... 6
SPECIAL CONSIDERATIONS FOR INFLATABLE DEVICES ...................... 7
DEFLATING THE INFLATABLE PFD ....................................................... 7
USAGE BELOW FREEZING .................................................................. 8
RE-ARMING YOUR PFD...................................................................... 9
REPACKING ..................................................................................... 13
SAILING HARNESS .......................................................................... 16
IS YOUR PFD IN GOOD AND SERVICEABLE CONDITION? ................. 17

CARE AND MAINTENANCE INSTRUCTIONS ..................................... 17
CLEANING AND STORING OF YOUR INFLATABLE PFD ..................... 19
HOW AND WHY TO TEST YOUR PFD............................................... 19
HOW DO YOU TEST YOUR PFD USING
THE AUTOMATIC INFLATOR? ........................................................... 19
HOW DO YOU TEST YOUR PFD USING
THE MANUAL INFLATOR? ................................................................ 20
HOW DO YOU TEST YOUR PFD USING
THE ORAL INFLATOR?...................................................................... 21
WEAR YOUR PFD............................................................................. 22
HYPOTHERMIA ................................................................................ 22
How Hypothermia Affects Most Adults........................................ 22
EACH OF THESE DEVICES IS INTENDED TO HELP
YOU SAVE YOUR OWN LIFE............................................................. 23
INFLATABLE PFD SAFETY ACCESSORIES .......................................... 24
ADDITIONAL INFORMATION............................................................. 24
DO NOT ATTACH PFD’S TO YOUR BOAT.......................................... 24
AIRLINE OPERATOR POLICY ON CARRIAGE OF
INFLATABLE PFDS AND CO2CARTRIDGES ....................................... 24

1
INFLATABLE PFDS
Inflatable PFDs are special devices in that the flotation of the wearer
is not derived from inherently buoyant materials. In order for them
to do their job, you, the wearer, must do yours! This means you have
the responsibility to ensure you are familiar with the operation and
maintenance requirements of your inflatable PFD! You must also
be aware of the limitations of the device and know that it is not
approved under the Small Vessel Regulations for certain boating
activities.
READ YOUR OWNER’S MANUAL AND THE
INFORMATION LABELS ON YOUR PFD! IT COULD SAVE
YOUR LIFE!
APPROVAL CONDITIONS AND CARRIAGE REGULATIONS
This inflatable PFD is approved by Transport Canada for use as a Type
II (MD3153 & MD3154) Personal Flotation Device (PFD). It is not
approved for water skiing or other high impact, high speed activities.
This inflatable PFD was designed to be more comfortable and less
restrictive to wear than inherently buoyant PFDs. When worn, used,
and serviced according to this owner’s manual, this PFD can greatly
increase your chances of survival in the water. Not recommended for
non-swimmers or weak swimmers. Users of inflatable PFDs must be at
least 16 years old.
The MD3154 has a built-in sailing harness that can cause injury
if not properly used. When worn, used, and serviced according to
this owner’s manual, these PFDs can greatly increase your chances
of survival in the water. They should always be fitted with the
appropriate, unpunctured, and fully functional inflation cartridge,
or be worn fully inflated. NOT for white water paddling or personal
watercraft use. PFDs fitted with an automatic inflator are not
permitted for sailboarding activities. In order to meet the equipment
carriage requirements of the small vessel regulations, these PFDs must
be worn by an adult, in the case of an open boat or on deck or in the
cockpit in any other type of boat, or readily available to any other
adult occupant while below deck.
A separate section titled “SAILING HARNESS” (see Sailing Harness,
p. 16) discusses requirements and features on the MD3154 only.
Transport Canada approval does not apply to the sailing harness
because some of the risks associated with its use have not been
evaluated.

2
MANDATORY CARRIAGE REQUIREMENTS
The Small Vessel Regulations require that you carry on board a
Transport Canada approved personal flotation device, which bear a
mark or label indicating the approval and is of an appropriate size
for each person on board. To be considered serviceable, this Inflatable
PFD shall not exhibit deterioration that could diminish its performance,
such as broken or deformed hardware, detached webbing, rotted
structural components, air leaks, or nonfunctional oral inflation
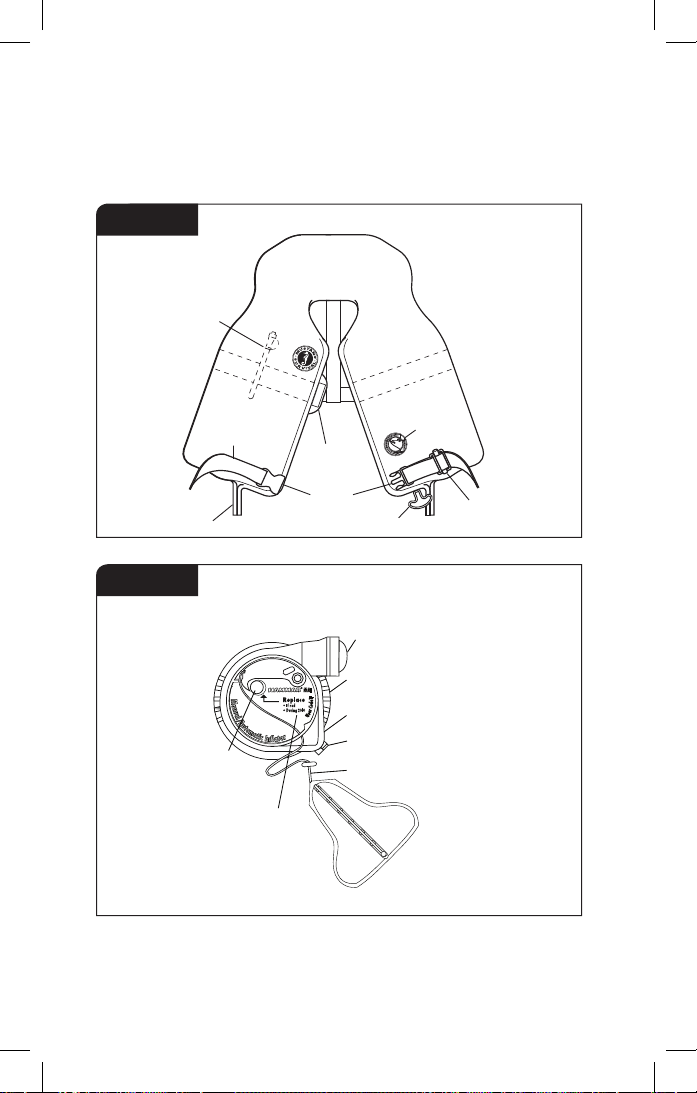
tube. Unless worn inflated, this Inflatable PFD must also be properly
armed with a full CO2cylinder, inflation system status indicator, and
an accessible manual inflation lanyard. A PFD which is “approved
only when worn” or “required to be worn” must be worn under the
specified conditions.
WHY ARE PFDS REQUIRED SAFETY
EQUIPMENT?
Drownings are the leading cause of fatalities involving recreational
boating. A PFD provides flotation to help keep your head above water,
help you to stay face up in the water, and increase your chances for
survival and rescue. Most adults only need an extra 3.2 to 5.5 kg (7 to
12 pounds) of flotation to keep their heads above water. The proper
size PFD will properly support the weight of the wearer.
Since this Inflatable PFD does not have inherent buoyancy, it provides
flotation only when inflated. Familiarize yourself with the use of this
Inflatable PFD so you know what to do in an emergency.
WHAT IS AN INFLATABLE PFD?
While traditional PFDs are inherently buoyant, inflatable PFDs rely
entirely on inflation for buoyancy. Uninflated, the Inflatable PFD is
a comfortable slim collar that can be inflated at any time with a
33-gram CO2gas cylinder. The Inflatable PFD is designed to offer
maximum mobility with minimum bulk. The Inflatable PFD can be
inflated either automatically by water immersion, manually by jerking
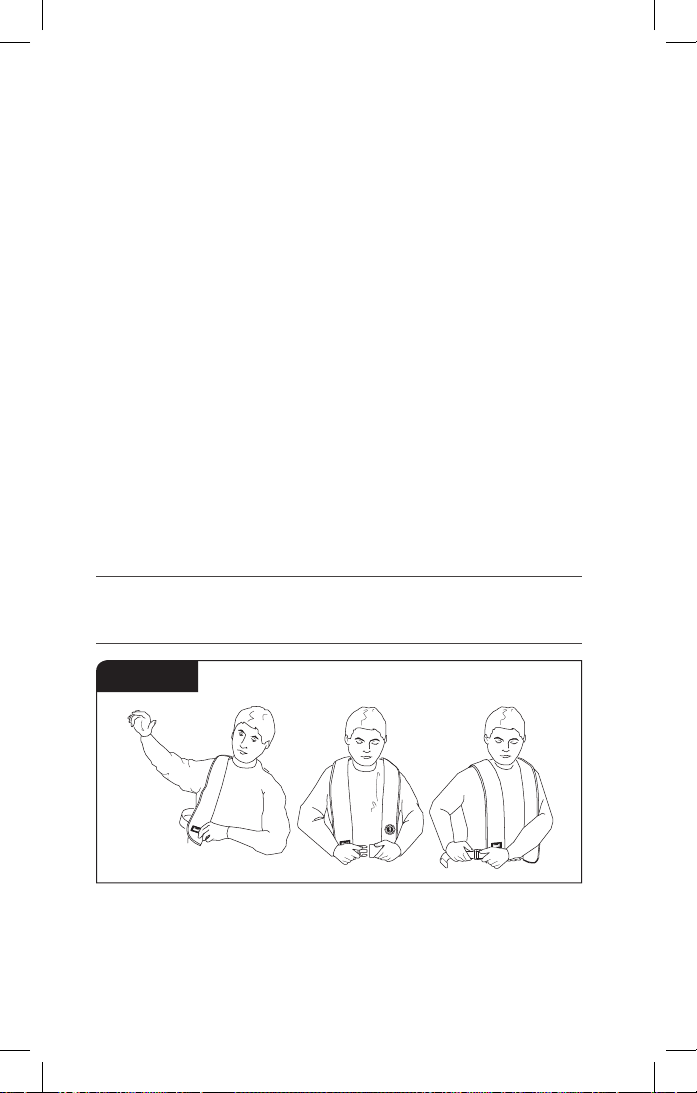
a pull-tab, or orally by mouth. It is recommended that you familiarize
yourself with the procedures outlined in INSTRUCTIONS FOR USE
(see Instructions For Use, p. 3). When worn, used and serviced
according to this owner’s manual, this PFD can greatly increase
your chances of survival in the water. Not recommended for non-
swimmers or weak swimmers.

3
INSTRUCTIONS FOR USE
This manual supplies instructional, maintenance and safety
information for both models (MD3153, MD3154). The model number is
listed on the underside label.
Oral Inflator
(behind cell)
VelcroTM Tab
Pull-tab
Front
Buckle
Hydrostatic
Inflator
MD3153 Unpacked
Adjustment
Point
Zipper
End
Waist Belt
Figure 1
Single
Point
Status
Indicator
Water Inlet Valve
Lanyard
Manual Inflation
Pull-tab
Hydrostatic Inflator Cap
Yellow Inflator Cap
Cap/Locking Ring
Tabs
Black Locking Ring
Inflator
Body
Expiry
Date
Figure 2

4
COMPONENT INSPECTION INSTRUCTIONS
1) Examine the single point status indicator through the window
panel (Fig. 1). Ensure the indicator is green. If the indicator is
red, the mechanism has been fired or is incorrectly fitted (see
Re-arming Your PFD, p. 9).
NOTE: The single point status indicator must be green
before proceeding.
2) Undo the zipper on the wearer's left side, exposing the oral
inflator.
3) Ensure the oral-inflation dust cap is in the stowed position (Fig. 7).
4) Ensure the single point status indicator is green and the pull-
tab lanyard is hanging on the outside; secure the zippers on the
Inflatable PFD (see Repacking, p. 13).
5) Ensure the current date is not past the date on the inflator. If it is,
replace the inflator (see Re-arming Your PFD, p. 9).
READINESS CHECKLIST
Check your Inflatable PFD and ensure all of the checkpoints listed
below are true before use.
Single point status indicator is green (Fig. 1 and 2).
Ensure the current date is not past the date on the inflator. If it is,
replace the inflator (see Re-arming Your PFD, p. 9).
All zippers, Velcro™ and waist buckle are securely fastened.
Oral-inflation dust cap is in the stowed position (Fig. 7).
Inflatable PFD is not twisted.
Ensure the inflation pull-tab is hanging on the outside (Fig. 31).
No rips, tears, excessive abrasion or holes; all seams are securely
sewn; and the cover, straps and hardware are still strong.
Your Inflatable PFD is ready for use if all applicable boxes are checked.
NOTE: Contact your Mustang Dealer if you have any
concerns about the readiness of your Inflatable PFD.

5
SIZING AND FIT
This PFD provides a minimum of 150 Newton (33.7 lbs) of buoyancy
when inflated and is designed for wearers over 16 years of age, with
a chest range of 76-132 cm (30-52 inches) weighing over 36 kg (80
pounds).
DONNING INSTRUCTIONS
It is important that the Inflatable PFD is properly adjusted to fit
the person wearing it. An incorrect fit or improper fastening of
attachments could impede its effectiveness.
1) All belts and straps are already threaded correctly and only need
to be adjusted for fit.
For the non-harness model MD3153, the belt should fit below
your rib cage adjusted to a tight personal fit.
For the harness model MD3154, the bottom of the belt must
always be worn at least 2 inches (5 cm) above the lowest rib and
adjusted to a tight personal fit.
2) Put the Inflatable PFD on just like a jacket (Fig. 3) and fasten the
front buckle. Adjust the waist belt using the side buckle on the
belt and secure the belt’s loose end in the belt loop.
WARNING: Do not wear Inflatable PFDs under clothing
as the inflation could be restricted or you could be
injured.
Figure 3

6
INFLATING YOUR INFLATABLE PFD
It is recommended that the following procedures be followed to
inflate your Inflatable PFD:
Automatic Inflator
Figure 4 1) Manual Inflation
Activate the inflation system
by jerking firmly downward
on the pull-tab (Fig. 4). The
Inflatable PFD should fully
inflate within 5 seconds.
2) Automatic Backup
Inflation
When the inflator is lowered
more than about 4 inches
in the water, then the
hydrostatic valve opens and
lets the water meet the
water sensitive element that in turn releases a stainless steel coil
spring. The spring then drives a needle into the end of the gas
cylinder, which is now punctured so that the gas instantly fills the
Inflatable PFD. Total buoyancy is normally reached within 4 – 5
seconds.
INFORMATION
When inflated, the carbon dioxide (CO2gas) used to inflate the PFD
will slowly escape through the fabric over time. A slight reduction
of pressure will be observed after several hours of inflation. Topping
up by oral inflation may be required in the event of very prolonged
immersion.
IMPORTANT: See Special Considerations for Inflatable
Devices
3) Oral Inflation
Properly armed and inspected Inflatable PFDs will inflate when
manually or automatically activated. However, you can fully inflate
the Inflatable PFD by mouth (Fig. 5) should inflation not occur, or
if you are in a non-emergency situation.
i. To orally inflate the Inflatable PFD, first ensure that each of the
zippers (2) are completely opened.

7
NOTE: Oral inflation may cause the Inflatable PFD to
break-out suddenly (loudly) if any of the zippers are
closed.
Figure 5 ii. Locate the oral inflation
tube by opening the
wearer’s left front panel of
the Inflatable PFD. Remove
the dust cap from the end of
the oral tube and blow into
the tube until the Inflatable
PFD is fully inflated.
SPECIAL CONSIDERATIONS FOR
INFLATABLE DEVICES
The Inflatable PFD might not be armed when needed, either knowingly
or unknowingly. Inadvertent inflation causes several risks that
you must address to avoid drowning. Much less common but also
important are:
1) Double inflation (CO2cylinder inflation after full oral inflation)
could damage the Inflatable PFD,
2) Inflation when stored in a tight space could damage the Inflatable
PFD, and
3) The Inflatable PFD could inflate when you are in an awkward
place or position.
If this Inflatable PFD should inflate inadvertently, a re-arm kit
(MA7214) is required to re-arm the device.
IMPORTANT: The Inflatable PFD should be re-armed
according to the instructions (see Re-arming Your PFD,
p. 9).
DEFLATING THE INFLATABLE PFD
1) To deflate the Inflatable PFD, reverse the oral-inflation tube dust
cap and insert it into the valve or depress valve with fingertip. The
dust cap will not lock in the deflate position so it is necessary to
hold it in place (Fig. 6).

8
2) Gently squeeze the Inflatable PFD until all air or gas has been
expelled. To avoid damage; do not wring or twist the Inflatable
PFD. Put the inflation tube dust cap back in its stowed position on
the oral inflation tube (Fig. 7).
IMPORTANT: Ensure all air has been removed from the
PFD.
3) Examine the single point status indicator (Fig. 2). If the indicator
is red, the mechanism has been fired and the inflator requires
service (see Re-arming Your PFD, p. 9).
IMPORTANT: The single point status indicator must be
green before proceeding.
4) Your device is ready to be repacked (see Repacking, p. 13).
Cap In
Deflate
Position
Figure 6
Dust cap
position for
deflation
Dust cap
in stowed
position
Oral Inflator
Figure 7
USAGE BELOW FREEZING
When the temperature is below freezing, the Inflatable PFD should
be worn partially inflated because a fully discharged cylinder may
not quickly or adequately inflate your Inflatable PFD. Under these
conditions use the oral inflator to adequately top-up the PFD, after
CO2inflation.
WARNING: CO2inflation could over-pressurize and
damage your Inflatable PFD if already fully inflated.

9
RE-ARMING YOUR PFD
NOTE: Use a valid Mustang Survival re-arm kit
(MA7214) for this procedure. Use of other re-arm kits
may result in improper operation or failure to operate
and will void the product’s warranty.
Figure 8 1) Place the Inflatable PFD
(Personal Flotation Device) on a
smooth, flat surface and wipe
off any water. Access the inflator
by reaching under the cover and
pull it toward you, turning the
cell and cover inside-out to fully
expose the inflator for
re-arming. Hold the CO2
cylinder through the fabric,
using one hand (Fig. 8).
2) Insert the metal key between the black locking ring and labeled
yellow cap. Turn the key counter-clockwise (Fig. 9).
Locking Ring Key
Figure 9
3) Turn the black locking ring counter-clockwise and lift off the cap
(yellow inflator operating head Fig. 10). Dispose of the used cap.

10
Cap
Figure 10
Red Indicator Inflator Body
Sealing Ring
Figure 11
4) Squeeze the sealing ring to elongate and remove the inflator body
through the sealing ring (Fig. 11).
5) Dispose of the used inflator body.
Red Indicator
Trash
Figure 12

11
Green Indicator Caution:
Do not turn
the center
shaft
Figure 13
6) Check that the new inflator body indicator is green. Insert the
new inflator body with CO2cylinder pointing upward inside the
Inflatable PFD (Fig.13). Let the sealing ring rest on the adapter
around the four lugs.
Single
Point
Indicator
Water
Inlet
Valve
Figure 14
7) Now check the new manual/automatic cap as follows (Fig. 14):
1. Is the single point status indicator showing green?
2. Is the expiry date OK?
If YES is the answer to both questions, then proceed as follows. If
the answer is NO to either question, get a new cap.
8) Hold the CO2cylinder through the fabric of the Inflatable PFD
(Fig. 15). Position the replacement cap with the water inlet valve
pointing to the right and press firmly onto the inflator body and
sealing ring (Fig. 16).

12
Figure 15 Figure 16
9) While pressing FIRMLY onto the inflator body, turn the BLACK
locking ring clockwise into the locked position (Fig. 17). Pull on
the cap to make sure it has locked onto the inflator body.
Black
Locking
Ring
Lanyard
Figure 17
Inflator Cap
Cover
Single Point
Status Indicator
Inflator Cap
Cover Window
Figure 17a
10) Check: To see that the single point status indicator on the cap is
green, the pull to inflate lanyard is present and that the locking
ring is locked. Turn the cell and cover right-side out, returning to
normal state.
11) As a final check, inflate the life jacket through the oral tube and
make sure it stays inflated at least overnight.
12) With the dust cap in the top of the oral tube, gently squeeze the
inflatable life jacket until all the air has been expelled (Fig 6). Do
not wring or twist it. Replace the oral tube dust cap back in its
stowed position (Fig 7).
13) If your inflatable PFD has a black inflator cap cover, position the
protective cap over the inflator body so that the single point
status indicator is visible through the inflator cap cover window
(Fig 17A).

13
14) Refold the Inflatable PFD in accordance with the Repacking
section (see Repacking, p. 13).
REPACKING
If your Inflatable PFD has been used and/or the hydrostatic inflator
replaced, always inflate through the oral tube and check that it stays
inflated at least overnight. With the dust cap in the top of the oral
tube, gently squeeze the Inflatable PFD until all air or gas has been
expelled (Fig. 6). Do not wring or twist the Inflatable PFD. Put the oral
tube dust cap back in its stowed position on the oral tube (Fig. 7). Let
the Inflatable PFD dry before packing.
IMPORTANT: Ensure all air is removed before repacking.
Before following the repacking sequence, be sure to
properly re-arm your Inflatable PFD, (see Re-arming
Your PFD, p. 9).
Figure 18 1) Lay out the Inflatable PFD flat
on a clean surface (Fig. 18).
NOTE: The fold lines, on the
diagram, are provided to
assist with packing.
2) Fold side (A) inward along the
full length of the dotted line
(Fig. 19). Fold cover (B) over;
covering side (A) (Fig. 20).
A
Figure 19
B
Figure 20
3) If your inflatable PFD has a black inflator cap cover, ensure the
inflator body is still located within its protective cap cover and that
the single point status indicator is visible through the inflator cap.

14
4) Repeat step 2 with side (C), cover (D).
C
Figure 21
D
Figure 22
E
Figure 23
F
Figure 24
5) Fold over the top side (E) and cover (F).
H
G
Figure 25
H
G
Figure 26
6) Mustang Survival uses advanced 2-step zippers. ZIP 1 - Reset the
zipper by pulling the slider (G) around the top to the Velcro™ tab
(H). ZIP 2 - Close by pulling the slider (G) in the opposite direction

15
to the end of the zipper (Fig. 26). Ensure that the Inflatable cell
does not get caught by the zipper when closing.
7) Fasten the Velcro™ tab (H) to keep zipper closed.
8) ZIP 1 - Reset the 2-step zipper by pulling the slider (I) to the
Velcro™ tab (H). ZIP 2 - Close by pulling slider (I) in the opposite
direction to the end of the zipper (Fig. 29). Ensure that the
Inflatable cell does not get caught by the zipper when closing.
H
Figure 27
H
I
Figure 28
H
I
Figure 29 Figure 30
J
Figure 31 9) Use a finger to push the
zipper ends into the openings
at the bottom of the the
packed Inflatable PFD (Fig.
30).
10) Ensure the pull-tab (J) is on
the outside of the folded
Inflatable PFD. Fig. 31 depicts
a correctly folded Inflatable
PFD.

16
SAILING HARNESS
CAUTION: Use only as a sailing harness.
Models with a sailing harness (MD3154) are designed to prevent
the user from falling overboard when used with a tether with an
under-load quick-release hook and have been designed and tested in
accordance with Offshore Racing Council (ORC) requirements. Care
and attention must be taken to ensure that the harness is used and
maintained correctly. The harness is designed to be worn by persons
at least 5 feet 5 inches tall (165 cm). The harness should be worn as
high on the chest as possible, but in all cases, at least 2 inches (5 cm)
above the lowest rib measured from the bottom of the belt and should
not be used if it does not fit in this manner. Adjust the harness using
the strap adjuster so that the harness is as snug as tolerable.
Failure to adjust the harness properly could result in injury.
When attached to the boat use a tether of less than 6 feet 6 inches (2
m) in length with quick-release under-load hardware (Fig. 32).
Ensure that a tether is secured to both D-rings. When not in use, the
D-rings can be pushed under the lapels.
WARNING: Use of a sailing harness to prevent falls
overboard presents several risks. In case of capsizing or
sinking, the boat may take you down. As such, ensure
that any tether used has quick-release under-load
hardware. This harness has not been designed for fall
arrest, lifting or climbing and should not be relied upon
in any of these instances.
Transport Canada approval does not apply to this harness and the
potential for injury has not been assessed.
Chest Buckle
Chest Belt Webbing
Quick Release Lanyard
D-Ring
Tether
Webbing
Figure 32

17
IS YOUR PFD IN GOOD AND SERVICEABLE
CONDITION?
Check your Inflatable PFD between outings to be sure that it is
properly armed; that it is free of rips, tears or holes; that all seams are
securely sewn; and that the fabric, straps and hardware are still strong
(see Readiness Checklist, p. 4). Inspect the inflatable portion of
the Inflatable PFD in accordance with the CARE AND MAINTENANCE
INSTRUCTIONS.
CARE AND MAINTENANCE INSTRUCTIONS
Federal Regulations require Transport Canada approved personal
flotation devices (PFDs) that are legibly marked with the Transport
Canada approval number, are in good and serviceable condition, and
are the correct size for each person on board. It is the responsibility
of the operator to be sure this PFD is in serviceable condition. To
be considered serviceable, this PFD shall not exhibit deterioration
that could diminish its performance, such as broken or deformed
hardware, detached webbing, rotted structural components, air leaks
or nonfunctional inflators. Unless worn inflated, this PFD must also
be properly armed with a cylinder installed in the inflator, and single
point status indicator showing green (ssee Re-arming Your PFD, p.
9). Failure to follow these instructions rigorously could result in a
non-functioning PFD causing injury or death.
Check the following at the intervals listed below.
1) Before Each Use:
i) Examine the single point status indicator through the
window panel, ensuring it is green. If the indicator is red, the
mechanism requires service. (see Re-arming Your PFD, p. 9).
ii) Ensure the manual pull-tab is accessible.
iii) Visually examine your Inflatable PFD for damage or excessive
abrasion, wear, tear or contamination. Particular attention
must be paid to the stitching, straps and hardware. If in doubt,
send it to your Mustang dealer for evaluation and/or servicing.
2) Every Two (2) Months:
i) Leak Test: The Inflatable PFD should be tested for general
leakage by orally inflating your Inflatable PFD until firm and
let stand 16 hours. A leaking Inflatable PFD will not hold its
firmness and should be replaced. If your Inflatable PFD leaks,
take it to your Mustang dealer for evaluation and/or servicing.
This manual suits for next models
1
Table of contents
Languages:
Popular Boating Equipment manuals by other brands

Texas Power Paddle
Texas Power Paddle Remora Quick installation guide

Grammer
Grammer AVENTO MSG 65/511 Repair manual

CHICAGO
CHICAGO 5002 Owner's instructions

Volvo Penta
Volvo Penta DPS installation instructions

Seastar Solutions
Seastar Solutions HC5370-3 installation instructions

Seakeeper
Seakeeper 1 Operation manual