Mustek PL408T User manual

Portable DVD Player
Quick Guide
Welcome to the Portable DVD Player Quick Guide.
This Guide will instruct you to install your Portable DVD
Player in a quick and easy way. Please carefully follow
the instructions to set up your Portable DVD Player.
Getting to Know Your Portable DVD Player
82-154-00140
RIGHT SIDE DIAGRAM
1. Volume Adjustment button
2. Phones 1 jack
3. Phones 2 jack
4. Coaxial output jack
5. AV out/AV in switch button
6. Audio output/input jack
7. Video output/input jack
8. S-Video/P-Scan output jack
FRONT SIDE DIAGRAM
1. Remote Sensor
2. POWER indicator
12
FRONT VIEW DIAGRAM
1
3
4
2
5
7
6
8
10 9
11
12
1314
LEFT SIDE DIAGRAM
1. DC IN jack
2. POWER button
3. TV tuner connector
4. TV tuner lock
1. LCD screen 2. LCD button
3. SETUP button 4. MODE button
5. MENU button 6. PAUSE/UP button
7. F.FWD/RIGHT button 8. PLAY/SEL. button
9. STOP/DOWN button 10. NEXT button
11. PREVIOUS button 12. SPEAKERS
13. F.BWD/LEFT button 14. OPEN button
REMOTE CONTROL DIAGRAM
1. INFO. button 2. Auto Search/SETUP button
3. MODE button 4. PAUSE/UP button
5. F.BWD/LEFT button 6. PLAY/SEL. button
7. PREVIOUS button 8. STOP/DOWN button
9. Number buttons 10. LCD button
11. TV Source/MENU button
12. SUBTITLE button 13. TITLE button
14. ANGLE button 15. F.FWD/RIGHT button
16. AUDIO button 17. NEXT button
18. REPEAT 1/ALL button
19. MUTE button
Service life of battery
1. The battery normally lasts for about one year although this
depends on how often and for what operations the remote
control is used.
2. If the remote control unit fails to work even when it is
operated near the player, replace the battery.
3. Use a 3V lithium battery.
BATTERY INSTALLATION FOR THE
REMOTE CONTROL
Insert the battery and match the (+) and (-) on battery to the
marks inside the battery compartment.
+
+
CR2025
OPEN
PUSH
First-time use:
Remember to remove the insulating
Mylon piece from the battery.
12
123456 87
12
1
2
3
4
5
6
7
8
18
17
16
15
14
13
12
11
10
919
3 4

Quick Operation Guide
STEP 1. Connect it to Power (A)
Please connect the applied AC adaptor to the DC IN jack on the
left side of this Portable DVD Player.
REMOTE CONTROL OPERATION RANGE
Point the remote control unit no more than about 6 meters from
the remote control sensor and within about 600of the front of
the unit.
The operating distance may vary according to the brightness of
the room.
Note:
1. Do not point bright lights at the remote control signal
sensor.
2. Do not place objects between the remote control unit and
the remote control signal sensor.
3. Do not use this remote control unit while simultaneously
operating the remote control unit of any other equipment.
30
remote sensor
STEP 2. Connect it with earphones or connect it
to external equipment. (B)
If you want to enjoy higher listening and viewing quality, you can
connect this Portable DVD player to external equipment, such as
a TV or an amplifier.
Note:
1. Before connections, make sure to turn off the power of this
Portable DVD Player and external equipment.
2. Make sure to slide AV OUT/IN switch to AV OUT.
STEP 4. Press POWER to turn on this Portable DVD
Player. (D)
STEP 5. Press <OPEN> to open the disc cover. (E)
STEP 6. Gently hold the edge of the disc, then put
it in the center with the printed side up.
Note: Make sure the printed side of the disc is facing up.
STEP 7. Close the disc cover.
STEP 8. Press <PLAY/SEL.> to play the disc.
(C)
STEP 3. Open the display panel. (C)
(B)
(White)(Red) (Yellow) (Blue) (Red) (Green)
1 2 3 4
(A)
(D)
(E)
4P-Scan TV
Pb
Pr
Y
(Blue)
(Red)
(Green)
Video input
S-Video
TV S-Video input
3
TV Video input
2
Audio input
(White)
L
R(Red)
1
Back/front panel of external equipments
Note: Make sure the external equipment supports
the audio/video input feature.

B. TO CHARGE THE BATTERY PACK WHILE
THE BATTERY PACK ATTACHED TO THIS
PORTABLE DVD PLAYER
STEP 1. Please align this portable DVD player’s battery
connectors with the battery pack’s battery
connectors. Then attach the battery pack to this
Portable DVD player. (as figure (B) shown)
Note:
1. Please turn Power off when attaching or removing the
battery pack.
2. If you want to remove the battery pack, press battery
release button, then slowly remove it from this Portable
DVD player.
STEP 2. Connect the AC adapter(12V, 1.25A) to the DC IN
jack on the left side of this Portable DVD player
and a household power outlet. (as figure (C) shown)
STEP 3. The battery charge indicator will turn red and start
charging.
STEP 4. When the battery pack is fully charged, the battery
charge indicator will turn green.
Note:
1. The battery pack is not charged while this Portable DVD
player is turned on.
2. Please use the specific power adapter (12V, 1.25A) to charge
the battery pack.
(B)
Before using the battery pack, make sure to charge it.
You could choose to charge the battery pack directly or
charge it while the battery pack attached to this Portable
DVD player.
INPUT FROM EXTERNAL EQUIPMENT
You could input images and sounds from external equip-
ment by connecting this Portable DVD player to external
equipment with Audio cable or Video cable.(F)
Note: Make sure to slide AV OUT/IN switch to AV IN.
Using the Battery Pack
(F)
(White)(Red) (Yellow)
1 2
A. TO CHARGE THE BATTERY PACK
DIRECTLY
STEP 1. Connect the AC adapter(12V, 1.25A) to the DC IN
jack on the left side of the battery pack and a
household power outlet. (as figure (A) shown)
STEP 2. The battery charge indicator will turn red and start
charging.
STEP 3. When the battery pack is fully charged, the battery
charge indicator will turn green.
(A)
DC IN jack
“The shape of the following battery pack is only for reference; the actual shape
differs from the battery packs of different specifications.”
TV Video output
2
Audio output
(White)
L
R(Red)
1
Back/front panel of external equipments
Note: Make sure the external equipment supports
the audio/video output feature. External
equipments with external output jack
(example: audio output and video output)
(C)
Battery release
button
Battery charge
indicator
DC IN jack
Battery
connectors

TV Tuner Operation
Preparations
1. Please connect this portable DVD player to Power and
connect it with earphones or connect it to external
equipments.
2. Then connect the TV tuner to this portable DVD player
as the following steps:
Step 1. Please align the TV tuner’s connector and lock
with this portable DVD player’s TV tuner
connector and lock. Then attach the TV tuner
to this portable DVD player.
(as figure (A) shown)
1
2
3
1. Antenna/Cable TV signal input jack
2. TV tuner connector
3. TV tuner lock
(A)
Step 2. Then connect the RF coaxial cable or Antenna
cable to Antenna/Cable TV signal input jack of
the TV tuner.
(as figure (B) shown)
HOW TO USE TV TUNER
Note: 1. Make sure all the preparation be ready.
2. TV reception quality might be different from the
area you are.
STEP 1. Press Power on.
STEP 2. Press <Mode> to switch to “Tuner”.
Press <Mode> a number of times, you can toggle
between “S-Video”, “P-Scan” or “Tuner”.
STEP 3. Press <TV Source> to choose the TV source
from “Cable” or “Antenna”.
Make sure to select the correct TV source.
STEP 4. Press <Auto Search>, the TV tuner window
as following shows on the screen.
(B)
Antenna cable
RF coaxial cable
Receive Antenna TV signal
Receive TV signal from cable
For using RF coaxial cable ONLY
Before connecting the RF coaxial cable to Antenna/Cable TV signal
input of the TV tuner, remember to connect the RF coaxial cable
with cable transfer as the following figure shown.
NOTE: There are two kinds of cable transfers: one is for NTSC, the other is for PAL.
3
2
4
1
For using Antenna cable ONLY
After connecting the Antenna cable to Antenna/Cable TV signal
input jack of the TV tuner, remember to extend the Antenna cable
to receive the best quality of TV signal.
1
2
3
4
(NTSC)
(PAL)
STEP 5. Press <UP> button or <DOWN> button
to choose the preferred option.
STEP 6. Press <LEFT> button or <RIGHT>
button to select the preferred setting.
NOTE:
1.Channel: Press <LEFT> button to previous channel, or press
<RIGHT> button to next channel.
2.Freq: Press <LEFT> button to decrease the frequency or
<RIGHT> button to increase the frequency for the best tuning.
3.Favorite: Press <LEFT> button or <RIGHT> button select “Yes”
or “No”.
4.Auto search: Press <RIGHT> button, a tuner search starts automatically
and allows the channel to be confirmed.
*While doing Auto search for the first time, this portable DVD
player will select available TV channels. Yet, if more channels
become available in your area, you may need to repeat the Auto
search to update the available channels.
*Before doing Auto search, make sure to set the correct country
setting in the Screen TV Tuner Setup.
STEP 7. Press <Auto Search> again, the TV tuner
window disappear on the screen.
Channel 56
Freq 415.3MHz
Favorite Yes
Auto search
1
2
3
4
1.Display the current channel
2.Indicate the frequency of the current channel
3.Mark or unmark the current channel as your favorite channel
4.Tuner search automatically

HOW TO USE TV TUNER-continued
To select the preferred available channel
Press <NEXT> or <PREVIOUS> to choose the
preferred available channel.
<<<<
<<<<
<< NOTE>>>>
>>>>
>>
1. This function only works on the available channels. Some
channels might be not available.
2. If you set the selected channel as “No” in Favorite setting,
then the selected channel will not be available while pressing
<NEXT> or <PREVIOUS>.
To select the specific channel
Press <F.BWD> or <F.FWD> to select the specific
channel; or press the number button(s) to specify the specific
channel.
<<<<
<<<<
<< NOTE>>>>
>>>>
>>
1. You can use this function to select the specific channel. All
channels are available.
2. Even if you set the selected channel as “No” in Favorite
setting, the selected channel will be available while pressing
<F.BWD>, <F.FWD> or number button(s).
3. Example: To select Channel 25 by using number buttons,
press “2” “5” by order.
To select the specific channel by number buttons
2 ways to select the specific channel by number buttons:
1. Press the number buttons and wait for 3 seconds, then enter
the specific channel.
2. Press the number buttons and press <PLAY/SEL.>, then
enter the specific channel. (If you press 3-digit number, and
it will enter the specific channel without pressing
<PLAY/SEL.>.)
Display the information of the current channel
Press <INFO.>, the current channel number shows on the
left corner of the screen.
<<<<
<<<<
<< NOTE>>>>
>>>>
>>
Unless you press <INFO.> again, the information of the current
channel always shows on the screen.
To recall between the current channel and the
previous channel
Press <1/ALL REPEAT>, you can recall between the
current channel and the previous channel.
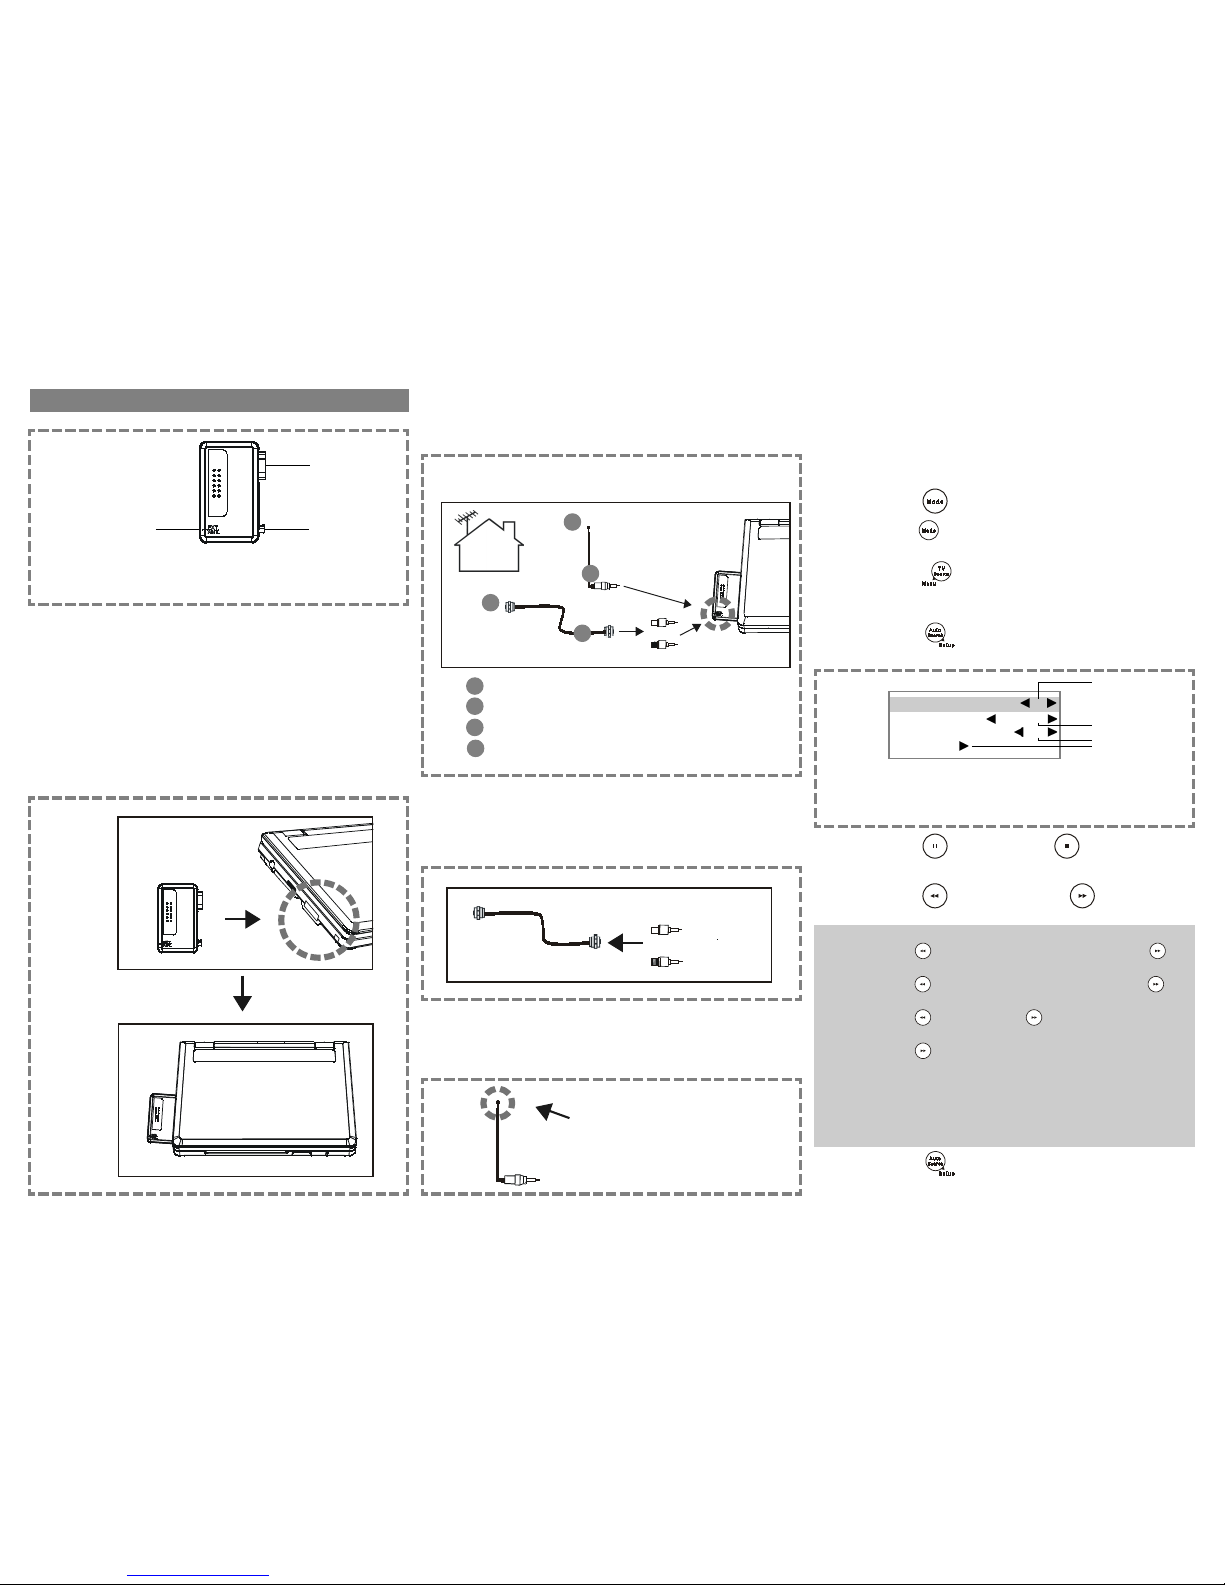
Country Setting
For the channel search setting, please choose the correct country
according to your area.
1Press <SETUP> in the stop mode.
2Press <UP> button / <DOWN> button to
select “Screen TV Tuner”, and then press
<PLAY/SEL.>.
3Press <UP> button / <DOWN> button to
select “Country”, and then press <PLAY/SEL.>.
4Press <UP> button / <DOWN> button to
select the correct country setting.
5Press <PLAY/SEL.>.
PAL TV Tuner
Screen TV Tuner
: Move : Select SETUP: Quit
TV Type
Screen Saver
TV System
Video Output
Country
German
Italian
Portuguese
Spanish
U.K.
NTSC TV Tuner
Screen TV Tuner
: Move : Select SETUP: Quit
TV Type
Screen Saver
TV System
Video Output
Country
Japanese
Taiwan
USA
<< NOTE >>
zRemember to choose the correct country setting, or only black
picture will show on the screen. If so, that means your portable DVD
player doesn’t support TV tuner function. For example, if you
purchased this portable DVD player in U.S. (NTSC TV tuner), then you
can’t use TV tuner function while travelling to Eupore (PAL TV tuner).
Because the TV tuner function sets into two different system:
NTSC and PAL. For details, please refer to the following chart. If your
area isn’t on the list, please choose “U.K.” as your TV tuner setting
if using PAL TV tuner; “USA” if using NTSC TV tuner.
NTSC TV Tuner
Canada, Japan, Korea, Panama, U.S., etc.
PAL TV Tuner
PAL-B/G
Australia, Denmark, Finland, Germany, Holland, Italy, Malaysia, New
Zealand, Portugal, Spain, Singapore, Sweden, Switzerland, Thaliand,
etc.
PAL I/I
Hong Kong, South Africa, U.K., etc.
PAL D/K
Czech, China, Hungary, Poland, etc.
To return to the SETUP MENU screen
Press <LEFT> button.
To finish the setup operation
Press <SETUP> to exit or select EXIT from SETUP MENU
screen.
Table of contents
Other Mustek Portable DVD Player manuals

Mustek
Mustek PL736 User manual

Mustek
Mustek PL8A90 User manual

Mustek
Mustek PL607 User manual

Mustek
Mustek PL510T User manual

Mustek
Mustek MP70B User manual

Mustek
Mustek MP102ATV User manual

Mustek
Mustek PL607 User manual

Mustek
Mustek P400H User manual

Mustek
Mustek MP80B User manual

Mustek
Mustek DTV-MP80D User manual

Mustek
Mustek MP100A User manual

Mustek
Mustek MVP1020B User manual

Mustek
Mustek PL408 User manual

Mustek
Mustek PL407 User manual

Mustek
Mustek PL510 User manual

Mustek
Mustek PL407HM User manual

Mustek
Mustek MP86ATV User manual

Mustek
Mustek PL8A90T User manual

Mustek
Mustek PL408H User manual

Mustek
Mustek PL510T User manual