Mustek PL207 User manual

Portable DVD Player
UserManual
English
82-135-00010

En 2
FCC and Safety Information..................................................................................3
Important Safety Instructions............................................................................... 4
Precautions..................................................................................................... 5
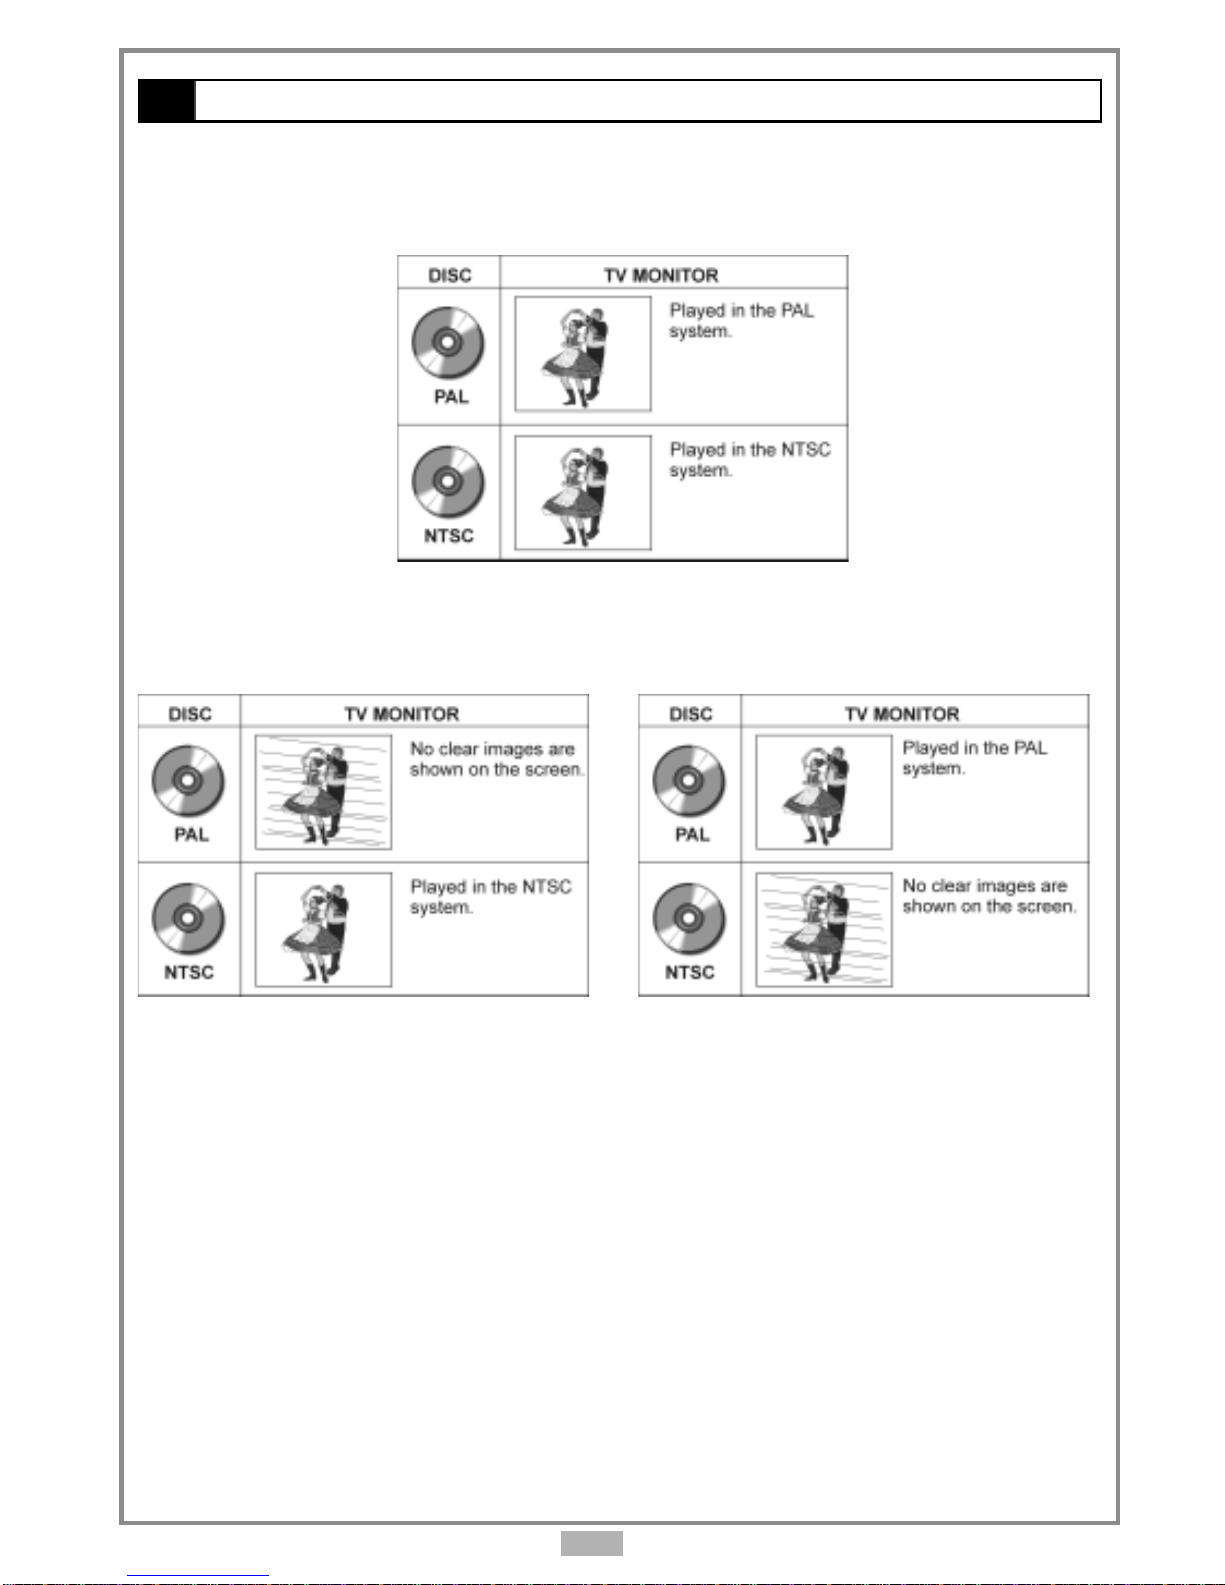
Selecting the type of disc for the type of TV connected................................................ 6
Chapter 1. DVD
1-1 DVD Playback.............................................................................................. 7
Basic Playback........................................................................................................................... 7
Stopping Playback and Returning to The Menu Screen (If a Menu Is Available on The Disc).................................7
Stopping Playback....................................................................................................................... 7
Rapid Advance (Rapid Reverse)....................................................................................................... 8
Skipping Ahead or Back to Chapters................................................................................................. 8
Still Picture(PAUSE)...................................................................................................................... 8
Repeat Viewing.......................................................................................................................... 8
Repeating Sections Between Two Specific Points (A-B Repeat).................................................................. 8
1-2 Convenient functions................................................................................... 9
Displaying the Information of the Scene............................................................................................ 9
Changing Audio Soundtrack Language..............................................................................................9
Clearing/Displaying Subtitles(A)...................................................................................................... 9
Changing Subtitle Language(B)........................................................................................................9
Viewing From Another Angle..........................................................................................................10
To Mute the DVD Player............................................................................................................... 10
Using a DVD Menu......................................................................................................................10
Using the Menu Function.............................................................................................................10
Playing Kodak Picture CDs and JPEG picture CDs.................................................................................11
Playing a JPEG picture with MP3 music.............................................................................................12
Chapter 2.Audio CD
2-1 Audio CD Playback..................................................................................... 13
Basic Playback..........................................................................................................................13
Playing MP3 Music Discs.............................................................................................................. 13
Stopping Playback..................................................................................................................... 13
Rapid Advance (Rapid Reverse)...................................................................................................... 14
Skipping Ahead or Back to Tracks................................................................................................... 14
Pause Playback......................................................................................................................... 14
2-2 Information [Audio CDs]................................................................................14
Displaying the Information of the Playing Track..................................................................................14
Chapter 3. Setup
3-1 Language Setup........................................................................................ 15
On Screen Display (OSD) Language Setting....................................................................................... 15
MENU Language Setting.............................................................................................................. 15
AUDIO Soundtrack Language Selection [DVD].................................................................................... 16
SUBTITLE Language Selection [DVD]................................................................................................ 16
3-2 Screen Setup........................................................................................... 17
SCREEN SAVER Setting................................................................................................................. 17
TV SYSTEM Setting..................................................................................................................... 18
BRIGHTNESS Setting....................................................................................................................19
CONTRAST Setting......................................................................................................................19
3-3 Custom Setup...........................................................................................20
PARENTAL CONTROL Setting [DVD]..................................................................................................20
CHANGE PASSWORD Setting [DVD].................................................................................................. 20
ANGLE MARK Setting [DVD]........................................................................................................... 21
DEFAULT Setting....................................................................................................................... 21
3-4 AUDIO Setup............................................................................................ 22
OUTPUT Setting [DVD]................................................................................................................ 22
Chapter 4.For Your Reference
4-1 Trobleshooting......................................................................................... 23
4-2 Disc Handling and Maintenance.................................................................... 24
4-3 Defintion of Terms.................................................................................... 25
Table of Contents

En 3
Since it is usual for DVD movies to be released at different times in different regions of the world, all players have region
codes and disc can have an optional region code. If you load a disc of a different region code to your player, you will see the
region code notice on the screen. The disc will not play, and should be unloaded.
Possible region codes:
There are 6 regions (also called “locals”). Each DVD player and disc will be played in one region ONLY.
1: Canada, U.S., U.S. Territories
2: Japan, Europe, South Africa, Middle East (including Egypt)
3: Southeast Asia, East Asia (including Hong Kong)
4: Australia, New Zealand, Pacific Islands, Central America, Mexico, South America, Caribbean
5: Former Soviet Union, Indian Subcontinent, Africa (also North Korea, Mongolia)
6: China
Never make or change connections with the power switched on.
CAUTION: VISIBLEANDINVISIBLELASERRADIATIONWHENOPEN
AVOIDEXPOSURETOBEAM
(WARNINGLOCATION:INSIDEONLASERCOVERSHIELD)
CAUTION:
This unit employs a laser. Due to possible eye injury, only qualified service personnel should remove the
cover or attempt to service this device. Use of controls or adjustments or performance of procedures
other than those specified herein may result in hazardous radiation exposure.
NOTE:
This equipment has been tested and found to comply with the limits for a Class B digital device pursuant to part 15 of the
FCC Rules. These limits are designed to provide reasonable protection against harmful interference in a residential
installation. This equipment generates, uses and can radiate radio frequency energy and, if not installed and used in
accordance with the instructions, may cause harmful interference to radio communications. However, there is no
guarantee that interference will not occur in a particular installation. If this equipment does cause harmful interference to
radio or television reception, which can be determined by turning the equipment off and on, the user is encouraged to try
to correct the interference by one or more of the following measures:
– Reorient or relocate the receiving antenna.
– Increase the separation between the equipment and receiver.
– Connect the equipment into an outlet on a circuit different from that to which the receiver is connected.
– Consult the dealer or an experienced radio/TV technician for help.
This product incorporates copyright protection technology that is protected by method claims of certain U.S. patents and
other intellectual property rights owned by Macrovision Corporation and other rights owners. Use of this copyright protection
technology must be authorized by Macrovision Corporation, and is intended for home and other limited viewing uses only
unless otherwise authorized by Macrovision Corporation. Reverse engineering or disassembly is prohibited.
FCC and Safety Information

En 4
1. Readtheseinstructions.
2. Keeptheseinstructions.
3. Heedallwarnings.
4. Followallinstructions.
5. Donotusethisapparatusnearwater.
6. Cleanonlywithadampcloth.
7. Donotblockanyoftheventilationopenings.Installinaccordancewiththemanufacturer’sinstructions.
8. Donotinstallnearanyheatsourcessuchasradiators,heatregisters,stoves,orotherapparatus(including
amplifiers)thatproduceheat.
9. Donotdefeatthesafetypurposeofthepolarized-typeplug.Apolarizedplughastwobladeswithonewiderthanthe
other.Thewidebladeisprovidedforyoursafety.Whentheprovidedplugdoesnotfitintoyouroutlet,consultan
electricianforreplacementoftheobsoleteoutlet.
10. Protectthepowercordfrombeingwalkedonorpinchedparticularlyatplug,conveniencereceptacles,andthepoint
wheretheyexitfromtheapparatus.
11. Onlyuseattachments/accessoriesspecifiedbythemanufacturer.
12. Useonlywithacart,stand,tripod,bracket,ortablespecifiedbythemanufacturerorsoldwiththeapparatus.Whena
cartisused,usecautionwhenmovingthecart/apparatuscombinationtoavoidinjuryfromtip-over.
13. Unplugthisapparatusduringlightingstormsorwhenunusedforlongperiodsoftime.
14. Referallservicingtoqualifiedservicepersonnel.Servicingisrequiredwhentheapparatushasbeendamagedin
anyway;suchaswhenthepower-supplycordorplugisdamaged,liquidhasbeenspilledorobjectshavefallen
intotheapparatus,theapparatushasbeenexposedtorainormoisture,doesnot operatenormally,orhasbeen
dropped.
WARNING:Toreducetheriskoffireorelectricshock,donotexposethisapparatustorainormoisture.The
apparatusshallnotbeexposedtodrippingorsplashingandthatnoobjectsfilledwithliquids,suchasvases,shallbe
placedontheapparatus.
Important Safety Instructions

En 5
Please read these precautions before operating this unit.
Power cord protection
To avoid any malfunctions of the unit, and to protect against electric shock, fire or personal injury, please observe
the following.
Hold the plug firmly when connecting or disconnecting the AC power cord.
Keep the AC power cord away from heating appliances.
Never put any heavy object on the AC power cord.
Do not attempt to repair or reconstruct the AC power cord in any way.
Placement
Avoid placing the unit in areas of:
direct sunlight or heating radiators, or closed automobiles
high temperature (over 950F) or high humidity (over 90%)
much dust as the internal parts may be seriously damaged.
Non-use periods
When the unit is not being used, turn it off. When left unused for a long period of time, the unit should be unplugged
from the household AC outlet.
No fingers or other objects inside
Touching internal parts of this unit is dangerous, and may cause serious damage to the unit. Do not attempt to
disassemble the unit.
Do not put any foreign object on the disc tray.
Keep away from water/magnet
Keep the unit away from flower vases, tubs, sinks, etc. If liquids are spilled into the unit, serious damage could
occur.
Never bring a magnet or magnetized object near the unit.
Stacking
Place the unit in a horizontal position, and do not place anything heavy on it.
Condensation
Moisture may form on the lens in the following conditions:
immediately after a heater has been turned on
in a steamy or very humid room
when the unit is suddenly moved from a cold environment to a warm one
If moisture forms inside this unit, it may not operate properly. In this case, turn on the power and wait about one
hour for the moisture to evaporate.
If there is noise interference on the TV while a broadcast is being received
Depending on the reception condition of the TV, interference may appear on the TV monitor while you watch a TV
broadcast and the unit is left on. This is not a malfunction of the unit or the TV. To watch a TV broadcast, turn off
the unit.
Precautions

En 6
Selecting the type of disc for the type of TV connected
DVD discs have the material recorded in the PAL and NTSC systems. Refer to the table below to select the correct
disc type for the type of connected TV.
Connecting to the multi-system TV
Connecting to the NTSC TV
Connecting to the PAL TV

En 7
1-1 DVD Playback
Preparations
Please connect this portable DVD player to Power and connect it with head phones or connect it to outer
equipments.
If connect it to outer equipment:
Press on the power button of the TV set, and select “Video” as the TV input.
Press on the power button of the stereo system if the player has been connected to a stereo system.
Push the AV OUT/IN silde switch to AV OUT.
Basic Playback
1Open the display panel then press POWER on.
2Press OPEN to open the disc cover.
3Hold the edge of the disc to put it in the center with the printed side up.
Hold the disc without touching its surfaces, position it with the printed title side facing up, align it with the guides, and place it in
its proper position.
4Close the disc cover.
Close the disc cover and this portable DVD player starts playback if the disc does not have any menus recorded on it.
If the disc has one or more titles recorded on it, a menu screen will appear on the screen.
NOTE: Proceed with steps 5 and 6 when a menu is available on the disc.
5Press / / / or the number button(s) to select the preferred title.
NOTE: To select a title, input the number, i.e. 1 for chapter 1, 10 for chapter 10, and etc.
6Press PLAY/SEL.
The player now starts playback the selected item.
Stopping Playback and Returning to The Menu Screen (If a Menu Screen Is Available on The
Disc)
Press MENU. This portable DVD player stops playback, and then displays the menu screen.
After operation
When this portable DVD player is not in use, remove the disc and press POWER to turn off the player. Then close
the display panel.
NOTE:
The disc continues to rotate while the menu is displayed even after the player has finished playing a particular disc. When no
further selections are to be played, be sure to press the STOP button to clear the menu screen.
If the disc is placed in upside down (and it is a single sided disc), the player’s display will appear “NO DISC”.
For your reference:
When “ ” appears while a button is being operated, it means that the corresponding operation is prohibited by the player.
To Stop Playback
Press STOP.
Chapter 1

En 8
Rapid Advance or Rapid Reverse
By the remote control:
Press F.BWD or F.FWD during playback.
Normal playback is resumed when you press PLAY/SEL.
The speed of advance ( x2, x4, and etc) or reverse ( x2, x4, and etc.) changes for each press of the F.FWD or
F.BWD button.
Skipping Ahead or Back to Chapters
You can skip a specific chapter or track to playback.
Skipping Ahead
Press NEXT during playback.
Skips a chapter each time you press the button.
Skipping Back
Press PREVIOUS during playback.
When you press the button once midway through a chapter, this portable DVD player returns to the begining of the chapter to
playback. The player skips back a chapter each time you press the button.
Still Picture (PAUSE)
Press PAUSE once during playback.
The screen is paused.
To return to normal playback
Press PLAY/SEL.
Repeat Viewing
1Press 1/ALL REPEAT during playback.
Each time you press the button, it will cycle through the following.
Press once: REP CHAPTER (Repeat chapter)
Press twice: REP TITLE (Repeat title)
Press three times: REP DISC (Repeat disc)
Press four times: REP off (Repeat cancelled)
To return to normal playback
Press 1/ALL REPEAT several times until “REPEAT Off” appears.
NOTE:
Repeat playback works only with discs for which the elapsed playing time appears on the player’s display during playback.
Repeat playback may not work correctly with some DVDs.
Repeating Sections Between Two Specific Points (A-B Repeat)
1Press A-B during playback at the point where repeat play is to start (A).
“REP A” appears on the screen.
2Press A-B again at the point where repeat play is to end (B).
“REP B” appears on the screen. Repeat playback of points A to B starts playback.
To return to normal playback
Press A-B again. (“REPEAT Off” appears on the screen.)
NOTE: A-B repeat playback works only within a chapter.
1-1 DVD Playback-continued
Chapter 1

En 9
Displaying the Information of the Scene
1Press INFO. during playback.
Press INFO. a number of times, to cycle through the title number, chapter number, and other information will show on
the screen.
Stop Displaying the Information of the Scene
Press INFO. a number of times until the information disappears.
Changing Audio Soundtrack Language
You can change the audio language from the one selected at the initial settings to a different language, if available.
(This operation functions only with discs on which multiple audio soundtrack languages are recorded.)
1Press AUDIO during playback.
2Press AUDIO a number of times until the preferred language is selected.
For your reference:
When the preferred language is not selected even after pressing the button several times, it may indicate that language is not
available on the disc.
When you turn on or remove the disc, this portable DVD player will playback the language which is selected at the initial setting.
If you select a language which is not recorded on the disc, this portable DVD player will playback a prior language programmed
on the disc.
Clearing/Displaying of Subtitles (A)
If a disc provides subtitles, you can choose to hide or display them. (This operation works only with discs that
provide subtitles.)
Press SUBTITLE during playback to display subtitles or hide them.
When you press SUBTITLE once, the first subtitle recorded on the disc will display. The rest of the subtitles recorded will display in
sequence as you press the button.
You may change to another language with this function, or you can clear the subtitle by pressing this button a number of times
until “SUBTITLE OFF” appears on the screen.
Changing Subtitle Language (B)
You can change the subtitle language with the initial settings , if available. (This operation works only with discs on
which multiple subtitle languages are included.)
1Press SUBTITLE during playback.
When no subtitles are recorded “ ” will display instead of the language number.
2Press SUBTITLE a number of times until the preferred language is selected.
NOTE:
In some cases, the subtitle language may not change immediately to the selected one.
For your reference:
When the preferred subtitle language is not selected even after pressing the button several times, it may indicate that the
language is not available on the disc.
When you turn on or remove the disc, this portable DVD player will playback the subtitle language which is selected at the initial
setting. If you select a subtitle language which is not recorded on the disc this portable DVD player will playback a prior subtitle
language programmed on the disc.
1-2 Convenient functions
Chapter 1

En 10
1-2 Convenient functions-continued
Viewing FromAnotherAngle
Some DVD discs may contain scenes which have been shot simultaneously from a number of different angles. For
these discs, the same scenes can be viewed from each of these different angles using the ANGLE “ ” button.
(The recorded angles vary depending on the disc programmed.)
1Press ANGLE during playback.
2Press ANGLE a number of times until the preferred viewing angle is selected.
Press the ANGLE “ ” button a number of times to change the viewing angle.
NOTE:
ANGLE will only function on discs where different angles have been recorded.
The viewing angles are shown on the player’s display and you can select one from them for viewing.
To Mute the DVD Player
In some cases, you may need to mute this portbale DVD player temporarily. This portable DVD player provides a
MUTE function for your selections.
1Press MUTE button during playback.
When “MUTE” appears on the screen, this portable DVD player is mute. To resume the sound, press the mute button until “MUTE
OFF” appears on the screen.
Using a DVD Menu
Some DVD discs have unique menu structures called DVD menus. For example, DVDs programmed with complex
contents provide guide menus, and those recorded with various languages provide menus for audio and subtitle
language. Although the DVD menu’s contents and operation vary from disc to disc, the following explains basic
operation when this feature is used.
1Press TITLE in stop mode
The DVD menu available on the disc now appears.
2Press / / / to select the preferred item.
3Press PLAY/SEL.
You now enter to the selected item.
To enter other menu screen
Repeat steps 2 and 3.
To return to the previous menu screen
Press TITLE.
Using the MENU Function
1Press PLAY/SEL.
2Press MENU.
A DVD chapter menu with brief broadcast of each paragraph now appears. You may see the introduction of each chapter and then
decide with which chapter to start first.
3Press / / / or number button(s) to select the preferred item.
Note: The menu details vary depending on discs recorded.
Chapter 1

En 11
1-2 Convenient functions-continued
Playing Kodak Picture CDs and JPEG picture CDs
You can play Kodak picture CDs and JPEG pictures for viewing on the screen.
Basic Playback
1Load a Kodak picture CD or a JPEG picture CD on the tray. After few seconds, this portable DVD
player starts play back the pictures in slide show automatically.
2You can press the number corresponding to the order of the picture. This portable DVD player will
begin the slide show from the selected picture.
To stop slide show
Press EJECT.
PAUSE, NEXT and PREV.
1Press PAUSE to pause the slide show.
2Press NEXT and PREVIOUS to view the next or previous picture.
To resume slide show
Press PLAY again.
Rotating
1When the picture is paused, press / to rotate the picture by 90 degree.
ZOOM and Scrolling
1Press ZOOM repeatedly to view the picture in different sizes.
2Press NEXT and PREVIOUS to view the next or previous picture.
3Press / / / to drag or scroll the picture in different directions if the image is larger than
the TV screen.
Thumbnail Viewing
1Press STOP to enter thumbnail preview. You will see 9 pictures per page for viewing.
2Press / / / to select the picture in thumbnail page. If you want to view the selected
image in original size, press PLAY/SEL.
3Press NEXT and PREVIOUS to view the next or previous thumbnail page.
INFO.
1Press INFO. The TV screen will appear, for example, TRK: 3/150 (The sequential order of the
current picture/ Total pictures.)
NOTE:
Features Rotating, Scrolling, Thumbnail Viewing can only work on Kodak Picture CDs.
Current Displaying
page / Total pages 1/4
6
7
4
3
5
98
21
Chapter 1

En 12
1-2 Convenient functions-continued
Chapter 1
Playing a JPEG picture with MP3 music
You can select your favorite JPEG picture to display on the TV screen while playing MP3 music.
1Load a disc containing MP3 music and JPEG pictures on the tray. This portable DVD player starts
playing the JPEG pictures in slide show automatically.
2Press STOP at the picture you like during slide show. At the mean time, you can see the
following screen appear.
3Press / to select a MP3 folder, and then press PLAY/SEL. The next screen appears:
4To play the track, you can
a. press NEXT or PREVIOUS to play the next or previous track,
b. press / to select the MP3 track, and then press PLAY/SEL.
c. press the track number (i.e. 1), and then press PLAY/SEL.
NOTE:
This feature allows displaying only one JPEG picture at a time with MP3 music playback.
In some cases, MP3 music and JPEG pictures cannot be played accordingly. This may result by the data on the disc was recorded
using options that are not supported by this portable DVD player.
JPEG folder
Folder List 01/02
N: 150
+ JPEG
+ DIR 002 +DIR 003
+ DIR 004 +DIR 005
+ DIR 006
The sequential order of selected
format/Total formats
Total MP3 tracks
MP3 folder
The selected folder
Track List 01/02
DIR: DIR 003 03/05
TRK 044/150
MP3 001 MP3 002
MP3 003 MP3 004
MP3 005
The sequential order of the
selected folder/Total MP3 folders
The playing track/
Total MP3 tracks

En 13
Preparations
Please connect this portable DVD player to Power and connect it with phones or connect it to outer equipments.
If connect it to outer equipment:
Press on the power button of the TV set, and select “Video” as the TV input.
Press on the power button of the stereo system if the player has been connected to a stereo system.
Slide the AV OUT/IN SWITCH button toAV OUT.
Basic Playback
1Press POWER on.
2Press OPEN to open the disc cover.
3Hold the edge of the disc to put it in the center with the printed side up.
Hold the disc without touching its surfaces, position it with the printed title side facing up, align it with the guides, and place it in
its proper position.
4Press PLAY/SEL.
For audio CDs without playback control:
This portable DVD player starts playback.
NOTE:
While Audio CD playbacks, you could press LCD several times to turn off the LCD screen.
Playing MP3 Music Discs
1Press POWER on.
2Press OPEN to open the disc cover.
3Hold the edge of a MP3 disc to put it in the center with the printed side up.
4Press PLAY/SEL.
Close the disc cover, wait about 5 seconds, playback will start automatically.
Normally, MP3 discs are divided into Root directories (main menu) which are sub-divided to MP3 music. You may select a specific MP3
music to playback.
With Root Directories
Press STOP to enter to the directories
Select a specified track to playback by pressing / buttons or the numbers.
Press PLAY/SEL.
Without Root Directories
During playback, select a specified track to playback by pressing / buttons or the numbers.
Press PLAY/SEL.
Stopping Playback
Press STOP.
2-1 Audio CD Playback
Chapter 2

En 14
Rapid Advance or Rapid Reverse
By the remote control:
Press F.BWD or F.FWD during playback.
Normal play is resumed when you release the button.
The speed of forward ( x2, x4, and etc.) or reverse ( x2, x4, x8, and etc.) changes for every press of the
F.FWD or F.BWD button.
Skipping Ahead or Back to Tracks
Skipping Ahead
Press NEXT during playback.
A track is skipped each time you press the button.
Skipping Back
Press PREVIOUS during playback.
When you press the button once midway through a track, this portable DVD player returns to the begining of the
track to playback. The player skips back a track each time the button is pressed.
Pause Playback
Press PAUSE during playback.
The player will pause playback.
To return to normal playback
Press PLAY/SEL.
2-2 Information [Audio CDs]
Displaying the Information of the Playing Track
1Press INFO. during playback.
Press INFO. a number of times to cycle through the elapsed time, track number, and other information.
Stop Displaying the Information of the Playing Track
Press INFO. a number of times until the information disappears.
2-1 Audio CD Playback-continued
Chapter 2

En 15
On Screen Display (OSD) Language Setting
Allows you to set various languages for the on screen display (OSD).
1Press SETUP in the stop mode.
2Press / to select “LANGUAGE SETUP” then press PLAY/SEL.
3Press / to select “OSD” then press PLAY/SEL.
4Press / to select the preferred language.
5Press PLAY/SEL.
To return to the SETUP MENU screen
Select “RETURN” and press PLAY/SEL.
To finish the setup operation
Press SETUP to exit or select EXIT from SETUP MENU screen.
MENU Language Setting
You can select a preferred language among various languages that has been recorded on discs for the disc menu
messages display.
1Press SETUP in the stop mode.
2Press / to select “LANGUAGE SETUP” and press PLAY/SEL.
3Press / to select “MENU” then press PLAY/SEL.
4Press / to select the preferred language.
5Press PLAY/SEL.
To return to the SETUP MENU screen
Select “RETURN” and press PLAY/SEL.
To finish the setup operation
Press SETUP to exit or select EXIT from SETUP MENU screen.
3-1 Language Setup
Chapter 3

En 16
AUDIO Soundtrack Language Selection [DVD]
You can select a preferred soundtrack language among various languages that have been recorded on DVD discs.
1Press SETUP in the stop mode.
2Press / to select “LANGUAGE SETUP” then press PLAY/SEL.
3Press / to select “AUDIO” then press PLAY/SEL.
4Press / to select a preferred language.
5Press PLAY/SEL.
ORIGINAL:
The top-priority language of each disc will always playback first.
To return to the SETUP MENU screen
Select “RETURN” and press PLAY/SEL.
To finish the setup operation
Press SETUP to exit or select EXIT from SETUP MENU screen.
For your reference:
If the language selected is not recorded on the disc, the DVD player will playback the top-priority language of the disc.
SUBTITLE Language Selection [DVD]
You can select a preferred subtitle language among various languages that have been recorded on DVD discs.
1Press SETUP in the stop mode.
2Press / to select “LANGUAGE SETUP” and press PLAY/SEL.
3Press / to select “SUBTITLE”, then press PLAY/SEL.
4 Press / to select a preferred language.
5Press PLAY/SEL.
To return to the SETUP MENU screen
Select “RETURN” and press PLAY/SEL.
To finish the setup operation
Press SETUP to exit or select EXIT from SETUP MENU screen.
For your reference:
If the language selected is not recorded on the disc, the subtitle will playback the top-priority language of the disc.
3-1 Language Setup-continued
Chapter 3

En 17
SCREEN SAVER Setting
If you have set the screen saver ON by the following method then you may see it functioning in the stop mode. This
function will ONLY function in the stop mode.
1Press SETUP.
2Press / to select “SCREEN SETUP” and press PLAY/SEL.
3Press / to select “SCREEN SAVER”.
4Press / to select “ON” or “OFF” and press PLAY/SEL.
The waiting time of the screen saver is set to 10 minutes. In other words, when you are in the stop mode and have not operated
this portable DVD player over 10 minutes then the screen saver will appear automatically on the screen.
To return to the SETUP MENU screen
Select “RETURN” and press PLAY/SEL.
To finish the setup operation
Press SETUP to exit or select EXIT from SETUP MENU screen.
3-2 Screen Setup
Chapter 3

En 18
TV SYSTEM Setting
The player provides “PAL”, “NTSC” and “AUTO” settings for your selection. Video output changes according to the
playback disc’s recorded fromat. When connecting this portable DVD player to your TV, set the “TV SYSTEM” from
the on-screen display to the format that is compatible with your TV’s system. Set ”NTSC” from on-screen display if
connecting to NTSC TV system, set “PAL” if it is PAL TV, or set “AUTO” if it is a multi-TV system that supports both
PAL and NTSC.
1Press SETUP.
2Press / to select “SCREEN SETUP”and press PLAY/SEL.
3Press / to select “TV SYSTEM” then press PLAY/SEL.
4 Press / to select the appropriate TV system for your clearest view.
5Press PLAY/SEL.
To return to the SETUP MENU screen
Select “RETURN” and then press PLAY/SEL.
To finish the setup operation
Press SETUP to exit or select EXIT from SETUP MENU screen.
3-2 Screen Setup-continued
Chapter 3

En 19
BRIGHTNESS Setting
You can adjust the brightness of the video with this setting to a soothing view for your eyes.
By the BRIGHTNESS Adjustment button:
1. Gently touch the BRIGHTNESS Adjustment button, slide it in a clockwise or a counterclockwise
direction for the preferred setting.
2. Slide it in a clockwise direction to lower the brightness of the screen.
3. Slide it in an counterclockwise direction to increase the brightness of the screen.
CONTRAST Setting
You can adjust the contrast of video with this setting to a soothing view for your eyes.
By the COLOR Adjustment button:
1. Gently touch the COLOR Adjustment button, slide it in a clockwise or a counterclockwise
direction for the preferred setting.
2. Slide it in a clockwise direction to lower the COLOR of the screen.
3. Slide it in an counterclockwise direction to increase the COLOR of the screen.
3-2 Screen Setup-continued
Chapter 3

En 20
Note: “Custom Setup” only works without disc inside this portable DVD player.
PARENTAL CONTROL Setting [DVD]
A built-in viewer rating setting enables you to lock the videos that you do not want children to view. For example, if
you set it to PG-13 then the player will not play the videos rated R, NC-17 or X unless the correct password is entered.
1Press SETUP in the stop mode.
2Press / to select “CUSTOM SETUP” and press PLAY/SEL.
3Press / to select “PARENTAL CONTROL”and press PLAY/SEL.
4Enter a 4-digit password and press PLAY/SEL.
Factory pre-set password : 0000
You need to enter “0000” to set the rating for the first time when purchasing your DVD from the store.
5Press / to select ratings and press PLAY/SEL.
To return the screen to the SETUP MENU
Select “RETURN” and then press PLAY/SEL.
To finish the setup operation
Press SETUP to exit or select EXIT from SETUP MENU screen.
For Your Reference:
You can use the parental control lock ONLY with DVD video discs featured with the parental lock funcion.
Some discs may not be encoded with specific rating level information though its disc jacket says that is for “adults”. For those
discs, PARENTALCONTROL lock will not function.
CHANGE PASSWORD Setting [DVD]
You can change the password to your DVD by selections.
1Press SETUP in the stop mode.
2Press / to select “CUSTOM SETUP” and press PLAY/SEL.
3Press / to select “CHANGE PASSWORD”and press PLAY/SEL.
4Enter your old password, and then press PLAY/SEL.
5Enter your new password, and then press PLAY/SEL.
To return the screen to the SETUP MENU
Select “RETURN” and then press PLAY/SEL.
To finish the setup operation
Press SETUP to exit or select EXIT from SETUP MENU screen.
3-3 Custom Setup
Chapter 3
Table of contents
Other Mustek Portable DVD Player manuals

Mustek
Mustek PL408 User manual

Mustek
Mustek MP90 User manual

Mustek
Mustek PL510T User manual

Mustek
Mustek MP76ATV User manual

Mustek
Mustek MVP76A User manual

Mustek
Mustek PL607 User manual

Mustek
Mustek MVP1020B User manual

Mustek
Mustek MVP700B User manual

Mustek
Mustek PL510T User manual

Mustek
Mustek PL8A90T User manual

Mustek
Mustek P400H User manual

Mustek
Mustek PL607 User manual

Mustek
Mustek PL408H User manual

Mustek
Mustek MP100 User manual

Mustek
Mustek MP70B User manual

Mustek
Mustek MP70B User manual

Mustek
Mustek MP102ATV User manual

Mustek
Mustek MP86ATV User manual

Mustek
Mustek DTV-MP80D User manual

Mustek
Mustek PL8A90 User manual