My Child Astro User manual

Astro Fix Car Seat
Group 1 child car seat
This product conforms to ECE R44.04
Group 1 child car seat.
Suitable for children from 9kg to 18kg (approx 1 to 4 years old)
Instructions: Please read carefully and keep for future reference.
Your child’s safety may be affected if you do not follow these
instructions.
V1


page 1
Warning: NEVER leave your child unattended – your child’s safety is your responsibility.
Warning: The child car seat must be tted in accordance with the manufacturer’s
instructions. Incorrect installation could be dangerous.
Warning: This installation must only be performed by a competent adult. Don’t try to
install the seat when intoxicated or drowsy.
Warning: Always ensure that new or occasional users [e.g. grandparents] have read
the instructions or been taught the correct installation by someone who has read and
understood the instructions.
Warning: Always keep this instruction manual with the child car seat, or in the vehicle
in which you are carrying the child car seat. Some models of child car seat have a
pocket to store the instructions.
Warning: Do not t the child car seat on a side or rear facing vehicle seat.
Warning: Before installing the child car seat ensure that the passenger seat you are
using is locked in the upright position.
Warning: Do not use the child car seat in the home - it has only been designed to be
used in the car.
Warning: Do not leave loose/unsecured objects on the back seat of your car or the
parcel shelf. They may be dangerous to your child if you are forced to brake suddenly.
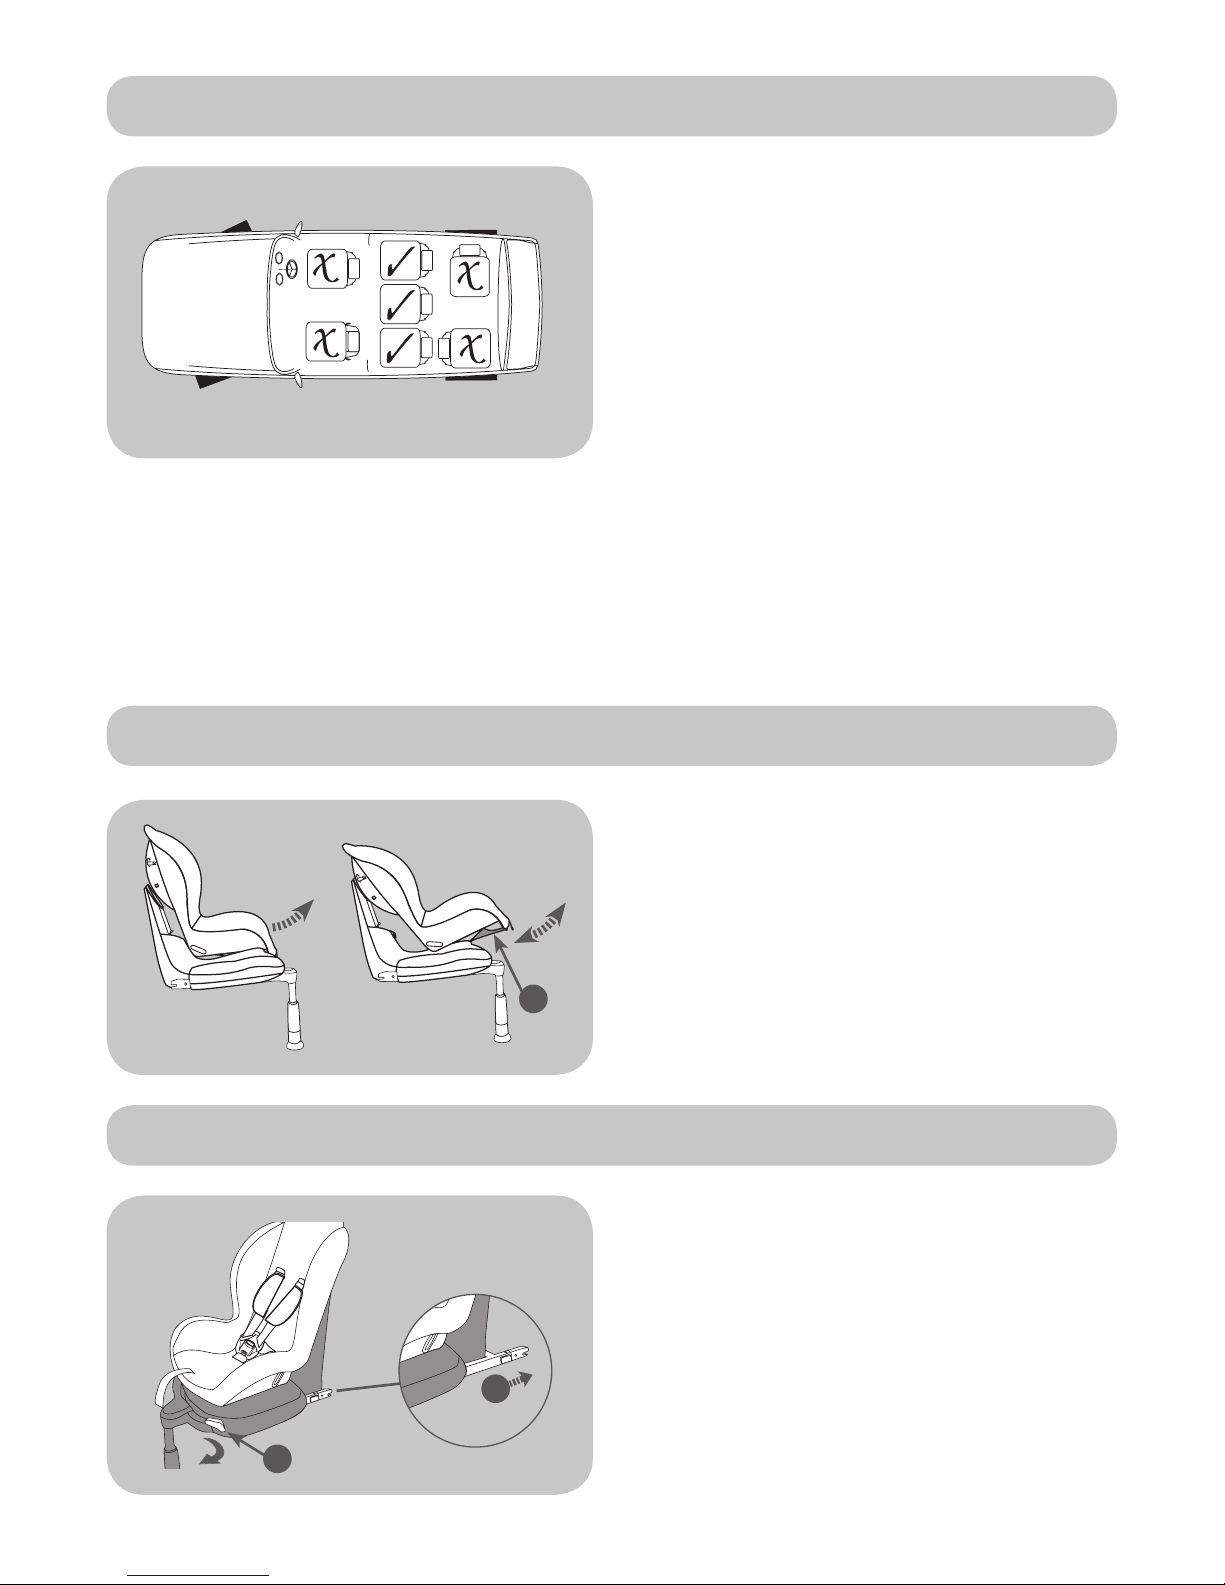
If your centre rear passenger seat is tted with a three point seatbelt system then you
should use it.
If your centre rear passenger seat does not have a three point seatbelt system (i.e. no
seatbelt at all, or only a lap belt)
- then you should use the rear left passenger seat or the rear right passenger seat.
The front passenger seat can only be used if it DOES NOT have an airbag and IS tted
with a three point seatbelt system.
GETTING STARTED
Which is the safest passenger seat to t your child car seat to?
Before Starting
Read Carefully Before Attempting to Fit the Child Car Seat
THE CENTRE REAR PASSENGER SEAT
1. The child car seat must only be used in vehicles which are tted with a three point
seatbelt system that has been approved by regulation ECE-16 or similar.
2. A correct t is likely if the vehicle manufacturer has declared in the vehicle hand
book that the vehicle is capable of accepting a ‘Universal ’child restraint for this
group.
3. The child car seat is a ‘Universal’ child restraint; it conforms to regulation
ECE-R44/04 for general use in vehicles. It will t most, but not all vehicle seats.
4. This child car seat has been declared ‘Universal’ under more stringent conditions
than those applied to earlier designs, which do not carry the ‘Universal’ mark.
5. Child car seats can mark vehicle seat upholstery. The manufacturer cannot be
held responsible for damage or marking to vehicle seats.
6. The following situations could be illegal and will invalidate the warranty: 1) Any
modications or change of use of the child car seat that have not been authorised
or advised by the manufacturer. 2) Any failure to t the child car seat in strict
accordance with the instructions.
The manufacturer accepts no liability for issues arising from unauthorised
modications, uses or tting.
7. Please keep this manual safe for any possible queries you may have in the future.
8. You will need to keep your proof of purchase. We recommend you keep them
together.
Notices

page 2
EXTREME HAZARD
NEVER USE IN FRONT PASSENGER SEATS EQUIPPED WITH AIRBAGS (SRS)
THIS CAN INCLUDE REAR PASSENGER SEATS THAT ARE EQUIPPED WITH AIRBAGS*
*Consult car manufacturer for suitability. Children’s bodies are not able to withstand the forces
exerted on them by a deploying air-bag
When Using the Child Car Seat
Seatbelt
Warning: Make sure that the child car seat is placed somewhere so that rigid items and
plastic parts do not become trapped in doors or movable seat units when the seat is in
everyday use.
Warning: Always use the vehicle’s door child safety lock system, if one is available, to
make it impossible for the child to open the car doors from inside.
Warning: Allow the child a break during long car journeys and make sure they don’t
get out of the car unaided and without supervision.
Warning: The child car seat must be tted securely to the passenger seat. Ensure that it
is not loose or wobbly after you have tted it. If it is loose, re-t it.
Warning: The child car seat must not be used without its original cover. The original
cover is essential for the safe operation of the child car seat.
Warning: Stop the car at regular intervals to check that the child car seat is in the
correct position and that both the car seatbelt (if used) AND the child car seat harness
are still taut and latched.
Warning: Ensure that no part of the child car seat is trapped in a door or folding seat.
Warning: In the event of an emergency it is important to be able to release the child
quickly (as dened by British Standards). This means that the seat buckle cannot be
fully tamper proof and you should actively discourage your child from playing with or
using the buckle.
Warning: If you travel with passengers using both the front and the rear passenger
seats, the lighter occupants should be in the rear and the heavier occupants in the
front.
Warning: If you have no option other than to put your child car seat on a rear
passenger seat next to side airbags:
- Consult with your vehicle manufacturer for side airbag details. It may not be safe.
- Make sure your child does not lean into the area immediately around the airbag.
Warning: Do not place anything under the child car seat (e.g. a towel or cushion) as
this could affect the performance of the seat in an accident.
Warning: Avoid winter clothing bundling - Bulky clothing can lead to incorrect harness
tightening. In an accident, the child can slip right out of the extra padding - and thus
out of the seat. Let the car warm up or cool down prior to placing your child in there if
possible. If your child is cold, place a blanket over the top of the harness.
Warning: NEVER use any load bearing contact points other than those described in
these instructions or marked on the child car seat.
Warning: Ensure that the lap section of the harness is worn low down, so that the pelvis
is rmly engaged.
Warning: Make sure that ALL the passengers in your vehicle have their seatbelts
fastened, as unrestrained people can be very dangerous to the child in an accident.
Warning: NEVER use a seatbelt routing scheme that differs from these instructions.
Warning: The harness must be used at all times when your child is in the child car seat.
Warning: If you are installing the child car seat using a seatbelt ensure there are no
twists in the seatbelt.

page 3
Whilst we make and test our products to the highest standards of durability there’s
always a small chance of a hiccup! Our promise is to repair, replace or refund a MyChild
product that has an identied manufacturing defect from the date of purchase for a full
3 years thereafter at no extra cost.
However, you must register within 28 days of the date of purchase to receive the full 3
years guarantee!
To receive your full guarantee you can register your product by:
visiting www.mychildonline.co.uk/warranty.html and complete the warranty form,
or by telephone on 0161 335 2508.
Sunlight/Hot days
Back of the Seat/Headrest
Second Hand or Damaged Child Car Seats and Seatbelts
Your 3 year warranty
Warning: Don’t leave your child in the child car seat while parked in direct sunlight or
on a hot day.
Warning: Do not subject the child car seat to prolonged direct sunlight as this may be
dangerous for your child (the metal and plastic ttings could become hot) and may
cause the fabric to fade. You can reduce this problem by covering the child car seat
with a sheet when not in use.
Warning: Ensure that the child car seat is as close as possible to the backrest of the car
seat.
Warning: REMOVE the headrest of the passenger seat being used if it obstructs the
proper installation of the child car seat. REMEMBER to ret the headrest when the child
car seat has been removed.
Warning: Never buy a second hand child car seat. It may have unseen damage.
Warning: The manufacturer only guarantees this product when the original owner uses
it.
Warning: You MUST replace the child car seat and your vehicles seatbelts if they
becomes badly worn or damaged.
Warning: You MUST replace the child car seat if it is involved in an accident – it may
have unseen damage and may not protect your child as well as they should. At the
very least send the child car seat to the manufacturers for inspection, together with the
accident report.
Welcome 4
Parts checklist 4
Positioning the seat 5
Five-position seat recline 5
Installing in a vehicle which has ISOFIX anchor points 5-6
Installing using the vehicle’s 3-point seatbelt 7-9
Placing your child in the child car seat 10-11
Adjusting the harness height 12-15
Removing the ISOFIX tted child seat from the vehicle 16
Removing the 3-point seatbelt tted child seat from the vehicle 17
Removing the seat cover 18
Maintenance and cleaning 19
Contents

page 4
Parts checklist
1 Lock off device
2 Belt guard cover
3 Red belt hooks
4 Warning label
5 ISOFIX connectors
6 ISOFIX indicator
7 ISOFIX release button
8 Seat cover
9 Seat shell
10 Upper shaft and lock
11 Lower shaft and lock
12 Belt yoke
13 Seat base
14 Head cushion
15 Harness strap
16 Buckle
17 Waist strap slots
18 Recline adjuster handle
19 Shoulder strap slots
20 Shoulder pads
21 Harness release button
(under the pad)
22 Harness adjuster strap
23 ISOFIX connector lever
24 Floor supporting leg
Thank you for purchasing the Astro Fix child car seat. Please read these instructions
carefully before use to ensure safe and satisfactory operation of this product.
Your child’s safety is your responsibility. If you have a query with this product or require
replacement parts, please contact your nearest MyChild retailer.
Welcome
14
21
22
23
24
19
20
15
16
17
8
9
10
11
1
2
3
4
5
13
6
7
18
12

page 5
Positioning the seat
Five-position seat recline
The child car seat can be secured in a
forward-facing position in the rear seats
of the car in two ways:
1. Using an approved ISOFIX anchorage
system.
2. Using an automatic 3-point seatbelt
(MUST be used along with the child car
seat support leg).
Although not recommended, the child
car seat can be used on a passenger
side front seat, so long as there is no
active airbag in place.
WARNING: Never use on a seat with an
active airbag.
There are 5 recline positions.
Squeeze the recline adjuster handle
(A), slide the seat shell forwards or
backwards to the desired position
upright reclined
Installing in a vehicle which has ISOFIX anchor points
Place the seat forward facing in your
car. Pull the ISOFIX connector lever (A)
to extend the ISOFIX connectors (B).
A
A
B

page 6
Installing in a vehicle which has ISOFIX anchor points (cont)
Lock the two ISOFIX connectors into the
ISOFIX anchorage points.
The ISOFIX indicator (A) will turn green
when the connectors are locked to the
anchorage points.
Pull the seat forward to check both
connectors are rmly locked in place.
Pull and hold the ISOFIX
connector lever (B), and
push the child car seat into
the vehicle seat, release the
lever when there is no space
between the child car seat
back and the vehicle seat.
Adjust the support leg until
the foot reaches the oor of
your vehicle. Do not continue
turning the adjuster after the
foot of the leg reaches the
oor, as this will raise the front of
the child seat (C).
The child car seat is now tted.
Go to page 10, “Placing your
child in the child car seat”.
WARNING: The child car seat should always be either strapped in using the vehicle’s
seatbelt or locked in place using the ISOFIX system, whether a child is seated in the
child seat or not.
click
A
B
C

page 7
Installing using the vehicle’s 3-point seatbelt
Place the child car seat into a suitable
passenger seat (see “positioning the
seat” page 5).
Unlock both the upper (B) and lower (C)
shafts and remove them.
Tilt the seat shell forwards (D), feed the
seatbelt between the seat and the base
and plug the buckle in ensuring the
seatbelt is not twisted.
Push the child car seat back into the
passenger seat ensuring a good t.
Thread the horizontal lap belt section
under both hooks (E) and remove all
the slack by pulling up on the diagonal
section of seatbelt. Thread the diagonal
section through the lock off device (F)
that is nearest to the seatbelt.
D
E
F
B
C
Adjust the shell to its most reclined
position.
Squeeze the recline adjuster handle (A)
under the front of the shell and whilst
holding it, pull the shell forwards to its
most reclined position.
A
click

page 8
Return the shell to its original
position ensuring the diagonal
shoulder belt exits between
the shell and seat base.
Thread the lower shaft (K)
back through the child car
seat and rotate the shaft
upwards to lock it into place.
Insert the upper shaft (L) back
through the child car seat
ensuring that the seatbelt
goes over the shaft (M). Push
the shaft all the way in and
rotate it downwards to lock it
in place.
Make sure that there are no
kinks or twists in the seatbelt.
To operate the lock-off device: Pull down on tab (G) to open the locking device. Lift
up the latch (H). Pass the seatbelt under the latch and pull the belt tight (I). Close the
latch and fasten the tab (J) whilst holding the diagonal section of seatbelt tight.
GH I J
Installing using the vehicle’s 3-point seatbelt (continued)
K
L
M

page 9
With your child car seat now buckled in, check it is secure by pulling forward from both
harness straps, there should be little or no movement. Next check that the vehicle’s
seatbelt buckle is NOT resting against the child car seat shell. This is called ‘buckle
crunch’ and could cause the child car seat to work loose or the seatbelt to come
undone in an accident. If you nd you are experiencing ‘buckle crunch’ then this child
car seat is not suitable for your vehicle.
Installing using the vehicle’s 3-point seatbelt (continued)
Finally, adjust the support
leg until the foot reaches
the oor of your vehicle. Do
not continue turning the
adjuster after the foot of the
leg reaches the oor, as this
will raise the front of the child
seat (J).
WARNING: The child car seat should always be either strapped in using the vehicle’s
seatbelt or locked in place using the ISOFIX system, whether a child is seated in the
child seat or not.
J

page 10
Placing your child in the child car seat
Ensure that you have rst installed the child car seat correctly.
Press button (A) and pull forwards on the shoulder straps (B), (not the shoulder pads) to
loosen the straps.
Press button (C) and unfasten the harness.
IMPORTANT: DO NOT pull the shoulder pads.
A
B
C
After placing your child in the
child car seat, match the two
halves of the harness buckles
together and insert them into
the crotch buckle until you hear
a click.
Make sure the shoulder straps t
your child snugly by pulling the
adjuster belt (C).
C
click

page 11
Placing your child in the child car seat (continued)
The harness should allow 1 nger width
(1cm) of space at the top of the
shoulders. This is the ideal tightness.
If the harness is too loose or too tight
then adjust the height or tightness
accordingly.
WARNING: The child car seat should
always be either strapped in using the
vehicle’s seatbelt or locked in place
using the ISOFIX system, whether a child
is seated in the child seat or not.

page 12
WARNING: You should not attempt to adjust the harness height with a child seated in
the child car seat.
Press button (A) and pull forwards on the shoulder straps (B), (not the shoulder pads) to
loosen the straps.
Press button (C) and unfasten the harness.
IMPORTANT: DO NOT pull the shoulder pads.
A
B
C
Adjusting the harness height
The harness should exit the child car seat at the same height as the child’s shoulder
and should not exit higher or lower than the childs’s shoulder.

page 13
Adjusting the harness height (continued)
Adjust the shell to its most reclined
position.
Squeeze the recline adjuster handle (C)
under the front of the shell and whilst
holding it, pull the shell forwards to its
most reclined position.
C
Rotate the lower shaft downwards to
unlock it and then remove it from the
shell.
Tilt the shell forwards (D).
Remove the belt guard cover (E)
D
E
C

page 14
Adjusting the harness height (continued)
Unhook the straps at the rear of the seat
shell by sliding the straps through the slits
in the shoulder pads connector (F) and
yoke (G).
Remove straps, pulling them out from
the front of the seat.
NOTE: The thinner straps are the shoulder
pad straps, and they connect to the
shoulder pads connector (F) and the
wider straps are the shoulder harness
straps, and they connect to yoke (G).
F
G
Adjust one side at a time.
Pull the shoulder straps through their slot (H) and avoid twisting the straps,
Pass both the wider strap (J) and narrow strap (K) back through the shell at your
desired slot height (I),making sure the wider strap (J) is threaded through the shoulder
pad (L), and that you keep the thinner strap (K) below the wider strap (J).
Repeat on the opposite side.
K
L
J
HI

page 15
Adjusting the harness height (continued)
Check that the straps are not twisted
and reconnect the shoulder pad straps
to the shoulder pad connector (M) and
the shoulder harness to the yoke (N).
Replace the belt guard cover (O).
Return the shell to it’s original position
(P).
O
M
P
N
Thread the lower shaft back through the
seat and rotate the shaft upwards (Q) to
lock it into place.
Q

page 16
Removing the ISOFIX tted child seat from the vehicle
Pull the ISOFIX connector lever (A)
and move the child seat forward
so access can be gained to the
release buttons (B).
Pull back both release buttons (B)
on each side of the child car seat
and remove the seat.
Pull the ISOFIX connector lever (A)
and at the same time push the ISOFIX
connectors (C) back into the base of
the seat.
B
B
A
C
A

page 17
Unbuckle the seatbelt.
Unlock both the upper shaft (D) and
lower shaft (E) and remove them.
Adjust the shell to its most reclined
position.
Pull the positioning handle (F) under the
front of the shell and whilst holding it,
pull the shell forwards to its most reclined
position.
Removing the 3-point seatbelt tted child seat from the vehicle
D
E
F
Pull the shell forward, and remove
the seatbelt from the locking
device (G) and hooks (H).
Return the shell to its original
position and return the seat
recline to the upright position.
Ret both shafts and lock them in
place. You can now remove the
child car seat from the vehicle.
H
G

page 18
The main cover is held in place by a series of hooks (B) located on the back and
underside of the shell. Unhook the cover’s elastic from the hooks and remove.
To replace the cover thread the crotch strap and harness straps through the slots in the
cover. Stretch the cover over and around the seat and hook the elastic back over the
hooks (B). Reattach the side covers. Reconnect the shoulder straps (see “Adjusting the
harness height” pages 12-15 for details on removing and replacing the straps)
Removing the seat cover
WARNING: The cover is a safety feature.
Never use the child car seat without it.
The seat cover can be removed
for purposes of hand washing (see
“maintenance and cleaning” page 19).
Remove the shoulder straps, shoulder
pads (see “Adjusting the harness height”
pages 12-15 for details on removing and
replacing the straps)
Remove the two small side covers (A)
by grasping the elasticated edges and
pulling each cover off.
A
B
B
Table of contents
Other My Child Car Seat manuals

My Child
My Child Rapido Fix Car Seat User manual

My Child
My Child Easy Twin User manual

My Child
My Child Chilton User manual

My Child
My Child Stirling User manual

My Child
My Child Button Booster Seat User manual

My Child
My Child Echo (SAP) User manual

My Child
My Child Jet Stream User manual

My Child
My Child Expanda User manual

My Child
My Child Chadwick User manual