My Child Pepper User manual

Pepper
Highchair
V6
INSTRUCTIONS:
This product conforms to BS EN 14988-1:2006+A1:2012
Suitable for children who can sit up unaided, aged
approximately 6 months but not exceeding 18kg/40lbs.
Your child’s safety may be affected if you do not follow these
instructions.
IMPORTANT!
KEEP FOR FUTURE REFERENCE

page 2
Safety instructions
We know that safety is of utmost concern for parents and carers of children. Whilst this
product has been developed to all of the relevant safety standards, we need your
help to maintain that level of safety and minimise the risk of a baby using this product
being harmed. Your baby should never be left alone in the highchair and all harmful
objects should be kept out of your child’s reach.
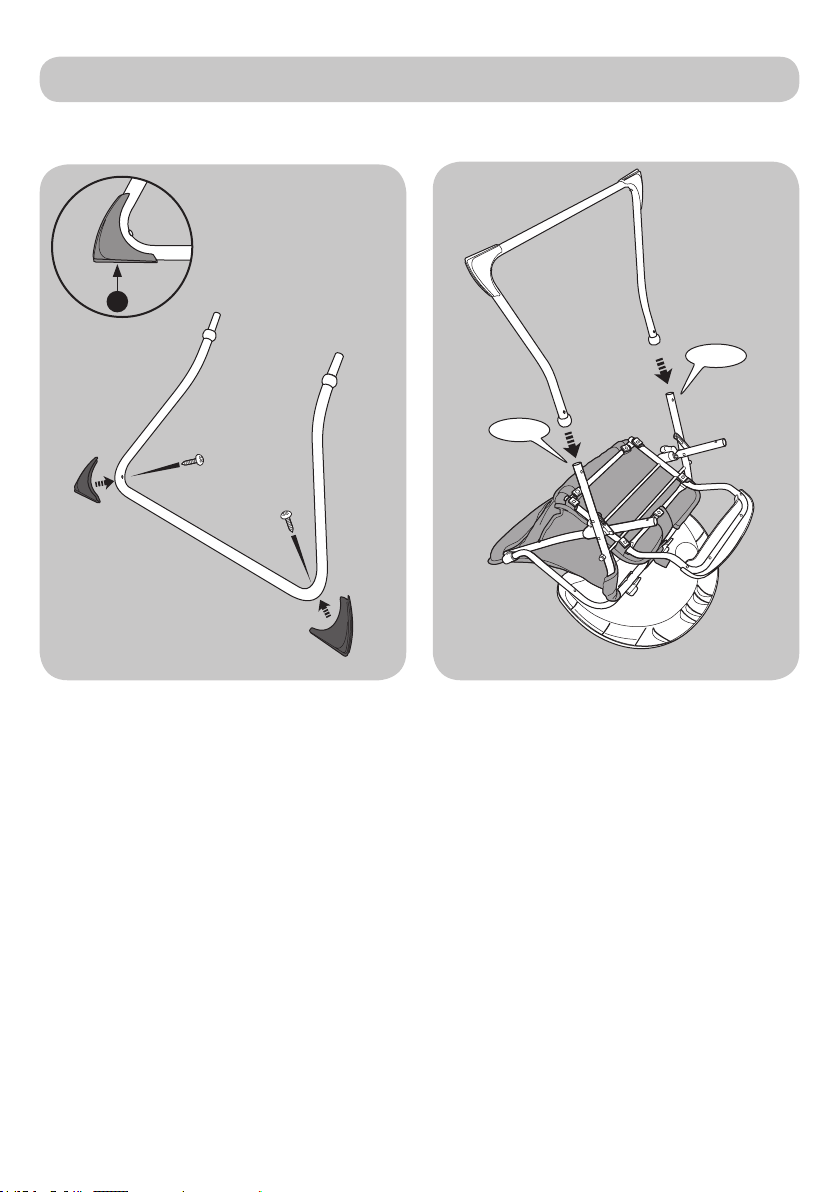
Warning: Do not use the highchair unless all components are correctly tted and
adjusted. Your child’s safety is your responsibility.
Warning: To avoid injury keep your child away when folding and unfolding this product.
Do not let your child play with this product.
Warning: Do not leave the baby unattended in the highchair.
• Ensure that the locks and catches on the product are not obstructed at any time
during use.
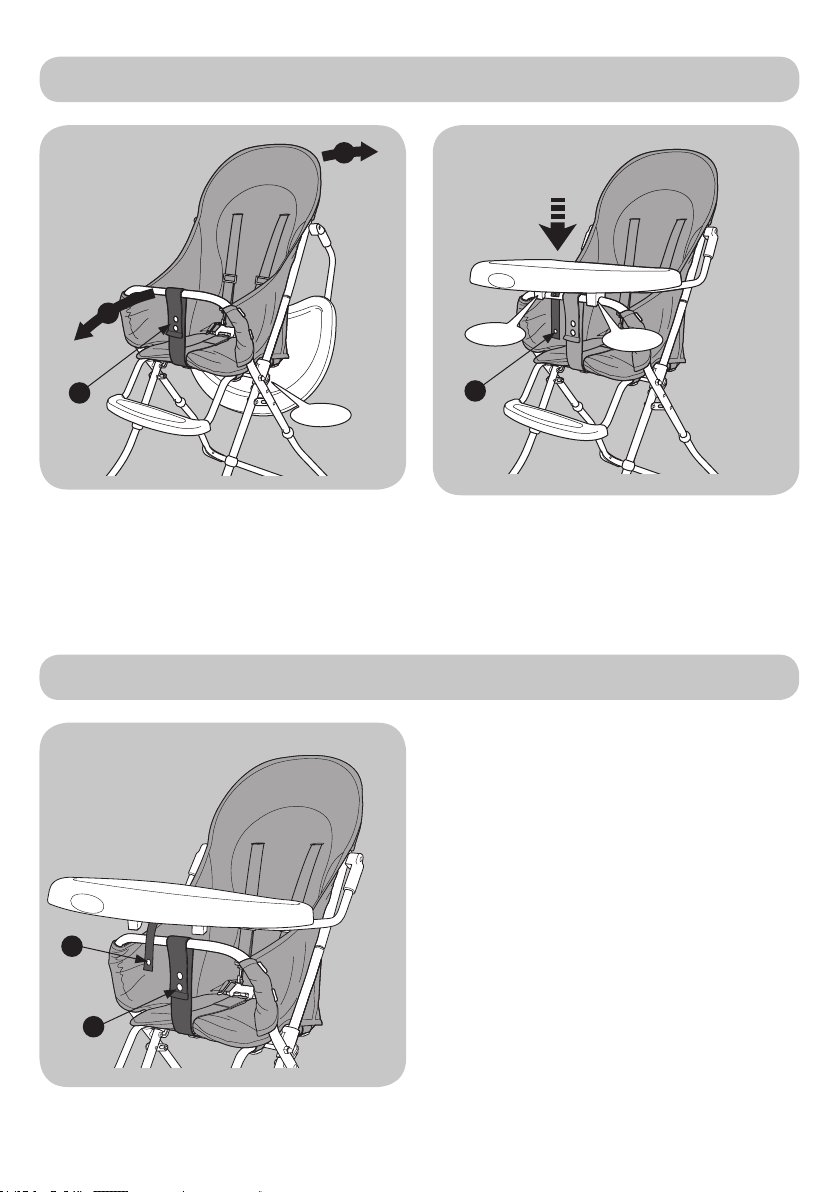
• Ensure the safety harness is fastened and correctly adjusted at all times.
• Do not use near stairs or steps.
• Ensure the highchair is used on a secure and level surface.
• Be aware of the risks of open res and other such sources of strong heat, such as
electrical bar res, gas res etc. in the vicinity of this highchair.
• Keep children away from the highchair during set-up and folding.
• Never carry the highchair with your baby in it.
• Periodically check for loose or damaged parts and do not use if any part is broken,
torn or missing.
• It is recommended that the highchair is only used by babies who can sit and
support themselves unaided.
• Only use parts and accessories approved by the manufacturer. Others may render
the highchair unsafe and will invalidate the warranty.
• This highchair is designed to hold 1 child.
Your 3 year warranty
Whilst we make and test our products to the highest standards of durability there’s
always a small chance of a hiccup! Our promise is to repair, replace or refund a
MyChild product that has an identied manufacturing defect from the date of
purchase for a full 3 years thereafter at no extra cost.
However, you must register within 28 days of the date of purchase to receive the full 3
years guarantee!
To receive your full guarantee you can register your product by:
visiting www.mychild.co.uk/warranty.html and complete the warranty form,
or by telephone on 0161 335 2508.

page 3
Parts checklist
Welcome
Thank you for purchasing the MyChild Pepper Highchair.
Please read the instructions and warnings carefully before use to ensure safe and
satisfactory operation of this product.
Your child’s safety is your responsibility. If you have a query with this product or require
replacement parts, please contact the MyChild Helpline on 0161 335 2508.
Lay out the parts on a soft level surface and compare to the part/xings checklist
below. Do not discard any packaging until you are sure that you have all the parts.
WARNING! Assembly by an adult. Keep away from children until fully assembled. Keep
children clear during assembly as pack contains small parts which may present a
choking hazard.
Contained in your carton are:
NoPart Qty
1 Seat unit 1
2 Tray frame tubing 1
3 Rear leg tubing* 1
4 Front leg tubing** 1
5 Footrest 1
6 Feet 4
7 Tray 1
8 Plastic spacers 2
9 Screws 12
* Slightly wider than front leg tubing
** Slightly narrower than rear leg tubing
You will require one Phillips screwdriver
(not supplied).
1
3
5 96 7 8
4
2

page 4
1. Open the seat unit.
2. Ensure the backrest tubing (A) is at the
back of the highchair. If it is not, then,
feed the backrest tubing (A) all the way
under the front bar (B) and out so that it is
at the back of the highchair.
A
B
front back
Assembling the seat unit backrest

page 5
Assembling the seat unit backrest (continued)
C
3. Pull the backrest seat cover from under
the front bar (C) as shown.
4. Press the release latches on both sides
(D) and at the same time fold the seat
together.
IMPORTANT! The seat must be folded
together for the following two steps.
D

page 6
Assembling the seat unit backrest (continued)
5. With the seat folded, feed the
backrest tubing (E) into the pocket on
the backrest cover, ensuring the two
shoulder straps (F) are not twisted around
one another.
E
F
6. Place the two ends of the backrest
frame (G) onto the two ends of the seat
base frame (H) ensuring both spring pins
click into place.
Top Tip: Angle the backrest frame (G)
slightly towards the front of the highchair
as you begin connecting the tubing.
IMPORTANT: The backrest frame will not t
onto the seat base frame if the highchair
is unfolded.
G
H
G
click click
G
H

page 7
Attaching the tray
1. Slot the two plastic spacers (A) over the
two plastic parts on the tray frame.
2. With the tray turned upside down place
the tray frame (complete with spacers)
onto the tray as shown. Secure the tray to
the tray frame using four screws.
IMPORTANT: DO NOT overtighten the
screws.
4. Push the two ends of the tray frame
into the attachment points on each side
of the seat unit, ensuring the spring pins
(D) click into place.
3. Holding the back of the seat frame (A)
and the front bar (B), open the seat unit
out ensuring it clicks into place.
Wrap the seat strap (C) over the front bar
(B) and fasten the two press studs.
A A
D
click
click
B
A
C

page 8
Attaching the footrest
Attaching the tray (continued)
1. Attach the footrest (A) to the footrest
bar (B) using four screws
IMPORTANT: DO NOT overtighten the
screws.
5. Push the tray down onto the front bar
ensuring it clicks into place and secure
the tray using press stud and strap (E).
B
A
E
click
click

page 9
Attaching the legs
1. Attach the feet to the front and rear
leg tubing, ensuring the straight edge
(A) on each foot goes against the oor.
Secure each foot using one screw.
IMPORTANT: DO NOT overtighten the
screws.
2. Place the seat unit upside down on the
oor.
Insert the rear leg tubing (the wider of the
two sets of leg tubing) into the back legs
of the seat unit. Press in the spring pins
and push the leg tubing in till the spring
pins click into place.
Repeat the above steps for tting the
front legs.
Keep ngers clear of all potential pinch points during assembly.
click
click
A

page 10
Unfolding the highchair
Placing your child in the highchair
1. Before placing your child in the
highchair ensure the seat strap (B) is
securely fastened.
If it is not fastened:
1. Release tray strap (A).
2. Lift up the tray.
3. Wrap the seat strap (B) around the
front bar and secure using the press
studs.
4. Replace the tray, making sure that it
clicks into place.
5. Fasten the tray strap (A) using the
press stud.
WARNING: Do not use the highchair
without the seat strap being secured. The
seat strap provides secondary protection
against accidental sliding out and folding
of the highchair.
1. Holding the back of the seat frame (A)
and the front bar (B), open the seat unit
out, ensuring it clicks into place.
Wrap strap (C) over the front bar (B) and
fasten the two press studs.
2. Push the tray down onto the front bar
ensuring it clicks into place and secure
the tray using press stud and strap (D).
B
A
D
C
click
click
click
B
A

page 11
Placing your child in the highchair (continued)
2. Fastening the 5-point harness:
To secure your child in the harness, place
the crotch strap between your child’s
legs and insert the harness clips into
the buckle, making certain your child’s
ngers are clear. Adjust the sliders (A) on
the waist and shoulder straps so that the
harness ts snugly.
3. Releasing the 5-point harness:
Using your thumb and forenger, squeeze
the top and bottom of the waist strap
connector (B). The shoulder straps can
be unclipped from the waist straps if
necessary (C).
The highchair should only be used with the feeding tray in place. It is essential that
the ve-point harness is used at all times. When using the highchair at a table ensure
the child cannot push against the table or any other surface as this could result in the
highchair tipping over.
A
A A
B
B
C
Folding the highchair
1. Unfasten the tray strap (A) and seat
strap (B).
Hold on to the back of the chair and pull
the tray upwards to release it. Rotate
the tray over the seat back allowing it to
hang down behind the seat unit.
A
B

page 12
2. Standing behind the highchair press the
release latches on both sides (C) and at
the same time, pull the front legs towards
you folding the highchair.
C
Folding the highchair (continued)
Dismantling for travel
1. Removing the main tray:
Press in the spring pins (A) on the
underside of the tray frame and at the
same time pull the tray free from the
highchair.
A
2. Removing the legs:
Press in the spring pins (B) on the inside
of the legs and at the same time pull the
legs free from the highchair seat unit.
You can now fold the seat unit as normal
and transport (or store) the highchair
more easily.
B

page 13
Removing the harness
1. Unfasten the tray strap (A) and seat
strap (B).
The 5-point harness can be removed for washing or replacing.
The harness should be washed by hand at 30ºC using a mild detergent.
Do NOT tumble dry. Air dry only.
A
B
2. Turn the highchair upside down and
unscrew screws (1,2 & 3) using a phillips
screwdriver.
3. Stand the highchair the right way up
and fold the tray over the back of the
seat.
1
3
2

page 14
Removing the harness (continued)
5. Slide the top of the seat fabric off the
seatback (D) to expose the shoulder strap
xing points and unscrew screws (4 & 5)
using a phillips screwdriver.
To reattach or replace the harness
reverse steps 1 to 5.
4. Standing behind the highchair press the
release latches on both sides (C) and at
the same time, pull the front legs towards
you folding the highchair.
C
4 5
D

page 15
Care and maintenance
• The highchair can be cleaned by using a sponge with warm water and a mild
detergent.
• The 5-point harness can be removed and hand washed at 30ºC using a mild
detergent. Do NOT tumble dry. Air dry only. See pages 10-12 for removing the
harness.
• A mild disinfectant can be used if desired. Stubborn marks maybe removed with a
non-abrasive cleaner.
• The highchair must be dried thoroughly before using or storing.
• Never clean with abrasive, ammonia based, bleach based or spirit type cleaners.
• Apply a small amount light lubricant such as WD40 to any of the moving parts of
the highchair as required, but be careful not to get any on the fabric as it may
stain, wipe off any excess lubricant.
Table of contents
Other My Child High Chair manuals