MyRepublic Wi-Fi Hub+ User manual

1
What’s in the box
Please wait until you have received an SMS or email advising you that your
service is active. Once you have received this, follow our step by step guide.
MyRepublic Wi-Fi Hub+
Modem
2 x Ethernet Cables
Power AdapterQuick Start Guide
Wi-Fi Security Card
Welcome to MyRepublic
Telephone Cable
2.4GHz Wi-Fi Network Name: MyRepublic XXXX
5GHz Wi-Fi Network Name: MyRepublic XXXX-5GHz
Wireless Key: XXYY123
Wi-Fi Hub+

2
Getting to know
your modem
The LED lights on your Wi-Fi
Hub+ will indicate the status of
you service. LED Indicator Icon
LEDlights(on/off)button
Broadband
Internet
Wi-Fi 2.4Ghz
Wi-Fi 5Ghz
WPS
LAN
USB
Voice
Wi-Fi(on/off)button
DSL Port LAN Port WAN
Port
Power
Inlet
Reset
Button
Power
Button
Telephone Port
A USB port and WPS button can be found on
the side panel.
USB port: Connect a USB device to share
your content on your home network.
WPS button: Hold down the WPS button on
the modem to connect your Wi-Fi devices
password free. Your device must have WPS
functionality. Once your device is connected
remember to press the WPS button on the
modemtoturnofftheWPSsessionsono
unauthorised devices access the connection.
The back ports are colour coded so it’s easy to see which cables connect to
which port.
Modem ports
3
USB Port WPS Button

Getting started
1. Connect one end of the power adapter to your modem and the other end
into a power outlet and switch this on.
Step 1: Connecting your modem
Power Cable
4 5

Step 2: Set up your nbn™ FTTC connection
device
• Takeoutthenbn™FTTCconnectiondevice,powercordandtelephone
cable.
• ReadtheWarningStickeronthesideofthenbn™connectiondeviceand
removeit.Thiswillnowprovideyouaccesstothenbn™connectionports.
• CheckthattheLEDindicatorlightpanelonthetopofthenbn™connection
device is visible.
• Connectoneendofthepowercableintothepowerportonthenbn™
connection device and the other end into a power outlet. Turn on the power at
thepoweroutlettoturnonthenbn™connectiondevice.
• Connectoneendofthetelephonecableintothewallsocketportonthenbn™
connectiondeviceandtheotherendintothefirsttelephonewallsocketin
your home.
• Takeanethernetcablethatwassuppliedwithyourmodemandplugoneend
intotheyellowgatewayportofthenbn™connectiondeviceandtheother
end into the red WAN port of your modem.
• Itcantakeupto15minutestosuccessfullyconnectedtothenbn™network,
onceconnectedtheDSLandconnectionlightonthenbn™connectionbox
will turn solid blue.
nbn™Equipment
Telephone
Wall Socket
Ethernet Cable
Telephone
Cable
6 7

2.4GHz Wi-Fi Network Name: MyRepublic XXXX
5GHz Wi-Fi Network Name: MyRepublic XXXX-5GHz
Wireless Key: XXYY123
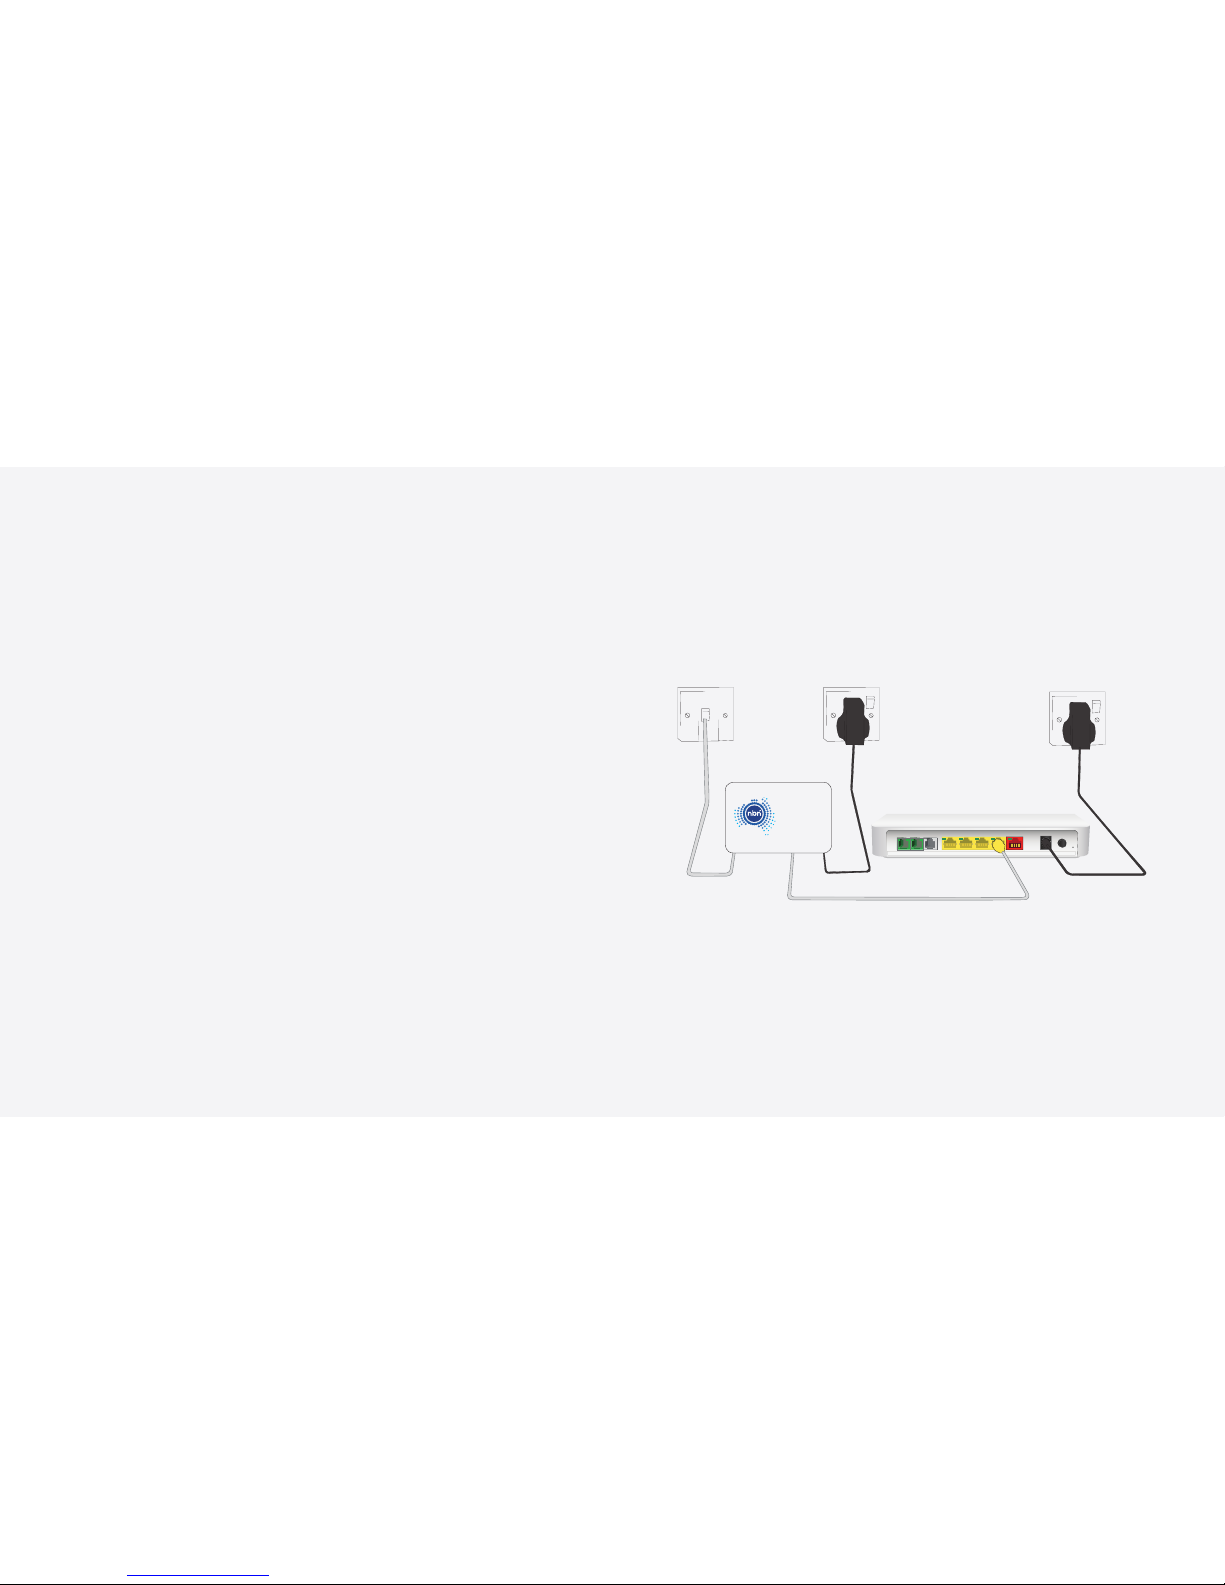
Step 3: Automated set up
You are now ready to switch on your modem by pressing the power button on the
back of the modem. Your device will now set up automatically.
TheLANLEDlightonthenbn™connectionboxwillbesolidblueoramberwhen
there is a successful connection to your modem.
This can take up to 10 minutes to complete the set up process. The broadband and
internet LED light on the modem will turn solid green once the setup is complete.
Whenyouareusingtheservicetheinternetlightwillflashgreen.
Step 4: Set up your Home Phone service
(if requested)
Connectoneendofatelephonecabletothefirstgreentelephoneportonthe
modem and the other end into your telephone.
Step 5: Connecting via Wi-Fi
Your wireless details are supplied on the magnetic Wi-Fi Security Card
and can also be found on the back of your modem.
• Openyourwirelessconnectionsonyourdeviceandsearchforthe
Wi-Fi Network Name. You can connect to the 2.4 or 5Ghz connection
depending on what type of connection is supported by your devices.
• EntertheWirelessKeyasyourpassword.
For optimal performance, we recommend that you connect no more than
10 devices wirelessly.
Wi-Fi Network Names
WirelessKey
The 5Ghz network has the ability to transfer data at faster speeds. We
recommend that you use the 5GHz network if visible. Your 2.4GHz network
has slower speeds but greater range. If you are experiencing issues at the
edge of your house, or are using an older device that can only see this
network – this is the one to use.
8 9
Congratulations, your now set up! You can now proceed to
connect via Wi-Fi or an ethernet cable to access the internet.
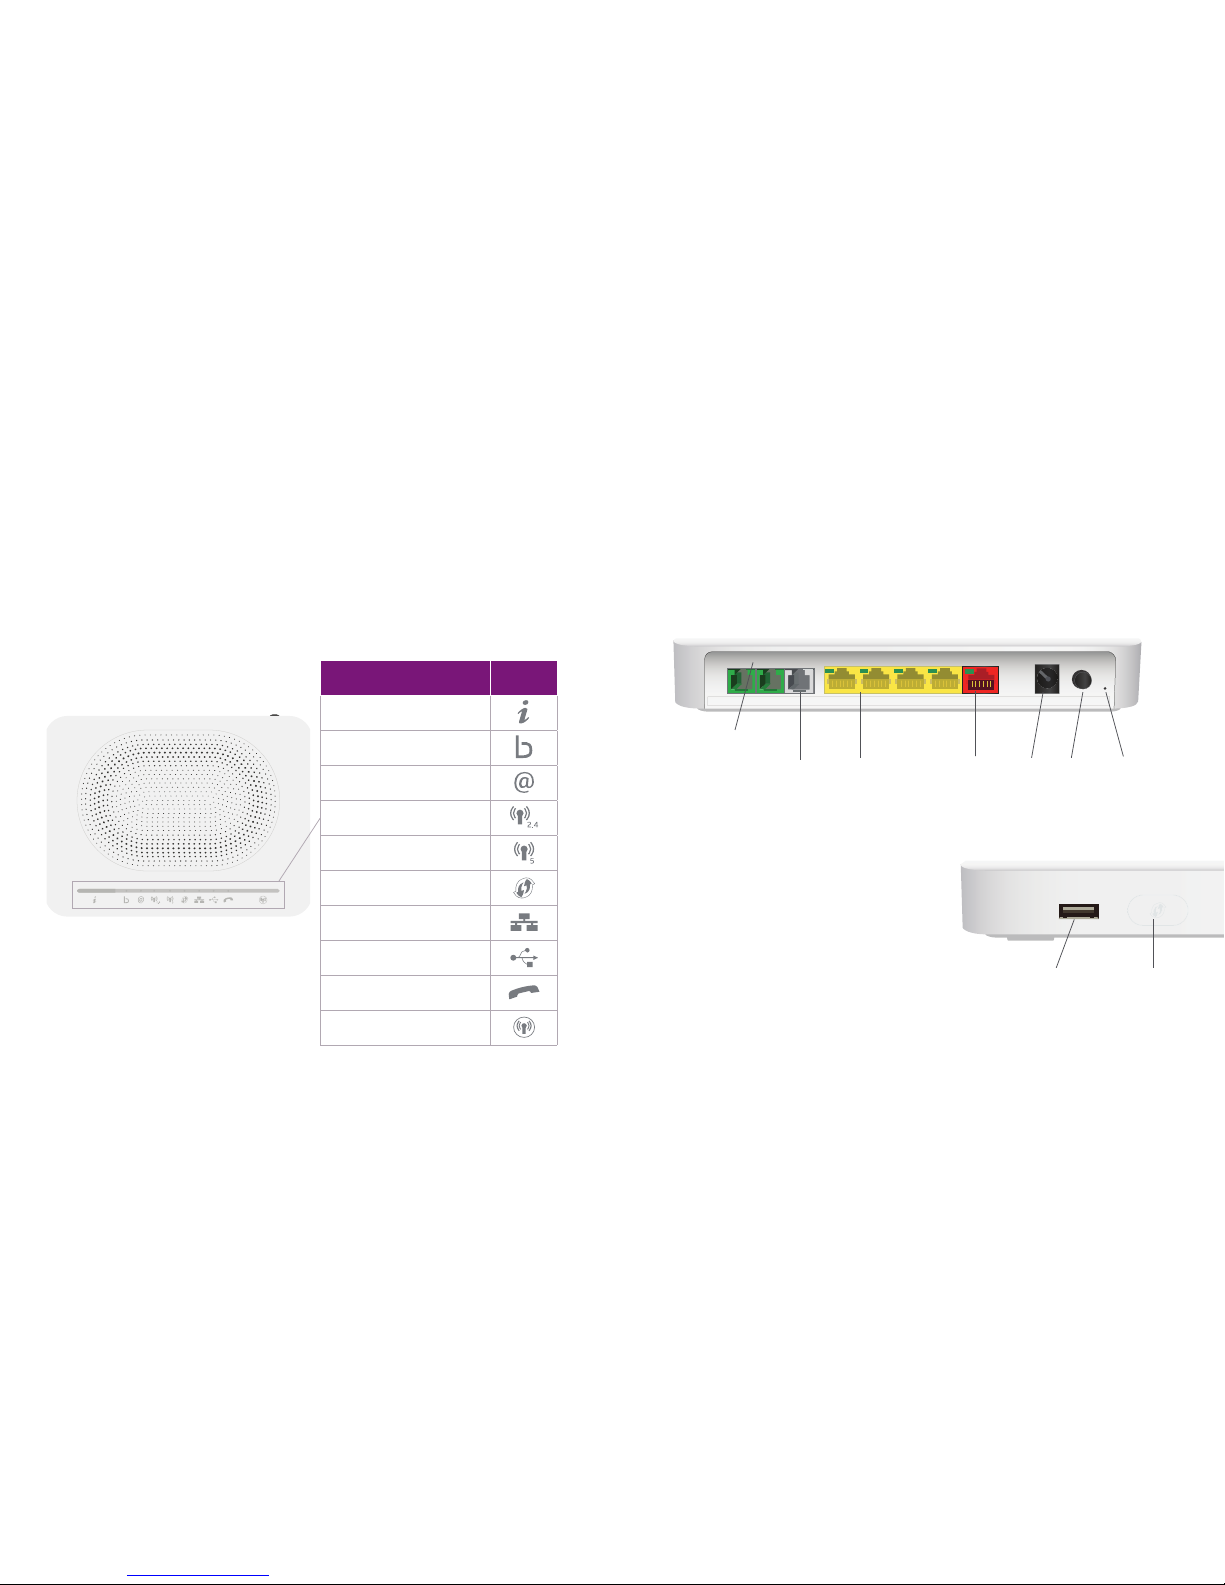
Telephone
Ports

10
Step 6: Connecting via ethernet
Connect the second supplied ethernet cable to one of the yellow LAN ports
on the back of the modem and connect the other end into the ethernet port on
your device.
Connecting via an ethernet cable will provide you with faster speeds than
when you connect via Wi-Fi. You can connect up to 4 devices directly to the
modem via an ethernet cable.
Plug the ethernet cable’s other end
into your computer’s ethernet port
11
Troubleshooting tips
If you are unable to successfully connect to your Broadband service via Wi-Fi
or directly via an ethernet cable, follow these steps that can help you get back
up and running:
1. Poweroffyourmodemandanyattachedequipment.
2. Check that all of the cables have been securely connected
to their corresponding ports as indicated previously.
3. After 2 minutes, power on your modem by pressing the
power button on the back of the modem.
4. Wait for the broadband and internet LED light on your
modem to turn solid green.
5. If the broadband and internet LED light does not turn
solid green please contact Customer Service for further
assistance.
6. Foradvancedconfigurationoptionsforyourmodemvisit
MyRepublic.com.au/Support

1300 130 888
suppor[email protected]
MyRepublic.com.au/Support
Important information
• Yourmodemsupportsbothnbn™andDSLnetworkssoisfuture
proofedifnbn™hasn’tarrivedinyourareaorifyoumovehouse.
• RemembertokeepanyunusedcablesandyourWi-FiSecurityCard
in a safe place.
• Yourmodemwillnotworkintheeventofapoweroutage.
• WarrantyInformationcanbefoundatMyRepublic.com.au/Legal
Contact us
Ifyourequirefurtherassistance,youcancontactusat:
Table of contents
Popular Modem manuals by other brands

Vega Absolute
Vega Absolute NB-12 user manual

RF SOLUTIONS
RF SOLUTIONS HURRICANE quick start guide

STMicroelectronics
STMicroelectronics UM2322 user manual

RaceAmerica
RaceAmerica 06-5830 quick start guide

Motorola
Motorola D15 Integration and Application Developers Guide

SG Wireless
SG Wireless SGW8100 user manual