Troubleshooting‐TestingtheWOTBox
1. Keyonthecarbutdonotstarttheengine.Pressthegaspedaltothefloor.Youshouldsee
theLEDontheWOTBoxstarttorapidlyblink.Ifitdoesnot,checkyourAPPsensorsignal
connection(WOTBoxBLUEwire).
2. Next,withthegaspedalstilldepressed,presstheclutchpedaltothefloor.Youshouldsee
theLEDontheWOTBoxbrieflygoout,andthencomebackonsolidforonesecondand
thenfinallyresumeblinkingrapidly.Ifyoudonotseethis,checkyourClutchPedalPosition
Switchsignalconnection(WOTBoxGREENwire).
3. Next,starttheengine.Quicklypressthegaspedaltothefloorandimmediatelysteponthe
clutch.Youshouldheartheenginestarttorevup,stumbleforashortperiodwhilethe
ignitioniscut,thenreturnbackonandcontinuerevving.Removeyourfootfromthegas
beforeyouhittherevlimiter.The2‐stepwillnotengageifthegasisdepressedbeforethe
clutch.Thisisnormal.IftheenginedoesnotstumbleorpausewhentheLEDturnsout,then
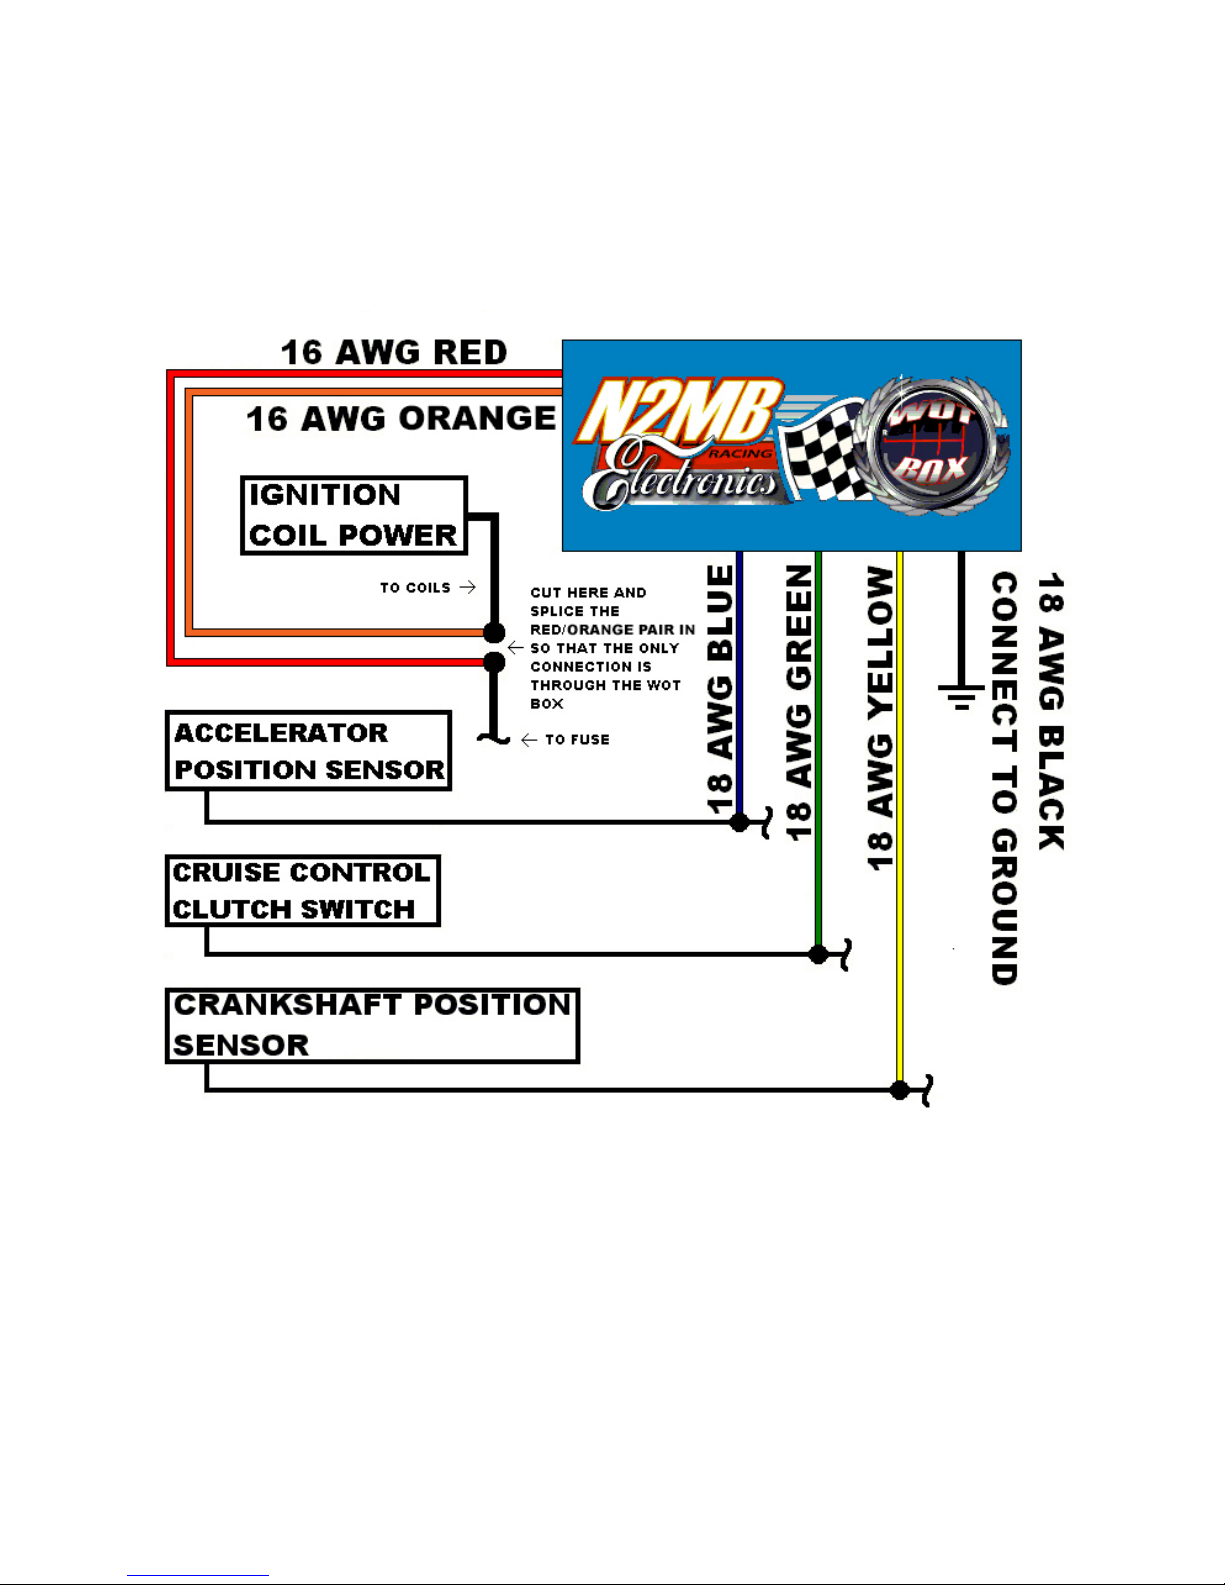
checktheRED/ORANGEpairedwire.VerifythattheREDandORANGE16AWGwiresare
wired facingtheproperway.Iftheyarereversed,theignitioncutwillnotwork.
4. Lastly,testthe2‐Step.Presstheclutchpedaldownandthenquicklypressthegaspedalall
thewaydown.Thegaspedalmustbeflooredforthe2‐steptoengage.Theengineshould
revuptothedesiredRPMandhold.Ifitdoesnot,besuretoremoveyourfootfromthegas
beforeyouhittherevlimiter.Ifthe2‐stepdoesnotwork,checktheWOTBoxYELLOW
wire.
5. TheWOTBoxGraphicalUserInterfacehassomeinherenttroubleshootingcapability.Ifyou
haveaccesstoalaptop,itmaybeusefulforyoutodownloadtheGUIat
www.n2mb.com/wotboxsoftwareandfollowtheinstructionsthere.
Usage
TousetheWOTShiftfeature,keepyourfootfullyonthegasandshiftquicklyusingtheclutch.
Keepthegasfullydepressedthroughtheshift.TheWOTBoxwilldetecttheclutchswitchsignal
andbrieflycuttheignitiontoenableaneffortlessshift.
Tousethe2‐Stepfeature,fullydepresstheclutch.Next,fullydepressthegaspedaltothefloor.
TheenginewillrevupandholdtheRPMthatyouhaveset.Quicklyreleasetheclutchwhile
leavingthegasfullydepressedtolaunchthecar.
Programming
TheWOTBoxcomespresetforanautomaticWOTShiftkilltime.ThismeansthattheWOTBox
willautomaticallyadjustthekilltimetoyourshifttime,uptoamaximumof350ms.Ifyou
wouldlikemanualcontrolovertheWOTShiftkilltime,startthecarandholddownthebutton
onthemoduleandwaitfortheLEDtobegintoblink.Usingthechartbelow,findthenumberof
blinksthatcorrespondstothedesiredkilltime.Setting0blinkswilldisabletheWOTShift