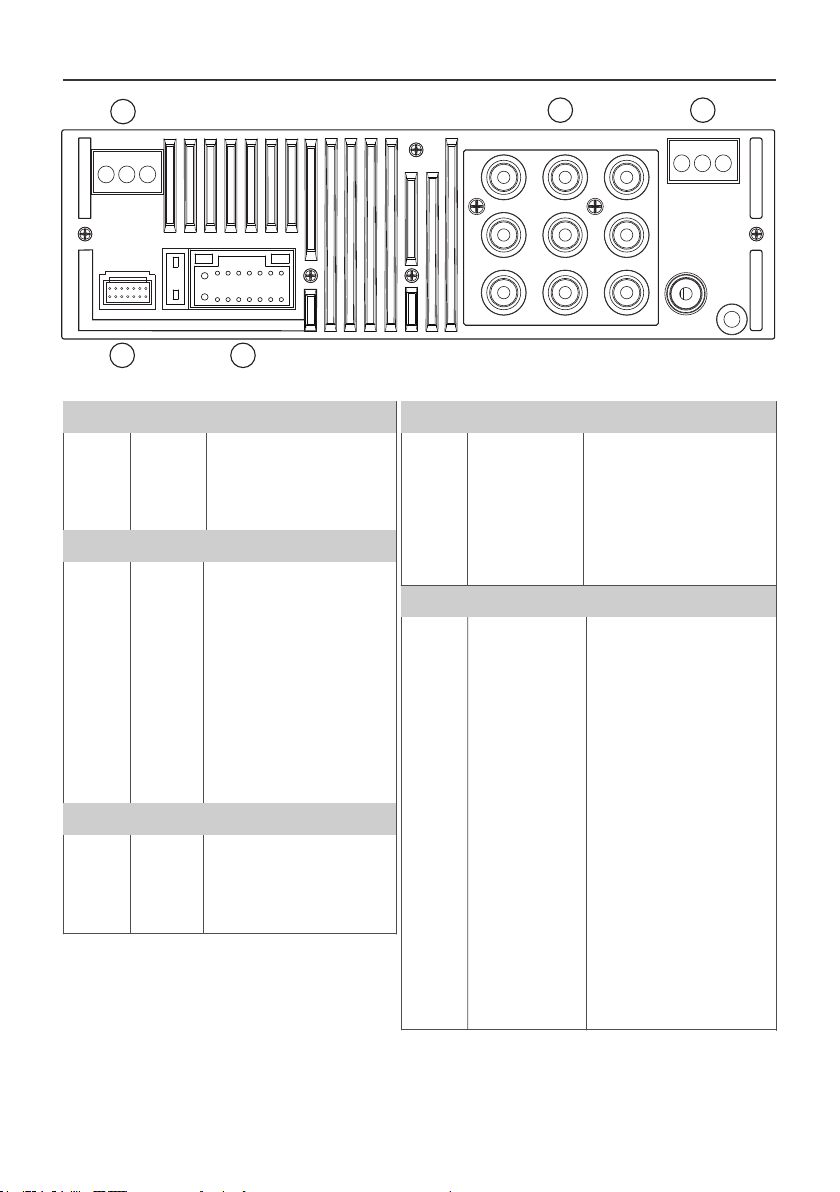
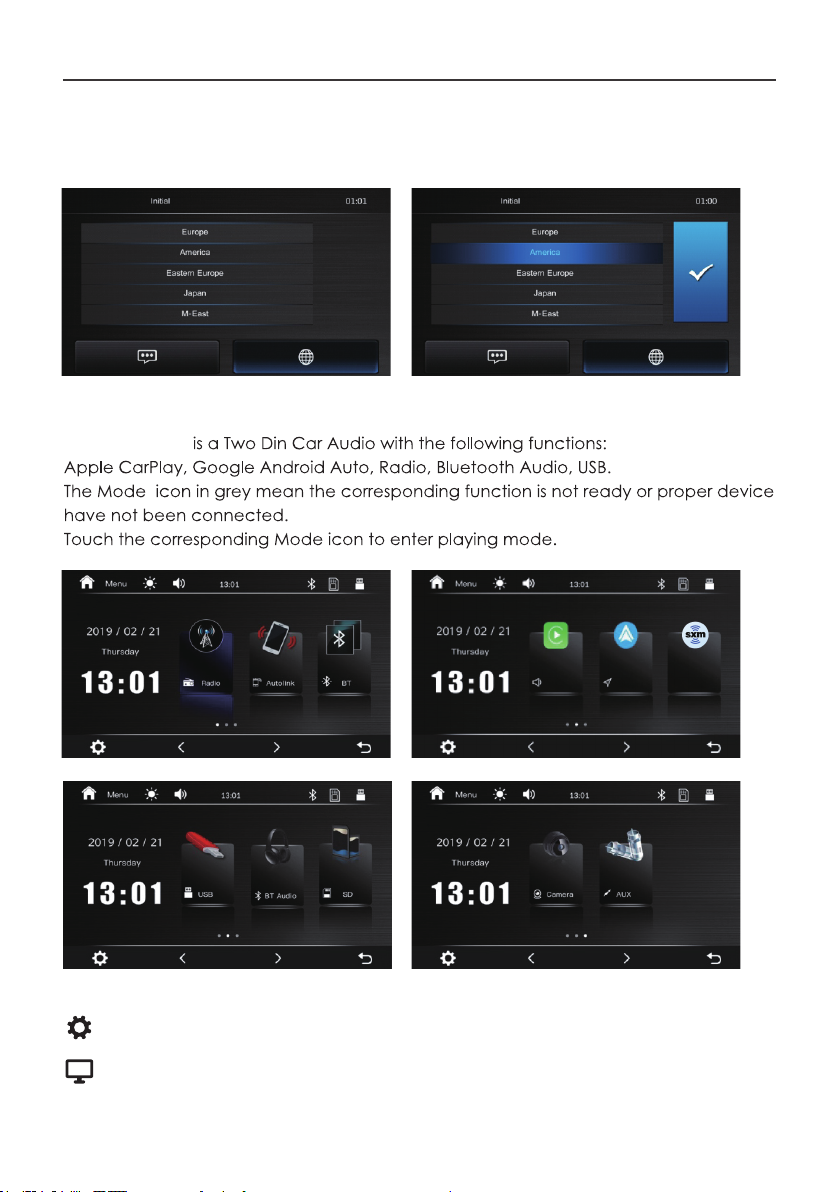
Nakamichi NA6605-M9 User manual

AV RECEIVER
User Manual
NA6605-MX
NA6605-M9
nakamichi.caraudionakamichicaraudio.com nakamichi.global


YOUR AV RECEIVER
Dear Customer,
Congratulations on purchasing our Nakamichi mobile system product for your sound
system.
This product has been designed and manufactured to Nakamichi’s exacting standards
to ensure many years of audio enjoyment. For the best performance, we recommend
that you have your Nakamichi product installed by an authorized Nakamichi dealer.
If you encounter any issues or if you have any questions on the operation of this product,
please contact your nearest authorized Nakamichi dealer for assistance, or you may
also contact us through our website or social media channels.
If you would like to install this product on your own, we recommend for you to go through
this manual to familiarize yourself with all the installation requirements and procedures.
Safety Warnings and Considerations
• Clean only with a dry cloth or other similar materials.
• Install your product in a dry, well-ventilated location that does not interfere with
your vehicle’s safety equipment.
• Do not block any ventilation openings when installing this product.
• Do not mount the product in the engine compartment of your vehicle or in any
areas of extreme heat such as mufflers, silencers, exhaust pipes or other heat
producing apparatus.
• Securely mount the product so that it does not come loose in the event of a
collision or as a result of repeated vibrations that might occur during normal
operation.
• Installation of the apparatus must be done with great care to prevent damage
to your vehicle’s fuel lines, power, and other electrical wiring, hydraulic brake
lines, and other systems. If possible, always visit your nearest Nakamichi dealer to
perform the installation.
• Do not run any wiring outside or underneath the vehicle. Keep all wires inside the
vehicle.
• Take the necessary precautions when making connections to the vehicle’s
battery to avoid any potential shock.
Installation of your Product
In today’s modern vehicles, it is very easy to cause damage to existing systems through
improper installation. Please follow and scrutinize all wiring diagrams to ensure that you
have connected everything in its proper place.
If you find yourself uncomfortable of unfamiliar with understanding the wiring and
installation diagrams or testing instructions, do contact your nearest Nakamichi dealer
to perform the installation for you.
1 EN

YOUR AV RECEIVER
Warranty Considerations
Nakamichi warrants this product to be free of defects in materials and workmanship for
a period stated by your country’s authorized Nakamichi distributor. This warranty is not
transferable and applies only to the original owner who has purchased from an
authorized Nakamichi dealer or distributor.
Damage caused by the following is not covered under warranty: accident, misuse,
abuse, product modification or neglect, failure to follow installation instructions,
unauthorized repair attempts, misrepresentations by the seller.
This warranty does not cover incidental or consequential damages and does not cover
the cost of removing or reinstalling the unit(s). Cosmetic damage due to accident or
normal wear and tear is not covered under warranty.
Warranty is void if the product’s serial number has been removed or defaced.
• Protect all system wires from sharp edges by carefully routing them, always use
rubber grommets to protect wiring and cables whenever you are installing them
through metal openings.
• Secure all wiring using cable ties or wire clamps to protect them from moving
parts and sharp edges.
• This apparatus shall not be exposed to dripping or splashing, and no object filled
with liquids, shall be placed on the apparatus.
• Refer all servicing to qualified service personnel. Servicing is required when the
apparatus has been damaged in any way, such as the power input terminals are
damaged, liquidhas been spilled or objects have fallen into the apparatus, the
apparatus has been exposed to rain or moisture, does not operate normally, or
has been dropped.
• Fuses shall be replaced only with the correct type and fuse value, and only when
the apparatus is powered off.
• Exposure to high sound pressure levels may lead to permanent hearing loss. Take
every precaution to protect your hearing.
• This product is designed specifically for use with 12 volt, negative- ground
electrical systems only. Using this product in systems with positive ground and/or
voltages other than 12V may result in damage to the product and your system.
2 EN

FCC NOTES
WARNING!
NOTE:
This equipment has been tested and found to comply with the limits for a Class B digital
device, pursuant to Part 15 of the FCC Rules. These limits are designed to provide
reasonable protection against harmful interference in a residential installation.
This equipment generates, uses and can radiate radio frequency energy and, if not
installed and used in accordance with the instructions, may cause harmful interference
to radio communications.
However, there is no guarantee that interference will not occur in a particular
installation. If this equipment does cause harmful interference to radio or television
reception, which can be determined by turning the equipment off and on, the user is
encouraged to try to correct the interference by one or more of the following measures:
● Reorient or relocate the receiving antenna.
● Increase the separation between the equipment and receiver.
● Connect the equipment into an outlet on a circuit different from that to which the
receiver is connected.
● Consult the dealer or an experienced radio/ TV technician for help.
Changes or modifications to this unit not expressly approved by the party responsible
for compliance could void the user's authority to operate the equipment.
3 EN

SPECIFICATION
Power Supply
Grounding Systen
Current Drain
Power Output
Speaker Impedance
Frequency Response
Operating Temperature
Dimensions
General
TFT Screen Size
Resolution
TFT Display
Frequency Range (USA)
Frequency Range (Europe)
Usable Sensitivity (S/N=30dB)
S/N Ratio
Stereo Separation
FM Radio
Frequency Range (USA)
Frequency Range (Europe)
Usable Sensitivity (S/N=20d B )
S/N Ratio
AM/MW
Note: Specification and design; functions and features; unit illumination; colour
and display segment are subject to change without prior notice. Photos and
drawings on gift box or operation manual might be varied from the exact unit.
Depends on the input devices operation might be varied from the operation
manual described.
Maximum Output Level (10K ohms load)
Subwoofer Time Align
Line-Out/Subwoofer Output
DC 10 ~ 16 Volts
Negative Ground
10 A (Max)
4 × 50 W / Channel (Max)
4 ~ 8 Ohms Per Channel
20 ~ 20k Hz
-20 ~ +60 ℃
178(W) × 100(D) ×152H) mm
9" (NA6605-M9);10" (NA6605-MX)
1024 × 600 pixels
87.5 ~ 107.9M Hz
87.5 ~ 108M Hz
≤ 15 dB
≥ 55 dB
≥ 30 dB
530 ~ 1710k Hz
522 ~ 1620k Hz
≤ 40 dB
≥ 45 dB
≥ 4 Vrms
0 ~ 18 ms
4 EN

WIRING CONNECTION
RR RL
V2
R-CAM
SW1
V1 L-IN
R-INV-IN
ANT
MIC
A
D E
BC
Label
SiriusXM
PAC
iData
Color
Black
Black
White
Name
SiriusXM Interface*
Steering wheel control
maestro idata Interface
Label
Carplay
USB
Amp.C
Brake
FCCD
Color
Black
Black
Blue/White
Brown
Pink/Black
Name
Caplay Interface
USB Interface
Amplifier Control
Brake Control
Front Camera Control
D: USB
Label
GND
BATT+
ILLUMI
ACC
R E V. R
SWC1
SWC2
P. A N T
FL+
FL-
FR+
FR-
RL+
RL-
RR+
RR-
Color
Black
Yellow
Red
Orange
Green/White
Yellow/White
Orange/White
Blue
White
White/Black
Gray
Gray/Black
Green
Green/Black
Purple
Purple/Black
Name
Ground wire
Battery wire
Ignition wier
Lamp control
Reverse wire
Steering wheel control 1
Steering wheel control 2
Automatic antenna
Front left speaker+
Front left speaker-
Front right speaker+
Front right speaker-
Rear left speaker+
Rear left speaker-
Rear right speaker+
Rear right speaker-
E: Power
Label
RR
RL
SW1
V2
V1
L-IN
R-CAM
V-IN
R-IN
Color
Red
White
Green
Yellow
Yellow
White
Yellow
Yellow
Red
Name
Audio Rear Right Output
Audio Rear Left Output
Audio Subwoofer Output
Video 2 Output
Video 1 Output
Audio Left Input
Rear Camera Input
Video Input
Audio Right Input
B: AV IN/OUT1
Label
FL
FR
F- CAM
Color
White
Red
Yellow
Name
Audio Front Left Output
Audio Front Right Output
Front Camera Input
C: AV IN/OUT2
A: Extend
* Requires SiriusXM Tuner and Subscription (sold separately)
5 EN

6 EN
Step 1:
Put the display part into the frame.
Left Bracket
1-DIN Body
Right Bracket
Step 3:
Fix the left and right brackets to the
1-DIN body.
Remarks: The left and right brackets
are installed according to the car
types, some car types do not need to
be installed.
Step 5:
Connect the cable of the
installed display to the body.
Step 4:
Fix the body in the car center console.
Step 2:
Insert the pair of cables into
the installed display socket.
INSTALLATION

FUNCTION OPERATIONS & CONTROLS
FRONT PANEL
When apple Carplay or Android auto available, Hold the voice
button to start the voice control function.
5. Voice
Short press to decrease volume (50~0).3. Volume
Press to enter main menu.4. Home
Turn Power on or off. During power OFF, Press power button to
turn ON the head unit. During the unit is ON, long press power
button toturn OFF the head unit.
1. Power
Press with a pointed object (such as a ball point) to reset the
unit to its initial setting by the factory (default stage).
1. RST
Short press to increase volume (0~50).2. Volume
ACCESSORY LIST
1. AV Receiver
2. Connect Cable
4. ISO to 16P Cable
1 pc
1 pc
2 pcs
5. Installation Brackets
6. Screws
8. User Manual
2 pcs
4 pcs
1 pc
7 EN

MAIN MENU
Language and Region Select
Main interface operation
The first time power on, unit will be default into languages setting interface, select
the needed country and language, press “√” enter to main menu.
Setup, to enter the Settings Menu.
Turn off TFT display. TFT enter black mode touch any zone return to TFT on.
8 EN
NA6605-M9/ MX
SiriusXMAndroidCarplay

User need to install the Android Auto App to the android phone. When the android
phone first time connected to the NA6605-M9 / MX via USB, the phone will show a
website link to download the android Auto application pack from Google Play.
Download and stall the apk file on the android phone. After installed the Android auto,
the Android phone can use the android Auto function.
Plug the iPhone (iPhone 5 or later models, and ios 7.1 or above) through the lightening
cable to the USB port of the Head unit. The iPhone will be shown the "CarPlay". The Head
unit will enter the CarPlay interface, the APP that support the CarPlay feature will be
displayed on the Head Unit as shown below. Touch the corresponding APP can operate
the function touch the button to go back to the CarPlay interface.
APPLE CARPLAY
In CarPlay mode, user can talk to SIRI to control the CarPlay function. Press button to
start the SIRI function, or touch the button for 2 seconds or the Home button of iPhone
in the CarPlay Home screen to talk to SIRI for playing music, i will go ......
Notice: For the SIRI function in the Head unit, the Microphone has to been connected.
In CarPlay mode, touch "HOME/SIRI" button or icon to enter the Head unit main menu.
Siri
The NA6605-M9 / MX have the Android auto function to allow the android 5.0 or above
smartphone display on the head unit screen.
SiriusXMAndroidCarplay
9 EN

RDS Function
SETTINGS
10 EN
RDS will allow you to display information such as traffic status, radio station name and
more. The unit can automatically switch to the strongest station based on the similar
program.
AF: Turn on/off AF mode.
TY: Turn on/off TA mode.
PTY: Shows program types, and allows you to search for stations according
to different programs.

SETTINGS
Plug the USB to the connector, the USB icon will have color, Touch the USB icon to enter
the USB playback mode. The Head unit default to play the audio in the USB driver.
11 EN
11. File list Browsing: NA6605 is default audio play back, it also support to play picture
and vidco. If there is other multimedia files in the USB touch List to browse the folder
and file list of the USB driver. Select the multimedia type.
12. Return to play pervious file
13. Select Audio or Music files
14. Select Movie or Video files
15. Select picture files
16. Short press it to skip to the previous track, long press it to fast reverse
17. Pause / Play button
18. Short press it to skip to the next track, long press it to fast forward
19. Repeat Play Press it to select Repeat All, Repeat One or Repeat Directory
20. Press it to turn on/off random play.
21. Touch it to select the next page of the keypad

Current Channel Display
Only SiriusXM• brings you more of what you love to listen to, all in one place. Get over
140 channels, including commercial-free music plus the best sports, news, talk, comedy,
and entertainment. Welcome to the world of satellite radio. For more information, visit
the website (www.siriusxm.com).
The SiriusXM Radio ID can be found by tuning in to Channel 0. You will need this number
to activate your subscription.
Activate the service either on line or by phone.
The SiriusXM satellites will send an activation message to your tuner. The activation process
usually takes 10 to 15 minutes, but it may take up to an hour. Do not turn off this product
while the activation message is displayed.
In the USA, you can activate online or by calling SiriusXM listener Care:
• Visit the website
www.siriusxm.com/activatenow
• Call SiriusXM listener Care at
1-866-635-2349
For Canadian subscriptions, please contact:
• Visit the website www.xmradio.ca
and click on ''ACTIVATE RADIO" at the top right corner of the page, or call (1-877-438-9677).
1. Direct Channel Tune
2. Category/Channel list
3. Channel Tune - Down
4. Channel Tune - Up
6. SiriusXM Setup
7. SXM1, SXM2, SXM3 band select
1. Parental Lock: OFF ON
2. Lock Channel
3. Change Passcode: Default is “0000”
4. Version information:
Model Brand/ Model Number/ Firmware Ver/
HW Version
SiriusXM Setup
Listening to SiriusXM(r)
1) Press then touch: Home ; 2) Touch [SiriusXM]
SiriusXM(r) OPERATION
12 EN
7

Lock Channel
1. On the SiriusXM interface, touch setup
2. Touch [Change Passcode], Display as follows:
Change Passcode
1. On the SiriusXM interface, touch setup
2. Touch [Change Passcode], Display as follows:
Remark: Password default is: 0000
The Parental Control feature allows you to limit access to any SiriusXM channels,
including those with mature content. When enabled, the Parental Control feature
requires you to enter a passcode to tune to the locked channels.
To lock the channel, touch the appropriate channel.
3. Favorite Artists 4. Favorite Songs Alerts
SiriusXM(r) OPERATION
13 EN

SETTINGS
15 EN

SETTINGS
SWC Study Mode
16 EN
User can select the preset wallpaper.
Touch the corresponding picture to select
the prefer background.

BLUETOOTH PHONE
17 EN
Touch the BT Audio icon to enter Bluetooth
Audio playing mode. If the Bluetooth is
connected, the music will be playing at
the left side.
If the Bluetooth is not connected, press
Reconnect to connect the paired phone
or Pairing to pair the new device.
Turn On the Bluetooth of the Mobile
phone/ Bluetooth device, you can see the
NA6605. Select the NA6605 for pairing and
connection.
Press Pairing and the Pairing Mode screen
will be shown as above.
BT Audio Settings
30. Short press it to skip to the previous track
31. Pause / play button
32. Short press it to skip to the next track
33. Repeat, press for select between Repeat All, Repeat One or Repeat Directory
34. Press it to turn on/off random play
34. Press it to turn on/off the Audio Settings menu to adjust the EQ

Touch the Phone icon in main menu to go to Phone mode. After the phone connected
with the Head Unit via Bluetooth (HFP), user can through the head unit to make a phone
call. Please note it needs to connect the microphone for phone call.
BT Phone Setting
● Touch the Keyboard icon to the above screen will appear.
● Using the keypad, touch 0-9, * , # to enter the phone number you wish to dial. If you
enter an incorrect number, touch the icon on the keypad to delete the incorrect
number.
● Once the correct number appears on the screen, touch the icon. To go back
dialing interface, touch the return icon at the upper right corner of the screen.
● To end the call, touch the icon on the screen.
Dial a Call
36. Dial Pad, tap Dial pad button to enter call mode
37. Call logs, to show the call record, missed, received and dialed calls
38. Contact, to show the phonebook connected phone
39. Show the usable devices
40. BT Setup, to set auto answer and load phonebook
41. Manage the connected device
42. Search the available device
BLUETOOTH PHONE
18 EN

43. Interchange between phone and head unit
44. Display the Dial Pad
45. ON/OFF the Microphone function
If the phone is connect with the unit via Bluetooth, when an incoming call, the below
screen will be shown.
Press to receive the Call or to hang the call.
Receive An Incoming Call
● Touch the History icon to display the
Call Combined list.
● Slide the bar at right side up and down
to display a call logs up to 20 records.
Call Logs
● Touch the contacts icon to access the
phone book of the connected phone.
● To make a call from the phone book,
simply touch the contact name.
Contacts
BLUETOOTH PHONE
19 EN
This manual suits for next models
1
Table of contents
Other Nakamichi Stereo Receiver manuals