nalanda MD030 User manual

MD030 User Manual

1
Metal Detector User Manual
This metal detector is designed for beginners and it’s easy to operate. With the
latest design, the coil has good sensitivity and the ability to differentiate various types
of metal. The result of the detection will display on the LCD. The full digital
positioning circuit shows high accuracy of locating and excellent anti-interference
ability.
Please read this manual carefully before using, especially the Quick-Star Demo
and Basic Operation.
CONTENT
TERMINOLOGY...................................................................................................................................... 2
SPECIFICATION...................................................................................................................................... 3
ASSEMBLY.............................................................................................................................................. 3
BATTERY................................................................................................................................................. 4
PANEL AND LCD.................................................................................................................................... 5
CONTROLLER......................................................................................................................................... 6
QUICK START......................................................................................................................................... 7
1. Prepare with the three metal samples.....................................................................................................7
2. Lay the detector......................................................................................................................................7
3. Turn on...................................................................................................................................................7
4. Test.........................................................................................................................................................8
5. PINPOINT mode test............................................................................................................................. 8
BASIC OPERATION.............................................................................................................................. 10
CAUTION................................................................................................................................................13
TROUBLE SHOOTING GUIDE............................................................................................................ 13
PART LIST.............................................................................................................................................. 14

2
TERMINOLOGY
The following terms are common terminologies about metal detector.
Motion Mode
One of the metal detector’s modes. It means you have to move the coil
continuously during detecting. In generally, motion mode can reduce the effect of the
soil mineralization with better distinction ability.
Non-motion Mode
The other mode of the metal detector. You don’t need to move the search coil
continuously during detection. Metal will be detected once the coil approaches it at a
certain distance. In the non-motion mode, the detector can’t distinct metal types.
Elimination
It’s a setting to eliminate a certain metal. The detector won’t signal on the
specific metal, like light, sound.
Discrimination
When the detector emits different tones for different types of metals, and when
the detector "eliminates" certain metals, we refer to this as the detector
"discriminating" among different types of metals. It’s an important feature of
professional metal detectors. This mode could allow you to ignore trash and
undesirable object.
Iron
Iron is common metal. It’s usually not the detection target, undesirable iron
objects contains such as iron nail, bolts, old cans, caps and so on. But some valuable
relics may also be made of iron, such as old armaments, old armature and so on.
Ferrous
Metals made of iron or contain iron.
Trash metals
Caps, pull-tabs, bottle-caps from beverage containers are the most bothersome
trash items for treasure hunters, which you should eliminate during detecting. But
some other valuable objects have a similar magnetic field with the above trash metals,
and will also be eliminated as trash when discriminating.
Pinpoint
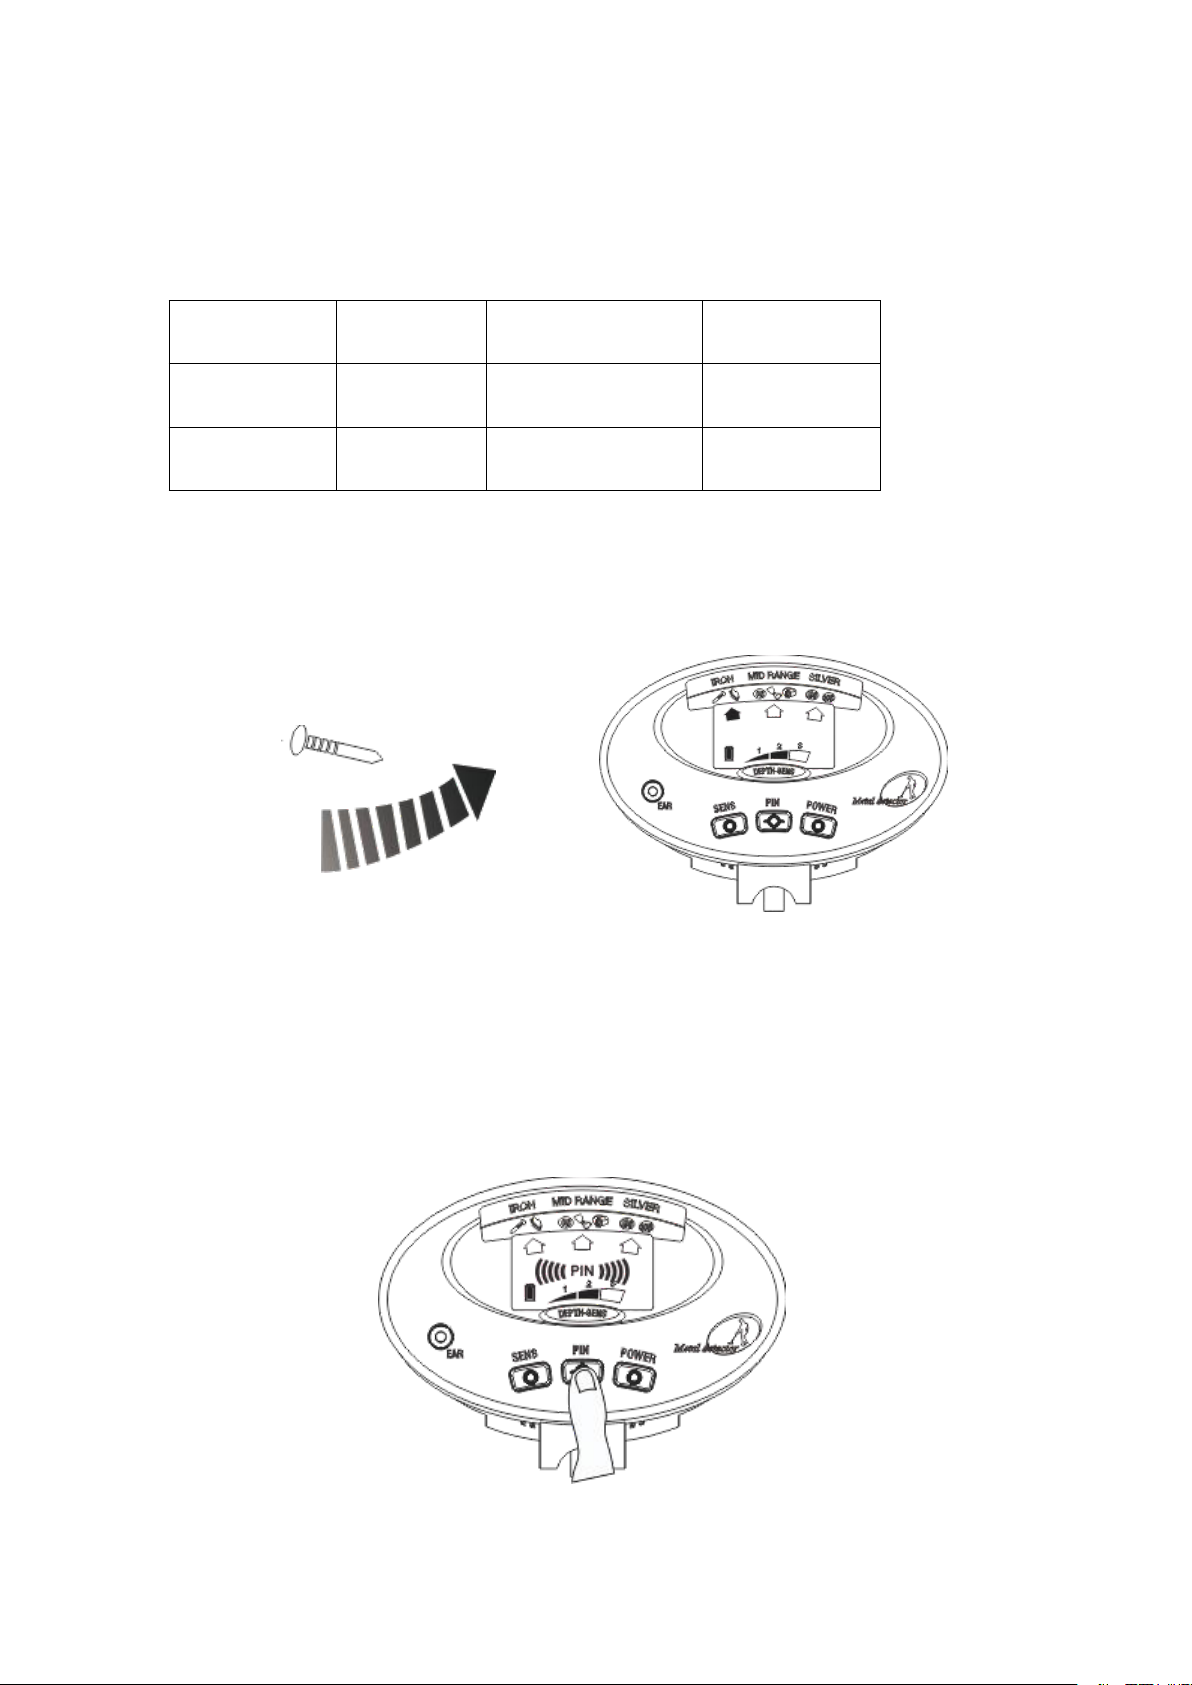
Pinpoint is the process of determining the exact location of the buried metal
object. As in the motion mode, you need to move the search coil continuously when
detecting, but it’s hard to determine the exact location of the buried metals. In the
Pinpoint mode, please use Non-motion mode to align the center of search coil with

3
the location of the buried metal, to help you to excavate.
Ground balance
Ground Balancing is the ability of the detector to ignore, or "see through," the
earth’s naturally occurring minerals, and only sound a tone when a metal object is
detected.
Coins depth
The coin depth is the approximate distance that the 25¢silver coin in the neutral
soil or in the air. It’s not an exact depth.
SPECIFICATION
Operation mode: 1+1
Motion mode: ALL-METAL
Non-motion mode: PINPOINT
Coins depth indication: 1, 2, 3 Steps (2″,4″ and 6″+)
Sensitivity control: 3 Steps
Target metals discrimination: 3 kinds
Sound frequency: Three kinds of sound indicating different metals
Battery indication: Low battery indicate
Turn off prompt: make a prompt tone every ten minutes
Search coil: 210x70mm open waterproof search coil
Earphone jack: 1/8 inch earphone jack(Earphone is not included)
Power supply: 6 AA batteries (Battery is not included)
ASSEMBLY
1. Loosen the two triangular fasten buttons below the control box, insert the bracket,
then tighten the two triangular fasten buttons (See Fig.1).

4
Fig.1
2. Turn clockwise to relax the end of bend-shape tube sleeve, and insert the tube
which connect search coil into the sleeve. Adjusting the length, so you can stand
comfortably and straighten your arms. Lock the sleeve anti-clockwise when the
search coil is from the ground about 1/2 inches. See Fig.2,Fig.3.
Fig.2
Fig.3
3. Wind the cable around the aluminum tube and keep the elastic moderate, so that
the cable won’t sway.
BATTERY
Please use 6 alkaline AA batteries.
1. Press the “key” on the battery cover in the direction of the arrow, pull out the
battery cover.(Fig.4)
Fig.4

5
2. Insert the 6 AA batteries to the case as indicated by the polarity symbols marked
inside the case.
Fig.5
3. And then push the battery cover to the batter cavity. A KATA tone will be heard,
which means the battery cover has been at the right position. Please note that the
direction indication of the “UP” on the battery cover. 6 alkaline batteries will last
approximately 40 hours. If you won’t use the detector for a long time, please
remove the batteries from the battery box.
PANEL AND LCD
All the controller adjustment can be displayed on the LCD, and all the detection
result also can be shown on the LCD. (See Fig.6)
Fig.6
Target ID: It’s located above the LCD screen. It indicates the wanted target metals.
When detecting a metal target, the target ID cursor will appear below such metal
patterns or the words.
Target ID cursor: it’s in the shape of .It consists of 3 segments. When the
target ID cursor is lighted, it indicates the probable metal type of the detected
target.
The three warning tones which be heard during finding targets are corresponding with
the target ID cursor. See the below table:
Low pitch
Median
High pitch
IRON
5¢,
10¢,25¢,50¢and
1$

6
Note: affected by the soil composition, as the same material metal in the different
soil, the position of the target ID cursor will change.
Coin depth indication cursor: it contains three grades, namely 1,2 and
3,equivalent to 2”,4” and 6”.It indicates the approximate depth of the 25¢silver
in the neutral soil. It’s only the approximate depth. The size and composition of
the target, and the composition of the soil will affect the indication value.
Sensitivity indication cursor: It’s shared with the depth cursor and will turn into
depth cursor automatically when detecting metal. It is divided into three grades,
which is the highest when all are lighted. Using SENS button to adjust.
PINPOINT cursor: Press and hold down the “PINPOINT” button, then the
PINPOINT cursor is lighted, and the detector turns into NON-MOTION mode,
it’s apply to locate the detected object accurately.
Battery power cursor: When all the cursor is lighted it means the power is enough.
While the entire battery indicator is extinct, it’s time to replace the battery right
away.
CONTROLLER
All the controllers are on the panel.(See Fig.7)
Fig.7
Power button: Press power button to turn on. Press again to turn off.
SENS Button: choose the 3 levels with the SENS button. Boot setting is the
middle level (the second level).The highest sensitivity is the third level, when
there is interference, you can set the sensitivity lower properly. In the PINPOINT
mode, the SENS button is useless.
PINPOINT Button: press and hold down the “PINPOINT” button, the detector
converts into the non-motion mode automatically, it no longer has discrimination
ability. At this time, the PINPOINT cursor is lighted, and indicates the signal
strength. The more close to the metal target, the more the strength cursor is
lighted, and louder the sound is, to locate the target location accurately.

7
QUICK START
1. Prepare with the three metal samples
an iron nail
a 5¢nickel coin
a 25¢silver coin
2. Lay the detector
Place the detector on a wooden or plastic table, let the search coil exceeds the
table edge about more than 20cm.keep the detector away from the wall, ceiling and
floor, turn off all the equipment which can cause elector-magnetic interference. Please
take off the watch, ring or other metal objects on your hand. ( See Fig.8).
Fig.8
3. Turn on
Press the POWER button, and the detector will make moo tones twice, all the
LCD patterns are lighted at minute, the detector is in the ALL METAL mode by
default, and the sensitivity is in the second grade.(See Fig.9)
Fig.9
4. Test

8
Sweep the three metal samples 5 to 8cm above the search coil.
a) The detector sounds three different tones in turn.
b) The depth cursor points to the second grade.
c) The Target ID cursor points to the three materials.
As below table
Sample
Iron nail
5¢nickel coin
25 ¢silver
coin
Tone
Low pitch
Medium
High pitch
Target ID
indication
IRON
5¢
25¢
(See Fig.10, take iron nail as an example)
Fig.10
5. PINPOINT mode test
a) Press and hold down the “PINPOINT” button, the PINPOINT cursor is lighted,
and the depth cursor points to the third grade. The detector will make low
single-frequency median sound. (See Fig.11)

9
Fig.11
b) Let the 25 ¢silver coin approach the search coil slowly, when it is in the
position of about 6”,the strength cursor begins to appear and turns stronger, the
sound turns louder. Continue let the 25¢silver coin approach the search coil, till
the strength cursor is full-scale lighted, the sound is more louder, then the depth
cursor denotes the depth dropping.(See Fig.12)
Fig.12
c) Maintain the position of the silver coin, release the PINPOINT button. Press the
PINPOINT button again after several seconds, the lower cursor is extinguished,
and the sound comes back to the initial state, the depth indication comes back to
the full scale.
d) Let the silver coin move to the center of the search coil again slowly, the lower
cursor appears again and increases, the sound turns louder again, the depth cursor
goes lower again, which means the metal target is closer to the center of the
search coil.
e) Repeat the above procedures for several times, till the silver coin is closer to the
search coil center. When moving the silver coin, the cursor and sound no longer
change. Up to now, you have had a “PINPOINT” operation completed.
Done this step, you have an initial familiarity to the detector, and you can begin
the next step of basic operation.
BASIC OPERATION
Metal detector is used outdoors. There are too many kinds of metals indoors, and
all kinds of electrical equipment that will bring interference signals. So, it is not fit for
using the detector indoors.
Field detection is more complicated, the composition of the regional soil, the
component, size, shape and the oxidation degree of the underground metals will all
affect the detection results. This chapter is only the general steps of the field detection.

10
You should operate again and again to accumulate experience to achieve good results.
1. Turn On
Press the Power button, the detector will make moo tones twice, and all the LCD
patterns are lighted at minutes. Then the sensitivity will be preset second grade, and
the operation mode will be preset ALL METAL mode.
2. Set the operation mode
In generally, the user can choose the preset ALL METAL mode. At this time, the
detector will make discrimination responses to all kinds of metals.
Since the soil will make the detection indication deviate, we suggest you bring
some samples, such as 25 ¢silver coins, 5 ¢nickel coins and so on. Bury these
samples in the soil of the detection region respectively, try to detect, observe the
position of the discrimination cursor appeared, and how much deviation from the
target pattern. It will help you judge the type of the target, in case you omit the
treasures that you want to find.
Directly using the PINPOINT to detect, which is also an alternative way.
Specifically, in the region where the ground is more complicated or there is too much
electromagnetic interference, the effect may be much better.
3. Choose the sensitivity
The users always expect to set the sensitivity higher. However, in the higher
sensitivity range, the detector will be sensitive to the electromagnetic interference that
comes from the power lines or cables around, and it will do abnormal reaction to the
mineralization soil or electrical conductivity soil. If you move the search coil in the
detection area, and the detector will send an unstable false signal, please decrease the
sensitivity.
If you operate the detector with your partner at the same time, please pay
attention to keep more than 10 meters away from each other and decrease the
sensitivity appropriately.
4. Move the search coil
When detecting, you should move the search coil at a constant speed, not
unsteadily. Let the search coil be parallel with and about 1/2 inch from the surface,
not to swing it like a pendulum high and low above the ground. (See Fig.13)

11
Fig.13
Most valuable metal objects will send repeatable signals. If the signal isn’t
repeatable, it’s mostly a false signal. When there is a clear sound instructing the
buried targets, you could read out the approximate target type and depth on the LCD
screen. And you could also move the search coil above the target objects fast, in order
to get a more stable signal.
5. Make use of the sound, to help discriminate
In the process of detection, the user doesn’t always watch the screen. And the
sound identification system will make four frequency tones to help discriminate the
targets.
Low pitch——ferrous metals, such as iron nail, caps and so on.
Median——S-caps,5¢nickel coin.
High pitch——copper, aluminum and silver, such as 1¢,10¢,25¢and so on
zinc coin, copper coin and silver coin.
6. PINPOINT
When detecting in the motion mode, as you should persistently move the search
coil, so although you find the region that burying metals, it’s not easy for you to
determine the exact location, it’s difficult to dig. At this time, you should recur to the
PINPOINT mode.
a) Press and hold down the PINPOINT button, the detector will make a low
single-frequency tone, and the sensitivity is in the highest state.
b) Let the search coil approach the ground, when you find the target, move the
search coil slowly in the region. In the position where the single frequency tone
turns louder and the signal strength cursor begins to appear. Continue moving the
search coil slowly until the sound turns louder, and the signal strength cursor is
full scale.
c) Maintain the position of the detector and release the PINPOINT button for
several seconds. Press the PINPOINT button again, the detector is self-balanced,
and make a low single frequency tone, the signal strength cursor is extinguished.

12
Move the search coil slowly again, let the single frequency tone turns louder, and
the signal frequency cursor gets more lighted.
d) Repeat the operation and approach the target, until you lock the location of the
metal target. You could make notes on the ground by the center of search coil, to
facilitate your excavation.
e) In the process of the PINPOINT, the depth cursor will turn into the signal strength
cursor, which denotes the distance between the center of the search coil and the
target, to help you pinpoint the location. Finally, the depth cursor will remain at
the position of 2”. In fact, it means the target is near the center of the search coil.
7. Depth and Target Indication (only in the motion mode)
Preset the detector in the motion mode. The LCD screen will show the rough
metal target types and the rough target depth.
When the position and type of the target are determined, the detector will send a
repeated signal. If in the same place, the discrimination display is inconsistent, it
means the target may be false, or it may be the trash metal or highly oxidation metal.
Trough practice, you must bear in mind only the repeatable signal existent, then you
do excavation.
When finding a metal target, the identification cursor will indicate the metal
type. The identification pattern, based on the metal conductivity, arrange in low to
high order from left to right. The gold ring and locking pieces will appear in the
position of MID RANGE. The silver objects will appear in the right. In the neutral
soil, the discrimination indication is more accurate, while in the mineralization or
saline soil, the discrimination indication will have various degree of deviation.
The above discrimination is just a reference, it is not full accurate.
The depth indication is accurate for coin-sized objects. Large objects and
irregularly-shaped objects will yield less reliable depth readings. If you sweep at the
same place for several times, and show the same depth, then it is a more accurate
detection. If the depth indication varies, try to change the sweeping angle. There may
be more than one target present.
Remind you once again, when detecting in the wild, due to the impact of the
ground condition, the discrimination indication and depth indication will be all
deviation. The composition, size and oxidation of the metals will all affect the
indication result. It’s necessary for you to consider these factors before choosing
elimination a certain metal or determining whether there are precious metals present.
Not to eliminate the precious metals.
8. The use of the non-motion mode.
In fact, the sensitivity in the non-motion mode is high, search metals directly
using non-motion mode is also a choice. In some regions, the ground is too narrow to
sweep search coil, you could choose the PINPOINT mode. In the severe
mineralization or saline region, and in the places where there is too much interference,
you could try to sweep using PINPOINT directly.

13
CAUTION
1) Please don’t wear earphone in areas of heavy traffic in case of accidents.
2) Please obtain permission before searching any site.
3) Please keep away from locations where may bury electrical line, cable line or
pipeline, especially pipes full of flammable gases and liquids.
4) Do not detect in the military area where may bury bombs or gas explosives.
5) Please keep the land and vegetation as intact as possible after the excavation.
TROUBLE SHOOTING GUIDE
SYMPTOM
SOLUTION
No power, no boot sound, and the LCD
have no indication.
1. Make sure that batteries are installed
correctly.
2. Make sure that the “UP” of the battery
cover is upward.
3. Replace the batteries.
Sound a successive “DI” “DI” tone
1. Make sure that there is no other metal
detector operating around.
Sound an irregular tone, or the target
identification cursor chatters.
1. Don’t use it indoors, because there are
many metals there.
2. Make sure whether there is
electromagnetic interference sources,
such as power lines, cables, electronic
fences and so on. Keep away from these
areas or try to reduce the sensitivity.
The signal is instable, and the position of
the target identification cursor change.
1. Sweeping as a different angle, in order
to determine whether you can get a more
stable signal.
2. If the target is buried deeply, you could
try to increase the sensitivity or speed up
the speed of sweeping the search coil, in
order to get a more stable signal.
3. Maybe more than one metal targets
buried there, you could try to increase the
sensitivity or set different discrimination
range to sweep.
4. Maybe you find a severe oxidation
target, or the ground is serious magnetic,
you should try to decrease the sensitivity.
Using PINPOINT, when the search coil
approaches the ground, the unit will
sound a tone.
1. The surface is severe magnetic, you
need to do the ground balance
adjustment, or you should press the

14
PINPOINT button again to reduce the
sensitivity.
2. There is a large metal underground.
PART LIST
NO
ITEM
QUANTITY
NO
ITEM
QUANTITY
1
Battery cover
1
15
Rubber
button
1
2
Battery
compartment
1
16
3
Battery
compartment
pressure plate
1
17
Panel
1
4
Screw ST3x8F
2
18
PVC
1
5
Cover
1
19
Aluminum
tube
1
6
Rubber ring
1
20
Gear liner
dentate
circle
1
7
Screw ST3x18F
2
21
No gear
liner dentate
circle
1
8
Casing
1
22
Pipe
covering
1
9
LCD
1
23
Connecting
rod
1
10
PCB
1
24
Handle
1
11
Pad
1
25
Triangle
fasten knob
2
12
Screw
ST2.6x6F
2
26
Disk
knob(screw)
1
13
Screw ST3x6F
2
27
Search coil
1
14
Speaker
1
28
Disk
knob(nut)
1

15
Table of contents
Other nalanda Metal Detector manuals
Popular Metal Detector manuals by other brands

Buki
Buki NATURE EXPERT manual

Explore Your World
Explore Your World Discovery Channel instruction manual

Bounty Hunter
Bounty Hunter Tracker IV owner's manual

Bounty Hunter
Bounty Hunter HandyMan user manual

Bounty Hunter
Bounty Hunter DISCOVERY 2200 owner's manual

Famous Trails
Famous Trails MD9300 owner's manual