NatComm CRU4 User manual

CRU4
USER GUIDE
For Technical Assistance
Please Phone: (07) 5596 5128

Page 2 National Communications
REGULATORY INFORMATION
About Telephone Call Recording
It is an offence, under theTelecommunications (Interception)Act 1979, to
record a telephone call without both parties knowledge.
There is also State and Territory legislation relating to the recording of
communications over the Telecommunications network which should be
adhered to by the user of this equipment.
A document entitled ‘Telephone Recording Guidelines’, written by the
Australian Communications Industry Forum (ACIF) is saved to the enclosed
CD. This document provides information and recommendations regarding
telephone call recording and the acceptable methods of advising the other
party. You should read this document to ensure that you comply with
appropriate state and federal regulations. This document also provides
contact details (AppendixA) for Federal, State and Territory departments
responsible for Telephone Call Recording, should you require further
clarification or assistance.
ACIFrecommend thatyou provideORAL notificationby automaticor manual
meansBEFORE youcommence recording.ACIFalso advisethat youshould
cease recording if requested by the other party.
CRU4 has the ability to provideAutomatic ORAL notification using the ‘Play
Then Record’facility.Asample advisory message is saved to your supplied
CD. This is the method recommended byACIF.
CRU4 can also inject ‘recording tones’ into the telephone call, at intervals
of15seconds,whenevercallsare being recorded. However, ACIF advise that
this method of advising that a call is being recorded is now considered
obsolete. A small slide switch located next to the power input is used to
Enableor Disable these recording tones.
To DISABLE the injection of call recording
tones when recording calls, you should set your
Slide Switch to the Left Hand side.
To ENABLE the injection of call recording tones when recording calls,
you should set your Slide Switch to the Right Hand side.

National Communications Page 3
PACKING LIST
Beforecommencinginstallation, please ensurethe following itemshavebeen
providedwithyourunit.
DESCRIPTION QTY
CRU4CALLRECORDUnit 1
CRS Voice Record Software CD 1
12VAC Plug Pack (Power supply) 1
Double adaptor unit 1
Handset Connection Cables 2
1) one cable has a straight through connection
2) this alternative cable has a crossed connection,
with a white band on one end (is required for some handsets)
PC Connection Cable 1
This cable has AUDIO and COM port plugs.
This cable connects CRU4 to :
1) the PC ’Line In’ or ‘Mic’ facility
2) the PC ‘Speaker Output’ facility
3)the PC ComPort
USB to Serial Adaptor 1
For PC’s which do not have a spare PC Comm (Serial) Port
This cable connects to the PC Comm (Serial) Port
connector of the above PC Connection Cable so
that you can connect to a USB port instead of a
Comm port. Note; you may need to load a device
driver for this accessory from the supplied CD.

DESCRIPTION
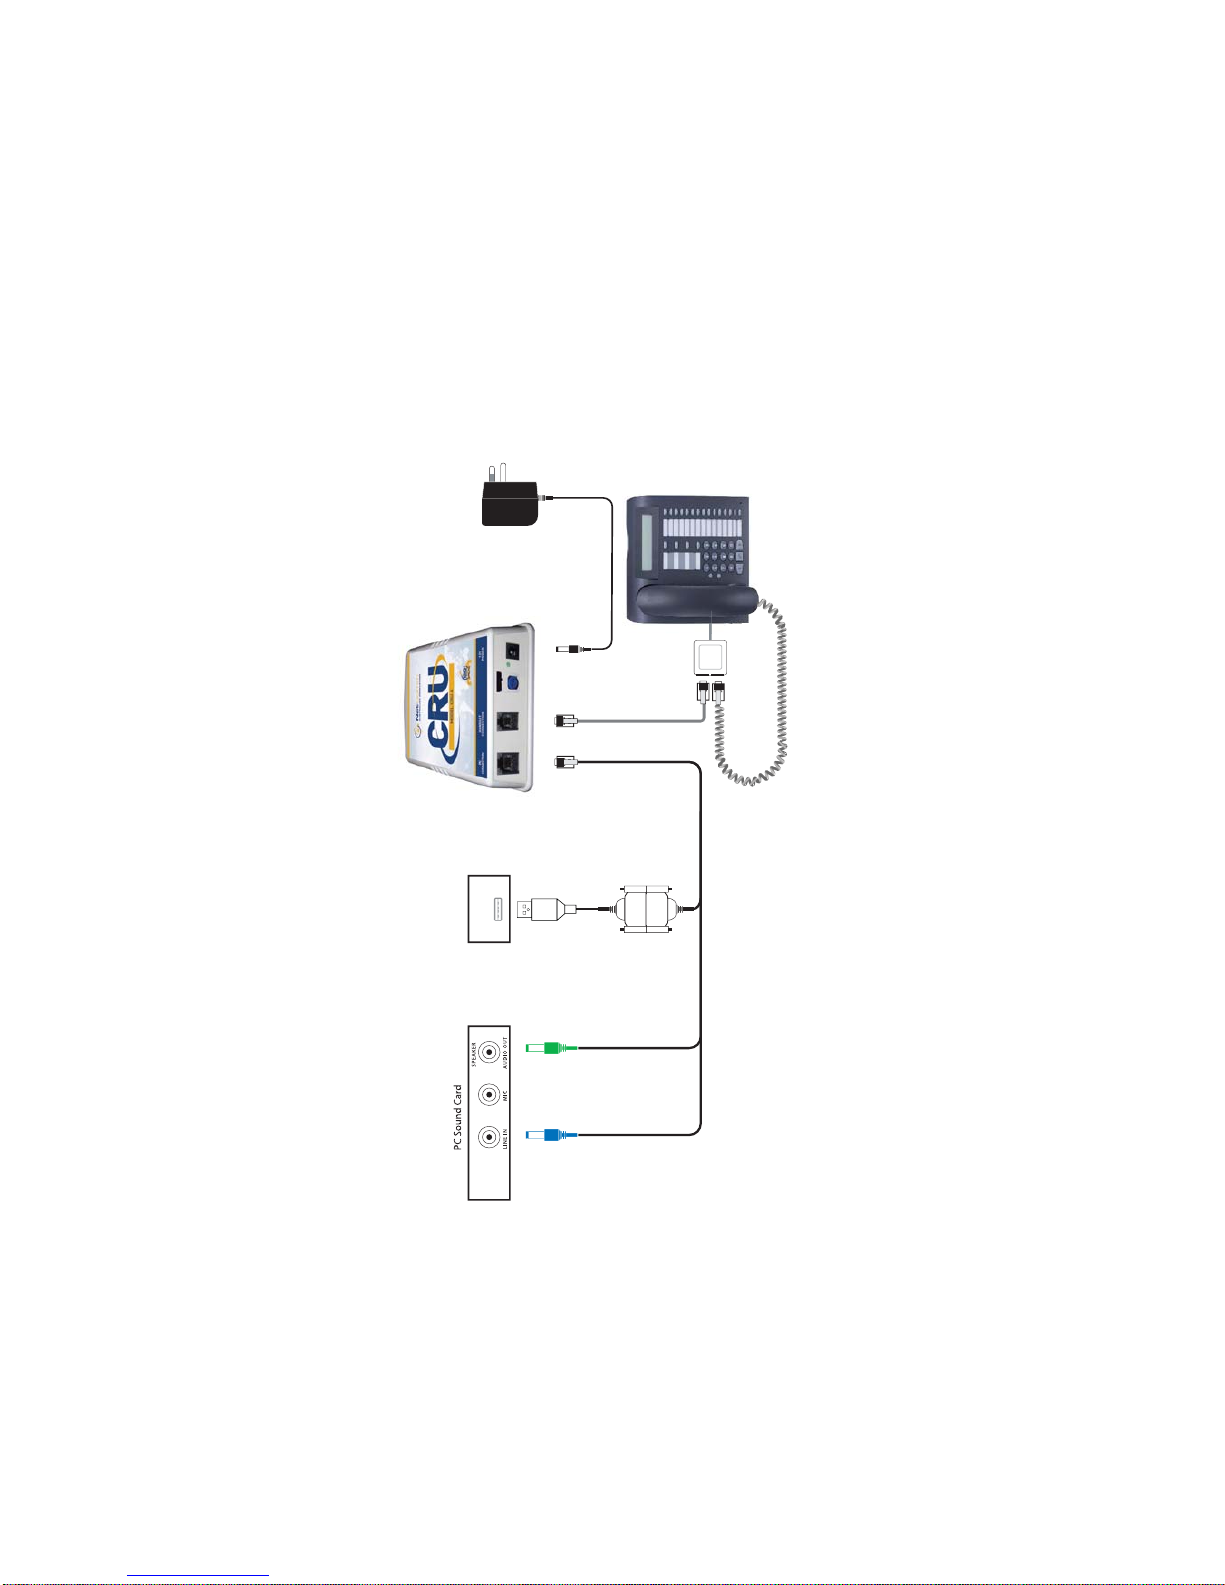
Our CRU4 CALL RECORD UNIT is designed to provide powerful and
cost effective PC BASED ‘PersonalTelephone Call Recording’facilities,
for professional users, when used in conjunction with a PC.
CRU4 can be connected to ANY telephone handset including those
used with ALL PABX, Commander, VOIP or Residential telephones. It
can even connect to a headset.
It is also designed to connect to a PC fitted with a SOUND CARD and
a SPARE Serial (COM) port or a SPARE USB port.
Telephone Call Recordings can be started and stopped, at any time, by
selecting the RECORD and STOP icons on the supplied CRS software.
Recorded calls are saved in MP3 format, which minimises memory usage
and facilitates easy replay, storage and email transfer. These ‘files’can
be individually named, auto-named or stored by time and date, in a
nominated folder located on a local or networked drive. Previous
recordings can be recalled and replayed to telephone callers as required,
emailed or archived to a CD or other permanent storage medium.
You can play an ‘advisory message’, or inject ‘recording tones’ into
the telephone call, to advise your callers that the call is to be recorded.
Please refer to page 2 for further information about the use of these
facilities.
Page 4 National Communications
WINDOWS 7 USERS
If you are using Windows 7, then you will need to CHANGE the folder
that your call recordings are stored to after installation of the CRS4
software. Failure to do so will cause files to not be saved.
The default installation folder for your CRS4 software is :
c:\Program Files\RecordSoftware.
The default destination folder for your recordings is:
c:\Program Files\RecordSoftware\MP3Store
Please change your destination folder for your recordings to any
folder outside of the “Program Files” folder (see page 15).
e.g.,c:\CRU4Recordings
If your recordings are of an important nature, we suggest that you
make your destination folder on your server to guarantee that your
files are backed up during your normal backup process.

PC REQUIREMENTS
OPERATING SYSTEM
The supplied CRS software is designed to operate on a Windows based
PC, running Windows 95 or later. It is not designed for operation onApple
Macintosh based computers.
If you are using the Windows 7 operating system, please refer to page
4 for important information.
SOUND CARD
The PC must be fitted with a Sound Card, which is required for use with our
CRS Call Recording Software. CRS has the ability to output call recordings
and other MP3 based audio to your telephone handset. For this reason,
your PC speakers should be disconnected. If audio is not required to be
played back into your handset, you can leave your speakers connected
and not connect the GREEN connector of the CRU4 cable. You can also
install a second sound card to your PC, for use with CRU4 if you wish to
maintain normal use of your original sound card.
SPARE COM PORT or USB PORT
The PC must be fitted with a spare COM port or USB port. If a spare COM
port is not available, you should use the supplied USB to SERIAL (COM)
Port adaptor, which will convert an existing USB port to a Serial COM port.
Note : You may need to load a driver for this accessory from the CD supplied
with this kit.
INSTALLATION OVERVIEW
A) CONNECT TO YOUR TELEPHONE HANDSET
B) CONNECT TO YOUR PC WITH SUPPLIED CABLE
C) CONNECT POWER
D) INSTALLTHE CRS SOFTWARE
CRU4 MUST BE INSTALLED BEFORE THE CRS SOFTWARE
National Communications Page 5

Page 6 National Communications
INSTALLATION PROCEDURE
A. TELEPHONE HANDSET CONNECTION
1) Disconnect the ‘curly cord’ telephone handset cable from the point where
it connects to the telephone.
2) Connect this cable to the supplied DoubleAdaptor unit.
3) Connect the short cable of the Double Adaptor unit to your telephone,
where the ‘curly cord’ was previously connected.
4) Locate the supplied telephone cable without the white band at one end,
andconnect itto the other outlet of the DoubleAdaptorunit. Note - depending
onyour handsetcurly cord configuration, you may need to use thealternative
supplied cable with the white band. You will need to do this if you cannot
hear the other party in a call recording. See details on page 17.
5) Connect the other end of this cable to the port labelled HANDSET
CONNECTION on the CRU4.
B. PC CONNECTION
1) Connect the supplied PC cable to your PC as follows :
The BLUE audio connector should plug into the LINE IN port of your PC.
This is often colour coded in blue. If there is no LINE IN port, connect it to
the MIC port (usually pink). Note - If you have to use the MIC input, you
should carefully implement the recommendations made on page 19.
TheGREEN audio connector should plug into theAUDIO OUT or SPEAKER
port of your sound card (usually colour coded green).
Note - If you currently have speakers connected in this socket, you should
remove the speaker connection (refer to SOUND CARD page 5).
The 9 PIN COM connector should connect to a spare COM (Serial) port of
your PC, then tighten the ‘locking screws’.
If your PC does not have a spare COM (Serial) port, then you should connect
the supplied USB to SerialAdaptor (see page 3) to the PC Cable and also
toa spareUSB port of your PC. NB: The device driver is located on the supplied CD.
2) Connect the other end of this cable to the port labelled PC CONNECTION
on the CRU4 unit.
3) Connect the supplied 12V power pack to CRU4 and turn it on.

National Communications Page 7
INSTALLATION DIAGRAM
Adaptor
Supplied
12V Power Supply
Cable Supplied
USB Port

Page 8 National Communications
CRS SOFTWARE INSTALLATION
1. Insert the CD into your CD drive.
2. Open windows explorer and select your CD drive.
3. Double Click the file ‘setup.exe’.
4. The CRS program will begin to load.
You can now select or deselect options to load the program into your
start up folder and also your desktop.
It is recommended that you leave both options selected, as the
program will then be loaded ready for use each time you start up
your PC and also it will be available for opening from your desktop
should you need to close it.
5. Follow the prompts until the installation is complete.
6. Run the CRS program clicking the CRS icon on your desk top.
You will need to accept the licence agreement to continue and the
program will now load.
7. With the software program loaded, and the supplied serial cable
connectedto both CRU4 andaPCSerial COM port, yourCRSprogram
should open and the COM port used to connect CRU4 should have
been automatically detected and displayed.
If a COM port number is not displayed click, Find Com Port.
If a COM port number is still not displayed, you have a problem with
yourCOMport and you should usetheUSBtoSerial COM port adaptor
instead, as described on page 6.

National Communications Page 9
8.You must now advise the CRS software
where the telephone call input is connected.
Select Line In from the drop down box
or
Select Mic
(if the Microphone Input has been used)
9. You are ready to TEST your Call Recording Software :
a) Pick up your handset and then press the
RECORD icon.
b) Speak into your handset for a short period
and then press the STOP icon.
c) Press the PLAY icon and you should now hear the recoding play back
into your handset. If you can hear yourself and the telephone dial tone,
and the volume is correct proceed to page 10.
If your cannot hear ANYTHING
Or the volume needs adjusting :
i) OPEN ‘Windows Mixer’.
ii) Adjust the slide bars for Volume and Line In (or Mic) until the correct
level is achieved.
iii) Deselect any Mute settings
that are ticked.

Page 10 National Communications
If you can only hear YOURSELF : Your curly cord handset
uses a different wiring configuration. You should exchange
the telephone cable connected to the handset port of your
unit (use the cable with a white band on one end) Page 6 -
Section A - point 4.
If you cannot hear yourself : please adjust the BLUE
Volume Control. This facility will
increase the volume of
the local party only (ie it
will increase the volume
of your voice only).
Note - You can adjust the RECORD
and PLAYBACK volumes by using the
slide bar on either the CRS program
or in Windows Mixer.
If you are still having problems :
1) Check that you have correctly followed all HARDWARE
INSTALLATION instructions as detailed on page 6.
2) Check that you have correctly followed all SOFTWARE
INSTALLATION instructions as detailed on page 8-9.
3) Check that your SOUND CARD is functioning CORRECTLY
by removing the GREEN connector of the CRU4 PC cable and
connecting speakers to this output. If your sound card is set
up correctly, you will be able to play music through your
speakers.
4) In the event you are continuing to experience problems, please
call National Communications for technical support on :
Ph : 07 5596 5128.

National Communications Page 11
USING CRS SOFTWARE
IMPORTANT NOTE :
The CRS Program is loaded by default into your Start Up
folder. If you elect to not have it installed in your Start Up
folder, you will need to RUN the CRS program, each time
you start your computer (ie; you will need to click the CRS
icon on your desktop).
Recording of your telephone calls is
STARTED by pressing the Record
icon on the CRS software.
After recording, you can play back
your recorded telephone call to the
other party by pressing the Play icon
on the CRS software.
Your recorded telephone calls are automatically converted to MP3
format. The default sampling rate is ‘Telephone Line Quality’.
A selection of MP3 conversion sampling rates are provided, which
will allow you to select the most appropriate balance between
recording quality and memory used, for your application (see
pages 14-15 for further details).

Page 12 National Communications
MP3 format is used, as this provides
you with maximum flexibility and
convenience when PLAYING files or
FORWARDING files to other parties.
Your recorded calls are
AUTOMATICALLY SAVED in the :
C:\Program Files\RecordSoftware\
MP3Store
directory which was set up on your
PC’s hard drive during installation of
this software.
You can change this directory or you
can select a Network hard drive for
recorded file storage.
(see page 15)
When selecting the Auto Save Facility, you have a choice of :
1) Using Set File Name
Once a file name is entered,
your subsequent stored files will
increment by 1.
ie:
C:\Recorded Telephone Calls\Jane Smith1.Mp3
C:\Recorded Telephone Calls\Jane Smith2.Mp3
C:\Recorded Telephone Calls\Jane Smith3.Mp3
etc

National Communications Page 13
2) Storing Files by DATE and TIME using :
Auto Date Stamp
The Time and Date file name
relates to the time and date that the
call was SAVED.
C:\Recorded Telephone Calls\5_08_2010_12_16_55_PM.Mp3
C:\Recorded Telephone Calls\5_08_2010_12_22_03_PM.Mp3
C:\Recorded Telephone Calls\5_08_2010_12_31_18_PM.Mp3
If you do not use the Auto Save
facility, then files will ONLY be saved
by ‘clicking’ the Save Icon displayed
within the CRS menu.
You will then be prompted to save the
file in a directory of your choice,
which will be used for future Manual
File Saves.
Files saved in this manner can be
saved in .mp3 format or .wav
format.
Important Note : In this mode, the
current call is held in temporary
memory and if you do not manually
save a file, it will be overwritten by
the next call you record and cannot
be recovered.

Page 14 National Communications
You are provided with a choice of 3 pre-configured ‘Sampling
and Save’ settings, for saving your recorded calls.
High Quality samples and saves files with the Highest audio
quality, (not necessary for phone calls) and uses the most
memory.
Medium Quality samples and saves files with very good quality,
using a moderate amount of memory (usually not necessary for
phone use)
Standard Quality samples and saves files with a sampling rate
which produces GOOD quality for most TELEPHONE LINE
applications and uses the least amount of memory.
‘Sampling Rate’ is a term which describes the frequency that a
sampling of audio is taken during the record period and saved.
The more frequently this is done, the higher the quality of the
recording, but the more memory used.
The DEFAULT SETTING for CRS is STANDARD QUALITY.
You will only need to change this setting if the quality of the
recorded file when played back is not adequate for your use.
You can change this setting by selecting :
Settings
Basic Settings
and then ‘clicking’ your required choice

National Communications Page 15
For Advanced Users, settings are
provided for separate selection of
the actual AUDIO SAMPLING
RATE of the telephone
conversation and also the MP3
BIT RATE SAVE QUALITY that you
wish to apply to the sampling.
Note - Files can also be saved in
.wav format, when the Auto-Save
facility is disabled (see p13).
CHANGE FILE SAVE PATH
Your recorded calls are
AUTOMATICALLY SAVED in
C:\Program Files\RecordSoftware\
MP3Store
This directory has been set up on
your PC’s hard drive, during
installation of this software.
You can change this directory or you
can select a Network hard drive for
recorded file storage, by navigating
through to the required directory and
then clicking :
‘Change Save Path’
If you are using the Windows 7 operating system, please refer
to page 4 for important information.

Page 16 National Communications
RECORDING PLAYBACK
CRU4 has the ability to PLAYBACK into the telephone handset :
1) Recording Advisory Message
or
2) MP3 based Messages
or
3) Previous Telephone Call Recordings
1) Announcement Messages
MP3 based Messages can be
playedinto the handset atany time.
Messages are loaded into CRS
using the ’Add File’ button.
To play a message, you need only
click it once to highlight it and then
simply click ‘Play’.
If you wish to play a Recording Advisory Announcement and then
start recording the telephone call, you should select ‘Play Then
Record’. CRS will play the highlighted message and then begin
recording.
2) Previous Telephone Call Recordings
Previous Telephone Call Recordings can be played back into the
handset at any time, by using the ‘Add File’ facility followed by ‘Play’.
This file can then be removed by using the ‘Remove File’ facility.

National Communications Page 17
TROUBLESHOOTING
AUDIO PLAYBACK
If your cannot hear ANYTHING or the volume needs
adjusting :
i) OPEN ‘Windows Mixer’.
ii) Adjust the slide bars for Volume and Line In (or Mic) until
the correct level is achieved.
iii) Deselect any Mute settings that are ticked.
If you can only hear YOURSELF :
You need to exchange the telephone cable that connects into
the HANDSET CONNECTION port of your CRU4.
This is because there are TWO different wiring configurations
used in curly cord handsets and the handset you are using uses
the less common configuration.
One cable has a white coded band on one end (this is the one
you should have installed first). The other does not.
You should exchange your installed cable with the cable that
does not have the small white band.

Page 18 National Communications
TROUBLESHOOTING
AUDIO PLAYBACK Cont.
If you can only hear DIAL TONE :
If you cannot hear yourself, then you should adjust the BLUE
knob in a clockwise position. Continue turning the knob until
the correct volume for yourself is achieved.
Turn the BLUE KNOB in a clockwise direction until you can
hear yourself clearly.
If you are still having problems :
1) Check that you have correctly followed all HARDWARE
INSTALLATION instructions as detailed on page 6.
2) Check that you have correctly followed all SOFTWARE
INSTALLATION instructions as detailed on pages 8-9.
3) Check that your SOUND CARD is functioning CORRECTLY
by playing a normal MP3 music file through your speakers. You
will need to temporarily disconnect the GREEN adio plug
attached to the PC Cable and plug your speakers in direct to the
green speaker output socket. Refit the cable when finished.
4) In the event you are continuing to experience problems, please
call National Communications for technical support on ph 07
5596 5128.

National Communications Page 19
GENERAL TROUBLESHOOTING
ENSURE YOUR SOUND CARD AND SPEAKERS ARE WORKING
CORRECTLYBYTESTINGWITHANOTHERSOUNDAPPLICATION
The vast majority of PC based Recording installations take place
without problem. On rare occasions, due to the wide range of
sound cards available, problems can be experienced due to
incompatible software settings within the sound card control
software.
If you experience other problems with your sound card, that you
are unable to rectify, we would recommend that you replace your
soundcard.Arecommended,inexpensiveandcommonlyavailable
replacement sound card is the Soundblaster range from Creative
Labs.
CRSSOFTWAREFAILSTOSTARTRECORDING
* Ensure that the supplied PC cable is correctly connected to your
PC’s SOUND CARD and COM port and that the other end of this
cable is correctly connected to the PC port of your CRU4 device.
*EnsurethatyourCRSsoftwarehasdetectedthecorrectCOMport
and that it is displayed on your CRS menu (see page 8).
FILESARERECORDEDBUTARESILENT
* Ensure that you have correctly selected LINE IN or MIC as your
input source (see page 9).
* Move the REC slide bar on the CRS menu towards MAX until
the required record level is obtained (see page 10).
USINGthe MIC inputinstead of the LINEIN input.
* The MIC input provides a much higher input level to your sound
card than the LINE IN input. As a result, the recorded volumes will
be much higher.
You will need to REDUCE the input volume
setting on the slide bar of your software (or
the MIC setting in Windows Sound Mixer).

Page 20 National Communications
SPECIFICATIONS
Dimensions(all in mm) : 106 (W) x 106 (D) x 43 (H)
Weight : 225g
Power Supply : 12VAC/500mA
Power Consumption : Idle - 0.5 Watts
Power Consumption : Call - 0.75 Watts
Handset Connector : RJ 4P4C 4 pin
PC output Connector : RJ 6P6C 6 pin
Power Connector : 2.5mm barrel connector
ACMA COMPLIANT : Supplier Number N 782
WARRANTY
This device is guaranteed against defects from workmanship for a period
of two years (24 months) from the date of purchase. In the event of
failure, you should return the product, along with proof of purchase date,
and a written statement about the nature of the problem.
This Warranty shall not apply to any unit which has been subject to
alteration, modification, abuse, negligence, accident, external voltage/
lightning surge or used in any manner contrary to these instructions.
The obligation is solely to repair or replace the product. The warrantor
is not liable for any incidental or consequential damages due to such
defects.
The user is responsible for freight costs to the repair point. The warrantor
will be responsible for freight costs in returning this unit back to the
user.
Damage caused to this device or attached equipment, by lightning strikes
or over voltage surge is not covered under this warranty.
CASE SEALED AT FACTORY
OPENING THE CASE VOIDS THE WARRANTY
Table of contents
Other NatComm Recording Equipment manuals