Navnet TZ Touch9 Instruction Manual

1
Connecting an iOS Device via Router
The wireless connection between an iOS device and the TZT9/14 built-in Wireless LAN can possibly be less
stable under some conditions, especially if there are many other wireless signals around the TZT9/14, the
distance in between is long, or if there is an obstacle in between. To solve these signal conflicts and remote
communication problems, a generic Ethernet router can be utilized. This document describes how to
configure a generic Ethernet router to network iOS devices with the TZT9/14.

2
1. Summary
iOS devices can be wirelessly networked with the TZT9/14 via an Ethernet router with the following settings on the
router:
1-1. (Mandatory) Fix an IP address to “192.168.252.2” to “192.168.252.99” (e.g. 192.168.252.2)
1-2. (Mandatory) Set the Subnet Mask to “255.255.255.0”
1-3. (Mandatory) Activate the DHCP server function
1-4. (Mandatory) Set the security mode to other than Open or Disabled
1-5. (Recommended) Set the wireless channel to Auto, instead of fixing to one channel *
1-6. (Recommended) Rename the router’s SSID to easily find the router with an iOS device **
1-7. (If necessary) Change the router’s Password **
Note:
* Setting the router’s wireless channel to Auto will have an effect on avoiding signal conflicts between many wireless
devices.
** The original SSID and password are usually stated on a sticker pasted on a router.
Tips on TZT9/14 Built-in Wireless LAN
For iOS connection (ad-hoc):
When the TZT9/14 is networked with iOS devices via the built-in Wireless LAN, a wireless channel is fixed to CH10. The
TZT9/14 works as a server and communicates with iOS devices with CH10 signals.
For Internet connection:
On the other hand, when the TZT9/14 is connected to the Internet via the built-in Wireless LAN, a wireless channel is
variable (auto), depending on an access point’s wireless channel because the TZT9/14 works as a client.

3
2. Setting up a Router
This section shows an example of settings with the Belkin N300.
http://www.belkin.com/us/p/P-F9K1002
If another type of router is used, open its setup page and make all the necessary settings shown in 1. Summary.
2-1. Connect a router to a PC with a LAN cable.
Note: The LAN cable should be connected to one of the LAN ports on the router, not the WAN port.
2-2. Install the Setup driver on a PC. (A driver CD is included with the product.)
WAN
LAN

4
2-3. Launch the Setup page.
2-4. Click [Advanced Tools].
2-5. Click [Network Name & Security] to make detailed settings such as IP address.
The Login page opens.
2-6. Click [Submit] to open the detailed setup page.

5
2-7. (Ref. Summary 1-1.)
In the [LAN Settings] page, fix an IP address to “192.168.252.2” to “192.168.252.99”. In this example, the IP
address is fixed to “192.168.252.2”.
Note:
If the message ”The LAN IP address cannot be
in the DHCP address pool.”appears as shown at
left, see troubleshooting on Page 7-8.
2-8. (Ref. Summary 1-2.)
Set the subnet mask to “255.255.255.0”.
2-9. (Ref. Summary 1-3.)
Set the DHCP on.

6
2-10. (Ref. Summary 1-6.)
In the [Channel and SSID] page, rename the SSID to an easy-to-recognize name.
This setting is recommended in order to easily find the router with an iOS device.
In this example, the original SSID is renamed to “NNTZT Router 1”.
2-11. (Ref. Summary 1-5.)
Set wireless channel to [Auto].
Wireless channels will then automatically switch to avoid surrounding wireless signals. This setting is recommended to
avoid conflicts between many wireless channels from other devices.
2-12. (Ref. Summary 1-4.)
DHCP: ON
Subnet Mask:
255.255.255.0
IP address:
192.168.252.2
Wireless Channel: Auto
SSID renamed to
“NNTZT_Router 1”

7
In the [Security] page, set the security mode to other than Open or Disabled.
In this example, it is set to “WPA/WPA2-Personal (PSK)”.
2-13. (Ref. Summary 1-7.)
Change the password to an easier-to-remember one if necessary.
Note: When an iOS device is connected to the built-in Wireless LAN of the TZT9/14 in ad-hoc, the security setting on the
TZT9/14 should be WEP. When connecting iOS devices to a router, however, the router’s security setting should be
anything other than Open or Disabled.
2-14. Check all the changes made.
Security Mode:
WPA/WPA2-Personal (PSK)
Change the password.

8
Troubleshooting
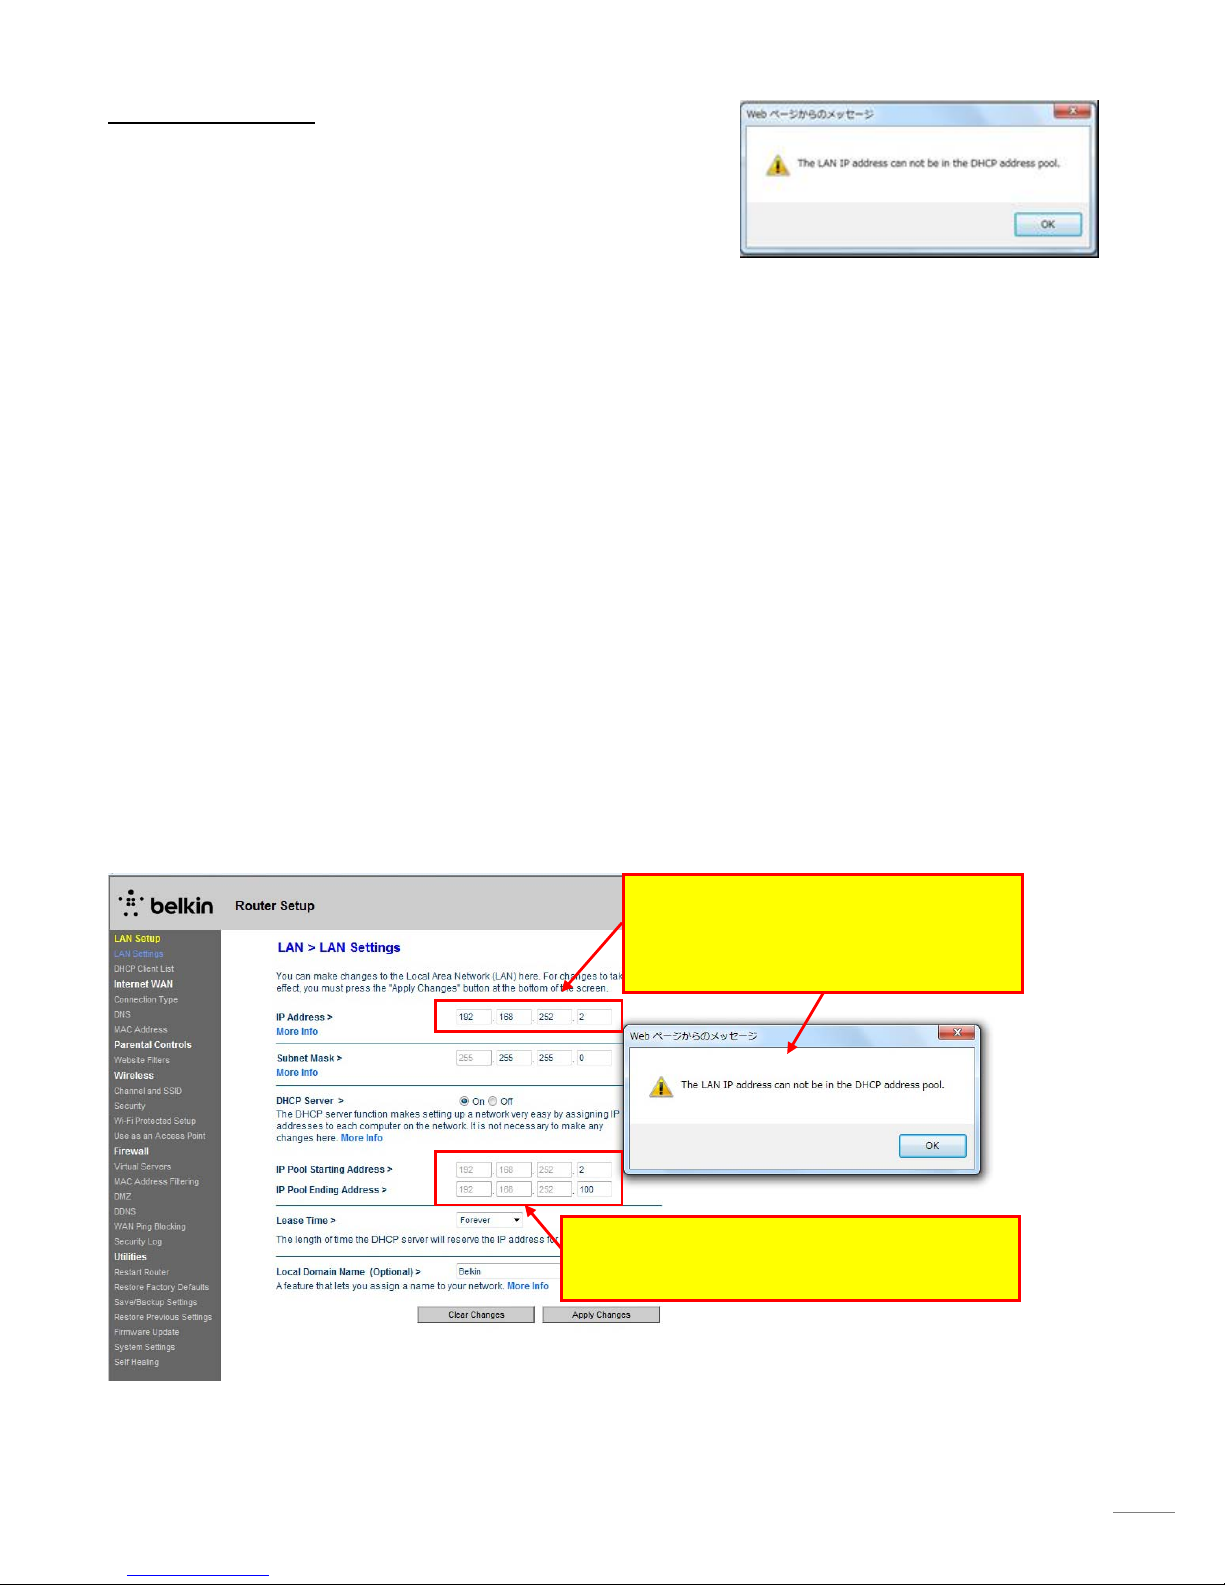
If the error message “The LAN IP address cannot be in the DHCP address
pool” appears, change the [IP Pool Starting Address] or [IP Pool
Ending Address]. See the following steps for solution.
Tips:
The router (DHCP Server) will allocate an IP address to a connected device (Client) in the IP range set in IP Pool Starting
Address and IP Pool Ending Address. When the error message above appears, the IP address you tried to enter must be
in that range.
Steps:
In this example, after you try to fix the router’s IP address to “192.168.252.2”, the error message appeared.
1. Check the IP Pool Starting Address and IP Pool Ending Address.
The present settings are:
IP Pool Starting Address – 192.168.252.2
IP Pool Ending Address – 192.168.252.100
You can see that the IP address “192.168.252.2” you tried to enter is in the IP range for clients. In order to be able to
fix the router’s IP address to “192.168.252.2”, the IP Pool Starting Address should be changed.
2. Change the IP Pool Starting Address to “192.168.252.3”.
After you tried to set the router’s IP address
to “192.168.252.2”, the error message
appeared.
1. IP Pool Starting Address: 192.168.252.2
IP Pool Ending Address: 192.168.252.100

9
3. Now you can change the router’s IP address to “192.168.252.2”.
3. Checking Wireless Connection between Router and
iOS Device
After fixing the IP address, setting the security mode, etc, check if the connection can be established between the router
and an iOS device.
3-1. With an iOS device, in [Settings] – [Wi-Fi], find the renamed SSID “NNTZT_Router 1” or the name you selected
for your router (Ref. Setting up a Router 2-10.)
2. Change IP Pool Starting Address to
“192.168.252.3”
3. Now you can change the router’s IP address to
“192.168.252.2”.

10
3-2. Select NNTZT Router 1 and enter its password. If the password is changed in the Step 2-13, enter the same one
here.
3-3. Check that the connection is established. To confirm the connection, tap the [ >] icon to verify that an IP address
[192.168.252.x] and subnet mask [255.255.255.0] are shown in the DHCP tab.

11
4. Connecting TZT9/14, Router, and iOS Device
4-1. Connect the router to the TZT9/14 or an Ethernet hub and install the router in a convenient place onboard.
Direct connection between one TZT9/14 and a router:
Multiple TZT9/14 units connected to router’s LAN ports:
A router connected to an Ethernet hub on the TZT9/14 network:
4-2. Connect an iOS device to the router following the Step 3-1 to 3-3.
4-3. Launch the NavNet Remote app and NavNet Viewer app.
4-4. Confirm that images and data are shown on the devices.
Note: In the interconnections described above, the TZT9/14’s built-in Wireless LAN does not have to be ON because iOS
devices are networked via the router. However, in order to fully make use of the built-in Wireless LAN, you can connect
the TZT9/14 to the Internet while networking iOS devices via a router as follows:

12
--- END ---
This manual suits for next models
1
Table of contents
Other Navnet Boating Equipment manuals