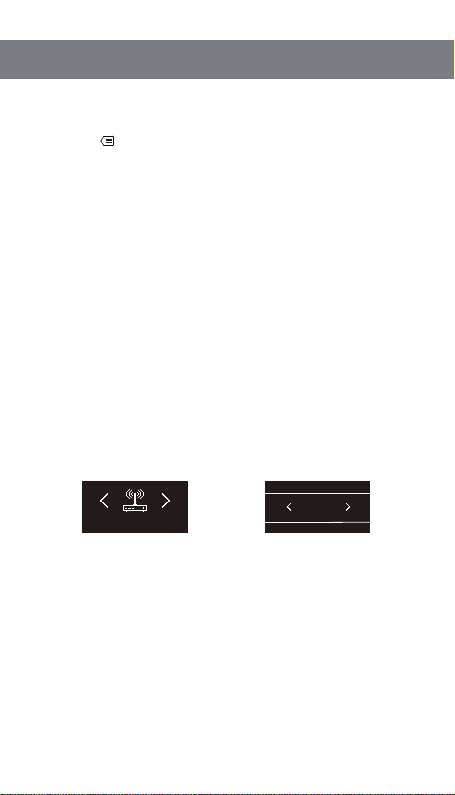
Naya PNI-HT2200 User manual

User’s manual of
intercom handheld
PNI-HT2200
Please read the manual carefully before use, and keep it properly for inquiries when necessary

Focus on R&D Stable and reliable
2.Antenna
4.Indicator
8.Display screen
9.Setting button
11.Charging indicator
1.Switch/volume knob
3.Headphone port
5.PTT button
12.Charging port
10.Mic pick-up hole
6.TALK button
7.Speaker
1. Product function
1.1 Switch/volume knob
Turn the knob clockwise, the device is powered on. Continue to turn the knob
clockwise, the voice get higher. On the contrary, the voice becomes lower, and then
will be off.
1.2 Antenna
It is an important component for signal reception and transmission. Signal will not
be received if the antenna is not installed.
1.3 Headphone port
External headphone jack, special customized interface, to buy headphones, you
need to contact the manufacturer or dealer to buy the headphone.
2

Focus on R&D Stable and reliable
1.4 Indicator
Operating status, the indicator light blue and is always on.
Sleep state, the indicator light flashes slowly.
While sending a voice, and the indicator light flashes quickly.
1.5 PTT button
Press the PTT button and keep the mouth to the microphone in 3 to 5CM to speak,
release the PTT button, voice transmission end.
1.6 TALK button
Turn on or off the function “continuous calls”. Press the TALK button to turn on the
continuous call function, and speak without pressing the PTT button. Press the
TALK button again, continuous call will be off, voice transmission is over.
1.7 Speaker
Play the voice
1.8 Display screen
Displays the relevant information.
1.9 Setting button
Menu/confirmation
Left arrow
Right arrow
Return
1.10 Mic pick-up hole
Mic of handheld
1.11 Charging indicator
Light is red while charging, and will get green when fully charged.
1.12 Charging port
Charging jack
3

Focus on R&D Stable and reliable
2. Using for the first time
2.1 Step 1:
Install the antenna. Hold the antenna and rotate it clockwise until it is tightened.
2.2 Step 2:
The equipment is powered on. Turn the volume knob clockwise, and the device is
powered on. Continue to turn the volume in place.
2.3 Step 3:
After the device is turned on, keep holding the PTT button to speak. Release the
PTT button to end the voice transmission.
4

Focus on R&D Stable and reliable
6.Relay Mode
85
85
1.Channel 3.Status
5.No relay mode
8.Call channel status
4.Power level
2.Signal strength
7.Keypad lock
3.1 Channel
Current channel of the handheld
3.2 Signal strength
When the handheld receives a signal from other handheld machines or repeaters,
it will show the signal strength of the current handheld or repeater. The higher the
signal intensity, the better the signal quality received, on the contrary the worse the
signal quality anyway. If no handheld or repeater sending a signal, the signal
strength becomes empty.
3.3 Status
Headset icon: speak with headphone while indicating the headset icon, if no
headset icon displayed, then using the speaker and MIC call.
Horn icon, showing the horn icon indicating the voice received from other
handheld machines. The horn icon is not displayed to indicating that no voice
message.
MIC icon, showing MIC icon indicating speaking in PTT or TALK mode. No MIC
icon showed, means that voice sending is not turned on.
3. Introduction of display screen
5

3.4 Power level
Shows the battery power of the handheld machine. When the battery power is
low, the extension will prohibit the voice transmission function. After charging voice
transmission can be restored. Low power does not affect the voice reception.
3.5 No relay mode
The No-relay mode shows the two handheld machine icons, indicating that the
handheld machine is not connected to any repeater. Communication between the
two handheld machines is in the straight-through mode without any repeater. To set
fixed channel as networking mode, and no repeaters connected, then the two
handheld icons are displayed.
3.6 Relay Mode
Relay mode shows a handheld machine icon and a repeater icon, indicating that
the handheld machine is connected to the repeater. The network mode is a fixed
channel, under which repeater works, the handheld and repeater icon are
displayed.
When the networking mode is set as roaming switching, connect the handheld to
the repeater, then the connection icon will be displayed, or disconnection icon will
be displayed.
3.7 Keypad lock
The icon on the screen to indicate that the key is in locked state,. Press first,
and then press to enter the menu.
3.8 Call channel status
This indicates that there are 8 call channels, the icon hollow indicates that the call
channel is idle, and the solid icon indicates that the call channel is in use. When all
the 8-channel call channels are solid, it means that all the call channels are in use.
The handheld with the call function off will be unable to send voice. The voice
function can only be turned on until any call channel is idle.
Focus on R&D Stable and reliable
6

Press and on the standby interface to enter the menu. After entering the
menu, press and to switch the menu. The menu options include: channel
setting, networking mode, and backlight time setting. Select the menu, press to
enter the submenu for parameters modification. After the modification is completed,
press to return to the superior dish, order, and then press again to exit the
menu.
4.1 Channel setting
After entering the menu, select the “Channel Settings” menu (Figure 1 below),
and press to enter the channel parameter modification page (Figure 2 below).
After entering the modification page, press left/right to modify the channel. After the
modification completes, press the return button to the superior menu, the
modification is completed.
4.2 Backlight time
After entering the menu, select the “backlight time” menu (Figure 1 below), press
to and then enter the backlight time modification page (Figure 2 below). Press
left and right for backlight time modification, and press the return key to return to
the superior menu after the modification is completed.
Focus on R&D Stable and reliable
Figure 1
Channel setting
Figure 2
Channel setting
Channel 88
return
Figure 2
Backlight time
10 second
return
Figure 1
Backlight time
4. Function settings
7

4.3 Networking mode
After entering the menu, select the “networking mode” setting menu (Figure 1
below), press to enter the networking mode selection page (Figure 2 below).
Press left and right to select the fixed channel or roaming switch mode. After the
modification completed, press the return key to return to the superior menu.
Fixed channel mode, using the currently set channel, under the channel there is
repeater, to which the handheld is automatically connected. If no repeater under the
channel, it will automatically change into a straight-through mode.
Roaming switch mode is set when the handheld needs to move among multiple
repeaters, to realize the automatic connection to different repeaters. If there is no
connection to the repeater in the roaming switching mode, the handheld will
constantly search for the repeater, accompanied by prompts, and do not stop the
search until finding one repeater.
Handheld should set the list of roaming channels through the configuration
software. For example, there are three repeaters, and the corresponding channels
are channels 60, 85 and 110, and the handheld roaming list is set up for the
corresponding channels 60, 85 and 110.
4.2 Backlight time
After entering the menu, select the “backlight time” menu (Figure 1 below), press
to and then enter the backlight time modification page (Figure 2 below). Press
left and right for backlight time modification, and press the return key to return to
the superior menu after the modification is completed.
Focus on R&D Stable and reliable
Figure 1 Figure 2
Networking mode
Fixed channel
return
Networking mode
8

Focus on R&D Stable and reliable
5.1 Don’t use this extension in the following scenarios because of interference
to electronic or medical devices:
◆ Hospitals, around people carrying pacemakers, and near other medical devices.
◆ Flammable and explosive places such as gas stations (flammable gas, dust,
metal powder, granular powder and other environments).
◆ On airplane (and near other electronics that are easily interfered).
◆ Any other occasions posted with restrictions or warnings about radio equipment.
5.2 Do not do the following violation operation on the call extension:
◆ Do not apply other than the specified voltage on the power supply of the call
extension.
◆ Do not disassemble or modify the call extension.
◆ Do not dip the extension in the water.
◆ Do not hit or throw the extension.
◆ Do not burn or heat the extension.
◆ Do not charge the battery against reverse polarity.
◆ Do not weld directly on the battery.
5.3 Other precautions:
◆ Do not place the call extension in direct sunlight or near the heater.
◆ Do not turn on extension near the TV or radio.
◆ Do not modify the battery at will.
◆ Please charge with the specified charger.
5. Warning
9

Please read the manual carefully before using the product
Website: http://www.nayatec.com
Manufacturer: Shanghai Naya Intelligence Technology. Co.,Ltd.
Address: No.7001 Zhongchun RD., Minhang district, Shanghai, 201101, China
20220829

Focus on R&D Stable and reliable
Dedicated data cable
6.1 Software download
Log in to the www.nayatec.com website, find the corresponding product model
in the technical support, and download the corresponding driver and configuration
software according to the tutorial.
6.2 Driver and software installation
Download the installed driver file, the file name is the PL2303_64bit_Installer.exe
driver installation package. After successful installation, plug the data cable into the
computer and view the port number in the device manager.
Install the downloaded configuration software and complete the software
installation according to the installation steps.(Windows7 system installation driver
and software is recommended)
6.3 Connection diagram
After the driver and software are installed, connect the handheld machine to the
computer as below. Data cable is specially customized, which can not be replaced
by charging cable.
6. Software installation and connection
11

Focus on R&D Stable and reliable
7.1 Open the software
After the installation is complete, run the PniHtCfg.exe file. After opening the
software, the following figure is shown. The setting interface is all gray and cannot
be edited before selecting and opening the port.
After the setting software is opened, select the corresponding serial port number,
and then click to open the port, the software interface becomes editable condition.
◆Turn on the handheld at this time (if it is already turned on, simply turn it off,
and then turn it on again). After the handheld is turned on, "connection successful"
appears in the software information bar, indicating that the connection is successful.
◆After the handset is successfully connected, it will automatically obtain the
parameter information currently set. Modify the parameters according to the needs.
◆After that, click “SET” to complete the setting operation.
7.2 Fixed channel settings
The fixed channel parameter corresponds to the channel setting of the handheld
machine. Handheld or repeater under the same channel can communicate with each
other.
7. Software use
Base Import
Link
Open Refresh
Setting
Channel
0
0
Password
Networking mode
Roam List
The password is an integer ranging from 1 to 999999999.
CH1: CH2: CH3: CH4: CH5: CH6:
0 0 0 0 0 0
Power Level
Info:
Set
Prolific USB-to-Serial Comm Port (COM5)
PniHtUserCfgEN
12

Focus on R&D Stable and reliable
7.3 Communication password
◆Under the same channel, the communication password is required to be the
same. Under the same channel but with different communication passwords, you
cannot communicate with each other. Modifying the communication password of all
handhelds and repeaters for communication. This function is often used to prevent
eavesdropping with same frequency.
7.3 Networking mode
◆Fixed channel and roaming switching mode are optional as networking mode.
For specific function descriptions, please refer to the handheld network mode setting.
7.4 Roaming list
◆After the handheld networking mode is set to the roaming switching mode, the
roaming channel should be set to correspond the channel list to repeaters channel.
For example, the three repeaters in corresponding channels 60, 85 and 110, first
handheld roaming channel is set to 60, 2-nd roaming channel is set to 85, 3-rd
roaming channel is set to 110, while the other three unused channels.
7.5 Power setting
◆Wireless transmission power of the handheld can be modified, the greater
the gear, the greater the power. Generally used to appropriately improve the call
effect in seriously obscured blocks. Wireless signal is prone to the same frequency
interference, or the wireless signal penetration through the wall and metal will
produce a large attenuation, etc., which will have different effects on the call, so
increasing the transmission power can not completely solve the poor call quality.
13

Focus on R&D Stable and reliable
Channel 88
Channel 88Channel 88
Channel 88 Channel 88
Channel 88
Channel 88Channel 88
Channel 88 Channel 88
Channel 88
8.1 Call diagram if without repeater
◆This call mode is the handheld direct-through mode, the handheld can be turned
on to realize the call, suitable for a simple space.
8.2 Single repeater for wireless forwarding call signal
◆This call mode is repeater forwarding mode, and the handheld sends the voice
to other handheld through the repeater.
8. Call diagram
14

Focus on R&D Stable and reliable
Channel 60
Channel 60
Channel 60
Channel 60
Channel 110
Channel 110Channel 110
Channel 110
Channel 60
Channel 110
Networking connection
8.3 multi-repeaters networking connection
◆This call mode is a network call mode, and two or more areas can be connected
together through the network to realize multiple mutual call function.
15

Focus on R&D Stable and reliable
Channel 60
Channel 60
Channel 60
Channel 60 Channel 60
Channel 60
Channel 110
Channel 110
Channel 110
Channel 110 Channel 110
Channel 110
Networking connection
8.4 Multi-repeaters networking for wireless forwarding connection
◆This call mode is a networked wireless forwarding call mode, and two or more
areas can be connected together through the network to realize the mutual call
function in multiple places.
16

Focus on R&D Stable and reliable
In order to ensure the good performance of this device and prolong its service life,
please be familiar with the following contents for better maintenance and cleaning.
9.1 Maintenance
◆Do not puncture or scratch the device with hard objects.
◆Do not store the device in an environment that contains corrosive electronic
circuits.
◆Do not damage the antenna.
9.2 Cleaning
◆Please clean the device regularly, and use a clean and dry towel or brush to
remove the dust on the surface of the equipment.
◆If the device casing is dirty, it can be cleaned with neutral detergent and
non-woven fabric. Do not use detergent, alcohol or spray which will damage the
device, make sure the device is completely dry, otherwise do not use it.
9. Maintenance and cleaning
Naya promises that defects in material or workmanship under normal operating
and maintenance conditions of all devices produced by our company, are covered
by the warranty service specified below from the date of purchase.
◆Scope and duration of warranty of equipment: 12 months
◆Scope and duration of warranty of headphones: 6 months
◆Warranty application
If you apply for product repair, please be sure to provide the company's product
warranty card or a valid purchase invoice as proof of warranty. During the period,
the relevant marks of the product shall be kept clean and intact and shall not be
torn up.
10. Quality commitment and maintenance terms
17

Focus on R&D Stable and reliable
If the following conditions occur, it is not covered by the warranty,maintenance
and repair should be paid:
◆Failure or damage caused by unauthorized dismantling, repair, modification,
misuse, abuse, liquid infeed, accident, use of non-original accessories.
◆Out of warranty.
◆Damage caused by force majeure.
◆Any damage caused by failure to comply with the requirements of the manual
and maintenance.
◆The performance failure of products and accessories is caused due to human
reasons.
◆Malicious damage to warranty card content or fuselage information, including
blurred damage, self-tearing and tampering, etc.
◆Other failures and damage caused by problems such as design, manufacture,
and quality of the device.
◆Products sold to Chinese mainland only be under national joint warranty service
in Chinese mainland.
11. No-warranty policy
Reseller information
User information
Model
Reseller
User
Address
Sales date
Contact telephone
or E-mail
Contact telephone
E-mail
◆In order to protect your rights and interests, please fill in it carefully and keep
it properly as a certificate for maintenance.
12. Warranty card
18
Table of contents