Nayax VPOS Touch User manual

VPOS Touch
All-in-one Card Reader with Touch Screen and Telemetry Device
VPOS Touch
User Manual
©Property of Nayax
All rights reserved
For more information contact us at support@nayax.com

Revision 1.6.4 VPOS Touch User Manual Page 2
Table of Contents
General Information.............................................................................................................................3
Organization of the Manual .............................................................................................................3
Device Overview...................................................................................................................................4
Device Summary...............................................................................................................................4
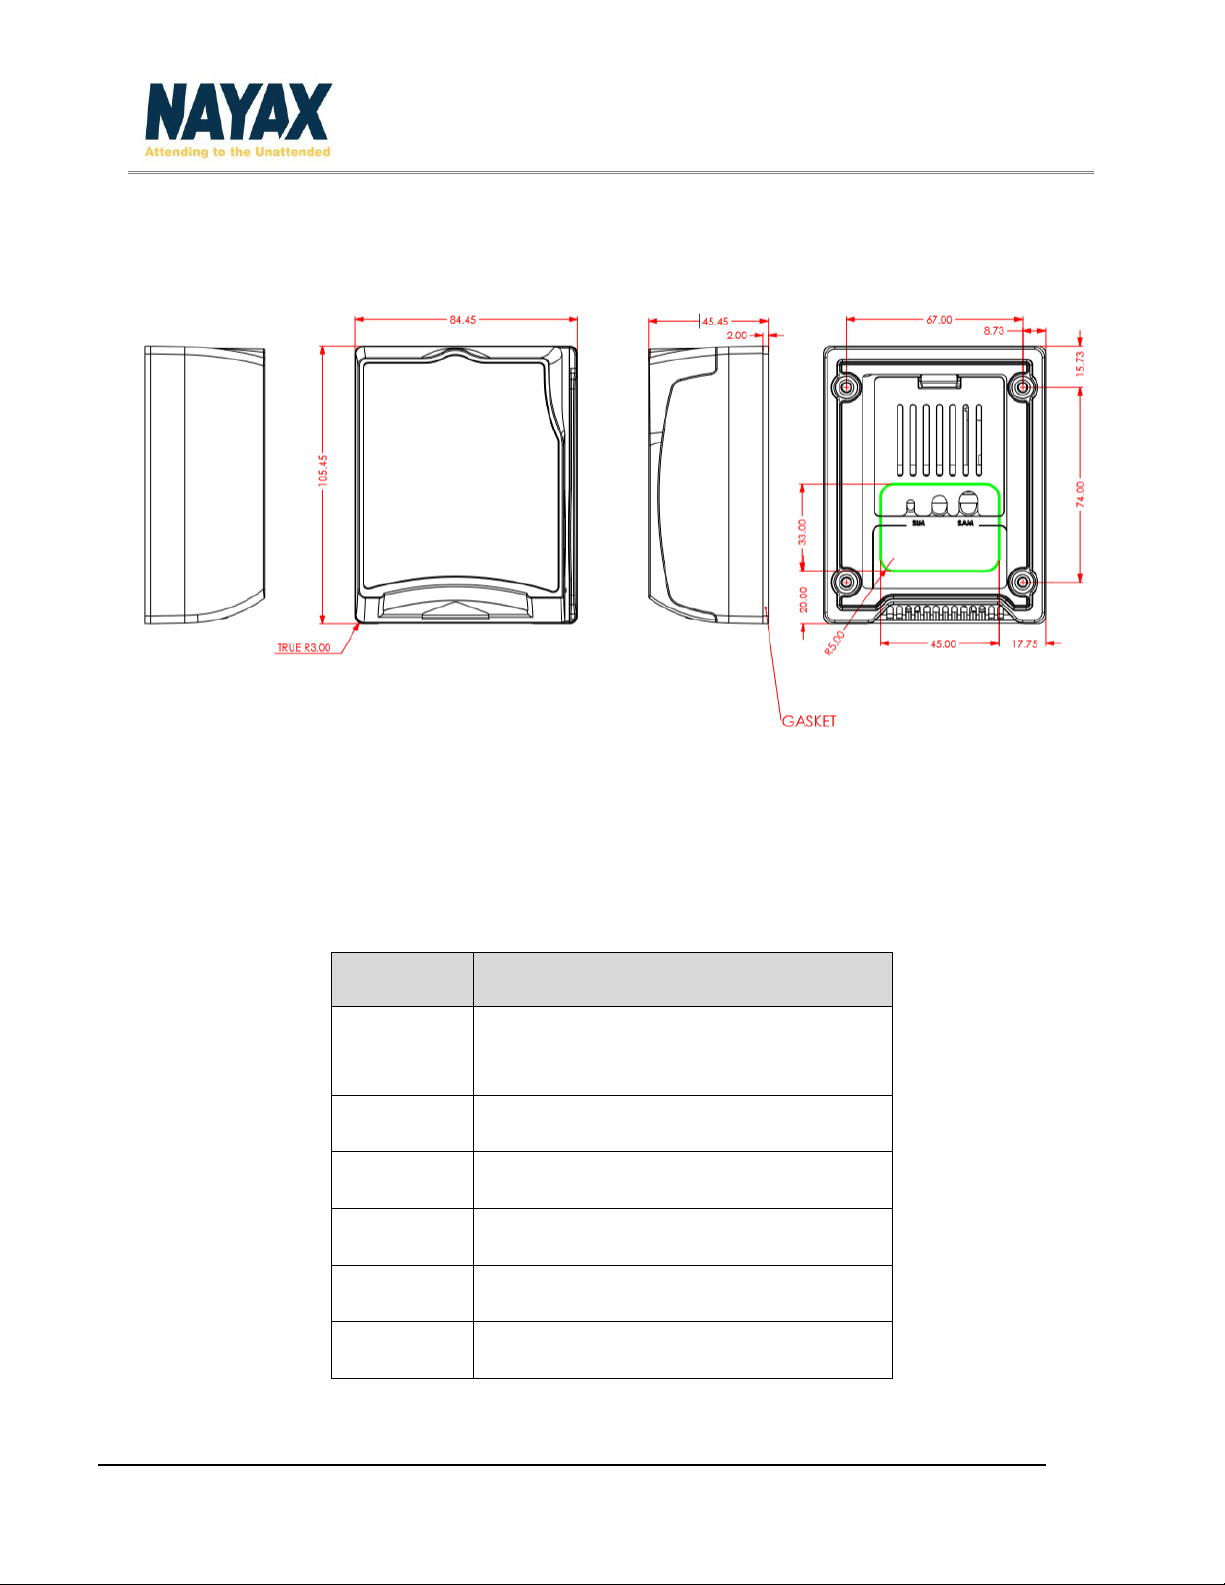
Device Specifications........................................................................................................................5
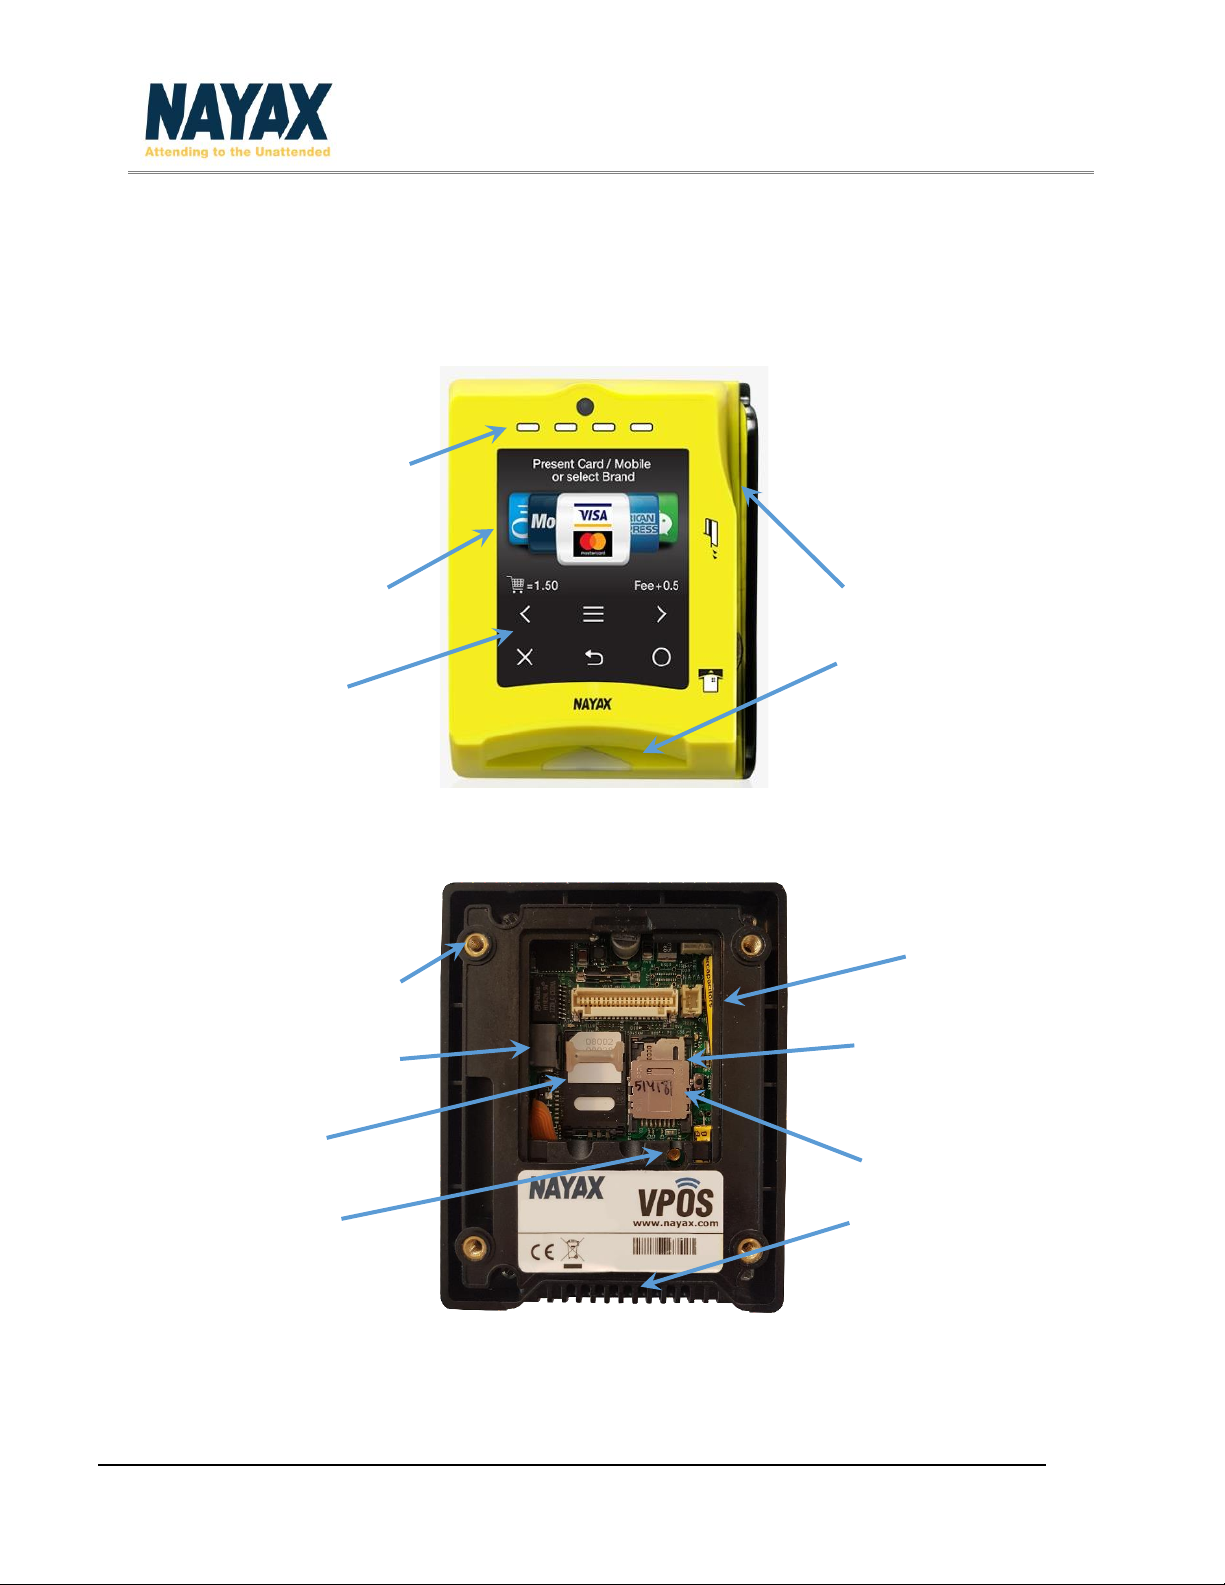
Device Components .........................................................................................................................7
Device Serial Number.......................................................................................................................8
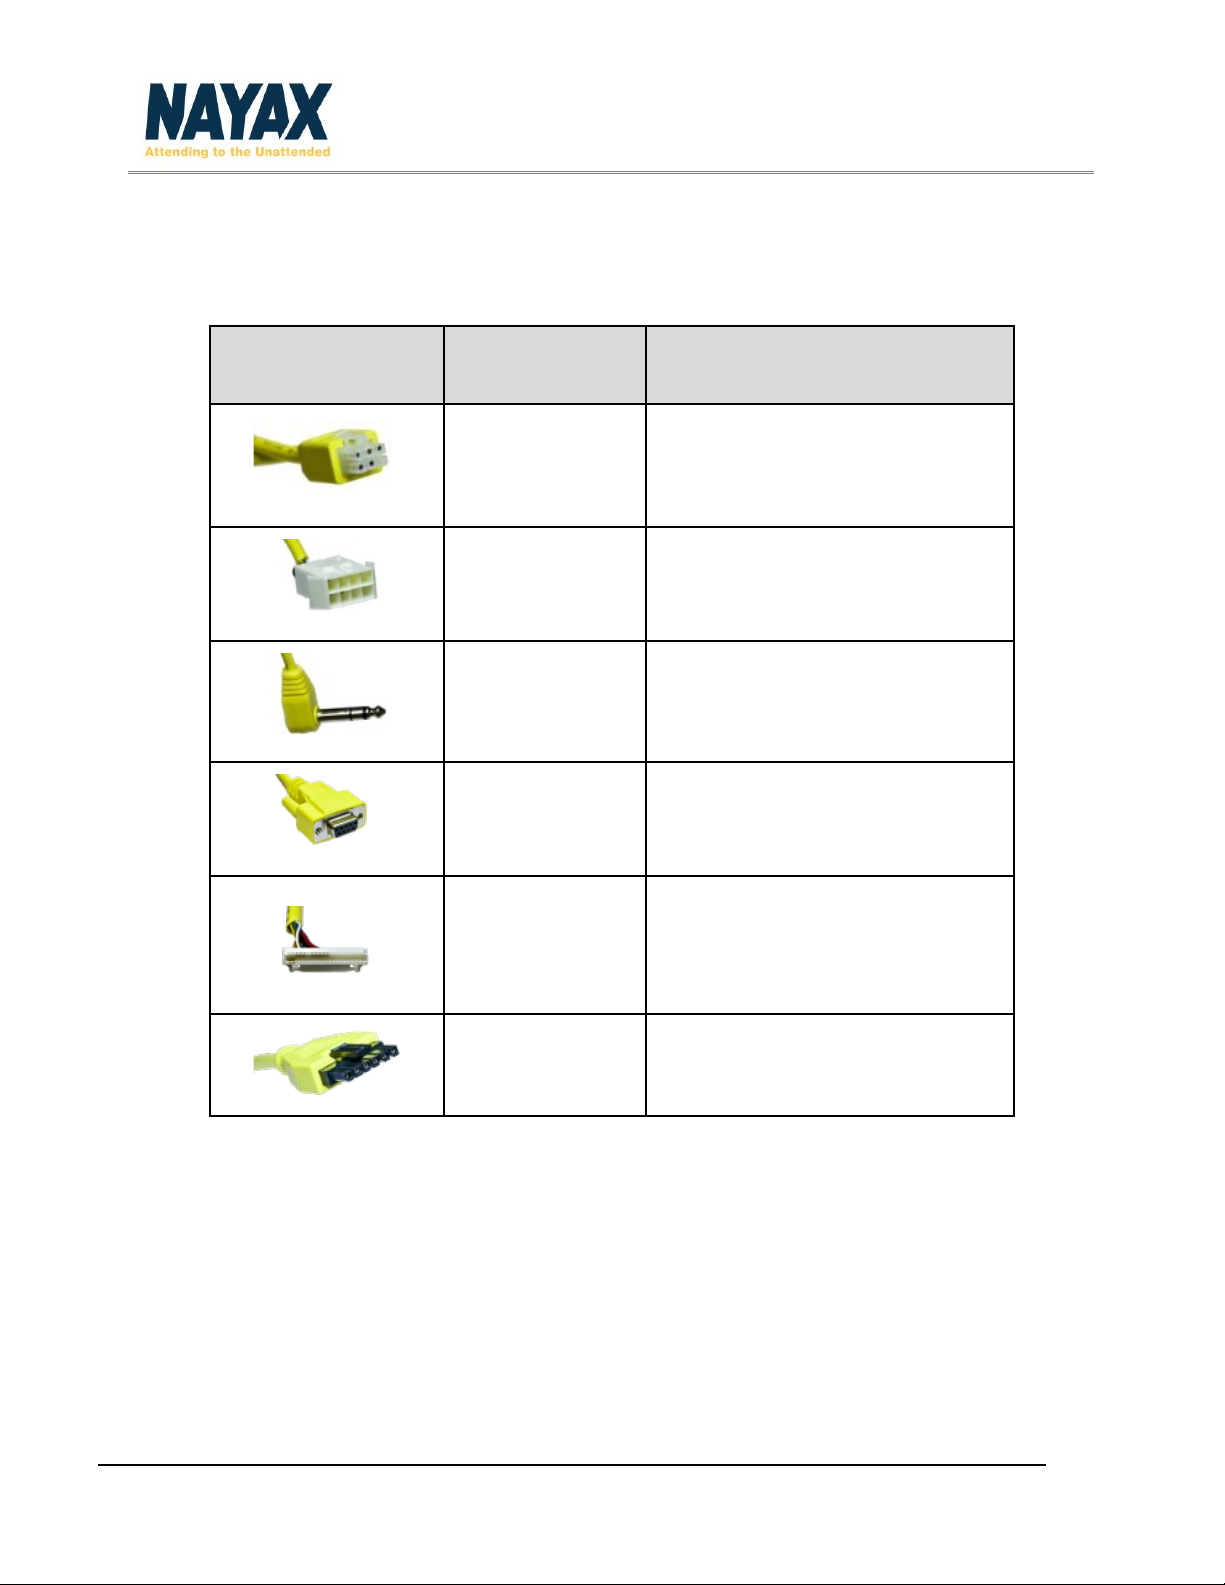
Device Cables....................................................................................................................................9
Device Connector Scheme (40-Pin)................................................................................................10
Additional Accessories (Included in Box) .......................................................................................10
Getting Started...................................................................................................................................12
Installation......................................................................................................................................12
Device Dismantling.........................................................................................................................12
Operating and Testing....................................................................................................................12
Configure VPOS Touch Settings in NayaxVend ..............................................................................13
Technician Mode............................................................................................................................14
Appendix 1 –Tests Prior to Repair.....................................................................................................15
Appendix 2 - FCC & IC Regulations.....................................................................................................17
Safety and Handling Instructions .......................................................................................................19
Environmental Guidelines..............................................................................................................19
Warranty and Liability....................................................................................................................19
Cleaning Instructions......................................................................................................................19

Revision 1.6.4 VPOS Touch User Manual Page 3
General Information
This section explains the classification of the manual and the purpose for which it is intended.
Organization of the Manual
The user manual consists of six sections namely General Information, Device Overview, Getting
Started, Appendix 1 –Tests Prior to Repair, Appendix 2 –FCC & IC Regulations and Safety &
Handling Instructions.
General Information section explains the purpose for which the manual is intended.
Device Overview section provides an overview of the device. The summary outlines the uses of the
hardware and software requirements, device configuration, and device behavior in case of any
contingencies.
Getting Started section explains the first steps to start using the device.
Appendix 1 –Tests Prior to Repair section describes how to resolve the most frequent issues
experienced prior to sending the device to the Nayax Laboratory.
Appendix 2 –FCC & ICC Regulations lists all the production regulations and guidelines.
Lastly, the Safety and Handling section provides guidelines on how to clean and maintain the
device.

Revision 1.6.4 VPOS Touch User Manual Page 4
Device Overview
Device Overview section provides an overview of the device, feature highlights, device
specifications and much more.
Device Summary
VPOS Touch is a complete telemetry and cashless payment solution, ideally suitable for the
unattended machines’ market.
VPOS Touch accepts all modes of cashless payments and transmits data in real-time. The different
modes of payment accepted are:
▪Debit and credit cards
▪Mobile and NFC payments
▪Prepaid cards
▪Swipe, contact and contactless cards
The advantages of using the device are enabling easy installation, monitoring machines in real-
time and a complete management solution. Our complete management solution consists of:
▪Inventory Management
▪Machine Management
▪Transaction Monitor
▪Alerts and Event System
▪Reports Suite
▪BI System
Feature Highlights
▪ARM, Cortex 32-bits (M4 + M7)
▪High Security Encryption System: AES / DES
▪External flash 64 MB, SD Card 4 GB, SD RAM 16 MB
▪Anti-vandal with Dragontrail glass
▪Shock and tilt detector
▪Monitoring and alert of Power Down
▪Decorative LED for Contact Smart Card slot
Pro Tip
The VPOS Touch has no battery and receives power via its connection to the vending machine. Strong
shock or vibrations to the device may cause failure.

Revision 1.6.4 VPOS Touch User Manual Page 5
Device Specifications
Installation Environment
Operating Temperature
-20 ℃to 55 ℃
-4°F to 131°F
Storage Temperature
-30 ℃to 85 ℃
-22°F to 185°F
Humidity
25% to 95% (non-condensing)
Dust & Water Resistance
IP 55
Flammability
UL-94 V0
Safety
CE, FCC, RoHS
Physical Dimensions
Height
105 mm
4.1 inch
Width
84.7 mm
3.3 inch
Depth
45.3 mm
1.78 inch
Weight
230 grams
8.1 ounces
Features
Display Screen
High quality color touch LCD Display 2.4 inch IPS, 400 nits
320 x 240 pixels + 4 LEDs + 6 Touch buttons
Architectutre
ARM Technology –2x Cortex, 32 bit, 180/216MHz
Audio
Speaker + Buzzer
Localization
Multiple language support - LCD text & voice audio
instructions
Security
Support DES, 3DES, AES, RSA, ECC, SHA1 algorithms,
Random Number Generator
Power Supply
12-42V DC, 12-24V AC; 5 Watts
Power Consumption
Recommended External Power Supply: 24V DC / 2Amp.
Glass
Internal shock/tilt detector, anti-vandal Dragontrail glass,
anti-fingerprint coating
Power-loss protection
Super capacitors with safe shutdown mechanism

Revision 1.6.4 VPOS Touch User Manual Page 6
Communication & Interfaces
External Interface
Ethernet, 2 X RS232 (RS232 or TTL level through SW), USB
device, external reader
Contactless
13.56 MHz : NFC, MIFARE,
ISO 14443 Type A and B, ISO 15693, SONY® FeliCa
Pulse Input/Output
6 pulse input/output interfaces + 1 Inhibit input
External Sensors Support
1 Door open & 1 Temperature
Communication
3G/4G/Ethernet/NFC
Machine Protocols
MDB / DEX / DDCMP / Pulse / VCCS / ccTalk / JVMA
Payments
Contact
EMV Level 1 , EMV Level 2
Contactless
EMV Level 1 , FeliCa
Level 2: Visa payWave, MasterCard PayPass, Interac Flash,
UnionPay qPBOC, AMEX ExpressPay, JCB J/Speedy, FeliCa,
Interac Flash, , Discover D-PAS, CUP QuickPass, SuiCa
Magnetic Stripe
ISO 7811 and JIS I Tracks 1,2,3
JIS II

Revision 1.6.4 VPOS Touch User Manual Page 7
Device Components
Front Panel
Front Panel Color - Yellow / Black
Rear Side
M4 x 5 mm
Typical Hole
LAN
SIM
Speaker
SAM
Connector
SD Card
Connect
or
Cable Connector
Antenna
Magnetic stripe
Contact slot
stripe
Touch buttons
Contactless display
touch screen
Status display LED

Revision 1.6.4 VPOS Touch User Manual Page 8
Device 2D Scheme
Device Serial Number
Serial number logic: PPMAPOWWYYSSSSSS
Characters
Description
PP
Product Type (E.g. For VPOS Touch -
04)
MA
Main HW Version
PO
POS HW Version
WW
Week Number
YY
Year
SSSSSSS
Serial

Revision 1.6.4 VPOS Touch User Manual Page 9
Device Cables
Nayax provides different configuration cables to suit different machines. The below table refers to
each cable and its configuration
Image
Connector
Connect to
MDB
MDB in vending machines
JVMA
JVMA in vending machines (Japan)
DEX
DEX
RS232 DB9 Female
Serial
VPOS Touch
Nayax VPOS Touch
*Refer to the device connector scheme
(40-pin) below.
Contessa
Nayax Contessa (Japan)

Revision 1.6.4 VPOS Touch User Manual Page 10
Device Connector Scheme (40-Pin)
Additional Accessories (Included in Box)
Rear Plate & Drilling Template
Stencil

Revision 1.6.4 VPOS Touch User Manual Page 11
Additional Accessories (Optional)
Reclining Spacer
(Angle = 7.5 degrees)
Protective Box

Revision 1.6.4 VPOS Touch User Manual Page 12
Getting Started
GettingStartedsectionbrieflyexplainshowto installthedeviceonthemachine,theoperatingand testing
process and the different screens.
Installation
The latest Installation Guide version is currently available and can also be downloaded from NayaxVend.
The VPOS Touch Quick Guide has been included in your box for your quick reference.
Device Dismantling
To unplug the VPOS Touch connector, you must press both sides of the releasing bridge at the same time
to avoid damaging the releasing bridge.
Operating and Testing
1. Turn on the machine.
2. Once the VPOS Touch is powered-up, a Self-Test is automatically initiated that performs a SIM card
and Server Connectivity check.
Note: If the device is not installed correctly, you may see an error message
3. Once the VPOS Touch is fully initialized, carry out the following trial purchases
a. Cash /Credit Purchase
b. E-money (E.g. A prepaid card transaction)
Once all purchases are successfully completed, the unit is fully installed and ready for use!
Pro Tip
Before performing any checks, make sure that the machine is loaded with products and that
the prices are updated in the system.
Pro Tip
In case you need to send your device to the Nayax Laboratory for review, refer to the Error! R
eference source not found. Error! Reference source not found. Prior to Repair.

Revision 1.6.4 VPOS Touch User Manual Page 13
Configure VPOS Touch Settings in NayaxVend
▪Refer to the below attributes used to configure the VPOS Touch device in the
NayaxVend system.
▪Payment Methods - Controls the type of payments that are displayed on the Welcome
screen (VISA, Mastercard, Apple Pay, Samsung Pay, etc.)
▪Support WEB - Displays the website that is visible under the Menu - Contact Us function.
▪Support Phone Number - Displays the phone number that is visible under the Menu -
Contact Us function.
▪Technician Code - Controls the pin code to access the Technician mode screen.
▪Menu Timeout - Controls the timeframe (in seconds) for the unit to return to the
Welcome screen after the menu button is pressed.
▪Menu Functions - Controls the options to be displayed when the Menu button is
pressed. It is possible to disable the Menu button entirely or display only the selected
features such as:
I. Technician Mode
II. Report a Problem
III. Contact Us
IV. Device Info
V. Nutrition Facts
VI. Languages

Revision 1.6.4 VPOS Touch User Manual Page 14
Technician Mode
To enter the Technician Mode either present the Technician Card in the Idle mode or click
the Triple Bar from the Menu. Click the Technician Mode button and then enter the technician
code and click the green OK button.
Technician Mode Commands
Under the technician mode, three different screens are visible.
The first screen consists of two buttons that are configured by logging into the Management Suite
–NayaxVend DCS.
The next two screens consist of a pre-defined collection of options that are listed below:
Icon
Icon Name
Description
Cash Collection
Indicates to the server that cash was collected
Poll
Initiate Keep Alive communication with the server
Reboot
Checks for updated device version in the boot server
Inventory Fill
Indicates to the server that the machine inventory
was filled
Fee
Defines the extra charge (convenience fee) for various
payment methods
Reset
Restarts the VPOS Touch firmware
Read Audit File
Initiates DEX read from the machine and sends it to
the server
Advanced Settings
Configure additional Nayax / Felica (JP) device
parameters
Modem Info
Displays modem details, version info, reception level,
and so on
View Audit
Displays DEX file on screen
Volume
Adjust the audio volume level
Language Settings
Set the audio and text languages

Revision 1.6.4 VPOS Touch User Manual Page 15
Appendix 1 –Tests Prior to Repair
The below procedure needs to be carried out by the Operator before sending the device to be
fixed at the Nayax laboratory.
1. Connect the VPOS Touch Cable Connector to get power from the machine –Refer to
below Image 1.
2. Once the device starts to load, the following initiation messages are displayed:
I. FW OK
II. Init mdm
III. RSSI 99 - In this case there are three options to proceed:
a. RSSI 99 - Check the External Antenna Adapter connected to the board
- Refer to Image 2
b. (SIM) / RST –This could refer to a SIM issue. In that case, confirm that the Sim
socket is closed securely and if required, try to replace the SIM card - Refer to
Image 3
c. RSSI => 10 –This is normal, and you can proceed to the next step.
IV. Mobile operator
V. Init GPRS
VI. TCPIP OK
VII. Gloader Test –In case you need to install a new Firmware Version it will run:
a. Gloader x.x.x TCPIP OK
b. Running FW … TCPIP OK
VIII. Nayax
IX. Ready

Revision 1.6.4 VPOS Touch User Manual Page 16
Image
No.
Title
Image
Description
1
VPOS
Touch
Connector
VPOS Touch cable connector (same connector for
MDB and Pulse cables).
Note: To disconnect the connector, press the
latch (indicated with an arrow) before pulling
out the cable.
2
External
Antenna
Adapter
(replace
image)
The External Antenna adapter connects to the
board and to the External Antenna that is
provided by Nayax.
3
Sim
Housing
The SIM socket is opened by pulling up and closed
by puling down the socket.
3. Test the following payment cards:
I. Magnetic Card –In case of an error, check the Magnetic Head connection to the
board –Refer to Image 4.
II. Contact Card & Contactless Card - In case of an error, send it to the Nayax
Laboratory
III. In case the speaker is not functional, check the Speaker Connection to the board –
Refer to Image

Revision 1.6.4 VPOS Touch User Manual Page 17
Appendix 2 - FCC & IC Regulations
This device complies with part 15 of the FCC Rules. The operation is subject to the following two
conditions: (1) This device may not cause harmful interference, and (2) this device must accept any
interference received, including interference that may cause undesired operation.
Note: This equipment has been tested and found to comply with the limits for a Class B digital
device, pursuant to Part 15 of the FCC Rules. These limits are designed to provide reasonable
protection against harmful interference in a residential installation. This equipment generates, uses and can
radiate radio frequency energy and, if not installed and used in accordance with the instructions, may cause
harmful interference to radio communications. However, there is no guarantee that interference will not
occur in a particular installation. If this equipment does cause harmful interference to radio or television
reception, which can be determined by turning the equipment off and on, the user is encouraged to try to
correct the interference by one or more of the following measures:
▪Reorient or relocate the receiving antenna.
▪Increase the separation between the equipment and receiver.
▪Connect the equipment into an outlet on a circuit different from that to which the
receiver is connected.
▪Consult the dealer or an experienced radio/TV technician for help.
Note: The manufacturer is not responsible for any radio or TV interference caused by unauthorized
modifications to this equipment. such modifications could void the user’s authority to operate this
equipment
Changes or modifications not expressly approved by the party responsible for compliance could
void the user's authority to operate the equipment.
This device complies with Industry Canada RSS standard(s). Operation is subject to the following
two conditions: (1) this device may not cause interference, and (2) this device must accept any
interference, including interference that may cause undesired operation of the device.
Le présent appareil est conforme aux CNR d'Industrie Canada applicables aux appareils radio
exempts de licence. L'exploitation est autorisée aux deux conditions suivantes:
(1) il ne doit pas produire de brouillage et
(2) l’ utilisateur du dispositif doit étre prêt à accepter tout brouillage radioélectrique reçu, même si
ce brouillage est susceptible de compromettre le fomctionnement du dispositif.

Revision 1.6.4 VPOS Touch User Manual Page 18
The VPOS Touch IDs are:
▪FCC ID: 2AK6L-VPOST
▪IC: 10840A-VPOST
The VPOS Touch device is available with two cellular modules.
These are the two options:
▪Contain FCC ID: RI7LE910NAV2, Contains IC: 5131A-LE910SNAV2
▪Contain FCC ID: RI7LE910SVL, Contains IC: 5131A-LE910SVL

Revision 1.6.4 VPOS Touch User Manual Page 19
Safety and Handling Instructions
It is advised to read the manual carefully before attempting to use the device.
Environmental Guidelines
It is recommended to avoid installing the device in direct sunlight to prevent any risk of burnouts.
Make sure not to expose the product to any corrosive gas or liquid. It is important to deploy the
device in non-condensing conditions.
Warranty and Liability
Thank you for choosing Nayax. Read the Nayax 24 months Limited Warranty Terms and Limitations
included in your contract. In the unlikely event that your device needs repair service or for additional
information, please contact us at support@nayax.com.
Your warranty shall be void in case the device is damaged due to vandalism and/or any corrosion
issues.
Cleaning Instructions
You can use a soft, dry cloth for cleaning purposes. In case your device is extremely dirty, use a
small amount of alcohol. Make sure not to use organic solvents such as thinner and benzene.
Other manuals for VPOS Touch
3
Table of contents
Other Nayax Card Reader manuals