NCast Hydra User manual

NCast Presentation Recorder Reference Manual
NCast Product Documentation
Presentation Recorder Hydra
Reference Manual
Revision 1.0
October 14th, 2015
PR-Hydra Software Release .0.0
Copyright © NCast Corporation, 2015
NCast Corporation Revision 1.0
Page 1

NCast Presentation Recorder Reference Manual
Table of Contents
1. Introduction............................................................................................................................................. 6
1.1. Purpose............................................................................................................................................ 6
1.2. Document Overview......................................................................................................................... 6
1.3. Presentation Recorders – Hydra......................................................................................................6
1.4. Presentation Recorders – Connector Options..................................................................................6
1.5. Presentation Recorder – Phoenix Balanced Audio Connectors Wiring............................................7
1.6. Presentation Recorder – Control 1 Connector Wiring......................................................................7
1.7. Presentation Recorder – Control 2 Connector Wiring......................................................................8
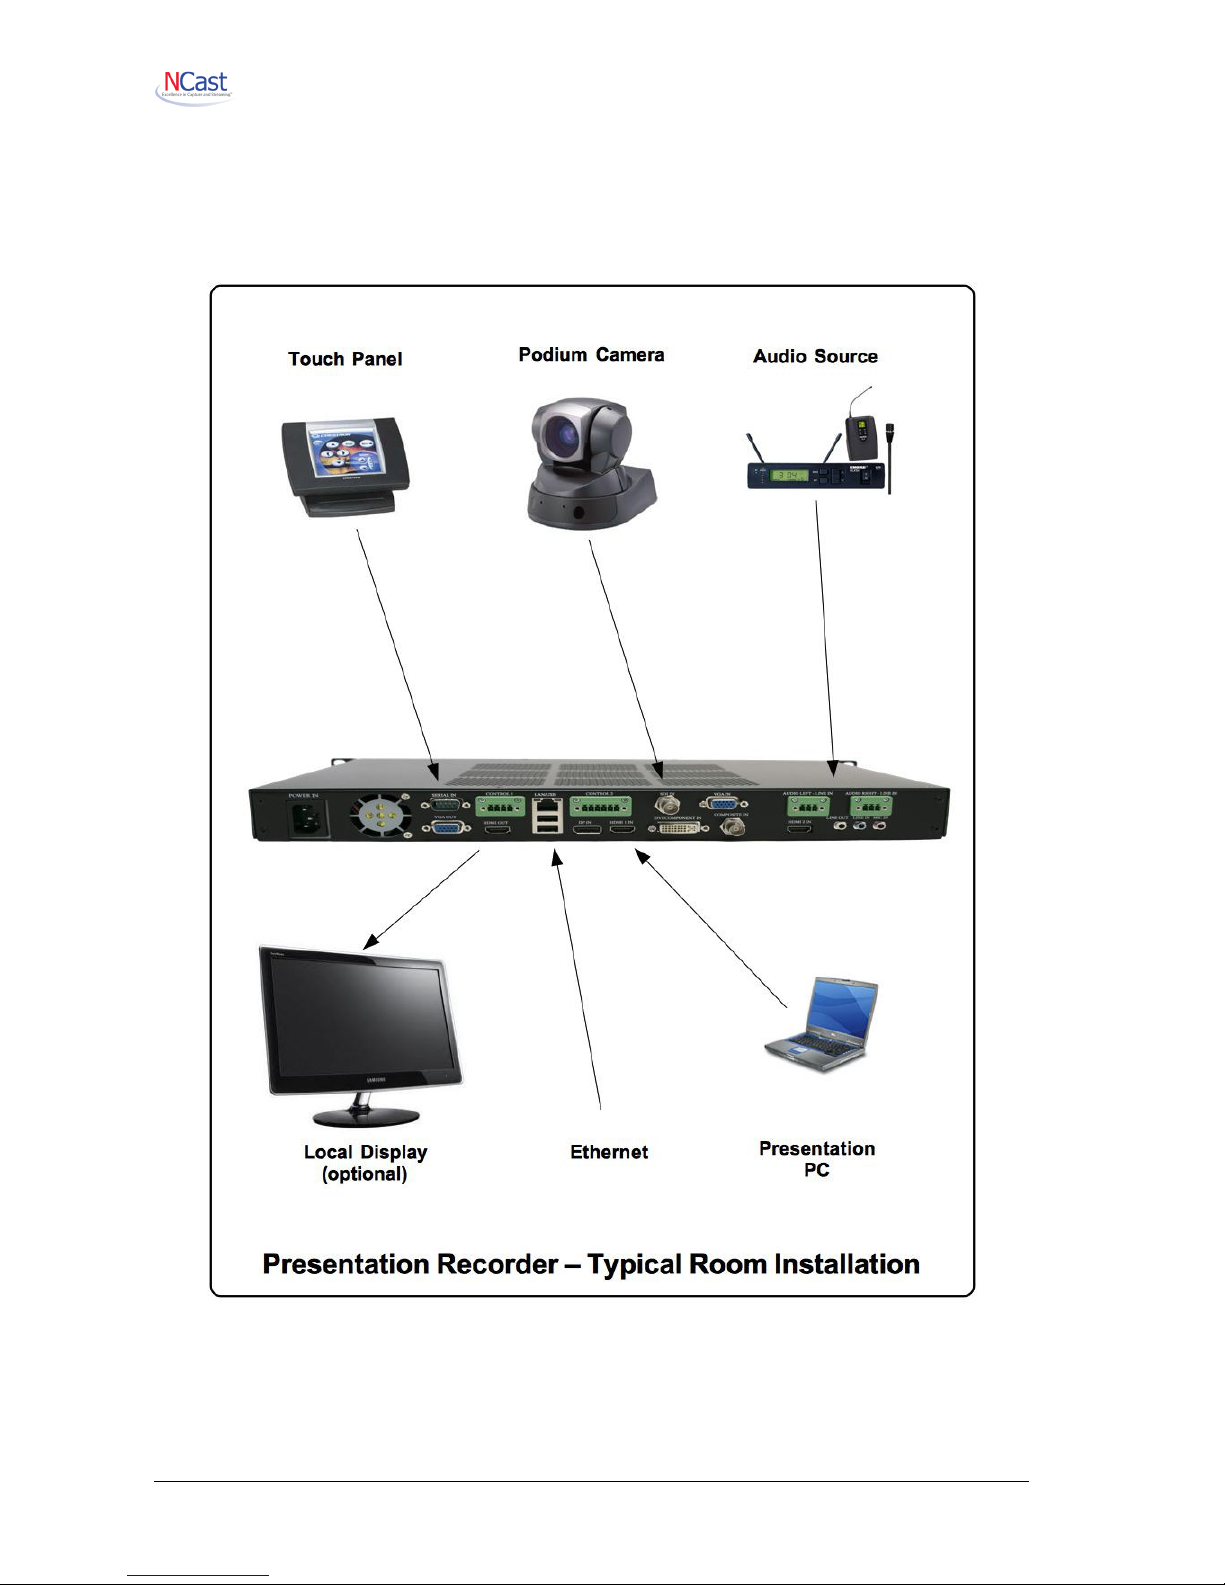
1.8. Presentation Recorder – Installation................................................................................................
2. Quick Start............................................................................................................................................ 10
2.1. Startup............................................................................................................................................ 10
2.2. Dual Streaming and Recording......................................................................................................11
2.3. Presentation Recorder Modes of Operation...................................................................................13
3. Quick Start Configuration and Setup....................................................................................................15
3.1. Quick Start Page Organization....................................................................................................... 15
3.2. Channel Selection.......................................................................................................................... 16
3.3. Source Selection............................................................................................................................ 17
3.4. Streaming Start/Stop...................................................................................................................... 1
3.5. Recording....................................................................................................................................... 1
3.6. Status Bar...................................................................................................................................... 20
3.7. Control Icons.................................................................................................................................. 20
4. The Channel Table............................................................................................................................... 22
4.1. Channel Settings............................................................................................................................ 22
4.2. Edit Channel – General.................................................................................................................. 23
4.3. Edit Channel – Frame Size............................................................................................................ 25
4.4. Edit Channel – Layout.................................................................................................................... 26
4.5. Edit Channel – Profile.................................................................................................................... 2
4.6. Edit Channel – Customized Profile Settings...................................................................................30
4.7. Edit Channel – Network.................................................................................................................. 32
4.8. Edit Channel – RTMP Streaming................................................................................................... 34
4. . Edit Channel – Recording.............................................................................................................. 35
4.10. Edit Channel – Upload................................................................................................................. 38
4.11. Edit Channel – Notifications.........................................................................................................44
5. Archives................................................................................................................................................ 46
5.1. Archive Settings............................................................................................................................. 46
6. Configuration........................................................................................................................................ 50
6.1. Personal......................................................................................................................................... 50
6.2. Time............................................................................................................................................... 51
6.3. Network.......................................................................................................................................... 52
6.4. Web................................................................................................................................................ 56
6.5. Display........................................................................................................................................... 57
6.6. Telnet Settings............................................................................................................................... 58
6.7. Scheduler....................................................................................................................................... 5
6.8. Presentation Server....................................................................................................................... 64
6. . Notifications.................................................................................................................................... 65
6.10. Custom......................................................................................................................................... 67
7. Status................................................................................................................................................... 70
7.1. System........................................................................................................................................... 70
7.2. Network.......................................................................................................................................... 70
7.3. Event Logs..................................................................................................................................... 71
7.4. Serial logs...................................................................................................................................... 71
8. Sources................................................................................................................................................ 73
8.1. Video.............................................................................................................................................. 73
8.2. Dual Input....................................................................................................................................... 74
NCast Corporation Revision 1.0
Page 2

NCast Presentation Recorder Reference Manual
8.3. Audio.............................................................................................................................................. 74
8.4. Advanced....................................................................................................................................... 75
8.5. Overlays......................................................................................................................................... 76
8.6. Previews(1/2)................................................................................................................................. 77
. Viewer Interface and Media Players..................................................................................................... 78
.1. View Stream................................................................................................................................... 78
.2. VLC Media Player.......................................................................................................................... 7
.3. Media Players................................................................................................................................ 80
.4. Closed-Caption Support................................................................................................................. 80
10. Custom Layouts.................................................................................................................................. 83
10.1. Frame Layouts and Presets......................................................................................................... 83
11. Presentation Recorder Interfaces.......................................................................................................8
11.1. Serial Interface............................................................................................................................. 8
11.2. Telnet Interface............................................................................................................................ 8
11.3. REST Interface – Archive Download............................................................................................ 0
11.4. REST Interface – Image and Thumbnail Capture........................................................................ 0
11.5. REST Interface – Graphics Overlay Upload................................................................................. 0
11.6. REST Interface – Reference Manual........................................................................................... 0
12. Theory of Operation............................................................................................................................ 1
12.1. Presentation Recorder Component Block Diagram ..................................................................... 1
12.2. Capture Module Function............................................................................................................. 1
12.3. Compression................................................................................................................................ 2
12.4. Transmission................................................................................................................................ 2
12.5. Decompression............................................................................................................................ 2
12.6. Display Function........................................................................................................................... 2
12.7. Audio Subsystem......................................................................................................................... 2
12.8. Archive Disk................................................................................................................................. 2
13. Techniques for Presentation Capture.............................................................................................. 3
13.1. Webcasting, Podcasting and Archiving........................................................................................ 3
13.2. Capturing Graphics, Video and Audio.......................................................................................... 3
13.3. Conference Day Problems and Issues......................................................................................... 5
13.4. Video Post-Production.................................................................................................................. 6
14. Terms and Definitions....................................................................................................................... 100
14.1. Audio and Video Terms and Definitions.....................................................................................100
15. References....................................................................................................................................... 102
15.1. MPEG Compression.................................................................................................................. 102
15.2. Packet Transmission.................................................................................................................. 102
15.3. Multicast..................................................................................................................................... 102
16. Revision History................................................................................................................................ 103
NCast Corporation Revision 1.0
Page 3

NCast Presentation Recorder Reference Manual
Regulatory Compliance Information
Equipment Label
The Presentation Recorder meets all applicable FCC, CE and ICAN radiation and emission
standards:
44366 S. Grimmer Blvd. Fremont, CA 94538
(510) 490-4307 (510) 490-3441 Fax
Report 4 03-
Electromagnetic Compatibility Test Report
47 CFR Part 2 Subpart J Paragraph 2. 06
Report 4 03-2
Electromagnetic Compatibility Test Report
ECD 2004/108/EC, LVD 2006/ 5/EC
(1) Connections between peripherals of this equipment may be made with low voltage non-
shielded computer data cables.
(2) Network connections may consist of non-shielded CAT 5 cable.
Warnings
(1) A non-shielded power cord may be used to connect AC power to every component and
peripheral of the system.
FCC NOTICE
This device complies with Part 15 of the FCC Rules. Operation is subject to the following two
conditions: (1) this device may not cause harmful interference, and (2) this device must accept
any interference received, including interference that may cause undesired operation.
FCC NOTICE – INFORMATION FOR THE USER
This equipment has been tested and found to comply with the limits for a Class A digital
device, pursuant to Part 15 of the FCC Rules. These limits are designed to provide reasonable
protection against harmful interference in a residential installation. This equipment generates,
uses and can radiate radio frequency energy and, if not installed and used in accordance with
the instructions, may cause harmful interference to radio communications. However, there is
no guarantee that interference will not occur in a particular installation. If this equipment does
cause harmful interference to radio or television reception, which can be determined by turning
the equipment off and on, the user is encouraged to try to correct the interference by one or
more of the following measures:
(1)Reorient or relocate the receiving antenna.
(2)Increase the separation between the equipment and receiver.
(3)Connect the equipment into an outlet on a circuit different from that to which the receiver is
connected.
(4)Consult the dealer or an experienced radio/TV technician for help.
The user may find the following publication prepared by the Federal Communications
Commission helpful:
“How to Identify and Resolve Radio-TV Interference Problems”
Stock Number 004-000-00345-4, available exclusively from the Superintendent of Documents,
Government Printing Office, Washington, DC 20402 (telephone +1-202-512-1800).
FCC WARNING
Changes or modification not expressly approved by the party responsible for compliance to
Part 15 of the FCC Rules could void the user’s authority to operate the equipment.
CE NOTICE – INFORMATION FOR THE USER
This equipment has been tested and found to comply with the limits for a Class A digital
device, pursuant to EN 55022 Rules. These limits are designed to provide reasonable
protection against harmful interference when the equipment is operated in a commercial
NCast Corporation Revision 1.0
Page 4

NCast Presentation Recorder Reference Manual
environment. This equipment generates, uses, and can radiate radio frequency energy and, if
not installed and used in accordance with the instruction manual, may cause harmful
interference to radio communications. Operation of this equipment in a residential area is likely
to cause harmful interference in which case the user will be required to correct the interference
at the expense of the user.
The user may find the following publication prepared by the Federal Communication
Commission helpful:
“How to Identify and Resolve Radio-TV Interference Problems”
Stock Number 004-000-00345-4, available exclusively from the Superintendent of Documents,
Government Printing Office, Washington, DC 20402 (telephone +1-202-512-1800).
WARNING
Changes or modifications not expressly approved by the party responsible for compliance to
EN 55022 Rules could void the user’s authority to operate the equipment.
ICAN Class A Digital Equipment
This Class A digital apparatus meets all requirements of the Canadian Interference-Causing
Equipment Regulations.
Cet appareil numérique de la classe A respecte toutes les exigencies due Réglement sur le
matériel brouilleur du Canada.
NCast Corporation Revision 1.0
Page 5

NCast Presentation Recorder Reference Manual
. Introduction
1.1. PURPOSE
The NCast Presentation Recorder Reference Manual is intended for the Audio/Video or Network
engineer who will be tasked with the job of installing and setting up a Presentation Recorder or a system
of multiple Presentation Recorders. This guide is designed to cover topics in depth and to assist in
optimizing the performance of a Presentation Recorder.
1.2. DOCUMENT OVERVIEW
This document is divided into two major sections: the theory of operation and a discussion of parameter
settings.
1.3. PRESENTATION RECORDERS – HYDRA
The Presentation Recorder is a stand-alone network communications appliance which captures RGB
(VGA), Composite, Component, DVI, HDMI, Displayport and optionally 3G-SDI signals from a desktop or
laptop, compresses the image with an industry standard compression algorithm, records the capture to a
file, packetizes and transmits the imagery as an internet media stream, receives a media stream from the
internet, decompresses the imagery, and presents the received information to a viewing audience
through use of a large-screen monitor or via a room projector. Presentation Recorders are able to
archive the media stream in real-time while simultaneously webcasting, allowing for playback by the
recipient at a later date.
The PR-Hydra-R brings unique capabilities to the Presentation Recorder lineup in being able to
simultaneously record and stream two hi-def images for capture or live viewing.
PR-Hydra-R – A rack-mounted unit with streaming and archiving
capabilities. The PR-Hydra-R allows for up to WUXGA (1920x1200 input
resolutions with up to 1080p (1920x1080 capture resolutions and PIP (Picture
In Picture video and graphics overlay. Dual streaming and recording is
standard.
1.4. PRESENTATION RECORDERS – CONNECTOR OPTIONS
The following photo shows the back-panel connectors available:
Backpanel for PR-Hydra-R
NCast Corporation Revision 1.0
Page 6

NCast Presentation Recorder Reference Manual
•VGA In – RGBHV Input from the presenter's PC
•HDMI- – Video input from cameras or computers + Audio
•HDMI-2 – Video input from cameras or computers + Audio
•DVI-D – Digital input
•DVI-A – Analog Y-Pb-Pr component from a camera source
•Displayport – Input from the Displayport output of a computer
•Composite – NTSC or PAL input
•SDI – 3G-SDI Serial Digital Input + Audio
•HDMI Monitor Out – Confidence monitor for the local display – Dual Primary Output
•VGA Monitor Out – Confidence monitor to the local display – Dual Secondary Output
•Audio – Balanced input connectors, Left Line-In and Right Line-In
•Audio Line-In, Line-Out, Mic-In - Unbalanced 3.5 mm. connections. Stereo for Line-In, Line-
Out
•Audio – USB microphones
•Serial Control – Wired control from a touch panel, such as Crestron or AMX
•Ethernet – Connection to the Internet
•Control – Trigger 1 Contact Closure, Trigger 2 Contact Closure
•Control 2 – Second Serial Port, Hardware Reset, Power On/Off
•USB – For specifying a static IP connection
•USB – For saving an archive file
•USB – For secure firmware update on closed networks
Note: Conversion of HDMI or DVI signals to Displayport requires an active (not passive) adapter.
Note: HDMI-1 and DVI may not be used together in PIP mode
Note: HDMI-2 and SDI may not be used together in PIP mode
Note: Dual capture input is limited to HDMI-2 or SDI
1.5. PRESENTATION RECORDER – PHOENIX BALANCED AUDIO CONNECTORS WIRING
The rack mount model comes with Phoenix balanced audio connectors.
Pin Signal Description
1 Ground (Shield) Cable ground or shield
2 Hot (Tip) + Audio Hot
3 Cold (Ring) - Audio Cold
1.6. PRESENTATION RECORDER – CONTROL 1 CONNECTOR WIRING
The unit has a connector for two external contact closure triggers (currently reserved for future use).
NCast Corporation Revision 1.0
Page 7

NCast Presentation Recorder Reference Manual
Pin Signal Description
1 Trigger 1 Active low, drive with relay
2 GND Ground
3 Trigger 2 Active low, drive with relay
4 GND Ground
1.7. PRESENTATION RECORDER – CONTROL 2 CONNECTOR WIRING
There is a second serial port (reserved for future use) and two connections which may be used by an
external controller or relay to power the unit on/off or reboot the system.
Pin Signal Description
1 Tx Data Serial Out, Transmit Data
2 Rx Data Serial In, Received Data
3 GND Ground
4 Reset Active low, drive with relay
5 GND Ground for Reset line
6 Power
On/Off
Active low, drive with relay
NCast Corporation Revision 1.0
Page 8

NCast Presentation Recorder Reference Manual
1.8. PRESENTATION RECORDER – INSTALLATION
The diagram below shows a typical room installation (single or dual stream):
NCast Corporation Revision 1.0
Page

NCast Presentation Recorder Reference Manual
2. Quick Start
2.1. STARTUP
2.1.1. A Really Short Start
Here’s a very short description on how to get started:
1. Plug the unit into a network with DHCP, plug in a display to the HDMI Out, plug your laptop into
the VGA In, a camera (if you have one) into HDMI-1 In and turn on the power.
2. When you see the bootup screen with the IP network address, log into the unit at
http //ipaddress using “admin” as the user and “ncast” as the password.
3. On the Quick Start page select your Channel Layout, your Video Sources, your Audio
Sources and then press Start.
4. Press Stop, go to the Archives page, download your recording and you’re done!
2.1.2. Mini Start
This is a short introduction on how to get started with a Presentation Recorder:
1. Plug the unit into a network, plug in a display to the HDMI Out, plug your laptop into the VGA In,
a camera (if you have one) into the HDMI-1 connector and turn on the power. If you aren’t using
DHCP and need to enter static IP addresses, edit a “ntwkconf.txt” file onto a USB stick and plug
it into a USB port. See the Configuration → Network tab (6.3.16.) for details on this file.
2. When you see the bootup screen with the IP network address, log into the unit at
http //ipaddress using “admin” as the user and “ncast” as the password.
3. On the Quick Start page select the Channel Layout you desire. The icons represent the
composition of the frame which will be recorded and allow for many different combinations of
video inputs, graphics inputs and graphical overlays.
4. The dialog box allows you to choose one of the unit's standard video profiles and permits you to
upload a custom graphical overlay to replace the factory default.
NCast Corporation Revision 1.0
Page 10

NCast Presentation Recorder Reference Manual
5. Select the Video and Audio sources you have connected to the recorder. The “Main” input is
normally associated with graphics capture and the PIP input usually contains the video camera.
You should see your captured graphics and video on the local display screen. Check your audio
levels on the meter.
6. Press the Start button to activate the streaming or recording.
7. Press Stop, go to the Archives page, download your recording.
8. You’re done!
2.1.3. Long Start
Read this whole manual from cover to cover (RTFM). There are hundreds of different
configuration options for a Presentation Recorder, allowing the setup and composition of many
different formats, resolutions, PIP options, layouts, bit-rates, frame-rates, start and stop and
scheduling options and the like. You can automatically upload your archives to a video server.
You can tag your archives automatically with course numbers and notes. You can add your own
customized graphic overlays to the captured graphics and video. Transmission can be automated
so that all that is required is to press the power-on button.
Please feel free to contact NCast Corporation if you have any questions about the use or
configuration of the Presentation Recorder.
2.2. DUAL STREAMING AND RECORDING
A significant new feature of the PR-Hydra is the ability to simultaneously, and in sync, stream and record
two hi-def media streams.
2.2.1. Primary Stream
The Primary Stream accepts input from all connectors listed above and provides for PIP options
of all inputs with the exceptions listed in Section 1.4. The Primary Stream supports graphical and
text overlays and the Main and PIP window Full-Screen and Swap options.
2.2.2. Secondary Stream
The Secondary Stream (also labelled the “Dual Stream”) accepts input from either the HDMI-2 or
SDI connectors and is used in wide-screen mode with no PIP capability. It is possible to use the
HDMI-2 and/or SDI connectors concurrently in the Primary and Secondary streams.
2.2.3. Enabling Dual Streaming
Dual streaming and/or recording is enabled in the Channel Configuration options (some Channels
may operate single-stream, others dual-stream). Go to the Channels tab, click “Edit” on the
Channel icon to be modified and in the first window choose “Dual capture mode?”. This will cause
subsequent configuration windows to present choices for the Primary and Secondary streams.
NCast Corporation Revision 1.0
Page 11

NCast Presentation Recorder Reference Manual
Single Stream Dual Stream
2.2.4. Local Confidence Monitor & Loopback Displays
In single-stream mode the Main/PIP windows of the Primary Stream will be displayed, by default,
on the HDMI Out connector. The VGA display will be blank or will have the OSD window if
enabled.
In dual-stream mode the Main/PIP windows of the Primary Stream will be displayed, by default,
on the HDMI Out connector. The Dual window of the Secondary Stream will be displayed on the
VGA Out connector.
These output selections may be swapped. Go to the Configuration → Display tab and check
“Swap”:
NCast Corporation Revision 1.0
Page 12

NCast Presentation Recorder Reference Manual
2.3. PRESENTATION RECORDER MODES OF OPERATION
The Presentation Recorders have six major modes of operation:
Record to File – The Presentation Recorder only records the file to storage. Once the
Session has ended the file may be automatically uploaded to a video-on-demand server
for later playback by client PCs or mobile devices.
Send a Unicast or Multicast Stream – In this mode of operation one of the Presentation
Recorders is designated as the “Sender” and all of the other units are designated as
“Receivers”. The media streams originate from the Sender and are decoded by one or
more Receivers or desktop client media players. The transmission is strictly one-way, and
no feedback or interactivity is provided for. The one-to-many operation is enabled via use
of multicast connected networks. The unit is able to stream and record simultaneously.
Send a Unicast or Multicast Stream and Record to File – This mode of operation is the
same as “Send a Unicast or Multicast Stream” with the addition of simultaneous
recording an archiving of the captured Session. The archive is first stored internally in local
NCast Corporation Revision 1.0
Page 13

NCast Presentation Recorder Reference Manual
storage and once the Session is finished the archive may be uploaded to a distribution
server or to a locally attached USB drive.
Send a Stream to an RTMP Server – For live streaming the Presentation Recorder sends
an RTMP protocol stream to a streaming server, CDN or Presentation Server where fanout
occurs and the media is distributed to multiple receiving PC's or mobile devices. The
server MUST be located at a high-bandwidth point on the network to provide for multiple
outbound unicast streams, one for each attached receiver.
Send a Stream to an RTMP Server and Record to File – Supports live streaming using
the RTMP streaming protocol and in addition simultaneously records to create a local
archive. See the diagram and description above.
Receive a Unicast or Multicast Stream – In this mode of operation the Presentation
Recorder is configured to receive a stream from another unit acting as a sender. The
receiving unit decodes and renders the composite image created by the sender and
displays it on the attached monitor. This configuration is frequently used to supply a
display to an overflow room or satellite classroom.
NCast Corporation Revision 1.0
Page 14

NCast Presentation Recorder Reference Manual
3. Quick Start Configuration and Setup
3.1. QUICK START PAGE ORGANIZATION
The Quick Start page is the primary control page for the Presentation Recorder and has six distinct
functional areas:
•Channel Selection – A Channel is a preset or template containing all layout and startup
parameters
•Source Selection – Input connectors are assigned to the active windows in a video frame
•Streaming Control – Streaming session activity on a Channel is started or stopped
•Recording Control – Recording of a session on a Channel is started, paused or stopped
•Status Bar – A real-time display of session activity and input signal status
•Control Icons – Special controls to power-off the unit, reboot and several other functions
With the Quick Start page the sequence of operations required to activate a streaming/recording session
may be summarized as follow:
1. Select a Channel layout.
2. Select the appropriate video and audio sources.
3. Start a streaming session.
4. Start recording.
5. Stop recording.
6. Stop the streaming session.
NCast Corporation Revision 1.0
Page 15

NCast Presentation Recorder Reference Manual
3.2. CHANNEL SELECTION
A Channel is a preset containing all the layout and startup parameters needed for a streaming or
recording session. There are seven categories of channel parameters:
•General – The Channel name and the type of Channel operation desired.
•Layout – The frame size, aspect ratio, position of the Main and PIP windows and graphical
overlays.
•Quality – The video and audio quality desired and respective bit-rates.
•Network – The Channel's multicast or unicast addresses.
•Recording – Archive filenames and other recording parameters.
•Upload – Disposition of the archive file once the recording has completed.
•Notifications – Email messages to the administrator of the Channel.
The Quick Start page allows for a limited selection of factory default settings. More comprehensive
modifications to a Channel are done from the Channels tab.
The first dialog box allows selection of a number of standard bit-rates, input connector selection and the
upload of custom graphics for overlay.
Select the lower speeds for material that is mainly graphics and the higher bit-rates for video material.
NCast Corporation Revision 1.0
Page 16

NCast Presentation Recorder Reference Manual
When a streaming or recording Session is started, the Main, PIP and Dual video/graphics input
connectors and the Audio input connectors can be forced to a known state or “Not Modified” (left as they
are prior to Session start).
Graphical overlays are JPEG, GIF or PNG images that may be used to fill in or overlay areas of the
frame being captured. Create a custom graphic in your favorite photo editing program and upload it to
the Channel by selecting “Customize Overlays”. Make sure the dimensions are correct as the Recorder
does not do any scaling of the incoming picture.
When all selections have been made the new Channel will be ready for use and the new layout will
appear on the locally attached monitor.
3.3. SOURCE SELECTION
The selection of which input signal (connector) to use for the Main, PIP and the Dual windows is
accomplished by clicking the Video button in the Sources area. This selection may be changed at any
time during a recording. The Swap button will exchange the Main and PIP window settings. The “Main
Full” or “PIP Full” will expand the Main or PIP window to fullscreen.
NCast Corporation Revision 1.0
Page 17

NCast Presentation Recorder Reference Manual
Similarly, the audio inputs are selected by the audio button. Choices include:
•Mic – Microphone jack input
•Line-in – Line jack input
•XLR – Balanced audio input
•HDMI- – Audio from HDMI-1 source
•HDMI-2 – Audio from HDMI-2 source
•SDI – Audio from SDI source
•Input gain – Input level adjustment for the above inputs
•Output gain – Speaker output level
•Loopback gain – Controls the feed from the input signal to the output. Watchout for feedback!
The other buttons on this line control these functions:
•Advanced – Fine adjustment and positioning of the images.
•Overlays – Shows or hides the graphical or text overlays, allows edit of text overlays.
•Preview( /2) – Creates a static image of the frame(s) being captured.
NCast Corporation Revision 1.0
Page 18

NCast Presentation Recorder Reference Manual
3.4. STREAMING START/STOP
The Streaming Start button activates a streaming/recording session based on the Channel parameters
and the selected video and audio sources.
Once activated the View button allows reception of the transmitted stream using an appropriate media
player.
3.5. RECORDING
The Recording button starts the recording and archiving of the video/graphics/audio media being
presented. A recording may be Paused and Resumed, and if Stopped and then Started a second file will
be created.
The Title button allows entry of metadata for the recorded file (Title, Presenter, Description).
NCast Corporation Revision 1.0
Page 1

NCast Presentation Recorder Reference Manual
3.6. STATUS BAR
The Status Bar at the bottom of the page creates a real-time report of the activity underway and has
indicators for Streaming and Recording operations, Audio levels and the state of the selected Main, PIP
and Dual input signals. This example shows Dual Channel streaming, recording and capture.
Clicking the righthand grey panel collapses the Bar and hides it from view.
3.7. CONTROL ICONS
The upper righthand corner of the page contains two Control Icons:
Clicking the green arrow expands the slider to reveal an additional set of Icons:
The function of these Icons (left to right) is listed below.
3.7.1. Reboot
Restarts the unit and reinitializes all processes. This operation may be needed to clear problems after a
power brownout or other unexpected glitch
3.7.2. Shutdown
Powers down the encoder. It is HIGHLY recommended to power off the equipment with this Icon rather
than simply pulling the plug. All operating parameters will be properly saved and restored.
3.7.3. Factory Defaults
Restores all Channels and other settings to their factory default. All configuration information will be lost.
Nothing is saved and the reset is irreversible.
3.7.4. Export Settings
Once a recorder has been setup and configured, it's highly recommended to export all settings to save
the configuration of the unit for easy restore or repair.
Clicking the Export button will create and download a .zip file with all of the checked information.
NCast Corporation Revision 1.0
Page 20
Table of contents
Other NCast Recording Equipment manuals