NDS iMANAGER User manual

NDS ENERGY S.r.l.
Via G. Pascoli, 169 – 65010 Cappelle sul Tavo (PE)
taly
Tel: +39 085 4470396 – Fax: +39 085 9507049
www.ndsenergy.it - commer@ndsenergy.it
All the energy
you Need
www.ndsenergy.it ~ e-mail: commer@ndsenergy.it

SUMMARY
1.DESCR PT ON .......................................... pag. 1
1.1 Main Functions .......................................... pag. 2
2. NS DE THE BOX .......................................... pag. 2
2.1 Device Components .......................................... pag. 3
2.2.Accessories for installation .......................................... pag. 4
3. NSTALLAT ON NSTRUCT ONS .......................................... pag.
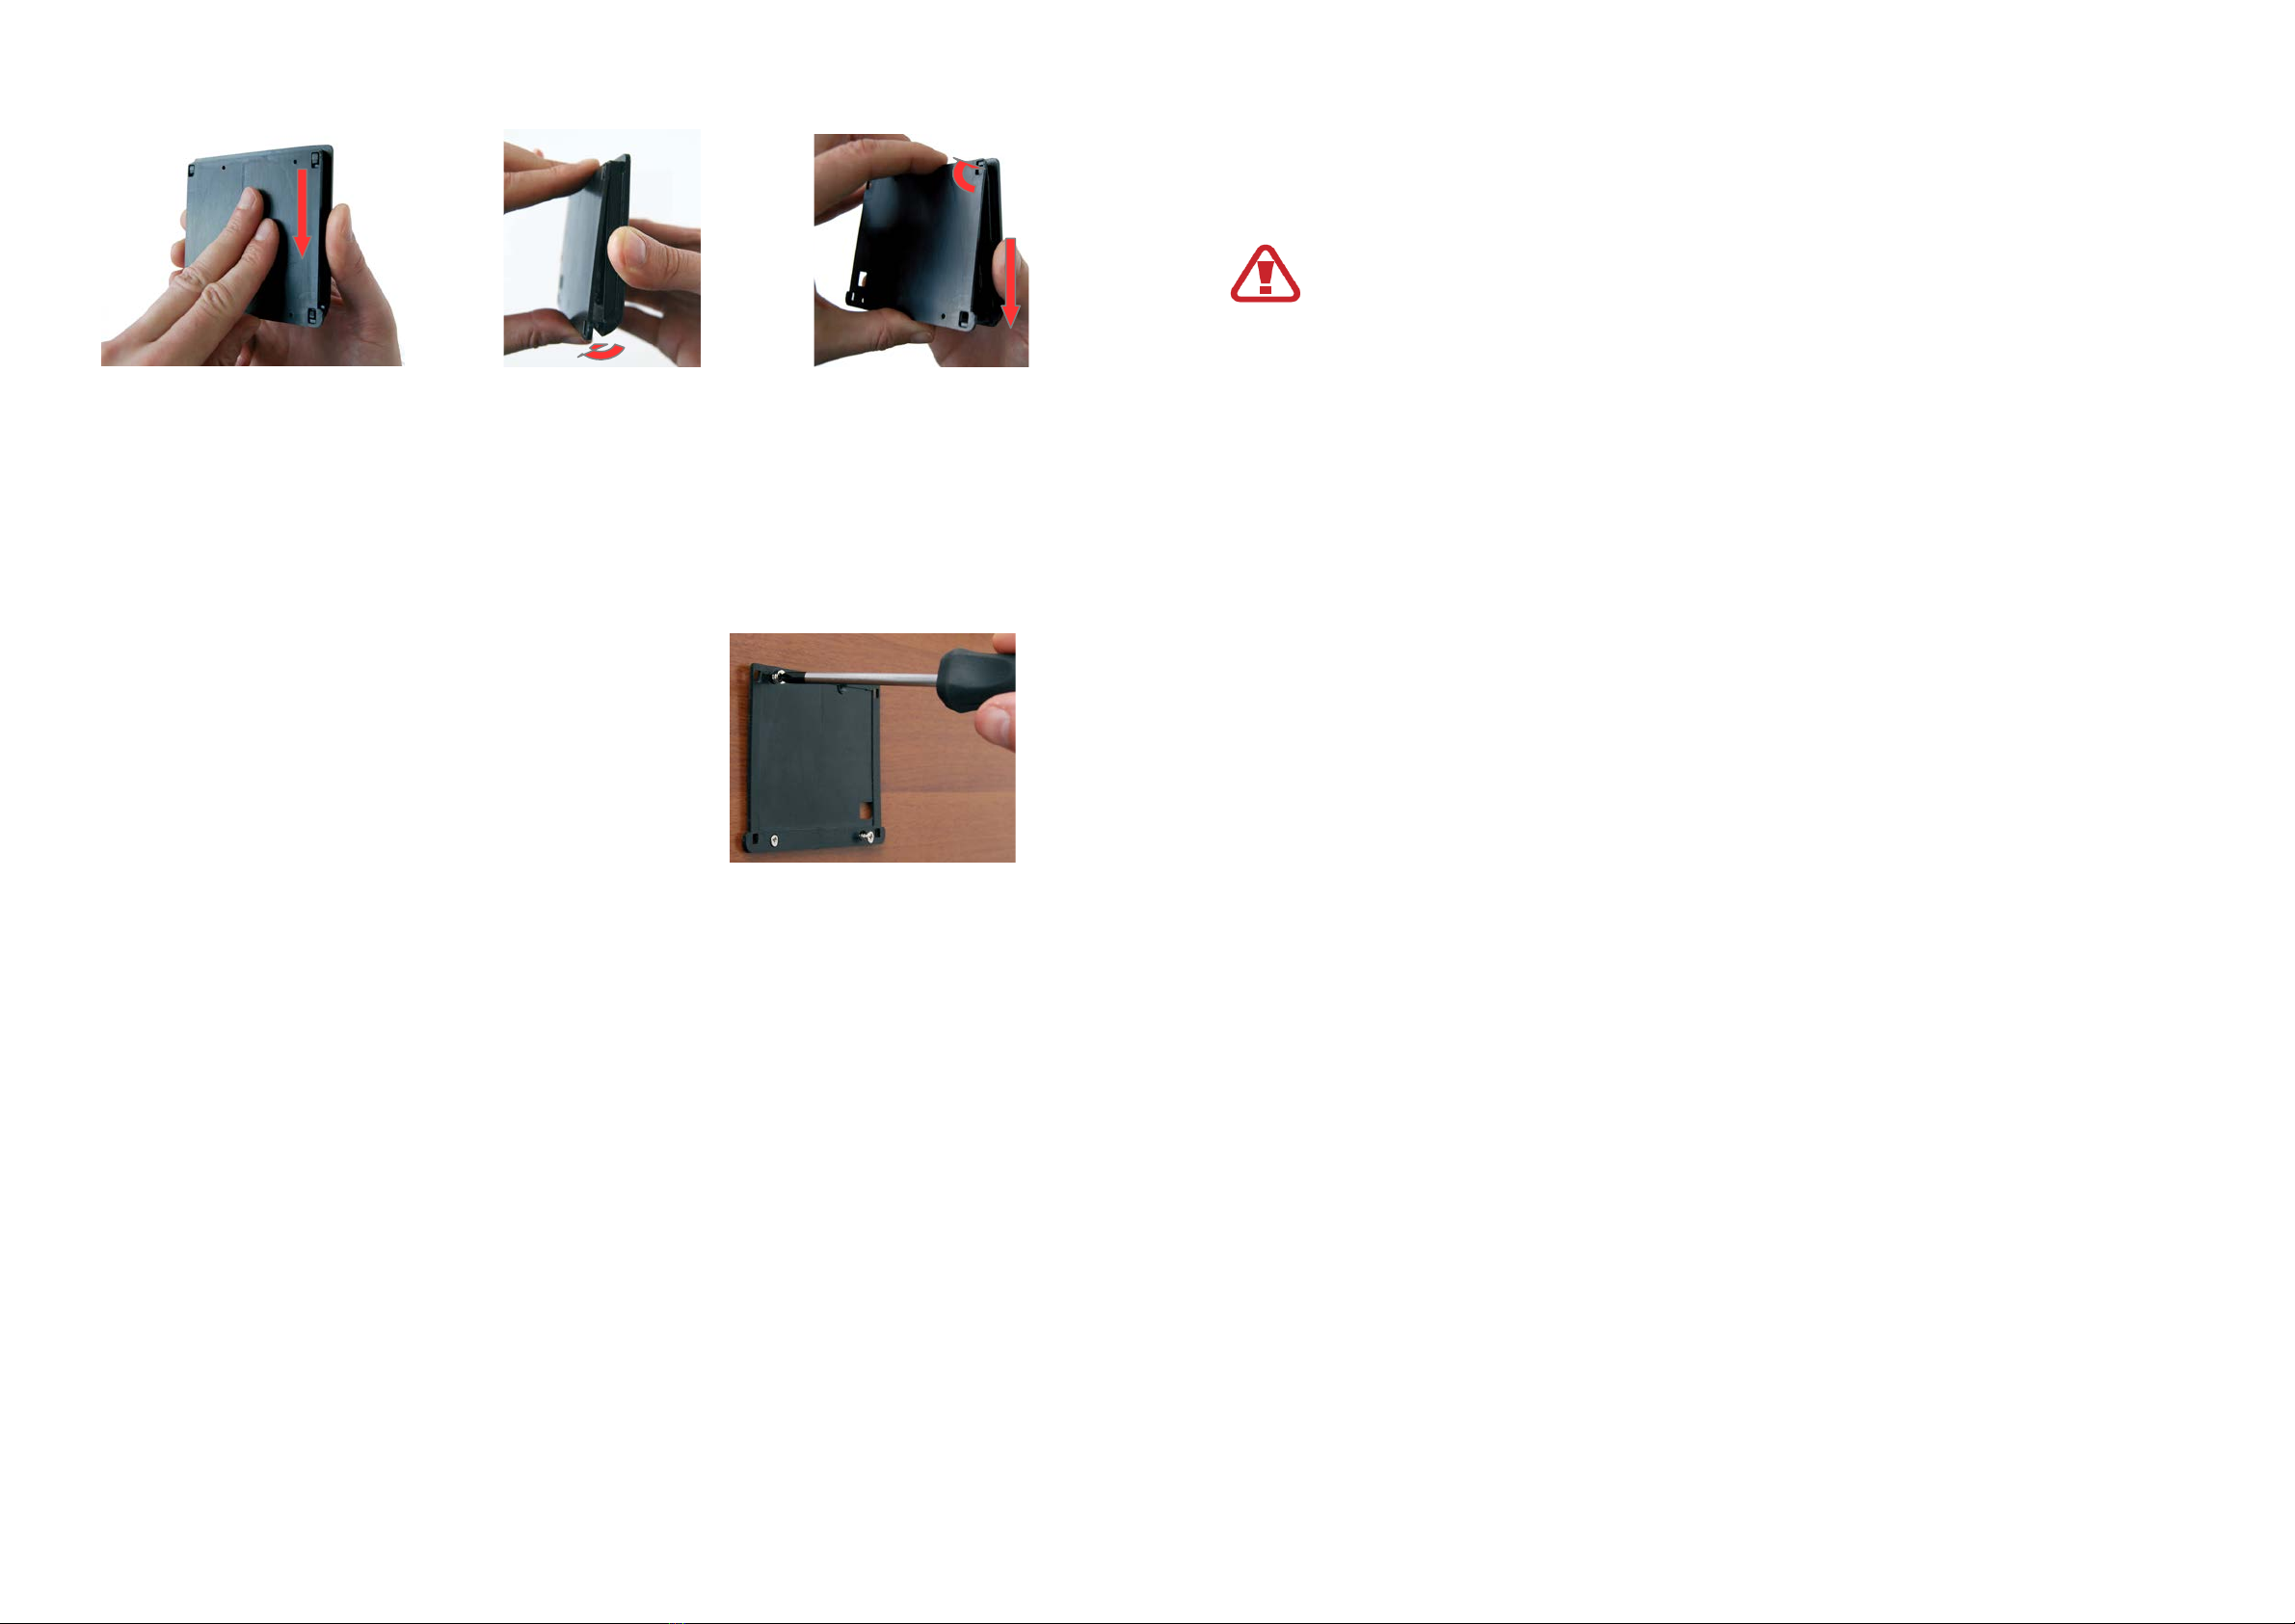
3.1 BlackBox Installation .......................................... pag.
3.2 iManager Installation .......................................... pag. 8
4.GETT NG STARTED .......................................... pag. 10
4.1 Using the Touch Screen .......................................... pag. 10
4.2 Initial Setting .......................................... pag. 11
5.OPERAT ON .......................................... pag. 14
.1 Main Screen .......................................... pag. 14
.2 Icons' meanings and functions .......................................... pag. 1
.3 Displaying the state of charge (SoC) .......................................... pag. 18
.4 Displaying Data .......................................... pag. 19
6.MANAG NG BATTER ES .......................................... pag. 19
6.1 Automatic Mode .......................................... pag. 19
6.2 Manual Mode .......................................... pag. 21
6.3 Automatic Batteries Switch off Function .......................................... pag. 22
6.4 Charging Engine Battery .......................................... pag. 23
7.Setting Menu (Setting Key) .......................................... pag. 24
7.1 Setting Key (Tap Click) .......................................... pag. 24
7.2 Setting Key (Click and Hold) .......................................... pag. 2
8.AUX L ARY FUNCT ONS .......................................... pag. 26
8.1 Warnings .......................................... pag. 26
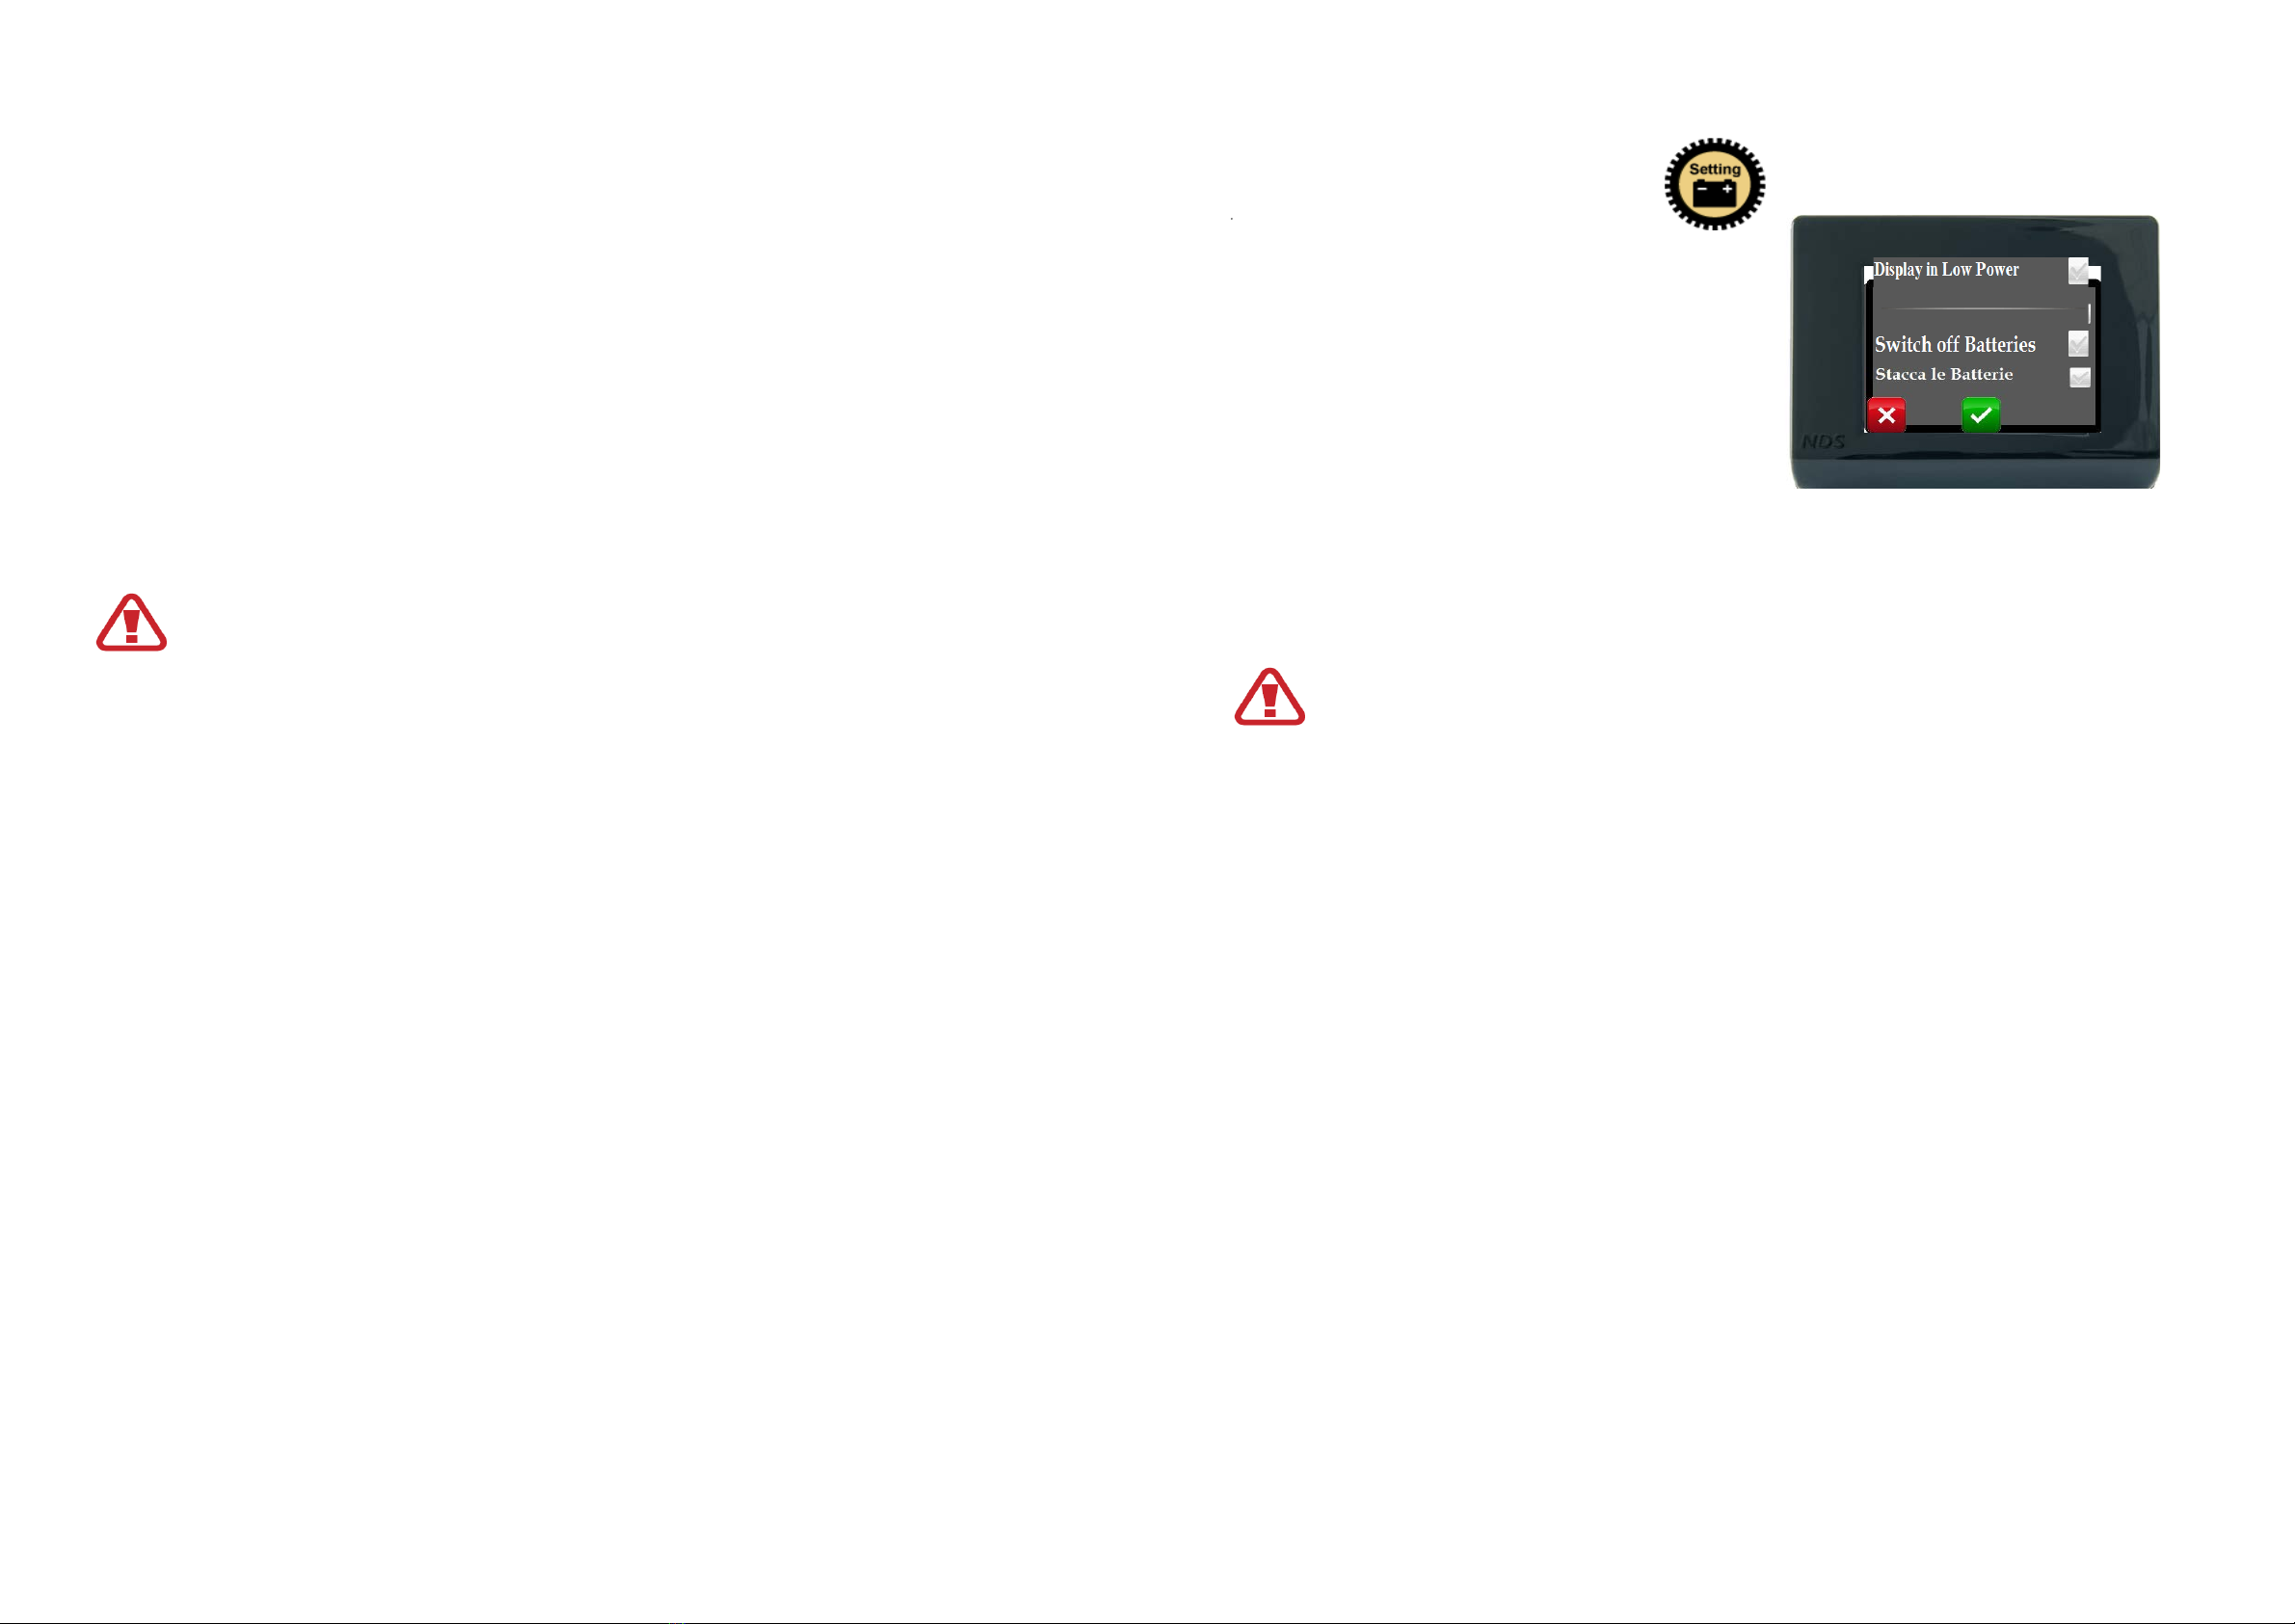
8.2 Display Switch off .......................................... pag. 26
8.3 NDS Useful Numbers .......................................... pag. 27
8.4 Current Reset and Measures Errors .......................................... pag. 27
9.TECN CHN CAL FEATURES .......................................... pag. 28
10.WARRANTY .......................................... pag. 29
10.1 Validation Slip .......................................... pag. 30
10.1 Validation Slip
Mod.....................................S/N: ....................................................................................
Date of purchase ..................................................
Surname...........................................................Name ....................................................
Street...............................................................N°........Post.Code...................................
City...................................................................Phone N°: ..............................................
I authorize the use of my personal data under the provisions of law “D.L. 30th June
2003 No.196”
To be returned in a sealed envelope to:
NDS ENERGY S.r.l. – Via G. Pascoli, 169 – 6 010 Cappelle sul Tavo (PE) – Italy
Seller Stamp and Signature
Customer's Signature
30

10. WARRANTY
The manufacturer shall guarantee the proper functioning of the iManager and
undertake to make free replacement of partswhich should be deteriorated due to
defects in construction within 24 months from the date of purchase, as evidenced by
the validation slip (to be filled in each part and returned to the manufacturer).
The defects resulting from improper installation, use,tampering or negligence shall
not be covered by warranty. Furthermore, we assume no liability for any direct or
indirect damages.The iManager returned, even if under warranty, will have to be
shipped “Freight paid” and shall be returnedand on a “Freight collect” basis.
The certificate of warranty shall be valid only if accompanied by a official receipt or
delivery document.
Any dispute will be under the competent jurisdiction of the court of Pescara (Italy)
Mod. ................................................ S/N: ...................................................................
Date of purchase ...................................................
Seller Stamp and Signature
29
1. DESCR PT ON
iManager Wireless is the innovative management system of all batteries and power
needs onboard. It allows to manage up to three batteries, including those with
different technologies and amperage, improving their performance and, thanks to the
automatic battery isolating function, preserves their lives.
Thanks to its touch screen, iManager shows all the information available on both the
accumulators’ state of charge and the modes of use, thus allowing to manually select
the batteries to be activated or deactivated with a single touch, or for a more
customized management.
iManager Wireless works on a continuous basis and monitors the voltages of the
two batteries and automatically selects the batteries to be used, according to the
charge and discharge currents.
Additionally, the system has a dedicated output for the engine battery. hen it detects
a charging source (network battery charger or solar panel) on the leisure batteries,
and the latter are 100% charged, it sends a current of 4 A to keep the engine battery
charged, thus avoiding bad surprises when restarting the engine.
iManager Wireless made of two units can be installed on every kind of battery and
vehicle, and thanks to the wireless communication, make shorten installation time
respect the standard version.
1

1.1 Main Functions
Automatic or manual management of one or two leisure batteries, even of
different technologies and amperage
Output dedicated to engine battery charging, when leisure batteries are at 100%
(example: storage)
Displaying of the accumulators’ state of charge
Displaying of the charge and discharge voltage and ampere
Automatic (under 11V) or manual battery isolator, using the touch screen
Displaying of info and advices on managing and maintaining the batteries
Date and time
Temperature control under charge/discharge, for higher safety
2. NS DE THE BOX
Make sure the box includes the following components:
'BlackBox' control device
'iManager' displaying device
'iManager' supply cable
No. 2 temperature probes
Assembling screw kit
Gli elementi forniti sono progettati esclusivamente per questo dispositivo e non
sono compatibili con altri dispositivi.
24
9.TECHN CAL DATA
BLACKBOX
orking voltage 12V (10V - 16V)
Relays maximum current 100A + 100A
Batteries’ automatic disconnection
threshold
Tensione: 10,5V
Temperatura: 60°C
Operation mode Automatico e Manuale
Maximum current on the Starter battery 4A (max 18A per 5sec dopo avvio carica)
Starter battery’s charging threshold < 12,5V Automatico ; < 12,7V Manuale
BlackBox average consumption 23mA@Batterie attive 4.2mA@Batterie OFF
orking temperature -15°C - +65°C
REMOTE D SPLAY
Type of Display TFT 2,83" 262k Colori con Touch Screen
Average Consumption 88mA@luminosità max. 24mA@Display OFF
0mA@batterie OFF alim. positivo comune
Type of Communication ireless GFSK 868MHz
Operating temperature -10°C - +70°C
28

8.3 NDS Useful Numbers:
Should you need to contact the NDS ENERGY S.r.l. technical department, by
pressing and holding the company logo on the upper left corner of the display, all the
company’s data are shown, including phone number and e-mail address for quick
use.
To exit that screen, just tap the display.
8.4 Current Reset and Measuring Errors
In case the system show you a residual current
different from Zero, when all loads and chargers
are switched off, if ppossible to do a Current Reset
and is possible to calibrate the battery Voltage
measures.
To do it:
Open tha wondow that show the battery
Voltage and Current clicking on the area of
one of the leisure batteries;
Click and hold for at least 10 seconds inside the area of the data showing
window
At this point the display show you the following screen:
At the rigth-top edge is showed the current
value of current and can be resetted clicking
on the Icon Reset I, while clicking on the + or
– icons you can calibrate the Voltage measure
for each Battery.
27
2.1 Device Components
››BLACKBOX
Front View: Back View:
NUMBER FUNCT ON
12-way connector for connecting the Ground and the positive pole of the
Starter battery
2M6 bolt connector for the Positive Pole of Leisure battery no. 1
3M6 bolt connector for the system’s Common Positive Pole
4M6 bolt connector for the Positive Pole of Leisure battery no. 2
54-way connector for the Cable of connection with iManager
6Push Button for reactivating from Battery switch-off mode.
12345
6
3

››iMANAGER
Front view: Back View:
NUMBER FUNCT ON
1Display touch screen
2Hole for the passage of the supply cable
34 Holes to fasten the cover to the wall
4System for fastening the frame display to the cover
2.2 Accessories for installation
n°1 Suppy cable
n°2 Temperature probes
n°8 Mounting screws
1
2
34
4
8. AUX L AR FUNCT ONS
8.1 Warnings
If one or both batteries are left unused with a
voltage lower than 12.3V (therefore discharged)
or under discharge for more for more than 15
consecutive days, the iManager will show the
following warning screen on the display:
If the device is set on the "power saving" mode,
this warning will be displayed upon reactivation
(by just tapping the display, or by reactivating a
charging source, etc.).
To quit the warning screen, you have to click on
the screen close icon on the lower right corner.
By touching anywhere else on the display, you
access the screen which explains briefly the
meaning of sulfation:
By touching anywhere on the display, you exit this
screen and go back to the main one.
8.2 Turning off the Display
You can switch the display off at any time by simply tapping the red icon with the
power-off symbol on the upper right corner of the screen.
hen the display is off, to reactivate it just touch it.
Remember to never leave the batteries discharged (or partially charged) for a
long time. For excellent and lasting performance, always keep them fully
charged.
26

can activate any battery charger (alternator, AC battery charged, solar panel or
generator) or just pushing for 5 seconds the ON-OFF Push Button placed on the top
of BlackBox.
f a charging source is active, the battery switch off function cannot be
executed, in fact is showed this icon
By clicking on the cancel-command red key ("X"), no function is performed
and you go back to the main screen.
Each Time is activated the Switch off Batteries function the system
isolate the leisure batteries from loads, so also the Display is
completely turned off, but all initial setting are stored and displayed
when the display is activated again.
Since the Dispay is completely switched off, the reactivation is
possible only from a charging source or by the ON-OFF Push Button
on the BlackBox!
7.2 Setting Key (press and hold)
By pressing and holding the Settings key, you access the initial settings menu,
meaning the several screens appearing on the first installation, which therefore can
always be referred to and changed
3. NSTALLAT ON NSTRUCT ONS
In order to install the device properly, Follow the instructions below.
3.1 BlackBox nstallation:
Prepare an area to house the BlackBox, as close as possible to the Leisure Batteries,
but never inside the engine bay or in compartments that are not protected against
weather agents.
Unscrew the two screws in the front, lift the cover and pull it out in order to access the
connection points conveniently.
Pay attention to do not damage the internal wires connected to the Push Button
on the BlackBox Top Cover!
MOUNT NG SCHEMAT C:
You can supply the iManager Display from the positive pole of the electric
plant (pin n°4) but in this way the display will turn off each time that the
leisure batteries switch off. So in other way, you can supply the Display
directly from one of the leisure batteries if you want, but you must prepare
the electric plant for this. 5
24

Follow these steps:
1. Make sure that the vehicle's engine and/or the battery chargers onboard are off
2. Prepare three cables (or two if you have only one leisure battery) with a
diameter equal to or higher than 10mm2, protecting each cable with a 120A
fuse, the cables’ length shall be suitable to make the following connections.
3. Connect a cable terminal for M6 screws on each cable.
4. Unscrew the three M6 nuts from the device’s front screws and make the
following connections with the cables prepared earlier:
Screw no. 3 => Positive pole of Leisure battery no. 1
Screw no.4 => Common positive pole of the vehicle’s system
Screw no. 5 => Positive pole of Leisure battery no. 2
Tighten the three cable terminals to the screws firmly using the nuts supplied.
5. Connect a cable with 1.5mm2 to 2.5mm2 of section, properly peeled, from
connector no. 2 to the engine battery’s positive pole. Then, fasten the screw
over the connector properly.
6. Connect a cable with 1.5mm2 to 2.5mm2 of section, properly peeled, from
connector no. 1 to the negative pole of one of the leisure batteries. Then,
fasten the screw over the connector properly.
DO NOT USE LOADS GREATER THEN 100A.
The negative cable (Earth) connection shall be performed only at the
end of the installation, as last step.
6
7. Setting Menu (Setting Key)
The icon below lets you access two different menus, based on the kind of touch:
Tap quickly
Press and hold
7.1 Setting Key (Tap Quickly)
By tapping the Settings icon on the main screen,
you access the additional settings:
Display in Low Power
Switch off Batteries
Display in Low Power:
The power saving mode lets you reduce the display’s brightness automatically after 3
minutes from the last touch on the touchscreen and, after 10 minutes with no touch,
the display turns off completely.
To activate this function, you have to tick the box of the relevant item and click on the
confirmation symbol.
By clicking on the cancel-command red key ("X"), no function is performed
and you go back to the main screen.
Switch off Batteries:
Through this command you manually isolate the batteries from the loads. This
command shall only be performed after clicking on the confirmation key.
Once the batteries have been disconnected from the loads, to reconnect them you
24

- hen the temperature measured on one or both batteries exceeds the limit
threshold of 60°C.
In case only one battery falls under one of these three cases and the automatic mode
is on, the iManager will select the battery which is most suitable for use.
Also During the Automatic Battery Switch off the Display will be deactivated!
f the temperature exceeds the critical threshold of 60°C, it cannot be reused until
it drops to under 55°C; such condition will be notified by an icon inside the battery.
When the Leisures Batteries are solated, is possible reactive the connection,
activating a Battery Charger, or Turning ON the Engine or pushing for 5
seconds the ON-OFF Push Button placed on the TOP cover of the BlackBox.
6.4 Charging the Engine Battery
This function is crucial for storage periods. In fact, even after long stops it prevents
from having the engine battery depleted, which would allow the engine to start.
The iManager allows to charge the engine battery automatically only when strictly
necessary, when the following conditions occur:
Engine battery under 12.5V
The leisure battery/batteries has/have to be completely discharged
A charging source must be available: AC battery charger, solar panel or
generator.
The maximum current delivered to the engine battery is 4A.
The charging stops when also the engine battery is completely charged and, anyway,
as soon as the charging source is disconnected or the vehicle is started.
You can activate the Engine Battery Charge manually, pusching for 3 seconds
the icon when is active a charger different form the alternator and the
Engine Battery is below 12,7V.
232
As soon as the earth cable has been connected to the BlackBox, the system
immediately becomes active.
7. Delicately connect the temperature probes’ connectors to their housings on the
back of the device
DO NOT FORCE: connectors’
direction must be mandatorily
complied with
Place the temperature probes in central
position on a major side of the batteries (long
side). Use a drop of hotmelt glue or silicone,
being careful to attach the sensor to the
surface firmly.
8. Fix the base on the BlackBox to a wall or to the floor of the housing chosen for
the installation; use the 4 self-tapping screws in the holes provided on the
bottom of the base,
PLEASE DO NOT Place the BlackBox between the two leisure batteries,
otherwise can be affected the wireless communication quality.
9. Close the BlackBox cover by introducing the two tabs on the back inside the
proper housings on the base; fasten the 2 screws provided on the holes of the
cover’s front corners
During this operations, please pay attention to the two wires
connected internally at the Push Button on the Top cover of the
BlackBox!
7

3.1 iManager nstallation:
1. Disassemble the iManager’s display frame
2. Place the back cover on the wall chosen for installation. Mark the reference of
the points where the holes for fastening screws (3mm of diameter) and the hole
for the passage of the communication cable (minimum diameter of 7.2mm)
have to be performed.
3. Perform the holes and tighten the cover behind the
wall using the screws provided and being careful
that they do not protrude the countersink once they
have been fastened.
a) make the display frame slide
upwards with respect to the cover
behind
b) lift the lower part
of the display frame
c) make the display frame slide
downwards with respect to the
cover and unhook it
8
Activation of the selected battery and deactivation of the one used previously, if
they have different states of charge (SoC).
Activation of both batteries (parallel mode) if their SoC are the same or differ by
just a bar.
If you do not want no parallel connection, press the desired battery again to select it
individually.
he parallel batteries setup is allowed only if their state of charge is the same
or differ by just a bar (20%).
In this mode, the battery/batteries to be used is/are always selected by the user, but
the iManager keeps monitoring the operating temperature and the minimum voltage
during the discharging phase (10.5V), thus always ensuring the highest condition of
safety and, if necessary, restricting the user’s choices.
You can go back to the automatic management at any time, by touching the little man
icon.
6.3 Automatic Battery solating Function
The iManager, as already described, monitors the voltage and the temperature of
both batteries to make sure that the conditions of use are always appropriate to avoid
efficiency loss or irreversible damage.
The automatic battery isolating function disconnects all the loads in three different
cases:
- hen the voltage of one or both batteries drops to under the critical limit of 10.5V.
- hen the voltage of one or both batteries remains under 11V for more than 15
minutes.
222

If the current taken is lower than 25A, the device selects the most charged battery
which will be used until its voltage decreases by 0.3V compared with that of the
battery which had remained deactivated until then.
Should the voltage of one of the batteries be lower than 11.2V, the system imposes its
parallel connection, thus avoiding an excessive stress up to the minimum threshold of
10.5V, where all the connected loads are disconnected (automatic battery isolating
function).
hen the discharging current is higher than 25A and the batteries have the
same state of charge, the system activates the parallel connection until the
current taken decreases to under 20A.
6.2 Manual Mode
To access the Manual mode, just press
and hold (press and hold for about 1.5
seconds) the icon of the battery you want
to select; the system will show a screen
confirming the switching to the manual
mode
n the Manual mode, the Computer icon ( ) is replaced by the little man
icon ( ) and the outline of the battery selected turns red.
In order to change the battery to use, always press and hold (press and hold for
about 1.5 seconds) the icon of the desired battery, and the following options will be
available:
21
4. Pass the supply cable through the hole especially made and insert it delicately
inside the connector of the display board.
DO NOT FORCE, the connector’s direction
must be mandatorily complied with.
5. Fasten the display to cover on the back:
6. Supply the Display with 12V using the two wires Red and Black wired to the
connector.
a) insert the plugs on the
top of the display frame
in the housings of the
cover behind while
keeping the lower part of
the display frame with
respect to the cover;
b) pull down the lower
part of the display
frame by attaching it
to the cover
a) make the display
frame slide downwards
with respect to the
cover.
9

4. GETT NG STARTED
4.1 US NG THE TOUCH SCREEN:
The iManager touch screen allows you to interact with the device by selecting the
several functions easily.
For the proper use of the touch screen, follow the instructions below:
Do not exercise too much pressure with your fingers on the display surface
and do not use sharp objects. By doing so, you may damage the device or
cause it to malfunction.
Do not allow the display to come into contact with other electrical devices.
Electrostatic discharges can cause it to malfunction..
Do not allow the display surface to come into contact with water. The touch
screen may malfunction in humid conditions or when exposed to water or
other liquids.
For best performance, tap the touch screen with your fingertip.
You can use plastic pens for a more accurate touch on the display, provided
that they do not have sharp tips which can damage the surface.
10
alternatively in order to keep them with a similar state of charge.
Automatic operation during Charging Phase:
Multiple factors affect iManager’s choices when managing this phase:
- Batteries’ voltage
- Charging current
- State of charge of the two batteries
- Temperature
If batteries have the same state of charge and the current supplied by the battery
charger (or the alternator or the solar panel) allows it, the iManager will connect
batteries in parallel until they reach an 80% state of charge. At this point, the charging
will be completed separately for each battery.
If batteries have different states of charge (therefore no parallel connection is
possible), the iManager will charge the most depleted battery first until it reaches a
state of charge such that to allow to proceed as the step above.
The engine battery will be recharged only if its voltage is lower than 12.5V and the
leisure batteries are completely depleted (see the section of reference).
Automatic operation during Discharging Phase:
This phase is affected by the same parameters previously seen for the charging
phase.
- Batteries’ voltage
- Discharging current
- State of charge of the two batteries
- Temperature
In the discharging phase, the most charged battery is always selected.

Right after the installation, the state of charge displayed may not be correct,
but thanks to the device’s self-learning algorithm, after the first use of the
batteries the accurate indication will be available, both for charging and
discharging.
5.4 Displaying Data
By quickly clicking on the area of one of the leisure
batteries’ icon, you can display the voltage (V) and
current (A) information regarding the relevant battery.
hereas, by clicking on the engine battery (if
connected) it is possible to display the voltage only.
The window may be closed by just clicking on their
area.
f the Display show a NOT Zero current
when all loads and chargers are switched off, DO a Currente Reset
Operation!
6. MANAG NG BATTER ES
6.1 Automatic Mode
This is the iManager’s default operation mode after installation.
By automatically managing leisure batteries, the system can optimize the
performance and preserve their efficiency over time thanks to the many safety
functions.
This function is based on an algorithm designed to allow the batteries to be selected
1920
4.2 N T AL SETT NGS
Switching on the device
hen the communication cable is connected, the display turns on and the initial
screen appears, with the "iManager" writing which will keep displaying until the device
has not received the first data from the BlackBox.
nitial Settings
Once the data have been received, the display will show the connected batteries’
data setup screen.
To ensure the system for proper functioning,
set the values requested in all the screens.
Language setup:
The selection shall be made with a single touch on
the relevant small box or the item indicating the
language.
By clicking on the rightward arrow, you can move
on to the settings, whereas by clicking on the
leftward arrow, you can go back and change the
input data.
From this screen you can set the following:
Manufacturing technology of batteries (agm,
gel, lead-acid);
11

Capacity (Ah) for each battery (except for the starter battery!);
The default capacity is 100Ah, but it can be changed by tapping the "+" (plus) or
"-" (minus) icon on the display.
You can select the technology of the relevant battery by tapping.
By clicking on the arrow, you move to battery no. 2’s settings (if any!) to be carried out
with the same methods or you access to the language setup.
f only one battery is connected to the system, battery no. 2's settings
screen shall be skipped. Should the second battery be installed later, it will
be possible to change the original settings
Setting the date and time:
Input the current date and time by clicking the "+"
(plus) or "–" (minus) icon under the relevant box.
By clicking on the arrow on the left, you can go
back and change the input data.
By confirming, all the data inserted earlier are
saved and you get to the iManager main screen.
13
5.3 Displaying the state of charge (SoC)
Each leisure battery icon shown on the display has a 5-bar sequence representing
the state of charge in percentage of the relevant battery.
cons with state of charge:
The state of charge of the battery in use is represented by coloured bars,
whereas the bars of the deactivated battery are grey. The meaning of the bars
remains unchanged.
In order to have a reliable SoC indication, the parameters requested in the
initial settings must be set properly.
SoC
0%
SoC
20%
SoC
40%
SoC
60%
SoC
80%
SoC
100%
18

CON MEAN NG AND FUNCT ONS
Represents the parallel connection of batteries
Represents battery charging
indow showing data on battery voltage and charge and discharge
current. By clicking inside its area, you close the view.
The window closes automatically if no operations are performed for 2
minutes.
indow displaying the engine battery voltage.
By clicking inside its area, you close the view.
The indow closes automatically if no operations are performed for
2 minutes.
Indicates the strength of the radio signal received , then indicates the
quality of radio communication .
17
5. OPERAT ON
5.1 Main Screen
The iManager main screen shows the information on the batteries’ state of charge
(SoC), the date and time.
Main Screen with 1 Battery Main Screen with 2 Batteries
14

5.2 cons' meanings and functions
CON MEAN NG AND FUNCT ONS
NDS ENERGY S.r.l. company logo, if pressed and held displays the
company’s complete data.
Represents the Automatic operation mode
Represents the Manual operation mode and, if clicked, allows to go
back to the Automatic Mode.
Engine battery not present.
Disconnected engine battery, if clicked on displays the battery
voltage.
Charging engine battery, if clicked on displays the battery voltage.
Power off icon, if clicked on turns off the display.
15
CON MEAN NG AND FUNCT ONS
Settings Key, if quickly clicked on allows to access commands, if
pressed and held allows to access the initial settings menu.
Leisure battery deactivated with state of charge indication, if clicked
on quickly within its area, the window displaying its voltage and
current activates; if pressed and held, the Manual mode activates or
the battery is selected in case the Manual mode is already on.
Leisure battery connected to the loads in Automatic mode with state
of charge indication, if clicked on quickly within its area, the window
displaying its voltage and current activates; if pressed and held, the
Manual mode activates.
Leisure battery connected to the loads in Manual mode with state of
charge indication, if clicked on quickly within its area, the window
displaying its voltage and current activates; if pressed and held, the
Manual mode activates.
Overheating Battery warning
Icon confirming that the display has been pressed
16
Table of contents
Other NDS Camera Accessories manuals
Popular Camera Accessories manuals by other brands

Stiga
Stiga BT 20 Li 2.0 S Operator's manual

Moog Videolarm
Moog Videolarm FDP75C2N Installation and operation instruction

Acebil
Acebil PE-80GX Operation manual

Hama
Hama SpotLight Smart 80 operating instructions

Dynex
Dynex DX-TRPFLX Guide d'installation rapide

General Sensing Systems
General Sensing Systems 2ABFESPRM20 manual