manuals.online logo
Brands
  1. Home
  2. •
  3. Brands
  4. •
  5. Neater
  6. •
  7. Kitchen Utensil
  8. •
  9. Neater Eater User manual

Neater Eater User manual

Providing equipment for greater
independence, dignity and choice
Neater Eater
Instruction
Manual
Further Health and Safety
The Neater Eater should only be used to assist the eating of consumable foods or for
holding safe light objects. Ensure that food is not scalding hot.
Do not attempt to eat large amounts of food in one mouthful as this can lead to choking.
A carer should always be present if there is any risk of choking or any other danger.
Clean all parts before every meal and check there are no cracks or chips. Most plastic
cutlery will crack eventually, ceramic plates can chip creating sharp edges and should be
replaced.
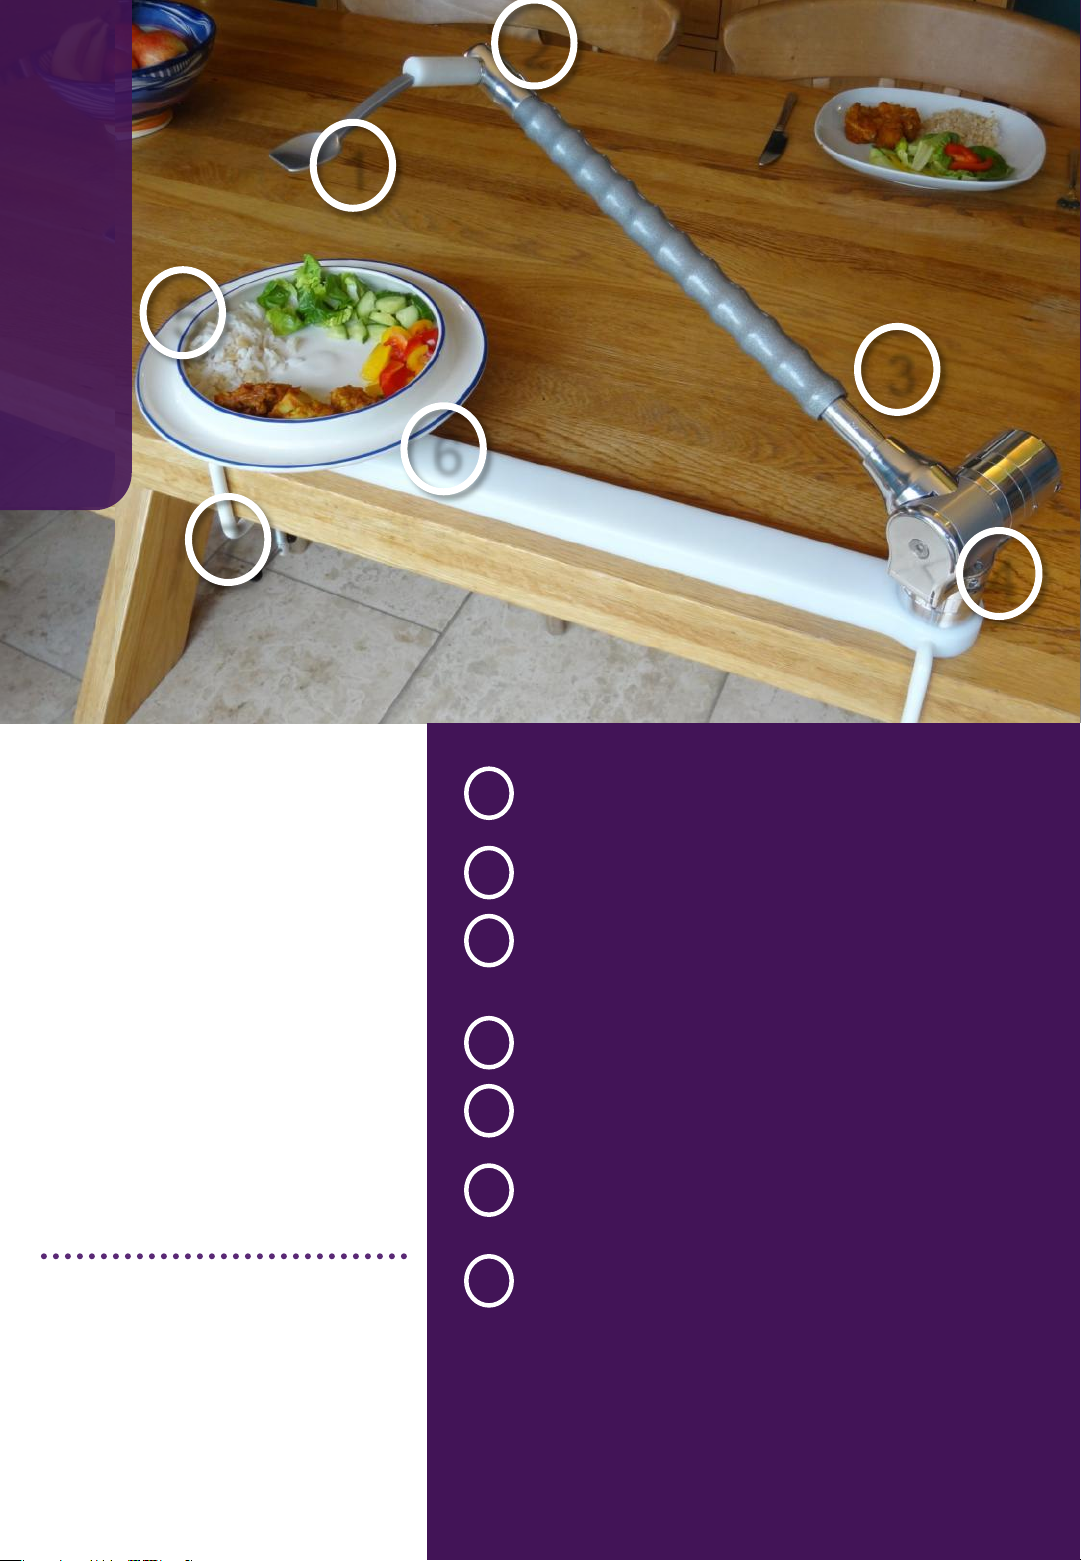
Before each meal, check that the peg on the base of the plate is firmly attached.
Only use attachments supplied by authorized Neater Eater distributors.
Take care not to stick the cutlery in your eye or into the back of your throat.
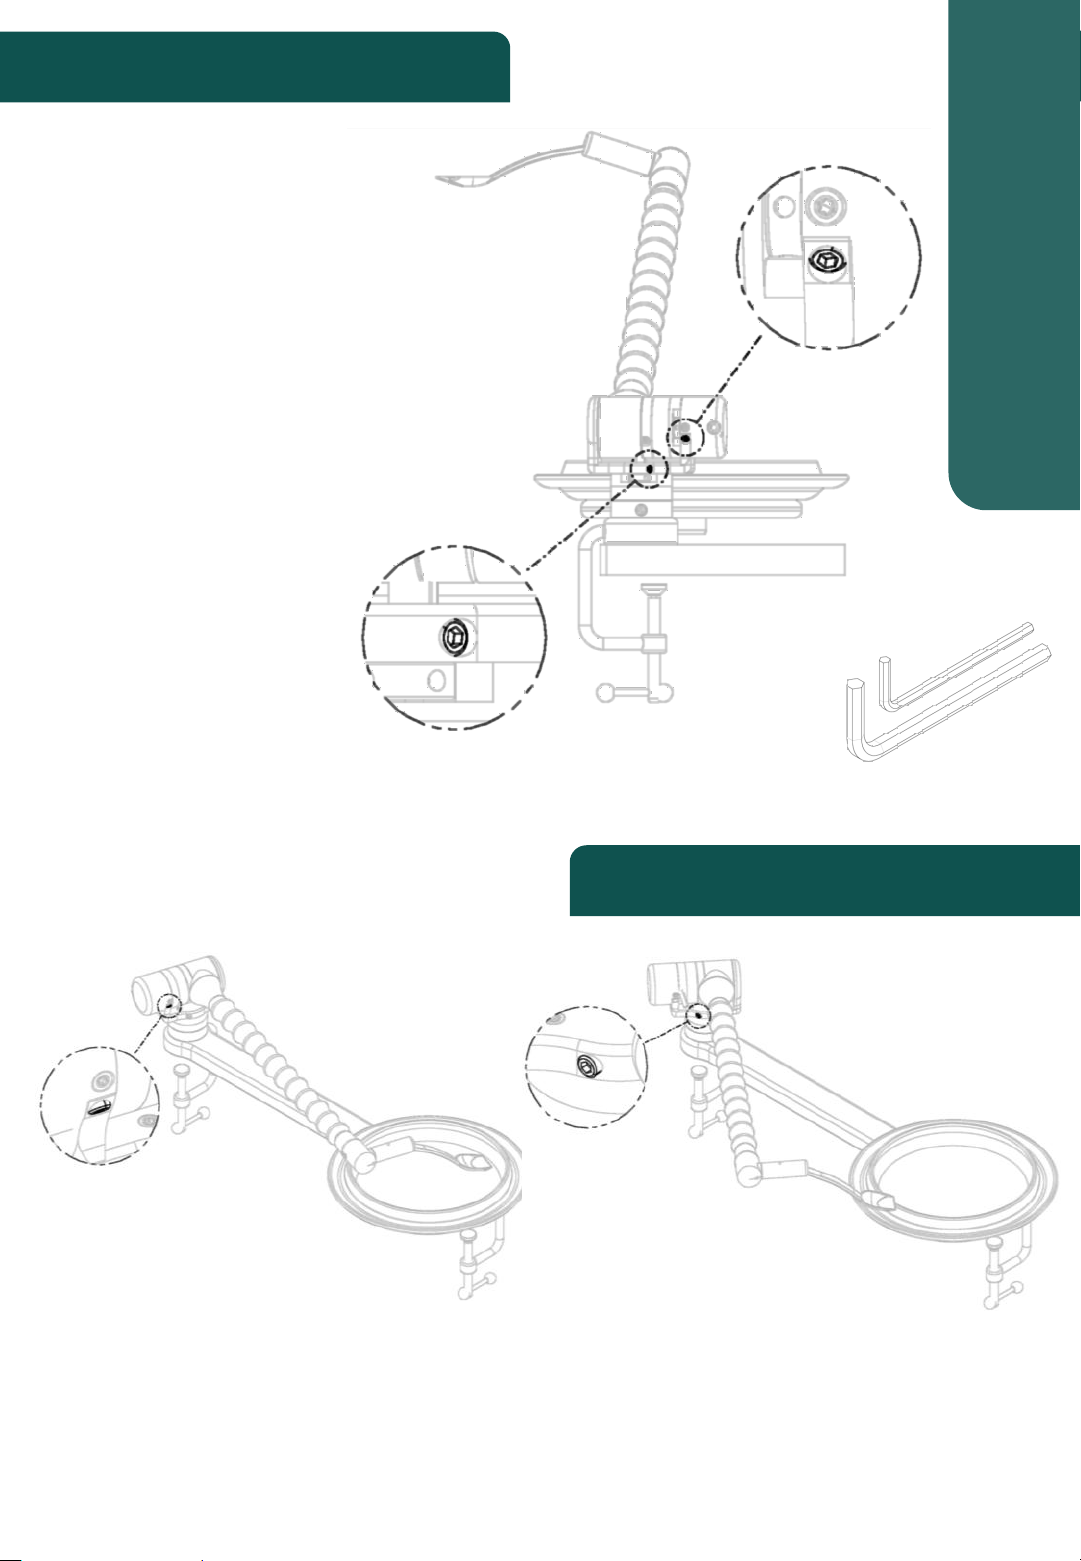
Ensure all stops are properly adjusted as appropriate before use.
Be careful not to hit the clamps when moving into position to use the Neater Eater.
Wipe the Neater Eater clean after each meal to stop any build up of food which can collect
germs and could also get into and damage the mechanism of the Neater Eater. Ensure
crockery and cutlery are properly cleaned.
Crockery and cutlery provided with the Neater Eater are food safe. Other components may
not be safe to suck or chew.
Side effects of using the Neater Eater may include over-eating, fatigue or muscle build-up
through the exercise involved. Advice should be sought as appropriate e.g.: from a dietician
and a physiotherapist.
Neater Eaters are designed to comply with the essential requirements of the
Medical Devices Directive Class 1 (EC Council Directive 93-52-EEC of 14 June 1993).
2
Health and Safety
Read all instructions carefully before use and particularly before
making any adjustments. Incorrect use and adjustment could damage
the Neater Eater and/or make its use dangerous in some way.
The Neater Eater should not be used by people with swallowing
difficulties or who are liable to choke, except under the supervision
of a Speech and Language Therapist.
Ensure the Neater Eater is firmly attached to a sturdy table to avoid
it overbalancing.
People with uncontrolled movements, particularly uncontrolled body
or head movements, should not use hard or sharp cutlery such as
metal spoons or forks.
Adaptations
Quick Set Up
User Safety
Contents
Overview
2 4 6
Hints and tips
8 Further Adjustments 10
Our products are developed and manufactured in the UK
Compliant with EU medical devices directives and supplied worldwide.
14 Maintenance 15Fitting Adaptations 13
3
Plate Flick Guard 12
Video instructions are available online: www.neater.co.uk
Neater Eater
7 4
2
3
1
1
2
3
4
Scooping action –clip-on spoon tilts up and
down with the arm
Spoon automatically remains level at all times
Tremor or ataxia absorbed by viscous fluid
damping*, this is adjustable
Lifting assisted by internal springs. Height
and speed easily adjusted
Scooping of food assisted by shaped plate lip
Plate secured in the baseboard. It is turned to
reach the food
The Neater Eater is secured to the table with
clamps
Overview
A modular system, the
Neater Eater® is designed
to enable people to use
their own movements to
feed themselves.
5
4
5
* Viscous Damping, a thick
liquid allows slow smooth
movement but absorbs fast
movement and tremor
6
5
7
6
4
“The Neater Eater is an invaluable piece of equipment in maintaining
someone’s independence and self- esteem.”
For our latest product information please contact us:
+44 1298 238823 inf[email protected]o.uk www.neater.co.uk
“It gives me the
independence to eat with
confidence and dignity.
I love the sleek design ;
it’s really cool.”
For info on other products please visit:
Wheelchair accessible
Neater Table
Touch controlled Neater
Eater Robotic
A range of Neater Drinkers
5
Neater Eaters are available RIGHT
or LEFT handed
PLATE FLICK GUARD stops spoon
from spilling food at edge of plate
PLATE HOLDER fitted in different
positions for accessibility
CLAMPS standard, compact, large
Adaptations
4
2
3
1
Modular system –adaptations
The Neater Eater is a modular system.
Different attachments and settings are
suitable for people with different abilities.
Latest information:
www.neater.co.uk
1
3
2
4
Cutlery
A range of sizes and materials to suit
individual needs:
•Stainless steel: spoons, fork and Spork
•We recommend the Neater Spoon;
it is ideally shaped for scooping and
quite soft and kind to your mouth
6
7 6
8
9
Crockery
Choices include:
•Large and small ceramic plates
•Plastic plates
•Heated ceramic plate
•Soup bowl
•Plate stands
RAISING SPACERS raise the arm
and/or the plate for accessibility.
Quick Release ADJUSTABLE
HANDLE enables easy use
PLATE TURNER allows plate
turning without lifting your hand
from your lap
EXTENDED BASEBOARD ARMS
for accessibility
FORWARD SPRING brings the
spoon to your mouth
automatically
5
5
6
7
8
9
7
Adaptations
Quick Set up
Step 1:
Fold out the Clamps
and attach to your
table
Step 2: Attach crockery and cutlery
Push the Spoon on ; it clicks into place.
The peg on the bottom of the Plate
goes into the hole in the baseboard
Sit quite close to the Neater Eater and adjust so that the spoon
comes to meet your mouth. Correct alignment is important.
Step 3: Position yourself
8
To adjust the stops, simply
screw the stops in or out
turning the small Allen key.
The Up Stop and Forward Stop
should be adjusted so that the spoon
reaches your mouth.
Forward Stop
Up Stop
Down Stop
Back Stop
Step 4:
Quick set up
Please read Hints and Tips
section page 14
Enjoy your meal
Step 4: Adjusting the stops
Further Stops
Small Allen key = 3mm
Large Allen key = 5mm
The Down Stop is usually pre set
so that the spoon goes into the
plate far enough for scooping
without bending up.
The Back Stop is usually pre set
to allow wiping the spoon against
the back of the plate but not
getting caught behind the plate.
9
•Increase Damping Levels
to absorb tremor.
•Decrease to ease movement.
•Use the small Allen key as a
lever to turn both damper
adjusting wheels.
•The arm needs to be moved
backwards and forwards and
up and down a few times
before the damping level
settles.
Damper
Adjusting
Wheel
Damper
Adjusting
Wheel
Lift Spring
Adjusting
Screw
- +
-
+
- +
+
Further Adjustments
10
•Adjust the Lift Spring to lift the arm
faster or slower.
•Turn the adjusting screw several
turns with the large Allen key.
If a Forward Spring is fitted it is usually
adjusted so that the spoon finishes coming
forwards after it has finished lifting up.
To adjust:
•Bring the arm forwards
•Carefully loosen the screw in the top part
of the forward spring attachment, taking
care not to allow the top part to rotate
quickly and throw the Allen key!
•Rotate this top part to change the
tension in the spring
•Retighten the screw.
Adjustable Handle allows easy reach for using the Neater Eater
To Remove: Unscrew ball knob just one or two turns and slide off handle.
Further Adjustments
11
Adjustable damping
Plate Orientation
The plate-holder part of the baseboard can be brought forward to improve accessibility.
Remove the 2 screws holding it in place, rotate it and refit the screws through the other
2 holes in the long part of the baseboard.
Adjust Handle Position
•Loosen both screws in the top
of any bracket slightly
•Slide and rotate the bracket and
handle into the desired position
•Retighten screws.
Ball Knob
Adjustable
Handle
The Lift Spring and Forward Spring (i
Plate Flick Guard
12
Plate flick guard stops spoon from spilling food at edge of plate.
•The plate flick guard can be set for
use with two plates
•When using the smaller plate,
simply slide the slider into position
to engage with the shaped catch.
•Shaped catch engages with guard
bar as spoon is brought forward
towards the edge of plate
•Here the spoon cannot be lifted and
flick food
•The spoon is made to move back as
it is lifted missing the plate edge
Guard Bar
Shaped Catch
Slider
Different plates may require
adjustment of:
•The angle of the shaped catch
(loosen bracket screws, adjust
angle, retighten screws)
•The length of the shaped catch
(loosen locking screw inside the
shaped catch, rotate shaped
catch to length or shorten,
retighten locking screw)
Bracket Screws
•Once clear of the plate, the spoon
can be brought to your mouth
Shaped Catch
Guard Bar
Locking Screw
Shaped Catch
Guard Bar
Slider
1
Plate Turner
(with one or
two spacers)
turn plate
without
lifting hand
Fitting adaptations
Baseboard modular components
•Screws are removed and replaced with longer screws to
fit different adaptations.
•Some holes are positioned to angle the extensions so
that spoon lines up with the edge of the plate
Fitting Adaptations
Raising Spacers
(one or two) inserted
between components
Baseboard
Extension
(fit either end)
for accessibility
Long Baseboard
keeps clamp away from knee
Clamp Replacement
•Different size clamps can be fitted:
Large, Standard and Compact.
•Clamps are held in by screws and
plastic washers underneath.
13
Correct positioning is vital
•Sit close to the plate.
•Ensure your mouth is aligned with the
spoon. (See quick set-up instructions)
•Some people like the spoon to stop a
little in front of their mouths.
•Others (particularly people with head
tremor) may need the spoon to come
up to mouthlevel and then move
forward all the way into their mouth.
First use and avoiding mess
•Start with less food in the plate.
•Start with food of even consistency
•Place food around the outside edge
of the plate.
•Chop food into chewable sized pieces
•Remember, we can all be a little
messy when eating!
Eating Hints and Tips
Scooping food
•Push the arm back and down so the
spoon sits in the middle of the plate.
•Keep the spoon down and bring it
forward scooping food against the edge
of the plate.
Avoid flicking
•Push back away from edge of plate as
you lift the spoon to avoid flicking.
•A Plate Flick Guard attachment is
available
14
•The Neater Eater is designed for a long maintenance-free life as long as it is
kept clean.
•Wipe with a damp cloth and a little detergent to remove food deposits.
•Do not immerse the Neater Eater in water.
•The plate and spoon can be washed in a dishwasher; on the top rack or away
from the heating element.
•Washing by hand will prolong the use of the plastic plates and spoons.
Drips
•Drips can be wiped off the bottom of the spoon against the back edge
of the plate.
•Hold the spoon over the plate for a few seconds to allow excess food
to fall off before bringing it to your mouth.
Turn the plate
•Turn the plate to select new food.
•It is held securely.
•Experiment with different ways of turning it.
Scrape the plate at the end of the meal
•When there is very little food left, bring the spoon forwards to the
front of the plate and turn the plate all the way round creating a pile of
food you can then scoop.
Maintenance and Cleaning
If you have a problem:
•Please do not try dismantling your Neater Eater!
•Get in touch with us:
[email protected] +44 1298 238823 www.neater.co.uk
15
Eating Hints and Tips
Neater Solutions Ltd
12 Burlington Road,
Buxton,
Derbyshire,
SK17 9AL
Tel: + 44 (0) 1298 238823
Email: inf[email protected]
www.neater.co.uk
Specifications subject to change without notice, patents applied for.
Active healthcare solutions Ltd.
unit 163 - 5489 Byrne Road
Burnaby, BC V5J 3J1
Canada
T: 1(888)712-2848
E: [email protected]

Popular Kitchen Utensil manuals by other brands

Shopify WowBacon Easy guide

Shopify

Shopify WowBacon Easy guide

IKEA FAVORIT quick start guide

IKEA

IKEA FAVORIT quick start guide

Thermos TS4319DB4 Care and use guide

Thermos

Thermos TS4319DB4 Care and use guide

Beaba BABYCOOK instructions

Beaba

Beaba BABYCOOK instructions

AEG A3SS quick start guide

AEG

AEG A3SS quick start guide

Jenn-Air A0320 use and care manual

Jenn-Air

Jenn-Air A0320 use and care manual

Rival BF150 owner's guide

Rival

Rival BF150 owner's guide

CORAVIN 1000 Getting started

CORAVIN

CORAVIN 1000 Getting started

Silit Silargan 2102295624 Instructions for use

Silit

Silit Silargan 2102295624 Instructions for use

Bravetti BCWT8 owner's manual

Bravetti

Bravetti BCWT8 owner's manual

Climadiff EVACO2 manual

Climadiff

Climadiff EVACO2 manual

DS Produkte 04154 instructions

DS Produkte

DS Produkte 04154 instructions

Tiger MMJ-A1 instructions

Tiger

Tiger MMJ-A1 instructions

Berghoff NEO manual

Berghoff

Berghoff NEO manual

WEKIGAI LoafNest user manual

WEKIGAI

WEKIGAI LoafNest user manual

Tupperware U 43 Easyplus Loops manual

Tupperware

Tupperware U 43 Easyplus Loops manual

DS Produkte 00140 instructions

DS Produkte

DS Produkte 00140 instructions

SIGE 295M quick start guide

SIGE

SIGE 295M quick start guide

manuals.online logo
manuals.online logoBrands
  • About & Mission
  • Contact us
  • Privacy Policy
  • Terms and Conditions

Copyright 2025 Manuals.Online. All Rights Reserved.