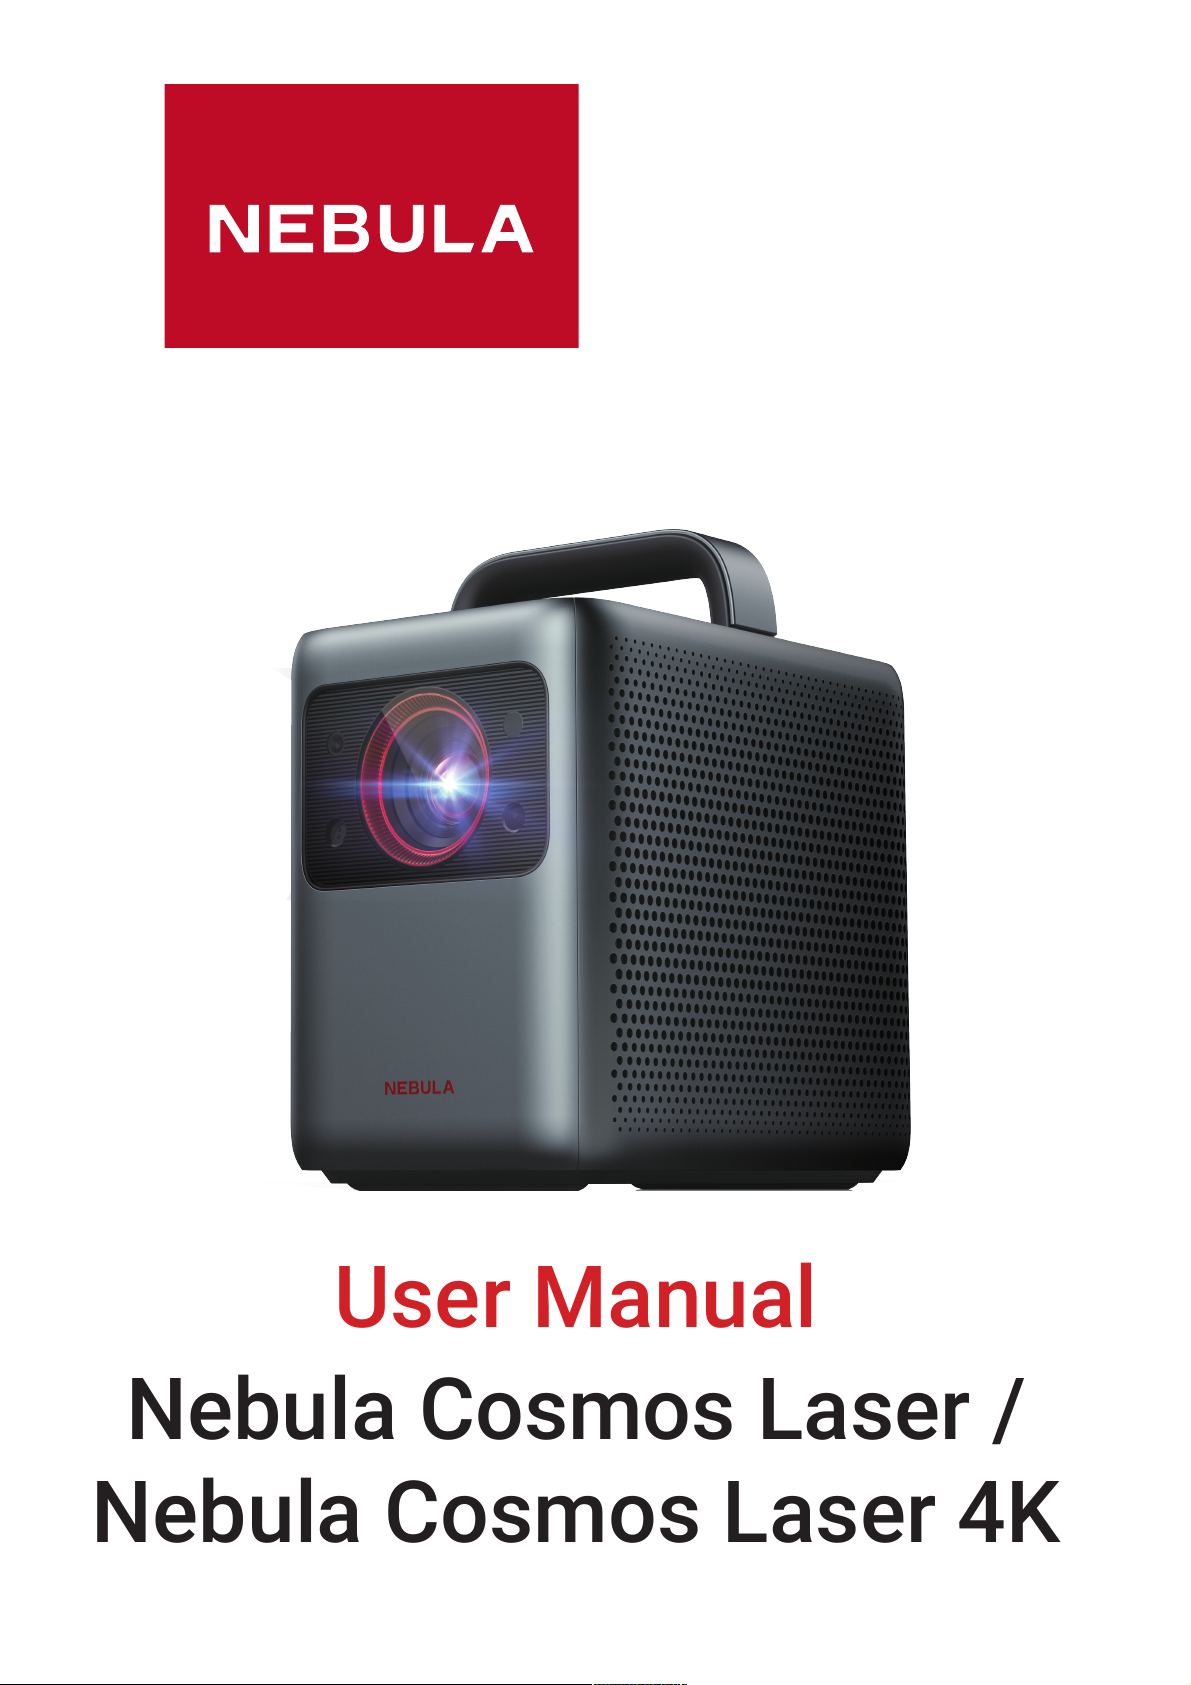
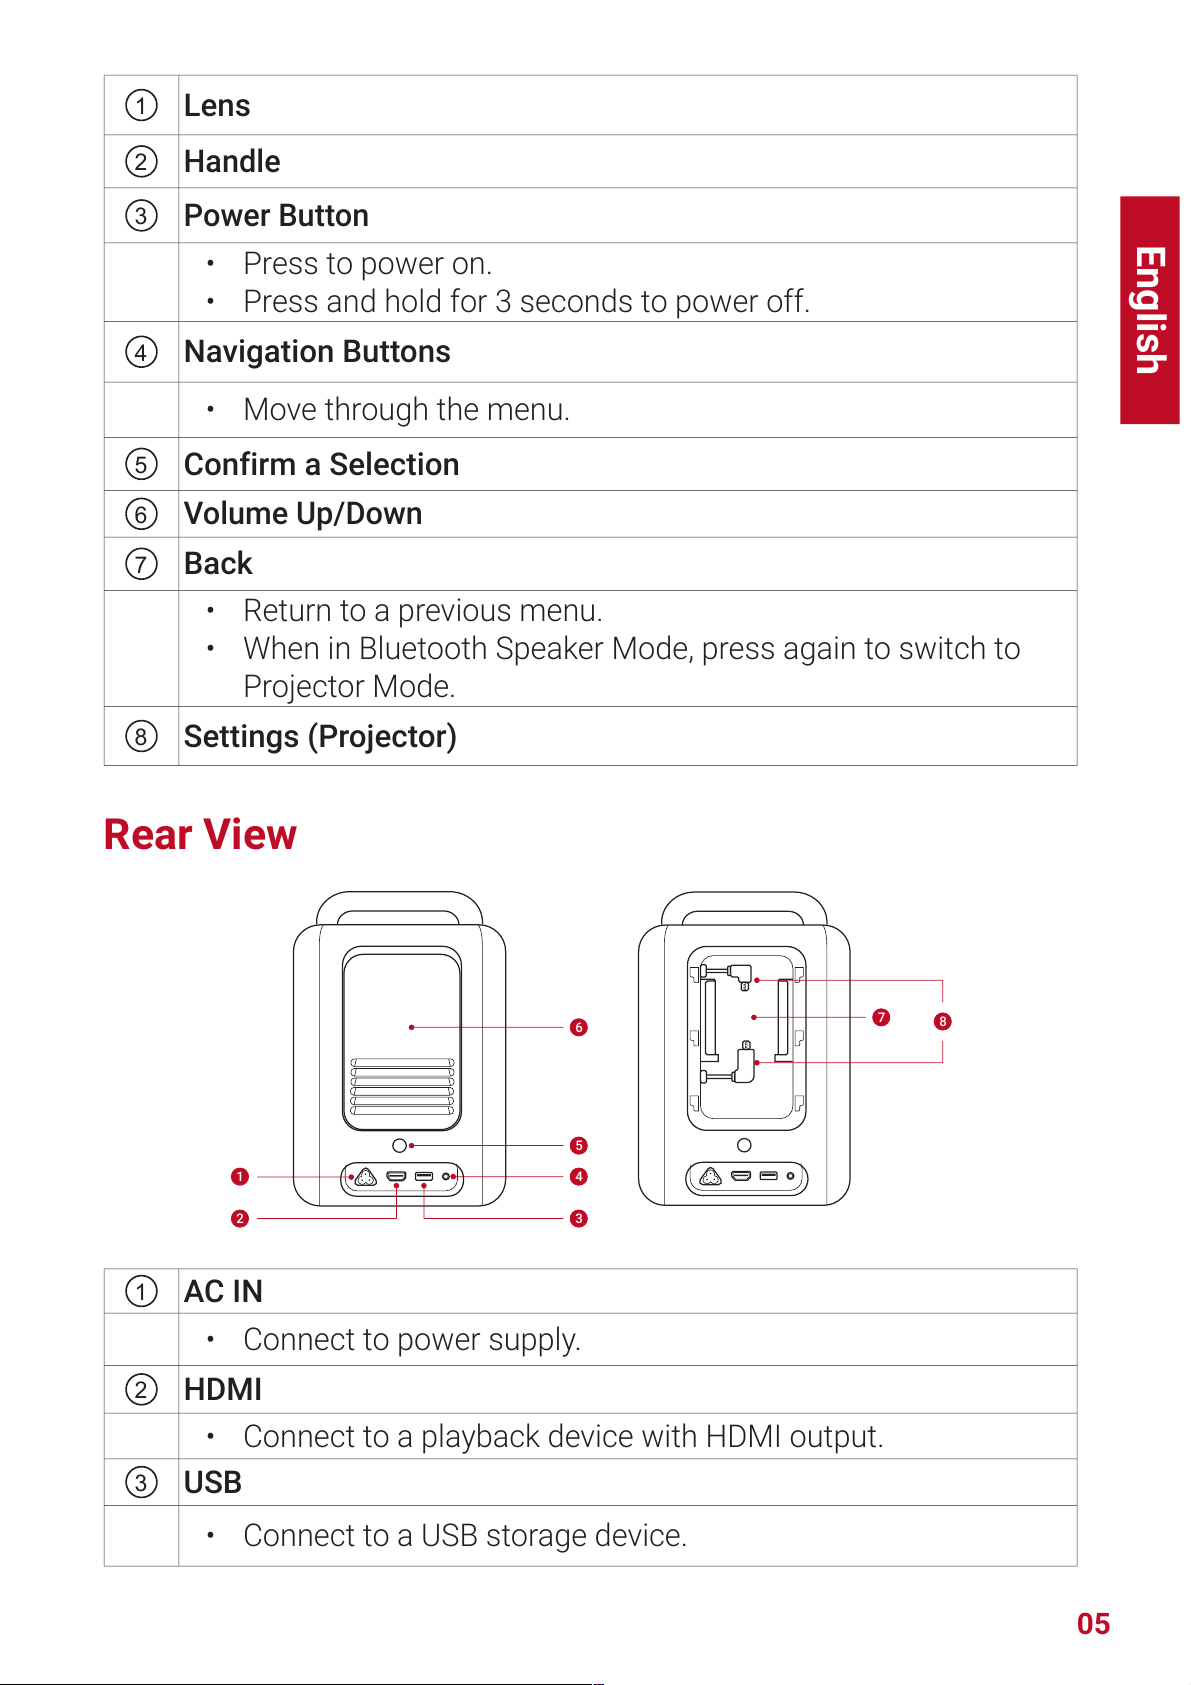
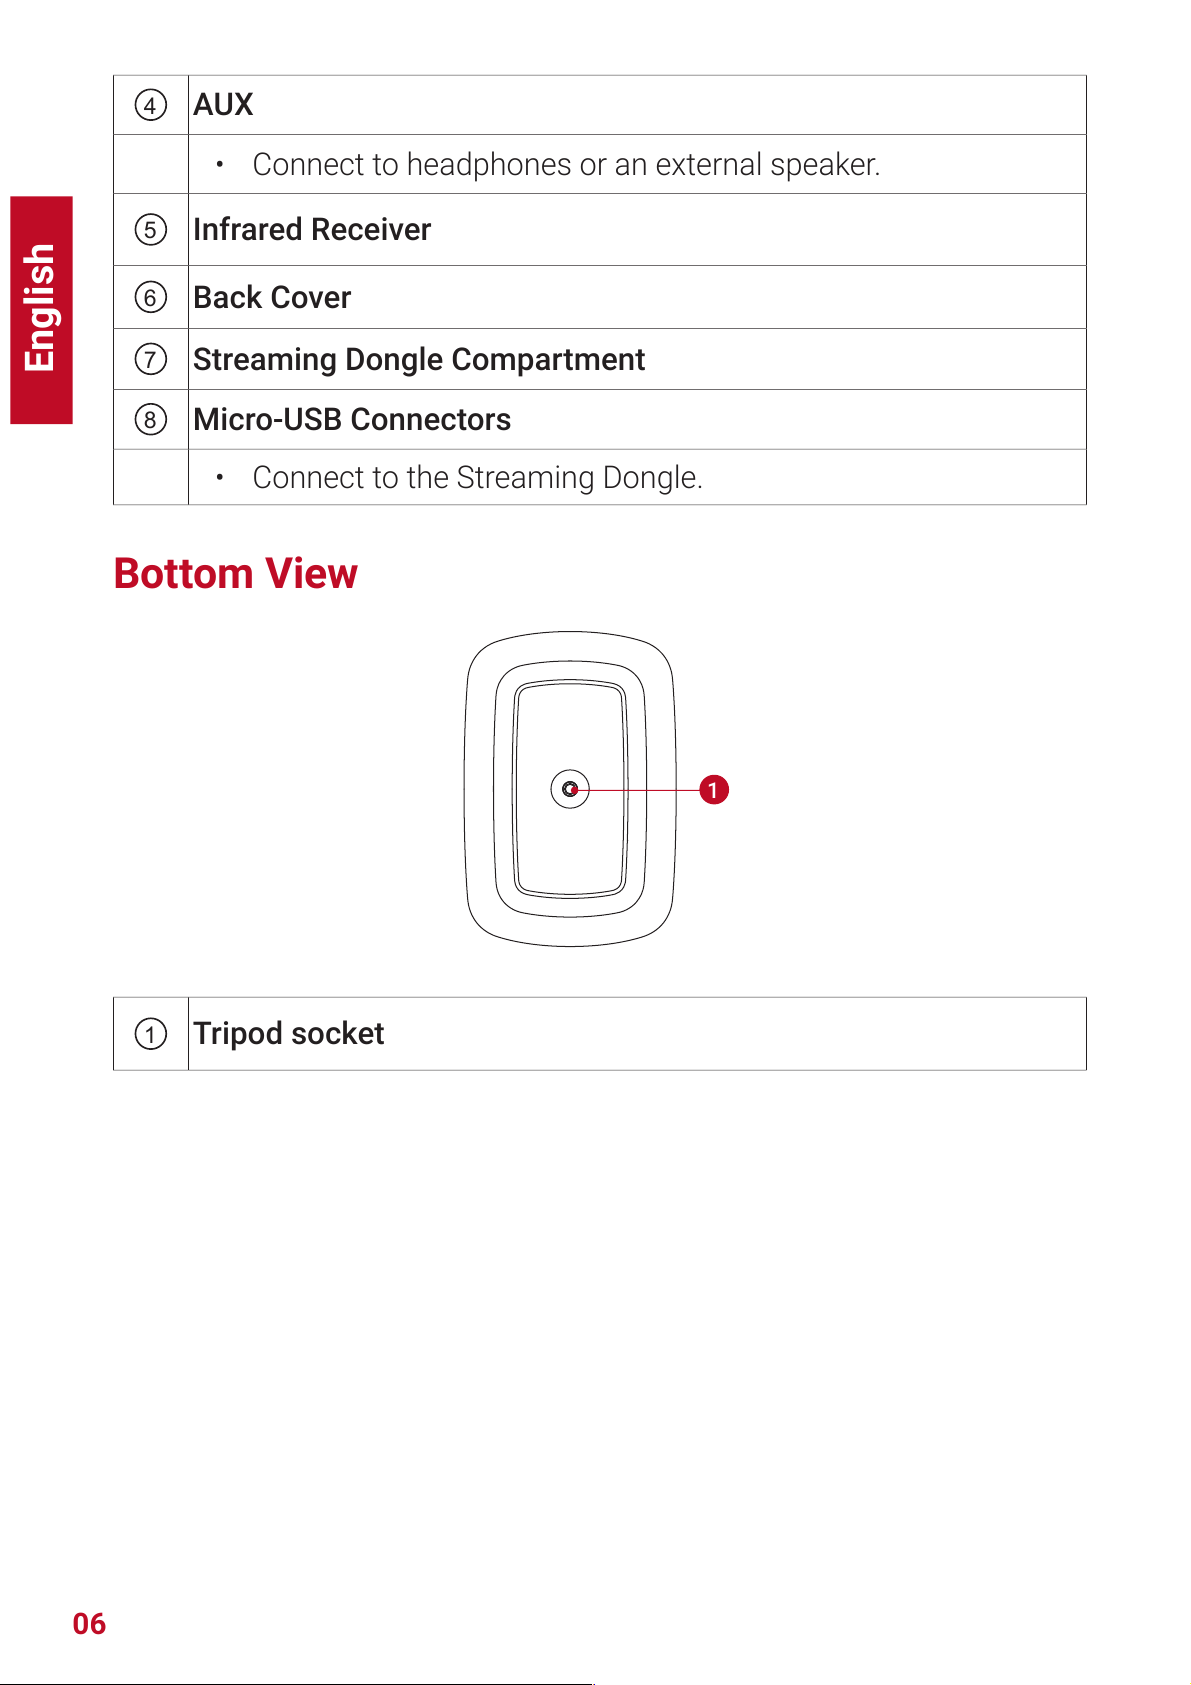
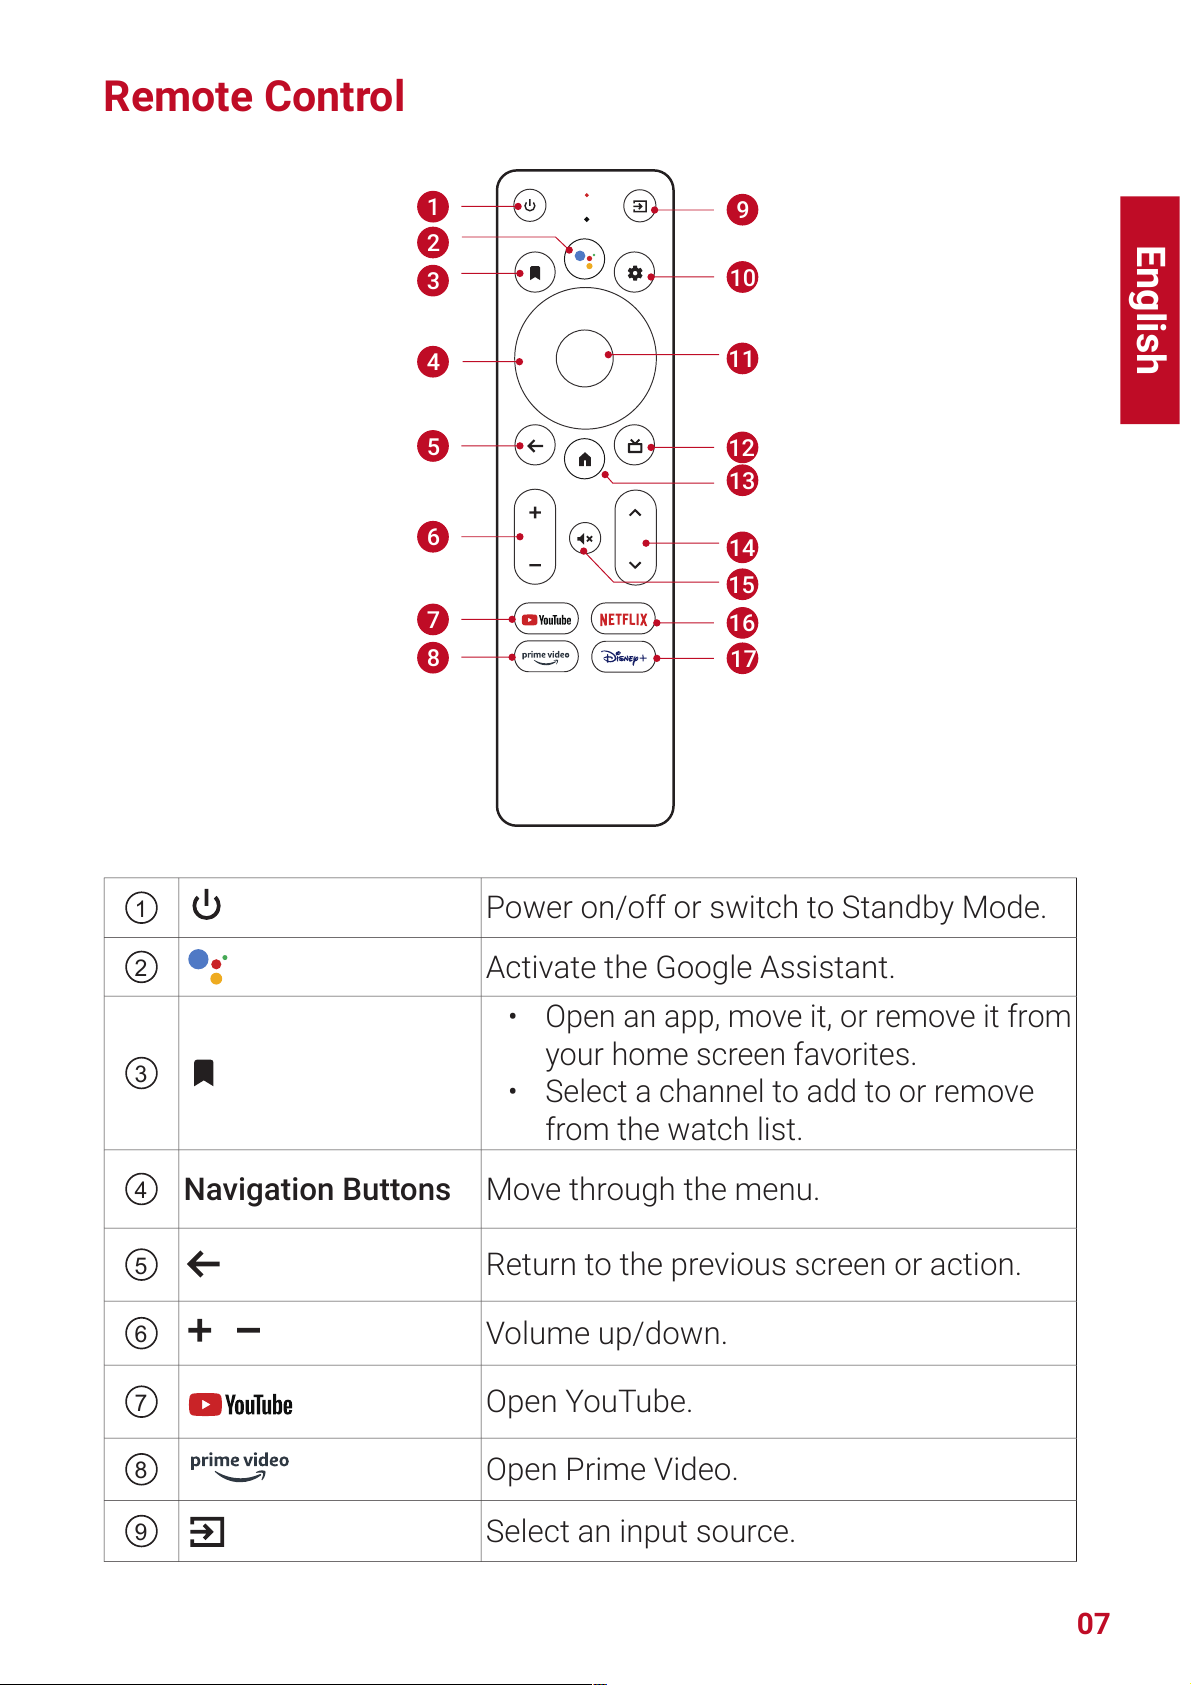
Nebula Cosmos Max User manual

User Manual
Nebula Cosmos Laser /
Nebula Cosmos Laser 4K

English
01
Important Safety Instructions
Read all instructions before you use this device. Do not make any
changes or create settings that are not described in this manual. If
physical injury, loss of data, or damage is caused by failure to follow
instructions, the warranty does not apply.
Setup
• Do not place heavy or sharp objects on this device.
• To avoid electric shock, do not disassemble the device.
• Only use attachments or accessories specified by the manufacturer.
• Keep away from any heat sources.
• Place in a dry and well-ventilated area.
• Do not place this device on soft surfaces such as tablecloths or
carpets. The device could catch fire.
• Do not look straight at the projector lens during operation. The
intense light beam may damage your eyes.
• To prevent overheating, do not block or clog the ventilation openings.
• To reduce the risk of fire and/or electric shock, do not expose the
device to rain or moisture. Objects filled with liquids, such as vases,
should not be placed on this device.
• Turn off and remove the cable if this product emits smoke or any
strange odor.
• Unplug from the power source when not in use for a long period of
time.
• Always handle the device with care. Avoid touching the lens.
• Do not allow children to handle the device without supervision.
• Avoid extreme vibrations. It may damage the internal components.
• Due to the enclosure material, the product must be connected to a
USB 2.0 or higher.
• The power cord shall connect to socket-outlet with a grounding/
earthing connection.
• The power supply should be installed near the equipment; for
pluggable equipment, the socket-outlet must be easily accessible.
• Only use the power cord provided by the manufacturer. An
unauthorized power cord may cause danger and violate the
authorization of the projector as well as the guarantee.
• The plug of the power cord is considered as the disconnect device.
Once unplugged, the projector is disconnected from the power
source.
• Do not use the device in an environment where the temperature is

English
02
too high or too low. Never expose the device to strong sunshine or
wet environments.
• Before you make or change any connections, ensure that all devices
are disconnected from the power outlet.
• Never touch the mains cable of the mains connection with wet
hands.
• The suitable temperature range for projector D2341 or D2350 and
its accessories is 32°F-95°F / 0°C-35°C.
• The suitable temperature range for 4K Streaming Dongle D0480 and
its accessories is 32°F-104°F / 0°C-40°C.
• The suitable temperature for remote C008 is 113°F / 45°C
maximum.
• It is recommended to operate the device in an environment with a
temperature that ranges from 41°F-77°F / 5°C-25°C.
• When operating, place the device in an environment that has a
normal room temperature and good ventilation.
• Possibly hazardous optical radiation emitted from this product may
be harmful to the eyes. Do not stare at the operating beam.
Battery
• The remote control contains batteries which can be swallowed. Keep
the remote control out of the reach of children.
• Keep away from heat, direct sunlight, or fire to avoid risk of explosion.
Never dispose of by burning.
• Remove the batteries when the remote control has not been used for
a long period of time.
• Replace the batteries only with the same or equivalent type.
• Batteries contain chemical substances, and they should be disposed
of properly.
CAUTION: RISK OF EXPLOSION IF BATTERY IS REPLACED BY AN
INCORRECT TYPE. DISPOSE OF USED BATTERIES ACCORDING TO THE
INSTRUCTIONS.
Hearing Safety
• To avoid hearing damage, do not listen for extended periods at high
volume. Set the volume at a safe level.
Cleaning
• Use a soft, lint-free cloth. Never use liquid, gaseous, or easily
flammable cleansers to clean.

English
03
• Do not use any liquid cleaning agents to clean the lens to avoid
damaging the coating film on the lens.
• Wipe the surfaces gently. Be careful that you do not scratch the
surface.
• Use lens cleaning paper to clean the lens of the projector.
Repairs
• Do not make any repairs to this device yourself. Only have your
projector repaired by an authorized service center.
• Improper maintenance can result in injuries to persons or damage
to this device.
• Refer servicing to qualified service personnel.
Laser Safety
• RG1 IEC 62471-5:2015
• Complies with IEC 60825-1:2014 Class 1 and IEC 62471-5:2015 Risk
Group 1.
• Potential hazards may exist during lamp or product servicing.
• Service shall be performed only by authorized, trained servicing
personnel.
• Do not open the enclosure of the product.
• When the enclosure of the product is damaged, discontinue use.
• Do not open the enclosure of laser module inside the product.
• When the enclosure of laser module inside the product is damaged,
discontinue use.
• Laser inside, be aware of the risk of skin or corneal burns.
• The lable is located at the bottom of the enclosure.

English
04
What’s Included
1 2 3
4 5 6
QSG
1
Nebula Cosmos Laser / Cosmos Laser 4K
2
Nebula 4K Streaming Dongle
3
Remote Control
4
Power Cord
5
AAA Batteries
x 2
6
Quick Start Guide
At a Glance
Top and Front Panel
7
8
3
4
2
6
5
1

English
05
1Lens
2
Handle
3
Power Button
• Press to power on.
• Press and hold for 3 seconds to power off.
4Navigation Buttons
• Move through the menu.
5Confirm a Selection
6
Volume Up/Down
7Back
• Return to a previous menu.
• When in Bluetooth Speaker Mode, press again to switch to
Projector Mode.
8Settings (Projector)
Rear View
1 4
5
6
2 3
78
1AC IN
• Connect to power supply.
2HDMI
• Connect to a playback device with HDMI output.
3USB
• Connect to a USB storage device.

English
06
4AUX
• Connect to headphones or an external speaker.
5Infrared Receiver
6Back Cover
7Streaming Dongle Compartment
8Micro-USB Connectors
• Connect to the Streaming Dongle.
Bottom View
1
1Tripod socket

English
07
Remote Control
19
10
11
12
13
14
15
16
17
2
3
4
5
6
7
8
1Power on/off or switch to Standby Mode.
2Activate the Google Assistant.
3
• Open an app, move it, or remove it from
your home screen favorites.
• Select a channel to add to or remove
from the watch list.
4Navigation Buttons Move through the menu.
5Return to the previous screen or action.
6Volume up/down.
7Open YouTube.
8Open Prime Video.
9Select an input source.

English
08
10 Access the settings page.
11 Confirm Button Confirm a selection.
12 Guide (Open Live TV EPG)
13 Go to the home screen.
14 Channel up/down.
15 Mute or resume the sound.
16 Open Netflix.
17 Open Disney+ Video.
T
• On the remote, press and hold the Home and Back buttons
simultaneously for about 10 seconds. After Bluetooth connected,
you can operate by using the remote.
Getting Started
Installing 4K Streaming Dongle
1. Press up to open the back cover.
2. Correctly connect the included 4K Streaming Dongle to the Micro-
USB connectors, then close the dongle compartment by pressing
down on the back cover.
open

English
09
Connecting to Power
Connect the power cord to the device, and then to the power supply.
Preparing the Remote
1. Press and slide down to open the battery cover.
2. Insert 2 new AAA batteries, matching the polarity (+ / -) as
indicated. Close the battery cover until it clicks into place.
12
+
+
T
• The distance between the remote and the projector should not
exceed 10 m / 33 ft.

English
10
Positioning Your Projector
You can position your projector in the following ways.
• Front: The projector is placed on the table in front of the screen.
This is the most common way to position the projector for quick
setup and portability.
• Rear: The projector is placed on the table behind the screen. A
special rear projector screen is required.
• Front Ceiling: The projector is suspended upside-down in front
of the screen. The ceiling/wall mount kit is required.
• Rear Ceiling: The projector is suspended upside-down from
behind the screen. A special rear projector screen and ceiling/
wall mount kit are required.
T
• After powering on the projector, press the Settings button on
the projector, then go to Advanced Settings > Projector Mode
and select a setting.
• It is unnecessary to tilt the projector toward the projection
surface. This device is featured with autofocus and auto-
keystone correction.
• You may also install the projector onto a tripod (sold
separately) if necessary.
• The distance between the projector lens and the screen
determines the projection image size.
Screen Size Distance Between Projector Lens and Screen
60 inches 1.68 m / 5.51 ft
70 inches 1.97 m / 6.46 ft
80 inches 2.25 m / 7.38 ft
90 inches 2.53 m / 8.30 ft
100 inches 2.81 m / 9.22 ft
110 inches 3.10 m / 10.17 ft

English
11
120 inches 3.37 m / 11.06 ft
130 inches 3.65 m / 11.98 ft
140 inches 3.93 m / 12.89 ft
150 inches 4.22 m / 13.85 ft
Powering On/Off
Press the power button to power on.
Press and hold the power button for 3 seconds to power off.
Steady Blue Powered On
Steady Red Standby Mode
Light Off Powered Off
T
• When powered on, press the power button to switch to Standby
Mode.
• In HMDI Source Mode, the projector will switch to Standby Mode
after 10 minutes of button inactivity or when no signal is detected.
• When Standby Mode lasts for 1 hour, the projector will
automatically power off.

English
12
Setup
When using the projector for the first time, follow the on-screen display
(OSD) instructions to complete the basic setup.
• Bluetooth connection
• Select your language
• Set up your TV with your Android phone (Optional)
• Wi-Fi connection
• Sign in with your Google account
Remote Buttons
For the best experience, add Nebula to the TV list and set up the remote
buttons. Follow the on-screen instructions to complete the setup. After
a successful setup, you can control the volume, power, and input of
your device by using the remote.
1. Press the Settings button on the remote.
2. Select Set Up Remote Buttons > Add Device > TV, then select
Nebula as the TV.
AutoFocus Keystone
When you power on the projector or move it to another location, the
projector will automatically focus and perform keystone correction.
• After setting up the remote controls, you can also press and
hold the Input Source button on the remote to activate this
feature.
• You can also manually adjust the focus and perform keystone
correction in the Settings menu. (See Device Settings)
Auto Screen Fit
This projector can automatically adjust the alignment to your screen
size.
• To activate this function, press the Settings button on the
projector, then select Image Correction > Auto Screen Fit.

English
13
Nebula Connect App
To easily control the projector, we recommend you to download the
devoted Nebula Connect app.
1. Download the Nebula Connect app from the App Store (iOS
devices) or Google Play (Android devices).
2. Enable Bluetooth on your phone and select this projector as the
device to be connected.
3. Open the Nebula Connect app and follow the on-screen
instructions to complete the connection setup.
System Update
To fully enhance your experience with this product with the latest
features, you are recommended to update the system from time to
time. (See Settings)
Settings
Device Settings
Go through the setup process when you turn on the projector for the
first time. Press the Settings button on the projector to access the
settings menu of this device.
Picture
Brightness
Adjust brightness based on your environment.
Picture Mode
The projector is preset with several predefined picture
modes so that you can choose one to suit your
environment and input source.
• Standard: Keeps natural looking colors with a
balance of warm and cool tones.
• Vivid: Provides more picture details and color
sharpness.
• Soft: Provides warm colors with lower light.
• Movie: Provides the best colors for watching
movies.
• Game: Increases the brightness and response
time level for playing video games.
• Picture Custom: Manually set the contrast,
saturation, sharpness, color temperature, and
gamma, or reset the values.

English
14
Aspect
Adjust the width and the height proportion of the
display. You can select from these options: Auto, 16:9,
16:10, 4:3.
HDR
Turn High-Dynamic Range on or off. HDR enables the
projector to automatically detect the brightness and
darkest points of the input source and optimize settings
to reproduce contents under high dynamic range.
Audio
Volume
Adjust the volume of the built-in speaker.
Audio Mode
The projector is preset with several predefined sound
modes so that you can choose one to suit your
environment and input source.
• Standard: Keeps the original sound.
• Music: Enhances the treble for listening to the
music.
• Movie: Creates a surround-sound listening
experience for watching movies.
• News: Make voices more clear and dynamic for
listening.
• Audio Custom: Manually set audio settings such
as bass, midrange, and treble.
Dolby
Adjust the Dolby ARC Mode.
Image Correction
One-Click Focus
and Keystone
Correction Automatically focus and perform keystone correction.
Keystone
Correction
Automatically or manually perform keystone
correction. Manual keystone correction is only available
when auto keystone correction is off.
Focus
• Autofocus: Activate or deactivate Autofocus.
• Manual Focus Correction: Manually adjust the
focus.
Screen Zoom Zoom in or out of the projection image.
Auto Screen Fit Activate to automatically adjust the image size to
your surface.

English
15
HDMI
Input Access Select Android TV or HMDI as the input source.
HDMI 2.0 Auto/Off/On
About
Projector Info Check the current system firmware version and the
projector firmware version.
Contact Us Check our regional hotlines to contact our customer
service team.
Nebula Connect Scan the QR code to install the Nebula Connect app.
Advanced Settings
Language Select your language.
Projector
Mode
• Front: The device is located in front of the projection
surface.
• Rear: The device is located behind the projection
surface.
• Front Ceiling: The device is hanging from the ceiling
in an upside-down position. The image is rotated by
180 degrees.
• Rear Ceiling: The device is hanging from the ceiling
in an upside-down position behind the projection
surface. The image is rotated by 180 degrees and
horizontal mirrored.
Eyesight
Protection Activate or deactivate the eyesight protection function.
ToF Calibration If the picture is still unclear after cleaning the lens,
calibrate the Time-of-Flight (ToF) sensor.
Back to Default Restore settings to default.
System Settings
On the remote, press the Settings button to access the setting menus of
the system.
Network &
Internet See available networks.

English
16
Accounts &
Sign-In Sign in to make the most of the Android TV.
Apps See all apps installed.
Device
Preferences
• About: Check the product information, upgrade
firmware, reset the system, or rename the
device.
• Date & Time: Set date and time. Select
time zone, time format, and automatic time
calibration.
• Language: Select an on-screen display language.
• Keyboard: Check and manage keyboards.
• Sound: Select the sound formats.
• Storage: View the internal storage usage.
• Home Screen: Set the channels and apps on the
home screen.
• Google Assistant: Sign in to get better voice
control of your TV.
• Chromecast Built-in: Choose to show
notifications on all Android devices connected to
your Wi-Fi and let them control media casting to
this device.
• Screen Saver: Change the screen saver settings.
• Location: Check the location status.
• Usage & Diagnostics: Automatically send
diagnostic information to Google, like crash
reports and usage data from your device, apps,
and Chromecast built-in.
• Accessibility: Set the caption settings.
• Reboot: Reboot the system or cancel.
TV Settings
• Display: Adjust screen resolution, display mode,
and screen position.
• HDMI CEC: Enable HDMI CEC to allow this
projector to communicate back and forth with
your TV through HDMI ports. This projector and
your TV can control each other. One Key Play
allows this projector to use the TV as the active
source when playback starts.
• Audio Output: Adjust Dolby DRC mode.
Remotes &
Accessories Search for accessories for pairing.

English
17
Set Up Remote
Buttons
Add Device: Add a TV, AV receiver, or a soundbar to
experience remote button controls. With the remote
control, you can control volume, power, and input on
TVs, AV receivers, and soundbars.
Using Your Projector
Select an App
Once connected to a wireless network, you can access online services,
enjoy movies, music, and pictures, and browse online. Apart from the
pre-installed apps, you can also download more apps from Google Play.
Voice Assistant
After setup, press the Google Assistant button on the remote, you can
speak to the Google Assistant and request your commands.
Wireless Screen Mirroring
Wirelessly cast movies, games, and music from your compatible iOS,
MacOS, Android, or Windows device right to Nebula Cosmos Laser /
Cosmos Laser 4K.
T
•Make sure that Nebula projector and your device are connected
to the same network. The network can be a WiFi network or your
phone's hotspot.
• Certain content may be unavailable to be cast due to copyright
restrictions. In this case, you can stream the content via the same
app installed on the projector. For example, copyrighted content
from Netflix cannot be mirrored or cast. You need to download
Netflix from Google Play.
iOS Devices
iOS devices support AirPlay while your Nebula projector does not
have AirPlay preloaded. You need to install the Nebula Manager app
from Google Play, and then install the AirScreen app from the Nebula
Manager app to enable AirPlay on your Nebula projector.

English
18
Screen Mirroring From iPhone or iPad:
1. Swipe up to display the control console and tap the AirPlay icon.
2. Select “D2341/D2350” as the device you want to cast to.
Streaming Video From iPhone or iPad:
1. Open the streaming apps you want to cast on the Nebula projector
and select a video to play.
2. Click the AirPlay icon or cast icon in the top right corner to cast to
the projector.
Screen Mirroring From Mac:
Click the AirPlay icon on the Mac and select the Nebula projector to start
mirroring.
• To stop mirroring, click the AirPlay icon again and then select Turn
AirPlay Off.
• The AirPlay icon in the menu bar is blue when the function is
active.
Android Devices
Your Nebula projector supports Chromecast, which means you can
mirror or stream videos from your Android devices that support
Chromecast.
Screen Mirroring:
1. Go to Settings > Connected Devices > Connection Preferences >
Cast on your phone.
2. Select “D2341/D2350” as the device you want to cast to.
Streaming Videos:
Chromecast can only open applications that support Chromecast, such
as YouTube and Prime Video. To find more information about apps that
support Chromecast, please install the Google Home app on your phone.
1. Play a video and click the Chromecast button at the top to search
for a Chromecast-compatible device.
2. Select “D2341/D2350” as the device you want to cast to.
Windows 10 PC
You can stream videos from a Windows 10 PC to your Nebula projector
by using the Chrome browser.

English
19
1. Launch the Chrome browser on your Windows 10 computer, at the
top right corner of the browser. Click More > Cast.
2. Select “D2341/D2350” as the device you want to cast to.
Bluetooth Speaker Mode
You can use this projector as a standalone Bluetooth speaker.
1. Press the Settings button on the projector, then select Bluetooth
Speaker Mode. You can also enter Bluetooth Speaker Mode in
the Nebula Connect app.
2. Enable Bluetooth on your phone and select "Nebula-XXXXXX" as
the device to be connected.
< Settings Bluetooth
Nebula-xxxxxx
Bluetooth
Connected
DEVICE
T
• The projector light will be shut off shortly.
• Press the Back button to exit Bluetooth Speaker Mode.
Playing Video from HDMI Devices
This projector supports connections with vairous HDMI playback
devices such as TV sticks, TV boxes, DVD players, set-top boxes (STB),
game consoles, or othre devices.
1. Connect this projector to an HDMI playback device with an HDMI
cable (not included).
2. Press the Input Source button on the remote to select your HDMI
playback device as the input source. Alternatively, select HDMI on
the home menu and press the Confirm button.
Other manuals for Cosmos Max
2
This manual suits for next models
1
Table of contents
Languages:
Other Nebula Lighting Equipment manuals
Popular Lighting Equipment manuals by other brands

RAB
RAB STL110H/L instructions

Laserworld
Laserworld GREEN-8000C user manual

EuroLite
EuroLite STL-50F user manual

California Accent Lighting
California Accent Lighting ALS500T-SWM-MI installation instructions

B&G
B&G HERCULES Basic operation guide

Eliminator Lighting
Eliminator Lighting Trio Par LED RG manual