manuals.online logo
Brands
  1. Home
  2. •
  3. Brands
  4. •
  5. NEC
  6. •
  7. Projector
  8. •
  9. NEC MultiSync VT Series Assembly instructions

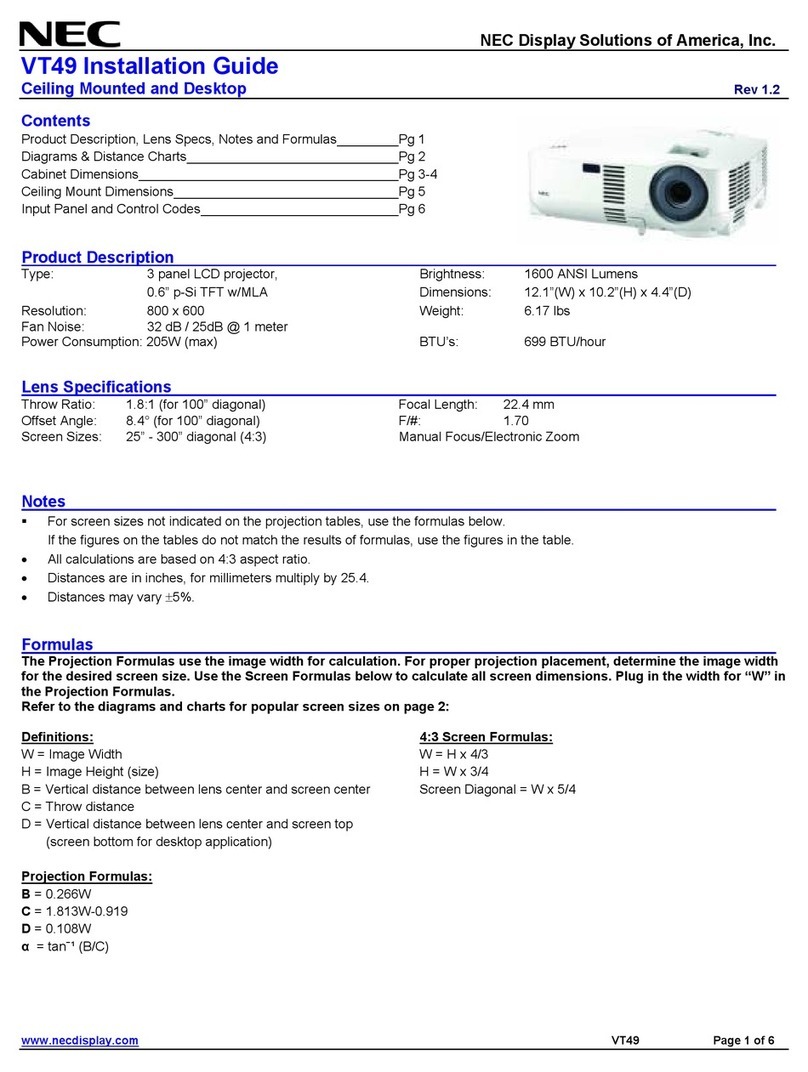
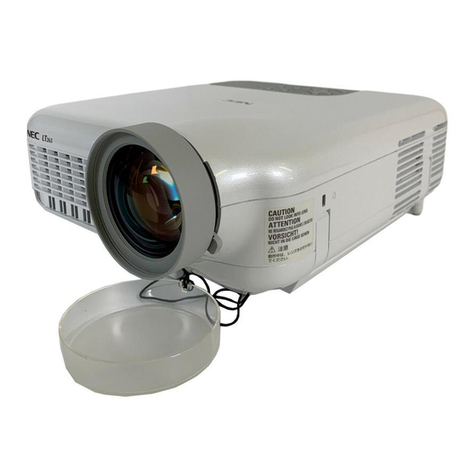
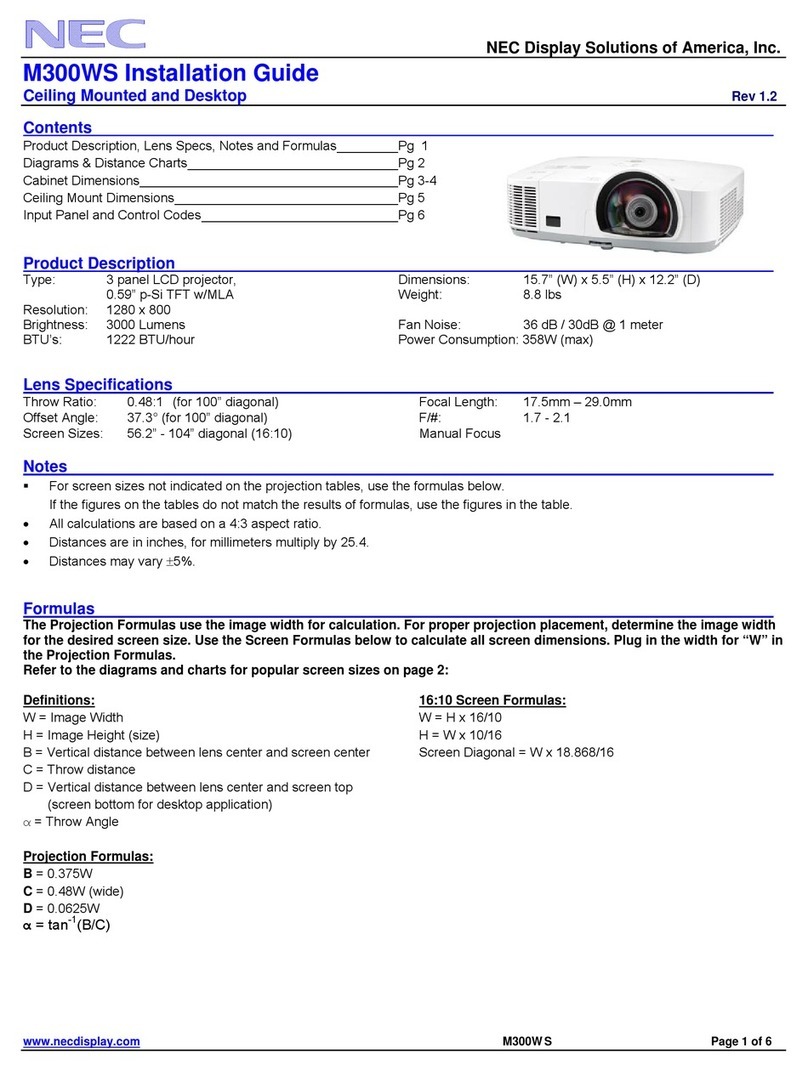
NEC MultiSync VT Series Assembly instructions

M
E
RCE A
RGB
INPUT
OUTPUT
AUD
IN
OUT
PC-CONTROL S-VIDEO VID
M
E
N
U
E
N
T
E
R
C
A
N
C
E
L
SELECT
POWER
STATUS ON
/
STAND BY
SOURCE AUTO ADJUST
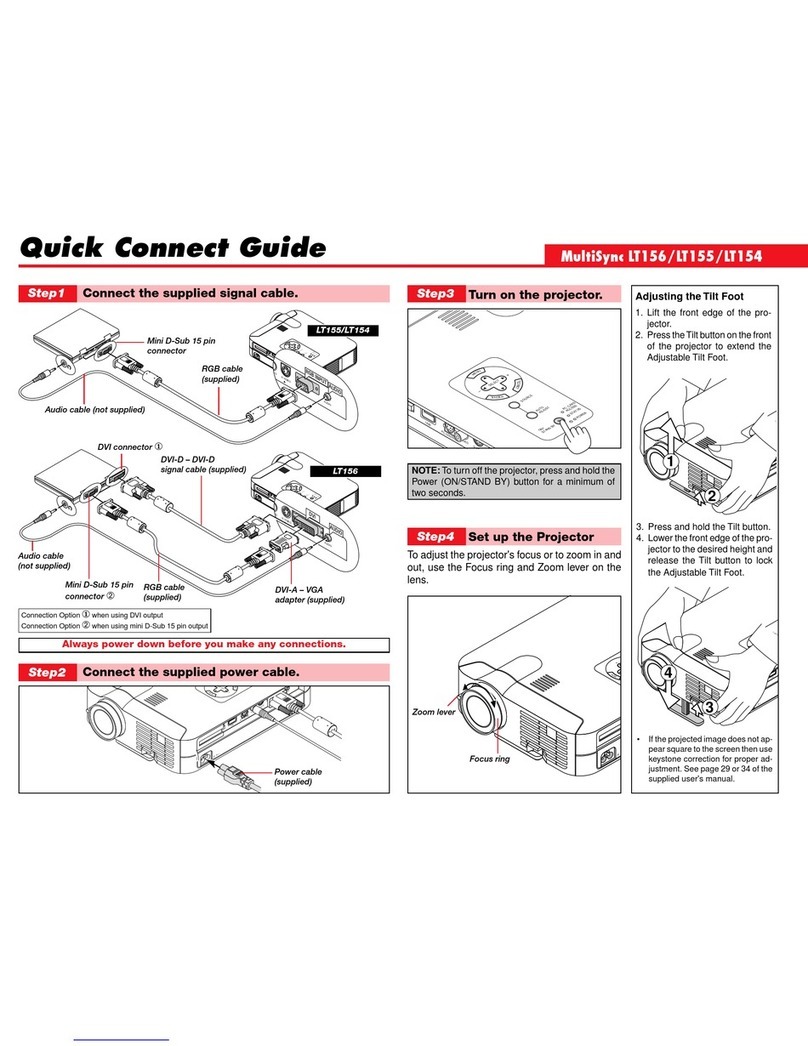
Quick Connect Guide
MultiSync VT Series LCD Projectors
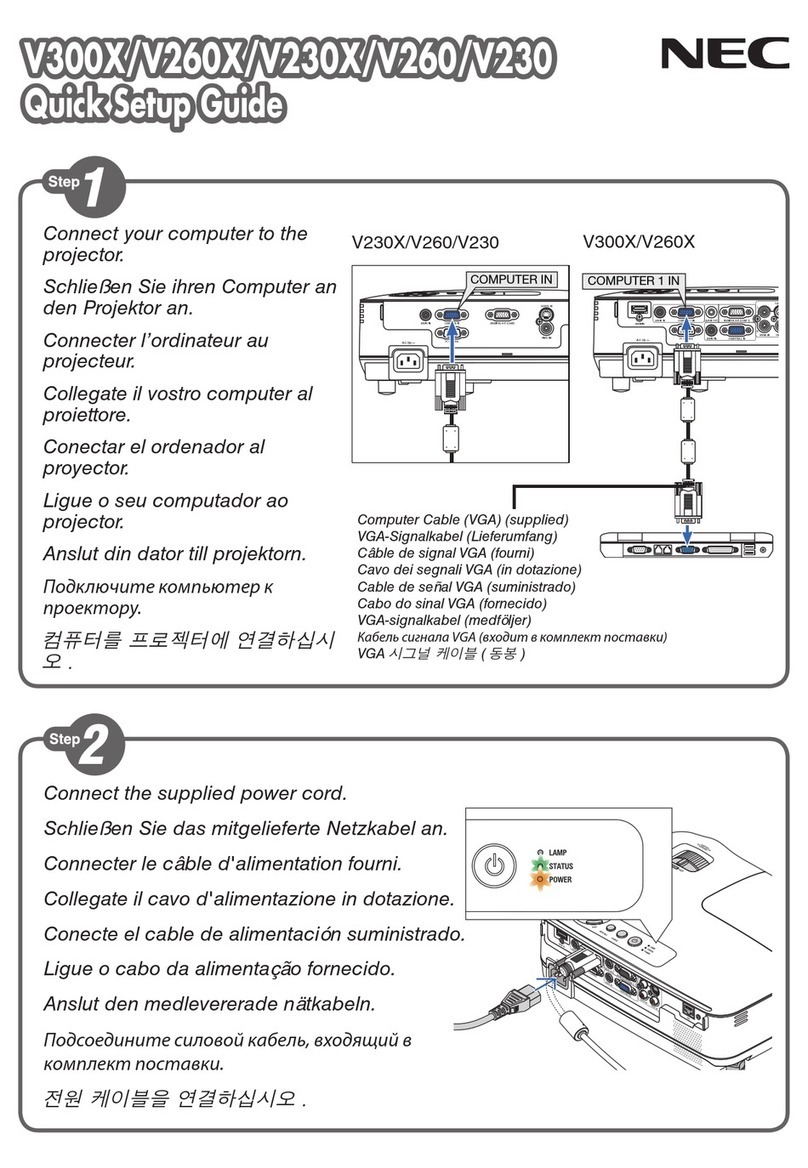
Step 1 Connect the supplied 15pin-15pin signal cable.
Step 2 Connect the supplied power cable.
Step 3 Turn on the projector.
RGB
INPUT
OUTPUT
AUDIO
IN
INOUT
OUT
PC-CONTROL S-VIDEO VIDEO
RGB INPUT
RGB OUTPUT
For older Macintosh computers,
use the supplied pin adapter to
connect to your Macintosh's video
port.
Monitor
Power button
Always power down before
you hook up.
RGB
INPUT
OUTPUT
AUD
IN
OUT
PC-CONTROL S-VIDEO VID
NOTE: To turn off the projector, press and hold the
POWER button for a minimum of two seconds.
Step 4 Set up the Projector.
To adjust the projector's focus or to zoom in and out use the Focus ring or Zoom
lever on the lens.
Focus ring
Zoom lever
M
E
N
U
E
N
T
E
R
C
A
N
C
E
L
SELECT
POWER
STATUS ON
/
OFF
SOURCE AUTO ADJUST
RGB
INPUT
OUTPUT
AUD
IN
OUT
PC-CONTROL S-VIDEO VID
• If the projected image does not appear square to the screen then use keystone correction
for proper adjustment.
Printed in Japan
78038752
Adjusting the Tilt Foot
1
.Press and hold the Tilt button on the front of the projector.
2
.Lift the front edge of the projector to the desired height, and release the button to lock
the Adjustable Tilt Foot.
To fine-tune the image's position vertically on the screen, rotate the foot. Each of the rear
feet height can be changed up to 0.6" (4 mm).
Basic Menu
Source Select
Picture
Volume
Image Options
Menu
Setup
Help
Source Select
RGB
Video
S-Video
Image Options
Keystone
Color Temperature
Lamp Mode High-Bright / Eco
Volume
Contents
Basic / Advanced
English/German/French/Italian/Spanish/Swedish/Japanese
Pointer 1- 8
On / Off
On / Off
Front Floor / Rear Ceiling / Rear Floor / Front Ceiling
Blue / Black / Logo
Menu
Menu Mode
Language
Projector Pointer
Source Display
Volume Bar
(Direct Button)
Setup
Orientation
Background
Help
Contents
Information Pege 1(Source Name / Input Terminal /
Horizontal Frequency /
Vertical Frequency / Sync Polarity)
Pege 2(Signal Type/Video Type/Sync Type /
Interlace / Resolution)
Page 3(Aspect Ratio / Gamma Correction /
Noise Reduction / Color Matrix /
Matrix Type)
Page 4(Lamp Hour Meter / Projector Usage)
Picture
Brightness
Contrast
Color
Hue
Sharpness
Basic Menu Remote Control Features
(
1
)
Source Button
Press to select a video source.
(
2
)
Auto Adjust Button
Use this button to adjust Position-H/V and
Pixel Clock/Phase for an optimal picture.
(
3
)
Menu Button
Displays the menu.
(
4
)
Select ( ) / Volume (+) (–)
Buttons
:Use these buttons to select the
menu of the item you wish to adjust.
:Use these buttons to change the
level of a selected menu item.
A press of the button executes the
selection. When no menus appear, these
buttons work as a volume control.
When the pointer is displayed, these
buttons move the pointer.
(
5
)
Enter Button
Use this button to enter your menu
selection.
(
6
)
Cancel Button
Press this button to exit “Menus”. Press
this button to return the adjustments to the
last condition while you are in the
adjustment or setting menu.
(
7
)
Magnify Button
Use the (+) or (–) button to adjust the
image size up to 400%. When the Pointer
is displayed, the magnified image is
displayed at the center of the Pointer.
When the Pointer is not displayed, the
magnified image is displayed at the center
of the screen.
When the image is magnified, the pointer
is changed to the magnifying icon.
(
8
)
Pointer Button
Press this button to display one of the
eight pointers; press again to hide the
pointer. You can move your pointer icon to
the desired area on the screen using the
Select button.
(
9
)
Picture Mute Button
This button turns off the image and sound.
Press again to restore the image and
sound.
(
10
)
Help Button
Provides information about operation and
adjustment procedures, the set-up
information for the current menu and
adjustment information during menu
operation. This also displays information
on how to use the Help menu.
(
11
)
Power Button
Use this button to turn your projector on
and off.
NOTE: To turn off the projector, press and
hold the Power button for a minimum of
two seconds.
(
12
)
Infrared Transmitter
Direct the remote control toward the
remote sensor on the projector cabinet.
SELECT
Vol.
Vol.
POINTER
POWER
HELP
RD-366E
PIC.
MUTE
MAGNIFY
SOURCE
AUTO
ADJ.
M
E
N
U
E
N
T
E
R
C
A
N
C
E
L
(
12
)
(
2
)
(
1
)
(
3
)
(
5
)
(
7
)
(
8
)
(
10
)
(
4
)
(
6
)
(
9
)
(
11
)
NOTE : The POWER, SOURCE. AUTO ADJ., MENU, SELECT, ENTER and CANCEL buttons
on the remote control perform the same functions as the corresponding buttons on the
projector cabinet. The remaining buttons are on the remote control only.

Other NEC Projector manuals

NEC NP-PH1000U User manual

NEC

NEC NP-PH1000U User manual

NEC P605UL User manual

NEC

NEC P605UL User manual

NEC M362W User manual

NEC

NEC M362W User manual

NEC NP510W EDU Manual

NEC

NEC NP510W EDU Manual

NEC Showcase Series HT1100 User manual

NEC

NEC Showcase Series HT1100 User manual

NEC NP1150 XGA User manual

NEC

NEC NP1150 XGA User manual

NEC NP600 Series User manual

NEC

NEC NP600 Series User manual

NEC VT45 User manual

NEC

NEC VT45 User manual

NEC P627UL User manual

NEC

NEC P627UL User manual

NEC NP4000 User manual

NEC

NEC NP4000 User manual

NEC UM352W User manual

NEC

NEC UM352W User manual

NEC PX803UL User manual

NEC

NEC PX803UL User manual

NEC MT1075 Series Assembly instructions

NEC

NEC MT1075 Series Assembly instructions

NEC SX10000 User manual

NEC

NEC SX10000 User manual

NEC VT800 Series User manual

NEC

NEC VT800 Series User manual

NEC LT75Z - MultiSync SVGA DLP Projector User manual

NEC

NEC LT75Z - MultiSync SVGA DLP Projector User manual

NEC TriDigital HD10K User manual

NEC

NEC TriDigital HD10K User manual

NEC VT460 User manual

NEC

NEC VT460 User manual

NEC NP03CM Guide

NEC

NEC NP03CM Guide

NEC NP600 Series User manual

NEC

NEC NP600 Series User manual

NEC PX750U Series User manual

NEC

NEC PX750U Series User manual

NEC DLP Cinema NP-NC1402L User manual

NEC

NEC DLP Cinema NP-NC1402L User manual

NEC NP200 User manual

NEC

NEC NP200 User manual

NEC NP500 Series User manual

NEC

NEC NP500 Series User manual

Popular Projector manuals by other brands

AAXA Technologies P4X Specifications

AAXA Technologies

AAXA Technologies P4X Specifications

InFocus LiteBoard IN3902LB user manual

InFocus

InFocus LiteBoard IN3902LB user manual

Epson EH-TW420 user guide

Epson

Epson EH-TW420 user guide

Hitachi EDPJ32 owner's guide

Hitachi

Hitachi EDPJ32 owner's guide

3M SCP716 Operator's guide

3M

3M SCP716 Operator's guide

3M Multimedia Projector MP8765 Operator's guide

3M

3M Multimedia Projector MP8765 Operator's guide

Wize PRG11A instruction manual

Wize

Wize PRG11A instruction manual

Panasonic PT-VMZ50 operating instructions

Panasonic

Panasonic PT-VMZ50 operating instructions

Eiki PLC-XU56 owner's manual

Eiki

Eiki PLC-XU56 owner's manual

Sony SRX-R515P Brochure & specs

Sony

Sony SRX-R515P Brochure & specs

Christie 103-011100-01 user manual

Christie

Christie 103-011100-01 user manual

Ask Proxima Ovation 842 Frequently asked questions

Ask Proxima

Ask Proxima Ovation 842 Frequently asked questions

Christie LWU701i User's manual and operating guide

Christie

Christie LWU701i User's manual and operating guide

Nikon V-12A instructions

Nikon

Nikon V-12A instructions

3M DX70 - Digital Projector XGA DLP Quick setup

3M

3M DX70 - Digital Projector XGA DLP Quick setup

Acer P1223 user manual

Acer

Acer P1223 user manual

Sharp PG-D50X3D specification

Sharp

Sharp PG-D50X3D specification

Optoma S310 manual

Optoma

Optoma S310 manual

manuals.online logo
manuals.online logoBrands
  • About & Mission
  • Contact us
  • Privacy Policy
  • Terms and Conditions

Copyright 2025 Manuals.Online. All Rights Reserved.