NEC PX-TUAN-01 User manual

PX-TUAN-01 Instruction Manual
-1-
TableofContents
Chapter 1 Introduction
1.1 Important Notices ………………………………………………………………………….…….3
1.2 Product Functions ………………………………………………………………………….……3
1.3 Package Contents ………………………………………………………………………….……4
Chapter 2 Installation
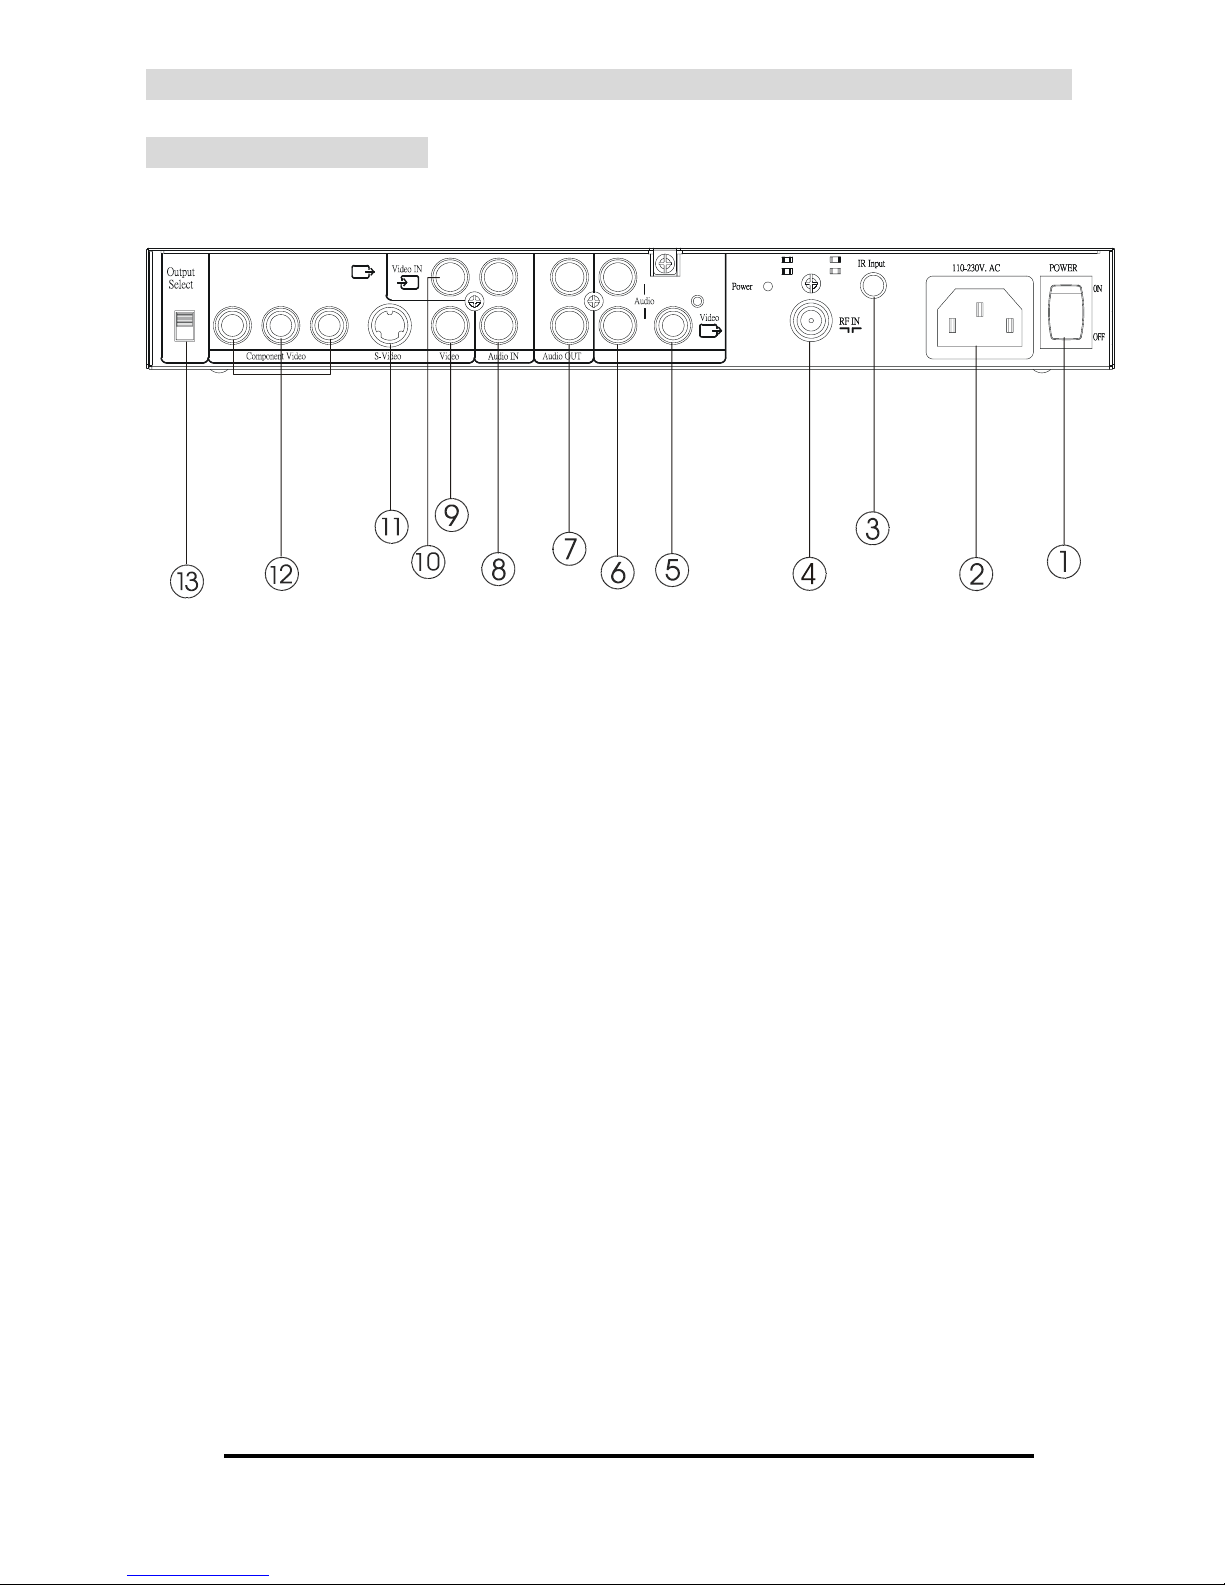
2.1 Product Overview...........................................…...……………...................................….....5
2.1.1 Rear View of Main Body......……….....................................................…...……...........5
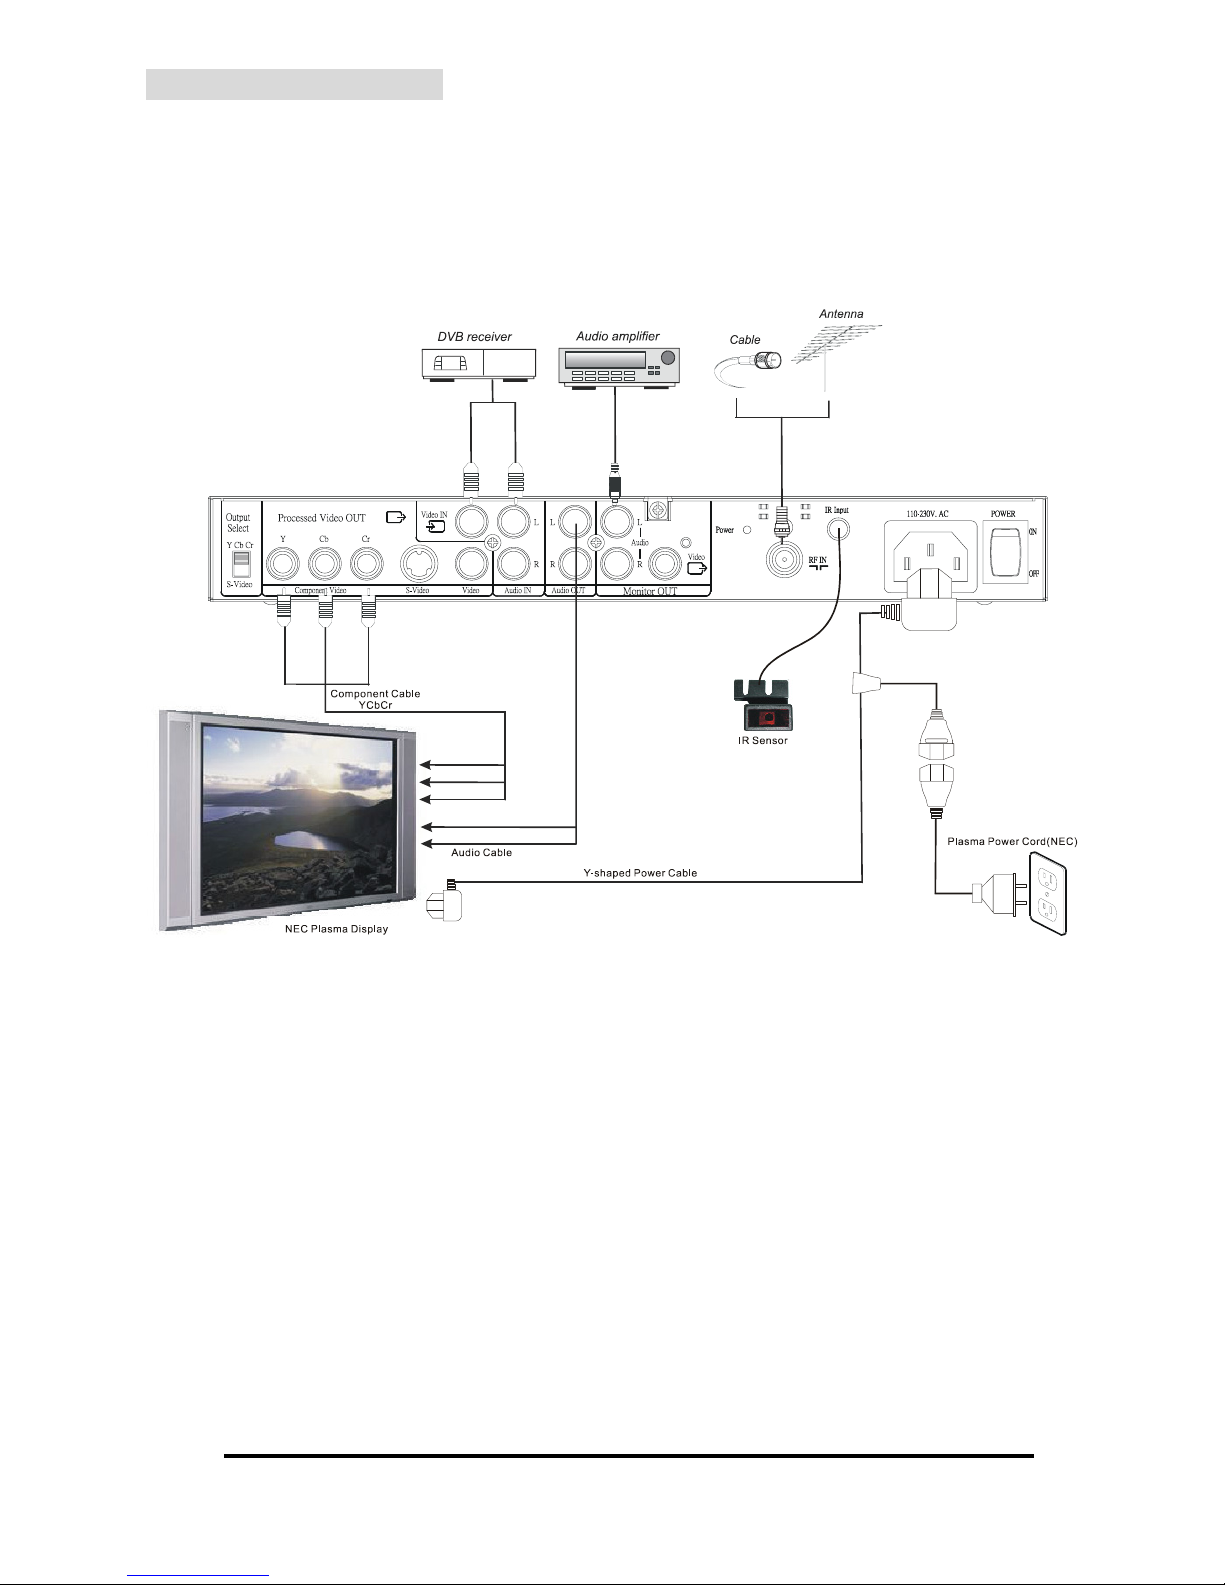
2.2 System Installation............................................................................………...…................7
2.2.1 Standard Connection…….………………….…………………………………………....7
2.2.3 Extended Connection for Split Screen Display ..…..………………………………....8
2.2.3 Audio/Video ………...……………………………………………………………...….....….9
2.2.4 Antenna……………………………..…………………………………………...…….......9
Chapter 3 Basic Settings
3.1 Initial Settings ................................................................…………................................…10
3.2 IR Remote Control – Tuner related…....................................……....................................12
3.3 IR Remote Control – NEC Plasma Display related... .................................………….......14
Chapter 4 Advanced Settings
4.1 MAIN MENU……….................................................................................…………….......16
4.2 SETTING UP…….................................................................................…………….........16
4.2.1 LANGUAGE……......................................................................…............…………....17
4.2.2 TV SYSTEM……......................................................................…............…………....17
4.2.3 CHANNEL Settings................…………………...........................................................18
4.2.4 CLOCK………………..............…………………..........................................................20
4.2.5 OSD…………………............………………….............................................................21
4.3 TELETEXT WEST/EAST Settings ……………...……………...…….…...………………….21
4.4 TTX CHARACTER Settings………………………………………………………………….22
4.5 FAST KEYS FUNCTIONS…………………………………………………………………….22
4.6 TELETEXT………………………….…….…...……………………….……………………….24
4.6.1 Open and Close Teletext ……………...….………..……………………………….…..24
4.6.2 Select a Teletext Page…………………..…...….…………………………………….…..24
4.6.3 Mix Teletext With Picture………………..…...….…………………………………….…..24
4.6.4 Display Hidden Text/Deactivate Teletext …………..…………...……………………….24
4.6.5 Double Height………………………………………..…………...……………………….24
Chapter 5 Other Information
5.1 Troubleshooting.......................….....….......................................................…………....25
5.2 Specifications..................................…..........................................................…………..26
5.3 Default Channel Tables................….............................................................…………..27

PX-TUAN-01 Instruction Manual
-2-
Chapter1 Introduction
Thank you for purchasing the PX-TUAN-01. This is an advanced multi-standard
(PAL/SECAM) Analogue TV Receiver/Tuner with integrated Stereo (NICAM/A2) and Teletext
decoder. It was designed and manufactured based on the PERFECT * principle and offers
the highest possible picture quality due to its digital processing of Video and Teletext signals.
Besides Composite Video and S-Video, it has a Component (YCbCr) output, which is
designed for NEC Plasma Displays.
For a very easy installation and operation the tuner has several unique features like, Auto
Detection of Video/Audio standard, Automatic Channel Installation (ACI**), Advanced
Channel Name Detection and Fastext. The tuner is supplied with all required adapter cables.
Additional (TV) Monitor OUT and (external) Video IN ports enable simultaneous display of TV
Video/TV Teletext and TV Video/external Teletext***, for use with the NEC Plasma Display
models 50XR4 and 61XR3.
For people with hearing problems, the PX-TUAN-01 has the facility to overlay the Video with
Teletext subtitles for simple recording on any standard VCR/DVR.
No additional hardware or software required. No need to learn complicated set-up
procedures. Just plug and play!
* The PERFECT principle is based on the following keywords:
Performance
Outstanding performance by sophisticated design and “state-of- the- art” components.
Easy to install
The product is supplied with all required accessories and auto-detects all relevant technical parameters in
different applications.
Reliability
Long-term reliability through the use of first class components and 100% inspection.
Features
Extensive features make the product multi-purpose.
Easy to operate
Software structure and operation is user friendly and “granny-proof”
Customer satisfaction
Product meets or exceeds customer’s expectations.
Technology
Latest technology and smart design ensure that the product outperforms existing products on the market.
** ACI offers very fast and fully automatic channel installation and labelling by means of a unique Teletext code
provided by cable operators.
*** In case the Teletext information is available in the Vertical Blanking Interval (VBI) lines.

PX-TUAN-01 Instruction Manual
-3-
1.1 Important Notices
Please use the PX-TUAN-01 under a normal environment.
1. Avoid the following circumstances:
• Exposure to direct sunlight or high temperatures
• Exposure to moisture or high humidity
• Positioning in unstable places
2. Do not attempt any repair yourself, since the warranty does not cover repair or attempted
repair by unauthorized personnel.
3. Unplug this product from AC outlet and remove batteries from the IR remote control when
left unused for a long time.
1.2 Product Functions
Easy to install due to: pre-programmed channel table, auto-detection of TV and Audio
system, ACI and channel name detection from Teletext.
Supports PAL-BG, PAL-I , PAL-DK , SECAM-L and SECAM-DK
(each with its own pre-programmed channel table).
Advanced automatic scan will detect all channels in 45-862 MHz range.
Teletext decoder, with Fastext, 10 page memory and detection of unused pages.
Teletext decoder supports Pan-European, Cyrillic and Arabic characters.
Decodes Teletext from C-Video IN signals (if Teletext is available in VBI lines).
Stereo Audio decoder for German A2 (Zweiton) and NICAM 728.
Master tune and fine-tune per channel (individual storage per channel).
On screen display in several European languages.
Accepts PAL,SECAM and NTSC signals at the Video Input.
Direct access keys for most functions.
NEC Plasma Display functions are supported by the remote control (dual function).
Digital video processing and S-Video/Component outputs for highest picture quality.
Simultaneous display of Video and Teletext (split -screen NEC Plasma Displays only).
Returns to last TV channel after power failure.

PX-TUAN-01 Instruction Manual
-4-
1.3 Package Contents
As you unpack the product, please make sure the following items were included. If any of
these items are missing, call your local dealer.
1. Main body………...………………………………………………….…………….……...x1
2. Bracket………..…………………………………….……………..…….…………………x1
3. Accessories kit…...…………………………...……………......................................... x1
4. A/V cable (Yellow, Red, White)..............………….............………….........................x1
5. YCbCr cable (Green, Blue, Red)………………………………………………………. x1
6. Audio cable (Red, White) .......................…………...................................................x1
7. S-Video cable……………………..……….……………............................................. x1
8. RF cable..........…………........................................…........………….……...………..x1
9. Power cable (Y-type to be used with the display power cable)..……………….....x1
10. IR sensor.........……........................................................….............…………..........x1
11. AAA batteries........…....................................................……….............….........x2
12. IR remote control...........…................……………..............………..………...…......x1
13. User Manual....…...........….............………………….........................……………......x1
1. Main body 2. Bracket 3. Accessories kit 4. A/V cable
5. YCbCr cable 6. Audio cable 7. S-Video cable 8. RF cable
9. Y-shaped power cable 10. IR sensor 11. AAA batteries 12. IR remote control
13. User manual

PX-TUAN-01 Instruction Manual
-5-
Chapter2 Installation
2.1 Product Overview
2.1.1 Rear View of Main Body
Monitor
OUT
R
L
Y Cb Cr
S-Video
Processed Video OUT
Cb Y Cr
RR
LL
①POWER ON/OFF
Use the power switch to select power ON or OFF.
② POWER IN
Connect one of the outputs of the supplied special power cable adapter (Y- type) to this
input. The other output of the power cable adapter should be connected to the display’s
power input. The original power cord of the display should be connected to the input of the
power cable adapter.
③ IR Input
Connect the IR sensor connection cable to the IR input.
④ RF IN
Connect the RF coaxial cable from your Cable TV network or terrestrial antenna.
⑤ Monitor OUT – Video (unprocessed “raw” Video)
This output always provides the video picture from the actual tuned TV channel. It can be
used to monitor the TV picture irrespective of the mode of the processed video outputs.
This enables you to have a simultaneous display of TV picture and Teletext for use with
NEC Plasma Display models 50XR4 and 61XR3. This output signal is not controlled by the
video settings of the tuner’s processed Video outputs but is processed solely through the
superior 3D Video decoder integrated in the NEC Monitor Display, resulting in an
outstanding TV picture.
⑥ Monitor OUT – Audio L+R
Provides always the L/R decoded audio signal from the tuner.
The Audio signal is not controlled by the Audio settings of the processed audio outputs.

PX-TUAN-01 Instruction Manual
-6-
⑦ Audio OUT
Provides the L/R decoded audio signal from tuner or an external source.
Connect with the audio inputs of your display or audio amplifier.
⑧ Audio IN
Connect with the audio output of an external source.
⑨ Processed Composite Video OUT
Connect with the Composite Video input of your NEC Plasma Display. This output provides
digitally processed video or Teletext signal from the TV tuner or external Video Input
source. This output has lowest picture quality, in particular for Teletext signals.
⑩ Video IN
Connect with the Video output of an external source.
⑪ Processed S-Video OUT
This output has same function as the Composite output but with higher quality.
⑫ Processed Component Video OUT
This output has same function as Processed Composite Video/S-Video output but with
higher quality, in particular for Teletext signals. To maintain the high quality, always use the
correct type of cable (with green/blue/red connectors).
Don’t use A/V cables (with yellow/red/white connectors).
⑬Output Select
Select the required output format, either YCbCr or S-Video. It is recommended to use the
YCbCr mode.

PX-TUAN-01 Instruction Manual
-7-
2.2 System Installation
2.2.1 Standard Connection
Please refer to the example closest to your configuration
Please turn off the power of all devices before connection!

PX-TUAN-01 Instruction Manual
-8-
2.2.2 Extended Connection for Split Screen Display
Please refer to the example closest to your configuration
Please turn off the power of all devices before connection !

PX-TUAN-01 Instruction Manual
-9-
2.2.3 Audio/Video
For audio connection, use the Audio L+R connectors (RCA, white+red).
Connect the “Audio OUT” to the “Audio INPUT” of the NEC Plasma Display.
Make sure that the used Audio INPUT is linked with the used Video INPUT (double check in
NEC “AUDIO” settings menu)
For video connection use the YCbCr (RCA, green+blue+red) cable.
Connect the YCbCr OUTPUT of the tuner box with the YCbCr (DVI/HD) INPUT of the
NEC Plasma Display (please double check that switch of the tuner box is in YCbCr mode).
If for whatever reason you can’t use the YCbCr INPUT of your NEC Plasma Display, you may
use the processed S-Video or Composite connection.
The MONITOR Video Output of the tuner will only display the actual received TV channel.
This output has no OSD (On Screen Dislay) information and no Teletext.
2.2.4 Antenna
It’s important to use high quality coaxial cable and connectors (with a high screening of more
than 60dB as supplied in the package).
A lower quality coaxial cable and connectors can cause serious picture quality
problems due to interference and/or reflections!

PX-TUAN-01 Instruction Manual
-10-
Chapter 3 Basic Settings
3.1 Initial Settings
The PX-TUAN-01 has been designed to comply with the plug and play principle. It’s very
easy to set up due to several smart and unique features. If you are connected to a cable
network (providing ACI information) the tuner will automatically recognize the ACI information
during scanning and program the tuner according to the list as provided by the cable operator.
If no ACI information is available, the tuner will detect most channel names from Teletext
information, if available, and copy them into the channel label table.
Remark:
For your convenience the Tuner remote control unit has double functions (NEC Plasma Display +
Tuner mode). In the initial setting procedure we recommend to use your actual NEC remote control to
operate the display and to use the Tuner remote control only to operate the Tuner. After setting up has
been successfully completed you may find it more convenient to operate your NEC display with the
Tuner remote control.
After having made the connections, as described in 2.2, follow the following steps:
-1- Install the supplied AAA batteries into remote control.
-2- Make sure the power main switch on the tuner box is in “ON” position.
Press the “ON” key on the remote control. Both Display and Tuner are operated by this command
(be sure that power LED of Display and Tuner are both “Green”)
-3- Select the appropriate Input of your NEC display and this will display the blue background picture
generated by the PX-TUAN-01.
-4- Press “Tuner” key on the remote control. On the blue screen the text “Tuner” will appear.
If this is NOT the case, don’t go to next point but double check all previous steps.
-5- The default OSD language is English. If this is your desired language go to the next point.
If you prefer another language, press the Yellow key on the remote control and select desired
language from the OSD it with "▲" or "▼" key and confirm with pressing the “OK” key.
-6- The default TV system is PAL BG (for most of continental Europe). If this is OK go to next point.
If your TV system is PAL-I (UK, Ireland) or SECAM (France and other countries), press the BLUE
key and select desired standard with "▲" or "▼" key and confirm with the “OK” key. The tuner
will automatically change the A/V settings (for ALL channels) and load the correct programmed
channel table (see section 5.3).

PX-TUAN-01 Instruction Manual
-11-
If you receive more than one TV system, don’t worry. The PX-TUAN-01 has intelligent TV system
detection software and will store each channel with the correct A/V settings during channel scan.
-7- Press Channel ”+” or “-“ key, or select a channel number from table in section 5.3 matching one of
your locally received TV channels, to check if all settings and connections are OK.
-8- Press “Menu” key and go via “SETTING UP” >> “CHANNEL” to >> “AUTOSCAN” menu.
If the PX-TUAN-01 is connected to a cable network, your cable operator might provide an
ACI (Automatic Channel Installation) signal on one of the TV channels.
In this case follow step 8.1 or 8.2.
If you are sure there is no ACI information on any of the received TV channels, e.g. when
PX-TUAN-01 connected to a roof antenna, follow step 8.3
-8.1- If you know on which TV channel the ACI information is available (most of the time the info
channel of the cable operator) select this TV channel with the help of the channel table in
section 5.3 and select “SCAN: ACI ON” and confirm with OK.
A “Warning” message will appear, confirm again with OK.
The PX-TUAN-01 will now immediately detect the ACI information and load this into the
CHANNEL TABLE. This will take less than 1 minute.
After a successful installation, the PX-TUAN-01 is programmed with all channels and channel
names according to the cable operator’s provided ACI list!
No hassle, just plug and play.
-8.2- If you are not sure if your cable operator provides an ACI signal, or don’t know the channel
number with the ACI information, select “SCAN:ACI ON” and confirm with OK (this can be
done on any channel). A “Warning” message will appear, confirm again with OK.
The PX-TUAN-01t will start to scan all channels and check on each channel if the ACI
information is available. If found, the result will be same as 8.1. , if not, the result will be same
as 8.3. It will take about 5 minutes to scan all frequencies. The display will keep you informed
about the number of channels that are already stored.
-8.3- If you are sure there is no ACI available (or you want to ignore the ACI information deliberately)
select “SCAN: ACI OFF” and confirm with OK. A “Warning” message will appear, confirm
again with OK. During scanning the intelligent Autoscan system of the PX-TUAN-01 will
decode for each received channel, the channel name transmitted in the Teletext information
(if available) and load it into the channel table.
It will take about 5 minutes to scan all frequencies.
To complete all channel names and put all channels into the right sequence please follow the
instructions in 4.2.3.2 and 4.2.3.3.

PX-TUAN-01 Instruction Manual
-12-
3.2 IR Remote Control – Tuner related functions
(active after pressing “Tuner” key)
Only the functions relating to Tuner mode, printed in black on remote control, are described
below. For functions relating to NEC Plasma Display mode, refer to chapter 3.3
① ON
Press to switch ON the display as well as
tuner box
②OFF
Press to switch OFF the display as well as
tuner box
④0~9 Number Keys
Used to select TV channels or TTX page
⑤Tuner
Press to activate Tuner mode
⑥Display
Press to activate Display mode
⑦Exit
Exit the current menu selection and return to
the previous menu.
⑧Menu
Select the main OSD (On Screen Display)
menu.
⑨ F.tune
Finetune the frequency of the actual
channel. The adjustment will be
stored for each individual channel.
⑩ Recall
Return to the previously selected channel.
⑪ ◀▶Adjust selected function
▲▼ Select the desired item on menu,
or channels/TTX page up or down
⑫ OK
Confirm the highlighted item in menu.
⑬Volume +/-
Adjust the volume.
1
2
3
4
56
7
89
0
?

PX-TUAN-01 Instruction Manual
-13-
⑭Channel +/-
Select channels up or down.
⑮ Mute
Turn the sound On/Off.
⑯ Audio
Will first display the actual mode. By pressing again you can toggle between Stereo,
Language 1, Language 2, and Mono.
⑰ Info
Channel Number, Channel Name, actual selected Audio Mode, and Video Standard will be
displayed for a few seconds and after that the Time. Press key again to delete Time.
⑱ Source
Select between Tuner and External Video source connected to the Tuner input.
⑲Reveal / Stop
Display the hidden text (if available) in TTX page and deactivate TTX (page counter will stop).
Press again to activate TTX again.
⑳ Double Height
Display half of TTX page in double height
Teletext (TTX)
Open Teletext mode. Press this button again to exit.
Mix
Press to display TTX together with broadcast picture or overlay with subtitles.
Blue Key
Tuner TV mode: Will open the TV-SYSTEM sub-menu
Tuner TTX mode: Selects the Blue coloured Fastext page at the bottom of the TTX page
Yellow Key
Tuner TV mode: Will open the LANGUAGE sub-menu
Tuner TTX mode: Selects the Yellow coloured Fastext page at the bottom of the TTX page
Red Key
Tuner TTX mode: Selects the Red coloured Fastext page at the bottom of the TTX page
Green Key
Tuner TTX mode: Selects the Green coloured Fastext page at the bottom of the TTX page

PX-TUAN-01 Instruction Manual
-14-
3.3 IR Remote Control – Functions in Display mode
(active after pressing “Display” key)
In this mode the green printed Display functions will be active, together with the Tuner functions
described below.
① ON
Press to switch ON the display as well as
tuner box
②OFF
Press to switch OFF the display as well as
tuner box
③ Wide
Press to toggle between screen sizes.
④0~9 Number Keys
Used to select sources and picture
adjustment set-ups when Display mode is
active.
1 Select Video as the source.
2 Select DVD/HD as the source.
3 Select RGB/PC as the source.
4 & 7 Adjust the contrast.
5 & 8 Adjust the brightness.
6 & 9 Adjust the colour.
0 Adjust the size and quality of the
picture automatically.
⑤ Tuner
Press to activate Tuner mode.
⑥ Display
Press to activate Display mode.
⑦ Exit
Exit the current menu selection and return
to the previous menu.
⑧ Menu
Select the main OSD (On Screen Display)
menu.
⑩ Recall
Return to the previously selected channel.
1
2
3
4
56
7
89
0
?

PX-TUAN-01 Instruction Manual
-15-
⑪ ◀▶Adjust selected function.
▲ ▼ Select the desired item on menu.
⑫OK
Confirm the highlighted item in menu.
⑬Volume +/-
Adjust the volume.
⑭Channel +/-
Select channels up or down
⑮ Mute
Turn the sound On/Off.
⑯ Audio
Will first display the actual mode. By pressing again you can toggle between Stereo,
Language 1, Language 2, and Mono.
⑰ Info
Channel Number, Channel Name, actual selected Audio Mode, and Video Standard will be
displayed for a few seconds and after that the Time. Press key again to delete Time.
⑱ Source
Select between Tuner and External Video source connected to the Tuner input
Select *
PIP *
Single*
Side *
* This function operates only with NEC Plasma Display 50XR4 and 61XR3.
Please refer to NEC manual for more details.

PX-TUAN-01 Instruction Manual
-16-
Chapter 4 Advanced Settings
General operation
If you press the “Display” key the green printed functions will be active (not described here).
If you press the “Tuner” key the black printed functions will be active (described below).
① Press "▲" or "▼" key to select item and “OK” key to open the selected item.
② Press "◀" or "▶" button to adjust the selected item.
③ Press "Exit" button to return to the previous menu.
4.1 MAIN MENU
Press "Menu" button to open the MAIN MENU.
1 MAIN MENU
> SETTING UP
TTX WEST/EAST
TTX CHARACTER
4.2 SETTING UP
SETTING UP sub-menu provides options for LANGUAGE, TV-SYSTEM, CHANNEL, CLOCK,
and OSD.
2 SETTING UP
> LANGUAGE
TV-SYSTEM*
CHANNEL*
CLOCK
OSD
Select required subject and confirm with OK key.
* not active in C-Video In mode.

PX-TUAN-01 Instruction Manual
-17-
4.2.1 LANGUAGE
LANGUAGE sub-menu provides options for ENGLISH, SVENSKA, DEUTSCH, ITALIANO,
FRANCAIS, ESPANOL, NEDERLANDS and TURKCE.
3 LANGUAGE
> ENGLISH
SVENSKA
DEUTSCH
ITALIANO
FRANCAIS
ESPANOL
NEDERLANDS
TURKCE
Select the required language and confirm with OK key.
4.2.2 TV SYSTEM
TV SYSTEM sub-menu provides options for PAL BG, PAL I, PAL DK, SECAM L, SECAM DK
and RESET.
If you select another TV SYSTEM in the default mode (before AUTOSCAN has been applied)
the settings for ALL channels will be changed and the corresponding channel table will be
loaded into the CHANNEL TABLE. In case an AUTOSCAN has been applied, the TV
SYSTEM setting will ONLY change the settings of the actual channel.
The RESET function will restore factory default settings (PAL- BG)
ALL THE PREVIOUSLY STORED CHANNEL INFORMATION WILL BE DELETED AND
REPLACED BY THE DEFAULT SETTINGS. Confirm with OK or EXIT.
4 TV SYSTEM
> PAL BG
PAL I
PAL DK
SECAM L
SECAM DK
RESET
Select the required TV system and confirm with OK key.

PX-TUAN-01 Instruction Manual
-18-
4.2.3 CHANNEL Settings
CHANNEL sub-menu provides service for AUTOSCAN, CHANNEL LABEL, CHANNEL
SWAP, MASTER TUNE and CH REMOVE.
5 CHANNEL
> AUTOSCAN
CHANNEL LABEL
CHANNEL SWAP
MASTER TUNE
CH REMOVE
Select the required subject and confirm with “OK” key.
① AUTOSCAN:
Normally SCAN: ACI ON should be used.
The PX-TUAN-01 will, during scanning, search for the ACI signal (only available on
larger cable TV networks) and, if found, automatically store all channels in the channel
table. If no ACI signal is found, the tuner will store most of the channels with a name by
using its advanced system to detect channel name from the Teletext signal.
In case you deliberately want to ignore the ACI signal select SCAN: ACI OFF.
The SEARCH NEW CH function will search for new channels and, if found, store them
above the already stored channels. This is a convenient option if a new channel (e.g.
your own VCR channel) has to be added without affecting your already stored channels.
Warning! : All previously stored channel information will be overwritten after
restarting scan with ACI ON or ACI OFF, but will be retained if you choose
SEARCH NEW CH. Confirm with OK or EXIT.
6 AUTOSCAN
> SCAN: ACI ON
SCAN : ACI OFF
SEARCH NEW CH
Select the required subject and confirm with “OK” key.

PX-TUAN-01 Instruction Manual
-19-
② CHANNEL LABEL:
The channel label menu gives you the option to write or change the name of each stored
channel. The selected channel will be displayed in the background for easy recognition.
Press "▲" or "▼" and “OK” to activate the required channel, then press "▲" or "▼"
button to pick a numeral or alphabetic character; press "▶" to move to next column.
After entering (maximally six characters) and pressing “OK” you come back into the
previous mode. You can leave the label mode at any time by pressing the EXIT key.
7 CHANNEL LABEL
> CH 001 - - - - - -
CH 002 - - - - - -
CH 003 - - - - - -
CH 004 - - - - - -
CH 005 - - - - - -
Select the required channel and open label mode by pressing the “OK” key.
③ CHANNEL SWAP:
It is advised to complete channel label function before you start with the CHANNEL
SWAP function.
Press "▲" or "▼" to select the program you want to swap to the CH 001 position. Press
“OK” key to activate swap mode. Two small arrows will appear at left/right side of the
selected channel number. Press "▲" key and go to channel 001. Press “OK” key and
the previously selected channel will be swapped with the actual program on channel 001.
With "◀" or "▶" button you can skip 5 channels at a time.
Repeat till all channels are in the desired sequence.
8 CHANNEL SWAP
> CH 001 AAAAA
CH 002 BBBBB
CH 003 CCCCC
CH 004 DDDDD
CH 005 EEEEE
Select channel to be swapped and confirm with “OK”.
Go to desired channel number and confirm again with “OK”.

PX-TUAN-01 Instruction Manual
-20-
④ MASTER TUNE:
The PX-TUAN-01 has a very accurate tuning system however (e.g. depending on signal
quality) a frequency “off-set” might improve the picture quality. The MASTER TUNE
mode offers the facility to give a certain frequency “off-set” for ALL channels. With the
“Finetune” function (key ⑤on remote control) you can optimise the tuning for EACH
channel.
⑤ CH REMOVE/ADD:
The channels are not actually removed but skipped in Channel UP/DOWN selection;
you can still select the removed channel by pressing the channel number. Once
channels are added, they can again be addressed in Channel UP/DOWN selection.
For example to REMOVE CH60
Select CH60, enter the CHANNEL sub-menu, press "▼" button to access CH REMOVE,
and then confirm CH REMOVE by pressing the "OK" key.
To ADD CH60 again
Use numerical keys on remote control to select CH60, enter the CHANNEL menu, press
"▼" button to access CH ADD, and then confirm CH ADD by pressing the "OK" key.
4.2.4 CLOCK
CLOCK menu provides TIME set up by hour (24h mode) and minute.
9 CLOCK
00 00
① Press "◀" or "▶" button to move to the digit for adjustment.
② Press "▲" or "▼" button to adjust.
③ Press “OK” button to save the time settings.
This manual suits for next models
1
Table of contents
Languages:
Other NEC TV Receiver manuals