nedis IREX150AT User manual

ned.is/irex150at
IR Remote Control Extender
to operate equipment which is out of sight
IRE X150AT
IREX150AT_MAN_COMP_0420_print_(20210 1422) v02_02.indd 1 20-4-2020 08:09:44

aQuick start guide 4
cKurzanleitung 7
bGuide de démarrage rapide 10
dVerkorte handleiding 13
jGuida rapida all’avvio 16
hGuía de inicio rápido 19
iGuia de iniciação rápida 22
eSnabbstartsguide 25
gPika-aloitusopas 28
fHurtigguide 31
2Vejledning til hurtig start 34
kGyors beüzemelési útmutató 37
nPrzewodnik Szybki start 40
xΟδηγό γρήγορη εκκίνηση 43
1Rýchly návod 47
lRychlý návod 50
yGhid rapid de iniiere 53
IREX150AT_MAN_COMP_0420_print_(20210 1422) v02_02.indd 2 20-4-2020 08:09:44

1
2
3
4
59
8
7
6
A
IREX150AT_MAN_COMP_0420_print_(20210 1422) v02_02.indd 3 20-4-2020 08:09:44

4
aQuick start guide
IR Remote Control Extender IREX150AT
For more information see the extended manual online:
ned.is/irex150at
Intended use
This product amplies and extends the infrared signal from a remote control to a
device connected with this product, even when your devices are concealed.
The product is intended for indoor use only.
The product is not intended for professional use.
Any modication of the product may have consequences for safety, warranty
and proper functioning.
Specications
Product IR Remote Control Extender
Article number IREX150AT
Dimensions (l x w x h) 88 x 55 x 26 mm
Power supply 12 VDC ; 1 A
USB power supply 5 VDC
Main parts (image A)
IR emitter ports (6x)
IR transmitter
12 VDC power port
5 VDC USB-B power port
IR emitter (6x)
Power indicator LEDs
Status indicator LED
IR receiver port (3x)
IR receiver (1x)
IREX150AT_MAN_COMP_0420_print_(20210 1422) v02_02.indd 4 20-4-2020 08:09:44

5
Safety instructions
-
WARNING
• Only use the product as described in this manual.
• Do not use the product if a part is damaged or defective. Replace a damaged
or defective device immediately.
• Do not drop the product and avoid bumping.
• This product may only be serviced by a qualied technician for maintenance
to reduce the risk of electric shock.
• Disconnect the product from the electrical outlet and other equipment if
problems occur.
• Do not expose the product to water or moisture.
• Do not open the product.
• If the power cable is damaged, it must be replaced by a special cable or
assembly available from the manufacturer or its service agent.
• Only use provided parts.
Installing the product
4Make sure all the devices you want to connect have been switched o.
1. Plug the IR receiver A9into the IR receiver port A8.
4When using multiple IR receivers A9, keep a distance of at least 6 meters to
avoid interference.
2. Plug the IR transmitter A5into an IR emitter port A1.
3. Place A5near an IR transmitter of your device.
4Only 1 A5can be connected per device.
4To avoid interference keep the distance between your device and the IR
receiver 10 m apart from each other.
Connecting the power supply
There are multiple options to connect the IR transmitter A2to a power supply.
Select one of the following:
• Plug a 12 VDC @ 1 A adapter into the 12 VDC power port A3.
IREX150AT_MAN_COMP_0420_print_(20210 1422) v02_02.indd 5 20-4-2020 08:09:44

6
• Plug a USB cable (not included) from your device into the 5VDC USB-B power
port A4.
4The corresponding power indicator LEDs A6lights up.
F.A.Q.
1. How do I locate the IR receiver of my device?
• Consult the manual of your device.
• Move the emitter on the surface of the device until a signal is received from
the remote control.
2. Why is A9not responding?
• Check if A2is pasted on the right position (IR point of your device).
• Change the power supply to the 5 VDC adapter (cable not included).
• Move A9away from the TV as the electrons may interfere from theTV.
3. Which remote control can be used?
• Use the remote control of your device.
Declaration of Conformity
We, Nedis B.V. declare as manufacturer that the product IREX150AT from our
brand Nedis®, produced in China, has been tested according to all relevant CE
standards and regulations and that all tests have been passed successfully. This
includes, but is not limited to the RED 2014/53/EU regulation.
The complete Declaration of Conformity (and the safety datasheet if applicable)
can be found and downloaded via webshop.nedis.com/IREX150AT#support
For additional information regarding the compliance, contact the customer
service:
Web: www.nedis.com
E-mail: [email protected]
Nedis B.V., de Tweeling 28
5215 MC ’s-Hertogenbosch, the Netherlands
IREX150AT_MAN_COMP_0420_print_(20210 1422) v02_02.indd 6 20-4-2020 08:09:44

7
cKurzanleitung
IR-Fernbedienungs-Extender IREX150AT
Weitere Informationen nden Sie in der erweiterten
Anleitung online: ned.is/irex150at
Bestimmungsgemäße Verwendung
Dieses Produkt verstärkt und erweitert das Infrarotsignal von einer
Fernbedienung zu einem mit diesem Produkt verbundenen Gerät, auch wenn
Ihre Geräte verdeckt sind.
Das Produkt ist nur zur Verwendung innerhalb von Gebäuden gedacht.
Das Produkt ist nicht für den professionellen Einsatz gedacht.
Jegliche Modikation des Produkts kann Folgen für die Sicherheit, Garantie und
ordnungsgemäße Funktionalität haben.
Spezikationen
Produkt IR-Fernbedienungs-Extender
Artikelnummer IREX150AT
Größe (L x B x H) 88 x 55 x 26 mm
Stromversorgung 12 VDC ; 1 A
USB-Stromversorgung 5 VDC
Hauptbestandteile (Abbildung A)
IR-Emitter-Anschlüsse (6x)
IR-Sender
12 VDC-Stromanschluss
5 VDC USB-B Stromanschluss
IR-Emitter (6x)
Betriebsanzeige-LEDs
Statusanzeige-LED
IR-Empfänger-Anschluss (3x)
IR-Empfänger (1x)
IREX150AT_MAN_COMP_0420_print_(20210 1422) v02_02.indd 7 20-4-2020 08:09:44

8
Sicherheitshinweise
-
WARNUNG
• Verwenden Sie das Produkt nur wie in dieser Anleitung beschrieben.
• Verwenden Sie das Produkt nicht, wenn ein Teil beschädigt ist oder es einen
Mangel aufweist. Ersetzen Sie ein beschädigtes oder defektes Gerät
unverzüglich.
• Lassen Sie das Produkt nicht herunterfallen und vermeiden Sie Kollisionen.
• Dieses Produkt darf nur von einem ausgebildeten Techniker gewartet
werden, um die Gefahr eines Stromschlags zu reduzieren.
• Trennen Sie das Produkt vom Stromanschluss und anderer Ausrüstung, falls
Probleme auftreten.
• Setzen Sie das Produkt keinem Wasser oder Feuchtigkeit aus.
• Önen Sie das Produkt nicht.
• Wenn das Netzkabel beschädigt ist, muss es durch ein Spezialkabel oder eine
Spezialbaugruppe vom Hersteller oder Servicepartner ersetzt werden.
• Verwenden Sie nur die mitgelieferten Teile.
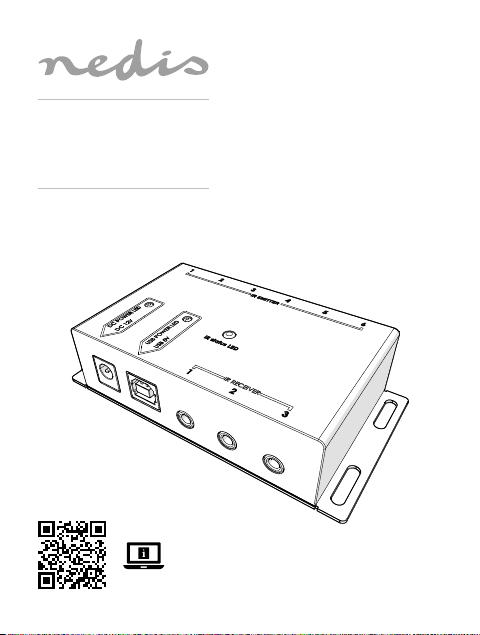
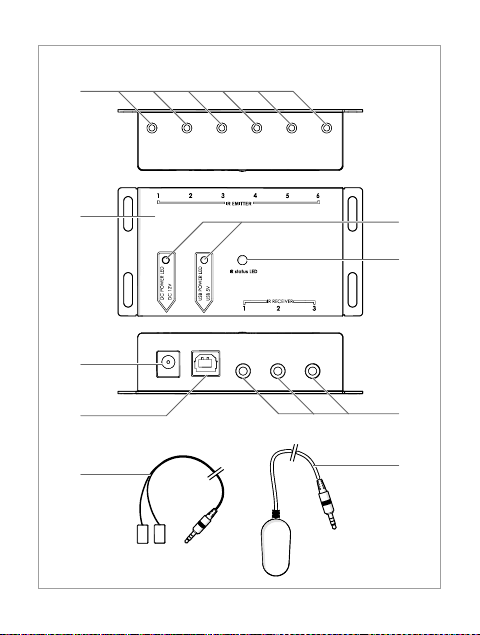
Installation des Produkts
4Stellen Sie sicher, dass alle Geräte, die Sie verbinden wollen, ausgeschaltet
sind.
1. Stecken Sie den IR-Empfänger A9in den IR-Empfänger-Anschluss A8.
4Bei Verwendung mehrerer IR-Empfänger A9halten Sie mindestens 6 Meter
Abstand, um Interferenzen zu vermeiden.
2. Stecken Sie den IR-Sender A5in den IR-Emitter-Anschluss A1.
3. Platzieren Sie A5in der Nähe eines IR-Senders Ihres Geräts.
4Nur 1 A5kann je Gerät verbunden werden.
4Um Interferenzen zu vermeiden, halten Sie einen Abstand von 10 m zwischen
Ihrem Gerät und dem IR-Empfänger ein.
Verbinden der Stromversorgung
Es gibt verschiedene Möglichkeiten, um den IR-Sender A2mit einer
Stromversorgung zu verbinden. Wählen Sie eine der folgenden Optionen:
IREX150AT_MAN_COMP_0420_print_(20210 1422) v02_02.indd 8 20-4-2020 08:09:44

9
• Schließen Sie einen 12 VDC @ 1 A Adapter an dem 12 VDC Stromanschluss
A3an.
• Verbinden Sie ein USB-Kabel (nicht im Lieferumfang enthalten) von Ihrem
Gerät mit dem 5 VDC USB-B Stromanschluss A4.
4Die entsprechenden Betriebsanzeige-LEDs A6leuchten auf.
F.A.Q.
1. Wie nde ich den IR-Empfänger meines Geräts?
• Sehen Sie im Handbuch Ihres Geräts nach.
• Bewegen Sie den Emitter über die Oberäche des Geräts, bis ein Signal von
der Fernbedienung empfangen wird.
2. Warum reagiert A9nicht?
• Überprüfen Sie, ob A2an der richtigen Stelle eingefügt ist (IR-Punkt Ihres
Geräts).
• Wechseln Sie die Stromversorgung auf den 5 VDC Adapter (Kabel nicht im
Lieferumfang enthalten).
• Bewegen Sie A9vom Fernseher weg, da die Elektronen im TV zu
Interferenzen führen können.
3. Welche Fernbedienung kann verwendet werden?
• Verwenden Sie die Fernbedienung Ihres Geräts.
Konformitätserklärung
Wir, Nedis B.V., erklären als Hersteller, dass das Produkt IREX150AT unserer Marke
Nedis®, produziert in China, nach allen geltenden CE-Standards und Vorschriften
getestet wurde und alle diese Tests erfolgreich bestanden hat. Dies gilt unter
anderem auch für die Richtlinie RED 2014/53/EU.
Die vollständige Konformitätserklärung (und das Sicherheitsdatenblatt, falls
zutreend) steht zum Download zur Verfügung unter webshop.nedis.de/
IREX150AT#support
IREX150AT_MAN_COMP_0420_print_(20210 1422) v02_02.indd 9 20-4-2020 08:09:44

10
Weiterführende Informationen zur Compliance erhalten Sie über den
Kundenservice:
Web: www.nedis.com
E-Mail: [email protected]
Nedis B.V., de Tweeling 28
5215 MC ’s-Hertogenbosch, Niederlande
bGuide de démarrage rapide
Prolongateur de télécommande RF IREX150AT
Pour plus d'informations, consultez le manuel détaillé en
ligne: ned.is/irex150at
Utilisation prévue
Ce produit amplie et étend le signal infrarouge d’une télécommande vers un
appareil connecté à ce produit, même lorsque vos appareils sont dissimulés.
Le produit est prévu pour un usage intérieur uniquement.
Le produit n’est pas destiné à un usage professionnel.
Toute modication du produit peut avoir des conséquences sur la sécurité, la
garantie et le bon fonctionnement.
Spécications
Produit Prolongateur de télécommande RF
Article numéro IREX150AT
Dimensions (L x l x H) 88 x 55 x 26 mm
Source d’alimentation 12 VDC ; 1 A
Alimentation électrique USB 5 VDC
IREX150AT_MAN_COMP_0420_print_(20210 1422) v02_02.indd 10 20-4-2020 08:09:44

11
Pièces principales (image A)
Ports d’émetteur IR (6x)
Transmetteur IR
Port d’alimentation 12 VCC
Port d’alimentation USB-B 5 VCC
Émetteur IR (6x)
Voyants LED d’alimentation
Voyant LED d’état
Port du récepteur IR (3x)
Récepteur IR (1x)
Consignes de sécurité
-
AVERTISSEMENT
• Utilisez le produit uniquement comme décrit dans le présent manuel.
• Ne pas utiliser le produit si une pièce est endommagée ou défectueuse.
Remplacer immédiatement un appareil endommagé ou défectueux.
• Ne pas laisser tomber le produit et éviter de le cogner.
• Ce produit ne peut être réparé que par un technicien qualié an de réduire
les risques d'électrocution.
• Débrancher le produit de la prise secteur et de tout autre équipement en cas
de problème.
• Ne pas exposer le produit à l'eau ou à l'humidité.
• Ne pas ouvrir le produit.
• Si le câble d'alimentation est endommagé, il doit être remplacé par un câble
ou un ensemble spécial disponible auprès du fabricant ou de son agent de
service.
• Utilisez uniquement des pièces fournies.
Installer le produit
4Assurez-vous que tous les appareils que vous souhaitez connecter soient
hors tension.
1. Branchez le récepteur IR A9dans le port du récepteur IR A8.
4Lorsque vous utilisez plusieurs récepteurs IR A9, gardez une distance d'au
moins 6 mètres an d’éviter des interférences.
2. Branchez le transmetteur IR A5dans un port d’émetteur IR A1.
IREX150AT_MAN_COMP_0420_print_(20210 1422) v02_02.indd 11 20-4-2020 08:09:44

12
3. Placez A5près d'un transmetteur IR de votre appareil.
4Seulement 1 A5peuvent être connectés par appareil.
4An de d’éviter des interférences, maintenez la distance entre votre appareil
et le récepteur IR à 10 m l’un de l’autre.
Connecter l'alimentation électrique
Il y a plusieurs options pour connecter le transmetteur IR A2à une
alimentation électrique. Sélectionnez l'une des options suivantes :
• Branchez un adaptateur 12 VCC de 1 A dans le port d'alimentation 12 VCC
A3.
• Branchez un câble USB (non fourni) depuis votre appareil sur le port
d'alimentation USB-B 5 VCC A4.
4Les voyants LED d'alimentation correspondants A6s’allument.
F.A.Q.
1. Comment localiser le récepteur IR de mon appareil ?
• Consultez le manuel de votre appareil.
• Déplacez l'émetteur sur la surface de l'appareil jusqu'à ce qu'un signal soit
reçu de la télécommande.
2. Pourquoi A9ne répond-il pas ?
• Vériez si A2est mis à la bonne position (point IR de votre appareil).
• Changez l’alimentation électrique de l’adaptateur 5 VCC (câble non fourni).
• Éloignez A9du téléviseur car les électrons du téléviseur peuvent interférer.
3. Quelle télécommande peut être utilisée ?
• Utilisez la télécommande de votre appareil.
Déclaration de conformité
Nous, Nedis B.V., déclarons en tant que fabricant que le produit IREX150AT de
notre marque Nedis®, produit en Chine, a été testé conformément à toutes les
normes et réglementations CE en vigueur et que tous les tests ont été réussis.
Cela inclut, sans toutefois s'y limiter, la directive RED 2014/53/UE.
IREX150AT_MAN_COMP_0420_print_(20210 1422) v02_02.indd 12 20-4-2020 08:09:44

13
La Déclaration de conformité complète (et la che de sécurité le cas échéant)
peut être trouvée et téléchargée via webshop.nedis.fr/IREX150AT#support
Pour plus d'informations sur la conformité, contactez le service client:
Site Web: www.nedis.com
E-mail: [email protected]
Nedis B.V., de Tweeling 28
5215 MC ’s-Hertogenbosch, Pays-Bas
dVerkorte handleiding
IR-afstandsbedieningsextender IREX150AT
Zie voor meer informatie de uitgebreide handleiding
online: ned.is/irex150at
Bedoeld gebruik
Dit product versterkt en breidt het infraroodsignaal uit van een
afstandsbediening naar een apparaat dat met dit product verbonden is, zelfs
wanneer uw apparaten verborgen zijn.
Het product is enkel bedoeld voor gebruik binnenshuis.
Het product is niet bedoeld voor professioneel gebruik.
Elke wijziging van het product kan gevolgen hebben voor veiligheid, garantie en
correcte werking.
Specicaties
Product IR-afstandsbedieningsextender
Artikelnummer IREX150AT
Afmetingen (l x b x h) 88 x 55 x 26 mm
Voeding 12VDC ; 1 A
USB-voeding 5 VDC
IREX150AT_MAN_COMP_0420_print_(20210 1422) v02_02.indd 13 20-4-2020 08:09:44

14
Belangrijkste onderdelen (afbeelding A)
IR-emitterpoorten (6x)
IR-zender
12 VDC-voedingspoort
5 VDC USB-B-voedingspoort
IR-emitter (6x)
Stroomindicatorlampjes
Statusindicatie LED
IR-ontvangerpoort (3x)
IR-ontvanger (1x)
Veiligheidsvoorschriften
-
WAARSCHUWING
• Gebruik het product alleen zoals beschreven in deze handleiding.
• Gebruik het product niet als een onderdeel beschadigd of defect is. Vervang
een beschadigd of defect apparaat onmiddellijk.
• Laat het product niet vallen en voorkom stoten.
• Dit product mag voor onderhoud alleen worden geopend door een erkend
technicus om het risico op elektrische schokken te verkleinen.
• Koppel het product los van het stopcontact en van andere apparatuur als er
zich problemen voordoen.
• Stel het product niet bloot aan water of vocht.
• Open het product niet.
• Als het netsnoer beschadigd is, moet het worden vervangen met een
speciale kabel of module dat verkrijgbaar is bij de fabrikant of zijn
onderhoudsmonteur.
• Gebruik alleen de meegeleverde onderdelen.
Het product installeren
4Controleer of alle apparaten die u wilt aansluiten uitgeschakeld zijn.
1. Steek de IR-ontvanger A9in de IR-ontvangerpoort A8.
4Wanneer u meerdere IR-ontvangers A9gebruikt, houd dan een afstand van
ten minste 6 meter aan om interferentie te voorkomen.
2. Steek de IR-zender A5in een IR-emitterpoort A1.
3. Plaats A5in de buurt van een IR-zender van uw apparaat.
4Alleen 1 A5kunnen per apparaat verbonden worden.
IREX150AT_MAN_COMP_0420_print_(20210 1422) v02_02.indd 14 20-4-2020 08:09:44

15
4Om interferentie te voorkomen, houd uw apparaat en de IR-ontvanger 10 op
een afstand van m van elkaar.
De voeding aansluiten
Er zijn meerdere opties om de IR-zender A2op een voedingsbron aan te
sluiten. Selecteer een van de volgende opties:
• Steek een 12 VDC @ 1 A-adapter in de 12 VDC-voedingspoort A3.
• Steek een USB-kabel (niet meegeleverd) van uw apparaat in de 5 VDC
USB-B-voedingspoort A4.
4De overeenkomstige stroomindicatorlampjes A6gaan branden.
Veel gestelde vragen
1. Hoe kan ik de IR-ontvanger van mijn apparaat vinden?
• Raadpleeg de handleiding van uw apparaat.
• Verplaats de zender op het oppervlak van het apparaat tot er een signaal van
de afstandsbediening wordt ontvangen.
2. Waarom reageert A9niet?
• Controleer of A2op de juiste positie (IR-punt van uw apparaat) is geplakt.
• Wijzig de stroomtoevoer naar de 5 VDC-adapter (kabel niet inbegrepen).
• Verwijder A9uit de buurt van de TV omdat de elektronen interferentie met
de TV kunnen veroorzaken.
3. Welke afstandsbediening kan worden gebruikt?
• Gebruik de afstandsbediening van uw apparaat.
Verklaring van overeenstemming
Wij, Nedis B.V. verklaren als fabrikant dat het product IREX150AT van ons merk
Nedis®, geproduceerd in China, is getest conform alle relevante CE-normen en
voorschriften en dat alle tests met succes zijn doorstaan. Dit omvat, maar is niet
beperkt tot de richtlijn RED 2014/53/EU.
De volledige conformiteitsverklaring (en het blad met veiligheidsgegevens
indien van toepassing) kan worden gevonden en gedownload via
webshop.nedis.nl/IREX150AT#support
IREX150AT_MAN_COMP_0420_print_(20210 1422) v02_02.indd 15 20-4-2020 08:09:44

16
Voor andere informatie met betrekking tot de naleving neemt u contact op met
de klantenservice:
Web: www.nedis.nl
Email: [email protected]
Nedis B.V., de Tweeling 28
5215 MC ’s-Hertogenbosch, Nederland
jGuida rapida all’avvio
Amplicatore IR per telecomando IREX150AT
Per maggiori informazioni vedere il manuale esteso online:
ned.is/irex150at
Uso previsto
Questo prodotto amplica ed estende il segnale infrarosso da un telecomando
a un dispositivo collegato con il prodotto, anche quando i dispositivi sono
nascosti.
Il prodotto è inteso solo per utilizzo in interni.
Il prodotto non è inteso per utilizzi professionali.
Eventuali modiche al prodotto possono comportare conseguenze per la
sicurezza, la garanzia e il corretto funzionamento.
Speciche
Prodotto Amplicatore IR per telecomando
Numero articolo IREX150AT
Dimensioni (p x l x a) 88 x 55 x 26 mm
Alimentazione 12 VDC ; 1 A
Alimentazione USB 5 VDC
IREX150AT_MAN_COMP_0420_print_(20210 1422) v02_02.indd 16 20-4-2020 08:09:44

17
Parti principali (immagine A)
Porte di emissione IR (6x)
Trasmettitore IR
Porta di alimentazione 12 VCC
Porta di alimentazione 5 VCC
USB-B
Emettitore IR (6x)
Spie LED indicatrici di accensione
Spia LED di stato
Porta ricevitore IR (3x)
Ricevitore IR (1x)
Istruzioni di sicurezza
-
ATTENZIONE
• Utilizzare il prodotto solo come descritto nel presente manuale.
• Non utilizzare il prodotto se una parte è danneggiata o difettosa. Sostituire
immediatamente un dispositivo danneggiato o difettoso.
• Non far cadere il prodotto ed evitare impatti.
• Il prodotto può essere riparato e sottoposto a manutenzione esclusivamente
da un tecnico qualicato per ridurre il rischio di scosse elettriche.
• Scollegare il prodotto dalla presa elettrica e da altre apparecchiature se si
vericano problemi.
• Non esporre il prodotto all’acqua o all’umidità.
• Non aprire il prodotto.
• Se il cavo di alimentazione è danneggiato, deve essere sostituito da un cavo o
gruppo speciale disponibile presso il produttore o un agente di servizio.
• Utilizzare solo le parti in dotazione.
Installazione del prodotto
4Assicurarsi che tutti i dispositivi che si desidera collegare siano stati spenti.
1. Inserire il ricevitore IR A9nella porta del ricevitore IR A8.
4Quando si utilizzano più ricevitori IR A9, mantenere una distanza di almeno
6 metri per evitare interferenze.
2. Inserire il trasmettitore IR A5in una porta dell’emettitore IR A1.
3. Posizionare A5accanto a un trasmettitore IR sul proprio dispositivo.
4Solo 1 A5possono essere connessi per dispositivo.
4Per evitare interferenze, mantenere la distanza fra il proprio dispositivo e il
ricevitore IR a 10 m l’uno dall’altro.
IREX150AT_MAN_COMP_0420_print_(20210 1422) v02_02.indd 17 20-4-2020 08:09:44

18
Collegamento dell’alimentazione
Sono possibili molteplici opzioni per collegare il trasmettitore IR A2a una
sorgente di alimentazione. Selezionare una delle seguenti:
• Inserire un adattatore 12 VCC a 1 A nella porta di alimentazione 12 VCC A3.
• Inserire un cavo USB (non incluso) dal dispositivo nella porta di alimentazione
USB-B 5 VCC A4.
4Le spie LED di alimentazione corrispondenti A6si accendono.
Domande frequenti
1. Dove trovo il ricevitore IR del mio dispositivo?
• Consultare il manuale del proprio dispositivo.
• Spostare l’emettitore sulla supercie del dispositivo no a quando non si
riceve un segnale dal telecomando.
2. Perché A9non risponde?
• Controllare che A2sia posizionato nella posizione corretta (punto IR del
proprio dispositivo).
• Cambiare l’alimentazione all’adattatore 5 VCC (cavo non incluso).
• Allontanare A9dalla TV poiché potrebbero vericarsi interferenze dalla TV
stessa.
3. Quale telecomando è possibile utilizzare?
• Utilizzare il telecomando del proprio dispositivo.
Dichiarazione di conformità
Noi sottoscritti, Nedis B.V., dichiariamo, in quanto fabbricanti, che il prodotto
IREX150AT con il nostro marchio Nedis®, prodotto in Cina, è stato collaudato
ai sensi di tutte le norme e i regolamenti CE pertinenti e che tutti i collaudi
sono stati superati con successo. Questo include, senza esclusione alcuna, la
normativa RED 2014/53/UE.
La Dichiarazione di conformità completa (e le schede di sicurezza, se
applicabili) sono disponibili e possono essere scaricate da webshop.nedis.it/
IREX150AT#support
IREX150AT_MAN_COMP_0420_print_(20210 1422) v02_02.indd 18 20-4-2020 08:09:44

19
Per ulteriori informazioni relative alla conformità, contattare il servizio clienti:
Sito web: www.nedis.com
E-mail: [email protected]
Nedis B.V., de Tweeling 28
5215 MC ’s-Hertogenbosch, Paesi Bassi
hGuía de inicio rápido
Extensor del mando a distancia por
infrarrojos (IR) IREX150AT
Para más información, consulte el manual ampliado en
línea: ned.is/irex150at
Uso previsto por el fabricante
Este producto amplica y extiende la señal de infrarrojos desde un mando a
distancia a un dispositivo conectado a este producto, incluso si sus dispositivos
están ocultos.
El producto está diseñado únicamente para uso en interiores.
El producto no está diseñado para un uso profesional.
Cualquier modicación del producto puede tener consecuencias para la
seguridad, la garantía y el funcionamiento adecuado.
Especicaciones
Producto Extensor del mando a distancia por infrarrojos (IR)
Número de artículo IREX150AT
Dimensiones (L x An x Al) 88 x 55 x 26 mm
Suministro eléctrico 12 VDC ; 1 A
Suministro de corriente
USB
5 VDC
IREX150AT_MAN_COMP_0420_print_(20210 1422) v02_02.indd 19 20-4-2020 08:09:44

20
Partes principales (imagen A)
Puertos del emisor de IR (6x)
Transmisor de IR
12 Puerto de corriente VCC
5 Puerto de corriente VCC USB-B
Emisor de IR (6x)
Indicadores LED de encendido
Indicador LED de estado
Puerto del receptor de IR (3x)
Receptor de IR (1x)
Instrucciones de seguridad
-
ADVERTENCIA
• Utilice el producto únicamente tal como se describe en este manual.
• No use el producto si alguna pieza está dañada o presenta defectos.
Sustituya inmediatamente el aparato si presenta daños o está defectuoso.
• No deje caer el producto y evite que sufra golpes.
• Este producto solo puede recibir servicio de un técnico cualicado para su
mantenimiento para así reducir el riesgo de descargas eléctricas.
• Desconecte el producto de la toma de corriente y de otros equipos si surgen
problemas.
• No exponga el producto al agua o a la humedad.
• No abra el producto.
• Si el cable de alimentación está dañado, deberá ser sustituido por un cable o
ensamblaje especial puesto a disposición por el fabricante o su agente de
servicio.
• Utilice solamente las piezas proporcionadas.
Cómo instalar el producto
4Asegúrese de que todos los dispositivos que quiere conectar se hayan
apagado.
1. Enchufe el receptor de IR A9en el puerto del receptor de IR A8.
4En caso de utilizar múltiples receptores de IR A9, mantenga una distancia
de 6 metros, como mínimo, para evitar interferencias.
2. Enchufe el transmisor de IR A5en un puerto del emisor de IR A1.
3. Coloque A5cerca de un transmisor de IR de su dispositivo.
IREX150AT_MAN_COMP_0420_print_(20210 1422) v02_02.indd 20 20-4-2020 08:09:44
Table of contents
Languages:
Other nedis Extender manuals