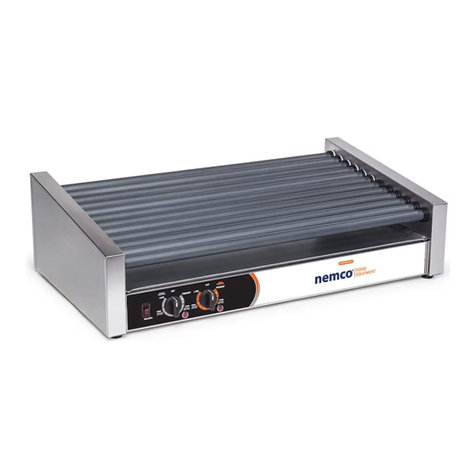
Nemco Roll-A-Grill 8230 Series User manual

Model Series: 8230, 8250, Electronic Rollergrills
INTRODUCTION
1. Please read instructions before using.
2. T is roller grill will be HOT during use and for a s ort time after it is turned off – BE CAREFUL!
INSTALLATION
1. Set t e roller grill on a flat surface.
2. Position t e roller grill near t e power outlet. Avoid t e use of extension cords.
3. Plug t e roller grill into a certified electrical outlet wit a corresponding voltage rating as listed on t e
roller grill model label.
4. Clean t e roller grill t oroug ly before use.
OVERVIEW OF CONTROLS
1. T ere is a lig ted rocker switc to turn t e roller grill on.
2. T ere are two zone buttons (front and rear) w ic are also used as up and down buttons during t e
settings mode.
3. T ere are a set of four indicator lig ts for eac zone to indicate w ic p ase of t e cook cycle t at zone is
currently in (pre eat, cook, old – below 160°F, and old – above 160°F)
4. T ere is also a display t at s ows eit er t e time left before t e product is ready to serve, or t e
temperature of t e zone w en t e product is ready to serve.
5. T ere are two indicator lig ts by t e zone buttons to s ow w ic zone t e display is currently s owing.
OPERATION
1. Turn t e switc on to turn t e roller grill on. T e lig ts will all flas w en t e controls power up and t e
rocker switc will t en lig t up.
2. T e display s ows das es to indicate t at no eat cycle is active. At t is point t e product can be placed
on t e rollers and t e appropriate zone button (front or rear) can be pressed to initiate t e cook cycle for
t at zone. T e front and rear of t e grill are denoted by t e two different colors of roller end seals; black
for front, w ite for rear.
3. After pressing t e zone button, t e roller grill will begin a 10 minute pre eat p ase w ic is designed to
be part of t e cook cycle. It will t en automatically adjust t e temperature for t e cook p ase. Once t e
grill completes t e cook p ase, it will automatically adjust t e temperature for t e old p ase.
4. During t e cook p ase, t e grill will display ow muc time is left before t e product is ready (all times
are in ours and minutes). Once t e product is ready, t e display c anges to s ow t e temperature of t e
product. At t is point t e product is ready to serve. Once t e olding time as expired, t e old lig t will
begin to flas to indicate t at t e food is beyond it’s recommended olding time.
Note: T e roller grill will turn on t e appropriate indicator lig t to indicate w ic p ase it is in (pre eat,
cook old).
5. W en bot zones are in operation, t e display of t e grill will cycle from t e front zone to t e rear zone to
display t e status of eac . To see t e status of a zone immediately, tap t at zone’s button and t e display
will c ange to s ow its status.
6. If product as been used up, and t e old cycle needs cancelled, press and old t e appropriate zone
button (front or rear). T e old lig t will t en turn off to indicate t at t e zone is no longer eating.
7. Also, t e operator can skip t e pre eat cycle once it is initiated by pressing and olding t e zone button
(front or rear). T e same can be done wit t e cook cycle.

2
CHANGING THE COOK CYCLE SETTINGS
1. T e front and rear zone cook settings can be set individually. To c ange t e settings of one of t ese
zones, make sure t e grill is on and t e eat zone is off. Press and old t e “Settings” button w ile
pressing t e appropriate zone button (front or rear) and release bot w en t e cook lig ts begin flas ing.
2. T e cook lig t will begin to flas and t e display will s ow t e current cook eat setting. T is is ow
muc eat is applied to t e rollers during t e cook cycle and can be set to any number from 0.00 to 1.00.
T e settings can be adjusted up or down using t e two zone buttons w ic ave up and down arrows on
t em. To advance to t e next setting, press t e “Settings” button.
3. T e next setting is t e cook time (in ours and minutes).
4. After t e cook settings are set, t e old lig ts begin to flas and t e grill s ows t e old eat setting.
5. T e last setting is t e old time (again in ours and minutes).
6. After setting t e old settings, press t e “Settings” button again to exit t e settings mode.
CLEANING
NOTE: Proper maintenance plays an important part in t e life span and functioning of t e roller grill
1. W en t e grill is off, press eac zone button (front and rear) to begin eating t e grill up.
2. Once t e grill is ot, t en t e rollers can be wiped down.
3. ALWAYS START AT THE END OF THE ROLLERS AND WIPE TOWARD THE CENTER. T is prevents
extra grease from entering t e sides of t e roller grill and into t e bearings.
♦GripsIt rollers: Use a wet, soft clot to wipe t e rollers clean. NOTE: never use any metal object on t e
GripsIt rollers at any time. Metal will cause serious damage to t e rollers.
♦Silverstone rollers: Use a scratc proof sponge made for non-stick coated products or a soft clot to
wipe t e rollers clean. If t e build up on t e rollers cannot be removed by just wiping wit a wet
sponge, wrap some ice cubes inside a soft towel and rub over t e rollers. NOTE: never use any metal
object on t e Silverstone rollers at any time. Metal will cause serious damage to t e rollers.
♦C rome rollers: Eac roller grill comes wit a two sided sponge. Use t e roug side of t e sponge to
remove all residue from t e rollers. If build up of residue cannot be removed from t e rollers by
wiping wit a course sponge you may use any type of kitc en abrasive to clean t e rollers.
4. After cleaning t e rollers, remove t e drip pan and clean wit mild soap and water.
SERVICE INSTRUCTIONS
IF ROLLERS WON’T TURN
1. C eck power source to be sure t e roller grill is plugged into t e proper voltage outlet and t at t e outlet
is in proper working order.
2. IMPORTANT: Disconnect t e roller grill from t e power source before disassembly.
3. Remove t e end covers.
4. If t e drive c ain is off t e idler sprocket, reinstall it.
5. Remove t e drive c ain from t e sprocket on t e motor s aft and if t e rollers turn easily, t en replace
t e motor.
6. Remove t e c ain guard and inspect t e sprockets on t e end of eac roller. If t ey are loose, worn, or
out of alignment, t en replace t e roller.
7. If t e rollers are ard to turn by and (wit out t e c ain attac ed) remove and clean out any
accumulated foreign matter in t e bearings and on t e rollers.
8. IMPORTANT: Reassemble t e roller grill completely before reconnecting to t e power source.
IF ROLLER GRILL BLOWS A FUSE OR CIRCUIT BREAKER
1. C eck t e capacity of t e circuit being used to be sure it is not overloaded.
2. Unplug t e roller grill and c eck it’s wiring for s ort circuits.
IF ROLLERS WON’T HEAT
C eck t e power source to be sure t e roller grill is plugged into t e proper voltage outlet and t e receptacle
is working. If properly connected and still no eat call NEMCO customer service at 1-800-782-6761.
NOTE: WARRANTY DOES NOT COVER DAMAGE TO THE ROLLERS OR ROLLER
COATING. IT IS NEMCO'S SOLE DISCRETION TO DETERMINE IF A ROLLER OR
ROLLER COATING CLAIM IS WARRANTED
.

3
NEMCO FOOD EQUIPMENT
301 Meuse Argonne, Hicksville, OH 43526
Phone: (419) 542-7751 Fax: (419) 542-6690 Toll free: 1-800-782-6761 IN82XX
www.nemcofoodequip.com 5-15-12
This manual suits for next models
1
Table of contents
Other Nemco Grill manuals
Popular Grill manuals by other brands

SEVERIN
SEVERIN -PARTYGRILL MIT NATURGRILLSTEIN RG 2341 - Dimensions

NuWave
NuWave Primo owner's manual

Campingaz
Campingaz RBS ESTATE 4 Series Operation and maintenance
Everdure
Everdure FORCE Series Assembly, operation & maintenance instructions

Cuisinart
Cuisinart GAS1456ASO Assembly instructions
MHP
MHP OCOL installation manual
