Neoi NeoIDesc 601 Owner's manual

(NEOI Group SINGAPORE –Neoi Technology Turkey – Neoi Technology HONG KONG –
NEOI Technology Deutschlan )
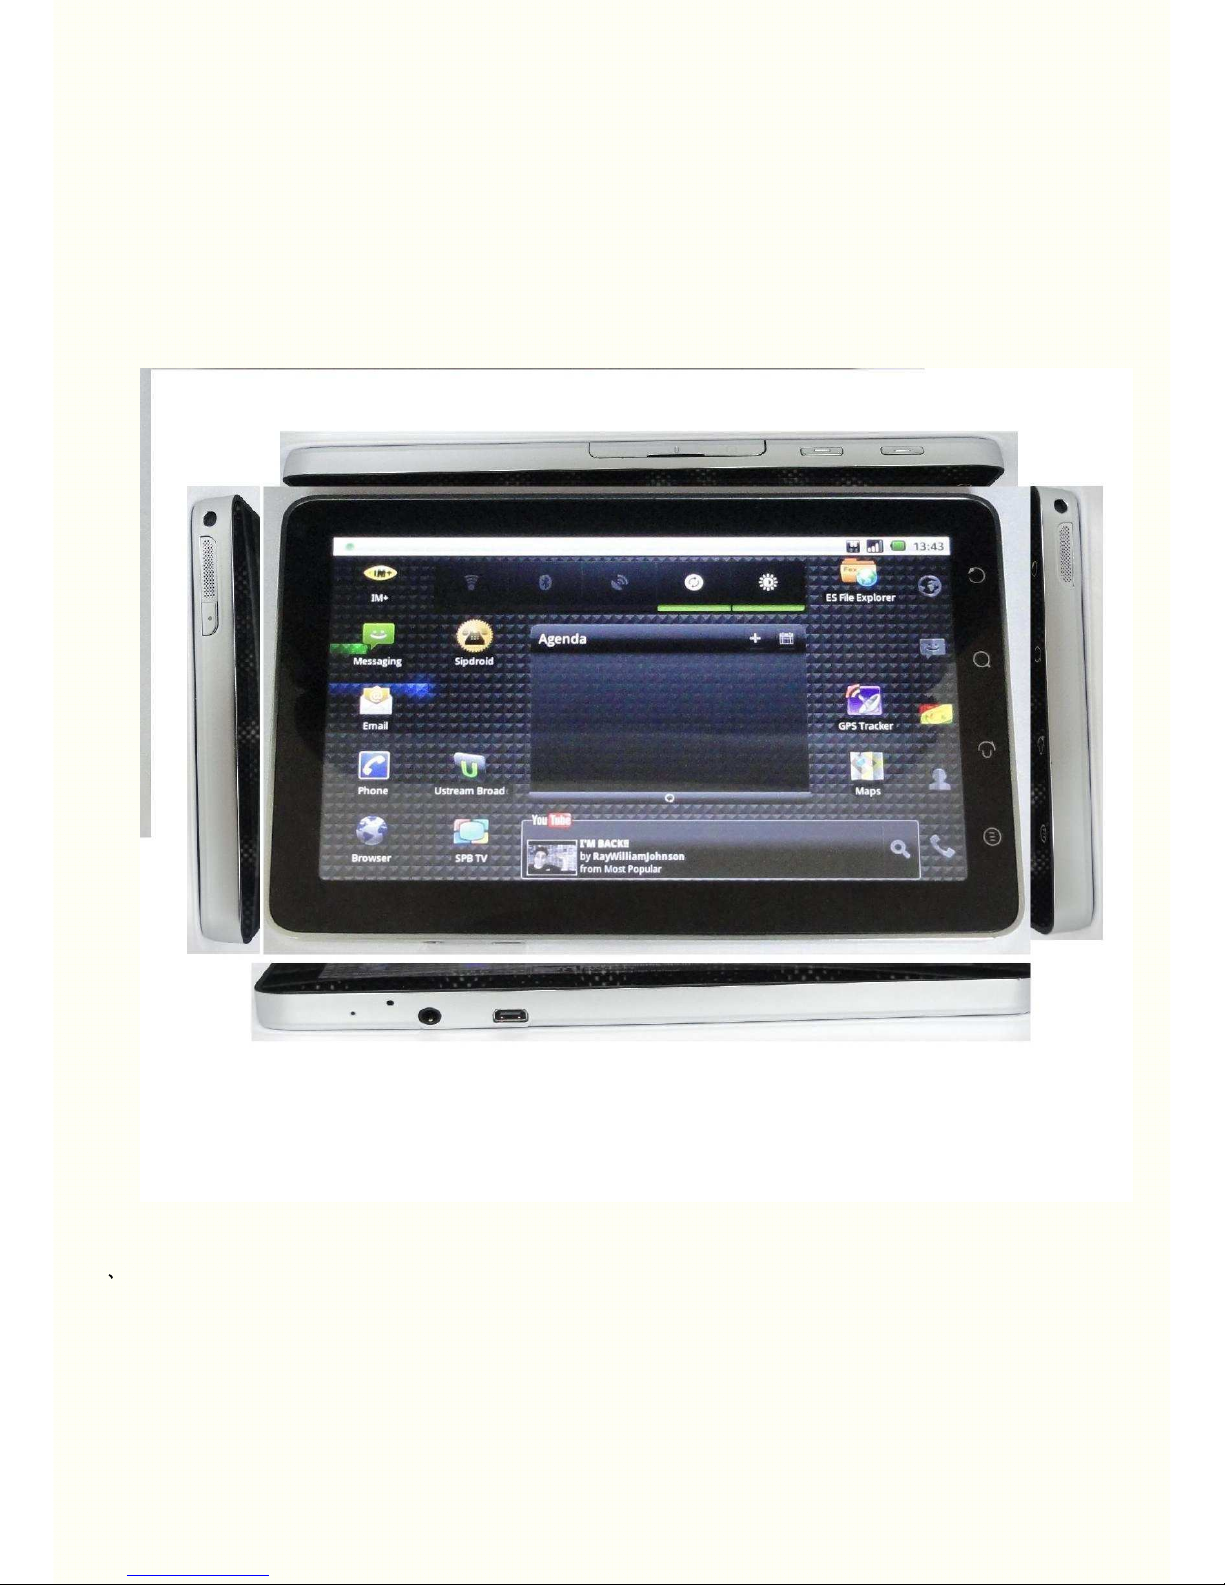
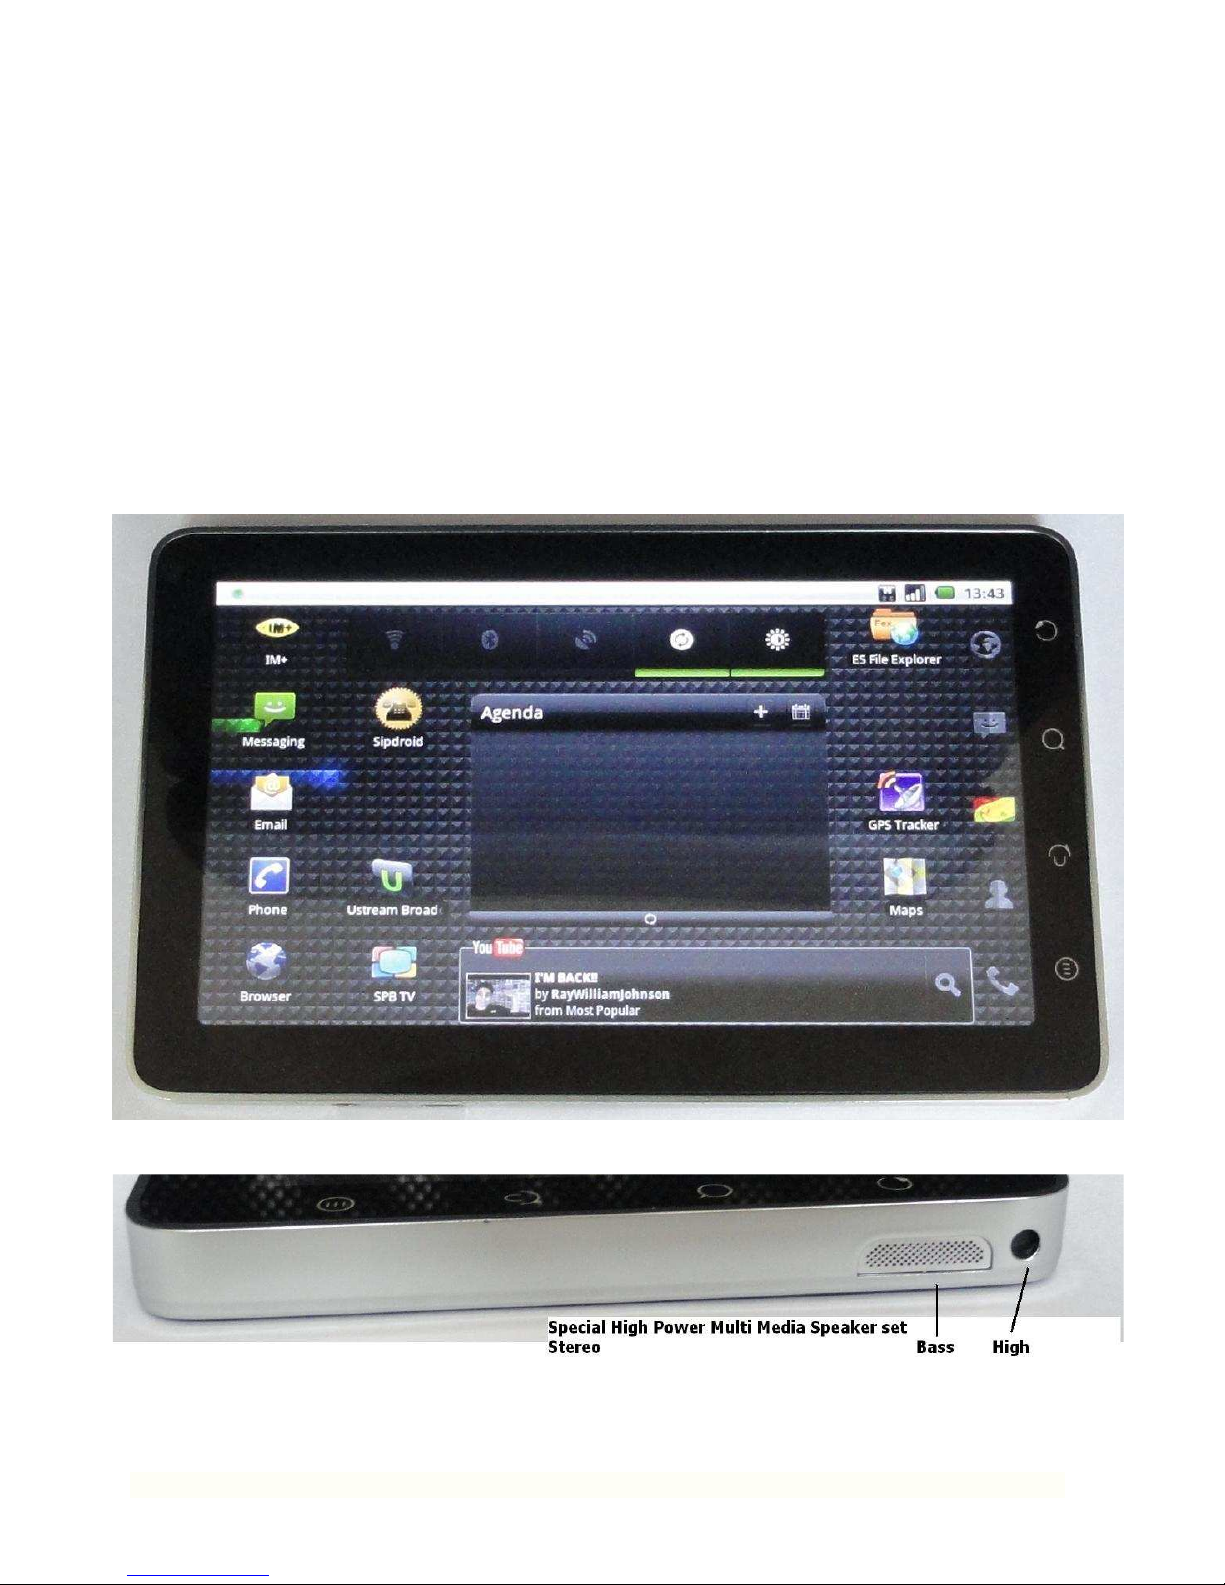
NeoIDesc 601
Quick User Manual – An roi 2.2
For Full User Manual, see Manual store on MID
or go to http://www.neoi-technology.com/manuals/
Support [email protected] , support@neoi. e
Or go to http://www.neoi. e ; http://ww.neoi-technology.com
Neoi Technology Pte. Ltd., 9 Temasek Blvd., #19-05, S ntec Tower 2, Singapore 038989.
Phone:+65-68389029 – S pport Line Global: +65-65249086
info@neoi-technology.com http://neoi.de

2
NOTE:A NOTE indicates important information that helps you make
better use of your device.
Notes, Cautions, and Warnings
CAUTION: A CAUTION indicates potential damage to hardware or
loss of data if instructions are not followed.
Information in this document is subject to change without notice
____________________
WARNING: A WARNING indicates a potential for property damage,
personal injury or death.

3
1 For Your Safety. . . . . . . . . . . . . . . . . . . . . . . . . . . .5
2 Device’s Features. . . . . . . . . . . . . . . . . . . . . . . . . . . .6
3 Setting Up Your Device . . . . . . . . . . . . . . . . . . . . . . . . .9
Getting Your Device Ready for Use . . . . . . . . . . . . . . . . 9
Turning On Your Device. . . . . . . . . . . . . . . . . . . . . . 11
Turning Off Your Device . . . . . . . . . . . . . . . . . . . . . 11
Turning Off the Screen. . . . . . . . . . . . . . . . . . . . . . . 11
Charging the Battery . . . . . . . . . . . . . . . . . . . . . . . .12
4 Understanding Your Device . . . . . . . . . . . . . . . . . . . . . .13
Home Screen. . . . . . . . . . . . . . . . . . . . . . . . . . . 17
Applications, Widgets, and Shortcuts. . . . . . . . . . . . . 21
Status Bar . . . . . . . . . . . . . . . . . . . . . . . . . . . . . 28
Adjusting Volume . . . . . . . . . . . . . . . . . . . . . . . . . 33
5 Using Your Device . . . . . . . . . . . . . . . . . . . . . . . . . . .34
Calling . . . . . . . . . . . . . . . . . . . . . . . . . . . . . . . 34
Call Log . . . . . . . . . . . . . . . . . . . . . . . . . . . 37
Contacts . . . . . . . . . . . . . . . . . . . . . . . . . . . . . . 38
Messaging. . . . . . . . . . . . . . . . . . . . . . . . . . . . 40
Input Methods . . . . . . . . . . . . . . . . . . . . . . . . . . . 45
Contents

4
6 Web Browser . . . . . . . . . . . . . . . . . . . . . . . 47
7 Settings. . . . . . . . . . . . . . . . . . . . . . . . . . 48
8 E-mail. . . . . . . . . . . . . . . . . . . . . . . . . . 53
9Applications . . . . . . . . . . . . . . . . . . . . . . . . 57
Camera. . . . . . . . . . . . . . . . . . . . . . . 57
Photos . . . . . . . . . . . . .. . . . . . . . . . . 59
Videos . . . . . . . . . . . .. . . . . . . . . . . . 62
Music. . . . . . . . . . . . . . . .. . . . . . . . . 63
Calendar . . . . . . . . . . . . . . . . . . . . . . 65
Alarm Clock. . . . . . . . . .. . . . . . . . . . . . 68
Calculator. . . . . . . . . . . . . . . .. . . . . . . . . . .70
Notepad . . . . . . . . . . . . . . . . . . . . . . . 71
11 USB Connections . . . . . . . . . . . . . . . . . . . . . . 72
12 Reset . . . . . . . . . . . . . . . . . . . . . . . . . . . . . . . . .72
13 Automatic Update . . . . . . . . . . . . . . . . . . . . . .73
13 Original Accessories . . . . . . . . . . . . . . . . . . . . . . 74
14 Battery Information . . . . . . . . . . . . . . . . . . . . 75
15 Care and Maintenance . . . . . . . . . . . . . . . . . . 76
16 Important Safety Information . . . . . . . . . . . . . . . 76

5
For Your Safety
Read these simple guidelines. Not following them may be dangerous or illegal. Read
the complete user guide for further information.
SWITCH ON SAFELY
Do not switch the device on when wireless device use is
prohibited or when it may cause interference or danger.
ROAD SAFETY COMES FIRST
Obey all local laws. Always keep your hands free to operate
the vehicle while driving. Your first consideration while driving
should be road safety.
INTERFERENCE
All wireless devices may be susceptible to interference, which
could affect performance.
SWITCH OFF IN HOSPITALS
Follow any restrictions. Switch the device off near medical
equipment.
SWITCH OFF IN AIRCRAFT
Follow any restrictions. Wireless devices can cause
interference in aircraft.
SWITCH OFF WHEN REFUELING
Do not use the device at a refueling point. Do not use near
fuel or chemicals.
SWITCH OFF NEAR BLASTING
Follow any restrictions. Do not use the device where blasting
is in progress.
QUALIFIED SERVICE
Only qualified personnel may install or repair this product.
ENHANCEMENTS AND BATTERIES
Use only approved enhancements and batteries. Do not
connect incompatible products.
WATER-RESISTANCE
Your device is not water-resistant. Keep it dry.
MAKE BACK-UP COPIES
Remember to make back-up copies or keep a written record
of all important information stored in your device.
CONNECT ANY OTHER DEVICE
When connecting to any other device, read its user’s manual
for detailed safety instructions. Do not connect incompatible
products.
EMERGENCY CALLS
Ensure the phone function of the device is switched on and in
service. Enter the emergency number, and then press the call
key. Give your location.
1
Device’s Features
1
Power and Sleep
• If the device is off, press and hold the button to power on the device.
• If the device is on, but the screen is off, press the button to turn on the screen.
• If both the device and the screen are on,
> Press the button to turn the screen off.
> Press and hold the button for two seconds to select one of these options:
2
• Silent mode: The device does not vibrate and disables all sounds except
for alarms.
• Airplane mode: Select to disable all wireless connections.
• Power off: Press and hold the button for four seconds to turn off the
device.
2. Reset button
> If the device is on, press the button to turn off the device.
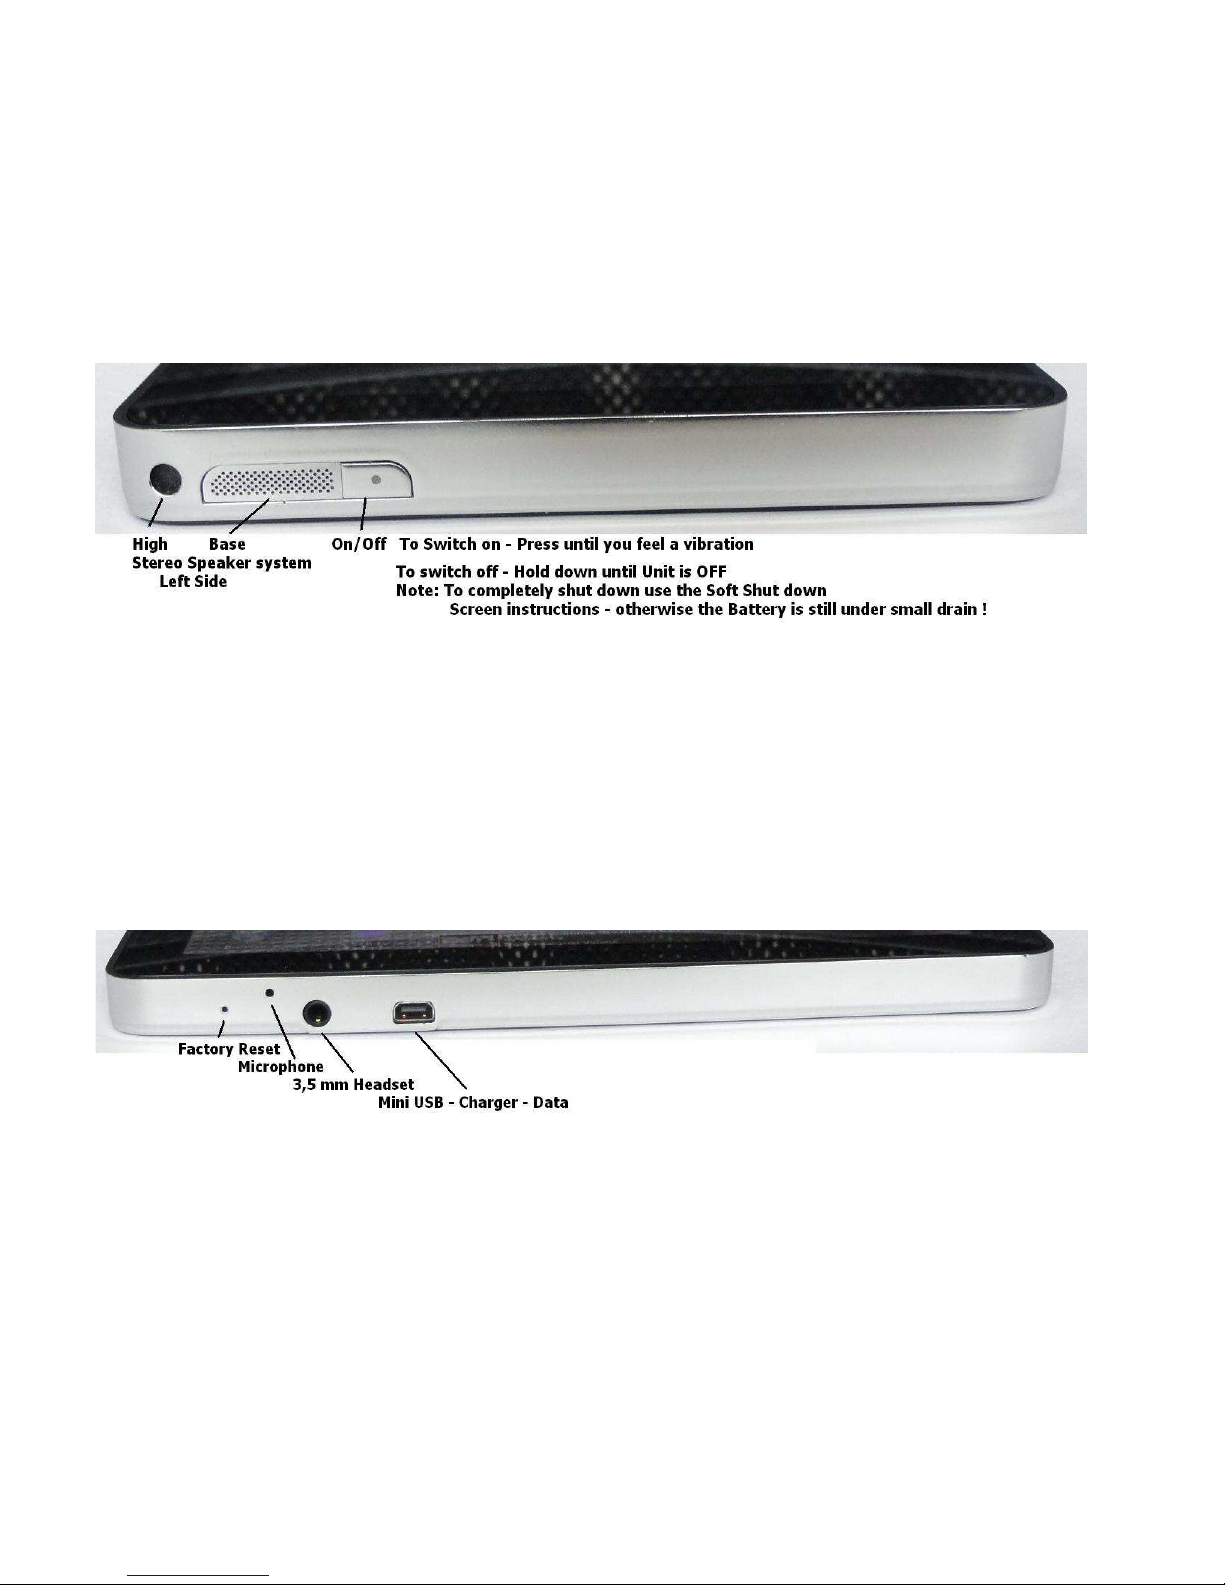
3. Headphone connector
> Connects to headphones.
4. Ca era lens Front / Back
> Captures pictures and videos. ront Camera 0.3 MP for Video Conference,
> Back Side 5 MP for High resolution Pictures and Video
>
3
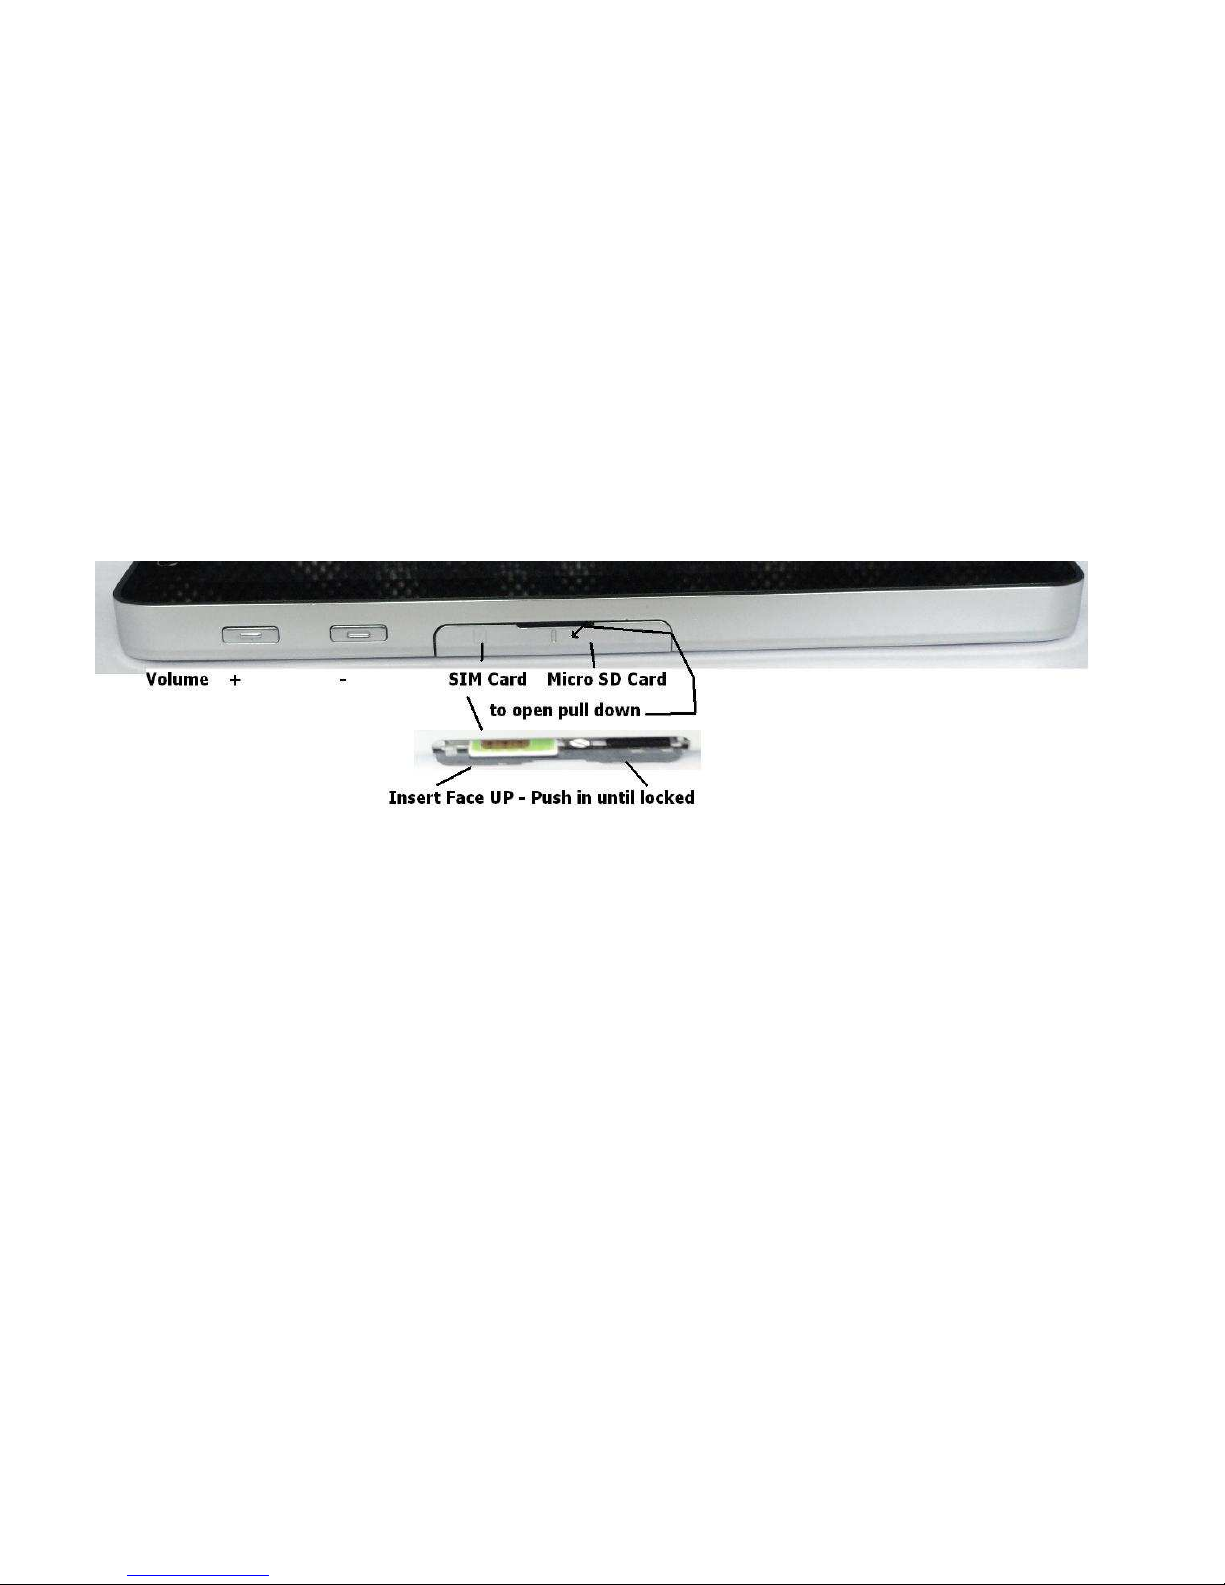
7. Volu e adjusting button
• While playing media such as music tracks or video clips:
> Press to increase or decrease media volume by one level.
> Press and hold to continuously increase or decrease the media volume.
• In all other situations:
> Press to increase or decrease the ringer volume by one level.
> Press and hold to continuously increase or decrease the ringer volume.
8. Micro SD card slot
> Micro SD card connector. Please pay attention to the card’s direction.
9. SIM card slot
> SIM card connector Please pay attention to the card’s direction.
10. USB/charging connector
• Connects to a USB cable to transfer files to a computer.
• Connects to a charger to charge the device.
11. Microphone
• Use for voice calls.
4
2. Reset button
> If the device is on, press the button to turn off the device.
3. Headphone connector
> Connects to headphones.
4. Ca era lens Front / Back
> Captures pictures and videos. ront Camera 0.3 MP for Video Conference,
> Back Side 5 MP for High resolution Pictures and Video

7
Getting Your Device Ready for Use
1 Insert the SIM card
Insert the SIM card in the illustrated direction.
NOTE: Don’t insert or re ove the SIM card while the device is on. Please insert
or re ove the SIM card while the device is off.
2
Install the icro SD card
Slide the micro SD card into
the micro SD card holder.
3 Charge the device
NOTE: Charge the battery in an environmental temperature between 0°C and 45°C.
The battery is not fully charged when first unpacked.
a. Plug the supplied USB cable into the USB connector on the device.
b. Plug the USB wall charger adaptor into a power outlet and charge the
device till the battery is fully charged.
c. NOTE: To charge the device using a co puter isn’t supported.

11
1. Press and hold the Power button for two seconds and touch the Power Off
option.
NOTE: If the device is on, but the screen is off, press the Power button to
turn on the screen (press and hold the Power button for one second).
Turning On Your Device
NOTE: 1. Press and hold the Power button for one second to lock the
screen.
2. Press and hold the Power button for two seconds, Options
menu displays: Silent Mode, Airplane Mode, and Power Off.
3. Press and hold the Power button for four seconds and power
off.
2. Press and hold the Power button to turn off the device.
NOTE: Use this device in an environmental temperature between -10°C and 45°C .
1. Press and hold the Power button to turn on your device. The operating system
starts up.
2. Gently slide the Screen Unlock button from left to right to unlock the screen if it
is automatically locked.
NOTE: If your SIM card is locked by a Personal Identification Number (PIN),
type the PIN by touching the corresponding number keys using the on-screen
keypad. Touch the OK button to confirm your input.
3. The device is ready for use when the home screen is displayed.
Turning off your device
Turning Off the Screen
If both the device and the screen are on, press the Power button to turn off the
screen.

12
Use only approved chargers, accessories and enhancements designated for this
device.
The use of any other types may invalidate any approval or warranty, and may
be dangerous.
When you disconnect the power cord of any accessory or enhancement, grasp
and pull the plug, not the cord.
If the battery is completely discharged, it may take thirty minutes before the
charging indicator appears on the display.
Charging the battery
13
Understanding Your Device
Finger gestures: Allows you to:
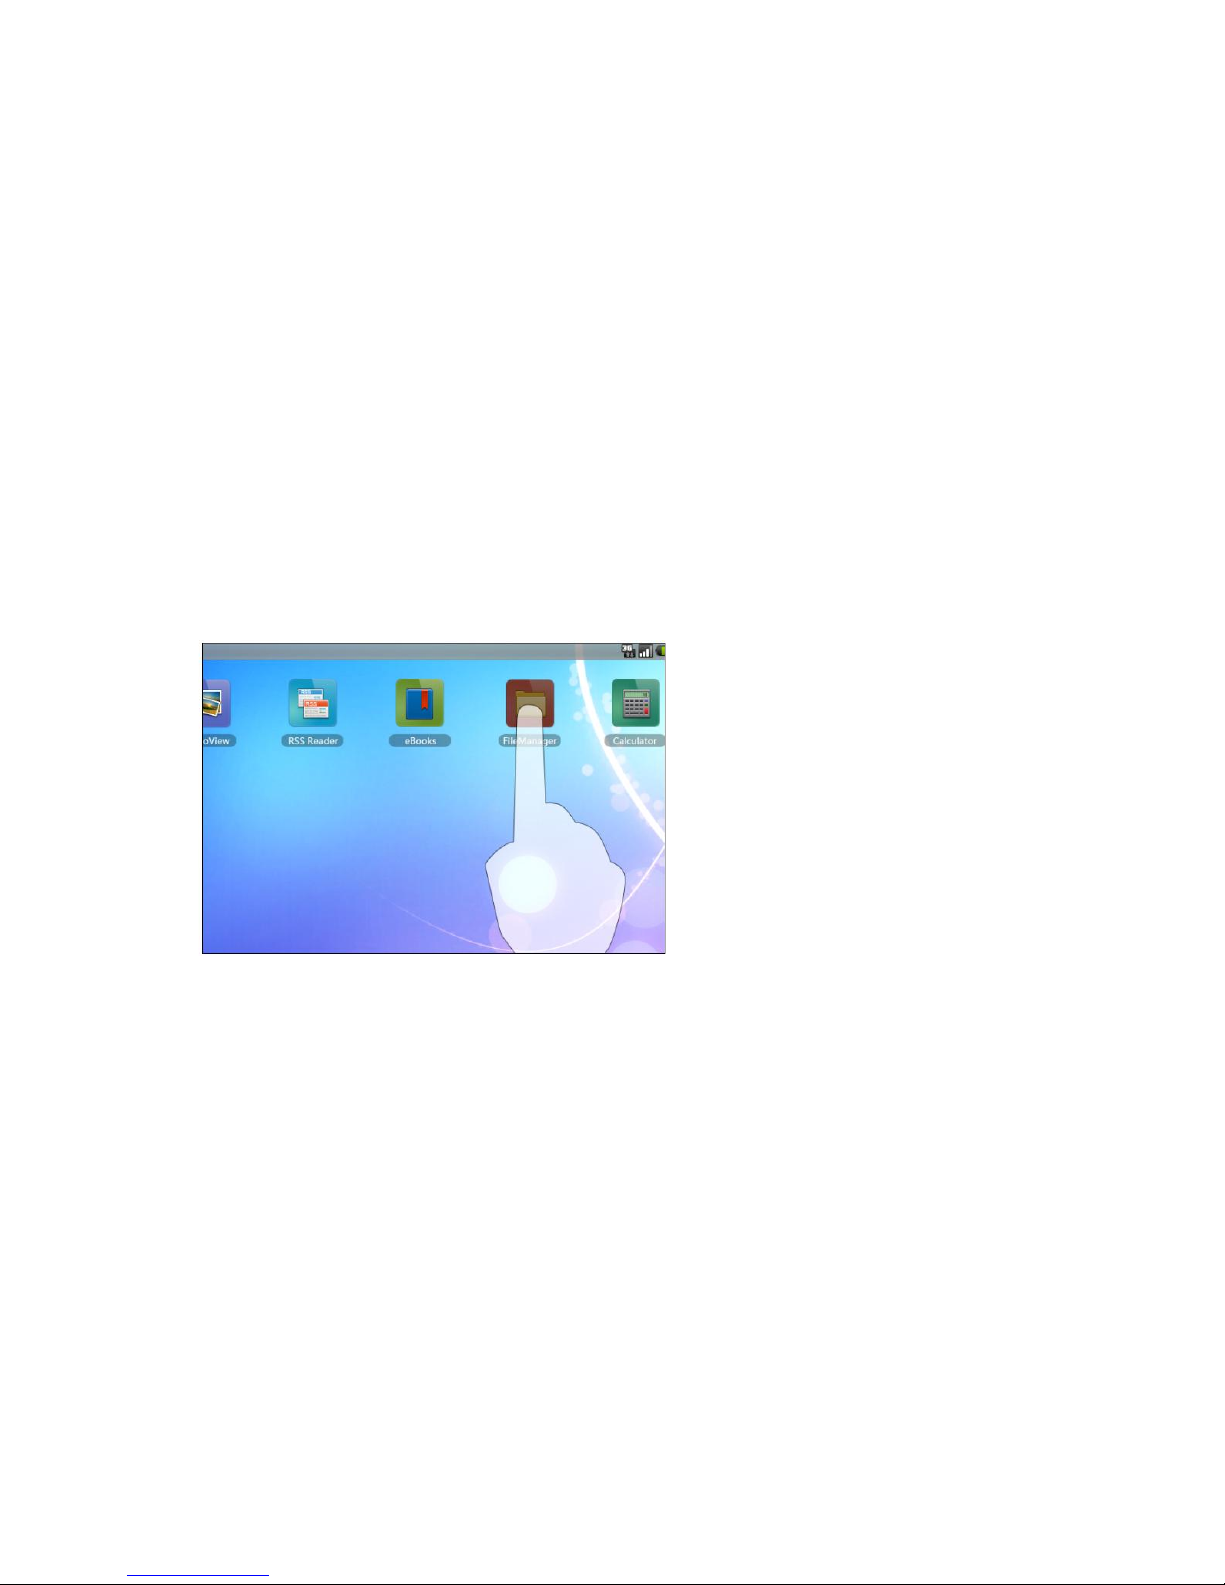
Touch
Tap gently on the screen with your finger.
When using the features in this device, obey all laws and respect local customs,
privacy and legitimate rights of others, including copyrights. Do not switch the
device on when wireless device use is prohibited or when it may cause
interference or danger.
Touch Screen
Select the items on the screen
including options, entries,
images, and icons.
Start applications.
Delete. Press and hold your
finger on the screen to delete.
For details, Please refer to the
shortcut to delete Home
screen.
14
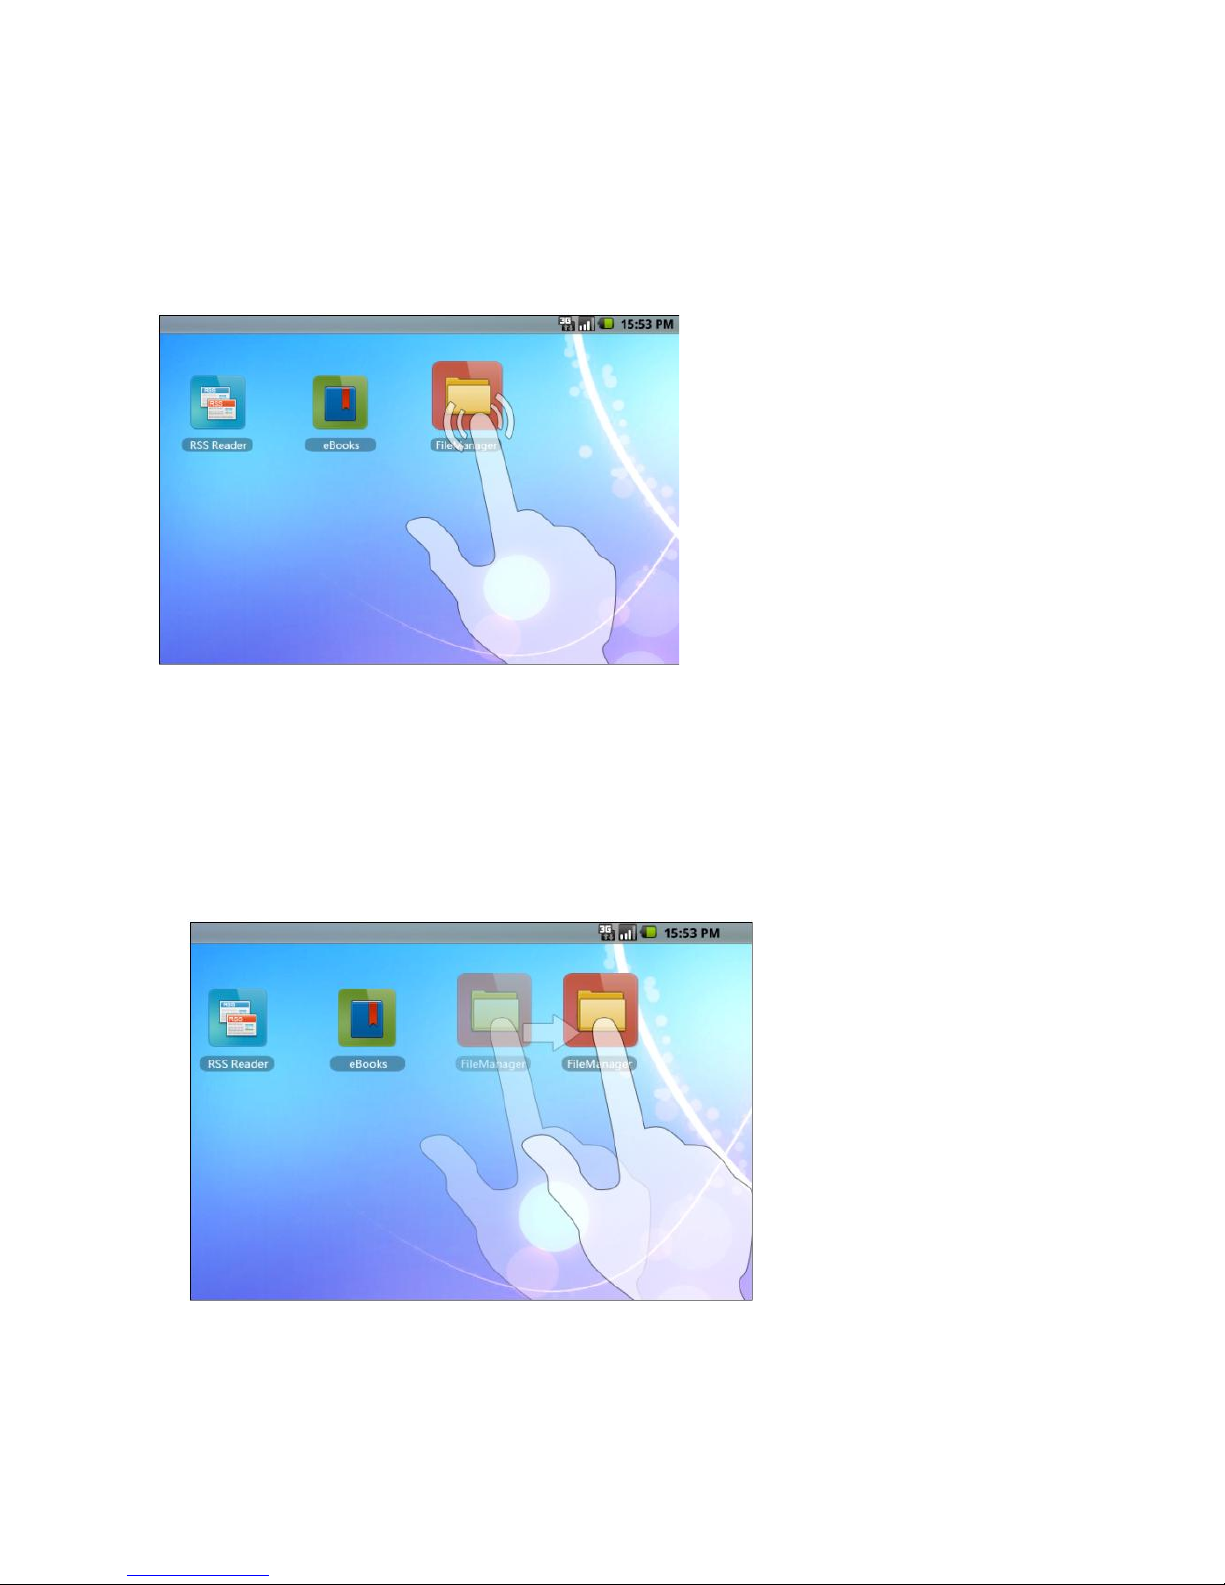
Touch and hold
Touch and hold your finger on the screen.
Drag
1. Touch and hold your finger on an item on the screen to move the item such as
images and icons.
2. keeping your finger in contact with the screen, move your fingertip to the desired
location.
Finger Gestures: Allows you to:
Move an item on the Home screen.
Add shortcut to a Home screen. Press
and hold an empty area on a Home
screen to add shortcut to the Home
screen. For details, Please refer to
adding shortcut to a Home screen.
3. Taking your finger off the screen to drop the item in the desired location.

15
Flick or swipe
Move your finger in horizontal direction on the screen to scroll through Home
screens, web pages, wallpapers, and so on.
Finger gestures allow you to:

16
Finger gestures allow you to:
Zoom-in
Move two fingers apart on the screen. Enlarge the view of an image or web
page.
Zoom-out
Move two fingers close together on the screen. Reduce the view of an image
or web page.
NOTE: You can calibrate your touch screen when you are starting up your device if
touching screen is not accurate. Press and hold the Volume “-”button on the upper
of the device and press and hold the Power button simultaneously to turn on the
device. Release the Power button when the device vibrates. Release the Volume “-”
button when the “Touch Screen Calibration,Don't Touch The Screen...OK” displays
on the screen. Do not touch the screen during the period.

17
Home Screen
On the Home screen, clock displays time and search box is used for searching.
The Home screen displays widgets, folders, and shortcuts that provide easy
access to your favorite or frequently-used applications. You can also display your
favorite pictures as your Home screen wallpapers.
NOTE: Touch the home screen ,pop up the drawer screen, touch to
return to the current Home screen.
Multiple Home Screens
Flick the Home screens horizontally until the desired one is displayed.
To navigate across the Home screens
NOTE: Device supports up to five Home screens.
Your device supports multiple Home screens to give you more space to display
widgets, shortcuts, or folders.

18
There are five screens on the Home screen. To enter other screens, flick your
finger horizontally to left or right on the Home screen. On the current screen press
Home button to return to the Home screen. You can freely add applications,
widgets, and shortcuts on each screen. For details, please refer to the Home
Screen. Each screen commonly displays:
Screen one displays project names you freely added such as Calendar. You can
touch any day to open the Calendar.
Screen two displays applications, widgets, and shortcuts you freely added.
Screen three displays project names you freely added such as Clock, Quick
Search Bar, and so on.
Screen four and Screen five displays built-in applications and project names that
you freely added.
NOTE: If you carelessly deleted an application, widget or shortcut, you can continue to add
the project name that you need.
Navigating the Home screens

19
NOTE: For details of adding a shortcut to a Home screen, please refer to
―Applications, Widgets, and Shortcuts‖.
1. You can add or download shortcuts of your desired applications to a home screen.
Touch and hold an empty area on the Home screen, the Add to Home screen menu
appears.
2. You can also touch the icon to open the drawer menu. Press and hold any
function’s icon to add the function’s shortcut to the current Home screen. (For
example: To add Phone, touch and hold the Phone icon to add it to the Home
screen.)
To remove a Home screen shortcut
1. Touch and hold the shortcut that you want to remove until it magnifies and the
icon ― ‖ below it appears.
2. Drag the shortcut that you want to remove into and drop it until the icon
― ‖ becomes red. The shortcut is deleted.
NOTE: Cannot delete the menu functions in the tray.
Tray menu function
Each screen has a tray and each tray displays the frequently-used menu functions
that user can conveniently use at any time. Default menu has browser, e-mail,
phone, drawer function key, music, gallery and settings.
To add a shortcut to a Home screen

20
On the Home screen, press the button ―MENU‖ to pop up the Options menu:
Add: Add an application’s shortcut to the Home screen.
Wallpaper: Customize the Home screen’s wallpaper.
Search: Search the web pages and applications.
Notifications: Open the notifications list of the status bar.
Settings:Enter the Settings screen.
The device supports multi-tasking capability, you can view your current running
applications via multi-task function which is also running in the background.
If you have multiple applications running in the background, you can open multiple
task management interface to run your current applications.
You can also click on the "end all" button to close all applications running in the
background. Or you can also close a single application by clicking the "x" button in
the upper right corner of the application.
Multi-task Feature
MENU Function
Other manuals for NeoIDesc 601
1
Table of contents
Other Neoi Tablet manuals


