Neoline Wide S45 User manual

1
Dear user!
Thank you for buying Neoline Wide S45 video recorder. Study this manual
thoroughly in order to use the device correctly and to make its service life longer.
Do not throw the user manual away because you may need to consult it in future.
[ Table of Contents ]
Operating conditions.....................................................................................................................2
Technical characteristics...............................................................................................................3
Completing parts ............................................................................................................................3
Description of connectors and buttons..................................................................................4
Meaning of buttons........................................................................................................................5
Special functions .............................................................................................................................6
Operation guide ..............................................................................................................................9
System menu .................................................................................................................................10
Video mode................................................................................................................................................ 10
Photo mode ............................................................................................................................................... 11
Playback mode.......................................................................................................................................... 12
Settings........................................................................................................................................................ 12
Possible problems and their causes ......................................................................................13

2
• Get acquainted with warranty service terms.
• Before launching the device, charge its in-built battery fully using a car power
supply adapter included in the kit.
• In cars with feeding supplied to 12/24 V car socket after the engine switch o, it is
necessary to disconnect the video recorder from the electric car power system
(to remove adapter from 12/24 V socket) in order to avoid car battery discharge.
• In cars with feeding supplied to 12/24 V car socket after the engine switch o, it is
necessary to disconnect the video recorder from the electric car power system
(to remove adapter from 12/24 V socket) in order to avoid car battery discharge.
• Use Micro SD cards no lower than Class 10 to avoid loss of data during
the recording.
• We recommend using memory cards from 8GB to 32GB.
• Operate your video recorder using accessories only from the supplied kit.
Neoline Company is not liable for any damage to the device due to the application
of accessories made by other manufacturers.
• Format Micro SD cards once in two months to avoid damage to its le system.
•Before launching the device, charge battery three hours. Also, replenish
the battery charge once in two months if the device has been idle long.
• Monitor the storing and operating temperature conditions (see technical
characteristics). Avoid prolonged exposure to the sun.
• Do not expose the product to excessive heat, humidity or chemically active sub-
stances (gasoline, solvents, reagents, etc.)..
• Disassembling or modifying of the device is forbidden
• Neoline Company is not liable for the loss of data and/or any damage – direct
or indirect – sustained by the user or a third party due to improper usage of the
device or software, inadequate installation, or application of accessories that are
not included in the accessory kit.
[Operating conditions]

3
[ Technical characteristics]
• CPU: GP3159
• Image sensor: Silicon Image CF02
• Viewing angle: frontal camera 155 degrees
• Additional camera 50 degrees
• Video resolution: basic camera Full HD 1920x1080 (30 fps),
additional camera VGA 640x480 (25 fps)
• Video recording format: MOV
• Dual channel recording
• miniHDMI-output
• Built-in battery 180 mAh
• Display: LCD 3 inches
• Screen resolution: 320x200
• Built-in microphone/speaker
• G sensor
• Motion detection
• Loop recording
• Continuous recording
• Night shot mode: no
• WDR
• Parking mode
• Auto switch on/o
• Date/time stamp
• Car plate number stamp
• MicroSD (8GB-32GB) SDHC Class 10
• Operating temperature: from -10 degrees to -40 degrees
• Storing temperature: from -20 degrees to +60 degrees
• Input voltage: DC 5V, 1.5A
• Car charger input: DC 12-24V
• Dimensions (mm): 88x52x16 (35 with lens)
• Weight: 91g
[ Completing parts ]
• Neoline Wide S45 video recorder
• Rear view camera
• Mounting with a suction cup
• Car charger
• Cable for rear view camera connection
• USB cable
• User manual
• Warranty card
4
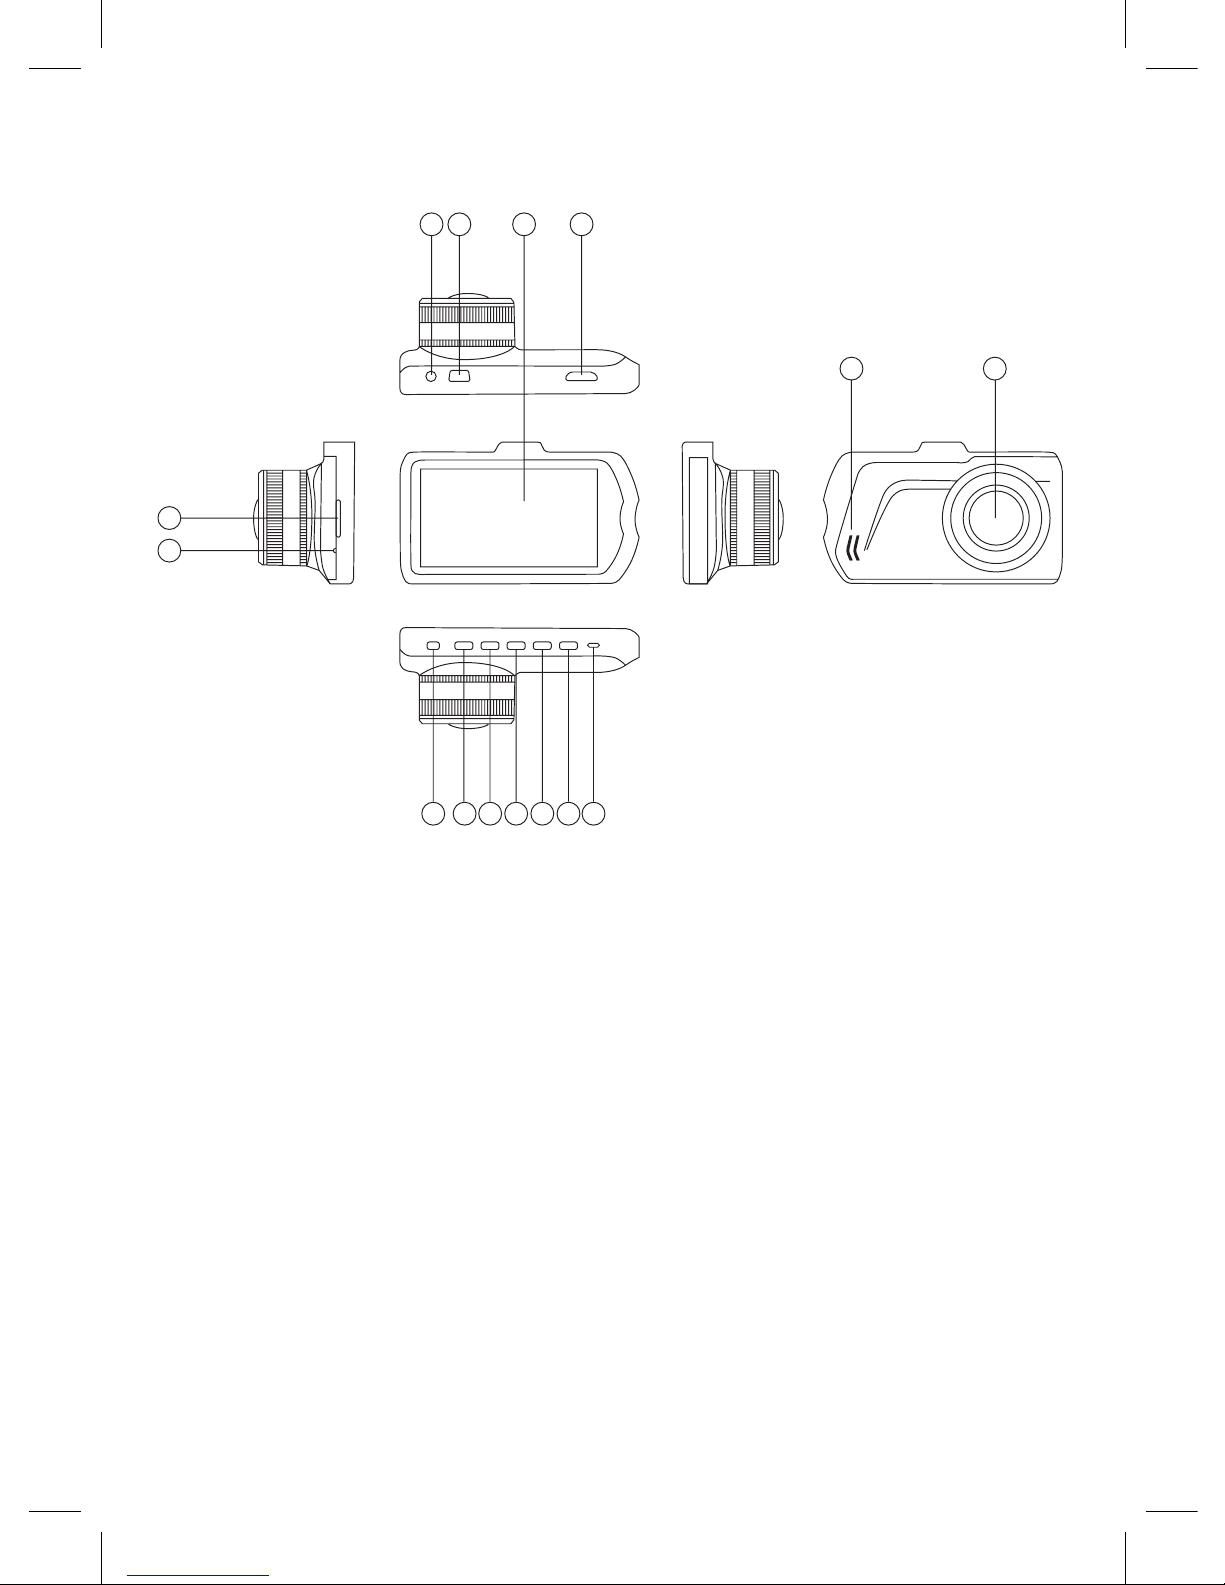
[ Description of connectors and buttons ]
1) Microphone
2) TF card slot
3) AV input
4) USB connector
5) Display
6) HDMI connector
7) Speaker
8) Lens
9) On/o feeding button (POWER)
10) Up button (UP)
11) Up button (UP)
12) OK button
13) Mode button (MODE)
14) Down button (DOWN)
15) Reset button (RESET)
9
1
2
3 4 5 6
7 8
10 11 12 13 14 15

5
[ Meaning of buttons ]
POWER on/o button:
Prolonged press switches the device on/o. Short press the button in Operating
mode to switch the screen lighting on/o.
UP button:
Short press the button to switch between the basic and the additional camera.
In Menu, this button is used for moving along Menu items (upwards); in Playback
mode, it is used for selecting a video or photo for viewing / playing back. During
the play back of a video, the button is used for increasing the sound volume.
MENU button:
Short press the button to open Settings menu; inside the menu, short press it to
switch between tabs. In shooting mode, short press the button to protect current
le from re-recording. In Playback mode, use it to open a window for removing
or protecting the le.
OK button:
In Video mode, this button is used to start/pause the recording, in Photo mode
– to shoot a photo. In Playback mode – to select a video for viewing, start /
complete the play back. In Menu – to acknowledge the selection of a denite
item or setting.
MODE button:
The button is used for switching between modes: Video / Photo / Playback.
In Video mode – short press the button to switch on the function of current le’s
protection; repeated press switches the protection function o.
DOWN button:
In Video mode, the button switches on/o the microphone. In menu mode, it is
used for moving along Menu items (downwards). In Playback mode, the button
allows selecting a video/photo for viewing / play back. During the play back of a
video, the button is used for reducing the sound volume.
RESET button:
The button is meant for resetting the device. If your video recorder fails to react
to the pressing of buttons, press RESET button for forced resetting of the device.
Warning: Do not apply too much force when pressing the button to avoid
damage to the device.
TF card slot.
The slot is meant for installing MicroSD memory card into the video recorder.

6
Before installing the memory card switch the device o
ATTENTION: Make sure that the memory card‘s position
is right. Your attempt to insert the memory card facing
the wrong direction may bring about damage
to the device and also to the memory card
Warning: НDo not apply too much force when installing
the memory card to avoid damage to the device.
In order to install the memory card insert Micro SD card into the slot pushing it
down all the way (till it clicks); if needed, use an installation needle. In order to
remove the card, press it until it clicks and pull it out of the slot.
USB connector:
USB connector is meant for charging, and connecting to computer. In order to
transfer data from your device to computer, use cable from the supplied kit,
switch o the device by pressing POWER button, and make sure that the device
is switched o. Insert into your device mini-USB –B connector, and into the com-
puter – USB type A connector.
For the purpose of securing feeding (car battery charging) connect your video
recorder to the car power supply network through the charger included in the kit.
[ Special functions ]
G sensor
This function allows adjusting the sensitivity level of G sensor initiating automated
protection of current video in case of violent speeding, braking, knocking, turning,
or tossing on an uneven road, etc. Upon G sensor’s activation, the current le is
blocked from re-recording. This secures the safety of les even if the memory card
has been re-recorded several times during the loop recording.
Auto switch o
Upon switching on this function, video recorder will switch o automatically after
a previously set interval of time following the car engine’s shut o.

7
ATTENTION: If after the engine switch o the feeding to 12/24 V car socket
does not stop, the auto switch o function will not be activated. Consult
your car operation documents or car manufacturer for more detailed
information about your 12/24 V socket.
Urgent recording function
It is meant for protecting current video le from re-recording or removing
.
In order to protect the current video le press MODE button during video
recording; the currently recorded le will get a special tag forbidding the device to
emove or re-record this le. At the top of display a key icon will appear.
Note: Protected les can be removed only by computer connected to the device
through USB cable from the kit. This can be done by formatting the memory
card, or through Menu, in Playback mode.
Parking mode
This function allows adjusting the G sensor’s sensitivity value at which the device
will start urgent recoding automatically. Recording completed, the device will
switch o again unless external feeding is supplied. As soon as push or knock
on your car is recorded by G sensor, recording will start automatically even if the
recorder is switched o and external feeding is missing. If the video recorder gets
external feeding, upon switching on, it will continue recording the video in a
usual mode without switching o any more.
Motion detection
Upon switching on this function recording will start automatically if any motion
is recorded in the frame.
Note: This function is meant for a standing car. Do not switch on the motion
detection when you drive the car – this may lead to fragmented recording and
the memory card overow.
8
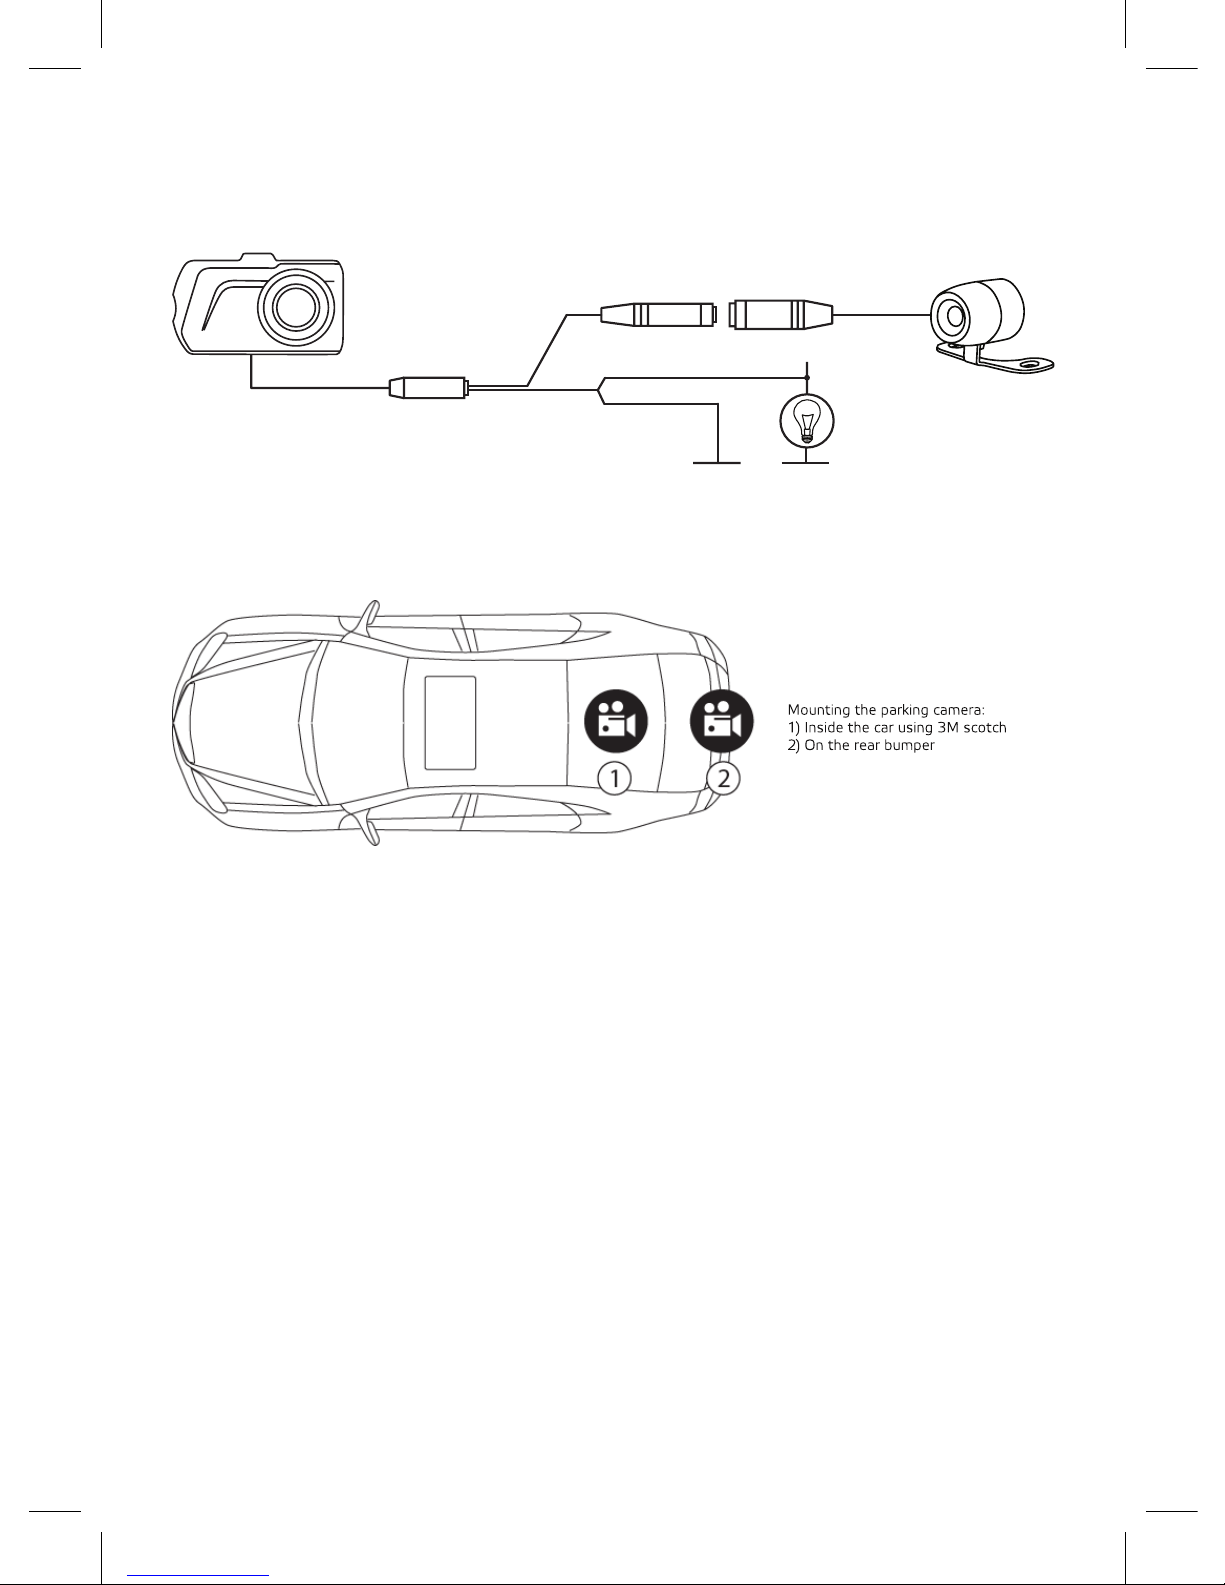
[Rear view camera mounting and using]
1. Mount your rear view camera as shown in Fig.1.
2. Fix the camera on the rear bumper by means of self-tapping screws or inside
the car using 3M scotch tape (from the kit) as shown in Fig.2.
3. Connect video cable to the video recorder’s AV input as shown in Fig.2.
4. Connect the power cable to the rear light wires to secure the displaying of
video from rear view camera in full screen mode when you switch your car gear
box to rear mode. Unless you supply feeding to the rear light wiring, the rear
view camera will record a video but it will not get into full screen mode automati-
cally.
+
camera
rear light
car body
red
black
video recorder

9
[ Operation guide ]
Connection to 12/24V car socket.
Plug in the charger to 12/24 car socket. Upon starting the engine (supplying
power to 12/24V car socket) the device will begin to record automatically. Upon
shutting o the engine (disconnection of power supply to 12/24V car socket) the
device will stop recording automatically and save recorded les.
Attention: For feeding the device use a standard car charger from the kit.
On/O:
Press and hold Power button 2 seconds to switch the feeding to the device on/
o.
Entering Menu:
Stop the recording. Press Menu button to enter Settings. A repeated press opens
General settings menu. In order to move along menu items, use Up and Down
buttons; for the acknowledgment of your selection press OK button.
Video recording:
To start video recording, switch to Video mode and press OK button; to make a
pause in the recording press OK button once more.
Switching the recording sound on/o:
In Video mode, press Down button to switch on/o the microphone. You can do
it also through Settings menu.
Switching o the screen:
For the energy saving purpose, in Video mode you can press POWER button to
switch the screen o. Also in Settings (screen switch o) you can set an interval
after which the screen will switch o automatically.
Photo shooting:
Press Menu button to switch to Photo mode, press OK to shoot a photo.
Date/time setting:
Press Menu button twice; select Date/Time item, by means of OK, Up and Down
buttons set the date and time, in order to save the selected settings press Menu
button.
Video playback:
Stop the recording by pressing OK button, then press MODE button twice; select
the le you need. In order to playback/pause the video, press OK. To quite Play-
back mode, press MODE button.

10
[System menu]
Menu has 4 modes: Video (settings in Video mode), Photo (settings in Photo
mode), Playback (settings in Playback mode), and Settings (general settings in
any mode).
They allow setting dierent modes of video recorder’s operation.
Video
Stop the recording, press Menu button, and select any menu item for setting.
Video Description Submenu
Resolution Setting the video
resolution
1080FHD: resolution FullHD, 30 fps
720P 30FHD: resolution HD, 30 fps
Loop
recording
Video le duration O /2minutes/ 3minutes/ 5minutes
WDR Wide dynamic range
function
On
Exposure Setting the exposure value -2 to +2
Motion
detection
Motion spotting function On/O
Recording of
sound
Microphone on/o On/O
Date/time st
amp
Imaging the date/time
stamp on a video
On/O
G sensor Selecting the impact sen-
sor’s sensitivity level
O/High/Medium/Low

11
Photo
In Photo mode, press Menu button, and select any menu item for setting.
Photo Description Submenu
Shooting
mode
Selecting the momentum
photo function or timer
setting
Single/2sec.timer/5sec.timer/10 sec.timer
Resolution Selecting the resolution 12M/10M/8M/5M/3M/2MHD/1.3/VGA
Burst shot Function 3x frames in
succession
On/O
Quality Selecting the shooting
quality
Best/Medium/Usual
Sharpness Selecting the image
sharpness level
Sharp/Medium/Soft
White balance Setting the white balance Auto / Sunny / Cloudy / Filament lamp /
Fluorescent
Colours Adjusting the colour eects Colours/Black-white/Sepia
ISO Setting the sensor
sensitivity level
Auto/100/200/400
Exposure Adjusting the exposure
value
-2 to +2
Stabilisation Blur-reducing stabilisation
function
On/O
Date/stamp Imaging the date/time
stamp on a photo
O/Date/Date/Time

12
Playback
In Playback mode, press Menu button, and select any menu item for setting.
Playback Description Submenu
Remove Removing the video or image Remove current /Remove all
Protection Protecting the video or image
against removal
Block current/
Unblock current/
Block ALL/
Unblock ALL
Slide show Selecting the interval for automated
le switch
2 seconds / 5 seconds / 8
seconds
Settings
In order to enter General settings menu press Menu button twice in any mode,
and select any menu item for setting.
Settings Description Submenu
Parking mode Selecting the G sensor’s sensitivity level
of in Parking mode
O/High/Medium/
Low
Date/time Setting the date and time YY /MM /DD XX:XX:XX
Car plate number Entering the car plate number AAAAAAAAA
Button sound Switching on/o the sound upon
pressing buttons
On/O
Language Selecting the language English/Russian
TV mode Selecting the TV mode NTSC/PAL
Network frequency Selecting the network frequency 50Hz/60Hz
Screen auto switch o Selecting the interval after which the
display lighting will switch o
O/3 minutes/5 min-
utes/10 minutes
Auto switch o Setting the interval after which the video
recorder will be switched o
O/3 minutes/5 min-
utes/10 minutes
Card formatting Formatting the memory card CD card
Manufacturer‘s
settings
Reset of settings Cancel/Yes
Software version Firmware version XXX-XXXXXXXX

13
[ Possible problems and their causes ]
If any problems with the device emerge although the equipment maintenance
and operation terms have been observed, read this section to solve them.
-It is impossible to shoot photos and record videos.
Check if there is enough free space on Micro SD card, and if it is not blocked.
-Spontaneous stop occurs during the recording.
Since HD quality video les occupy much space, use only high quality Micro SD
cards no lower than 6 class (class 10 is recommended).
- When you try to view / back play a photo-video le, “wrong le” inscription
appears on the display.
This is caused by incomplete le recording due to the le system failure on the
Micro DS card. Format your SD card.
- Blurred image.
Check for dirt or ngerprints on the lens. If you nd any, wipe the lens with a
piece of soft cloth before usage. (To avoid damage to the lens surface special
substances for the maintenance of optical equipment are recommended).
- Image is darkened when you shoot the sky or water.
If a sharp contrast is present on the shooting scene, it will aect the exposure.
Change the exposure value settings in menu.
- Unnatural colour on the recording and photo occurs when you shoot on a
cloudy day or indoors.
Check White balance settings in menu, set White balance in Auto mode or select
the value which suits the shooting conditions.
- Horizontal stripes are visible on the image.
They are caused by wrong settings of the electric network frequency. Set the
frequency value corresponding to the parameters of your local electric network.

14
- Hang (no image on the display, no reaction to pressing on buttons).
For starting a forced reset of the device press RESET button.
Table of contents
Other Neoline DVR manuals


