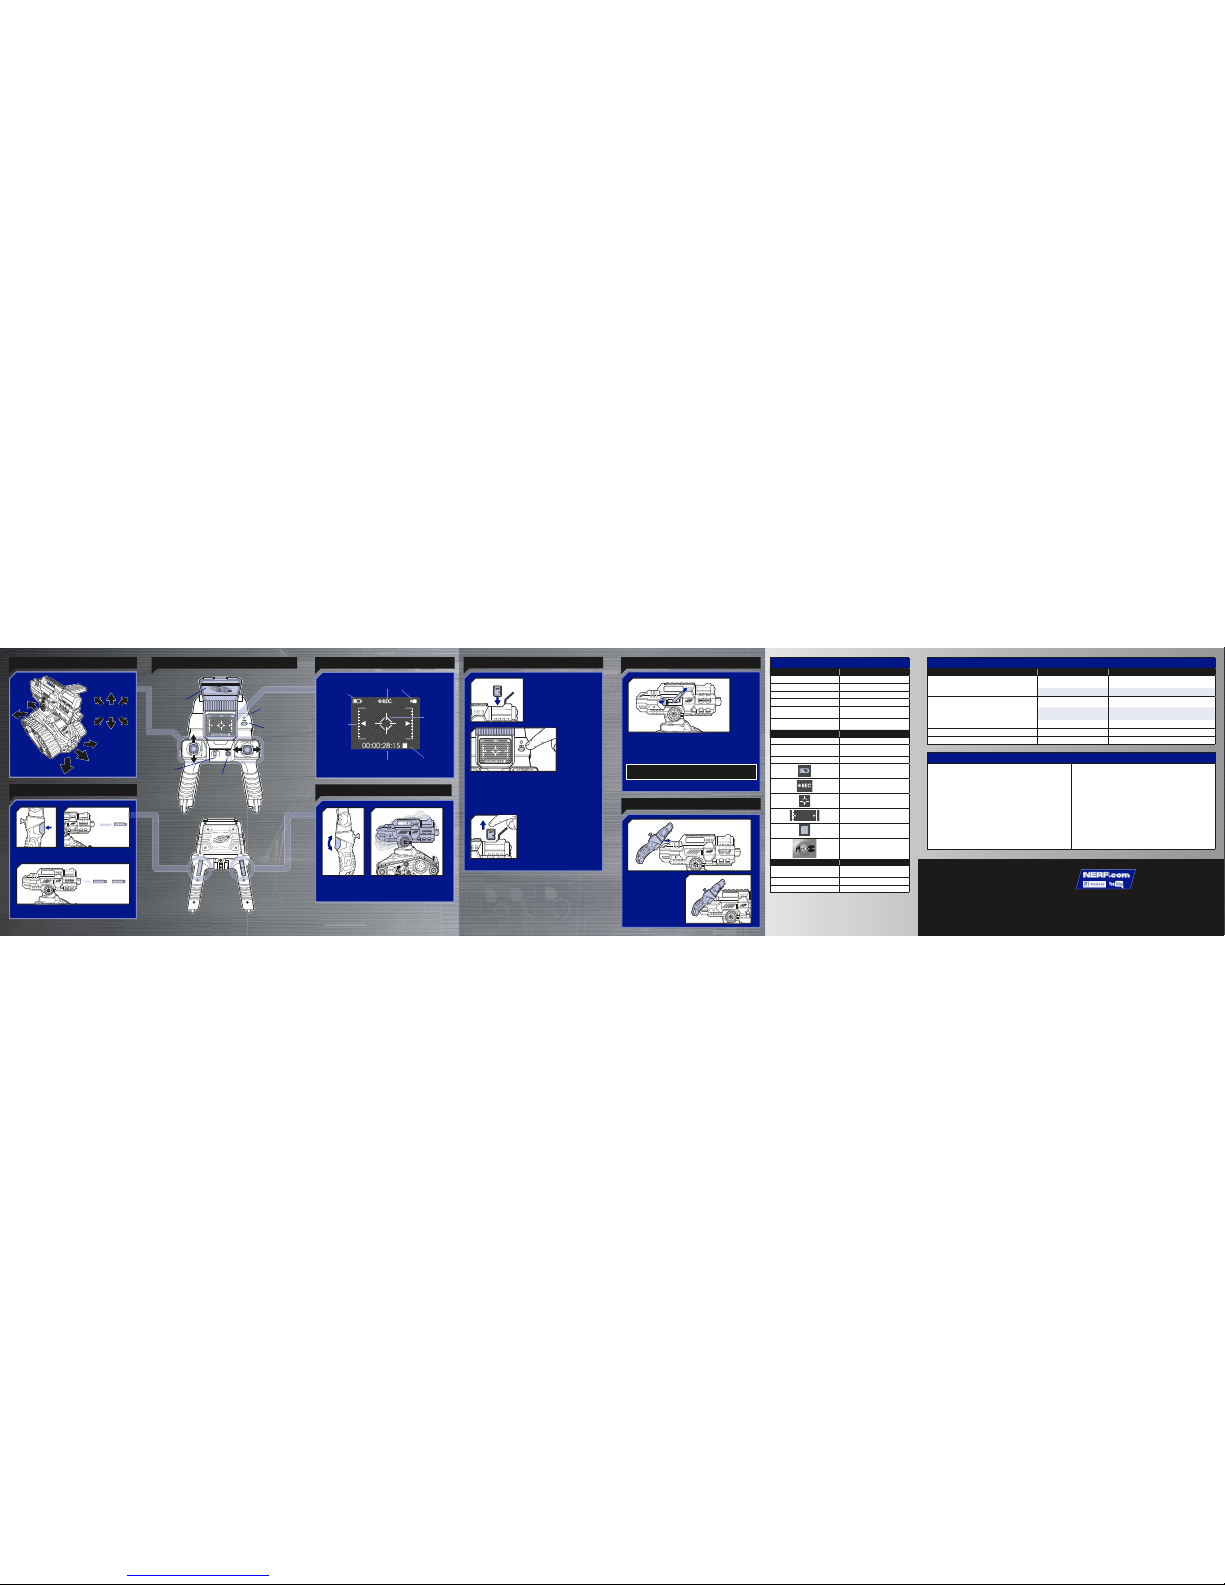
manuals.online logo
Brands
  1. Home
  2. •
  3. Brands
  4. •
  5. Nerf
  6. •
  7. Motorized Toy Car
  8. •
  9. Nerf TERRASCOUT User manual

Nerf TERRASCOUT User manual

Popular Motorized Toy Car manuals by other brands

Eduard Humber Scout Car Mk.I exterior quick start guide

Eduard

Eduard Humber Scout Car Mk.I exterior quick start guide

Traxxas 4995X instructions

Traxxas

Traxxas 4995X instructions

Jamara VW T1 Bus Instruction

Jamara

Jamara VW T1 Bus Instruction

REVELL 68 CHEVY CHEVELLE SS 396 manual

REVELL

REVELL 68 CHEVY CHEVELLE SS 396 manual

Schumacher Pro Cat instruction manual

Schumacher

Schumacher Pro Cat instruction manual

Tamiya TT-01 TYPE E instruction manual

Tamiya

Tamiya TT-01 TYPE E instruction manual

Eduard Krupp Protze 6x4 1/48 quick start guide

Eduard

Eduard Krupp Protze 6x4 1/48 quick start guide

New Bright 61072UEP quick start guide

New Bright

New Bright 61072UEP quick start guide

Team Durango DEX410v5 manual

Team Durango

Team Durango DEX410v5 manual

Jamara Mercedes Actros Muldenkipper 2,4 GHz Instruction

Jamara

Jamara Mercedes Actros Muldenkipper 2,4 GHz Instruction

PLAYMOBIL 9536 manual

PLAYMOBIL

PLAYMOBIL 9536 manual

Atomic BZ3 instruction manual

Atomic

Atomic BZ3 instruction manual

Aiyaplay 370-290V00 user manual

Aiyaplay

Aiyaplay 370-290V00 user manual

Power Wheels GRJ53 owner's manual

Power Wheels

Power Wheels GRJ53 owner's manual

ZEROTRIBE Zetricks ZT1144 instruction manual

ZEROTRIBE

ZEROTRIBE Zetricks ZT1144 instruction manual

INJUSA 412 Assembly instructions

INJUSA

INJUSA 412 Assembly instructions

Maverick MSC-30BR-WP instruction manual

Maverick

Maverick MSC-30BR-WP instruction manual

Land of B. Rollin' Riders quick start guide

Land of B.

Land of B. Rollin' Riders quick start guide

manuals.online logo
manuals.online logoBrands
  • About & Mission
  • Contact us
  • Privacy Policy
  • Terms and Conditions

Copyright 2025 Manuals.Online. All Rights Reserved.

TERRASCOUT™
AGES 8+
Do not aim at eyes or face. TO AVOID INJURY:
Use only darts designed for this product.
Do not modify darts or dart blaster.
CAUTION:
Hair entanglement may result if child’s hair
comes in contact with moving parts of toy.
Adult supervision is required.
CAUTION:
CAMERA/
MICROPHONE
• ON/OFF BUTTON
• STATUS LIGHT
• CHANNEL
SELECTOR
SWITCH
2.4 GHz
Input: 100-240V AC, 50-60Hz 10W
Output: 12V DC, 500 mA
Please read all instructions before operating this vehicle.
CONTROLLER
CAUTION:
• Be sure to fully charge the battery pack before using.
• If the battery pack is hot after use, let cool before recharging.
• Do not recharge battery pack if signs of leakage or corrosion are visible.
• Do not attempt to open or service the battery pack.
• Do not dispose of battery pack in fire.
CHARGING PRECAUTIONS:
• Do not leave battery unattended while charging.
• Charge the battery on a non-flammable surface, away from flammable items.
• Unplug the battery once fully charged. Do not leave the battery connected to
the charger for an extended period of time.
• Disconnect AC wall charger from outlet while not in use.
• Do not charge battery pack that shows signs of leakage or corrosion, or
attempt to open the battery pack.
• The power adaptor should be used with floor or wall receptacles only.
TO CHARGE & INSTALL BATTERY IN VEHICLE
1. Plug one end of charger cord into
battery, and plug other end into wall
outlet.
• 

charger.
• LED status light will glow steadily
while battery is charging.
• 
battery is fully charged.
2. When battery is full recharged,

and wall outlet.
3. Plug battery
cord into vehicle.

into vehicle.
5. Attach battery
cover. Tighten screw
with a Phillips/cross
head screwdriver.
NOTE: Never charge the battery while it is installed in the vehicle.
1x 9.6v Rechargeable NiMh BATTERY INCLUDED
WARNING:
The charger that is supplied with this item (model #SJC1200500CU)
should be examined regularly for potentially hazardous conditions
such as damage to the plug, enclosures, or cords. In the event of
such conditions, the charger should not be used until the damage is
properly repaired. Only use the charger that is supplied with this item.
IMPORTANT: VEHICLE RECHARGEABLE
BATTERY INFORMATION
CAUTION:
Risk of fire, explosion, and burns. Do not disassemble, crush, heat
above 60 degrees C (140° F) or incinerate. Dispose of the whole
product according to local recycling or waste regulations – never
disassemble. Do not use the item near a heat source such as a fire
or heater.
TO INSTALL BATTERIES IN CONTROLLER
4x 1.5V AA
ALKALINE BATTERIES REQUIRED
NOT INCLUDED
Use a Phillips/cross head screwdriver (not included).
IMPORTANT: BATTERY INFORMATION
CAUTION:
1. TO AVOID BATTERY LEAKAGE
a. Always follow the instructions carefully. Use only batteries specified
and be sure to insert them correctly by matching the + and - polarity
markings.
b. Do not mix old batteries and new batteries or standard (carbon-zinc)
with alkaline batteries.
c. Remove exhausted or dead batteries from the product.
d. Remove batteries if product is not to be played with for a long time.
e. Do not short-circuit the supply terminals.
f. RECHARGEABLE BATTERIES: Do not mix these with any other types
of batteries. Always remove from the product before recharging.
Recharge batteries under adult supervision. DO NOT RECHARGE
OTHER TYPES OF BATTERIES.
2. Should this product cause, or be affected by, local electrical interference,
move it away from other electrical equipment. Reset (switching off and
back on again or removing and re-inserting batteries) if necessary.
ASSEMBLY



forward to lock it in place.
CLICK
x18

ON/OFF • CHANNEL SELECTOR


status light blinks for a short interval, and then vehicle

Status light glows steadily when it receives a signal.

When done playing, press buttons again to switch

LOAD RELOAD
Load darts into clip.
STATUS LIGHT
on reverse side of vehicle
RECORD

in blaster. (SD card not
included.)

if an SD card is inserted.
2. Press record button on the controller to
start recording.
3. Press record button again to stop recording.

BLASTER/CAMERA ELEVATION
Move toggle switch on controller to raise and

LCD SCREEN
BATTERY
ICON
BARREL
ELEVATION
ICON
CROSSHAIR
TIMER
SD CARD
ICON
RECORDING ICONS
MOVEMENT CONTROLLER
FIRING
TRIGGER
ELEVATION
SWITCH
ON/OFF
BUTTON
CHANNEL
SELECTOR
SWITCH
RECORD
BUTTON
STATUS
LIGHT
LCD SCREEN
FORWARD/
REVERSE
STICK
LEFT/RIGHT
STICK
SUN VISOR
FULL
FUNCTION
FIRE


INIDICATOR LIGHTS
 
Steady green light Vehicle is on
Steady red light Low power
 
No light 
Blinking green light Vehicle searching for
controller to pair with
Blinking red light Vehicle and controller
connection is broken
 
Steady red light 
 
No light 
Low power

Targeting sight
Blaster elevation

inserted properly

to pair with
 
 
connected
Steady light 
Flashing light Battery is fully charged
ACCESS DOOR

• 
• 

NOTE: Blaster will not function unless access door
is fully closed.
NOTE: For best

store darts in clip.
STORAGE
FCC STATEMENT
This device complies with Part 15 of the FCCRules. Operation is subject to the following two conditions: (1) This device may not
cause harmful interference, and (2) this device must acceptany interference received, including interference that may cause
undesired operation.
NOTE:This equipment has been tested and found to comply with the limits for a Class B digital device, pursuant to Part 15 of the
FCC Rules.These limits are designed to provide reasonable protection against harmful interference in a residential installation.
This equipment generates,uses and can radiate radio frequency energy, and, if not installed and used in accordance with the
instructions, may cause harmful interference to radio communications.However, there is no guarantee that interference will not
occur in a particular installation. If this equipment does cause harmful interference to radio or television reception,which can be
determined by turning the equipment off and on, the user is encouragedto tr y to correct the interferenceby one or more of the
following measures:
• Reorient or relocate the receiving antenna.
• Increase the separation between the equipment and receiver.
• Connect the equipment into an outlet on a circuit different from that to which the receiveris connected.
• Consult the dealer or an experienced radio/TV technician for help
CAUTION: Changes or modifications to this unit not expresslyapproved by the party responsible for compliance could void the
user’sauthority to operate the equipment.
CAN ICES-3 (B) / NMB-3 (B)
This device complies with Industry Canada’slicense-exempt RSSs. Operation is subject to the following two conditions: (1) this
device may not cause interference,and (2) this device must accept any interference, including interference that may cause
undesired operation of the device.
Le présentappareil est conforme aux CNR d’Industrie Canada applicables aux appareils radio exempts de licence. L’exploitation
est autorisée aux deux conditions suivantes: (1) l’appareil ne doit pas produire de brouillage, et (2) l’appareil doit acceptertout
brouillage radioélectrique subi, même si le brouillage est susceptible d’encompromettre le fonctionnement.
Product and colors may vary.Retain this information for future reference. YouTubeand the YouTubelogo are trademarks of
Google Inc. © 2016 Hasbro,Pawtucket, RI 02861-1059 USA. All Rights Reserved. TM & ®denote U.S. Trademarks.
B8072 PN7607280000
Hey NERF Nation! Join us online and keep up
with the latest and greatestNERF news! Ask a
parent beforegoing online.
TROUBLESHOOTING
SYMPTOM  
Blaster will not fire.  Make sure darts are loaded correctly into clip,
and clip is correctly attached to blaster.
Access door is open. 
Vehicle does not respond to controller.  

 Make sure vehicle and controller are on

Vehicle battery is low. 
Vehicle is working erratically. Vehicle battery is low. 
 Static discharge interference. 
SAFETY PRECAUTIONS
• Please read all instructions before operating the vehicle.
• Operate your vehicle only in wide-open areas. Avoid
collisions with hard surfaces.
• Do not operate the vehicle on the street or near full-
sized vehicles.
• Do not operate this vehicle at night, or on a street or

• 
• 
while the vehicle is powered on.
• 

• 
Distractions can lead to accidents.

and accessories. Do not operate in wet conditions or drive
through puddles.






