manuals.online logo
Brands
  1. Home
  2. •
  3. Brands
  4. •
  5. Nestbox
  6. •
  7. Lawn And Garden Equipment
  8. •
  9. Nestbox O1BAPZZZZ User manual

Nestbox O1BAPZZZZ User manual

User Guide
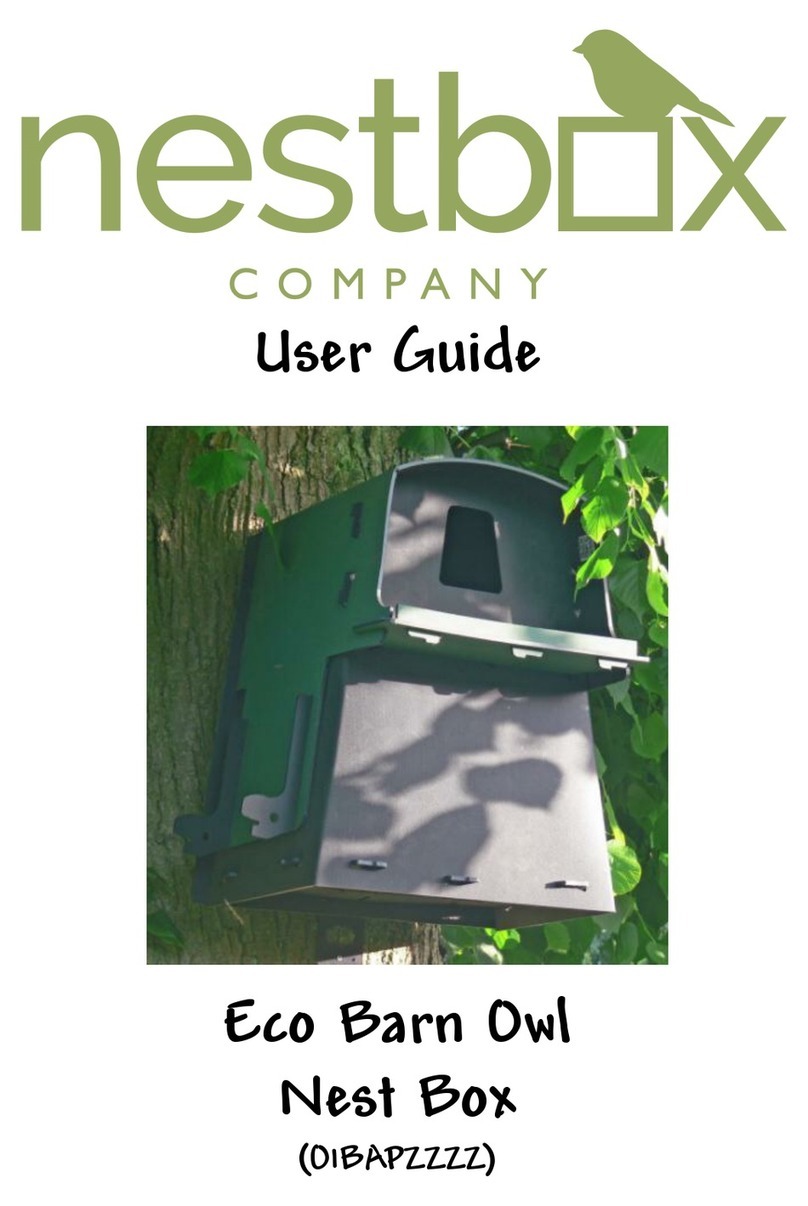
Eco Barn Owl Nest Box
O1BAPZZZZ
Where to site your box
Your eco barn owl box is suitable for use inside a build-
ing such as a barn, or outside, xed to a tree etc. When
ng inside, ideally it should be mounted high up
(>3 metres if possible). Near the apex of a roof is
ideal, providing there is enough venlaon to
avoid overheang when the sun shines on the
roof. The owls must have permanent access to
the roof space, and the entrance to the box
should be visible to any passing owls. For sing
outside we recommend that the box is at least 4.5
metres high. To minimise the risk of overheang
it is best to site the box somewhere shaded that
avoids too much direct sunshine (especially in the
middle of the day). To reduce rain being blown
into the box, if possible face the box away from
the prevailing wind. It is also best to choose a
locaon where any passing owls can clearly see
the entrance hole (and have a good view from the
entrance hole).
Maintenance
Your box is designed to last for many years. If oc-
cupied by barn owls the box should be cleaned
out every couple of years to remove accumulated
debris. If jackdaws or pigeons use the box they
will ll the box with scks etc this will make it
unaracve to barn owls and should be cleared
out at the end of the breeding season. The wood-
en oor is designed to be easily replaced and
aer 5+ years in an occupled box it may need re-
placing (replacement oors available from our
website)
Please note that Barn Owls are a Schedule 1 spe-
cies and an occupied nest box should not be dis-
turbed or inspected by anyone other than a li-
censed individual.
The Nestbox Company Limited
Eastcote House
Barston Lane
Eastcote
Solihull
B92 0HS UK
+44 (0) 1675 442299
www.nestbox.co.uk
mail@nestbox.co.uk
Assembly instrucons
Thanks for purchasing your Eco Barn Owl Nestbox. There
are a couple of things to do before pung up your box.
First check you have all the parts (please check inside
the box as they are somemes packed in there) :
At your chosen locaon x
the back of the mounng
bracket with screws or
nails as appropriate
(making sure the hooks
face upwards).
Once the back of the
mounng bracket is se-
curely mounted , t the
front of it back on, push-
ing it fully back so that
the hooks are exposed.
To t the hatch clo-
sures, push them
through the slots in
the side of the
nestbox then push
them down to x in
posion.
Before mounng the box, take the mounng bracket and
separate the two parts. The back of the mounng bracket
is aached to the tree or wall.
Lower xing
tab
Landing
Plaorm
Mounng
Bracket
2 x Hatch
Closures
Wooden
Floor
1. Fit the hatch closures
To t the plaorm onto the front of the box is straighor-
ward and does not require any tools . Bend the 3 tabs on
the back edge of the plaorm down (i.e. away from the
fence already ed to the top near the front edge) by
about 25 Degrees, and then push the plaorm onto the
front of the box, so that the tags go through the curved
slots in the front of the nest box, and the slots in the sides
of the plaorm line up with the slots in the sides of the
roof. Pung your hand inside the box, bend the tags
straight again to hold the plaorm in place.
2. Fit the landing plaorm 3. Mounng the box—cont.
The nestbox has an access hatch for cleaning out unoccu-
pied boxes aer the breeding season. It can also be used
by suitably licensed individuals to monitor breeding
aempts and ring any chicks.
3. Mounng the box
You are now ready to hang the nestbox o the mounng
bracket. The nestbox has two elongated keyholes in the
back of the box which enable the box to be securely hung
from the hooks on the mounng bracket. Hook the box on
to the bracket then pull it down so it is securely held.
The box has a lower xing
tab to further secure the
box and ensure it stays in
a vercal posion. This
should be bent so it is at
on the surface of the wall
or tree then xed with
screws or nails. Placing a
block of wood or similar
may also help to keep the
box vercal.
Assembled
Nestbox
Finally t the oor—it simply rests in the box on the plasc
edges at the base of the nest box.

Other Nestbox Lawn And Garden Equipment manuals

Nestbox Eco Barn Owl Nest Box User manual

Nestbox

Nestbox Eco Barn Owl Nest Box User manual

Nestbox IZMOTELZZ User manual

Nestbox

Nestbox IZMOTELZZ User manual

Popular Lawn And Garden Equipment manuals by other brands

Makita UMLOOOD instruction manual

Makita

Makita UMLOOOD instruction manual

Alecto BC14WH user manual

Alecto

Alecto BC14WH user manual

DynaTrap DT1100 Frequent Asked Questions

DynaTrap

DynaTrap DT1100 Frequent Asked Questions

Craftsman CMXGZBF7124336 instruction manual

Craftsman

Craftsman CMXGZBF7124336 instruction manual

Tiger Mowers FLX10 parts manual

Tiger Mowers

Tiger Mowers FLX10 parts manual

Gardigo 66643 instruction manual

Gardigo

Gardigo 66643 instruction manual

Swisher LV87551 owner's manual

Swisher

Swisher LV87551 owner's manual

BIOLAN COMPOSTER FOR SUMMER COTTAGE USE user manual

BIOLAN

BIOLAN COMPOSTER FOR SUMMER COTTAGE USE user manual

EINHELL GE-BC 43 AS Original operating instructions

EINHELL

EINHELL GE-BC 43 AS Original operating instructions

Land Pride RTR1042 Specifications & Capacities

Land Pride

Land Pride RTR1042 Specifications & Capacities

ILESTO BENNI BOY Assembly instructions

ILESTO

ILESTO BENNI BOY Assembly instructions

Hozelock AQUA CONTROL 1 quick reference

Hozelock

Hozelock AQUA CONTROL 1 quick reference

Bush Hog TOUGH RFM-60 Operator's manual

Bush Hog

Bush Hog TOUGH RFM-60 Operator's manual

Ryobi RY40001 Operator's manual

Ryobi

Ryobi RY40001 Operator's manual

FCMP OUTDOOR Woodgrain Rain Barrel manual

FCMP OUTDOOR

FCMP OUTDOOR Woodgrain Rain Barrel manual

Krone 835 525 Original operating manual

Krone

Krone 835 525 Original operating manual

Bio Green Super Seeder Installation and operating instructions

Bio Green

Bio Green Super Seeder Installation and operating instructions

RioOutdoors 4P-DC installation instructions

RioOutdoors

RioOutdoors 4P-DC installation instructions

manuals.online logo
manuals.online logoBrands
  • About & Mission
  • Contact us
  • Privacy Policy
  • Terms and Conditions

Copyright 2025 Manuals.Online. All Rights Reserved.