manuals.online logo
Brands
  1. Home
  2. •
  3. Brands
  4. •
  5. NetComm
  6. •
  7. Wireless Router
  8. •
  9. NetComm NB504 User manual

NetComm NB504 User manual

Other manuals for NB504

2

Other NetComm Wireless Router manuals

NetComm NTC-30WV User manual

NetComm

NetComm NTC-30WV User manual

NetComm VELOCITY NP805N User manual

NetComm

NetComm VELOCITY NP805N User manual

NetComm N300 GATEWAY SERIES User manual

NetComm

NetComm N300 GATEWAY SERIES User manual

NetComm NB16WV User manual

NetComm

NetComm NB16WV User manual

NetComm NP740n User manual

NetComm

NetComm NP740n User manual

NetComm NetComm Gateway Series Quick start guide

NetComm

NetComm NetComm Gateway Series Quick start guide

NetComm NB6W User manual

NetComm

NetComm NB6W User manual

NetComm N3G001W User manual

NetComm

NetComm N3G001W User manual

NetComm NB604N User manual

NetComm

NetComm NB604N User manual

NetComm NB16DG User manual

NetComm

NetComm NB16DG User manual

NetComm 3G10WVR User manual

NetComm

NetComm 3G10WVR User manual

NetComm Videotron 3G36W-V User manual

NetComm

NetComm Videotron 3G36W-V User manual

NetComm NB7 User manual

NetComm

NetComm NB7 User manual

NetComm NetComm Gateway Series User manual

NetComm

NetComm NetComm Gateway Series User manual

NetComm NTC-402 User manual

NetComm

NetComm NTC-402 User manual

NetComm LIBERTY SERIES User manual

NetComm

NetComm LIBERTY SERIES User manual

NetComm NP5420 User manual

NetComm

NetComm NP5420 User manual

NetComm NB12WD User manual

NetComm

NetComm NB12WD User manual

NetComm N3G001W User manual

NetComm

NetComm N3G001W User manual

NetComm VELOCITY Series User manual

NetComm

NetComm VELOCITY Series User manual

NetComm Liberty 3GM2WN User manual

NetComm

NetComm Liberty 3GM2WN User manual

NetComm NB8W User manual

NetComm

NetComm NB8W User manual

NetComm N150 User manual

NetComm

NetComm N150 User manual

NetComm NB504 User manual

NetComm

NetComm NB504 User manual

Popular Wireless Router manuals by other brands

NETGEAR Zing user guide

NETGEAR

NETGEAR Zing user guide

Proroute GEM420 user manual

Proroute

Proroute GEM420 user manual

ICP DAS USA WF-2000 Series Faq

ICP DAS USA

ICP DAS USA WF-2000 Series Faq

SMC Networks 7904WBRA-N FICHE user guide

SMC Networks

SMC Networks 7904WBRA-N FICHE user guide

Hamlet HRDSL300N user manual

Hamlet

Hamlet HRDSL300N user manual

Icidu NI-707517 Quick installation guide

Icidu

Icidu NI-707517 Quick installation guide

Hawking HWRGM1A user manual

Hawking

Hawking HWRGM1A user manual

Airlogic AirSync Class 1 Features

Airlogic

Airlogic AirSync Class 1 Features

Samsung WCH730B user manual

Samsung

Samsung WCH730B user manual

NETGEAR PowerLINE WiFi 1000 Series quick start

NETGEAR

NETGEAR PowerLINE WiFi 1000 Series quick start

TRENDnet TEW-211BRP user manual

TRENDnet

TRENDnet TEW-211BRP user manual

Cisco Valet M10 user guide

Cisco

Cisco Valet M10 user guide

Alloy WLF2454AP-S user guide

Alloy

Alloy WLF2454AP-S user guide

TELEFONICA USB Adapter quick start guide

TELEFONICA

TELEFONICA USB Adapter quick start guide

TP-Link TL-WR542G user guide

TP-Link

TP-Link TL-WR542G user guide

Hama 53120 Operating	 instruction

Hama

Hama 53120 Operating instruction

Asus RT-N10P user guide

Asus

Asus RT-N10P user guide

D-Link DIR-506L Quick installation guide

D-Link

D-Link DIR-506L Quick installation guide

manuals.online logo
manuals.online logoBrands
  • About & Mission
  • Contact us
  • Privacy Policy
  • Terms and Conditions

Copyright 2025 Manuals.Online. All Rights Reserved.

1. Connecting the Router
Before you install the router, you should have connected your PC to the Internet through your
broadband service successfully. If there are any problems, please contact your ISP. After that,
please install the router according to the following steps. Don’t forget to pull out the power plug
and keep your hands dry.
a. Power off your PC(s), Cable/DSL modem, and the router.
b. Locate an optimum location for the router. The best place is usually near the center of
the area in which your PC(s) will wirelessly connect.
c. Adjust the direction of the antenna. Normally, upright is a good direction.
d. Connect the PC(s) and each Switch/Hub on your LAN to the LAN Ports on the router,
shown in the following figure.
e. Connect the DSL/Cable Modem/Ethernet to the WAN port on the router, shown in the
following figure.
f.
Connect the AC power adapter to the AC power socket on the router, and the other
end into an electrical outlet. The router will start to work automatically.
g. Power on your PC(s) and Cable/DSL modem.
h. When all of the devices boot up completely, make sure that the router’s LEDs light as
follows:
Power LED: Lit up
System LED: Flashing
Link/Act LEDs(WAN&LAN): Lit up
WLAN LED: Flashing
2. Login to the Router
To connect to the router, you should set up the TCP/IP Protocol in “Obtain an IP address
automatically” mode on your PC(s). If you need instructions as to how to do this, please refer to
Appendix B in the User Guide on the Resource CD.
a. Connect to the router by typing http://192.168.1.1 in the address field of web browser.
b.
After a moment, a login window will appear. Enter
admin
for the User Name and
Password, in lower case letters. Then click OK or press Enter.
Quick Start Guide
NB504
54Mbps Wireless Router
YML865 NB504 QSG V2.indd 1 30/07/2009 10:13:24 AM
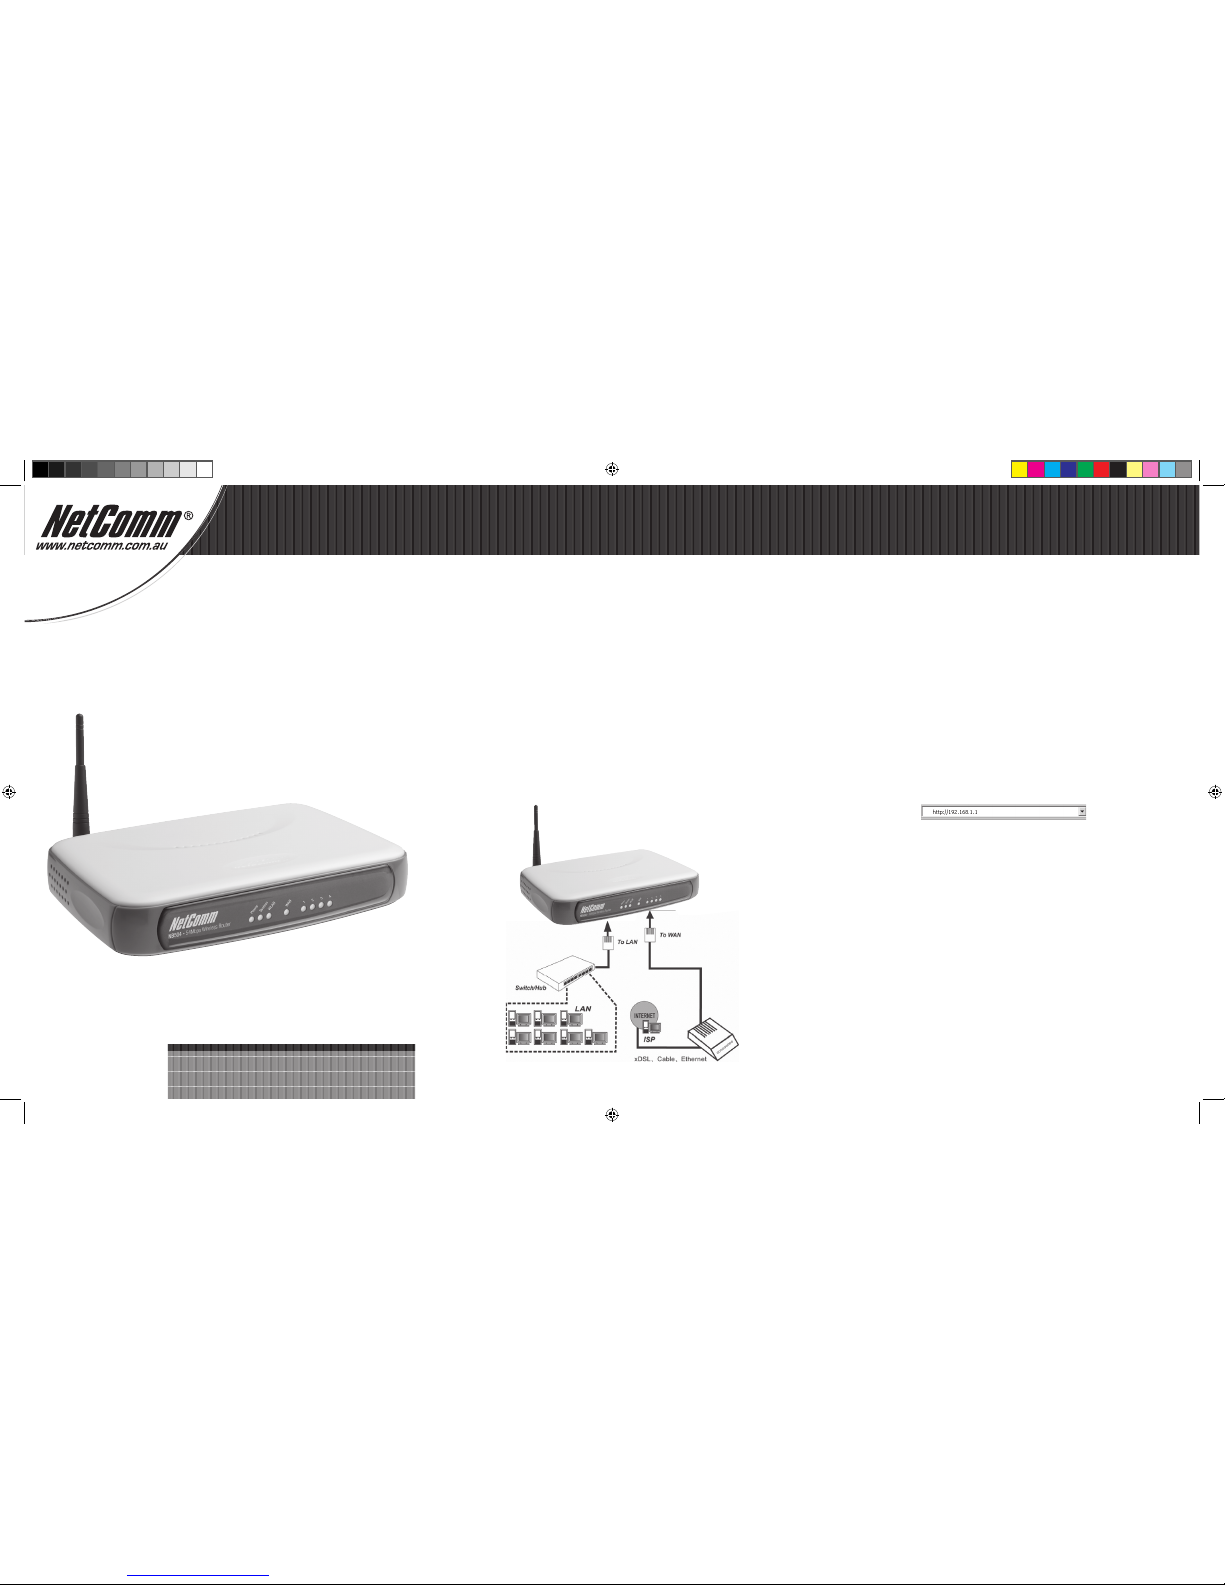
3. Connecting the Internet
a. If the User Name and Password are correct, you can configure the router using the web
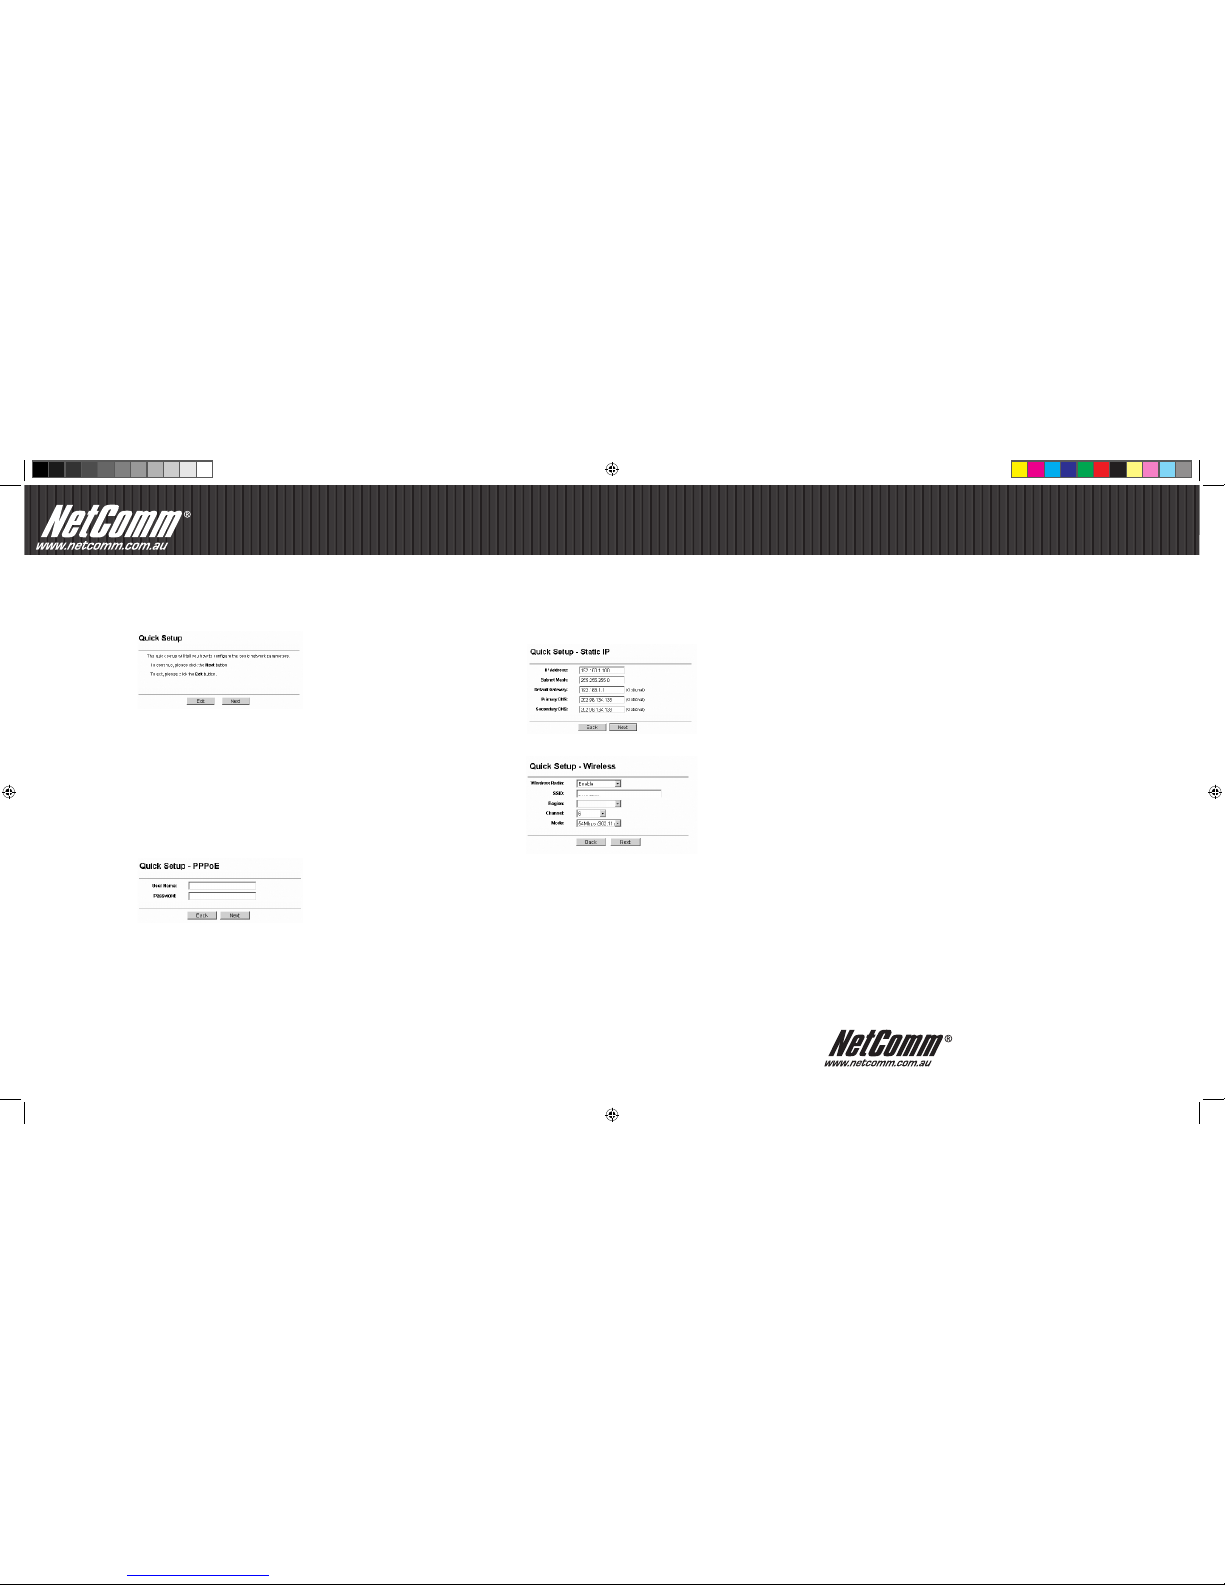
browser. Please click the Quick Setup link on the left of the main menu and the Quick
Setup screen will appear.
b. Click Next, the Choose WAN Connection Type screen will appear. Make sure which
connection type has been provided by your ISP, choose it, and then click Next.
I. If you have a PPPoE account, select PPPoE and click Next to load the following
figure, and enter User Name and Password provided by your ISP.
Please note: If you have an existing modem router and your ISP requires a PPPoE connection, it is usually recommended that you firstly
place your existing modem router into “bridge mode” (if feature is supported). This mode will turn your modem router into a transparent
device thus allowing the NB504 to establish, maintain and share your broadband connection. In most situations this saves future
configuration e.g port forwarding / virtual server of both devices.
For assistance with configuring your existing modem router into “bridge mode” please refer to the hardware vendors user guide, online
material or make contact with them directly.
II. If you have a Dynamic IP (or automatic IP) account, select Dynamic IP and
click Next, the router will automatically get IP parameters from your ISP without
entering any parameters.
III. If you have a fixed IP (or static IP) account, select Static IP and click Next to load
the following figure, and fill the blanks with the parameters provided by your ISP.
c. Fill in the details and click Next. The wireless settings screen will appear:
d. At the end of the Quick Setup, click the Finish button to exit. The router should now
be connecting you to the Internet.
Note: For other connection menthods or If you have difficulty with these steps, please refer to the User Guide on the Resource CD for
detailed instructions.
Product Warranty
NetComm products have a standard 12 months warranty from date of purchase. However some products
have an extended
warranty option, via registering your product online at the NetComm website
www.netcomm.com.au. Refer to the User Guide
for complete product warranty conditions, limitations of
warranty and other legal and regulatory information.
Contact Information
If you have any technical difficulties with your product, please do not hesitate to contact NetComm’s Customer
Support Department.
Email: [email protected]
www.netcomm.com.au
Note: NetComm Technical Support for this product only covers the basic installation and features outlined in the Quick Start Guide. For
further information regarding the advanced features of this product, please refer to the configuring sections in the User Guide or contact
a Network Specialist.
NetComm Limited ABN 85 002 490 486
PO Box 1200, Lane Cove NSW 2066 Australia
E– [email protected] W– www.netcomm.com.au
YML865 NB504 QSG V2.indd 2 30/07/2009 10:13:25 AM