NetUP Streamer 16xC User manual

1/7, Ulofa Palme str., Moscow, Russia
+7 (495)510-1025 |info@netup.tv |http://netup.tv
NetUP Streamer 16xC
User manual
9 April 2019
NetUP Streamer 16xC. User manual
2
Contents
Introduction ............................................................................ 3
Appearance and illustration................................................................................................... 3
Specifications ......................................................................................................................... 4
Installation guide..................................................................... 5
Device’s installation flow chart.............................................................................................. 5
Packing list check ................................................................................................................... 5
Safety instructions ................................................................................................................. 5
Environment requirement ..................................................................................................... 6
Grounding requirement ......................................................................................................... 6
WEB NMS Operation ............................................................... 7
Login ....................................................................................................................................... 7
Summary → Status................................................................................................................. 8
Parameters → TS Config ........................................................................................................ 8
Parameters → Scrambler..................................................................................................... 11
Parameters → Modulator .................................................................................................... 11
Parameters → IP Stream...................................................................................................... 12
System → Network .............................................................................................................. 13
System → Password............................................................................................................. 14
System → Configuration ...................................................................................................... 14
System → Firmware............................................................................................................. 14
System → Log....................................................................................................................... 15
Troubleshooting.........................................................................................16
NetUP Streamer 16xC. User manual
3
Introduction
NetUP Streamer 16xC – is the latest generation Mux-scrambling-modulating all-in-one device
developed by NetUP. It has 16 multiplexing channels, 16 scrambling channels and 16 QAM (DVB-C)
modulating channels, and supports maximum 1024 IP input through the GE port and 16 non-adjacent
carriers (50MHz~960MHz) output through the RF output interface.
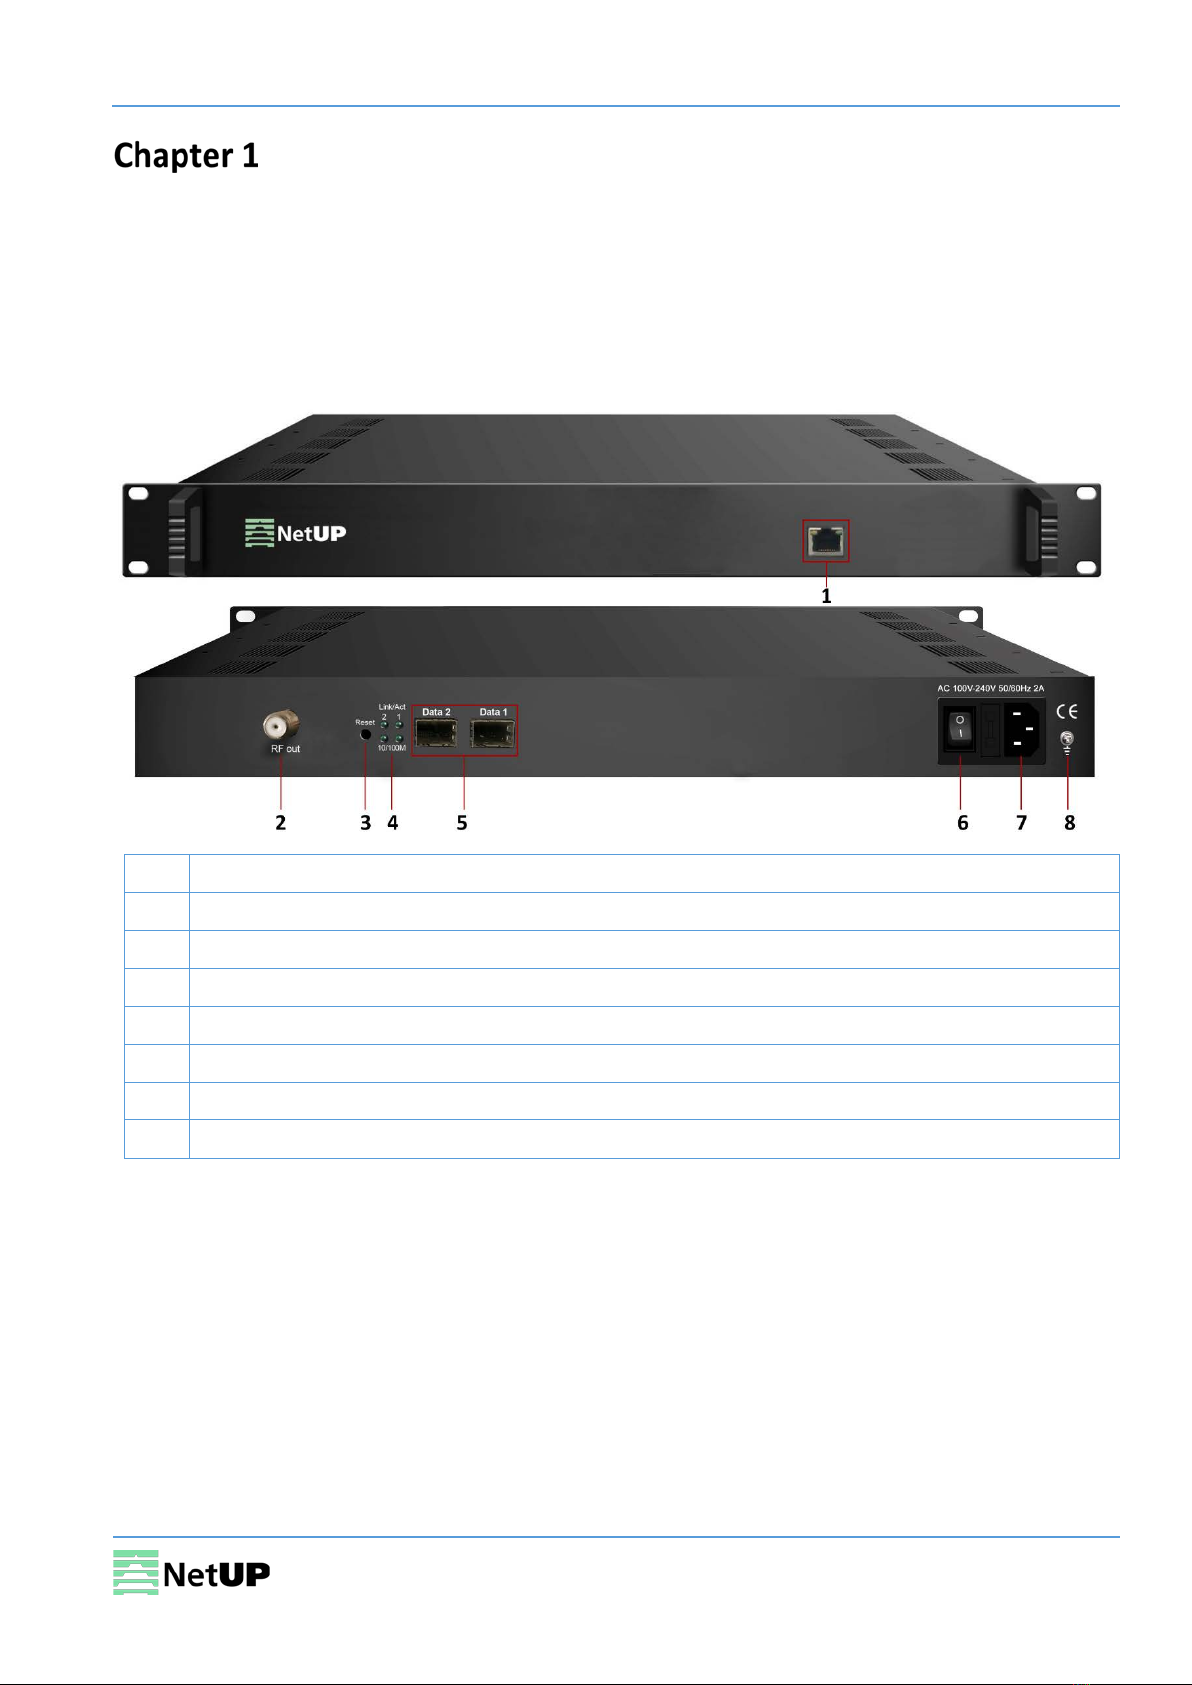
Appearance and illustration
1
NMS/CAS: network management port and CA data port
2
RF output port
3
Reset IP: reset the device’s IP address to its default value
4
Link/Act Indicators
5
Data Input / Output 1/2 (SFP)
6
Power switch
7
Power socket
8
Grounding pole

NetUP Streamer 16xC. User manual
4
Specifications
Input stream
Input
512×2 IP input, 2 100/1000M Ethernet Port (SFP)
Transport Protocol
TS over UDP/RTP/RTSP, unicast and multicast, IGMP
V2/V3
Transmission Rate
Max 840Mbps for each GE input
Mux
Input Channels
1024
Output Channels
16
Max PIDs
180 per channel
Functions
PID remapping (auto/manual, optional)
Scrambling
Max simulscrypt CA
4
Scrambling Standard
ETR289, ETSI 101 197, ETSI 103 197
Connection
Local/remote connection
Modulation
QAM Channel
16 non-adjacent carrier
Modulation Standard
EN300 429/ITU-T J.83A/B
Symbol Rate
5.0~7.0Msps, 1ksps stepping
Constellation
16, 32, 64, 128, 256QAM
FEC
RS (204, 188)
RF output
Interface
1 F type output port for 16 carriers, 75Ω impedance
RF Range
50~960MHz, 1kHz stepping
Output Level
-20dBm~+10dBm(87~117dbµV), 0.1dB stepping
MER
≥ 40dB
ACLR
-60 dBc
TS output
16×IP output over UDP/RTP/RTSP, unicast/multicast, 2 100/1000M Ethernet
Ports
System
Network management software (NMS) support
Other parameters
Dimension (W×L×H)
420 mm × 440 mm × 44,5 mm
Approx. weight
3kg
Temperature
0~45℃(operation), -20~80℃(storage)
Power requirements
AC 100V±10%, 50/60Hz or AC 220V±10%, 50/60Hz
Power consumption
15.4W
NetUP Streamer 16xC. User manual
5
Installation guide
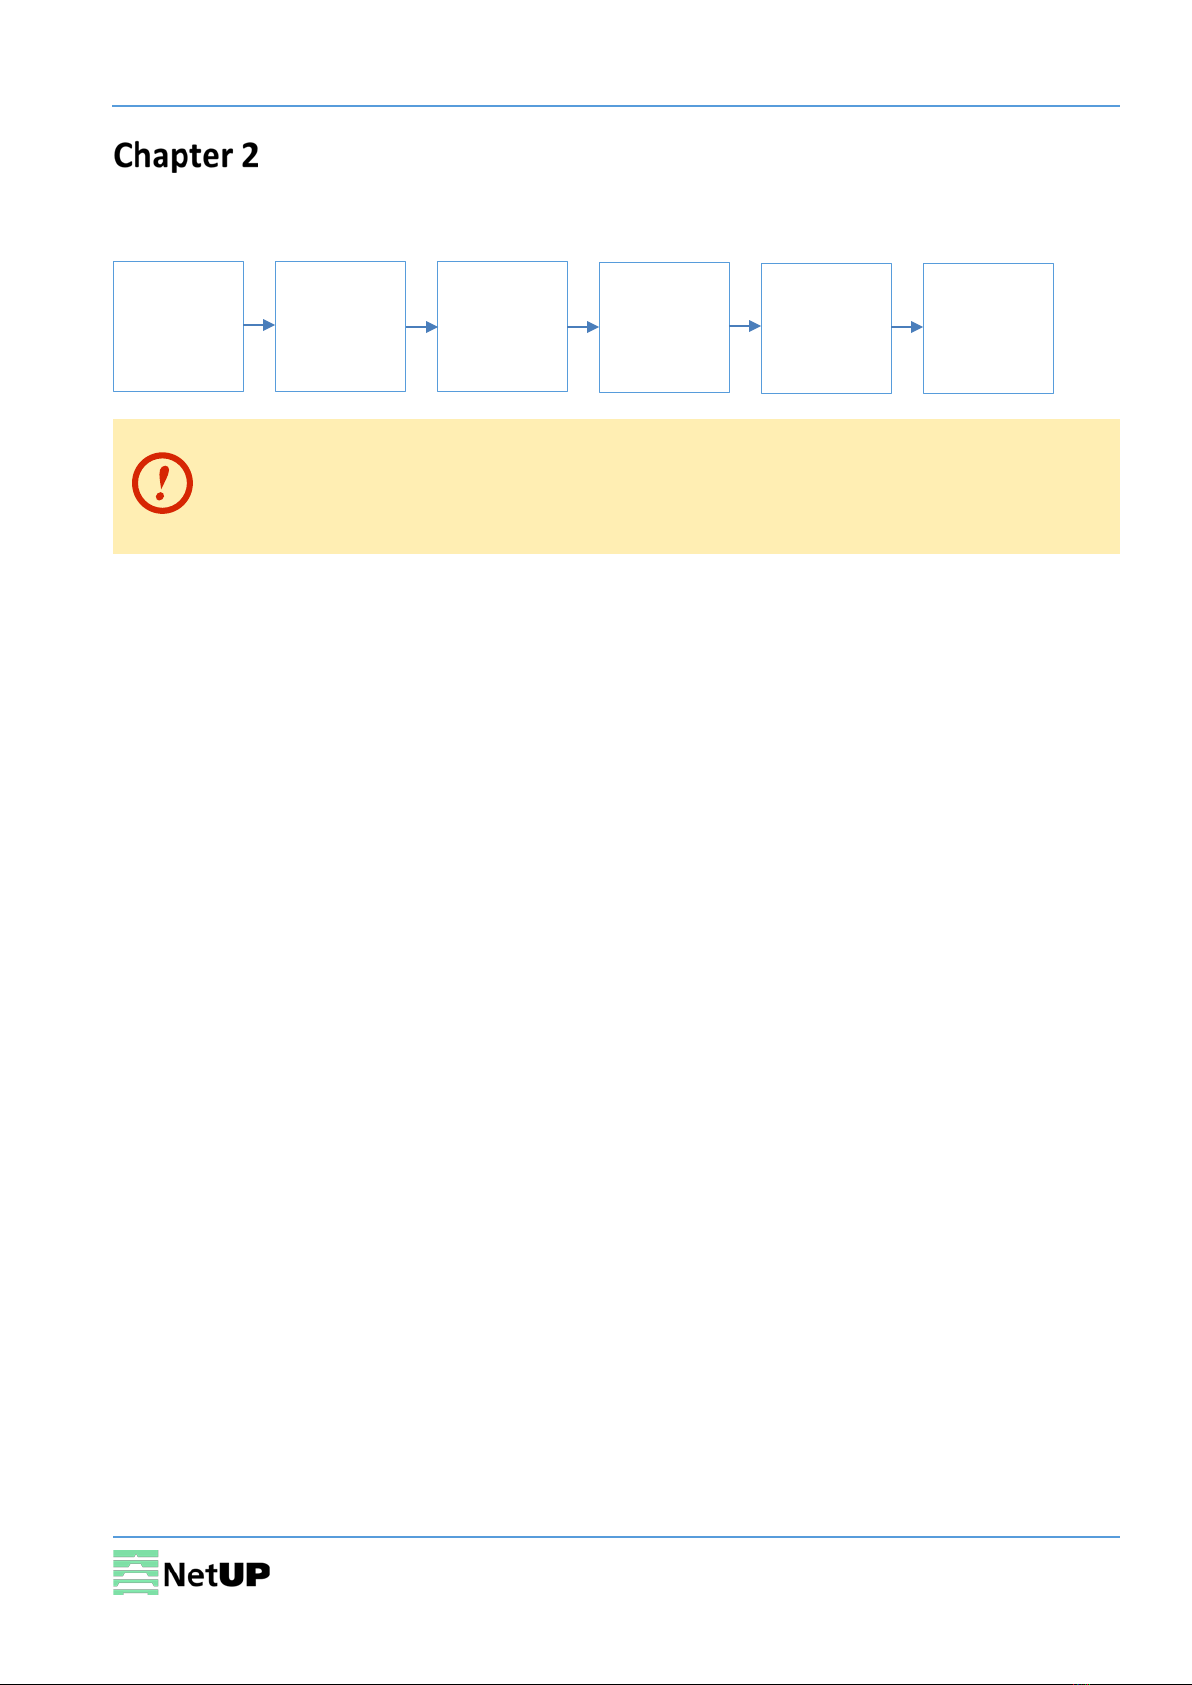
Device’s installation flow chart
Before installing and connecting the device, carefully read the environment and
grounding requirements, as well as safety instructions for the sake of your safety and for
the safety of the device
Packing list check
Check items according to packing list. Normally it should include the following items:
•NetUP Streamer 16xC
•Power Cord
Safety instructions
•Before installing and connecting the device make sure that the device was damaged during
delivery.
•Install the device in an appropriate place. The device is designed to work in a clean and dry room.
It must be operated and maintained free of dust.
•Before switching on the device make sure that it is adjusted to the mains voltage you intend to
use. Make sure that you keep within the specifications – AC 100V-220V±10%, 50/60Hz.
•Check that all the cables are connected properly. Connect cables only to a device that is turned
off.
Packing list
check
Connecting
grounding
wire and
power cord
Installing
device
Connecting
signal cable
Setting
parameter
Running
device

NetUP Streamer 16xC. User manual
6
Environment requirement
Item
Requirement
Room space
When installing a rack in the room, make sure the distance between two
rows of racks is 1.2~1.5m and the distance to the wall is at least 0.8m.
Room floor
Electric isolation. Dust free. The volume resistivity of ground anti-static
material: 1×10⁷~1×10¹⁰ Ω. Grounding current limiting resistance: 1M (Floor
bearing should be greater than 450Kg/m2).
Environment
temperature
5~40℃(sustainable), 0~45℃(short time).
Installing air-conditioning is recommended.
Relative temperature
20%~80% (sustainable); 10%~90% (short time).
Pressure
86~105KPa
Door & window
Install rubber strip for sealing door-gaps and dual level glasses for windows
Walls
Can be covered with wallpaper or dark paint.
Fire protection
Fire alarm system and extinguisher.
Power
The device requires AC 100V-220V±10%, 50/60Hz.
Please carefully check before running.
Grounding requirement
•Connect the ground wire to the grounding hardware on the device. Ground resistance should be
no more than 1 Ω
Grounding is essential for device’s functionality, surge and electronic interference
protection
•Keep proper contact with the metal housing of the device
•Grounding wire must be made out of copper and as thick and short as possible
•Make sure the two ends of grounding wire conduct electricity and are not rusty
•It is prohibited to use any other devices as a part of grounding electric circuit
•All racks should be connected with a protective copper strip. Ground loops should be avoided
•Grounding wire’s contact area with the rack should be no less than 25mm2

NetUP Streamer 16xC. User manual
7
WEB NMS Operation
Use the Web interface to control NetUP Streamer 16xC.
Login
Connect a personal computer and the device with net cable, and use ping command to confirm they
are on the same network segment.
Make sure that the computer’s IP address is different from the device’s IP address;
otherwise, it would cause an IP conflict
The default IP address of NetUP Streamer 16xC is 192.168.0.136 or 10.0.0.103. Thus, set the
computer’s IP address to 192.168.0.X or 10.0.0.X, where X can be from 0 to 255, except 136 or 103.
Open a web browser, enter the device’s IP address in the browser address bar and press Enter. If the
network is configured correctly, you will see the login interface (Figure 1).
Enter username and password and click LOGIN to enter the web interface. Default username is
“admin”, default password is “admin”.
Figure-1

NetUP Streamer 16xC. User manual
8
Summary →Status
After login, you will get the Status page which displays the current system status (Figure-2).
Figure-2
Parameters → TS Config
Use the TS Config page to configure the TS output parameters and select one of the following tabs:
Output TS, Stream Select, General, PID Bypass.
Output TS
Select the Output TS X tab, to open the list of available TS channels. Click one of the channels to
select it (Figure-3).
Figure-3
Use this menu to
navigate between
the interface pages
System information
Select a channel

NetUP Streamer 16xC. User manual
9
Stream Select
Select the Stream Select tab to select streams that should be sent to Mux out (Figure-4).
Figure-4
Figure-5
Operation area:
CA Filter filter or not filter the source CA information
PID Remap enable or disable PID remapping
Refresh input / output refresh an input or an output
===> / <=== move programs between the input and the output areas
All input / output select all input or output programs
Input area
Output area
Operation area
Change the
channel
information
(Figure-5)
Parse programs
Confirm
changes
NetUP Streamer 16xC. User manual
10
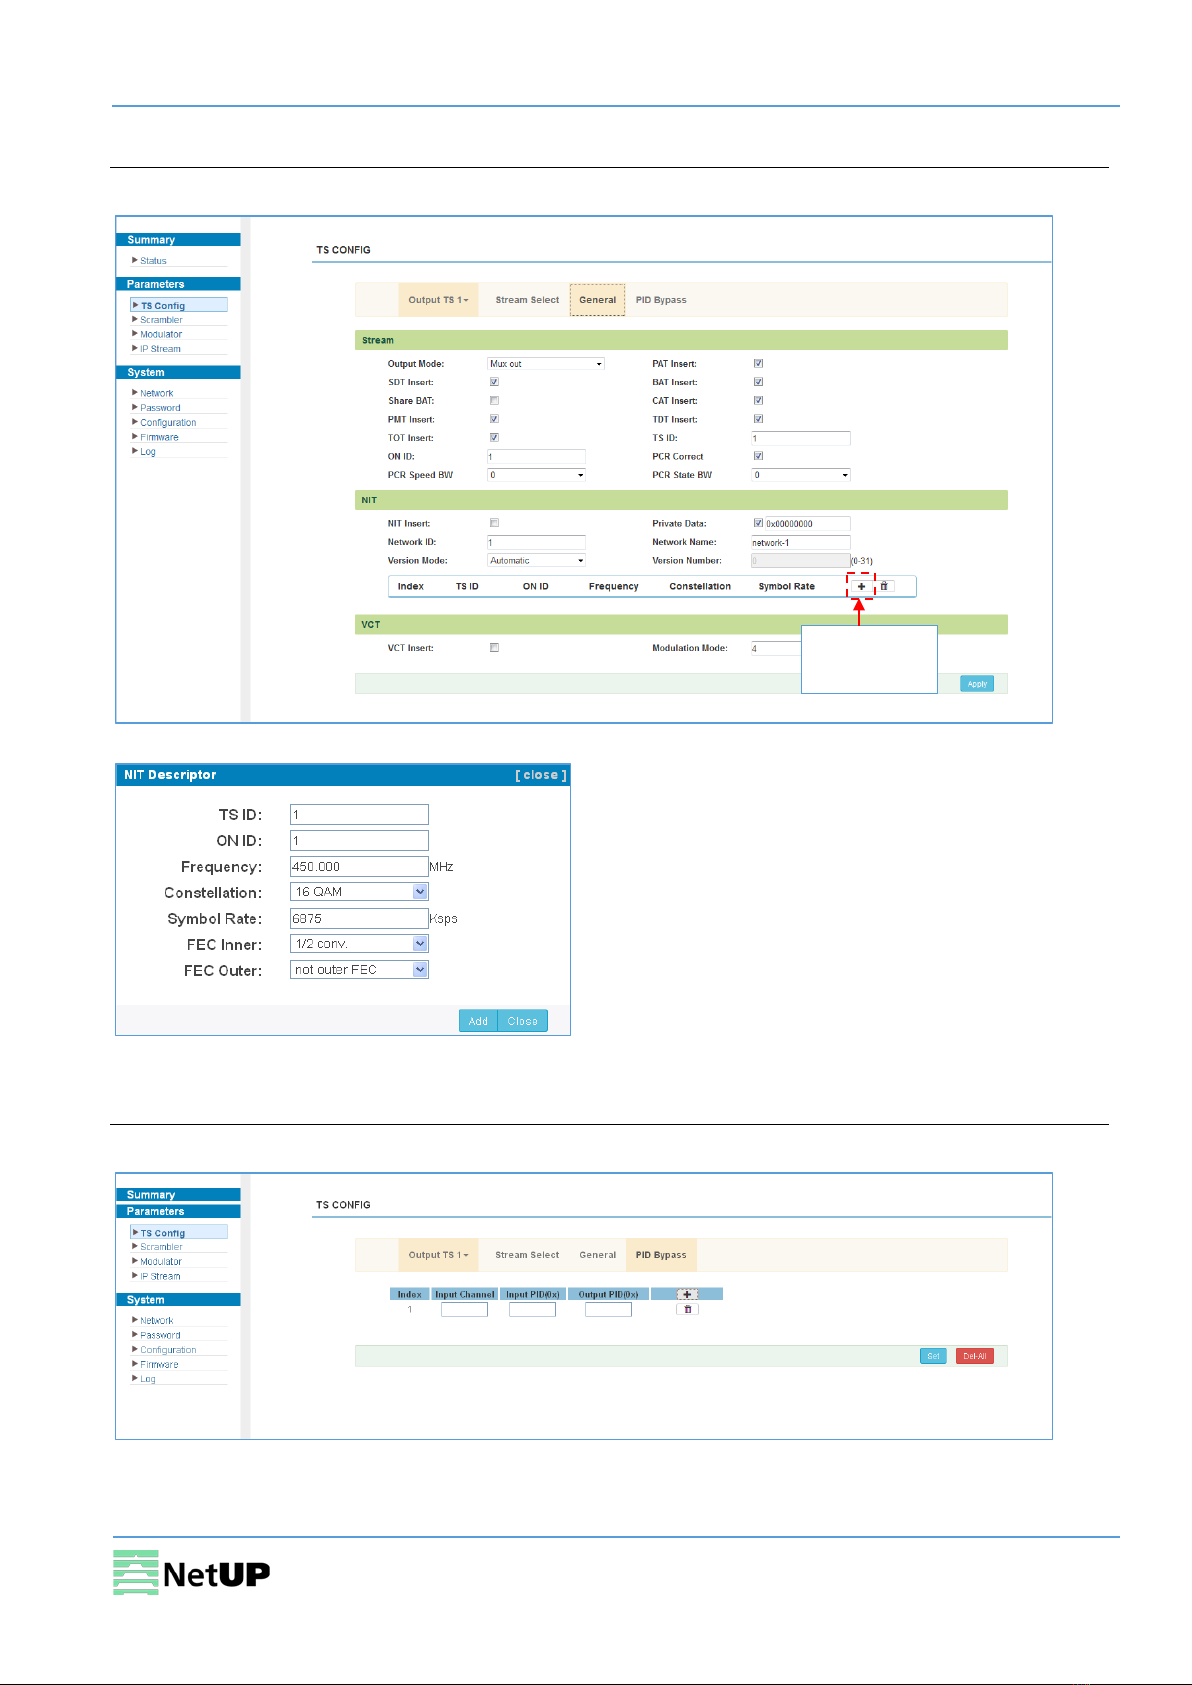
General
Select the General tab to edit common parameter for output streams (Figure-6).
Figure-6
Figure-7
PID Bypass
Select the PID Bypass tab to edit the list of PIDs that should pass through (Figure-8).
Figure-8
Add an NIT
descriptor

NetUP Streamer 16xC. User manual
11
Parameters → Scrambler
Use the Scrambler page to manage scrambling options and select programs to scramble (Figure-9).
Figure-9
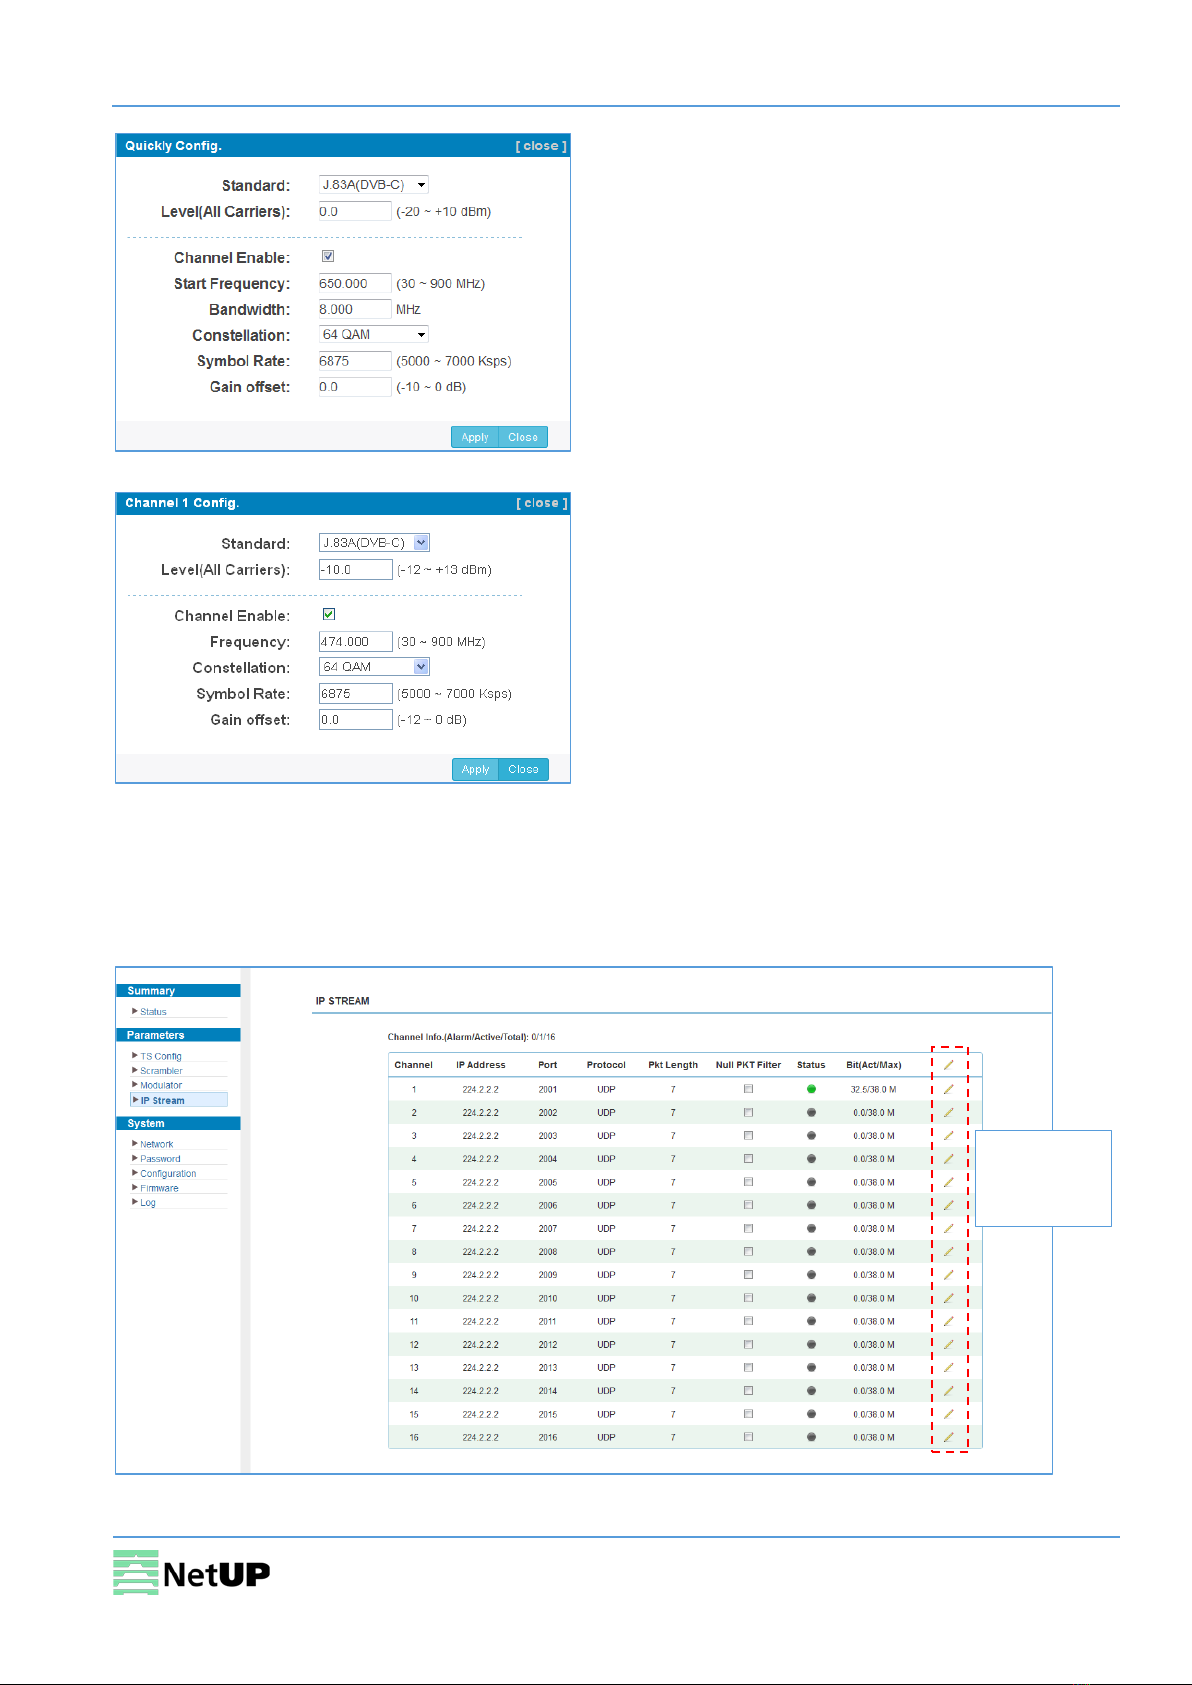
Parameters → Modulator
Use the Modulator page to edit RF output parameters (Figure-10).
Figure-10
Select a channel
Check programs
that should be
scrambled
Green means
normal state,
while red means
communication
error or no
communication
Quick config
(Figure-11)
Channel
config
(Figure-12)
NetUP Streamer 16xC. User manual
12
Figure-11
Figure-12
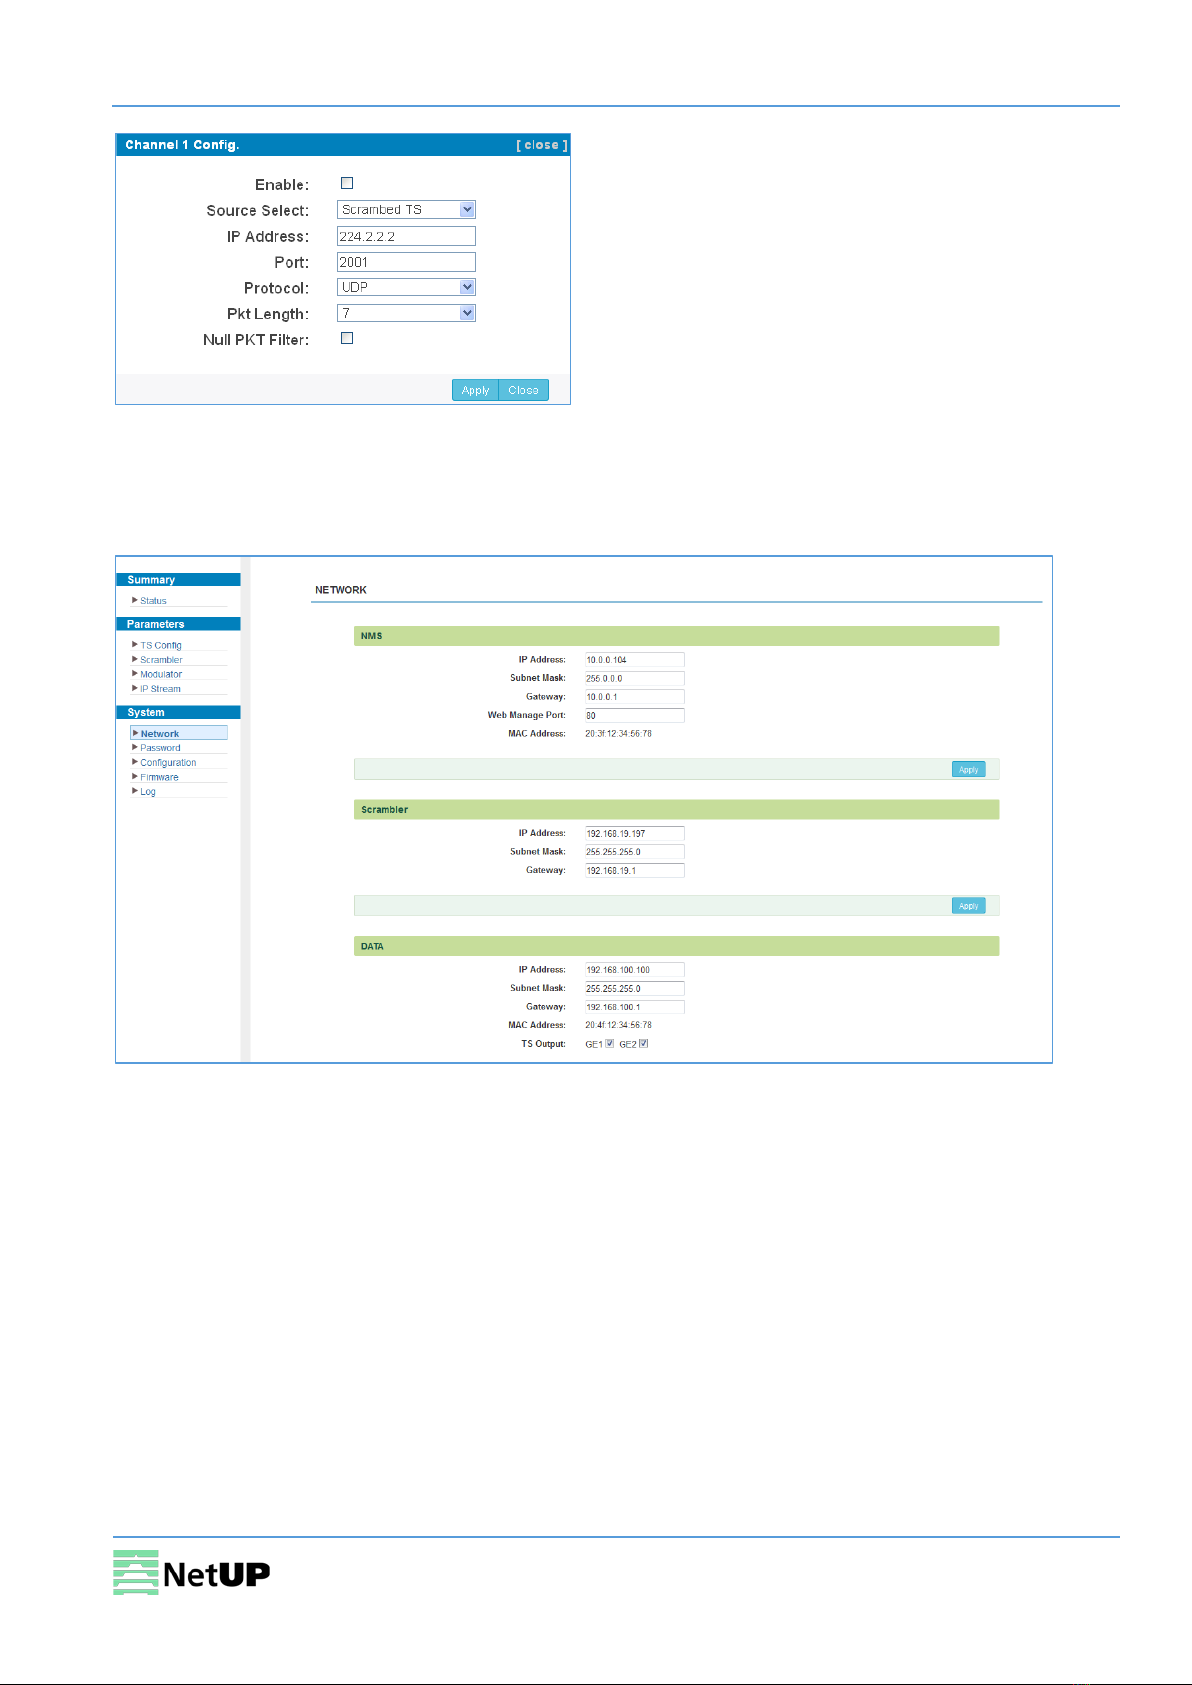
Parameters → IP Stream
NetUP Streamer 16xC supports TS IP output (16×MPTS) via the DATA port. Use the IP Stream page to
set IP output parameters (Figure-13).
Figure-13
Click to edit
parameters
(Figure-14)
NetUP Streamer 16xC. User manual
13
Figure-14
System → Network
Use the Network page to edit networking parameters (Figure-15).
Figure-15

NetUP Streamer 16xC. User manual
14
System → Password
Use the Password page to change current password and username (Figure-16).
Figure-16
System → Configuration
Use the Configuration page to save or restore system configuration, to revert to factory settings, to
work with backups or to load configurations (Figure-17).
Figure-17
System → Firmware
Use the Firmware page to update firmware for the device (Figure-18).
Figure-18
Select a tab
NetUP Streamer 16xC. User manual
15
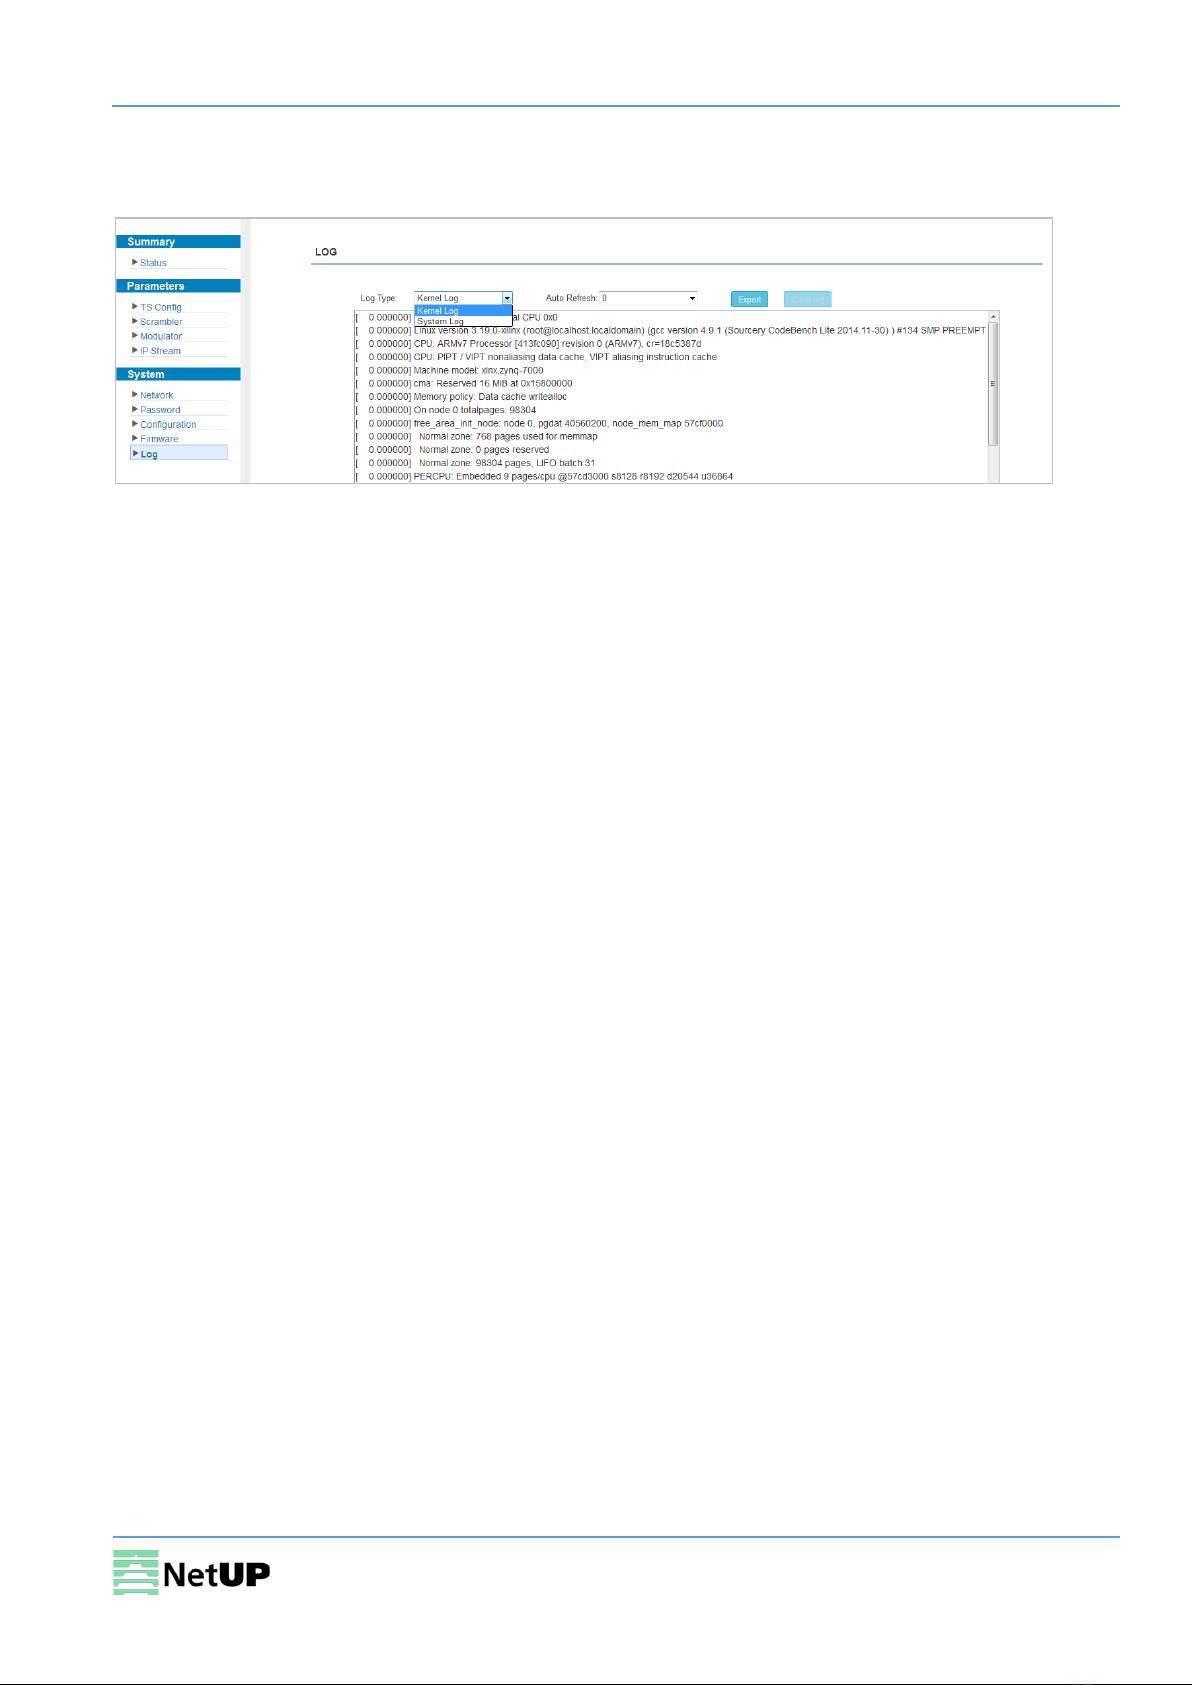
System → Log
Use the Log page to see system logs (Figure-19).
Figure-19

NetUP Streamer 16xC. User manual
16
Troubleshooting
Check the following before troubleshooting:
•Whether the server room is well ventilated and hot air from the back panel of the device is
effectively removed?
•Does the supply voltage meet the power requirements of the device?
•Is the RF output level vary within the tolerant range?
•Are all cables connected correctly?
Turn off the device and unplug the power cord in the following cases:
•The power cord or socket is damaged.
•A liquid is splashed on the device.
•A short circuit has occurred.
•The device is in damp environment.
•The device suffered from physical damage.
•Longtime idle.
•After switching on and restoring to factory setting, device still cannot work properly.
•Maintenance needed.
Frequent on and off switching is prohibited; the interval between switching the device on
and off must be more than 10 seconds
Table of contents
Other NetUP Media Player manuals


