Netvue Birdfy User manual
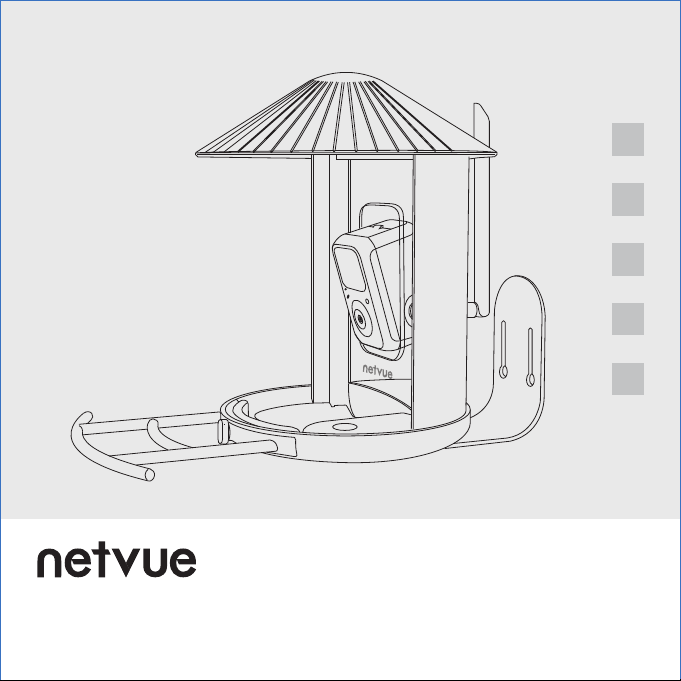
Birdfy Feeder Quick Guide
EN
DE
FR
ES
IT

Warning
NOTE: This equipment has been tested and found to comply with the limits for a
Class B digital device, pursuant to part 15 of the FCC Rules. These limits are
designed to provide reasonable protection against harmful interference in a
residential installation. This equipment generates uses and can radiate radio
frequency energy and, if not installed and used in accordance with the instructions,
may cause harmful interference to radio communications. However, there is no
guarantee that interference will not occur in a particular installation. If this
equipment does cause harmful interference to radio or television reception, which
can be determined by turning the equipment off and on, the user is encouraged to
try to correct the interference by one or more of the following measures:
- Reorient or relocate the receiving antenna.
- Increase the separation between the equipment and receiver.
-Connect the equipment into an outlet on a circuit different from that to which
thereceiver is connected.
-Consult the dealer or an experienced radio/TV technician for help.
The antennas used for this transmitter must be installed to provide a separation
distance of at least 20 cm from all persons and must not be co-located for operating
in conjunction with any other antenna or transmitter.
FCC (USA) 15.9 prohibition against eavesdropping except for the operations of law
enforcement officers conducted under lawful authority, no person shall use, either
directly or indirectly, a device operated pursuant to the provision of this part for the
purpose of overhearing or recording the private conversations of other unless such
use is authorized by all of the parties engaging in the conversation. Changes or
modifications not expressly approved by the party responsible for compliance could
void the user's authority to operate the equipment.
FCC ID: 2AO8RNI-8101

CE RED
This product can be used across EU member states.
CE RED
Das Produkt kann in allen EU-Mitgliedstaaten verwendet werden.
CE RED
Ce produit peut être utilisé dans tous les États membres de l'UE.
CE RED
Este producto se puede utilizar en todos los estados miembros de la UE.
CE RED
Questo prodotto può essere utilizzato in tutti gli stati membri dell'UE.

1. What’s In The Box
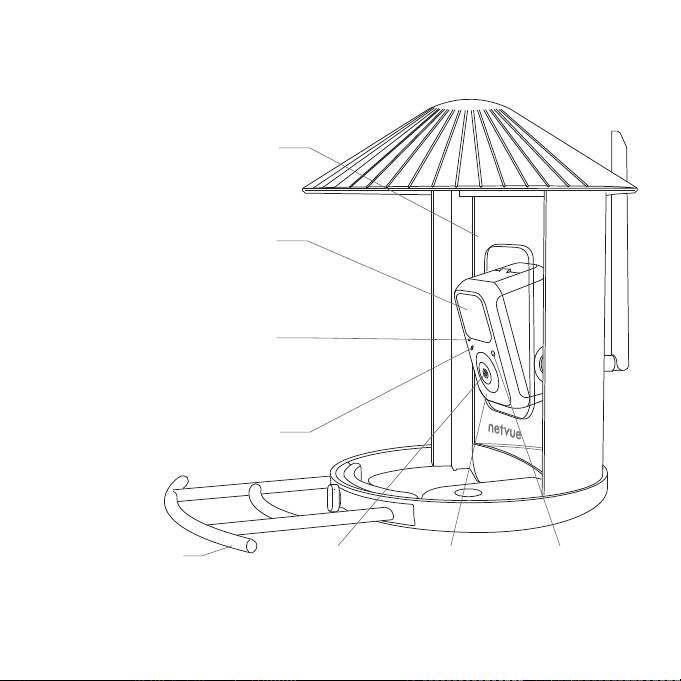
2. Camera Structure
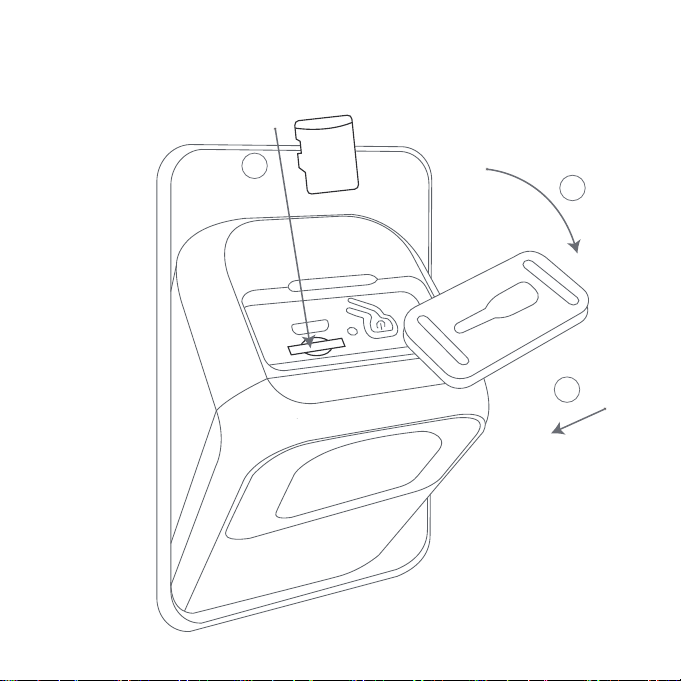
3. Insert Micro SD Card
4. Assemble Birdfy Feeder
5. Battery Charging
6. How To Turn On & Off The Camera
7. Read Before Installation
8. Set Up With Netvue App
9. Installation
10. Special Step for Bracket & Tripod Connector Removal
11. How to Add Bird Seed
12. Status Light
13. AI Bird Recognition
P. 1-2
P. 3-4
P. 5-7
P. 8-10
P. 11-12
P. 13
P. 18-20
P. 21-22
P. 23-40
P. 41-42
P. 43-44
P. 45-46
P. 47-49
1. Was ist in der Box
2. Kamerastruktur
3. Micro-SD-Karte einlegen
4. Birdfy Feeder zusammenbauen
5. Aufladen des Akkus
6. So schalten Sie die Kamera ein und aus
7. Vor der Installation lesen
8. Mit der Netvue-App einrichten
9. Installation
10. Spezieller Schritt zum Entfernen von Halterung und Stativanschluss
11. Wie man Vogelfutter hinzufügt
12. Statusleuchte
13. KI-Vogelerkennung
P. 1-2
P. 3-4
P. 5-7
P. 8-10
P. 11-12
P. 14
P. 18-20
P. 21-22
P. 23-40
P. 41-42
P. 43-44
P. 45-46
P. 47-49
Catalog

1. Qu'y a-t-il dans la boîte
2. Structure de la caméra
3. Insérez la carte Micro SD
4. Assembler Birdfy Feeder
5. Charge de la batterie
6. Comment allumer & Hors de la caméra
7. À lire avant l'installation
8. Configurer avec l'application Netvue
9. Installation
10. Étape spéciale pour le retrait du connecteur du support et du trépied
11. Comment ajouter des graines pour oiseaux
12. Voyant d'état
13. Reconnaissance des oiseaux par IA
P. 1-2
P. 3-4
P. 5-7
P. 8-10
P. 11-12
P. 15
P. 18-20
P. 21-22
P. 23-40
P. 41-42
P. 43-44
P. 45-46
P. 47-49
1. Qué hay en la caja
2. Estructura de la cámara
3. Inserte la tarjeta Micro SD
4. Montaje del Birdfy Feeder
5. Carga de la batería
6. Cómo encender y apagar la cámara
7. Leer antes de la instalación
8. Configurar con la aplicación Netvue
9. Instalación
10. Paso especial para la extracción del conector del soporte y del trípode
11. Cómo agregar semillas para pájaros
12. Luz de estado
13. Reconocimiento de aves por IA
P. 1-2
P. 3-4
P. 5-7
P. 8-10
P. 11-12
P. 16
P. 18-20
P. 21-22
P. 23-40
P. 41-42
P. 43-44
P. 45-46
P. 47-49

1. Cosa c'è nella scatola
2. Struttura della fotocamera
3. Inserire la scheda Micro SD
4. Assembla Birdfy Feeder
5. Ricarica della batteria
6. Come accendere e spegnere la fotocamera
7. Leggere prima dell'installazione
8. Configurazione con l'app Netvue
9. Installazione
10. Passaggio speciale per la rimozione del connettore della staffa e del treppiede
11. Come aggiungere semi per uccelli
12. Spia di stato
13. Riconoscimento dell'uccello AI
P. 1-2
P. 3-4
P. 5-7
P. 8-10
P. 11-12
P. 17
P. 18-20
P. 21-22
P. 23-40
P. 41-42
P. 43-44
P. 45-46
P. 47-49
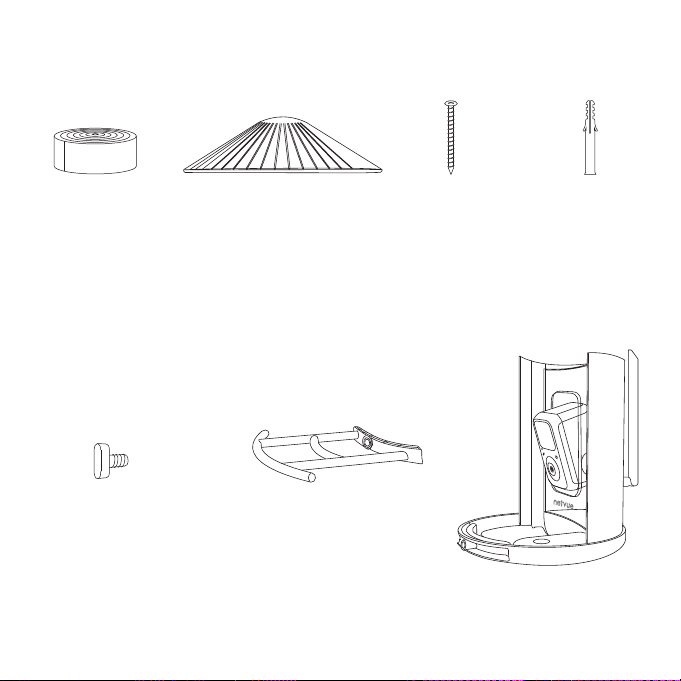
Anchors
Anker
Ancres
Anclas
Ancore
X 3
Mounting Screws
Befestigungsschrauben
Vis de montage
Tornillos de montaje
Viti di montaggio
Birdfy Feeder
Cover
Abdeckung
Couverture
Cubrir
Coperchio
Bird Stand
Vogelständer
Support d'oiseau
Puesto de pájaros
Stand per uccelli
Bird Stand Screw
Vogelständerschraube
Oiseau Stand Vis
Tornillo de soporte para pájaros
Vite per supporto per uccelli
Black Strap
Schwarzer Riemen
Bracelet noir
Correa negra
Cinturino nero
X 3
What’s In The Box
1

Mounting Bracket
Montagehalterung
Support de montage
Soporte de montaje
Staffa di fissaggio
Type C Power Cable
Netzkabel Typ C
Câble d'alimentation de type C
Cable de alimentación tipo C
Cavo di alimentazione di tipo C
Drilling Template
Bohrschablone
Gabarit de perçage
Plantilla de perforación
Modello di perforazione
Ejector Pin
Auswerferstift
Broche d'éjecteur
Perno expulsor
Perno di espulsione
Tripod Adapter
Stativadapter
Adaptateur de trépied
Adaptador de trípode
Adattatore per treppiede
Quick Guide
Kurzanleitung
Guide rapide
Guía rápida
Guida veloce
Birdfy Feeder Quick Guide
2
3
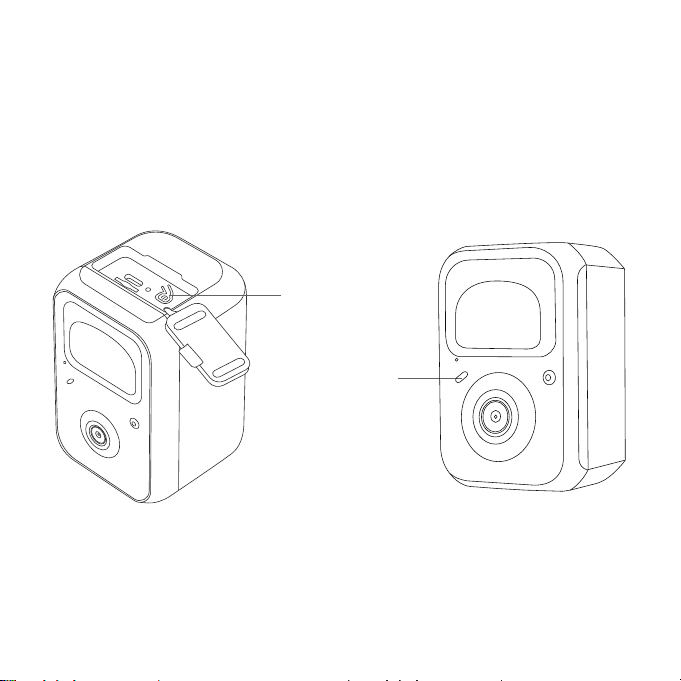
Lens
Linse
Lentille
Lente
Lente
Spot Light
Spot-Licht
Projecteur
Destacar
Riflettore
Camera Structure
Bird Seed Container
Vogelfutterbehälter
Conteneur de graines pour oiseaux
Contenedor de semillas de aves
Contenitore per semi di uccelli
PIR Infrared
Passives Infrarot
Infrarouge passif
Infrarrojos pasivos
Infrarossi passivi
Status Light
Statuslicht
Voyant d'état
Luz de Estado
Luce di stato
LED Infrared
LED Infrarot
LED Infrarouge
Infrarrojos LED
LED Infrarossi
Bird Stand
Vogelstand
Support d'oiseau
Soporte de pájaro
Supporto per uccelli
Microphone
Mikrofon
Microphone
Micrófono
Microfono

4
Camera Direction
Adjuster
Einstellung der
Kamerarichtung
Ajusteur de
direction de caméra
Ajustador de
dirección de la cámara
Regolazione della
direzione della telecamera
Speaker
Lautsprecher
Orateur
Orador
Altoparlante
Power Port
Stromanschluss
Port d'alimentation
Puerto de alimentación
Porta di alimentazione
Power Button
Netzschalter
Bouton marche
Botón de encendido
Pulsante di accensione
Reset Hole
Loch zurücksetzen
Réinitialiser le trou
Restablecer agujero
Ripristina foro
Micro SD Card Slot
Micro SD-Kartensteckplatz
Emplacement pour carte micro SD
Ranura para tarjeta micro SD
Slot per scheda micro SD
Antenna
Antenne
Antenne
Antena
Antenna
5
1
2
3
DC-5V
Insert Micro SD Card

6
Birdfy Cam comes with a built-in card slot which supports up to 128GB Micro
SD card.
Step 1: Rotate the camera down to the bottom.
Step 2: Open the top silicone plug. Insert the Micro SD card. Make sure to plug
it in the right direction.
Step 3: Finally, Cover silicone plug.
Die Birdfy Cam verfügt über einen integrierten Kartensteckplatz, der bis zu
128 GB Micro SD-Karte unterstützt.
Schritt 1: Drehen Sie die Kamera nach unten.
Schritt 2: Öffnen Sie den oberen Silikonstopfen. Legen Sie die Micro-SD-Karte
ein. Achten Sie darauf, es in die richtige Richtung zu stecken.
Schritt 3: Schließlich Silikonstopfen abdecken.
Birdfy Cam est livré avec un emplacement pour carte intégré qui prend en
charge jusqu'à 128 Go de carte Micro SD.
Étape 1: Faites pivoter la caméra vers le bas.
Étape 2: Ouvrez le bouchon supérieur en silicone. Insérez la carte Micro SD.
Assurez-vous de le brancher dans le bon sens.
Étape 3: Enfin, couvrez le bouchon en silicone.

7
Birdfy Cam viene con una ranura para tarjeta incorporada que admite tarjetas
Micro SD de hasta 128 GB.
Paso 1: Gire la cámara hacia abajo.
Paso 2: Abre el tapón de silicona superior. Inserte la tarjeta Micro SD.
Asegúrese de enchufarlo en la dirección correcta.
Paso 3: Finalmente, cubra el tapón de silicona.
Birdfy Cam è dotato di uno slot per schede integrato che supporta schede
Micro SD fino a 128 GB.
Passo 1: Ruota la fotocamera verso il basso.
Passo 2: Aprire il tappo in silicone superiore. Inserisci la scheda MicroSD.
Assicurati di collegarlo nella giusta direzione.
Passo 3: Infine, coprire il tappo in silicone.
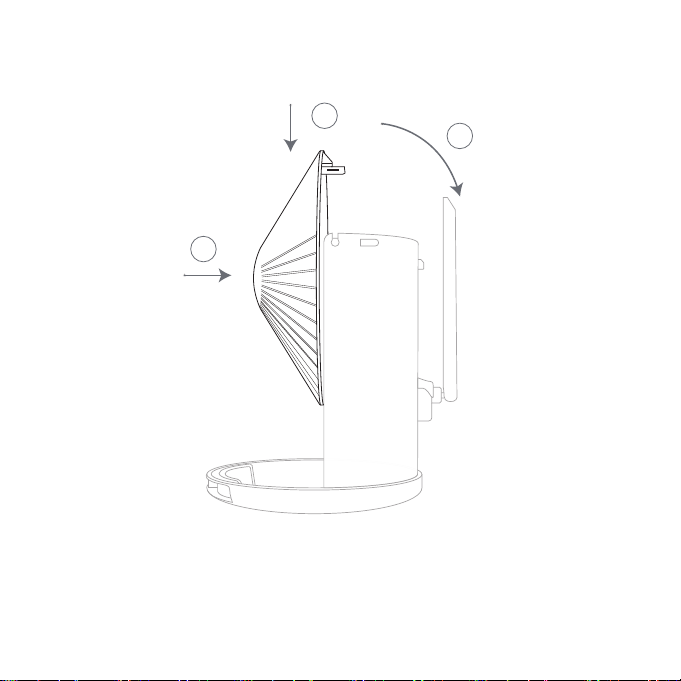
Assemble the cover
Step 1: Face up the side of the cover with the buckles. Align the small pillar on both the left and
the right side with the buckles of the white bird seed container.
Step 2:
Push down to insert.
Step 3:
Then rotate back to install the buckle behind the white bird seed container.
8
Assemble Birdfy Feeder
3
1
2

Montieren Sie die Abdeckung
Schritt 1: Schauen Sie die Seite des Gehäuses mit den Schnallen nach. Richten Sie die kleine
Säule links und rechts mit den Schnallen am weißen Vogelfutterbehälter aus.
Schritt 2: Zum Einfügen nach unten drücken.
Schritt 3: Dann drehen Sie sich zurück, um die Schnalle hinter dem weißen Vogelfutterbehälter
zu installieren.
Assembler le couvercle
Étape1:Recherchez le côté du boîtier avec les boucles. Alignez le petit pilier sur les côtés
gauche et droit avec les boucles sur le conteneur de graines pour oiseaux blanc.
Étape 2: Appuyez vers le bas pour insérer.
Étape 3: Ensuite, revenez en arrière pour installer la boucle derrière le conteneur de graines
pour oiseaux blancs.
Montar la Cubrir
Step 1: Mire hacia arriba el lado de la funda con las hebillas. Alinee el pequeño pilar en el lado
izquierdo y derecho con las hebillas del contenedor de semillas para pájaros blanco.
Step 2:
Empuje hacia abajo para insertar.
Step 3:
Luego, gire hacia atrás para instalar la hebilla detrás del contenedor de semillas para
pájaros blanco.
Installa il coperchio
Passo 1:
Guarda il lato della custodia con le fibbie. Allineare il piccolo pilastro sul lato sinistro e
destro con le fibbie sul contenitore bianco del becchime.
Passo 2:
Premere verso il basso per inserire.
Passo 3:
Quindi, tornare indietro per installare la fibbia dietro il contenitore bianco di semi per
uccelli.
9

Assemble Bird Stand
Use the provided bird stand screw to install the bird stan.
Vogelständer zusammenbauen
Verwenden Sie die mitgelieferte Vogelständerschraube, um den Vogelständer zu
installieren.
Assembler le support d'oiseau
Utilisez la vis de support d'oiseau fournie pour installer le support d'oiseau.
Ensamblar soporte para pájaros
Utilice el tornillo del soporte para pájaros provisto para instalar el soporte para pájaros.
Assemblare il supporto per uccelli
Utilizzare la vite del supporto per uccelli fornita per installare il supporto per uccelli.
10
11
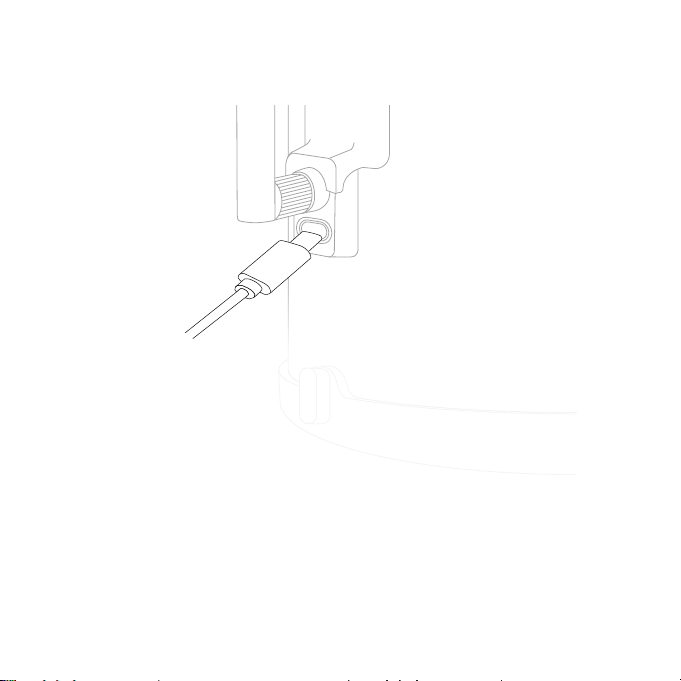
Battery Charging
The batteries inside the camera are not fully charged according to the transportation
safety regulations. Please fully charge the camera before using it. Please charge the
batteries with provided Type C Port Cable (DC5V / 1.5A adapter not included).
The status light will be in solid yellow when charging, and will turn to solid green when it
is fully charged. It takes about 14 hours to fully charge your camera.
Die Akkus in der Kamera sind gemäß den Transportsicherheitsbestimmungen nicht
vollständig geladen. Bitte laden Sie die Kamera vollständig auf, bevor Sie sie verwenden.
Bitte laden Sie die Akkus mit dem mitgelieferten Typ-C-Anschlusskabel (DC5V /
1,5A-Adapter nicht im Lieferumfang enthalten).
Die Statusleuchte leuchtet während des Ladevorgangs durchgehend gelb und leuchtet
durchgehend grün, wenn sie vollständig aufgeladen ist. Es dauert ungefähr 14 Stunden,
um Ihre Kamera vollständig aufzuladen.

12
Les batteries à l'intérieur de l'appareil photo ne sont pas complètement chargées
conformément aux règles de sécurité relatives au transport. Veuillez charger complète-
ment l'appareil photo avant de l'utiliser. Veuillez charger les batteries avec le câble de
port de type C fourni (adaptateur DC5V / 1.5A non inclus).
Le voyant d'état sera en jaune fixe lors de la charge et deviendra vert fixe lorsqu'il sera
complètement chargé. Il faut environ 14 heures pour charger complètement votre
appareil photo.
Las baterías del interior de la cámara no están completamente cargadas de acuerdo con
las normas de seguridad para el transporte. Cargue completamente la cámara antes de
usarla. Cargue las baterías con el cable de puerto tipo C proporcionado (adaptador DC5V
/ 1.5A no incluido).
La luz de estado estará en amarillo fijo cuando se esté cargando y se volverá verde fijo
cuando esté completamente cargada. Se necesitan aproximadamente 14 horas para
cargar completamente la cámara.
Le batterie all'interno della fotocamera non sono completamente cariche secondo le
norme di sicurezza per il trasporto. Si prega di caricare completamente la fotocamera
prima di utilizzarla. Si prega di caricare le batterie con il cavo della porta di tipo C fornito
(adattatore DC5V / 1.5A non incluso).
La spia di stato sarà di colore giallo fisso durante la ricarica e diventerà verde fisso
quando sarà completamente carica. Sono necessarie circa 14 ore per caricare completa-
mente la fotocamera.
13
How To Turn On & Off The Camera
To turn on the camera:
Long press the power button for 3s to turn on the camera. Then the Status
Light in the front of the camera will be solid blue. Double click the power
button to enter WiFi mode after the prompt tone.
To turn off the camera:
Long press the power button for 3s to turn off the camera. Then the Status
Light in the front of the camera will be off.
Power Button
Status Light
DC-5V

Netzschalter
Statuslicht
DC-5V
14
So schalten Sie die Kamera ein:
Halten Sie den Netzschalter 3 Sekunden lang gedrückt, um die Kamera
einzuschalten. Dann leuchtet die Statusleuchte an der Vorderseite der Kamera
durchgehend blau. Doppelklicken Sie auf den Netzschalter, um nach dem
Aufforderungston in den WLAN-Modus zu wechseln.
So schalten Sie die Kamera aus:
Halten Sie den Netzschalter 3 Sekunden lang gedrückt, um die Kamera
auszuschalten. Dann erlischt die Statusleuchte an der Vorderseite der Kamera.
So schalten Sie die Kamera ein und aus
Table of contents
Popular Pet Care Product manuals by other brands

Kohab
Kohab Ruru Birdhouse Assembly instructions

Pet Fit Designs
Pet Fit Designs Triple One Standard User manual & assembly instructions

Shear Magic
Shear Magic Tuffy 3000 Professional instruction manual

Trixie
Trixie Vital Flow Instructions for use

CatLink
CatLink Young user manual

Airyzone
Airyzone MBFX14-MOT11 manual


