Petainer IS-PET998DBB User manual

Rechargeable and Waterproof LCD Remote Pet
Training System Operating Guide
Please read this entire guide before beginning
Model Number:
IS-PET998DB 1 for 1
IS-PET998DBB 1 for 1
Model Number:
IS-PET998DB 1 for 2
IS-PET998DBB 1 for 2
Common size of different dogs
Size Neck
(cm)
Back
Length
(cm)
Type
Mini
Small
Medium
Large
Large
Large
Huge
20-22
20-24
23-28
27-31
30-34
33-37
43-48
47-52
52-62
25-30
29-36
35-42
41-47
46-53
52-59
76-84
88-97
92-100
19
23
28
31
35
40
60
65
70
Chest
Measurement
(cm)
Chihuahua, Yorkshire
Temier
Chihuahua, Yorkshire
Temier, Poodle, Pomeranian
Maltese Dog, Shih Tzu
Miniature Schnauzer,
Pekingese
Beagle
Husky
Labrador Retriever
Golden Retriever, Old
English Sheepdog
Schnauzer, English Cocker
Spaniel
LIMITED 90 DAYS WARRANTY
Pet rai ne r w ar r an ts th i s pro du c t to be f r ee of d efe cts i n par t s, m a te r ia ls an d
wor kma ns h ip f o r a per iod o f 9 0 day s, fr om da t e of pu rch as e .
Sh o u l d any repairs or servicing und e r this warranty be required, co n t a c t
Cu s t o m e r Service by phone or email for i n s t r u ctions on how to pack and ship
th e product to Petrainer.
Petainer CUSTOMER SERVICE
Telephone: 1-866-877-7949 (US&CA only)
Email: service@ipets-mall.com
Hours: Weekdays 9:00 AM- 5:00 PM EST
Th i s w a r r an t y g i v e s yo u s p ec i fi c l e ga l r i g h t s an d y o u m a y a l so ha v e o t h e r
ri g ht s w h ic h v a r y f r om s t a te t o s t at e .
20
V20160705 EN

WARNING
CAUTION
2 3
Table of Contents
Compments
Key Definition
Features
6
5
5
How the Petrainer Rechargeable and Waterproof Training Collar Works
Operating Guide
Prepare the Remote Transmitter
Prepare the Receiver Collar
Pairing the Remote Transmitter and Receiver Collar
To Test Petrainer Rechargeable and Waterproof Training Collar
Fit the Receiver Collar
Re-Thread the Collar
Frequently Asked Questions
Troubleshooting
9
12
14
15
17
20
Important Safety Information
Not f o r use w i t h aggressive dogs. Do not use this pr o d u ct if y o u r dog i s
aggressive, or if y o u r dog is prone to aggressive behavior. Aggressive dogs
can cause severe injury and even de a t h to their owner and ot h e r s . If you are
unsure w h e th e r this product is appropriate fo r your dog, ple a s e consult yo u r
veterinarian or certified trainer.
Avoid leaving the collar on the dog for more than 12 hours per day.
When possible reposition the collar on the pet’s neck every 1 to 2 hours.
Check the fit to prevent excessive pressure; follow the instructions in this
manual.
Never connect a lead to the electronic collar; it will cause excessive pressure
on the contacts.
When using a separate collar for a lead, don’t put pressure on the electronic collar.
Wash the dog’s neck area and the contacts of the collar weekly with a damp cloth.
Examine the contact area daily for signs of a rash or a sore.
If a rash or sore is found, discontinue use of the collar until the skin has healed.
If the condition persists beyond 48 hours, see your veterinarian.
These steps will help keep your pet safe and comfortable. Millions of pets are
comfortable while they wear stainless steel contacts. Some pets are sensitive
to contact pressure. You may find after some time that your pet is very tolerant
of the collar. If so, you may relax some of these precautions. It is important to
continue daily checks of the contact area. If redness or sores are found,
discontinue use until the skin has fully healed.
Thank you for choosing Petrainer Rechargeable and Waterproof LCD Remote
Pet Tr a ining System. Our missio n is to ensure your pet’s sa f ety by prov i ding
you the tools and techniques to successfully train your pet.
Warning
Please charge before using the product!
If putting the transmitter and receiver collar in storage for a long
t i m e , p l e a se c h a r ge b o t h f ul l y b ef o r e l ea v i n g t he m i d l e a n d
con ti nue cha rging onc e every month.
8
8
10
9
Risk of Skin damage. Please read and follow the instructions in this manual.
Proper fit of the collar is important. A collar worn for too long or made too tight
on the pet's neck may cause skin damage. Ranging from redness to pressure
ulcers, this condition is commonly known as bedsores. These collars can cause
pressure necrosis if used incorrectly and is often misidentified as burns.
4
General Training Tips 18
Common size of different dogs 20
LIMITED 90 DAYS WARRANTY
20
Petrainer CUSTOMER SERVICE

4 5
Components
IS-PET998DB 1 for 1
Charger Testing Bulb 2 sets Contact Points
Adjustable TPU Belt
Receiver Collar
Remote Transmitter
Charger 4 sets Contact Points
IS-PET998DB 1 for 2
Remote Transmitter Receiver Collar
Adjustable TPU Belt Testing Bulb
USB Cable and
Resembling splitter cable
USB Cable and
Resembling splitter cable
Petrainer Rechargeable and Waterproof LCD Remote Pet Training System has
be e n proven safe, comfortable, a n d effective for all pets over 8 pounds. T h i s
system assists you in controlling your pet without a leash in a range up to 328
yards (300m). At the push of a button, the Remote Transmitter sends a signal,
ac ti v a t i n g th e Re ce iv er C ol la r. U si ng t he R em ot e Tra in er c on si st en tl y a n d
cor rec t ly, ma ny mi sbe hav ior s th a t you r pet exh ibi ts wi l l be cor rec ted or a n y
basic obedience commands can be taught.
Impor t ant: The Rem o te Tr aine r ha s a rang e up to 328 yar d s. Depend ing on
the way you hold the Remote Transmitter, the range may vary. Hold the Remote
Transmitter in a horizontal position away from yo ur body to achieve optimum
range. Terra i n, we ather, ve getati o n, tr ansmis s ion from other radio devi c es,
and other factors will affect the range of your Remote Trainer.
How the Petrainer Rechargeable and Waterproof LCD
Remote Pet Training System Works
Features
3. 100 levels of vibration.
4. 100 levels of static shock (optional).
7. Power save:
1. Rechargeable Remote Transmitter and Receiver collar.
2. Waterproof Receiver Collar, allowing your pet to swim in water.
5. Alter stimulation levels by pressing the Up & down buttons.
6. Tone button activates a tone on the receiver collar.
The rec eiver collar will go int o deep sleep if t here is no operation for 4
minutes and any dog movement will activate the receiver.
The transmitter will go into STANDBY MODE if there is no operation after 20
seconds and go into deepsleep after 2 minutes, press any button except the
LED l i g h t button to activate th e transmitter fr o m Standby mo d e and press
th e Mode button for 5 seconds to a w a k e n the tra n s m i t t e r from deep sleep
mode.
8. The system can be used for 1 or 2 Receiver Collars.
9. Two pairs of metal prongs (short/long) to be suitable for dogs with different fur
lengths.

6 7
Key Definition
1. Antenna
2. Led light
3. LED Indicator
4. LCD Screen
Light mode
Static shock mode
1-100 level
Vibration mode
Beep mode
5. U
6. Led light button
7. Channel button
8. Launch button
9. Mode button
10. Lithium battery
11. Charging hole
p/down button
Channel 1
Channel 2
Low Battery Indicator
Y
1. Antenna: Transmits the signal from the Transmitter to the Receiver Collar.
2. Led light: This light will be on when pressing the LED light button.
3. Indication light: This light will flash when the “Y” button is pressed. The
will be activate when charging as well.
light
4. LCD display:
Static mode: With this mode selected, pressing the “Y” button will cause the
receiver to emit shock.
Vibration mode: With this mode selected, pressing the “Y” button will cause
the receiver to vibrate.
Beep mode: With this mode selected, pressing the “Y” button will cause the
receiver to emit a beep sound.
Light mode: With this mode selected, pressing the “Y” button will cause the
LED light on the receiver to flash green once every second. Its primary purpose
is to help locate your pet.
Channel 1: Indicates the selection of the first collar receiver.
Channel 2: Indicates the selection of the second collar receiver.
5. Up/down button: Selects intensity level for Vibration and Static Shock.
6. Led light button: When pressing the LED light bu tton, the LED light on th e
transmitter will be on.
7. Channel button: Pressing this button will swap between the first and second
receiver.
collar
8. Lau nch b u tt o nS e nd s t he sig nal f r om tr ans mit ter to r ece ive r, r es u lt i ng in
stim ula tio n, be e p or li g ht , d epe ndi ng on yo u r mod e sel e ct i on .
9. Mode button: Press this button to switch between modes. There are 4 modes:
Static, Vibration, Beep and light mode.
10. Lithium Battery: 3.7V 240 mAhLiP.
11. Charging hole: Insert charging connector into charging hole to charge the
Transmitter.
Contact Points: Deliver
the safe static correction.
Charging holes: Charge
for Receiver Collar.
Rubber Cover: Seal
charging hole to keep
from dust.
On/ Off/Encode Button:
turn on/off the Receiver
Collar and hold it to enter
encoding status.
A. When charging the battery, the red LED light
shows up and changes to green LED after fully
charged.
B. In LED Light mode, press the launch button, the
green LED in the Receiver Collar will flash every
one second.
C. W he n St an db y, the Rec ei v er Col la r wi ll f la sh gre en LED light every fo ur
seconds.
D. Af te r t u rn on th e Re c e iv er Co l l a r, p r e s s a n d h o l d t h e O n / O f f / E n c o d e
b u t t o n f o r 5 seconds to enter encoding period The green LED light will keep
flashing for 10 seconds to indicate the encoding time.
A B C D

8 9
A B
Note: Please check whether the battery needs recharging before you
use the device. When you turn on the receiver, if there are beeps for
20 seconds, you need to recharge the receiver collar before using the
unit.
3. Press up/Down buttons on right hand side of the transmitter to set
Vibration or Static Shock level.
4. Press the ½ button to swap between channel 1 or 2, depending on
which receiver you wish to select.
5. The Remote Transmitter will go into STANDBY MODE if no operation
for 20 seconds and will TURN OFF if no operation for 2 minutes.
6. In STANDBY MODE, press any button (except LED light button) to wake
up the transmitter. When the transmitter is powered off, hold the Mode
button on the Transmitter for 5secconds to TURN ON.
Operating Guide
How to use the Remote Transmitter
2. Se t to the di ff ere nt mo des b y pr e ssi ng t h e Mo d e Bu t to n -Th e LCD
images will change from .
Prepare the Remote Transmitter:
Charge the Remote Transmitter
1. Connect the charger connector to the charging jack.
2. Plug the charger into a standard outlet.
3. The red light on the Transmitter will be on.
4. Charge the Transmitter for 2 hours or until the light indicates charging
is complete.
5. After fully charged, the red led will turn off automatically.
Low battery indicator: the symbol will show up on the right side of
screen when recharging is necessary.
LCD
1. To turn on/off the Transmitter, hold the Mode button for 5 seconds.
Step
1
Prepare the Receiver Collar:
Charge the Receiver Collar
1. To TURN ON the Receiver Collar, press the on/off button, a beep
and the green LED will turn on and begin to flash every 4 seconds.
will sound,
2. Open the rubber cover and insert the charger connector into the
hole.
charging
3. Plug the charger into a standard outlet.
4. The red LED will be on. (A)
5. Charge the Receiver Collar for 2 hours or until the light indicates
charging is complete.
6. After the unit is fully charged, the red LED light will turn to a green LED
light automatically. (B)
7. Put the rubber cover back in place.
8. If the battery needs recharging, the receiver collar will beep for 20
seconds.
Step
Step
2
3
Pairing the Remote Transmitter and Receiver
Collar:
1. Power on the Receiver Collar by pressing the ON/OFF button, a beep
will sound.
2. Press and hold the ON/OFF button for 5 seconds until a beep sounds,
and the indicating light will begin to flash quickly.

10 11
Test LED Light Function
Note:
Press LED light Button, LED
light will turn on, means LED
l i g h t b u t t o n w o r k s .
I: If LCD of Remote Transmitter does not display, there is probably two
reasons:
Important: If the transmitter is in sleep mode (the LCD display is turned
off) you must press the “Y” button once to wake up the unit, then press
the “Y” button again to send the signal from the remote to the collar
receiver. This applies to all functions.
Test Static Shock Function
Take out the test bulb from the
package and place its metal wire
against the Receiver Collar ’s
Contact Points.
Press Mode button on the Remote
Transmitter, switch to Shock
Mode, confirm using the LCD
di s p l a y t h a t t h e s ti m u l a t io n
level is not at 0, you can press
the UP/DOWN button on the
right side to adjust.
Press Y button, test bulb will flash, that means Shock function works.
To Test Petrainer Rechargeable and Waterproof
LCD Remote Pet Training System:
The sta tic imp u lse re l eas e d by the Rece ive r Co llar ca nnot be se en
with na ked eye . Yo u ca n test the St imul atio n wi th thi s m e tho d :
Step
Note: If wanting to test the shock function on yourself, please ensure
your finger or hand is across both contact points to ensure the connection
is complete. Otherwise, user will feel no stimulation.
Test Vibration Function
P r e ss M od e b u tt o n o n t h e
Remote Transmitte r, switch
to Vibrate mode, confirm using
t h e L C D d i s p l a y t h a t t h e
stimula t ion level is no t a t 0 ,
y o u c a n p r e s s U P / D O W N
b u t t o n o n t h e r i g h t s i d e t o
adjust.
PressY button, Remote Collar
will vibrate, that means Vibration
Function works.
Test Beep Function
Press Mode button of Remote
Transmitter, switch to Beep
Mode.
Press Y button, Receiver Collar
wi l l be ep , th at m e an s Be ep
Mode works.
4
3. Press the Y button on the Remote Transmitter once the Receiver Collar
beeps and flashes quickly.
When the Remote Transmitter and Collar Receiver are paired
successfully, the Collar Receiver will beep again, and the indicating
light will stop flashing quickly.
4. If needing to pair a second Collar Receiver, follow the same steps but
first press 1/2 button to different channel.
Note: Pairing has to be finished within 10 seconds after the 1st beep from
the Receiver Collar. Meaning, you have to press the Y button within 10
seconds of the 1st beep for pairing to be completed.

12 13
4. Allow your pet to wear the collar for several minutes then recheck
fit. Check the fit again as your pet becomes more comfortable with the
Collar.
the
CAUTION: Risk of skin damage.
The Re c e i ver Col l a r is not designed to be worn constantly. We
recommend th e Collar not be worn for m ore t han 1 2 h o u rs o u t o f
every 24-h o u r period.
Most pets feel uncomfortable at first wearing the collar. Don’t use
any functions until the pet has gotten used to the collar.
We suggest you give the dog Vibration be fore starting the Static
Shock. After a time of training, the dog will learn that Static Shock
St i mu la ti on w i ll c om e aft er Vi br a ti on . In t h is w ay, the v ib ra ti o n
al o n e c a n e ff e c ti v e l y c u r b t h e i m p r o pe r d e e d s o f t h e p e t. T h e
St i mu l at i on o n ly a c t s as a me n ac e t h a t m i gh t b e u nn e ce s sa r y
most of the time.
WARNING
Fit The Receiver Collar with your dogs:
3A
3B
Important: The proper fit and placement of your collar is important for
effective tr a i n i n g . Th e Contact Points must have direct c o n t a c t with
your pet’s skin on the underside of the dog’s neck.
To assure a proper fit, please follow these steps:
1. Have your pet standing comfortably (3A).
2. Centre the Contact Points underneath your
pet’s neck, touching the skin (3B). If your pet
has a long or thick coat, please use longer
Contact Points, we enclosed 2 sets Contact
Points, short ones and longer ones.
CAUTION: here are 100 levels for
Vibration and Stimulation. The strong
Stimulation can penetrate the hair of
the pet and fabric within 6mm thick. Do
not shave the pet’s neck as this may
increase the risk of skin irritation.
3. The Collar should fit snugly, yet loose
enough to allow one finger to fit between
the strap and your pet’s neck.(3C)
Step
3C
1. Light Standby : In order to save power, the Remote Transmitter
will go into Standby Mode if there is no operation after 20 seconds,
press any button except LED Light Button to activate Remoter
Transmitter, LCD will display.
2. Deep Sleep: In order to save power, the Remote Transmitter will
go into Deep Sleep Mode if there is no operation after 2 minutes,
h ol d t h e M od e b u t t o n f o r 5 s e c o n d s t o a c t i v a t e t h e R e m ot e
Transmitter, LCD will display.
II : Th e r e ce i v e r c o l la r w i ll g o i n t o de e p s l e e p i f n o o p e r at i o n fo r 4
minutes. And any movement by the dog will activate the receiver.
If the Receiver Collar has no response when you press the Y button, and
the Indication light of the Receiver Collar is not on either, you can shake
Receiver Collar or force the dog to move, and the indication light of the
Receiver Collar will show green, which means the Receiver Collar is
activate and will work.
III: When te sting, choose any mode except LED light. When you
under Vibration or Stati c Shock mode, Intensity Le vel cannot be
at a stimulation level of 0, p ress UP/DOWN to adjust.
are
5

14
15
Is the Receiver Collar waterproof?
Yes, your pet can swim in the water.
Frequently Asked Questions
How old does my pet have to be before using Petrainer Rechargeable and
Waterproof LCD Remote Pet Training System?
Your pet should be able to recognize basic obedience commands such as “Sit”
or “Stay.” Petrainer Rechargeable and Waterproof LCD Remote Pet Training
System may be too large for pets under 8 pounds.
Once m y pet is trained an d has be e n obey i n g my co m m a n d s, will my pet
have t o continue to w e a r the Re c e i v er Collar?
Probably not. You may need to reinforce training with the Receive Collar from
time to time.
Can I use Petrainer Rechargeable and Waterproof LCD Remote Pet Training
System with more than one pet?
Yes, ther e is 2 ser i es with our Pet rain e r Re char geab l e an d Water p roof LCD
Re m o t e P et Tr a i n i n g S ys t e m , o n e ki n d i s 1 V 1 ( 1 Tr a n sm i t t e r t o 1 R ec e i v e
Collar ) TT-PT05;the other one kind is 1V2 (1 Transmitter to 2 Receive Collar)
TT-PT06.
Will I get exactly 328 yards of range with the Remote Trainer?
The effect i ve rang e of th e Re mote Train e r me ans the str aigh t -lin e di stan c e
between Remote Transmitter and Receiver Collar without obstacles in between.
Ra n g e may vary ac c o r ding to terrain, weather, v e g etation, batter y capability
as well as transmission from other radio devices.
How long can I continuously deliver vibration or Static Shock to my pet ?
The maximu m a mount of time you can pres s th e Vibra t ion or St atic Shoc k to
your pe t co nti n uous ly is 10 seco nds. Aft er this , t h e Remo t e Tr ans m itte r will
time-out, and the Vibration or Static Shock must be released and pressed again.
Re-Thread the Collar (as diagram)
Step
Regular Maintenance
Check Contact Points for tightness weekly.
Clean Contact Points with alcohol weekly.
Note: remove the battery and discharge Regular the Bark Automatic
Control Collar before touching the Contact Points.
Check your dog’s neck for irritation and wash neck weekly.
6

16 17
R e m o te T r a n sm i tt er w i l l a u t om a ti ca l ly g o es i n to d e ep s l e ep s t at u s i f
no a ct io n is d et ec t e d w i t h i n 2 mi nu te s. A t th is t im e, t he re w i l l b e n o L CD
d i s pl ay. Yo u h a v e t o p r e s s “ M o d e ” b u tt on f o r 5 s e c on ds u n t i l t h e L C D
display reappears.
Troubleshooting
My pet does not respond after correct installation Petrainer Rechargeable
and Waterproof Training Collar.
You need to charge the Remote Transmitter and Receiver Collar for 2 hours
individually first.
You n ee d to t u rn o n th e Re m ot e Tra ns m i t te r By h ol d in g th e mo de b u tt on
fo r 5 s ec on ds .
Check the levels of vibration or static shock.
Make sure the Receiver has enough power to operate.
Restart the Receiver collar by pressing the on/off button.
Test 4 functions (Beep, Light, Vibration and Shock) first before using. See
part “Test” of Operation Guide.
In t e n si t y le v el h a s to b e m or e t ha n “ 0” w h en p a ir i n g . Tes t la u n c h f o r
vi b r a ti o n an d S ta t i c S h o c k F u n ct i on .
The Receiver Collar will go into deep sleep if no operation for 5 minutes and
any dog movement will activate the device.
Make sure the Contact Points are placed snugly against your pet's skin.
Trim your pet's fur where the Contact Points touch the neck or switch to
longer Contact Points.
the
If none of the above works, you can try repairing between the Remote Transmitter
and Receiver Collar. (See part “Pairing” of Operation Guide)
Remote Transmitter does not work.
You need to charge the Remote Transmitter for 2 hours when you get product
for the first time.
Che c k if the Re m ote Tran smi tter i s o n l ow bat t ery st atu s , the sy m bol wi ll
sho w u p o n the rig h t side o f t h e LCD sc r een .
You need to hold the Mode button on the Remote Transmitter for 5 seconds
to power it the device on.
Re mo t e Tra n s m it te r a ut o m a ti ca l ly g oe s i nt o s t a nd b y m o de i f n o ac ti o n
is d e t e ct ed w i th i n 2 0 s ec o nd s, a t t hi s t i m e th e r e w il l b e no L C D di sp l ay.
Pr es s a ny b u t t on t o r e- ac t i v at e t he R em o te Tr a n s mi t t e r.
What do I do If my pet’s neck becomes red and irritated?
Discontinue use of the Petrainer Rechargeable and Waterproof LCD Remote
Pet Training System for a few days. If the condition persists beyond 48 hours,
yo u r ve te ri na ri an . On c e th e sk in r et ur n s to n or ma l, m on it o r yo ur p et ’s sk in
condition closely.
Can I attach a leash to the Receiver Collar?
NO. This can result in pulling the Contact Points too tightly against your pet’s
neck. Use a separate collar placed above the Receiver Collar.
How will I know when to charge the batteries?
Fo r R e mo t e Tr a n s m it t er : t h e s y m b ol w i l l s h o w u p o n t h e r i g h t s i d e o f LC D
scr ee n. Fo r Rec ei ve r C ol lar : wi l l he r a bee p for 2 0 sec on d s, i ndi ca ti n g th e
dev ic e nee ds t o b e cha rg ed .
How long is your lithium battery lifetime?
Ou r L it hi u m ba tt e ry c an c h ar ge 4 0 0 ti me s for r em o te C on t ro l an d Rec ei ve r
Co l la r.
How long can I leave Receiver Collar on mydog?
The Collar is not designed to be worn constantly. We recommend the Collar not be
worn for more than 12 hour out of every 24-hour period.
How long should my training sessions be for my pet?
Training sessions should be kept positive and short, it is better for about 10-15
minutes long each session.
What kind of dogs are your Petrainer Rechargeable and Waterproof LCD
Remote Pet Training System suitable for?
The collar is adjus t able from lengt h 5. 9 ”(15cm ) to 19.6 ” (50cm ) ,if your pet’s
neck is smaller tha n 5.9 ” , yo u ha v e to reth read it, if yo ur pe t’s nec k is larg e r
than 22”, pleas e do n ’t bu y it : and thi s Co l lar is no t s uitabl e f or the do gs le ss
than 8 po unds either.

18 19
(15) Please be reminded that you should keep training sessions short and end
every session on a high note. Stop training and play wi th you r dog as soon as
he/she has accomplished a new level of proficiency.
If ne eding more train i ng ti ps, pl ease visit us at o r
for plenty of resourc e s.
www.ipets- m all.com w ww.
faceboo k.com/i p etsmal l
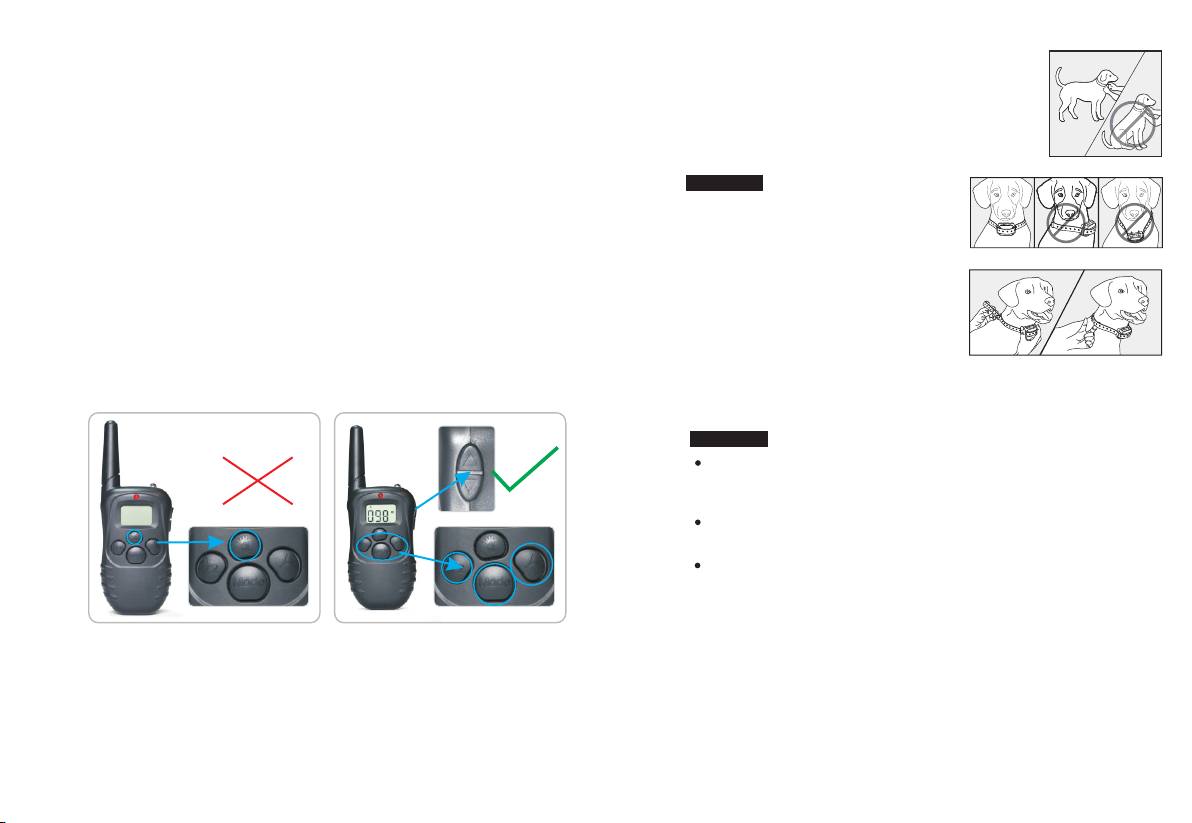
(9) Avoid over-correcting your dog. Use as few remote corrections as possible
during the training process.
(10) Wh en you r dog has become apparently perpl e x ed, sh i ft the focus of the
training session by drawin g his/her attention to a c om ma nd they are f a m i li ar
with, e . g . sit. Gi v e your do g pra i s e and en c o u ra g em e nt galore on s u c c e s s fu l
co mp l e t io n of t h e co mm a n d . Re pe a t th is s e v e ra l ti m e s b ef o r e r et ur n i n g to
training with remote corrections.
(11) If y ou k n ow a p ar ti c ul ar m is be h av io r yo ur d o g do es , th e n re in ve nt th is
situation during a training session. You will have far more success if you deal
with one misbehavior at a time in a controlled situation.
( 1 2 ) B e c o n s is t en t ; g i v e y o u r d o g a t on e , v i b r a ti o n o r s ta t ic - st i mu l a ti o n
c o r r e c t i o n f o r e a c h m i s b e h a v i o r. W h e n r e i n f o r c i n g a c o m m a n d w i t h a
c o r r e c t i o n . I t i s c r i t i c a l t h a t y o u d o s o w i t h o u t e mo t i o n t h e n i m me d i a t e l y
praise and reward your dog for marking the right decision.
(13) When your dog see ms to react in a timid and frightened fashion to either
the tone, vibration or static-stimulation, particularly in early training sessions,
do not be flabbergasted. Shift the focus of the training session by drawing his/
her a t t e n ti on to a comm a n d they ar e familiar with. E. G. s i t and gi ve your dog
abundant praise and encouragement on successful completion of the command.
(14) Do no t us e Pet rainer Remo t e Pe t Traini n g C ollar to correc t or elim i nate
fo r m o f a g g r e s s i o n o r b i t i n g b e h a v i o r. W h e n y o u r d o g i s s h o w i n g s i g n s o f
aggressive behavior then contact a professional dog trainer in your vicinity.
(7) Issue an obedience command at a time, which will focus your dog's attention
and reduce confusion. Do not use the remote collar to correct commands that
have not already been covered.
(8) During training, look for all the positive changes in your dog's behavior and
remember to reinforce them promptly with ample praise and reward.
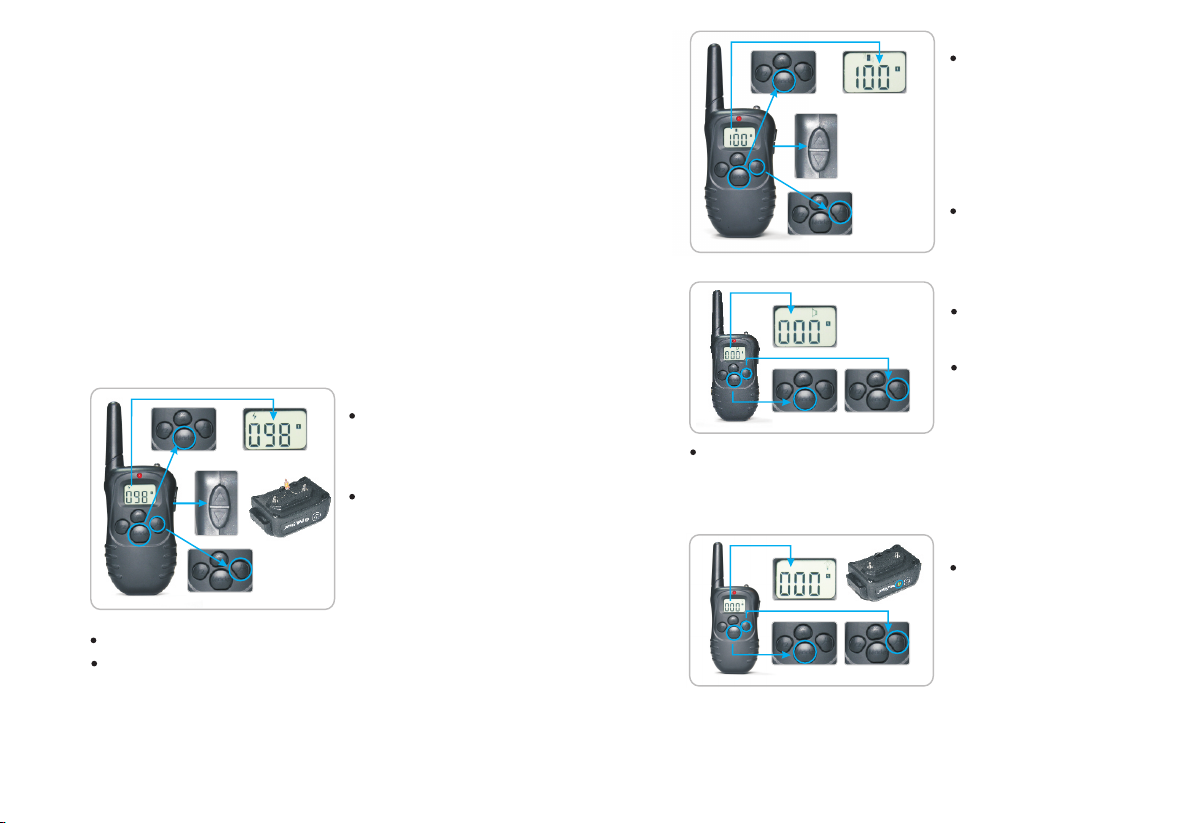
(6 ) F o r b as i c ob e d i en c e t r ai n i n g, V I BR ATI O N a nd A U D I O mo d es a r e m o re
us ef u l.
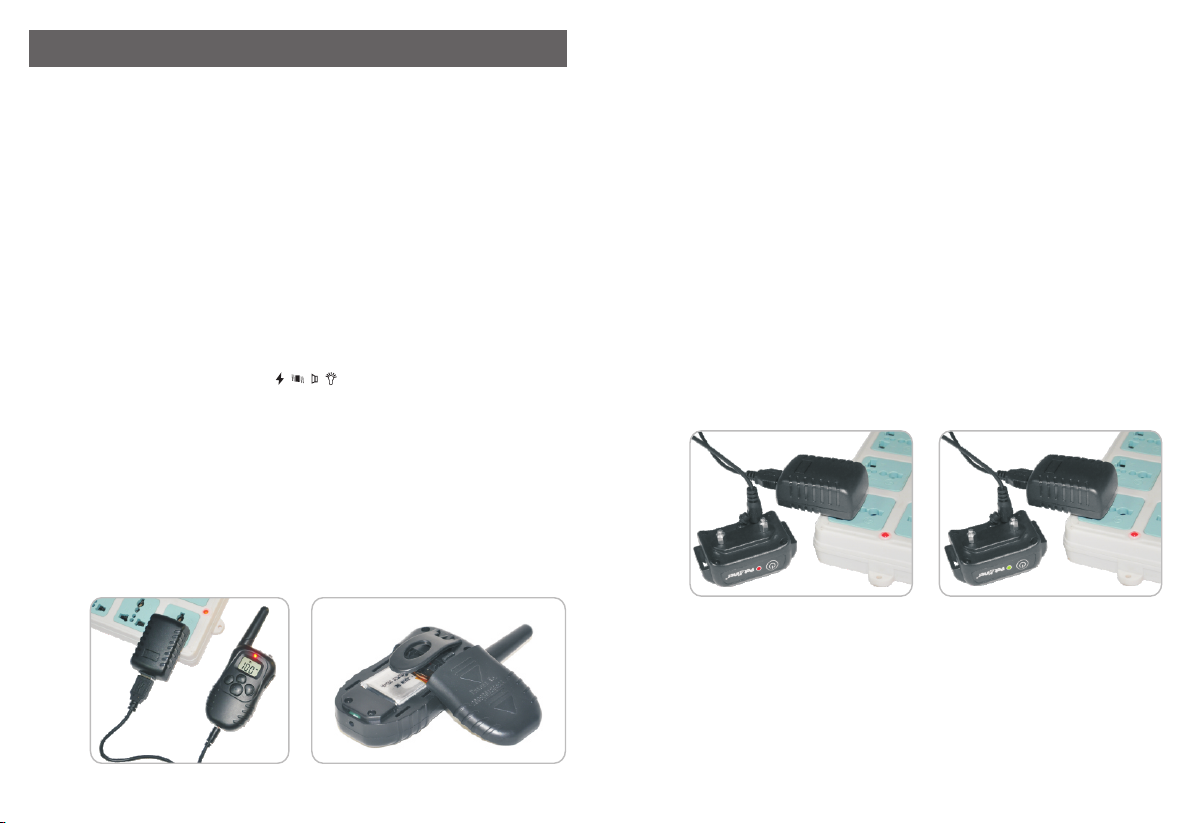
You have to turn on Receiver Collar again after you're finished charging.
We turned on the receiver collar and it starts to beep for 20 seconds.
Receiver Collar will beep for 20 seconds in low battery status unless it gets
charged. Charge it for 2 hours and the other functions will work after charging
is finished.
Th e Receiver Collar is damaged and it doesn't work af t e r being knocked
do w n .
Our Receiver Collar is designed to not be knocked down, please don't knock
down the device, to avoid breaking structure and circuits.
I want to test Receiver Collar myself, but it does not work.
If you test Receiver Collar by your hand or leg, please touch the 2 electrodes
at the same time, only touching one electrode will not work.
General Training Tips
The following are tips on how to get the best out of your Petrainer Remote
Pet Training Collar:
(1) Make the training sessions short and positive (between 10-15 minutes long
for each time), which will enable your dog to keep its attention focused on you.
(2) Train one dog at a time.
( 3 ) D ur i n g i n i t i a l t r ai n i n g s e s s i on s , k e e p y o u r d o g i n a f a mi l i a r o u t d o o r
enviro n ment e.g. an en closed are a of the garde n and away fro m oth e r do g s/
animals and people. Training in new locations may cause your dog to become
di s tr ac te d c au si ng yo u to re in fo rc e y ou r com ma nd s wit h th e r em ot e col la r-
receiver more often collar-receiver more than accordingly.
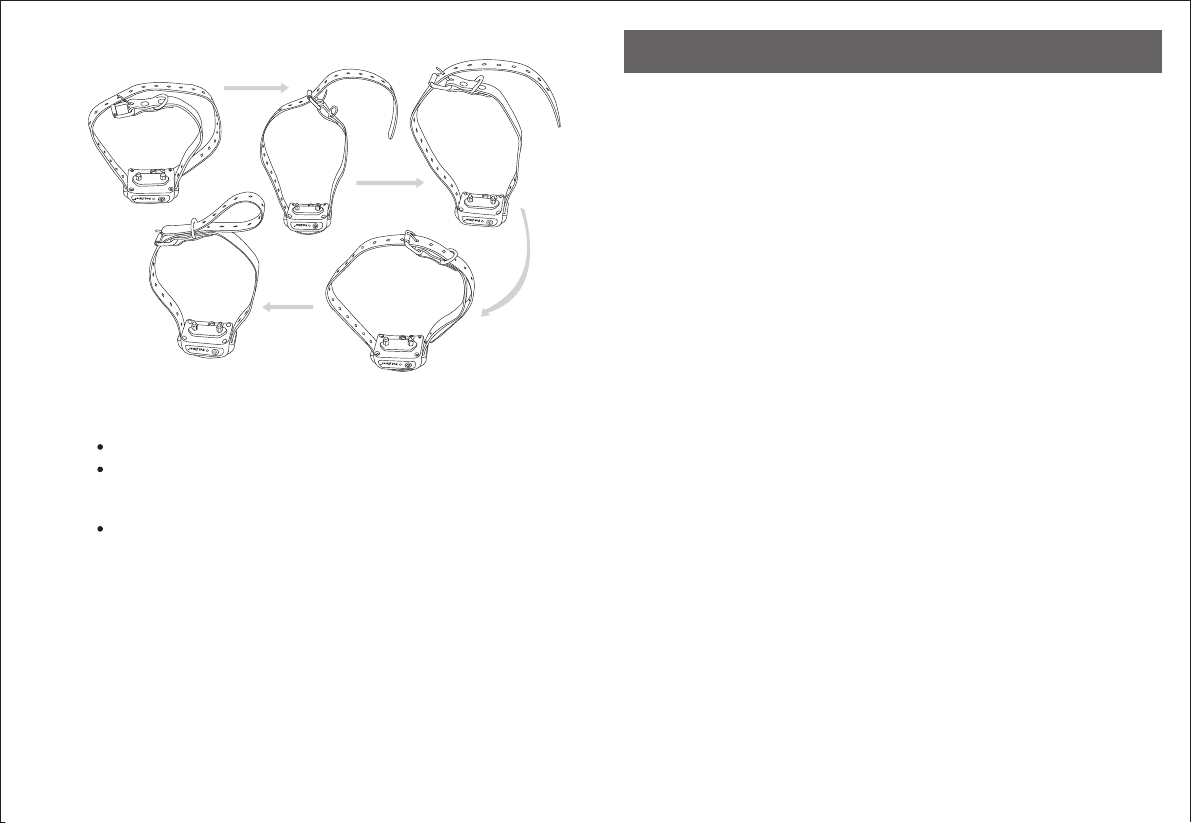
(4) Use a long leash fastened to a non-metallic collar to help his/her learning.
Ensure the additional collar and leash does not interfere with the skin contact
of the metal probes on the collar-receiver. Do not use the remote training collar
without a long leash until your dog is fully trained.
(5 ) Yo u wil l ha ve mo re s uc c es s by te ac hi ng th e do g a com ma nd fi rs t bef or e
tr y in g to r e in fo rc e t o co mm a nd w it h t he r em o te t ra in e r.
My Receiver Collar works great for some time, but it does not work anymore
after I charged the device.
First, check if charging is successful, when you are charging, red LED light
will be on, after fully charged, the red led light will turn off automatically.
This manual suits for next models
1
Table of contents
Other Petainer Pet Care Product manuals

Petainer
Petainer IS-PET900-B 1 User manual

Petainer
Petainer PET853 User manual

Petainer
Petainer PET910 User manual

Petainer
Petainer PET916N User manual

Petainer
Petainer IS-PET998DBU User manual

Petainer
Petainer PET851 User manual

Petainer
Petainer IS-PET998DRU-1 Installation guide

Petainer
Petainer PET916N User manual

Petainer
Petainer PET803 User manual

Petainer
Petainer IS-PET998DR-B 1 for 2 User manual