New Digital S2 600 HD 2in1 SENIOR User manual

* NOTE: this receiver supports the reception of Free To Air
programs only.
FRONT AND REAR PANELS AND CONNECTIONS DIAGRAM
Front panel and controls:
Rear panel:
1 POWER – Switches between working and Standby mode.
2 CH- switches TV program up the list.
3 CH+ switches TV program down the list.
4 LED Display.
IR (Infrared remote control) window.
USB connector for an external USB memory device (USB 2.0 support).
1 2 3 4 5
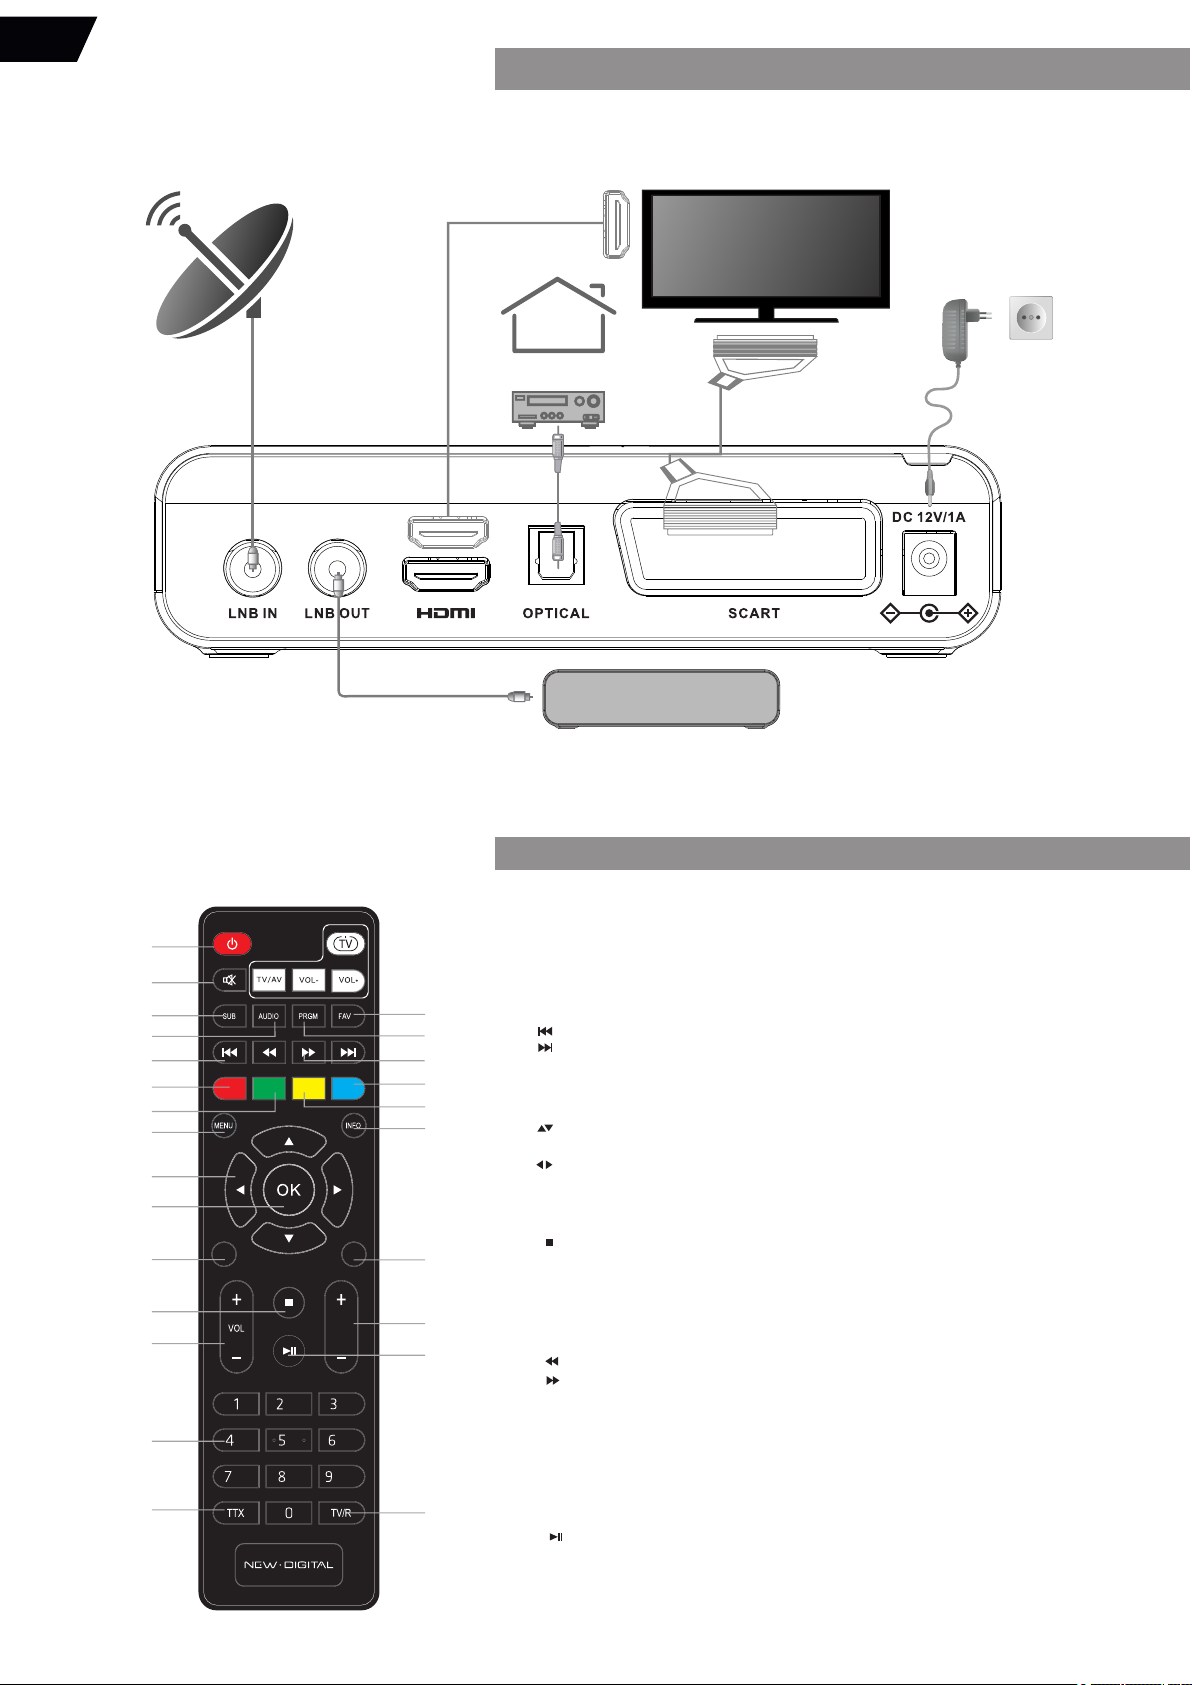
1 LNB (Sat signal) IN.
2 LNB (Sat signal) OUT.
3 HDMI: High definition audio and video output used to connect to the TV HDMI socket.
4 OPTICAL SPDIF (Digital Audio out).
5 SCART.
6 12V DC power.
1 2 3 4 5
1. Read these instructions.
2. Do not use this apparatus near water.
3. Clean only with dry cloth.
4. .Do not install near any heat sources
5. Operate this product only from the type of power source indicated on the label and
protect the mains cord from damage and stress.
6. Unplug this apparatus during lightning storms or when unused for long periods of time.
7. Powering down of the device is done by unplugging the AC/DC Adapter from Mains
socket.
IMPORTANT SAFETY INSTRUCTIONS
CAUTION
Risk of electric shock!
DO NOT OPEN!
ATTENTION
Risque de choc electrique!
NE PAS OUVRIR!
CONTENTS OF THE PACKAGE:
Tuner Unit; AC/DC adapter; 2 x Remote Control Units;
4 units AAA type batteries; User Manual.
65
6
HIGH DEFINITION DIGITAL SATELLITE
DVB S2/S RECEIVER USER MANUAL
This symbol indicates that dangerous voltages constituting a risk
of electric shock are present within this unit.
This symbol on the product or in the instructions means that your
electrical and electronic equipment should be disposed at the
end of life separately from your household waste. There are
separate collection systems for recycling.
For more information, please contact the local authority or your
retailer where you purchased the product.
This symbol indicates that this product incorporates double
insulation between hazardous mains voltage and user
accessible parts. When servicing use only identical
replacement parts.
Refer all servicing to qualified service personnel. Servicing is required
when the apparatus has been damaged in any way, including
damage to the mains cord or plug, if the unit has been exposed to
liquid or moisture, has been dropped or is not operating correctly.
This symbol indicates that there are important operating and
maintenance instructions in the literature accompanying this
unit.
This symbol on the product means that your equipment is
suitable only for Indoor use.
EN
6

TV
HDMI cable
Home
cinema
RF cable
RF cable
Satellite
antenna
AC/DC 12 V
adapter
Amplifier
Second SAT
receiver
SCART
Cable
CONNECTING TO A TELEVISION SET AND THE SATELLITE ANTENNA
For connections please follow this diagram:
EXITBACK
ASPECT V-FORM TIMER
1
2
3
4
5
6
7
8
9
10
25
24
23
22
21
20
19
18
17
16
11
12
13
14
15
1. POWER: Turns the receiver On/Standby.
MUTE: Mutes audio output of the receiver.2.
SUB: Shows list of available subtitle languages 3.
temporary override of the subtitle setting in the main menu.
AUDIO: Shows list of available audio type or language 4.
temporary override of Main menu audio setting.
Jumps to previous item in playlist. 5.
Jump to next item in playlist.
6. : S .REC tart TV program recording
ASPECT: Change aspect modes: 4:3, 16:9 and to Auto.7.
MENU: Opens the main menu, in menu you will get one step back8. .
9. .Menu Off: Change channel to previous/next
Menu On: Moves the cursor up/down.
.Menu Off: Increases/decreases the volume level
Menu On: Change settings for specific Menus .
10. OK: Displays the current channel list Confirmation of Menu Items.
BACK11. . Switches back to previously watched program.
12. .Stop of playback
16. FAV: Access to Favorite programs List.
PRGM17. . Access to program guide.
18. .Fast rewind
.Fast forward
19. .TIMER: Call directly Timer menu to view or set timers
V-FORMAT: Change video resolution 20.
:modes 720p to 1080i and 1080p.
INFO: Shows the current channel information Press twice 21.
for programme and technical information.
EXIT: Exits from the menu or sub-menu22. .
23. G G-: N .P + P ext or previous page in the TV Program list Menu
24. : SPlay elected Media file
( Media player mode) or Enter Timeshift mode during TV Viewing
*Both modes require external USB memory device.
TV/R: Toggles between TV or RADIO mode25. .
13. OL OL .V +/V -: Increases/decreases the volume level
14. .0~9: Channel selection or value input
15. ).TTX: Shows Teletext on OSD (On Screen Display
abc def
ghi jkl mno
pqrs tuv wxyz
REC
PG
DESCRIPTION OF THE REMOTE CONTROL UNIT (RCU)
EN
EXITBACK
ASPECT V-FORM TIMER
abc
ghi jkl mno
tuv
REC
PG
TIMESHIFT
EXITBACK
ASPECT V-FORM TIMER
abc
ghi jkl mno
tuv
REC
PG
TIMESHIFT
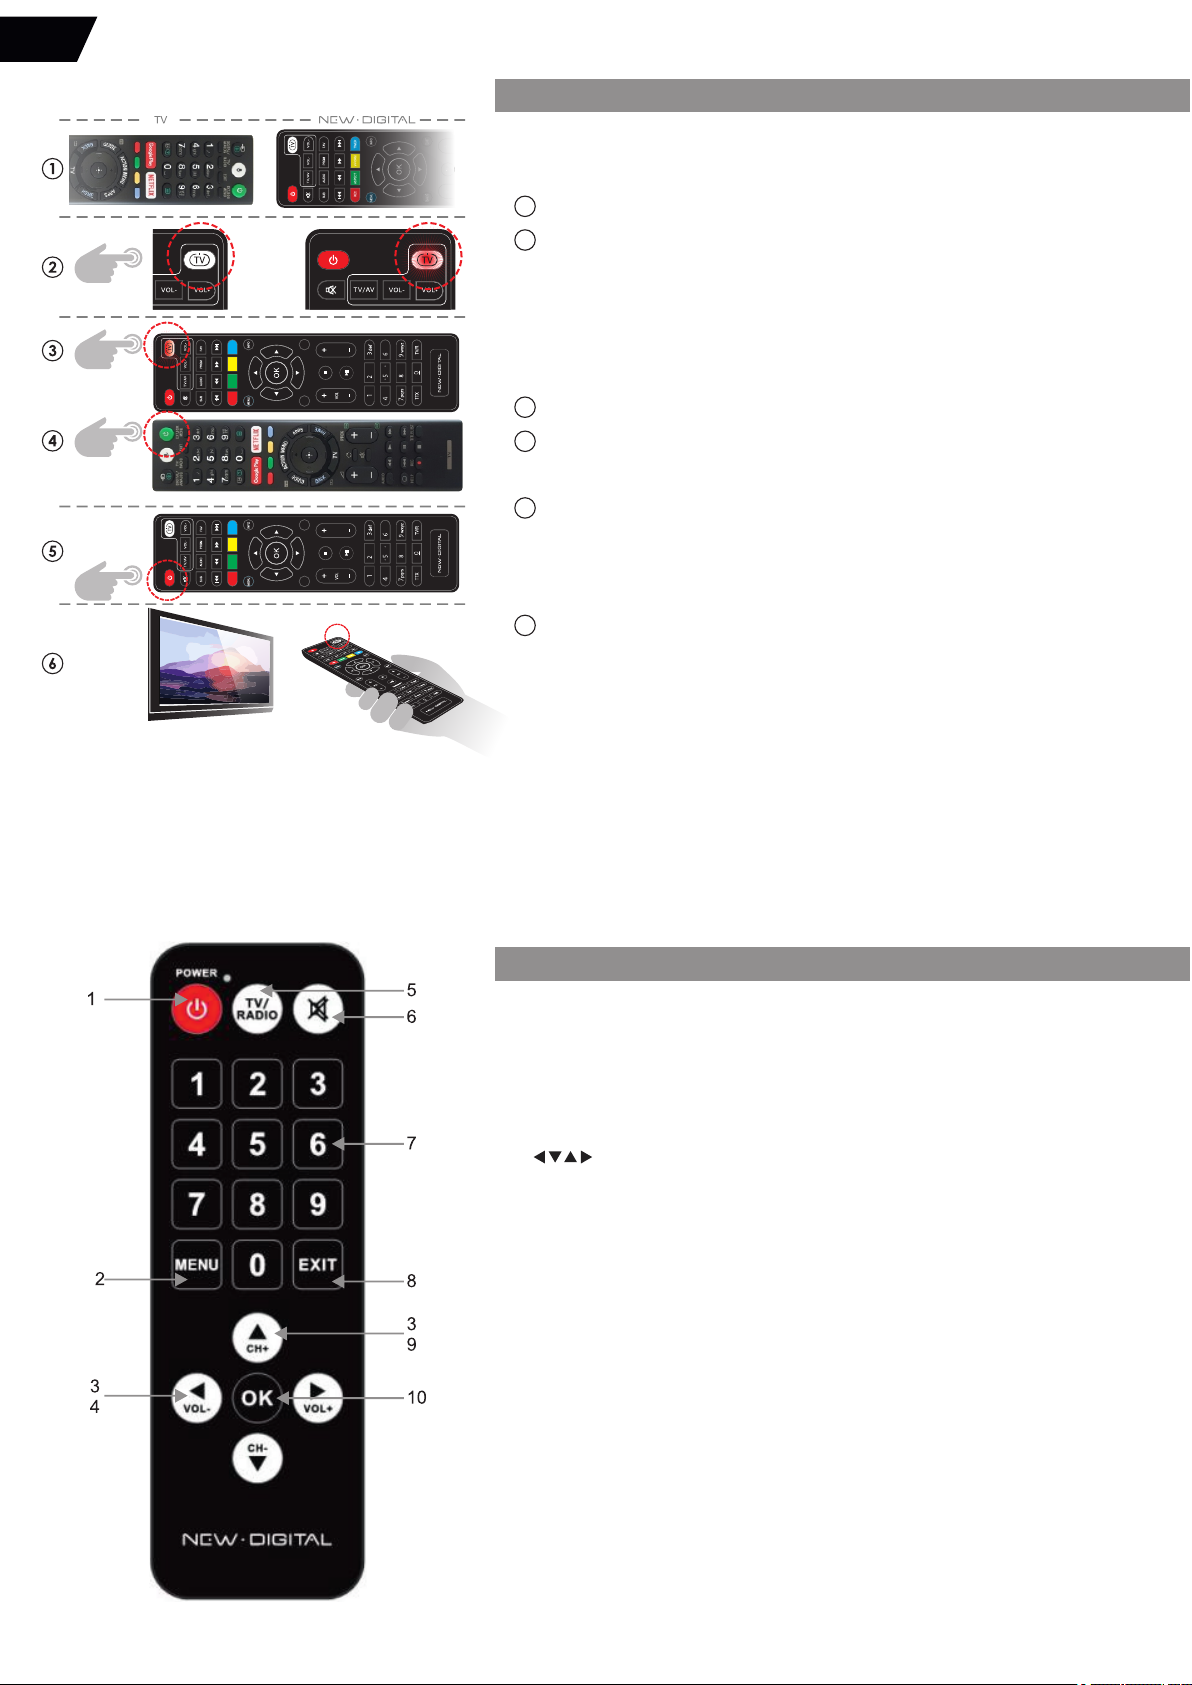
The Remote Control Unit (RCU) of the STB has 4 learning keys,
every key can be programmed to the corresponding function
of TV remote control.
1 Place both RCUs in front of each other.
2 Press TV button on New Digital RCU and hold for 6-8 sec, until it will light in
permanent RED light.
A Red LED on the TV button indicates that the RCU is now ready to be
programmed (Programming mode).
*NOTE: The red light will automatically go off in around 10 sec. if no further action is done.
The programming has to be done within this time. In a case of failure the actions
can be repeated.
3 Press the TV button on New Digital RCU one more time, the red LED will start to blink slowly.
4 Press the ON/OFF button on TV Remote control.
5 The RED LED on TV button on New Digital RCU will blink fast few times, this shows
the command from TV RCU is received.
The RED LED on TV button on New Digital RCU will continue to light constantly.
It is ready for programming the next button or exit.
It is possible now to exit the Programming mode by pressing the red STBY
button on New Digital RCU.
6 For testing if programmed TV button is turning ON/OFF TV set please test by using
New Digital RCU for TV control.
Procedures 1-6 can be repeated for programming TV.
Volume (vol+ vol-) and Video Input select functions on the New Digital RCU.
HOW TO PROGRAM TV SET RCU (REMOTE CONTROL UNIT) FUNCTION
1. POWER: Turns the receiver On/Standby.
2. MENU: Opens the main menu, in menu you will
get one step back.
3. Press to move the cursor.
4. VOL+/ VOL-: Menu on: Move the Left/Right menu cursor
Menu off: Adjust the volume -/+.
5. TV/RADIO: Switch between Digital Radio and TV modes.
6. MUTE: Mutes audio output of the receiver.
7. <0><9>: Numeric keys.
8. EXIT: Exits from the menu or sub-menu.
9. CH-/CH+: Menu on: Move the up/down menu cusor.
10. OK: Menu Off: Displays the current channel list
Confirmation of Menu Items.
Functions of the secondary SENIOR remote control unit:
EN

GENERAL INTRODUCTION
The instructions for browsing Menu / selecting items:
Press [Up/Down] key to select menu item.
Press [OK] or [Right] key to enter the Menu Item. If Menu Lock is "On",
it will display a dialogue box for the password.
The default Password is "0000".
Press [Left] key or [Exit] key to go back to main menu.
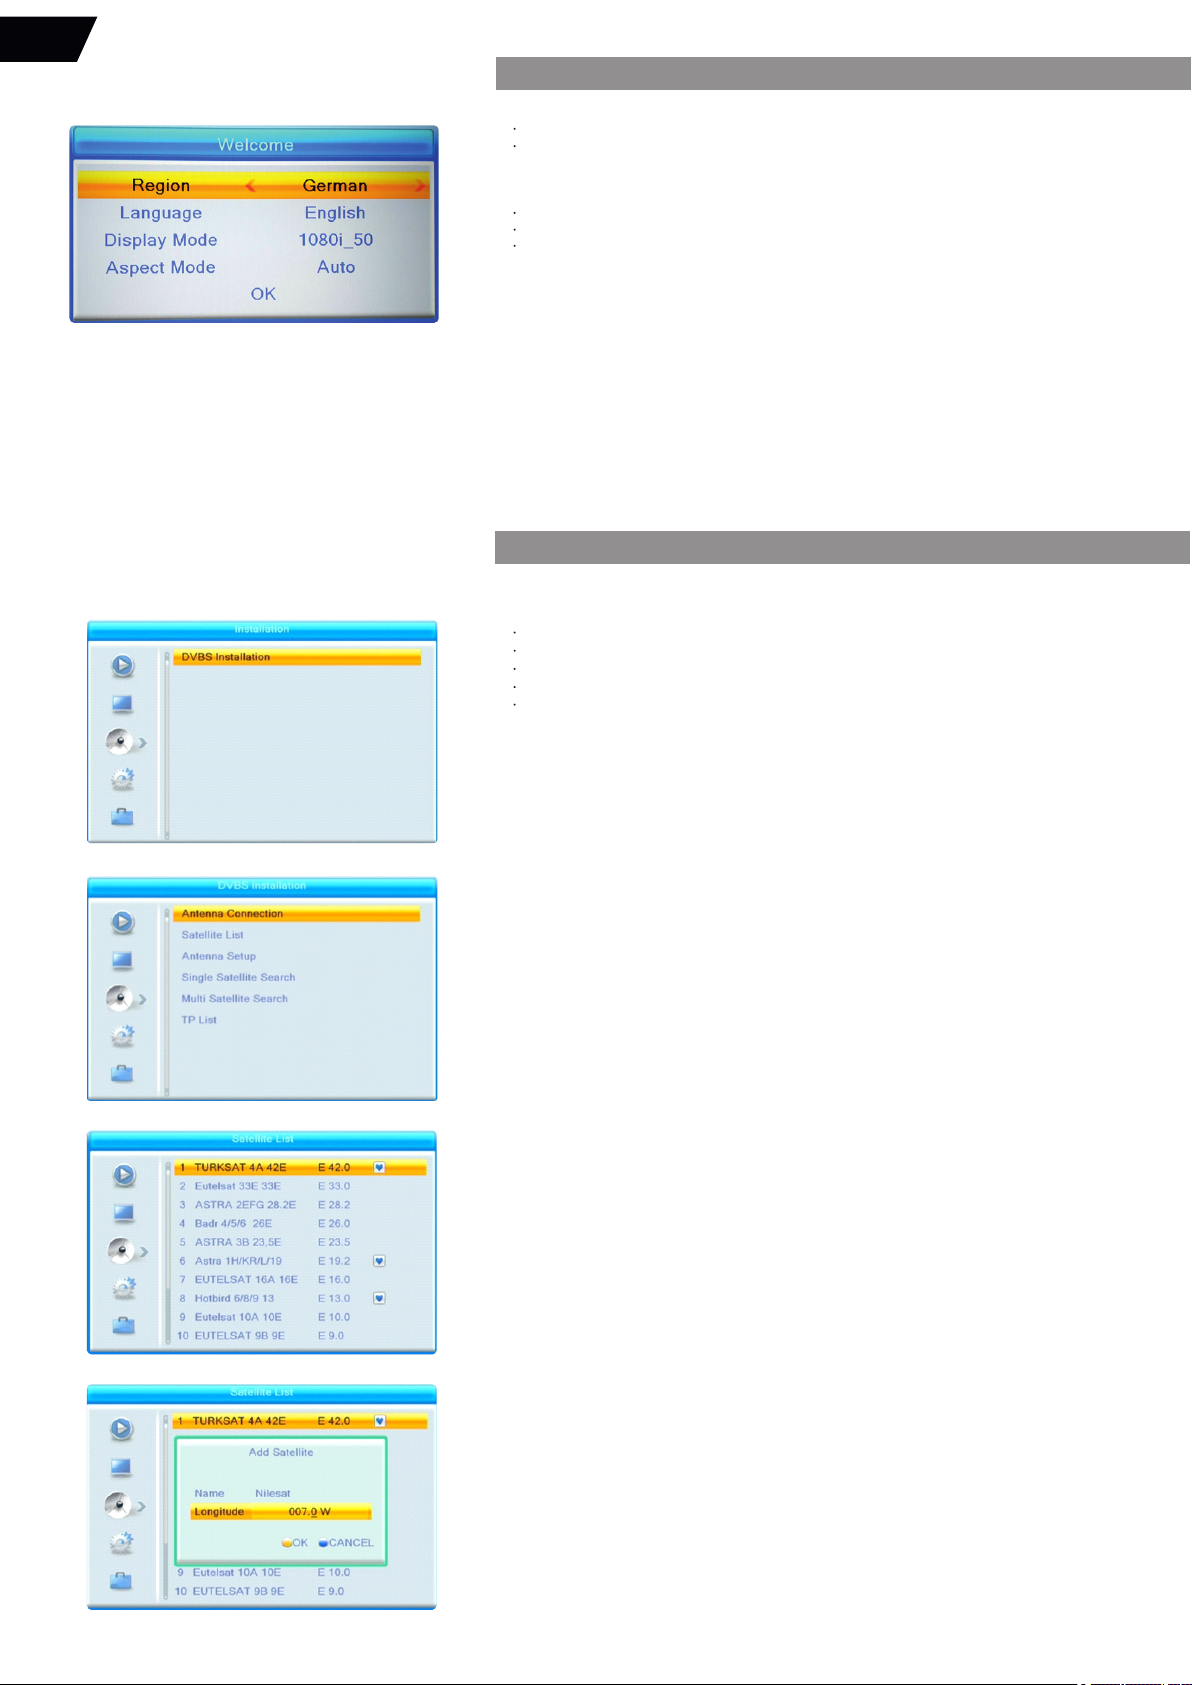
Selecting the Region/Language.
Please check the antenna installation and connections are correct and
done with the receiver NOT powered. Power the receiver ON.
After the receiver is powered on the Welcome screen will be displayed:
Please choose your Region and Language, select and press OK.
NOTE: your receiver is preprogrammed with favorite programs from Astra / Hot bird/ other
satellites. The Default DiseqC 1.0 setting for Astra is Port1, for Hot Bird Port2. If your system is
installed accordingly - you can start watching the TV programs without search procedure. If
you want to receive the other Satellites - please use the Satellite list Menu and use Search
procedures as described. Press MENU button to Enter Installation Menu.
For FAV lists details please check manual in your language.
MAIN OSD (ON SCREEN DISPLAY) MENU
Press the [Menu] key to enter the main menu list, it includes the list:
Media Player Menu;
·
· Edit Channel Menu;
Installation Menu;
·
System Setup Menu;
·
· Tools Menu;
· Press Exit to exit the Main Menu.
To start viewing the TV programs you have to set the receiver according to your
Satellite Dish installation and configuration. Please choose Installation Menu.
Enter this Menu by pressing OK.
DVBS Installation:
Select Antenna connection:
Select the Antenna connection type according to your system,
you can choose between Fixed Antenna which is most common
or Motorized Antenna.
Fixed antenna Setup:
After selecting the antenna type please enter Satellite list Menu
and select the Satellites according to your installation:
The Satellites selected by default are Astra 19E; Hot Bird 13E and Turksat 42E.
If you do not find the desirable Satellite in the list it is possible to add the new Satellite to the list
by using the green “Add” button:
EN
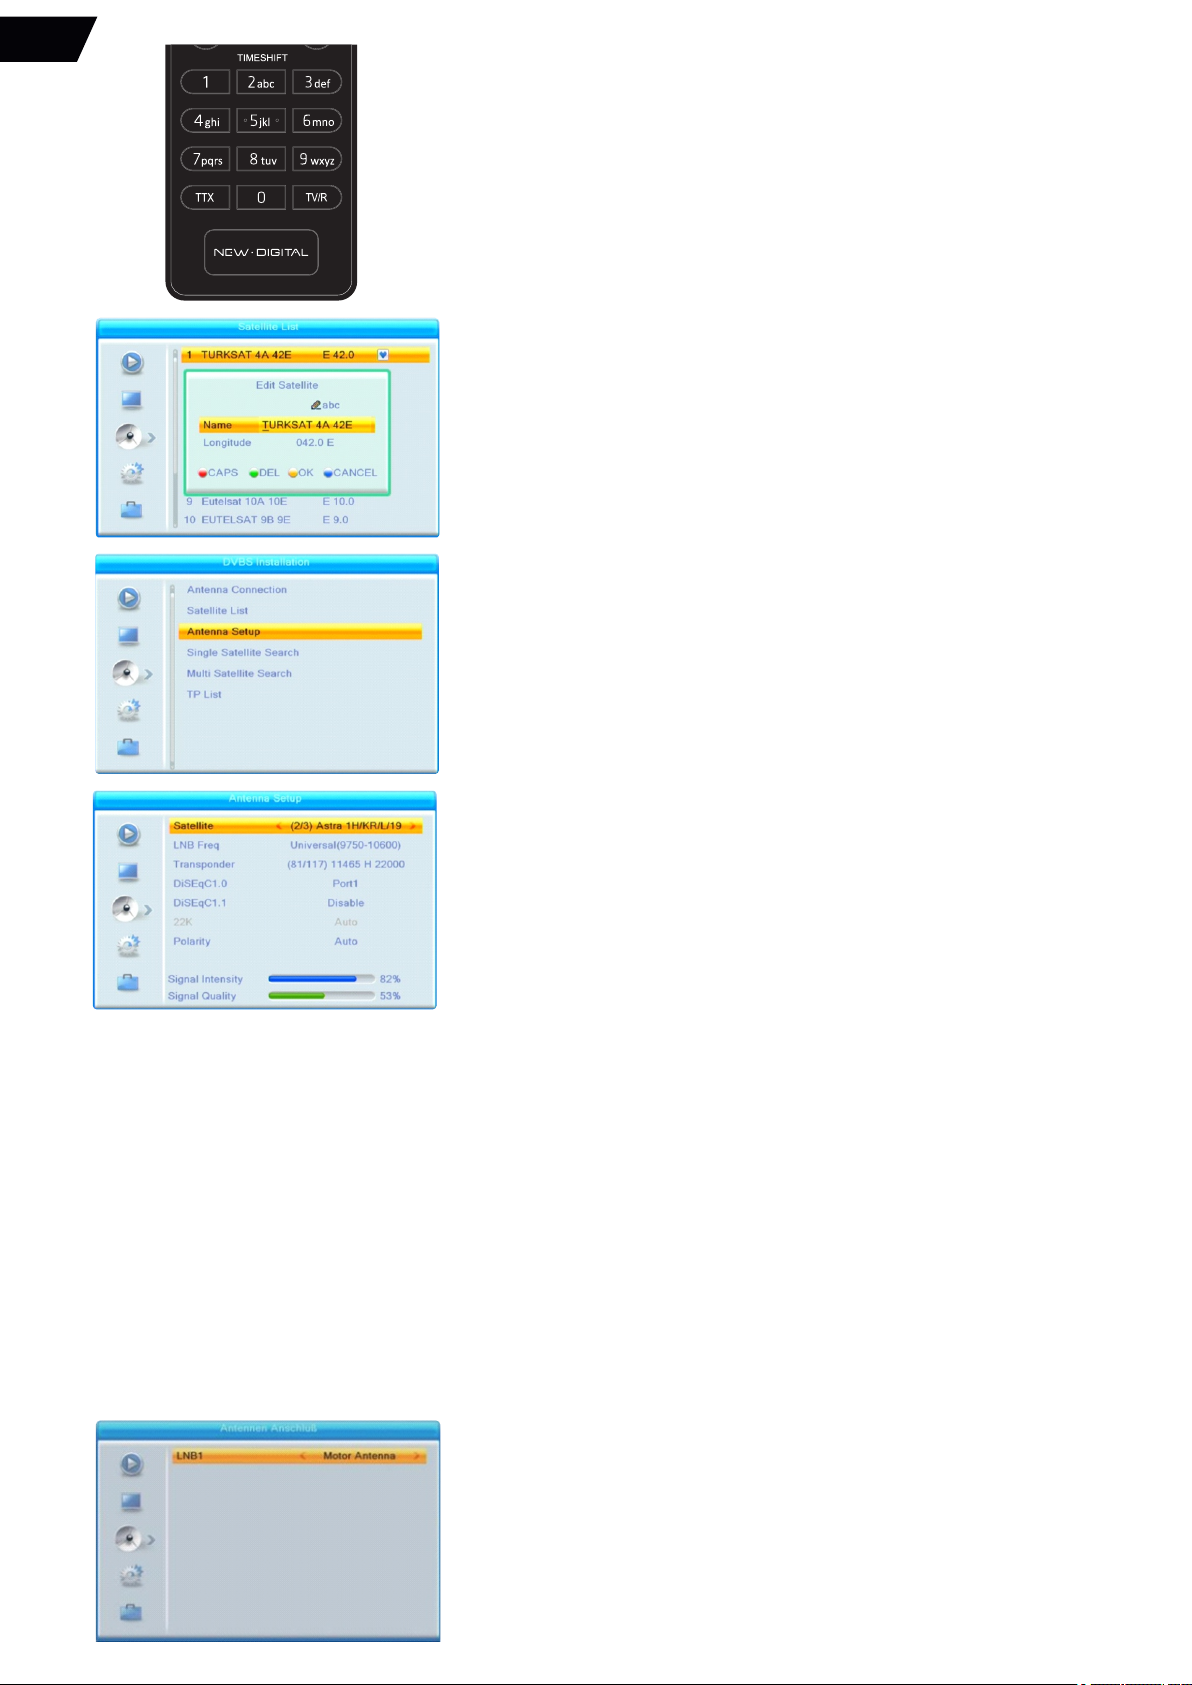
Please enter the satellite position along with the name and follow the OSD prompts to save
the new satellite in the list.
Please use the Edit function to make necessary corrections for the entered data.
After selecting the Satellites please proceed with Antenna setup:
Satellite: In this item, press [the Left/ Right] key to switch Satellites; press the [OK] button can
enter the satellite list for you to select directly.
LNB Freq: In this item, press [the Left/ Right] button to select the necessary parameter.
The most commonly used LNB type is Universal (9750-10600) which is set by
Default.
Transponder: select the desired transponder in order to check the signal.
DiSEqC1.0: please use [Left / Right] button to switch options. There are several options for your
selection: Disable/ LNB1 / LNB2 / LNB3 / LNB4.
For switching between more LNB please use DiseqC 1.1.
22K: please use [Left / Right] key to switch “ON / Off”. When this item is switched to “ON”, the
receiver will receive TV and radio input signal from 22K port.
It is not possible to modify 22K for LNB type “Universal”.
Polarity: In “Polarity” item, [Left / Right] key to switch “Auto / H / V” functions,
The default setting is “Auto”.
If the antenna setting is correct - the signal indicator will show the signal level
and signal quality of the selected Transponder.
You can proceed with the Program search.
NOTE: your receiver is preprogrammed with favorite programs from Astra / Hot bird/ other
satellites. The Default DiseqC 1.0 setting for Astra is Port1 , for Hot Bird Port2. If your system is
installed accordingly - you can start watching the TV programs without search procedure. If
you want to receive the other Satellites - please use the Satellite list Menu and use Search
procedures as described. Press MENU button to Enter Installation Menu.
For FAV lists details please check manual in your language.
To clear the preprogrammed programs please use the “Delete all” function in the “Edit
channel” menu described further in this Manual.
Motorized Antenna Setup:
The device supports two types of the positioning of the motorized antenna: DiseqC 1.2 and
USALS.
Select “Motor Antenna” in the “Antenna Connection” menu:
The name of the Satellite has to be entered by using the RCU keyboard which
enables to use of letter functions along with the number functions:
EN
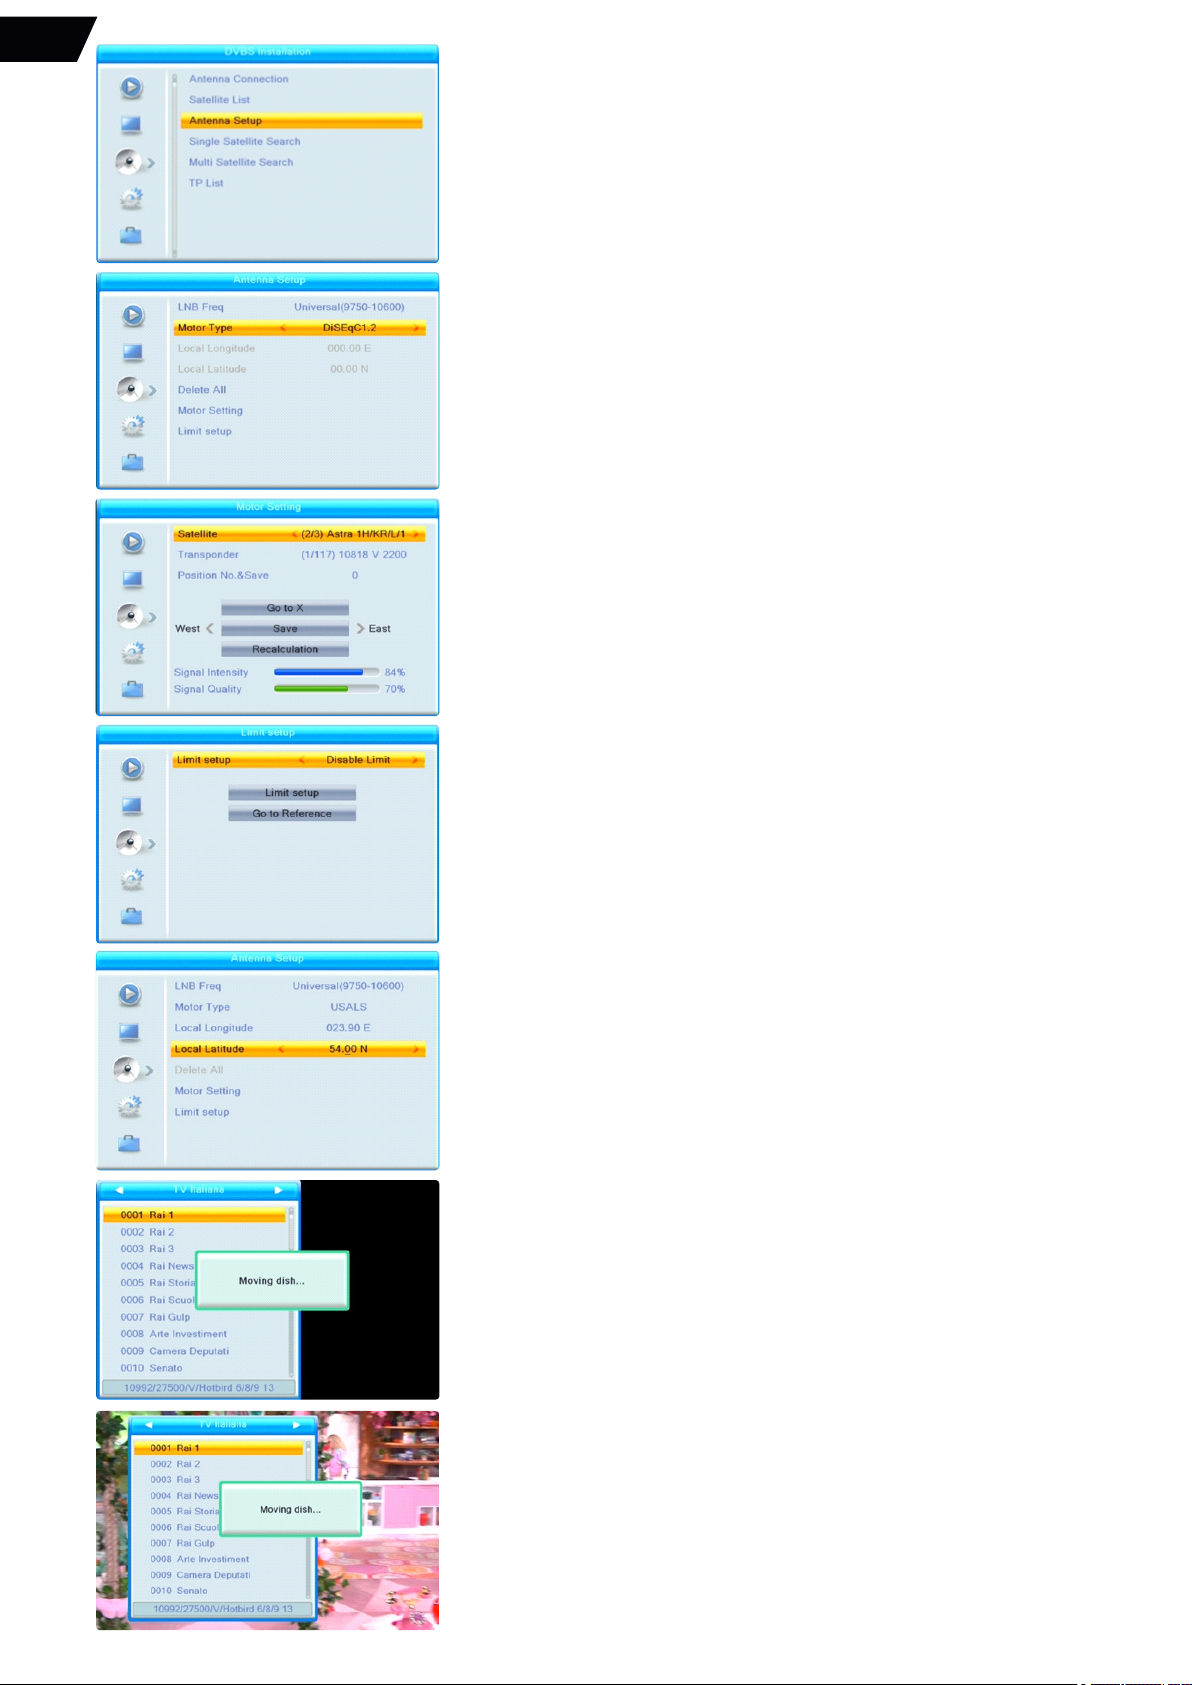
Go to Antenna setup:
Select LNB Type and Motor type DiSEqC1.2 or USALS:
Delete All: This operation will delete all satellite positions. It will display a dialogue “Are you
sure…”. If you select “Yes”, it will clear all positions. Select “No” to cancel the operation. This
item is only valid in “DiSEqC1.2” Mode.
For Motor Setting “DiSEqC1.2” please select the Satellite, Transponder and tune the dish
eastwards or westwards to the Satellite positions accordingly using the Left-Right buttons, so
the signal level meter will show maximum:
Please assign the number to the position and save it.
Please use recalculation in case the position data is not accurate.
For securing the dish position limits please use the Limit setup Menu:
For Motor setting to “USALS” mode please enter the local longitude / local latitude, so USALS
can move the dish automatically.
After the correct setting the motorized dish will be moving accordingly to the selected
Program / Satellite position:
Press Exit for viewing the program.
EN

Program search.
There are 3 options for the program search:
Single Satellite search ( one satellite automatic search), Multi-satellite search (automatic
search for several selected satellites), and TP list (program search on selected Satellite
transponder).
Single Satellite search:
·Select the Satellite;
·Select the search type ( FTA (Free to air) or ALL programs);
·Select Scan channel ( TV, Radio, or all programs);
·Select Search and press OK.
After the search the programs will be saved in the Satellite program list:
Also, they will be listed in ALL TV program list:
Multiple Satellite search:
The procedure is the same as a Single satellite search, just several satellites will be scanned
one – by one.
TP list search is used for the program search on the particular Transponder:
Select the Satellite, select the Transponder:
The TP search Menu has the possibility to Edit, Add or delete transponder in addition to TP
Search function.
The receiver will start the automatic search, the found programs will be listed in the upper part
of the Search window.
EN
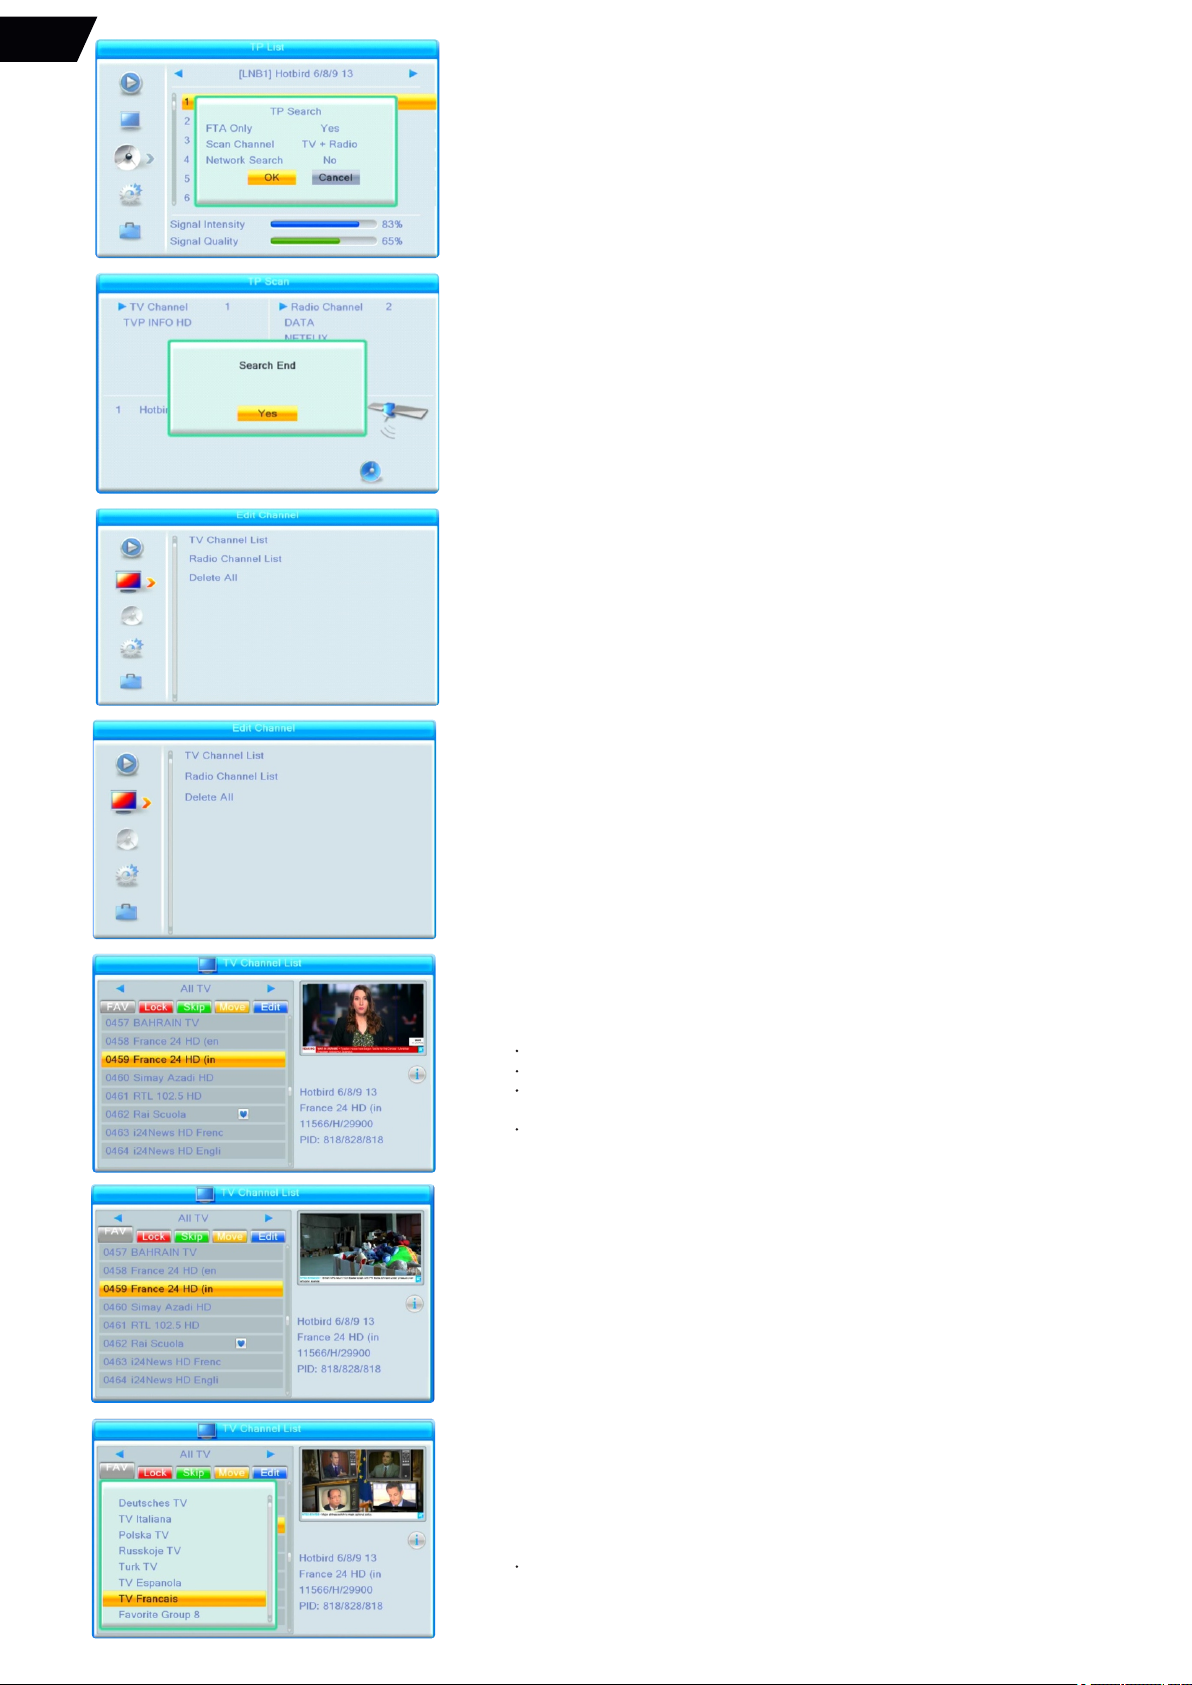
After verifying the signal level and quality please select the Blue button for the program
search.
Select necessary search options and press OK to confirm the search.
The found programs will be saved in All TV (All radio) and Satellite program lists.
Edit channel Menu:
Edit Channel Menu: Allows to edit the TV channels individually. Main sections:
TV Channel list – allows to edit TV channel list;
· Radio Channel List – allows to edit Radio channel list;
· Delete All – deletes all preprogrammed channels.
·
To Edit TV Channel list:
Enter TV channel list section;
Select the TV channel you would like to edit;
Select one of the Edit functions (FAV; Lock; Skip; Move; Edit) by pressing the buttons
(press the button second time to deselect function);
Press OK to enable the function (press OK second time to disable function).
The example of FAV function
(assigning the program to Favourite group):
Select the TV program you would like to assign to FAV group.
* NOTE: some Tuners may not have the FAV button available on the RCU,
therefore the FAV function is not available to use.
EN
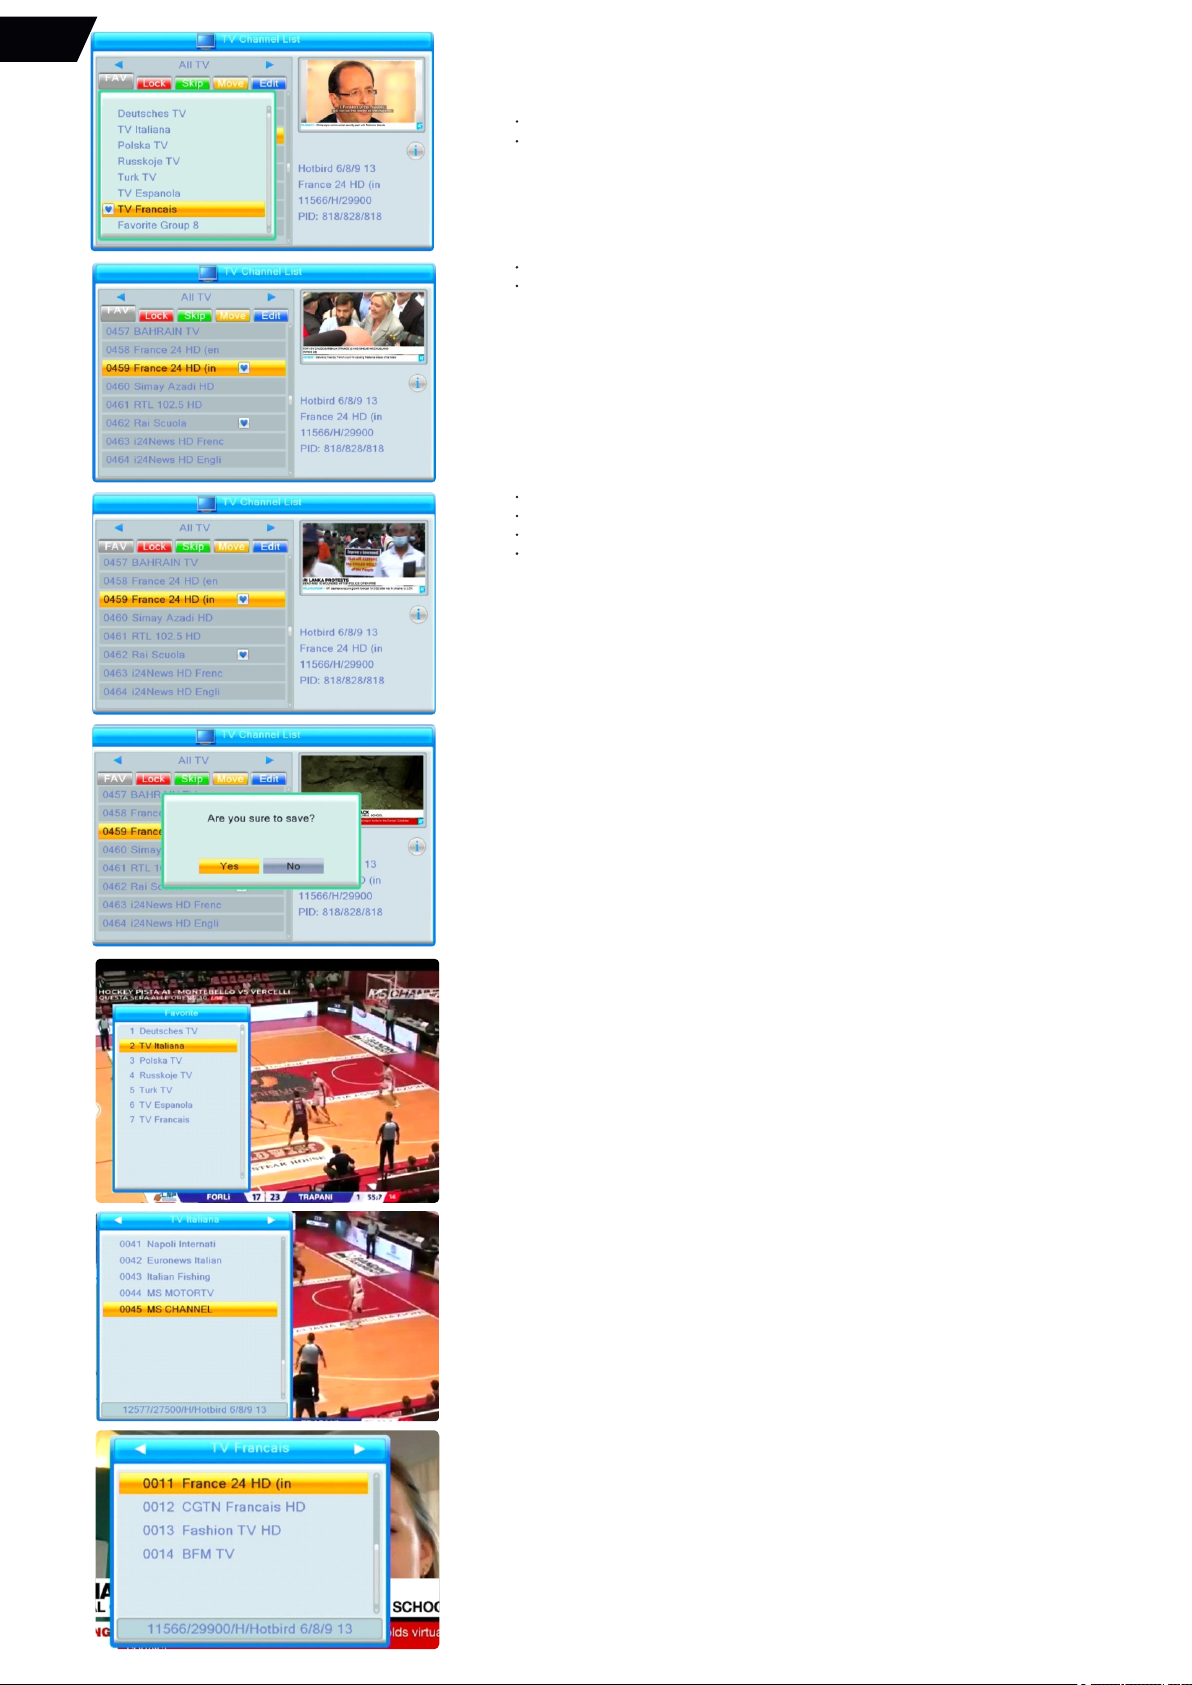
Press FAV on RCU to select the FAV grouping function.
Press OK to enter FAV grouping list.
Select FAV group (Fav group 1 to 8).
Press OK – the heart Icon will appear at the Group name.
Press Exit, the heart Icon will appear at the name of the TV program.
Press FAV to disable FAV function.
Press Exit to Exit edit Menu (the popup asking for edit confirmation will appear).
Press Exit to exit the Main Menu.
To view the Favorite program in the Favorite Group:
When viewing the program press FAV button.
Select the FAV group of your program, press OK, enter FAV group list.
Select the program, press OK.
The FAV program groups and the Satellite program lists can be toggled using the Left
or Right buttons when the program list window is on the screen.
EN
Please use the same principles to operate the other Channel Edit functions:
LOCK; SKIP; MOVE; EDIT.
Lock function – Locks the channel under the individual PIN code.
Skip function – skips the channel when browsing the channel list with CH+ CH- buttons.
Move function – moves the channel Up or Down the channel list.
Edit function – allows to edit Channel name.
To Edit Radio Channel List please choose Radio channel list from Edit channel Menu.
Please use the same guidelines as described in TV Channel Edit section.
* NOTE: the edited program lists are deleted automatically when using Automatic Program
Search, Factory Reset or Delete ALL functions.
Media Player Menu:
Use external USB device (not included) to play video, audio and
image files to play PVR, video, audio and image files.
Supported formats:
Video - .avi; .mkv; .ts;
· Music - .mp3;
· Image - .jpeg.
·
After entering each section of the Media player Menu you can select and play the media
files accordingly. Please follow OSD prompts.
*Note: the Manufacturer does not guarantee the complete compatibility for all
video / audio / image files due to variety of Codecs, compression rates and resolutions
when using the above named file formats.
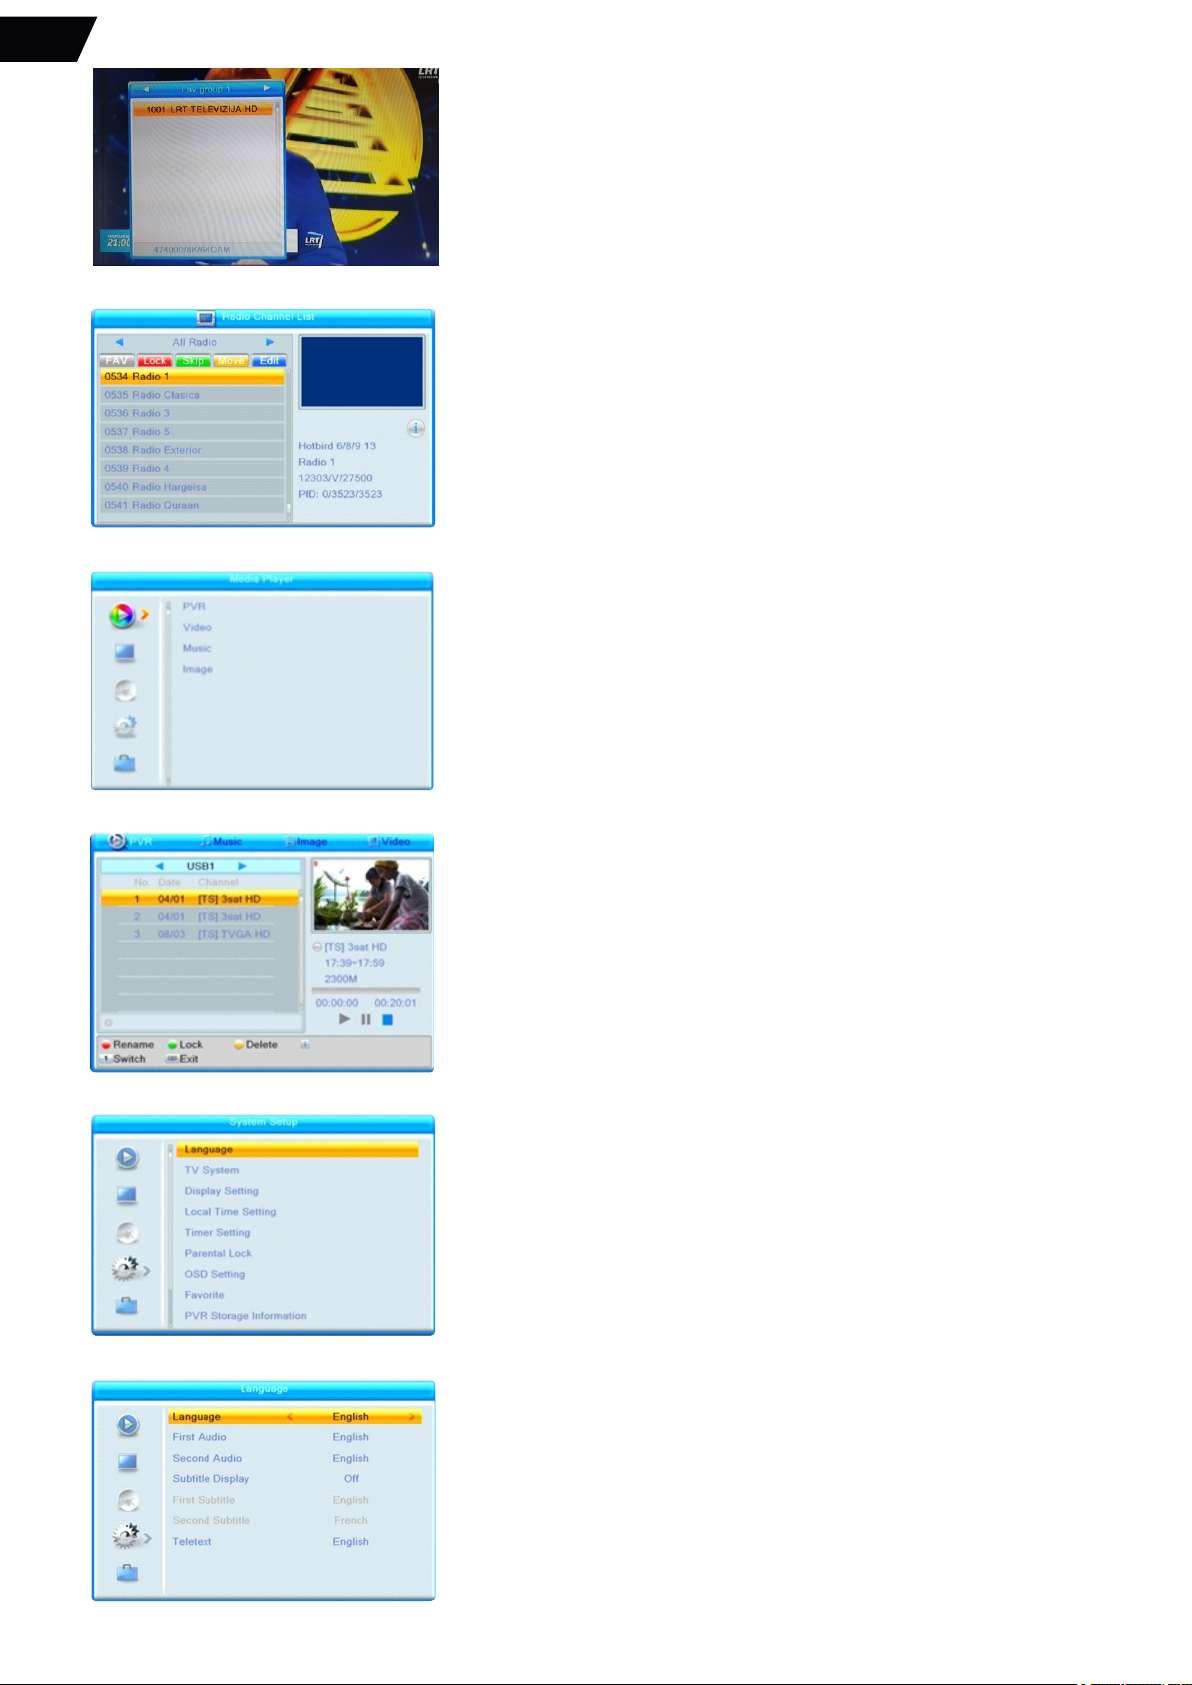
System Setup Menu:
Set up the Tuner according to User requirements.
Language – allows to set the OSD Menu, Audio and Teletext languages accordingly.
EN
TV system – allows to set Video resolution, Aspect mode, Digital Audio output mode and
turn on / off HDR (High dynamic rate) correction.
*NOTE: when using the Tuner with 16:9 LCD/LED TV sets it is recommended to use Video
resolutions of 1080i or 1080p to achieve the best picture quality via HDMI port.
The AUTO Aspect Mode is recommended to use.
When using the Tuner with 4:3 TV (old CRT) sets it is recommended to use AUTO Aspect
mode or 4:3 LB aspect mode to achieve the best picture fitting for the 4:3 screen.
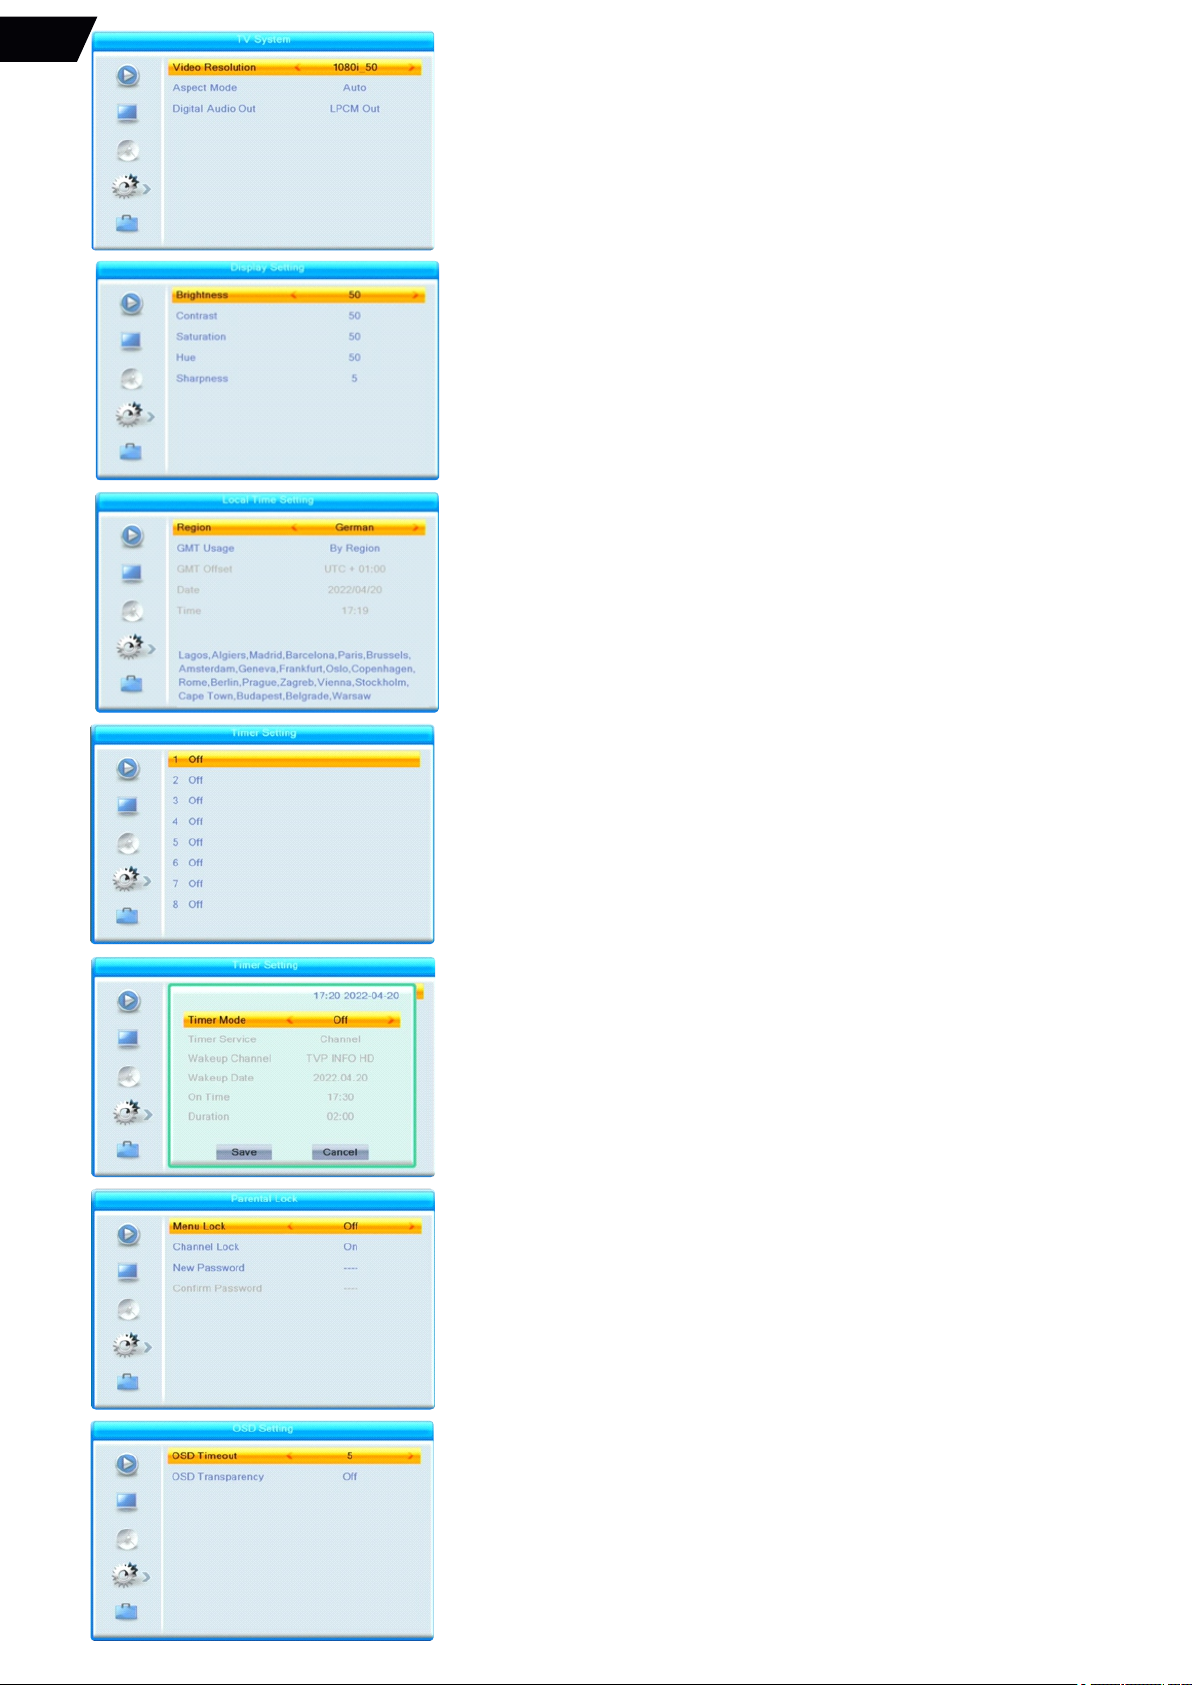
Display Setting – allows to adjust picture Color, Brightness, Contrast and Saturation.
·
It is recommended to use Default values (50). Available on selected products.
*NOTE : This Menu Item may be not available on certain product versions.
Local Time Setting – Allows to select the correct time zone for the place of viewing.
·
Timer Setting – Allows to set the Tuner to turn ON for viewing of selected
·
channel with certain duration.
Parental Lock – Allows to set the Tuner for locking the Menu,
·
Programmes according to Rating, set the New password for the system.
OSD Setting – Allows to set the On screen display appearance time (timeout) and OSD.
·
Transparency.
·
EN

Favorite – Allows to rename the Favorite Program Groups.
·
PVR storage information
(Activates only with the external USB memory device).
Allows to format the external USB memory disk and set Digital Video Recording
(DVR) modes (Record only or Record & Timeshift).
PVR setting:
Allows to turn on/off Timeshift mode, set Jump time for Playback.
Other settings Menu:
Channel play type – Free to Air;
Channel change – Black screen or Freeze frame;
Beeper – allows to turn on the sound beeper for the signal level meter in
Antenna settings Menu to allow tuning of SAT antenna using the sound signal;
Auto Standby – allows to set the Tuner in Energy saving mode
(automatically turns off after 3 Hours).
Tools Menu:
Information – Allows to see the information about the Tuner (HW / SW versions and dates).
·
Factory Setting – Allows to set the Tuner back to Manufacturer's settings, deletes all the
·
saved data and loads the Initial Installation Menu. Recommended to use in case of tuner
malfunction. Requires to us PIN code (0000). In case of forgetting the PIN code please use
the Master PIN code 3327.
Upgrade by USB – Used for SW update, used exclusively for the Service cases
·
recommended and described by the Manufacturer.
Remove USB device safely – allows to disconnect the external USB device safely.
·
EN
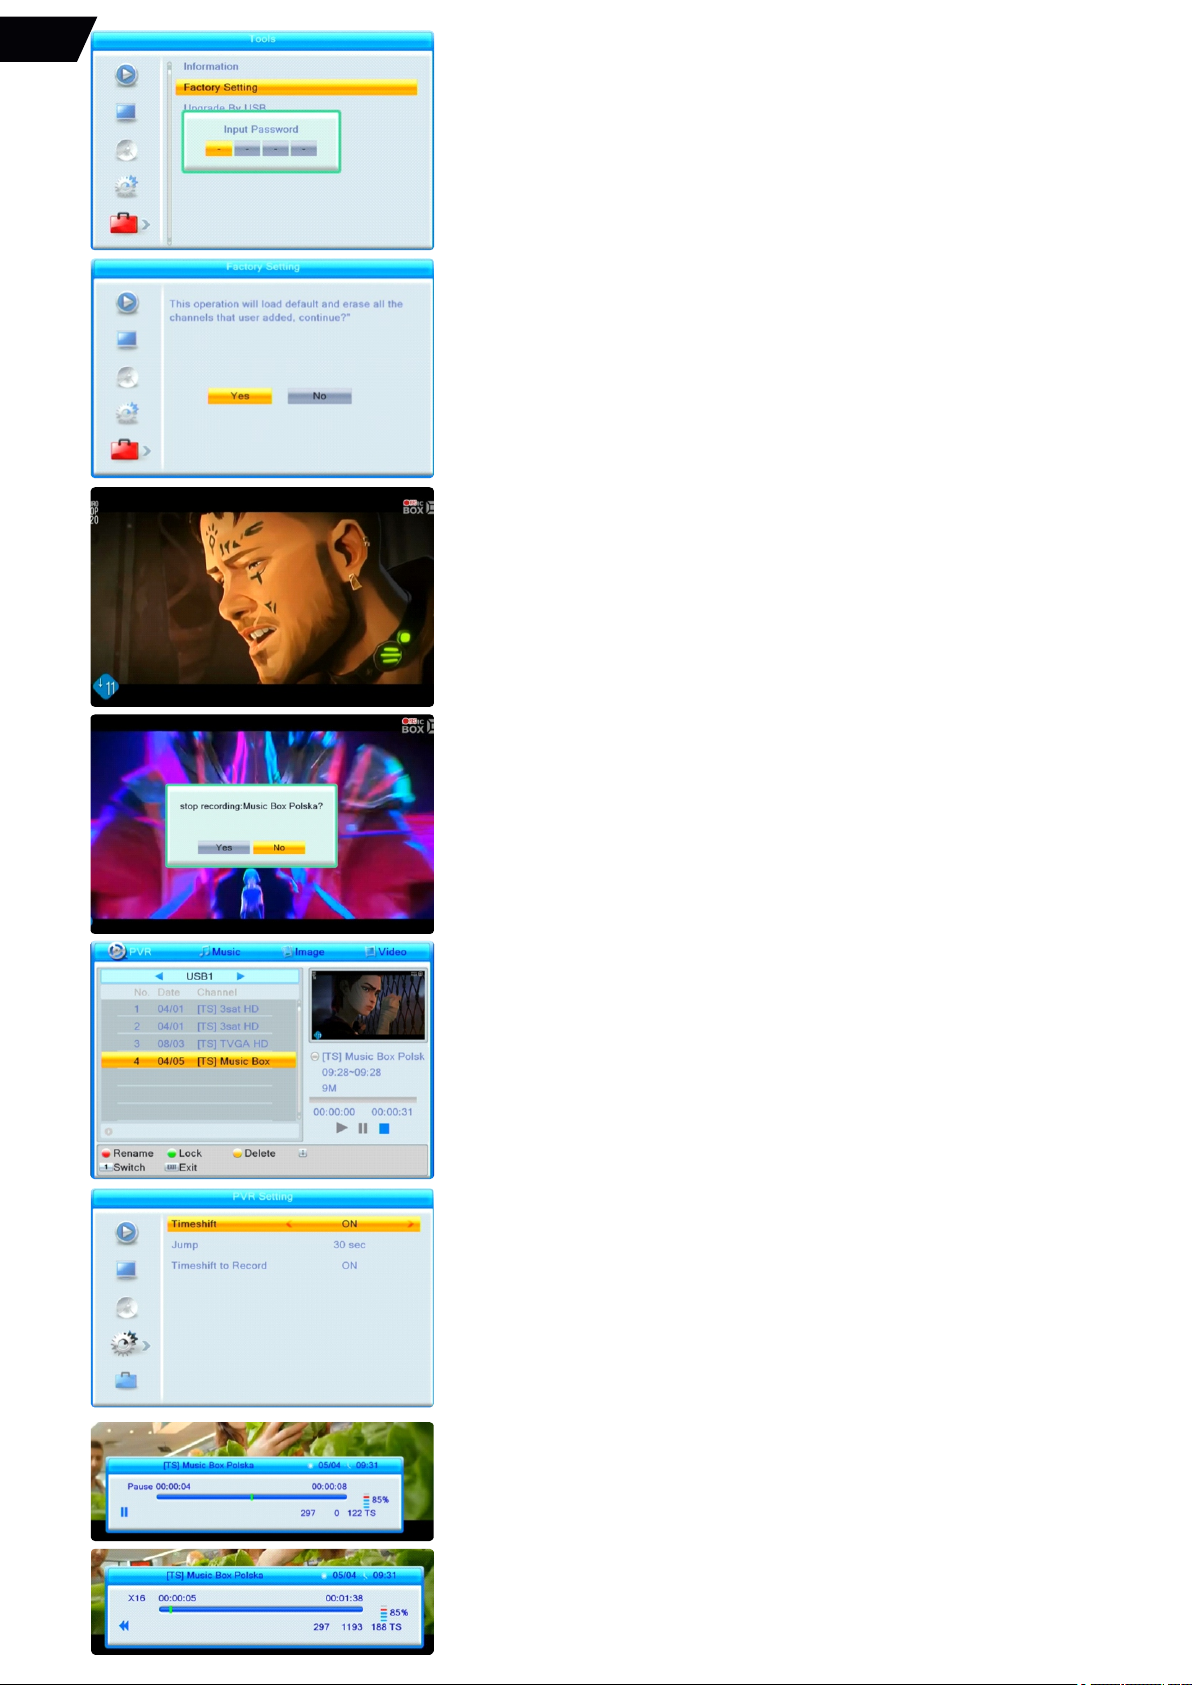
Factory settings:
To perform the factory settings procedure select Factory setting, press OK.
The request to enter the password will appear on the screen:
Input password, the request to confirm the procedure will appear,
select YES to perform the procedure further, and press OK:
The receiver will reboot and come back to Installation Menu.
NOTE: the preloaded FAV program and Satellite program lists will be still available
after performing the factory reset. To delete the preloaded program lists please select
the “Delete all” procedure in Edit channel Menu.
PVR (Personal Video Recording) function:
(works only with the external USB memory device connected).
*NOTE: To achieve the best recording quality the USB memory device must support
at least CAT10 writing/reading speed.
Press the REC button during TV viewing mode, the Record mode will be activated
and the program will be recorded.
The Recording process is marked with the red dot and letters Rec. on the right upper
side of the screen:
To stop recording press the Stop button, the OSD pop-up will appear asking if you want
to stop recording, select YES and press OK to stop or choose NO to continue recording.
The records can be found in the PVR Menu of the Multimedia player, they are stored
in the ALIDVRS2 folder on the USB device.
Timeshift mode (works only with the external USB memory device connected).
NOTE: Timeshift mode is turned off by default.
To Turn on please select PVR setting in System settings Menu:
To enter Timeshift mode press the “Pause” button on the RCU.
The picture will freeze and the info bar with the Pause sign will appear on the screen.
Timeshift mode can be managed further using Play, FF and REW buttons.
Press the Stop button on RCU to exit Timeshift mode. The device will return to a normal
TV viewing mode.
*NOTE: the timeshift mode records are not saved.
EN

OTHER FUNCTIONS:
Program Guide:
Press [PRGM] key to display Program Guide screen.
·
Press [OK] key in each item can see more detail information and press [RED] key to cancel.
Audio language Menu:
Press Audio key on RCU, the Audio Menu will appear on screen
with multiple Audio Tracks listed (if available from Broadcaster).
Select the desirable Audio track.
User selected Audio track preference will be saved and available
upon selecting the same program next time.
Subtitle Menu:
Press Sub key on RCU, the Subtitle language Menu will appear on screen with multiple
Subtitle Tracks listed (if available from Broadcaster).
Select the desirable Subtitles.
User selected Subtitle preference will be saved and available
upon selecting the same program next time.
Teletext Function:
Press TTX button on the Remote control Unit to activate
TTX service window (if available from Broadcaster).
The Tetetext page search function is activated by entering the necessary Teletext page
with number keys, it may take up to 20 seconds to load the requested page, please wait.
OSD INFO window:
Press INFO control key to display Information on the viewed program.
Press Info key second time to display the Signal information.
Exit the information window by pressing Exit key.
EN

ww w. ne wd i g i t a l . l t
TECHNICAL DATA
PROBLEM Potential reasons What to do
No picture
Screen shows
No Signal
No sound from
speaker
Only sound, no
image on the screen
Remote Control
is not responding
Picture is breaking up
Power isn’t connected
The power switch is not on
Aerial cable is faulty
No or incorrect connection with audio cable
Sound on mute
No or incorrect connection with AV cable
The program is a radio program
The battery is exhausted
Remote Control is not facing or close enough
to the Set-Top Box
The signal is too weak
Connect the power
Switch on the power
Check aerial cable and connections
Connect the audio cable correctly
Turn off the mute function
Make sure cables are connected correctly
Press <TV/RADIO> key to shift into TV mode
Change battery
Adjust the position of the Remote Control
and move closer to the unit
Check aerial cable and
connections
TROUBLESHOOTING
RF input with support of: DiSEqC 1.0, 1.1, 1.2, USALS, SCR (Unicable I), Tone
LNB Control Voltages: - Vertical: +13.5V (+14.5V at high voltage)
- Horizontal: +18V (+18.9V at high voltage); 13/18V DC
control for V or H polarities 22kHz LNB tone control
Tuner/Demodulator: Type DVB-S &S2
Frequency Range 950~2150MHZ
RF Input Level -70 ~ -25dBm
Symbol Rate: - DVB-S: 2 - 45Ms/s ( QPSK)
- DVB-S2: 3~42Ms/s(QPSK), 3 - 30Ms/s(8PSK)
Demodulation DVB-S Mode QPSK
DVB-S2 Mode 8PSK
Programmable
Code Rate:
- DVB-S: Auto, Viterbi ½, 2/3, 3/4, 5/6, 7/8
- DVB-S2: Auto, ½, 3/5, 2/3, 3/4, 4/5, 5/6, 8/9,
9/10(QPSK)
- Auto, 3/5, 2/3, 3/4, 5/6, 8/9, 9/10(8PSK)
Video and Audio
performance:
Supported SD and HD
Video formats:
MPEG1/MPEG2 MP@HL/H.264 [email protected]
Video resolution: 576i, 576p, 720p, 1080i, 1080p
Audio formats: MPEG1 LAYER 1&2, EAC3 with downmix to Stereo
System: CPU ALI M3510 G
Flash Memory 8 MB
SDRAM 128MB integrated
PVR and Media player part:
File system: - FAT12/FAT16/FAT32
File extensions supported *.ts /*.tp/*.trp
Video codec supported: MPEG1/MPEG2 MP@HL/H.264
Maximal video resolution:1920x1080x30 FPS
Audio codec supported:MPEG layer 1/2, AAC, Dolby
D/Dolby D+(License)
Supported Media le
formats: Video les: avi; mkv/Photo: Jpeg; png/Music: mp3
Power: 220V-240V AC, 50-60 Hz, External power Adapter 220V AC/12VDC
Tuner Input Voltage DC 12V/1.0A
Power Consumption Max. 12W (Operating),
Max.1W(Standby)
THE MANUFACTURER RESERVES THE RIGHT TO CHANGE THE CONFIGURATION,
TECHNICAL OR ANY OTHER PARAMETERS WITHOUT PRIOR NOTICE
EN

* HINWEIS: Dieser Receiver unterstützt nur den Empfang
von Free-To-Air (FTA)-Programmen.
PACKUNGSINHALT
Tuner; AC/DC-Adapter; 2 x Fernbedienung; 4 Batterien
vom Typ AAA; Bedienungsanleitung.
VORDER- UND RÜCKSEITE SOWIE ANSCHLUSSPLAN
Frontplatte und Bedienelemente
Rückwand
1 POWER - Schaltet zwischen Betriebs- und Standby-Modus um.
2 CH- schaltet das TV-Programm in der Liste nach oben.
3 CH+ schaltet das TV-Programm in der Liste nach unten.
4 LED-Anzeige.
IR-Fenster (Infrarot-Fernbedienung).
USB-Anschluss für ein externes USB-Speichergerät (USB 2.0-Unterstützung).
1 2 3 4 5
1 LNB (Sat-Signal) IN.
2 LNB (Sat-Signal) OUT.
3 HDMI: HD Audio- und Videoausgang zum Anschluss an die HDMI-Buchse des Fernsehers.
4 OPTICAL SPDIF (Digitaler Audioausgang).
5 SCART.
6 12V DC Stromversorgung.
1 2 3 4 5
1. Lesen Sie diese Anleitungen.
2. Nicht in der Nähe von Wasser verwenden.
3. Nur mit einem trockenen Tuch reinigen.
4. Nicht in der Nähe von Wärmequellen installieren.
5. Betreiben Sie das Gerät ausschließlich an der auf dem Etikett angegebenen Stromquelle
und schützen Sie das Netzkabel vor Beschädigung und Belastung.
6. Ziehen Sie bei Gewitter oder längerem Nichtgebrauch des Geräts den Netzstecker ab.
7. Das Ausschalten des Geräts erfolgt durch Herausziehen des AC/DC-Adapters aus der
Netzsteckdose.
WICHTIGE SICHERHEITSVORSCHRIFTEN
CAUTION
Risk of electric shock!
DO NOT OPEN!
ATTENTION
Risque de choc electrique!
NE PAS OUVRIR!
65
6
HOCHAUFLÖSENDER (HD-) DIGITAL-SATELLIT
DVB S2/S RECEIVER BENUTZERHANDBUCH
Dieses Symbol zeigt an, dass gefährliche Spannungen in diesem Gerät die
Gefahr eines elektrischen Schlages bergen.
Dieses Symbol auf dem Produkt oder in der Anleitung bedeutet, dass Ihre
elektrischen und elektronischen Geräte am Ende ihrer Lebensdauer nicht im
Hausmüll entsorgt werden dürfen. Für das Recycling gibt es getrennte
Sammelsysteme. Bitte kontaktieren Sie für weitere Informationen die örtlichen
Behörden oder den Händler, bei dem Sie das Produkt gekauft haben.
Dieses Symbol verweist auf eine doppelte Isolierung zwischen gefährlicher
Netzspannung und für den Benutzer zugänglichen Teilen des Geräts.
Verwenden Sie bei Wartungsarbeiten nur die vom Hersteller vorgesehenen
Ersatzteile.
Wartungsarbeiten obliegen ausschließlich qualifiziertem Servicepersonal. Das Gerät ist
einer Wartung zu unterziehen, falls es irgendeinen Schaden erlitten hat, z. B. bei einer
Beschädigung des Netzkabels oder -steckers, einem Kontakt des Geräts mit Flüssigkeit
oder Feuchtigkeit, wenn es heruntergefallen ist oder wenn eine Fehlfunktion vorliegt.
Dieses Symbol verweist auf wichtige Bedienungs- und
Wartungsanweisungen in der Begleitliteratur zu diesem Gerät.
Dieses Symbol auf dem Produkt bedeutet, dass Ihr Gerät nur für
den Gebrauch in Innenräumen geeignet ist.
DE
6
TV
HDMI-Kabel
Heim
Kino
RF-Kabel
RF-Kabel
Satellit
Antenne
AC/DC 12 V
Adapter
Verstärker
2 SAT Receiver
(Empfänger)
SCART
Kabel
ANSCHLUSS FÜR EIN FERNSEHGERÄT UND DIE SATELLITENANTENNE
Für die Anschlüsse folgen Sie bitte diesem Schema:
EXITBACK
ASPECT V-FORM TIMER
1
2
3
4
5
6
7
8
9
10
25
24
23
22
21
20
19
18
17
16
11
12
13
14
15
1. Schaltet den Receiver ein/Standby. POWER:
2. Schaltet die Audioausgabe des Empfängers stumm. MUTE:
3. Zeigt eine Liste der verfügbaren Untertitelsprachen SUB:
Vorübergehendes Überschreiben der Untertiteleinstellung im Hauptmenü.
4. Zeigt die Liste der verfügbaren Audiotypen oder Sprachen an AUDIO:
Vorübergehendes Überschreiben der Audio-Einstellung im Hauptmenü.
5. Springt zum vorherigen Element in der Wiedergabeliste.
Springt zum nächsten Element in der Wiedergabeliste.
6. REC: Startet die Aufnahme eines TV-Programms.
7. Ändern Sie den Bildseitenmodus: 4:3, 16:9 und auf Auto.ASPECT:
8. Öffnet das Hauptmenü, im Menü gehen Sie einen Schritt zurück.MENU:
9. Menü Aus: Wechsel zum vorherigen/nächsten Kanal.
Menü An: Bewegt den Cursor nach oben/unten.
Menü Aus: Erhöht/senkt die Lautstärke.
Menü An: Einstellungen für bestimmte Menüs ändern.
10. Zeigt die aktuelle Kanalliste an. Bestätigung der Menüpunkte.OK:
11. . Schaltet zurück zum zuvor gesehenen Programm.BACK
12. Stoppt die Wiedergabe.
13. OL OL Erhöht/senkt die Lautstärke.V +/V -:
14. Kanalauswahl oder Werteingabe.0~9:
15. Zeigt Videotext im OSD (On Screen Display) an. TTX:
16. Zugang zur Liste der Lieblingsprogramme.FAV:
17. . Zugriff auf den Programmführer. PRGM
18. Schneller Rücklauf.
Schneller Vorlauf.
19. Direkter Aufruf des Timer-Menüs zum Anzeigen oder Einstellen von Timern.TIMER:
20. Ändern der Videoauflösungs- V-FORMAT:
modi 720p auf 1080i und 1080p.
21. Zeigt die aktuellen Kanalinformationen an. Drücken Sie zweimal INFO:
für Programm- und technische Informationen.
22. Menü oder Untermenü verlassen.EXIT:
23. G G-: -- Nächste oder vorherige Seite im TV-Programmlistenmenü.P + P
24. :Ausgewählte Mediendatei Play
(Medienplayer-Modus) oder (Taste ENTER) Aufrufen des Timeshift-Modus während
der TV-Wiedergabe.
*Für beide Modi ist ein externes USB-Speichergerät erforderlich.
25. Schaltet zwischen TV- und RADIO-Modus um.TV/R:
abc def
ghi jkl mno
pqrs tuv wxyz
REC
PG
BESCHREIBUNG DER FERNBEDIENUNG (RCU)
DE

EXITBACK
ASPECT V-FORM TIMER
abc
ghi jkl mno
tuv
REC
PG
TIMESHIFT
EXITBACK
ASPECT V-FORM TIMER
abc
ghi jkl mno
tuv
REC
PG
TIMESHIFT
Die Fernbedienung (RCU) der STB umfasst 4 Lerntasten.
Jede Taste kann auf die entsprechende Funktion
der TV-Fernbedienung programmiert werden.
1 Legen Sie beide Fernbedienungen (RCUs) voreinander.
2 Drücken Sie die TV-Taste auf der New Digital RCU für etwa 6-8 Sekunden bis sie
dauerhaft ROT leuchtet.
Eine rote LED auf der TV-Taste zeigt an, dass die RCU nun programmiert werden kann
(Programmiermodus).
*HINWEIS: Das rote Licht erlischt automatisch nach ca. 10 Sekunden, wenn keine weitere
Aktion durchgeführt wird. Die Programmierung muss innerhalb dieser Zeit erfolgen.
Bei einem Fehler können die Aktionen wiederholt werden.
3 Drücken Sie die TV-Taste an der New Digital RCU erneut, beginnt die rote
LED langsam zu blinken.
4 Drücken Sie die Taste ON/OFF auf der TV-Fernbedienung.
5 Die ROTE LED auf der TV-Taste der New Digital RCU blinkt einige Male schnell.
Dies zeigt an, dass der Befehl von der TV RCU empfangen wurde.
Die ROTE LED auf der TV-Taste der New Digital RCU leuchtet konstant.
Sie ist bereit für die Programmierung der nächsten Taste oder zum Verlassen des Programms.
Sie können den Programmiermodus nun verlassen, indem Sie die rote STBY-
Taste der New Digital RCU drücken.
6 Zum Testen, ob die programmierte TV-Taste den Fernseher ein- und ausschaltet,
verwenden Sie bitte die New Digital RCU für die TV-Steuerung.
Die Verfahren 1-6 können zur Programmierung des Fernsehers wiederholt werden
Lautstärke (vol+ vol-) und Videoeingangswahlfunktionen an der New Digital RCU.
PROGRAMMIERUNG DER FERNBEDIENUNG (RCU)
1. POWER: Schaltet den Receiver ein/Standby.
2. MENU: Öffnet das Hauptmenü. Im Menü gelangen Sie
einen Schritt zurück.
3. Drücken, um den Cursor zu bewegen.
4. VOL+/ VOL-: Menü an: Bewegen des Cursors nach
links/rechts Menü aus: Einstellen der Lautstärke -/+.
5. TV/RADIO: Umschalten zwischen Digitalradio- und TV-Modus.
6. MUTE: Schaltet die Audioausgabe des
Empfängers stumm.
7. <0><9>: Zifferntasten.
8. EXIT: Menü oder Untermenü verlassen.
9. CH-/CH+: Menü an: Bewegen Sie den Menü-Cursor
nach oben/unten.
10. OK: Menü Aus: Zeigt die aktuelle Kanalliste an
Bestätigung der Menüpunkte.
Funktionen der sekundären SENIOR-Fernbedienung:
DE
ALLGEMEINE EINFÜHRUNG
HAUPTMENÜ OSD (ON SCREEN DISPLAY)
Wählen Sie Antennenanschluss:
Wählen Sie die Art der Antennenverbindung entsprechend Ihrem System,
Sie haben die Wahl zwischen einer festen Antenne, die am häufigsten verwendet wird,
oder einer motorisierten Antenne.
Feste Antenne einrichten:
Nach der Auswahl des Antennentyps rufen Sie bitte das Menü „Satellite list“ auf
und wählen Sie die für Ihre Anlage geeigneten Satelliten aus:
Die standardmäßig ausgewählten Satelliten sind Astra 19E, Hot Bird 13E und Turksat 42E.
Ist der gewünschte Satellit nicht gelistet, können Sie den neuen Satelliten zur Liste zufügen,
indem Sie die grüne Schaltfläche „Add“ (Hinzufügen) betätigen:
Die Anweisungen zum Durchsuchen des Menüs / Auswählen von Elementen:
Drücken Sie die Taste [Up/Down], um einen Menüpunkt auszuwählen.
Drücken Sie die Taste [OK] oder [Right], um den Menüpunkt aufzurufen. Bei aktivierter Menü-
Sperre („An“) wird ein Dialogfeld zur Eingabe des Passworts angezeigt.
Das Standardkennwort lautet „0000“.
Drücken Sie die Taste [Left] oder [Exit], um zum Hauptmenü zurückzukehren.
Region/Sprache auswählen.
Bitte überprüfen Sie, ob die Antenne korrekt installiert und angeschlossen ist und
dass der Receiver NICHT eingeschaltet ist. Schalten Sie den Receiver ein (ON).
Nach dem Einschalten des Receivers wird der Willkommensbildschirm angezeigt:
Bitte wählen Sie Ihre Region und Sprache und drücken Sie dann OK.
*HINWEIS: Ihr Receiver ist mit den beliebtesten Programmen von Astra / Hot Bird / anderen
Satelliten vorprogrammiert. Die DiseqC 1.0 Standardeinstellung für Astra ist Port1, für Hot Bird
Port2. Sofern Ihre Anlage entsprechend installiert ist, können Sie die TV-Programme ohne
Suchlauf starten. Falls Sie andere Satelliten empfangen möchten, verwenden Sie bitte das
Menü „Satellite list“ und führen Sie den Suchlauf wie beschrieben durch. Drücken Sie die
Taste MENU, um das Installationsmenü aufzurufen.
Drücken Sie die [Menu]-Taste, um das Hauptmenü mit dieser Liste aufzurufen:
Menü Media Player;
Menü Programme bearbeiten;
Menü Installationen;
Menü Systemeinstellungen;
Menü Werkzeuge.
Drücken Sie Exit, um das Hauptmenü zu verlassen.
Um die TV-Programme sehen zu können, müssen Sie den Receiver entsprechend
Ihrer Installation und Konfiguration der Satellitenschüssel einstellen. Bitte wählen Sie
„Installation Menu“. Rufen Sie dieses Menü durch Drücken von OK auf.
DVBS-Installation:
DE
Um die vorinstallierte Favoritenliste mit deutschen Fernsehsendern zu sehen, richten Sie bitte
Ihre Satellitenantenne in Richtung Astra Satellite (19 Grad E) aus. Die Favoritenliste von
"Deutsches TV" kann durch Drücken der FAV-Taste ausgewählt werden. Andere vorinstallierte
Favoritenlisten könnten auf anderen Satelliten eingerichtet sein - in diesem Fall würden die
vorinstallierten TV-Kanäle nicht angezeigt.

Geben Sie die Satellitenposition zusammen mit dem Namen ein und folgen Sie den OSD
Anweisungen, den neuen Satelliten in der Liste zu speichern.
Benutzen Sie die Editierfunktion für notwendige Korrekturen an den eingegebenen Daten.
Bitte führen Sie nach Auswahl des/der Satelliten die Einrichtung der Antenne fort.
Satellit: Drücken Sie in diesem Menüpunkt die [Left/Right]-Taste, um zwischen den Satelliten zu
wechseln;
Drücken Sie die [OK]-Taste, um die Satellitenliste für die Direktwahl aufzurufen.
LNB-Freq: Drücken Sie in diesem Menüpunkt die [Left/Right]-Taste zur Auswahl der
notwendigen Parameter.
Der am häufigsten verwendete LNB-Typ ist Universal (9750-10600), der standardmäßig
eingestellt ist.
Transponder: Wählen Sie den gewünschten Transponder aus, um das Signal zu überprüfen.
DiSEqC1.0: Bitte benutzen Sie die [Left/Right]-Taste, um zwischen den Optionen zu wechseln.
Es gibt mehrere Optionen für Ihre Auswahl: Deaktivieren / LNB1 / LNB2 / LNB3 / LNB4.
Zum Umschalten zwischen mehreren LNBs verwenden Sie bitte DiseqC 1.1.
22K: Bitte benutzen Sie die [Left/Right]-Taste zum Umschalten zwischen „ON/Off“. Wenn dieser
Menüpunkt auf „ON“ geschaltet ist, empfängt der
Receiver das TV- und Radio-Eingangssignal über den 22K-Anschluss.
Es ist nicht möglich, 22K für den LNB-Typ „Universal“ zu ändern.
Polarität: Unter „Polarität“ können Sie mit der [Left/Right]-Taste die Funktionen „Auto/H/V“
umschalten.
Die Standardeinstellung ist „Auto“.
Sofern die Antenneneinstellung korrekt ist, zeigt die Signalanzeige den Signalpegel und die
Signalqualität des ausgewählten Transponders an.
Sie können mit der Programmsuche fortfahren.
*HINWEIS: Ihr Receiver ist mit den beliebtesten Programmen von Astra / Hot Bird / anderen
Satelliten vorprogrammiert. Die DiseqC 1.0 Standardeinstellung für Astra ist Port1, für Hot Bird
Port2. Sofern Ihre Anlage entsprechend installiert ist, können Sie die TV-Programme ohne
Suchlauf starten. Falls Sie andere Satelliten empfangen möchten, verwenden Sie bitte das
Menü „Satellite list“ und führen
Sie den Suchlauf wie beschrieben durch. Drücken Sie die Taste MENU, um das
Installationsmenü aufzurufen.
Einstellung der motorisierten Antenne:
Das Gerät unterstützt zwei Positionierungsarten der motorisierten Antenne: DiseqC 1.2 und
USALS.
Wählen Sie „Motor Antenna“ im Menü „Antenna Connection“:
Der Name des Satelliten muss mit Hilfe der RCU-Tastatur eingegeben werden, die neben Ziffern
auch die Eingabe von Buchstaben ermöglicht:
DE
Table of contents
Languages:
Other New Digital Receiver manuals


