New Image FITT STRIDER User manual

ASSEMBLY AND USER GUIDE
To help you get started visit:
newimagefitness.co.uk
DOWNLOAD THE
NEW IMAGE FITNESS
APP TODAY
To help you get started visit:
DOWNLOAD THE
NEW IMAGE FITNESS
APP TODAY
FITT STRIDER

We’re passionate about helping you be fit, strong and active!
Whatever your fitness goal, New Image has a range of unique
and easy-to-use fitness solutions to help you be your best.
We know getting started is sometimes the hardest part so we
design all our products to be simple, fun to use and effective.
We hope you enjoy your new FITT Strider and would love to hear
your experiences. Check out our social channels and take a look
at YouTube for videos, tips and workouts.
to New Image
WELCOME
• Watch exclusive workout videos
• Ask questions to our thriving community
• Check out our nutritional tips and tricks
To find out more about the New Image range of fitness
equipment, tools and accessories to help you achieve your
goals, visit newimagefitness.co.uk
Join the conversation...
Track your fitness & access all your
workout videos for our New Image range
wherever & whenever you want!
Download the app...


The FITT Strider by New Image is a compact,
upright elliptical cross trainer that delivers
total body results for all experience levels.
The smooth, elliptical motion mimics the
movements used in running to give you a
heart-pumping, cardio workout without all the
impact on your joints. It’s the perfect way to
improve heart-health, cardiovascular fitness,
muscle tone and more, all in one machine.
Congratulations on purchasing
your new FITT Strider!
WHAT’S IN THE BOX:
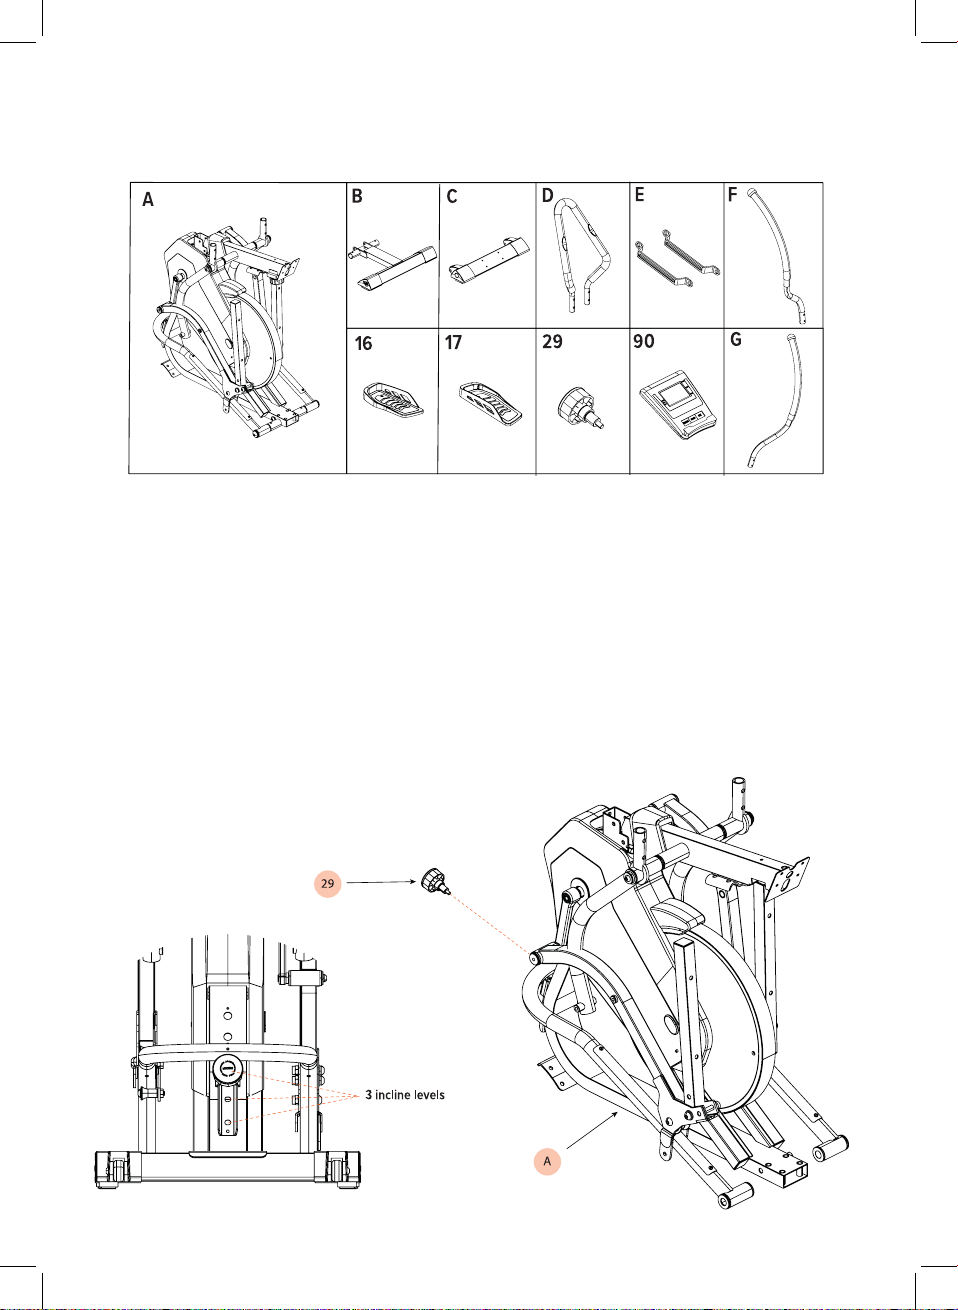
WHAT’S IN THE BOX: Fixings & tools
QUICK-START GUIDE:
Insert the spring locking knob through 1 of the 3 respective holes to set the incline
level of the machine. The higher the hole, the higher the incline.
Note: Ensure the main frame is standing safely. The unit will be unstable at this stage
Step 1

Rotate the middle upright tube up 90
degrees. Use Multi wrench (106) to lock
into position above the main frame using
M8 bolt (44), flat washer (66) and M8
nut (62) to secure through the side hole
using the Allen Key #5. Following this,
use M8 bolt (50), and flat washer (66) to
secure through the front hole using the
Allen Key #5.
Step 3
Using the supplied
Allen Key #5 (105), lock the front
stabiliser leg on to the main frame by inserting
the 4 Spring washers (73), Flat washers (66) & M8 Bolts (50)
Using the Allen Key #5 again, lock on the rear stabiliser leg by inserting
4 spring washers (73), Flat Washers (66) and M8 Bolts (51)
Next, lock the side of the rear stabiliser leg using Allen Key #6 (104) to
tighten M10 Bolt (46) & Nut (63) through the respective hole. Ensure these are
tightly fastened.
Finally, Take the 2 M16 bolts (59) & M16 Washers (96) and insert through
the tubular part of main frame (A) and the corresponding tube of the rear
stabiliser leg (B).
Using Allen Key #8 (114), Tighten each of the bolts securely.
Step 2
B
66
73
51
51
C
46
63
59
96
0
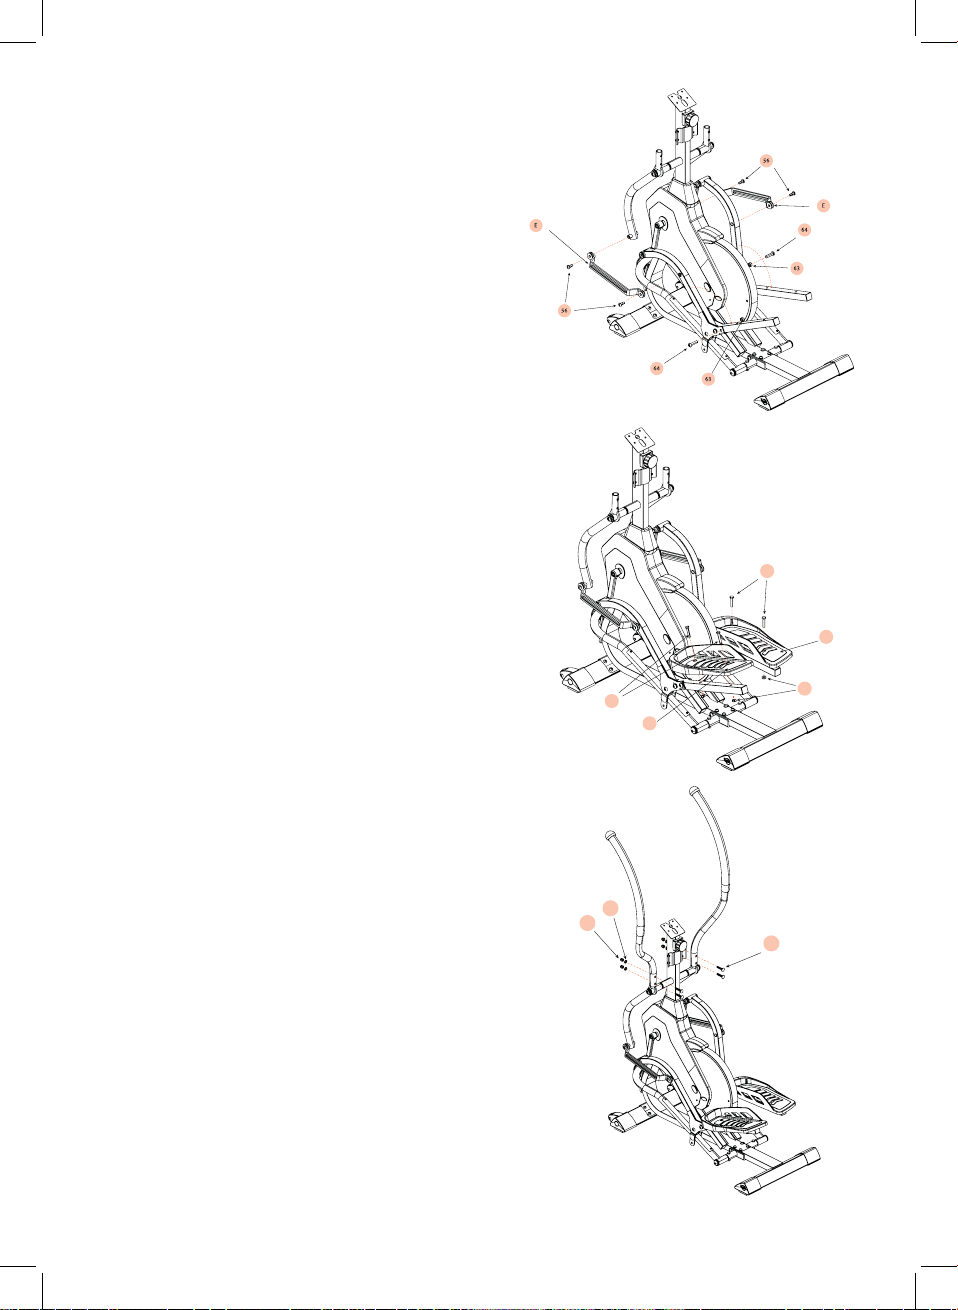
Using Allen Key #6, lock the connector bars
(E) to the corresponding moving handle bar
and pedal frame with the 4 M8 bolts (56)
Unfold the pedal bars until they are at a
90 degree angle. Using Allen Key #6 (104)
and Multi Wrench (106) lock the pedals into
place using M10 Bolt (64) and M10 nut (63).
Put the left pedal (16) on top of the pedal
tube and align holes. Use M8 Bolts (49)
to insert through holes and secure with M8
Nuts (62).
Repeat the same process using the right
pedal (17) and 2 M8 bolts (49) and nuts (62)
on the opposite side.
Use Multi Wrench (106) to tightly secure
the nuts.
Insert the Left (F) & Right (G) handle bars
onto the swinging handle bars. Using the
supplied multi wrench, lock the 4 M8 Bolts
(82), Curved Washers (83) and M8 nuts (80)
and tightly secure.
Step 4
Step 5
Step 6
49
17
62
49
16
82
80
83
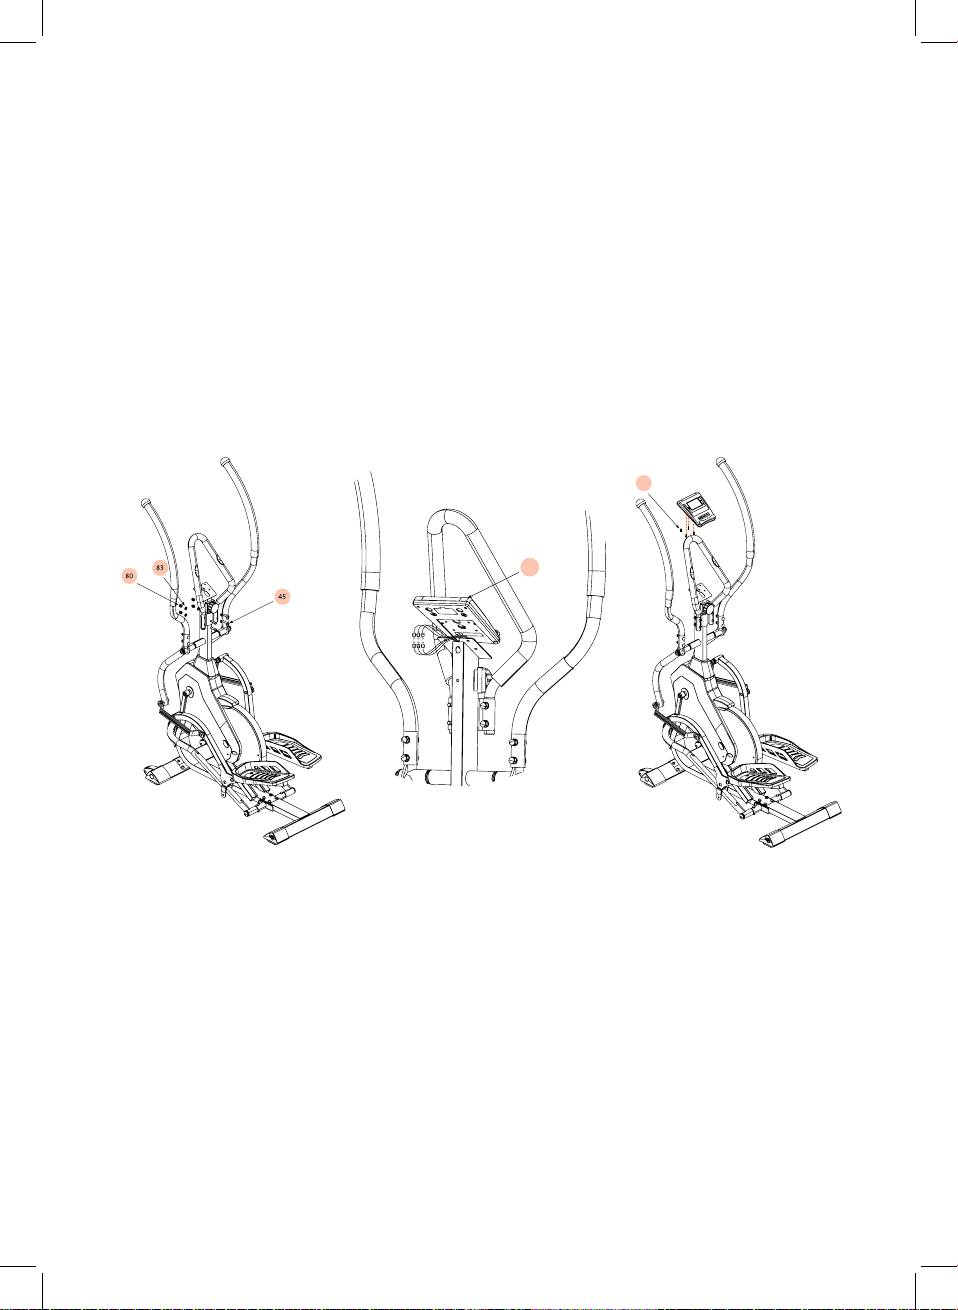
Using supplied Multi wrench (106) & Allen Key #5 (105), place the middle handle bar
(D) onto the bracket on the upright frame. Insert M8 Bolt (45) through the front side
and secure tightly using the M8 curved washers (83) & M8 nuts (80).
First, remove the 4 screws (58) that are pre-assembled on the back of the Computer
(90) and set the aside temporarily.
Locate the 6 wires (3 from the computer & 3 stored in the upright computer tube) and
connect the opposing ends and ensure they are secure. Once connected tuck the
cables neatly into the upright tube to stop any interference with the cables.
Using Allen Key #6 (104) and secure the previously removed 4 bolts (58) through the
upright computer bracket and into the corresponding holes on the rear side of the
computer (90).
Step 7
90
58

HEIGHT: Displays estimated height.
GEAR: Displays estimated incline value from level 1 to level 3.
DISTANCE: Indicates the simulated distance that has been ‘run’
SPEED/TIME: Displays speed and time when exercising
CALORIES/PULSE: Displays estimated calories burnt and pulse rate whilst exercising
DISPLAY:
BUTTONS:
OPERATING THE MONITOR
[RESET] clear data from selected mode.
• To reset all stored information from previous workout, press and hold for four
seconds.
[MODE] selects mode. Choose between Height, Distance, Time and Calories.
• Press MODE button for Height, Distance, Time or Calories. They will flash on
the display. After finding the intended function mode, press SET button to
enter target data setting.
E.g., Press MODE button, when the Height window flashes, press SET button
to increase your target value.
• Long press MODE button to clear date from selected mode
[SET] programs data setting for selected mode. press SET button to increase
setting target value.
• Put both palms of hands on each of the pulse sensor on the fixed handles.
The pulse value will display on window (this data is just for reference, cannot
be regarded as medical data)
• 2. Display turns off automatically after 4 minutes when not in use. Press any
button or start operating the unit to re-start.
Monitor Maintenance
When the display is dark or non-responsive, replace with 2x AAA batteries.

• Please read this user guide before first using your Fitt Strider training
equipment. It is important to keep these instructions for future reference.
• Assemble and operate the equipment on a level surface.
• Ensure the equipment is stable before use.
• Always ensure you have adequate space on all sides when performing
exercises, at least 0.6m on each side.
• The safety level of the equipment can only be maintained if it is regularly
examined for wear and tear e.g ropes, pulleys, handles and connections.
• Replace defective components immediately and keep the equipment out of
use until it is required.
• Use only the adjustment setting as described in the instructions. Always
use the correct adjustment plug / fixing. Note any adjustment devices left
projecting could interfere with the user’s movement during use.
• Keep hair, fingers and loose clothing away from hinges and other moving
parts to avoid serious injury.
• Always consult your GP before undertaking any exercise programme.
• Always wear suitable clothing and footwear e,g. tracksuit, shorts and training
shoes.
• Remove all personal jewellery before exercising.
• Ensure you warm up well before using the equipment as this will help to
reduce muscle strain.
• After eating, allow 1-2 hours before exercising as this help to prevent strain.
• Never overload the equiment: MAX USER WEIGHT 120kgs.
• Never use the equipment in any other manner other than the ways explained
in these instructions.
• If you feel faint, stop exercising immediately.
• Injuries to health may result from incorrect form / technique or excessive
training.
• Care should be taken at all times when getting on and off the equipment.
Falling off the equipment could result in injury. Mount and dismount the
equipment safely e.g footplatform in the lowest position.
• Children should not be allowed on or around the equipment, especially when
it is not in use and unsupervised.
• Parents and others in charge of children should be aware of their
responsibility because the natural play instinct and the fondness of
experimenting of children can lead to situations and behaviour for which the
training equipment is not intended.
• This product is not intended for use by persons with reduced physical,
sensory or mental capabiltiies, or lack of experience and knowledge, unless
they have been given supervision or instructions concerning the use of the
appliance by a person responsible for their safety.
SAFETY INFORMATION

MAINTENANCE AND STORAGE
• This product is not suitable for therapeutic purposes.
• This product is intended for home use only.
• Only use accessory items recommended by the manufacturer.
• CAUTION the instructions must be followed carefully in the assembly, use
and maintenance of the equipment.
• Assembly: It is important you assemble the product in a clean and
uncluttered space.
• Keep away from fire.
• This product is not a toy. Do not stand or jump on it.
• Product weight: 41kgs.
• Product dimensions: Length 1050mm x Width 650mm x Height 1735mm.
• Please note the Fitt Strider is not equipped with a free wheel and therefore
the moving parts cannot be stopped immediately.
• WARNING! - This stationary training equipment is not suitable for high
accuracy purposes.
• WARNING! – Heart rate monitoring systems may be inaccurate. Over
exercising may result in serious injury or death. If you feel faint stop
exercising immediately.
• Wipe clean only with a clean, damp cloth. DO NOT use detergents.
• This equipment should not be stored outside, in a garage or outbuilding.
Keep the equipment in a dry place with as little temperature variation as
possible.
• We recommend placing a mat beneath the equipment to protect both
the equipment and flooring. New Image mat can be purchased at
newimagefitness.co.uk
• The safety level of the equipment can only be maintained if it is regularly
examined for wear and tear. This includes any ropes, pulleys, handles, nuts,
bolts, moving parts, bushes, chailns, wheels, bearings and connections.
Made in China
Please read all instructions carefully and retain for future reference.
Model number: BM606G
Class: HC
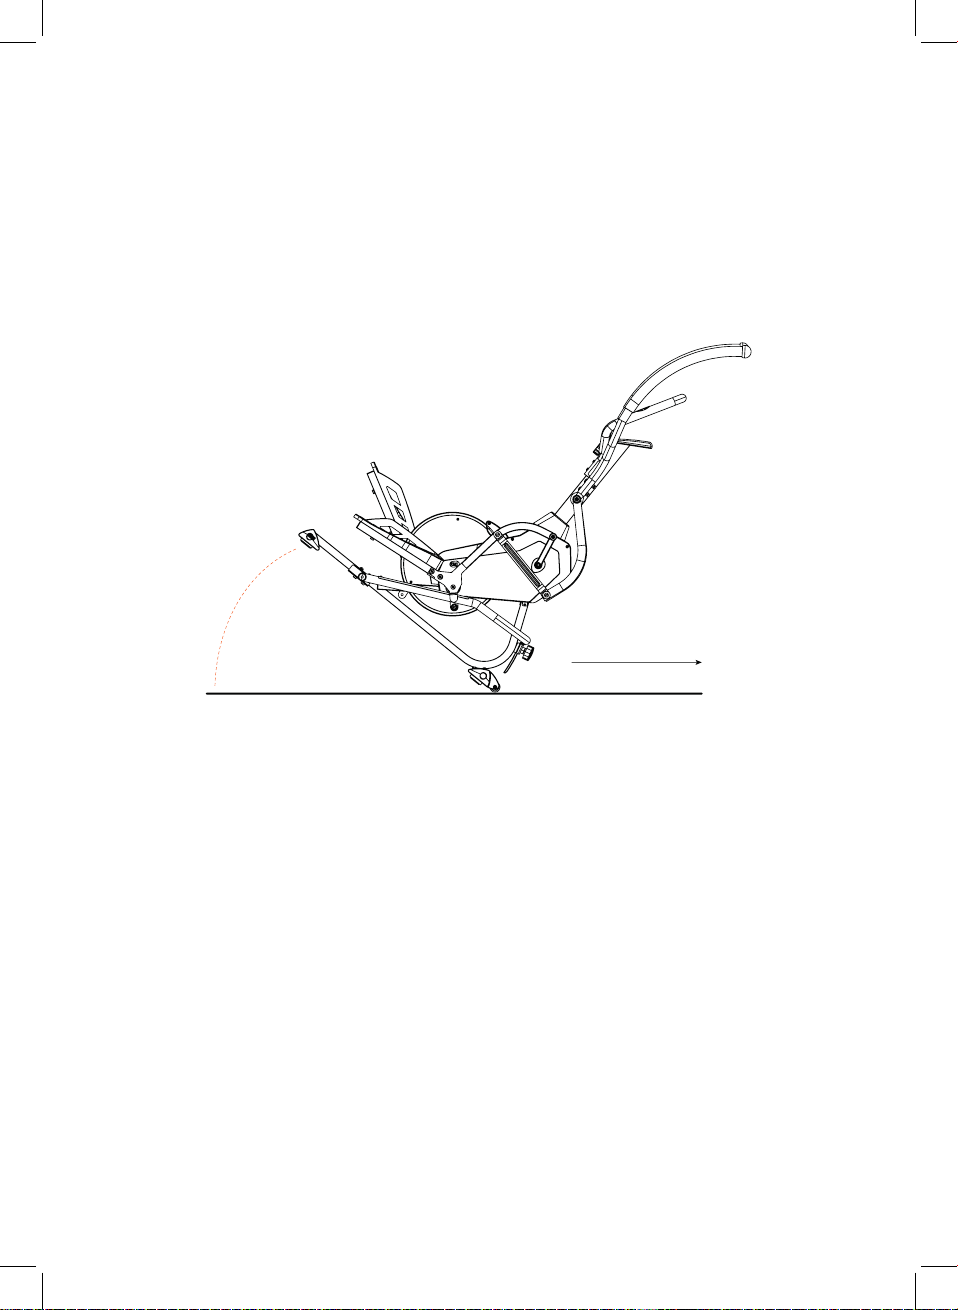
1. Moving the Machine
To move the machine lift up the rear stability leg until the wheels on the front stability
make contact with the ground as shown in the diagram below. With the wheels on the
ground you can transport the unit to the desired location.

2. Surrounding distance
When operating the machine, always ensure a minimum distance of 0.6m around all
surround edges of the product. This will ensure a safe exercise space is maintained.


connected tness
NEW IMAGE FITNESS APP
DOWNLOAD THE NEW
IMAGE FITNESS APP TODAY
Track your fitness & access all your
workout videos for our New Image range
wherever & whenever you want!

Distributed by:
High Street TV, PO Box 7903,
CORBY, NN17 9HY
Version V2 04/22
newimagefitness.co.uk
DOWNLOAD THE NEW IMAGE
FITNESS APP TODAY!
To access all your workout videos
wherever & whenever you want!
This manual suits for next models
1
Table of contents
Popular Elliptical Trainer manuals by other brands


Spirit
Spirit Inspire ZE40 owner's manual

Domyos
Domyos AB 600 operating instructions

Christopeit Sport
Christopeit Sport AX 6 Assembly and exercise instructions

NordicTrack
NordicTrack E4.0 Elliptical HASZNALATI UTASITAS

Weslo
Weslo Momentum 850 Elliptical Manuel de l'utilisateur

Weslo
Weslo Momentum 750 manual