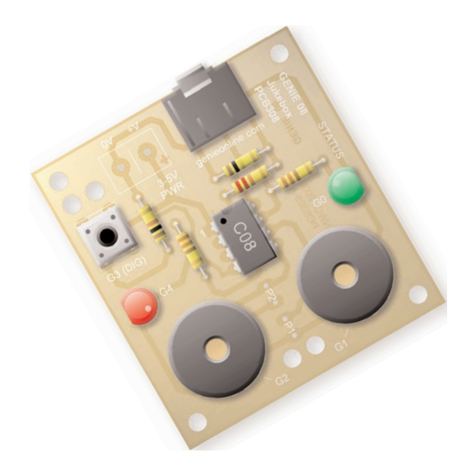
New Wave Concepts Genie 08 Activity Kit User manual

This worksheet is copyright © New Wave Concepts Limited. All rights reserved.
It may be photocopied for classroom or non-commercial use.
w
ww
ww
w.
.g
ge
en
ni
ie
eo
on
nl
li
in
ne
e.
.c
co
om
m
Page 1 of 9 ®1
10
08
8GENIE 08 Activitiy Kit.pdf ®Version 1.5
G
GE
EN
NI
IE
E0
08
8A
Ac
ct
ti
iv
vi
it
ty
yK
Ki
it
t(
(P
PC
CB
B1
10
08
8)
)
Introduction 1
1
Battery connects here (red wire to
‘+V’, black wire to ‘0V’). You can
feed the wires through the two of the
larger strain-relief holes to the left.
Download socket (the cable
plugs in here so that the
GENIE microcontroller can
talk to the computer)
Green LED, controlled
by output signal G
G0
0
8-pin GENIE
microcontroller (the
magic bit!)
Sounder, controlled by
output signal G
G4
4
Light sensor (LDR) on
analogue input A
A1
1
Push switch on
input G
G3
3
Red LED, controlled by
output signal G
G2
2
B
Ba
at
tt
te
er
ry
yp
po
ow
we
er
rm
mu
us
st
t
b
be
eb
be
et
tw
we
ee
en
n3
3v
vo
ol
lt
ts
s
a
an
nd
d5
5v
vo
ol
lt
ts
s.
..
..
.
.
..
..
.t
th
ha
at
t’
’s
s2
2o
or
r3
3A
AA
A-
-
s
si
iz
ze
ed
db
ba
at
tt
te
er
ri
ie
es
s!
!
W
We
el
lc
co
om
me
et
to
ot
th
he
eG
GE
EN
NI
IE
E
m
mi
ic
cr
ro
oc
co
on
nt
tr
ro
ol
ll
le
er
rs
sy
ys
st
te
em
m!
!
The activity kit is a great
place to start. It provides
you with a fun introduction
to GENIE by allowing you to
control outputs so that lights
flash and sounds are made!
‘L
LE
ED
D’is short for ‘L
Li
ig
gh
ht
t
E
Em
mi
it
tt
ti
in
ng
gD
Di
io
od
de
e’
‘L
LD
DR
R’is short for ‘L
Li
ig
gh
ht
t
D
De
ep
pe
en
nd
de
en
nt
tR
Re
es
si
is
st
to
or
r’

This worksheet is copyright © New Wave Concepts Limited. All rights reserved.
It may be photocopied for classroom or non-commercial use.
w
ww
ww
w.
.g
ge
en
ni
ie
eo
on
nl
li
in
ne
e.
.c
co
om
m
Page 2 of 9 ®1
10
08
8GENIE 08 Activitiy Kit.pdf ®Version 1.5
G
GE
EN
NI
IE
E0
08
8A
Ac
ct
ti
iv
vi
it
ty
yK
Ki
it
t(
(P
PC
CB
B1
10
08
8)
)
Making the GENIE 2
2
Switch on the soldering iron. It will only take a
few minutes for the iron to reach operating
temperature. Once the soldering iron is hot,
clean the soldering iron tip with a moist sponge.
Melt some solder at the chamfered end of the
soldering iron tip. This is called ‘tinning’ and it
will aid the flow of solder from the soldering
iron to the copper track on the printed circuit
board and component pins.
Fit each component onto the board. When
fitting components such as resistors, you should
use long-nosed pliers to bend the legs through
90 degrees. This will make them easier to fit.
Some of the components need to be fitted the
correct way around:
®The 8-pin GENIE microcontroller should be
positioned so that the notch points towards
the download socket and the dot next to pin
1 is at the same corner as the ‘1’ shown on the
board.
®The green and red LEDs should be fitted so
that the flat edges of the LEDs line up with
the flat edges shown on the board.
To solder a pin, hold the soldering iron onto the
board for a few seconds, then quickly touch the
tip with a small amount of solder.
When using an uncased sounder, you should
solder the sounder to the two points marked P
P4
4.
You should always remember to replace the
soldering iron back into the stand after soldering
and repeat cleaning the tip of the iron with the
moist sponge before the start of each soldering
operation.
Finally, cut off any excess
wire or component legs
for a tidy finish.
C
Co
om
mp
po
on
ne
en
nt
ts
sL
Li
is
st
t
This is what you will need:
C
Co
om
mp
po
on
ne
en
nt
tQ
Qu
ua
an
nt
ti
it
ty
y
8-pin GENIE microcontroller 1
GENIE 08 activity board (PCB108) 1
Download (3.5mm stereo) socket 1
8-pin DIL socket 1
Battery clip 1
3 x AA battery holder 1
6 x 6mm switch 1
Miniature light sensor (LDR) 1
Piezo sounder 1
Green LED 1
Red LED 1
330 ohm resistor 2
(orange, orange, brown, gold)
10k ohm resistor 2
(brown, black, orange, gold)
22k ohm resistor 1
(red, red, orange, gold)
100k ohm resistor 1
(brown, black, yellow, gold)
T
Ta
ak
ke
ec
ca
ar
re
ew
wh
he
en
nu
us
si
in
ng
ga
a
h
ho
ot
ts
so
ol
ld
de
er
ri
in
ng
gi
ir
ro
on
n!
!

This worksheet is copyright © New Wave Concepts Limited. All rights reserved.
It may be photocopied for classroom or non-commercial use.
w
ww
ww
w.
.g
ge
en
ni
ie
eo
on
nl
li
in
ne
e.
.c
co
om
m
Page 3 of 9 ®1
10
08
8GENIE 08 Activitiy Kit.pdf ®Version 1.5
G
GE
EN
NI
IE
E0
08
8A
Ac
ct
ti
iv
vi
it
ty
yK
Ki
it
t(
(P
PC
CB
B1
10
08
8)
)
Telling the GENIE your wishes 3
3
A
Av
va
ai
il
la
ab
bl
le
eS
Si
ig
gn
na
al
ls
s
These are the i
in
np
pu
ut
ta
an
nd
do
ou
ut
tp
pu
ut
t
s
si
ig
gn
na
al
ls
savailable in your flowchart:
I
In
np
pu
ut
tD
De
es
sc
cr
ri
ip
pt
ti
io
on
n
A1 Light sensor (LDR)
G3 Push switch
O
Ou
ut
tp
pu
ut
tD
De
es
sc
cr
ri
ip
pt
ti
io
on
n
G0 Green LED
G2 Red LED
G4 Sounder
For your project to work, you need to tell the GENIE microcontroller what it should do.
This involves writing a sequence of commands in a f
fl
lo
ow
wc
ch
ha
ar
rt
t. Your flowchart is then sent down the
cable and stored on the GENIE chip. By changing the flowchart, you can vary how the GENIE behaves.
First, you need to tell the software which type of chip you are using. To do this,
click on the M
Mi
ic
cr
ro
oc
co
on
nt
tr
ro
ol
ll
le
er
rbutton on the toolbar and choose P
Pr
ro
og
gr
ra
am
mS
Se
et
tt
ti
in
ng
gs
s.
.
Select an 8-pin G
GE
EN
NI
IE
Echip.
In the same window, choose the ‘2
2I
In
np
pu
ut
ts
s,
,
3
3O
Ou
ut
tp
pu
ut
ts
s(
(G
G0
0,
,G
G2
2,
,G
G4
4)
)’
’setting to tell
GENIE which inputs and outputs you need.
Click on O
OK
Kwhen you are ready.
Á
Á
Ã
Ã
You can now decide which commands you
want your GENIE to perform. To do this,
drag commands from the G
Ga
al
ll
le
er
ry
y.
See the next worksheet for flowchart ideas.

This worksheet is copyright © New Wave Concepts Limited. All rights reserved.
It may be photocopied for classroom or non-commercial use.
w
ww
ww
w.
.g
ge
en
ni
ie
eo
on
nl
li
in
ne
e.
.c
co
om
m
Page 4 of 9 ®1
10
08
8GENIE 08 Activitiy Kit.pdf ®Version 1.5
G
GE
EN
NI
IE
E0
08
8A
Ac
ct
ti
iv
vi
it
ty
yK
Ki
it
t(
(P
PC
CB
B1
10
08
8)
)
Telling the GENIE your wishes 4
4
T
Tu
ur
rn
ni
in
ng
gl
li
ig
gh
ht
ts
so
on
na
an
nd
do
of
ff
f
You can use GENIE to turn lights on and off.
M
Ma
ak
ki
in
ng
gs
so
ou
un
nd
ds
so
or
rp
pl
la
ay
yi
in
ng
gt
tu
un
ne
es
s
GENIE microcontrollers can make sounds and
also play musical tunes.
This will light the green LED that is connected to
output G0.
In addition to changing the output, you can also
add a delay (GENIE programs run very quickly
and without a wait, sometimes the lights change
too fast for you to see!).
The flowchart on the
right uses the HIGH
and LOW commands
to turn the green LED
on and off.
It loops back to make
the flashing repeat.
This would play the
note middle C for one
second.
By playing two different
notes (one after the
other, as shown on the
right), you can create an
alarm. In this flowchart,
the green LED is also
flashed to give a visible
as well as audible alarm.
There are two lights on the activity kit, a green
LED on output G
G0
0and a red LED on output G
G2
2.
Double-clicking on an output command allows
you to control a light (or several in the case of
the OUTPUTS command), for example:
The activity kit has a sounder connected to
output G
G4
4. To make a sound, you could use the
SOUND command as follows:
You can use the TUNE command to play a
whole tune such as a mobile telephone ring
tone. For better quality sound and music, you
may wish to consider the GENIE 14 Audio Kit.
Use the S
SO
OU
UN
ND
Dcommand to
play a single note.
Use the T
TU
UN
NE
Ecommand to
play a whole musical tune.
Use the H
HI
IG
GH
Hcommand to
turn a single light on.
Use the L
LO
OW
Wcommand to turn
a single light off.
Use the O
OU
UT
TP
PU
UT
TS
Scommand
to control more than one light.

This worksheet is copyright © New Wave Concepts Limited. All rights reserved.
It may be photocopied for classroom or non-commercial use.
w
ww
ww
w.
.g
ge
en
ni
ie
eo
on
nl
li
in
ne
e.
.c
co
om
m
Page 5 of 9 ®1
10
08
8GENIE 08 Activitiy Kit.pdf ®Version 1.5
G
GE
EN
NI
IE
E0
08
8A
Ac
ct
ti
iv
vi
it
ty
yK
Ki
it
t(
(P
PC
CB
B1
10
08
8)
)
Telling the GENIE your wishes 5
5
R
Re
es
sp
po
on
nd
di
in
ng
gt
to
ot
th
he
ep
pu
us
sh
hs
sw
wi
it
tc
ch
h
Some types of input signal, such as push switches,
can only be either on or off. These are known as
d
di
ig
gi
it
ta
al
lsignals.
R
Re
es
sp
po
on
nd
di
in
ng
gt
to
ot
th
he
el
li
ig
gh
ht
ts
se
en
ns
so
or
r
Other types of input signal, such as temperature
or light, can be at a number of different levels.
These are known as a
an
na
al
lo
og
gu
ue
esignals.
Use the A
AN
NA
AL
LO
OG
GU
UE
Ecommand
to respond to analogue signals.
Use the D
DI
IG
GI
IT
TA
AL
Lcommand to
respond to a digital signals.
The ANALOGUE command allows you to check
if a signal lies within a given range.
With GENIE, analogue levels can vary between 0
0
(the lowest level) and 2
25
55
5(the highest).
Double-click on the command to select a sensor
to check and a range. GENIE will follow the ‘Y
Y’
(yes) path when the signal is in range, otherwise
it will follow the ‘N
N’ (no) path.
For example, to test if the light sensor on
analogue signal A1 is between 0 and 100, you
should enter the following:
The DIGITAL command allows you to make a
decision based on whether a digital signal is
either on (pressed) or off (not pressed).
When a digital signal is on, it has the value ‘1
1’
whereas when it is off, it has the value ‘0
0’.
Double-click on the command to select which
digital inputs you wish to check. GENIE will
follow the ‘Y
Y’ (yes) path when the digital signal
matches the chosen pattern, otherwise it will
follow the ‘N
N’ (no) path.
The above pattern will test if the push switch on
is pressed. Y
ou can see below how to use this in
a flowchart: the green LED on output G0 will
light whenever the switch is pressed.
In a flowchart, this would look like:

This worksheet is copyright © New Wave Concepts Limited. All rights reserved.
It may be photocopied for classroom or non-commercial use.
w
ww
ww
w.
.g
ge
en
ni
ie
eo
on
nl
li
in
ne
e.
.c
co
om
m
Page 6 of 9 ®1
10
08
8GENIE 08 Activitiy Kit.pdf ®Version 1.5
G
GE
EN
NI
IE
E0
08
8A
Ac
ct
ti
iv
vi
it
ty
yK
Ki
it
t(
(P
PC
CB
B1
10
08
8)
)
Bringing the GENIE to life 6
6
As soon as the program has been
downloaded you will see the
above screen (c) and GENIE will
start running your flowchart.
Y
our GENIE project is now ready
to go! Y
ou can disconnect the
cable and use your GENIE board
away from the computer.
ü
ü
F
Fi
in
ni
is
sh
he
ed
d!
!
(
(a
a)
)
(
(b
b)
)
Once you have written your flowchart program,
you need to store it on the GENIE chip. Here’s
how you do it:
1
1Wire-up the built GENIE circuit board and
connect up a suitable battery power supply.
2
2Plug the GENIE cable into the download
socket on the GENIE circuit board.
3
3Once done, the P
Pr
ro
og
gr
ra
am
mpanel in the
software will then show a ‘Connected’
message (see picture a).
4
4Click on the R
Ru
un
nL
Li
iv
ve
eoption. Your flowchart
will be transferred onto the GENIE chip—this
is known as d
do
ow
wn
nl
lo
oa
ad
di
in
ng
g(see picture b).
(
(c
c)
)
T
Th
he
eg
gr
re
ee
en
ns
st
ta
at
tu
us
sL
LE
ED
Do
on
nt
th
he
e
a
ac
ct
ti
iv
vi
it
ty
yk
ki
it
tw
wi
il
ll
lf
fl
la
as
sh
ha
as
st
th
he
e
d
do
ow
wn
nl
lo
oa
ad
dt
ta
ak
ke
es
sp
pl
la
ac
ce
e.
.
I
It
tt
te
el
ll
ls
sy
yo
ou
ue
ev
ve
er
ry
yt
th
hi
in
ng
gi
is
sO
OK
K!
!

This worksheet is copyright © New Wave Concepts Limited. All rights reserved.
It may be photocopied for classroom or non-commercial use.
w
ww
ww
w.
.g
ge
en
ni
ie
eo
on
nl
li
in
ne
e.
.c
co
om
m
Page 7 of 9 ®1
10
08
8GENIE 08 Activitiy Kit.pdf ®Version 1.5
G
GE
EN
NI
IE
E0
08
8A
Ac
ct
ti
iv
vi
it
ty
yK
Ki
it
t(
(P
PC
CB
B1
10
08
8)
)
Troubleshooting GENIE 7
7
If you are unable to connect to a GENIE microcontroller or download a program, you should go
through the following troubleshooting hints and tips.
R
Ru
un
nt
th
he
eG
GE
EN
NI
IE
Et
tr
ro
ou
ub
bl
le
es
sh
ho
oo
ot
ti
in
ng
gt
to
oo
ol
l
The GENIE troubleshooter will automatically
check your cable and software to ensure that
the computer can access the GENIE cable.
To run the GENIE troubleshooter, choose
T
Tr
ro
ou
ub
bl
le
es
sh
ho
oo
ot
tG
GE
EN
NI
IE
E.
..
..
.from the H
He
el
lp
pmenu of
the Circuit Wizard or GENIE software.
If that option is not shown in your version of
the software, you can download it separately
from w
ww
ww
w.
.g
ge
en
ni
ie
eo
on
nl
li
in
ne
e.
.c
co
om
m/
/c
ca
ab
bl
le
e.
Step through the on-screen instructions.
S
St
te
ep
pt
th
hr
ro
ou
ug
gh
ht
th
he
ef
fo
ol
ll
lo
ow
wi
in
ng
gc
ch
he
ec
ck
kl
li
is
st
to
of
fc
co
om
mm
mo
on
np
pr
ro
ob
bl
le
em
ms
s
C
Ca
ab
bl
le
e
• Circuit Wizard, GENIE Design Studio and the GENIE Programming Editor software all check
and report problems involving the cable. If given, follow through on the on-screen advice.
• Unplug the cable, wait a few seconds and then plug it back in. Windows can occasionally fail
to detect that a cable has been inserted.
P
Po
ow
we
er
r
• Check that the voltage of the battery is sufficient. For this board, the battery voltage should
be in the range of 3 volts to 5 volts.
• Check the voltage level across the power connections (+V and 0V) on the board. This can
identify if there is a problem with the battery clip or battery holder. Ensure that the wiring
has not become loose and the batteries are properly seated in the holder.
C
Ci
ir
rc
cu
ui
it
t
• Try plugging the cable into another GENIE board if you have one available. When powering
up this circuit, the green STATUS LED should flash once (when properly connected it will flash
repeatedly).
• Try with another GENIE microcontroller if possible.
• Visually inspect the board for bad solder joints or cases where soldering has incorrectly
bridged pins together. Note that for the download socket, the two left-most pins should be
connected together, as should the two right-most pins.
For more troubleshooting hints and tips, please read the separate G
GE
EN
NI
IE
ET
Tr
ro
ou
ub
bl
le
es
sh
ho
oo
ot
ti
in
ng
gG
Gu
ui
id
de
e.
A
B

This worksheet is copyright © New Wave Concepts Limited. All rights reserved.
It may be photocopied for classroom or non-commercial use.
w
ww
ww
w.
.g
ge
en
ni
ie
eo
on
nl
li
in
ne
e.
.c
co
om
m
Page 8 of 9 ®1
10
08
8GENIE 08 Activitiy Kit.pdf ®Version 1.5
G
GE
EN
NI
IE
E0
08
8A
Ac
ct
ti
iv
vi
it
ty
yK
Ki
it
t(
(P
PC
CB
B1
10
08
8)
)
C08
3-5V
G0 (Green LED)
G3 (Switch)
10k10k
A/G1 (LDR) 330
V+
PR
G4/A
G3 A/G2
A/G1
ST/G0
0V
GENIE L08/C08
22k
PR
ST
0V
Download Socket
G2 (Red LED)
330
100k
G4 (Sounder)
Circuit information 8
8
This is the c
ci
ir
rc
cu
ui
it
td
di
ia
ag
gr
ra
am
m. It shows how all of the components in
the circuit are connected. You can compare it to the layout of the
components on the actual circuit board (shown below it).
L
The technical bit... it’s
only needed if you
want to learn more!

This worksheet is copyright © New Wave Concepts Limited. All rights reserved.
It may be photocopied for classroom or non-commercial use.
w
ww
ww
w.
.g
ge
en
ni
ie
eo
on
nl
li
in
ne
e.
.c
co
om
m
Page 9 of 9 ®1
10
08
8GENIE 08 Activitiy Kit.pdf ®Version 1.5
G
GE
EN
NI
IE
E0
08
8A
Ac
ct
ti
iv
vi
it
ty
yK
Ki
it
t(
(P
PC
CB
B1
10
08
8)
)
Physical dimensions and mounting 9
9
The diagram below shows the physical dimensions of the printed circuit board (PCB). This information is
important to know when you are embedding the circuit into another project or container.
49mm
1.93in
52.5mm
2.06in
∅3mm (M3)
42.5mm
1.68in
46.5mm
1.83in
H
He
ei
ig
gh
ht
t
The PCB’s height including
components, legs and soldering, is
approximately 15mm (0.6in).
M
Mo
ou
un
nt
ti
in
ng
g
The four large holes in the corners of
the PCB (indicated by the arrows) are
designed for mounting. They have a
diameter of 3mm, suitable for use
with M3-sized screws.
The other two large holes, located at
the top-left of the PCB, are of the
same size but are instead intended to
act as strain-relief holes for an off-
board battery clip.
This manual suits for next models
1
Table of contents
Other New Wave Concepts Microcontroller manuals
