Newacalox NEW858D User manual

858D
SMD REWORK STATION User Manual
Welcome to use 858D rework station. This manual will show the parameters, performance, usage
and precautions of this machine.
If you have any problem of usage or any suggestion about this soldering station, please send the
Warranty
1: if hot air gun was broken within a year, we will send a replacement to you after connecting with
After-sales service mailbox.
2:If the gadgets in the package are lost during the shipping, please contact us for re-send.
3:We will guide you carefully about the use and maintenance of this product.
858D rework station is good for repair phone and PCB circuit board. Please read this operating
instruction manual carefully before using the serial soldering station of our company.
If you like our product, can you share your experience or review for it on Amazon. It can help us a
lot,thanks in advance.
Specification
Model
NEW858D
Type
LED indicator light
Power
Consumption
700W
Blower Fan
Brush-less Fan
Amount Of Wind
120L/m(MAX)
Temperature Range
100℃-500℃
Discharge Feature
LED indicator light
Handle Length
(With Cable)
120cm
Size
12.4(h)*18.7(w)*
24.9(l)(cm)
13.8(h)*10(w)*15(l)(cm)
Weight
2.20kg
1.52kg
1.55kg
Noises
<45db
Usage
Hot-air rework stations can be very handy. As mentioned above, they are a crucial tool when it comes to
reworking a board. The term rework just means you are refinishing or repairing an already reflowed board,
and it is a term commonly used in the electronics world. Just think of it as doing any work to the board
that wasn't involved in the actual production process. Here are some common rework scenarios:
Polarized Components - Parts that have been placed incorrectly (backwards, shifted x degrees off). These
include ICs, diodes, some capacitors, connectors, etc.
Tombstone Parts - This is when a part (usually a resistor or capacitor) reflows only on one side. The part
usually sticks strait up resembling a tombstone.
Cold Joints - This is similar to a tombstone except the parts might not be sticking strait up, making it
harder to see the connection that is not being made.
Removing Defective Parts - Sometimes, during the IC manufacturing process, errors can arise and go
unnoticed. These ICs are then placed on perfectly good PCBs. Hot-air is great for replacing these bad parts.
Missing Components - The smaller the component, the easier it is for it to disappear. This can happen
before or during reflow, resulting in a spot where something should be, but isn't. Hot-airing a new part in

its place is a snap with this rework station.
Unintentional Solder Jumpers - If too much solder or solder paste is used, the result can be jumpers on
one or more of your surface mount IC's legs. Hot-air can sometimes be used in conjunction with a flux pen
to remove these pesky buggers.
Hardware Overview
Power Switch -- uses a standard North American plug/outlet (~110VAC). Hopefully the power on/off
switch is self-explanatory. Move the switch to "ON" to turn the hot-air rework station on, move the switch
to "OFF" to turn the hot-air rework station off. Easy peasy.
Please Note! The device will not power off immediately after turning the switch to the "OFF" position. It
will continue to blow air until the air temperature is below 100°C.
LED Digital Output -- The LED digital output lists temperature range.The display will change as you press
temperature buttons.
Air Flow Grade -- You can adjust the air flow by turning the air setting knob. The LED output will display
the setting air flow grade for 2 seconds and then return to the current air temperature of the nozzle.
Temperature Range -- Output temperatures range from 100°~ 500°Celsius. You can adjust the
working temperature by press the temperature setting buttons. The LED output will display the setting
temperature.
Nozzles -- comes with 3x changeable hot-air nozzles. The smaller nozzle is good for focusing the hot air on
smaller components. The bigger nozzle is great if you are trying to focus hot air around a big area on the
board.
Operation Instruction
1.Assemble the station with the hot air gun and power line, install required nozzle.
2.set the required temperature
turn on main switch behind the case, then turn on the air gun switch. the air gun will start to heat up. press the air
gun temperature up“▲”or down”▼”buttons to adjust the temperature, and the air flow knob to set the
appropriate air flow. when the air gun operation light flashing regularly at high speed and the temperature is
stable, normal operation can be commenced.
3. Turn off
After operation is completed, turn off the air gun switch. the machine will automatically cut off the power supply
to the air gun heating element, and enter auto cooling mode. when the temperature below 100 ,the air gun
display and air supply are switched off.
Feartures
1.Auto sleep features
To ensure safety and conserve power, when the handpiece is placed in the handpiece holder(or et the
temperature below 100℃), the screen will displays”SLP” means auto sleep function will be activated and it will
start cooling automatically. When you take off handpiece it will stating heating again.
2.Temperature memory function
When you turn off the station at 400 degree centigrade, when you turn on next time, it will auto heat up to the
400 degree centigrade.
4. Overheat Protection Thermostat
NOEVSBIG hot air gun used temperature control switch,when the inside of the heat gun is short-circuited due to
transportation or other reasons, the temperature control switch will automatically power off when it detect that the
temperature reaches a certain value. Avoid the common fire problems of other soldering stations (there will be a

lot of smoke at this time but not catching fire)
Troubleshooting
Low Airflow when “Air”Dial is Turned Up
If you are getting low airflow when the “Air”Dial is turned up, make sure that you have the nozzle
securely attached. With the nozzle, you will get more air flowing through the hot-air rework station’s
handle.
S - E — Sensor error: this message appears in case the sensor, or anything in the sensing circuit, is out of order. At
this moment the power from the defective unit will be switched off. The rework station might be able to be
revived by removing and re-attaching the heater. Another tech support rep thinks it’s oxide building up on the
connections. This results in fooling the controller into thinking the heater has failed.
H - E — Heating elements error: this message appears if there is something wrong with the heating element. At
this moment the power from the defective unit will be switched off. Try checking the connections to see if the
heating element needs to be re-seated. Last resort is getting a replacement heating element. A last resort is
getting a replacement heating element.
Odours — When using rework station for the first time, please use it in a ventilated environment. Keep the heat
gun away from your eyes. When the oil is exhausted, the heat gun will no longer have an unpleasant smell.
Nozzles don't fit —The nozzles produced are all tight. In order to avoid being too easy to fall off during use,
there is a danger of burns. You can take it out with pliers. After a few more uses, there will be no this problem
again, or you can use pliers to adjust the size of the nozzle.
Safety Regulations
To use this product, the following basic measures should be strictly followed to avoid hazards of
electric shock, bodily injury, fire and other phenomenon.
1. In order to ensure safety, please turn off the power switch when not in use. When not in use for
an extended period, please unplug the power cord!!!
2. Serious consequences may result if non-original or non-approved parts are used.
3. Machine failure must be maintained by professional or our designated personal.
4. This product uses three wire grounding plug must be inserted into three grounding socket, do
not change the plug or no use the three floating head adapter bad grounding.
5. After the rework station is switched on, its temperature can exceed 400 degrees centigrade.
Do not use near flammable or explosive objects. To avoid burns, do not touch the metal part of
the soldering iron.
6. Do not leave the work area when the rework station is switched on.
7„ The power cord must be unplugged and the rework station Must be allowed to cool before
installing or replacing parts.
8. After used, remember that cooling the unit before installation.
9. Soldering produces fumes, ensure there is adequate ventilation.
Warning
1. If the power cord is damaged, it must be replaced by a manufacturer or a maintenance
specialist to avoid danger.
2. The tool must be placed on its support when not in use.
3. Be careful when using this device in the vicinity of flammable materials; Never use this device
for extended periods in the same location.
4. Be aware that heat may be transferred to distant flammable materials; Someone must be
present at all times while the device is connected.
This device is not intended to by operated by Individuals with diminished physical, sensory, or mental
capacities or by those who lack experience (such as children), except in the presence of individuals
qualified to provide necessary supervision and guidance
Attached: Technical section-rework process (for reference only)
The air gun with preheating station to facilitate the welding of large flat integrated circuit IC, double
sided board and large components desoldering.
• Remove the components
1. The first successful repair is removing the motherboard fault location component, the solder
heated to the melting point, and then carefully take components from the board.
2. The heating control is a key factor to repair, welding material must be completely melted, so as
avoid to damage the pad and a copper element in the removed. At the same time the
temperature is not too high, to prevent the circuit board heating due to excessive motherboard
distortion.
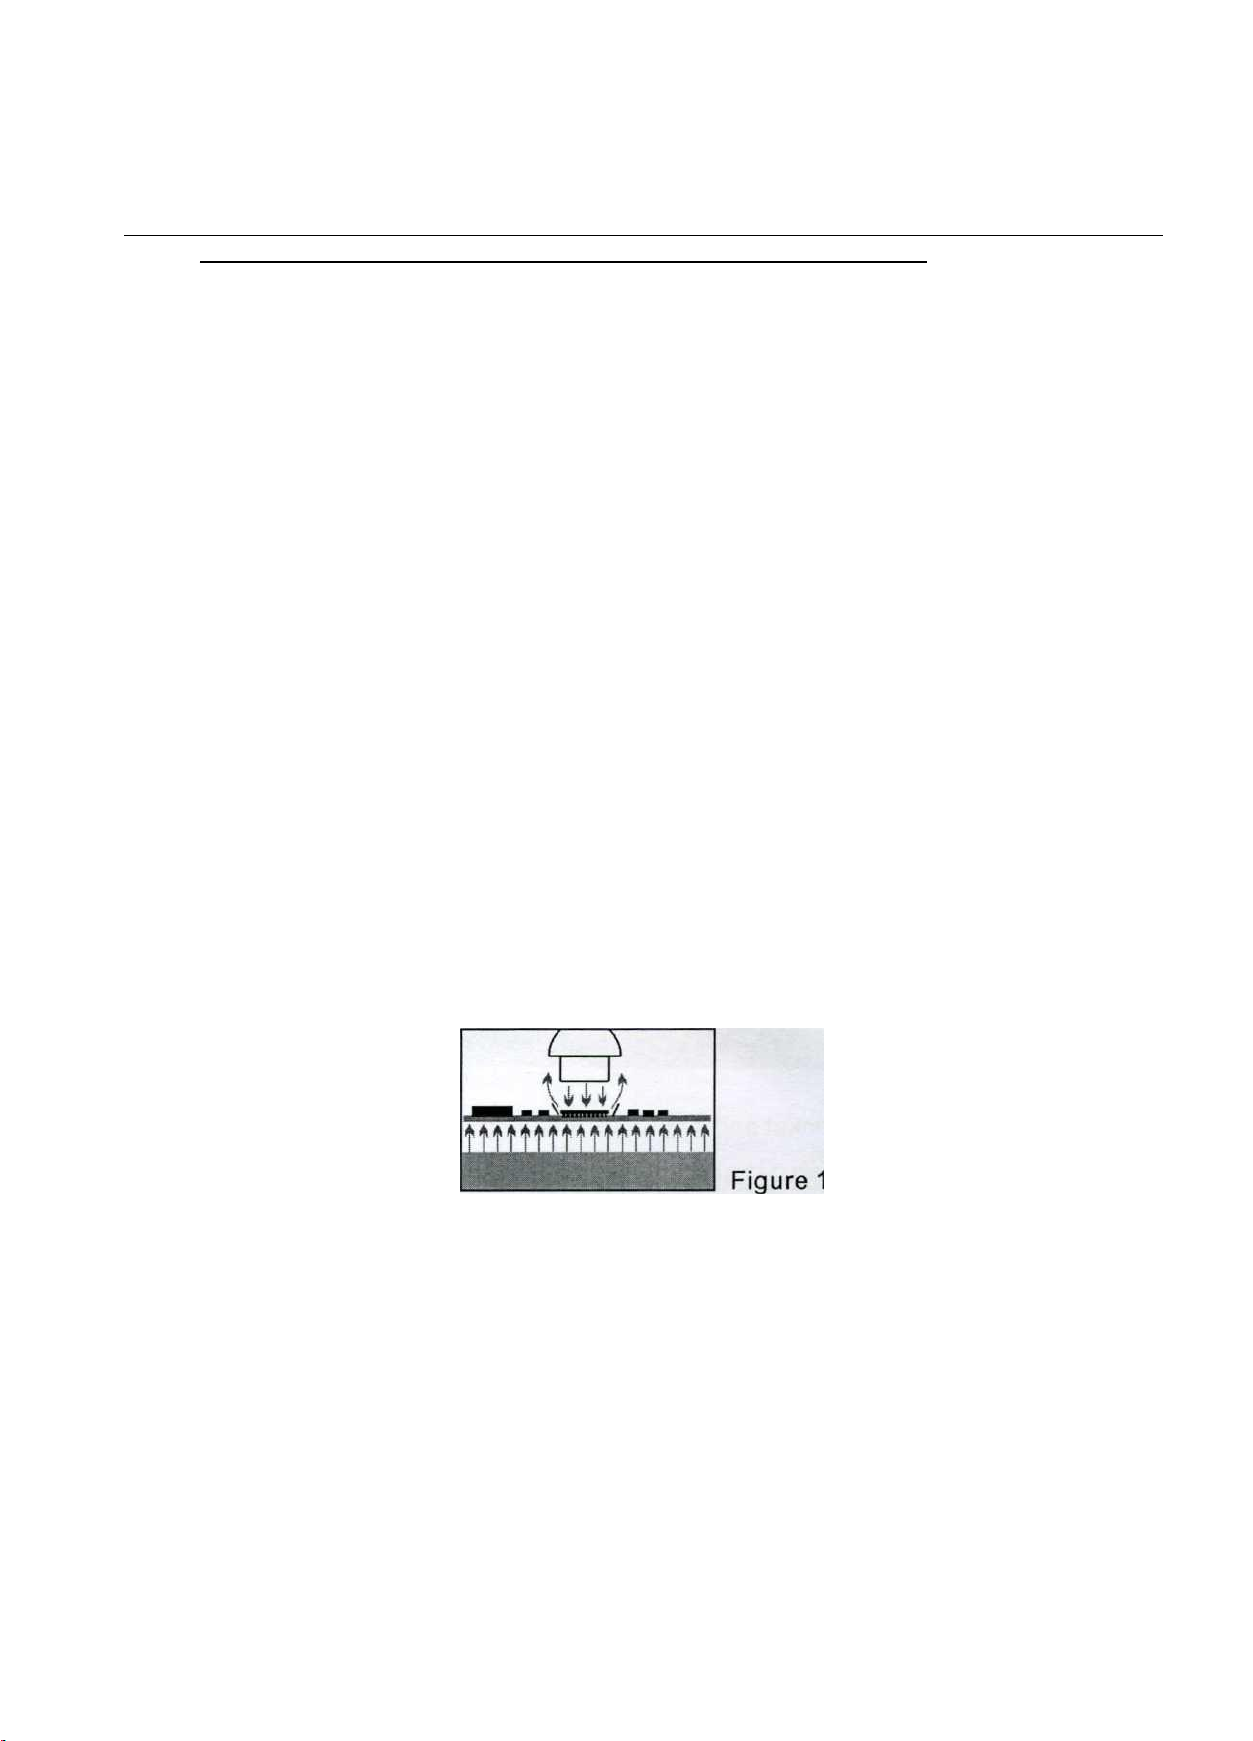
• Heating of circuit boards and components
1. The advanced rework system uses microcomputer to control the heating process, as close as
possible to the specifications given by the solder paste manufacturer, and shall be combined
with the top and bottom heating.
2. To supplement, at the bottom of the heating circuit board for heat conduction loss, and increase
the temperature of the circuit board; and the top heating is used for heating elements, in
addition to use a large area at the bottom of the heater can eliminate circuit board caused by
local heating excessive distortion.
3. Can use three methods to the motherboard heating, conduction, convection, and heat
conduction effects. When heating the heat source and the motherboard contact (such as the
electric heating board) circuit board components does not apply to the back.
4. The heating element (or top heating) is generally used for gas nozzle, carefully control of the
top heating element, make components uniform heat, is extremely important, especially critical for
small components (Figure 1).
5. In addition to avoid rework of components around again reflow or blow away the small patch
component, nozzle thermal isolation and these components must be, in repair stations
surrounding components on a thin layer of the cover plate or mask. The mask technique is very
effective, but also can be used for model time consuming. BGA desoldering nozzle, it can
reduce the damage of desoldering process on the removal of welding components near the
element and the circuit board.

X. Replacement Instruction
Replacement of Hot Air rework heating element(Figure 7)
1. Ensure that the air gun temp fully cools down before replacing the air gun
heater.
2. As Figure, loosen the two screws on the handle.
3. Screw out the handle assembly and then remove the handle's cover.
4. Gently takes out the fan, loosen the three screws and remove the fixing
wiring board.
5. Turn the wiring board back and take apart the heater connection cable
from the board. Please remember the cable location on the board.
6. Remove the heater and mica paper from the tube and do not break the
connection on the tube.
7. Wrap a new heater well with mica paper and insert the heater to the tube in
right place.
8. Connect the heater according to the original location of the connection
9. Install the handle back in apposite way of disassembling the handle.
Table of contents
Other Newacalox Soldering Gun manuals


