Newfeellight NF-230B User manual

7R Moving Head Beam Sharpy Light User Manual
INDEX
Thank you for using our product! Please read this manual carefully and completely. For
technical reference in future, please keep this user manual well. This user manual contains
all installation and operation information of this Moving Head Sharpy Light, it’s very useful
for user to install and operate the light. Please strictly abide by the relevant instruction for
the installation and operation.
This light has very beautiful appearance. Our Sharpy 230W Moving Head Light is a very
small and smart light. It owns very good beam light, and very wonderful color mixing effect.
It has compact module structure, and the space between each modules are equalization
and balance, the cooling wind channels are unobstructed, these features can make the light
continuous use in long time. As a sharpy light, it’s small, but it runs extremely fast. This light
is very suitable for bar, disco, stage, theatre, decoration etc.
This light meets the following criteria:
GB7000.1-2007/IEC60598-1:2003
GB7000.217-2008/IEC60598-2-17:1984+A2:1990
ⅠCHECKING
We are very glad to offer you our best quality product and service to make you satisfied.
Please check that there has been no damage caused in transportation and the following
items are enclosed.
230W Moving Head Beam Sharpy Light 1PCS
User Manual 1PCS
ⅡMAIN FEATURES
·Using imported color chip and heat filter to make the color temperature will more uniform
01
ⅧTECHNICAL SPECIFICATION........................................................... 22
ⅨDIMENSION.................................................................................................. 22
ⅥDMX PROTOCOL................................................................................ 12
ⅦTECHNICAL SPECIFICATION........................................................... 20
ⅣINSTALLATION AND OPERATION.................................................. 03
ⅤMENU OPERATION.....................................................................................07
ⅢSAFETY INFORMATION.................................................................... 02
ⅡMAIN FEATURES......................................................................................... 01
ⅠCHECKING........................................................................................... 01

02
03
and unification;
·It will ensure the light can putouts more colorful, more beautiful and more brightness;
·The light uses Taiwan YODN 7R 230W lamp default, the Philips 7R 230W lamp is optional;
·We insist develop PCB by ourselves. All dip-in chips and electronic components have been
changed into surface mount type to make sure the XY drive and module drivers separately,
which make the circuit boards are more stable and reliable.
higher than this.
The Maximum surface temperature is 50°C
When suspending the fixture above ground level, verify that the structure can hold at
least 10 times the weight of all installed devices.
Verify that all external covers and rigging hardware are securely fastened and use an
approved means of secondary attachment such as a safety cable.
ⅢSAFETY INFORMATION
※Important
Every person involved with the installation, operation and maintenance of this device has to
be qualified and follow the instructions of this manual. Manufacturer will not with
responsibility for those operations which are not according to this Instruction.
Verify that the voltage matches the rated voltage.
When the voltage is 110V , Do not connect more than 10 lightings in total to AC mains
power in one interconnected daisy chain
When the voltage is 220V , Do not connect more than 20 lightings in total to AC mains
power in one interconnected daisy chain
Before using the fixture, check that all power distribution equipment and cables are in
perfect condition and rated for the current requirements of all connected devices.
Always ground (earth) the fixture electrically.
Avoiding hit the Light when you are move or install the light.
The minimum distance between light-output and the illuminated surface must be
more than 0.5 meters. Keep all combustible materials (for example fabric, wood,
paper) at least 0.2 meters away from the fixture.
Do not expose the fixture to rain or moisture.
Avoid looking directly into the light source (especially those who suffer from epileptic
fits)
Maximum ambient temperature (Ta) is 40°C. Do not operate fixture at temperatures
ⅣINSTALLATION AND OPERATION
Picture 1: The locking and releasing mechanism of Pan, every 90 degree will LOCK or
UNLOCKED.

04
05
Picture 2: The locking and releasing mechanism of Tilt, every 45 degree will LOCK or
UNLOCKED
Picture 3: This light can be installed on the floor of the rubber feet, truss, the ceiling or
wall
WARNING: The light must be connected with the safety rope, unless it is
installed and posited on the floor

06
07
Picture 4: The steps to connect or break the power cable
Picture 5: Connect to Power
Picture 6: Connect to the Control Single Cable (DMX-512 Single)
Note: Please use the standard twisted signal cable which can shield the double electrodes.
The characteristic impedance is 120 ohm. Don’t use the microphone cable or other different
using single cable. You have to use the XLR type 3 pins male and female cannon connector
to connect the terminal.
Important: Two electrode cables do not mutual or touch the metal shell, You must use the
bushing to pack the pin 1.
ⅤMENU OPERATION
MENU USING

09
08
OPERATION OF TOUCH SCREEN
Take the "modify DMX address code" as an example, show the use of button as below:
If the current interface is not the main one, press the "Left" button (one or multiple) can get
back to the main interface.
In the main interface, press the "Up" button or "Down" button to select the "Settings"
button.
Press the "OK" button, enter the "Settings" interface.
In the "Settings" interface, press the "Up" button or "Down" Button to select "DMX address"
Press the "OK" button to enter edit state.
Press the "Up" button or "Down" button to modify the DMX address code.
Press the "OK" button to exit editing state.
If use the touch screen, the process is more convenient.
1. In the main window touch "Settings" button to enter the "Settings" interface;
2. It is the same with 4 ~ 7 steps (can use the true buttons, also can use the touch button),
no longer talk about them in details.
INTERFACE INSTRUCTION
1. Manual control interface
The interface is used to control the current light, not only does not belongs to the slave
state (don’t receive DMX signal), but also does not belong to the master state (don’t send
DMX signal).
Option
Instruction
Touch screen
calibration
Into the calibration interface, according to cross cursor
indication to touch the corresponding position, if four position
to receive the correct data, then complete calibration and keep
calibration data.
If calibration fail, this process will continue cycle down, can by
press the "OK" button at any time to stop calibration
Reset calibration
Enter the son interface, can adjust the X, Y motor reset
position, to make up for the hardware installation error.
Be different from the address code and channel value, reset
calibration does not support unit, ten, hundred separate
editing, also does not support long press, and must be
calibrated step by step as 1 for unit.
Note: please do not do reset calibration when the motor is
running! If the motors are running, please reset calibrate after
the motors stop
When necessary, please perform a reset operation before
Option
Instruction
Reset
Press the “OK” button, see the confirmation dialog box, click"
Right Button
Enter the menu, or confirm the setting
reset calibration.
Left Button
Exit the menu, or back the previous menu
Up Button
Up choose menu, or parameter value increase
Down Button
Down choose menu, or parameter value reduce
Confirm Button
Confirm the setting

11
2. Advanced Interface
The password is "up and down up and down". Operation process is: press the "Up" key
(appear first "*"), click again "Down" key (appear the second "*"), then press the "Up" key
(appear third "*"), click again "Down" key (appear fourth "*"), and press the "ok" button to
verify password.
3. Setting Interface
4. Information Interface
Option
Instruction
Software version
Current software version
Total usage time
Total usage time is accurate to minutes
Usage time of this time
Usage time of this time is accurate to
minutes
OK "button again, enter reset interface, all motor reset
CH Mode
16
CH17~20 no function
Color wheel
0~255
Press the "OK" button to enter edit state. And it chosen the
hundred position, press the "Up" and "Down" button to
change address code. Press "OK" button once again to select
ten position editing. Click "OK" button twice again to select the
unit editing. Click again exit editing state.
20
CH17~20 control the speed(See the channel table)
……
0~255
Pan
Inversion
Off
Gobo speed
0~255
On
Tilt
Inversion
Off
Lamp control
On
On
Off
Pan/tilt
exchange
Off
On
Exchange XY channels(Included fine adjustment)
XY coder
On
Use the coder(optocoupler) to judge whether out of step,
and correct position automatically
Off
Don’t use the coder( optocoupler ) to correct position
NO
DMX signal
Retain
According to the original state to continue running
Reset
Motors return, stop running
Screen
protection
On
No operation for 30 seconds, the backlight will be off
Off
The backlight will be on all the time
Lamp on
Off
After power on reset directly, bulb doesn’t light up(need to
use the menu or controller to manual light bulb)
On
After power on, bubble light automatically, and to wait on
the bulb light successfully, then reset.
Default
Settings
Click "OK" button, see the confirmation dialog box, click
"OK" button again to recover default Settings
Option
Instruction
Operation
Mode
DMX
Slave state: Receive the DMX signal from controller or the
host one
Auto
Master state: Auto run, and send DMX signal to slave one
Notice: If the lamp is off before, it can’t light the lamp by
itself. If you need the observe the lamp effect, please light
the lamp firs, then enter the auto state.
DMX
Address
1~512
Press the "OK" button to enter edit state. And it chosen the
hundred position, press the "Up" and "Down" button to
change address code. Press "OK" button once again to
select ten position editing. Click "OK" button twice again to
select the unit editing. Click again exit editing state.

13
12
Enter into the son interface from this, shows
080
Yellow
DMX channel value
the numerical and percentage channel value
085
Yellow + magenta
for check
090
Magenta
If the red ERR light shine, it means the light
095
Magenta + cyan
has operation error, the details can be view
100
Cyan
in son interface. After the check, can click
105
Cyan +CTO260
System error record
"OK" button, the error record will empty
110
CTO260
Note: Sometimes it's not really the
115
CTO260 +CTO190
installation problem of hall or optocoupler,
120
CTO190
but the motor line are reversed.
125
CTO190 + CTB8000
130
CTB8000
ⅥDMX PROTOCOL
16CH MODE: STAND CHANNEL MODEL
135
140
145
CTB8000 +Blue
Blue
Blue +white
Channel Value Standard Function
150
Slow rotation
Color wheel
......
......
000 White
255
Fast rotation
005 White + red
Blackout/Strobe
010 Red
000←→003
Closed
015 Red + orange
004←→102
Slow strobe
020 Orange
103
Fast strobe
025 Orange + aquamarine
......
......
030 Aquamarine
104←→107
Open, controlled by dimmer channel
CH1 035 Aquamarine + green
108
Slow pulsation
040 Green
CH2
......
......
045 Green + light green
207
Fast pulsation
050 Light green
208←→212
Open, controlled by dimmer channel
055 Light green + lavender
......
......
060 Lavender
213←→225
Random slow strobe
065 Lavender + pink
226←→238
Random medium strobe
070 Pink
239←→251
Random fast strobe
075 Pink + yellow
252←→255
Open, controlled by dimmer channel

14
15
CH3
000←→255
General dimmer
Dimmer, 0-100%
......
180
......
246
......
250
251
......
255
......
Gobo2 shake, fast speed
......(Gobo 3 to gobo 15)
Gobo16 shake, slow speed
......
Gobo16 shake, fast speed
Gobo17 shake, slow speed
......
Gobo17 shake, fast speed
CH4
000
005
010
015
020
025
030
035
040
045
050
055
060
065
070
075
080
085
090
......
129
130←→134
135
......
170
171
......
175
176
Static gobo change
White
Gobo1
Gobo2
Gobo3
Gobo4
Gobo5
Gobo6
Gobo7
Gobo8
Gobo9
Gobo10
Gobo11
Gobo12
Gobo13
Gobo14
Gobo15
Gobo16
Gobo17
Fast rotation(backward)
......
Slow rotation(backward)
Stop(white)
Slow rotation(forward)
......
Fast rotation(forward)
Gobo1 shake, slow speed
......
Gobo1 shake, fast speed
Gobo2 shake, slow speed
CH5
000←→127
028←→255
Prism insertion
Prism excluded
Prism inserted
CH6
000←→127
128
......
190
191←→192
193
......
255
Prism rotation
Position
Fast rotation(backward)
......
Slow rotation(backward)
Stop
Slow rotation(forward)
......
Fast rotation(forward)
CH7
000←→255
Effect movement (reserved)
CH8
000←→127
028←→255
Frost
Frost excluded
Frost inserted
CH9
000←→255
Focus
Focus, 0-100%
CH10
000←→255
Pan
Pan movement, 0-540 degree
CH11
000←→255
Pan fine
Pan fine adjust(16Bit)
16
17
CH12
020←→255
Tilt
Tilt movement, 0-250 degree
070
075
080
085
090
095
100
105
110
115
120
125
130
135
140
145
150
......
255
Pink
Pink + yellow
Yellow
Yellow + magenta
Magenta
Magenta + cyan
Cyan
Cyan +CTO260
CTO260
CTO260 +CTO190
CTO190
CTO190 + CTB8000
CTB8000
CTB8000 +Blue
Blue
Blue +white
Slow rotation
......
Fast rotation
CH13
000←→255
Tilt fine
Tilt fine adjust(16Bit)
CH14
000←→255
Function setting(reserved)
CH15
000←→025
026←→076
077←→127
128←→255
Reset
Unused range
Effects reset
Pan/tilt reset
Complete reset
CH16
000←→009
010←→100
101←→255
Lamp control
Unused range
Lamp off
Lamp on
20CH MODE: EXTEND CHANNEL MODEL
Channel Value Standard Function
Color wheel
000 White
005 White + red
010 Red
015 Red + orange
020 Orange
025 Orange + aquamarine
CH1 030 Aquamarine
035 Aquamarine + green
040 Green
045 Green + light green
050 Light green
055 Light green + lavender
060 Lavender
065 Lavender + pink
CH2
000←→003
004←→102
103
......
104←→107
108
......
207
208←→212
......
213←→225
226←→238
Blackout/Strobe
Closed
Slow strobe
Fast strobe
......
Open, controlled by dimmer channel
Slow pulsation
......
Fast pulsation
Open, controlled by dimmer channel
......
Random slow strobe
Random medium strobe

18
19
239←→251
Random fast strobe
175
Gobo1 shake, fast speed
252←→255
Open, controlled by dimmer channel
176
Gobo2 shake, slow speed
CH3
General dimmer
......
......
000←→255
Dimmer, 0-100%
180
Gobo2 shake, fast speed
Static gobo change
......
......(Gobo 3 to gobo 15)
000
White
246
Gobo16 shake, slow speed
005
Gobo1
......
......
010
Gobo2
250
Gobo16 shake, fast speed
015
Gobo3
251
Gobo17 shake, slow speed
020
Gobo4
......
......
025
Gobo5
255
Gobo17 shake, fast speed
030
Gobo6
Prism insertion
035
Gobo7
CH5
000←→127
Prism excluded
040
Gobo8
028←→255
Prism inserted
045
Gobo9
Prism rotation
050
Gobo10
000←→127
Position
055
Gobo11
128
Fast rotation(backward)
CH4
060
065
Gobo12
Gobo13
CH6
......
190
......
Slow rotation(backward)
070
Gobo14
191←→192
Stop
075
Gobo15
193
Slow rotation(forward)
080
Gobo16
......
......
085
Gobo17
255
Fast rotation(forward)
090
Fast rotation(backward)
CH7
000←→255
Effect movement (reserved)
......
......
Frost
129
Slow rotation(backward)
CH8
000←→127
Frost excluded
130←→134
Stop(white)
028←→255
Frost inserted
135
Slow rotation(forward)
CH9
Focus
......
......
000←→255
Focus, 0-100%
170
Fast rotation(forward)
CH10
Pan
171
Gobo1 shake, slow speed
000←→255
Pan movement, 0-540 degree
......
......

20
21
CH11
000←→255
Pan fine
Pan fine adjust(16Bit)
2. Gobo wheel
CH12
020←→255
Tilt
Tilt movement, 0-250 degree
CH13
000←→255
Tilt fine
Tilt fine adjust(16Bit)
CH14
000←→255
Function setting(reserved)
CH15
000←→025
026←→076
077←→127
128←→255
Reset
Unused range
Effects reset
Pan/tilt reset
Complete reset
CH16
000←→009
010←→100
101←→255
Lamp control
Unused range
Lamp off
Lamp on
CH17
020←→255
Pan/tilt(pan fine/tilt fine) Speed
Speed from fast to slow, 0-100%
CH18
020←→255
Color wheel speed
Speed from fast to slow, 0-100%
CH19
020←→255
Dimmer-Prism-Frost speed
Speed from fast to slow, 0-100%
CH20
020←→255
Gobo wheel speed
Speed from fast to slow, 0-100%
ⅦCOLOR WHEEL AND GOBO WHEEL
1. Color wheel
22
23
ⅧTECHNICAL SPECIFICATION
Input power
AC100V~240V±10%/50~60Hz
Light sources
YODN MSD230 7R Lamp (Philips 7R 230W optional)
Ballast
Electronic ballast
Color temperature
8000K
Luminous flux
8250lm (6 meters)
Intensity of illumination
65760lx (20 meters)
Average life
2000 hours
Color wheel
14 colors + white, forward and backward rotation
Gobo wheel
17 fixed gobos + white, forward and backward rotation
Prism
Rotation eight prism, forward and backward rotation, effect
movement, Atomization
Lens
3 pieces high quality lens group
Atomization effect
0~100% adjustable atomized flare angle
Iris
Seven beam control
Dimmer
Linear dimmer
Dimmer/Strobe
0~100% linear dimmer and double vanes strobe, speed
control (0.5~14seconds)
Pan scan
540 degree, 8bit/16bit auto correction
Tilt scan
250 degree, 8bit/16bit auto correction
Beam angle
Parallel beam angle 0~3.8 degree
Control mode
International standard DMX-512
DMX channels
16CH/20CH
IP rating
IP20
Other functions
The power consumption of the light source will be half
reduced when the light mechanical closed
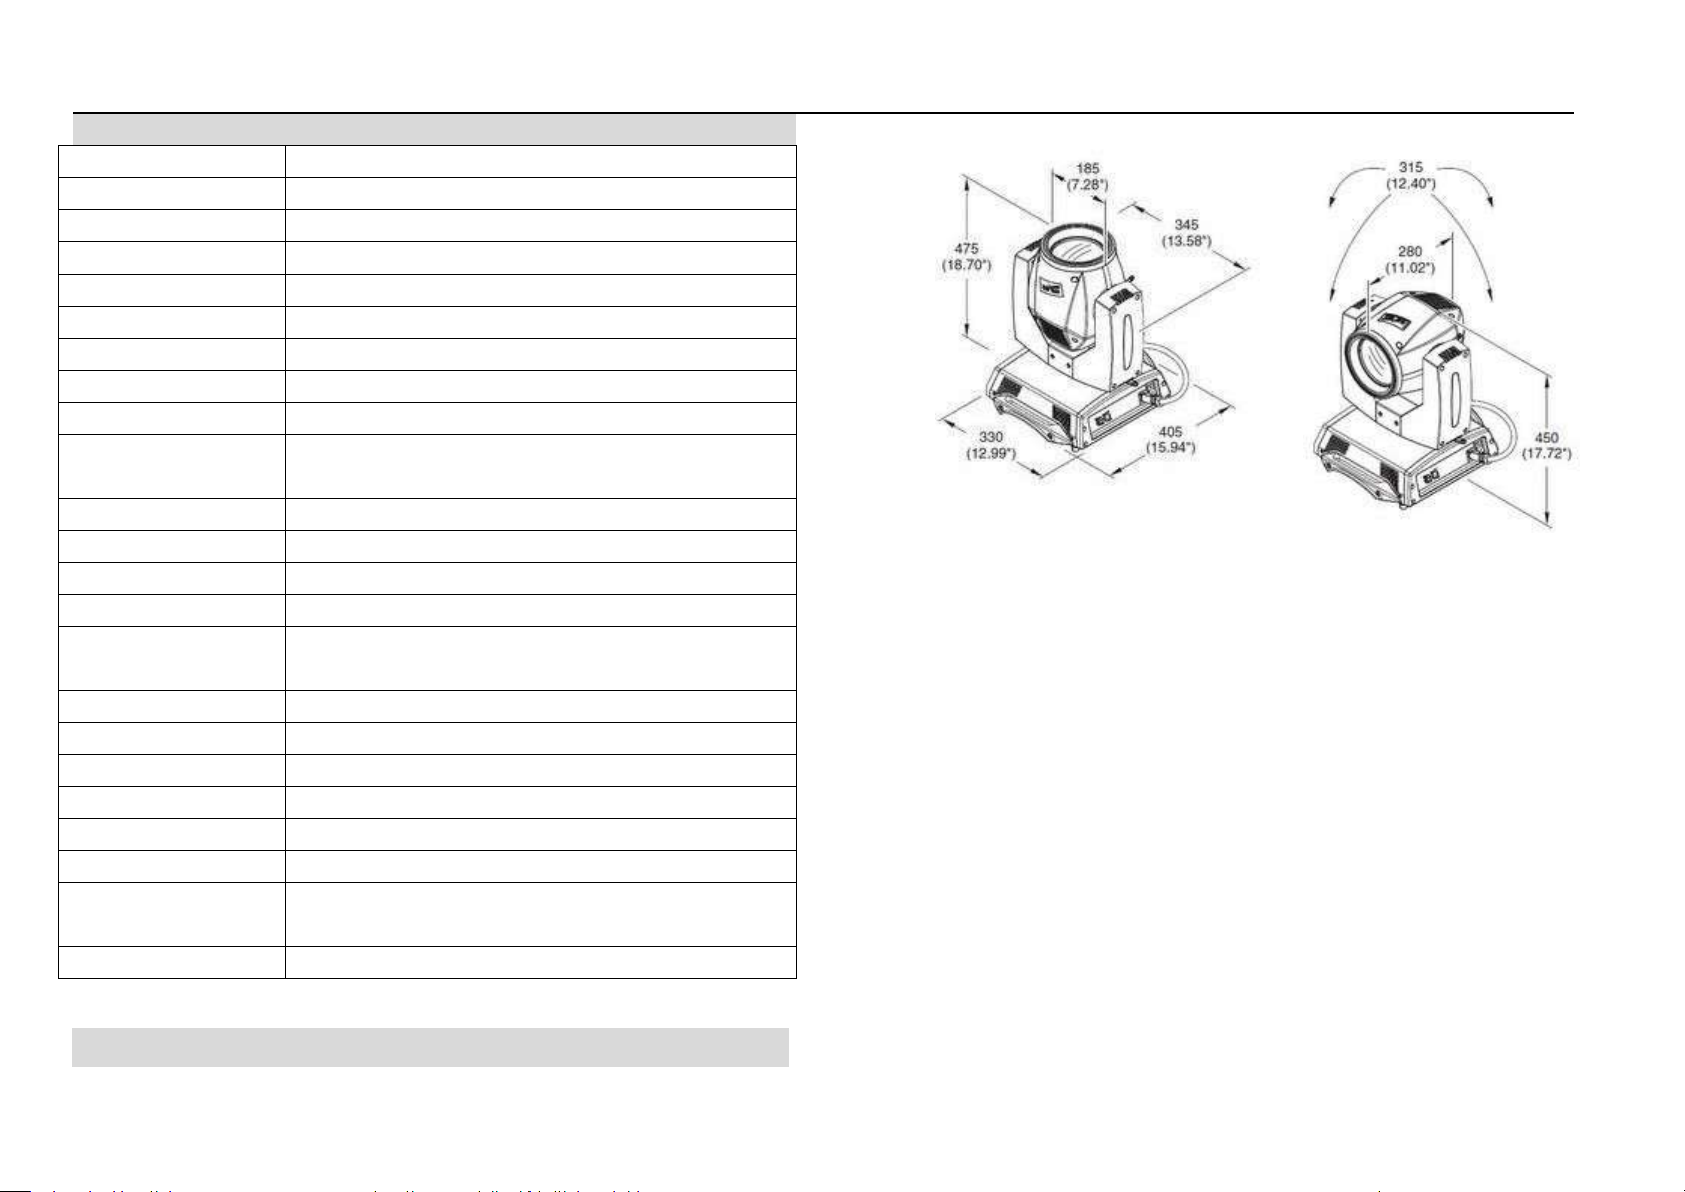
Dimension
345mm(arm width)*475mm(total height)X405(base width)
ⅨDIMENSION
Innovation, Quality, Performance, Achieving Users’ Value!
Table of contents
Other Newfeellight Lighting Equipment manuals


